
TI 60 X - Cooker INDESIT - Free user manual and instructions
Find the device manual for free TI 60 X INDESIT in PDF.


| Product Type | Freestanding Cooker |
| Brand | Indesit |
| Model | TI 60 X |
| Width | 60 cm |
| Depth | 60 cm |
| Height | 85 cm |
| Weight | Approximately 55 kg |
| Power Supply | 220-240 V, 50/60 Hz |
| Energy Class | A |
| Oven Type | Electric multifunction |
| Oven Capacity | 71 liters |
| Hob Type | Gas (4 burners) or Electric (depending on variant) |
| Number of Burners | 4 |
| Functions | Conventional, grill, fan assisted, defrost |
| Cleaning Method | Easy-clean enamel interior |
| Safety Features | Flame failure device (gas hob), child lock, cool door |
| Control Type | Knobs and digital timer |
| Display | LED clock/timer |
| Accessories Included | Oven tray, grill pan, shelf |
| Spare Parts Availability | Yes, through authorized service centers |
| Repairability Index | 8.2/10 |
Frequently Asked Questions - TI 60 X INDESIT
User questions about TI 60 X INDESIT
0 question about this device. Answer the ones you know or ask your own.
Ask a new question about this device
Download the instructions for your Cooker in PDF format for free! Find your manual TI 60 X - INDESIT and take your electronic device back in hand. On this page are published all the documents necessary for the use of your device. TI 60 X by INDESIT.
USER MANUAL TI 60 X INDESIT
Download the complete instruction manual at http://docs.indesit.eu or call the phone number shown on the warranty booklet.
Before using the appliance, read these safety instructions. Keep them nearby for future reference. These instructions and the appliance itself provide important safety warnings, to be observed at all times. The manufacturer declines any liability for failure to observe these safety instructions, for inappropriate use of the appliance or incorrect setting of controls.
⚠️ Very young children (0-3 years) should be kept away from the appliance. Young children (3-8 years) should be kept away from the appliance unless continuously supervised. Children from 8 years old and above and persons with reduced physical, sensory or mental capabilities or lack of experience and knowledge can use this appliance only if they are supervised or have been given instructions on safe use and understand the hazards involved. Children must not play with the appliance. Cleaning and user maintenance must not be carried out by children without supervision.
⚠ WARNING: The appliance and its accessible parts become hot during use. Care should be taken to avoid touching heating elements.
Children less than 8 years of age shall be kept away unless continuously supervised.
⚠ WARNING: If the hob surface is cracked, do not use the appliance - risk of electric shock.
⚠ WARNING: Danger of fire: Do not store items on the cooking surfaces.
⚠️ CAUTION: The cooking process has to be supervised. A short cooking process has to be supervised continuously.
⚠ WARNING: Unattended cooking on a hob with fat or oil can be dangerous - risk of fire. NEVER try to extinguish a fire with water: instead, switch off the appliance and then cover flame e.g. with a lid or a fire blanket.
⚠ Do not use the hob as a work surface or support. Keep clothes or other flammable materials away from the appliance, until all the components have cooled down completely - risk of fire.
PERMITTED USE
⚠️ CAUTION: the appliance is not intended to be operated by means of an external switching device, such as a timer, or separate remote controlled system.
This appliance is intended to be used in household and similar applications such as: staff kitchen areas in shops, offices and other working environments; farm houses; by clients in hotels, motels, bed & breakfast and other residential environments.
⚠️ No other use is permitted (e.g. heating rooms).
⚠ This appliance is not for professional use. Do not use the appliance outdoors.
INSTALLATION
⚠ The appliance must be handled and installed by two or more persons - risk of injury. Use protective gloves to unpack and install - risk of cuts.
⚠️ Installation, including water supply (if any), electrical connections and repairs must be carried out by a qualified technician. Do not repair or replace any part of the appliance unless specifically stated in the user manual. Keep children away from the installation site. After unpacking the appliance, make sure that it has not been damaged during transport. In the event of problems, contact the dealer or your nearest After-sales Service. Once installed, packaging waste (plastic, styrofoam parts etc.) must be stored out of reach of children - risk of suffocation. The appliance must be disconnected from the power supply before any installation operation - risk of electric shock. During installation, make sure the appliance does not damage the power cable - risk of fire or electric shock. Only activate the appliance when the installation has been completed.
⚠️ Carry out all cabinet cutting operations before fitting the appliance and remove all wood chips and sawdust.
⚠️ If the appliance is not installed above an oven, a separator panel (not included) must be installed in the compartment under the appliance.
ELECTRICAL WARNINGS
⚠ It must be possible to disconnect the appliance from the power supply by unplugging it if plug is accessible, or by a multi-pole switch installed upstream of the socket in accordance with the wiring rules and the appliance must be earthed in conformity with national electrical safety standards.
⚠ Do not use extension leads, multiple sockets or adapters. The electrical components must not be accessible to the user after installation. Do not use the appliance when you are wet or barefoot. Do not operate this appliance if it has a damaged power cable or plug, if it is not working properly, or if it has been damaged or dropped.
⚠️ If the supply cord is damaged, it must be replaced with an identical one by the manufacturer, its service agent or similarly qualified persons in order to avoid a hazard - risk of electric shock.
CLEANING AND MAINTENANCE
⚠ WARNING: Ensure that the appliance is switched off and disconnected from the power supply before performing any maintenance operation; never use steam cleaning equipment - risk of electric shock.
⚠ Do not use abrasive or corrosive products, chlorine-based cleaners or pan scourers.
DISPOSAL OF PACKAGING MATERIALS
The packaging material is 100% recyclable and is marked with the recycle symbol
The various parts of the packaging must therefore be disposed of responsibly and in full compliance with local authority regulations governing waste disposal.
DISPOSAL OF HOUSEHOLD APPLIANCES
This appliance is manufactured with recyclable or reusable materials. Dispose of it in accordance with local waste disposal regulations. For further information on the treatment, recovery and recycling of household electrical appliances, contact your local authority, the collection service for household waste or the store where you purchased the appliance. This appliance is marked in compliance with European Directive 2012/19/EU, Waste Electrical and Electronic Equipment (WEEE). By ensuring this product is disposed of correctly, you will help prevent negative consequences for the environment and human health.
The symbol on the product or on the accompanying documentation indicates that it should not be treated as domestic waste but must be taken to an appropriate collection center for the recycling of electrical and electronic equipment.
ENERGY SAVING TIPS
Make the most of your hot plate's residual heat by switching it off a few minutes before you finish cooking.
The base of your pot or pan should cover the hot plate completely; a container that is smaller than the hot plate will cause energy to be wasted. Cover your pots and pans with tight-fitting lids while cooking and use as little water as possible. Cooking with the lid off will greatly increase energy consumption.
Use only flat-bottomed pots and pans.
DECLARATION OF CONFORMITY
This appliance meets the Ecodesign requirements of European Regulation n. 66/2014, in compliance with the European standard EN 60350-2.
INSTALLATION
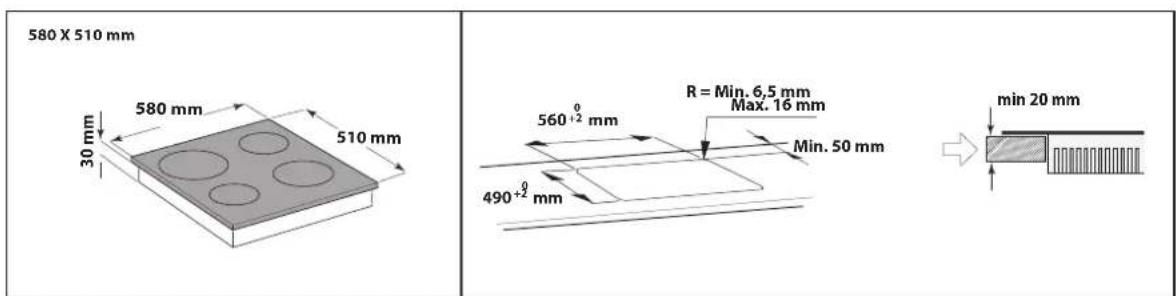
• The cooktop must be set into a worktop between 20 mm and 50 mm deep. - There must be nothing between the cooktop and the oven (cross rails, brackets, etc.). - The distance between the lower face of the glass ceramic hob and the cupboard or separating panel must be at least 90 mm. - If the cooktop is to be installed next to a column unit, leave a distance of at least 100 mm from the edge of the cooktop to the side of the column unit.
- For built-in dimensions and installation see the picture in this paragraph.
- A minimum distance must be maintained between the hob and the hood above it. Please refer to the user manual of the hood for more information.
- Apply the supplied gasket to the cooktop (unless it has already been fitted), after having cleaned its surface.
- Do not install the cooktop near a dishwasher or washing machine, so that the electronic circuits do not come into contact with steam or moisture, which could damage them.
- If an oven is installed beneath the cooktop, make sure that it is equipped with a cooling system.
- ATTENTION: to install the hob on surfaces other than wood (marble, plastic, ceramic, stone, etc.) remember to ask After Sales Service for the fixing plates (fig. B) Code 4819 404 78697.

PLACING THE HOB
Important: remove any protective film before installing the hob.
Make sure that the opening in the worktop for the hob is cut according to the dimensions given in the drawing, paying attention to the tolerance range.
If the worktop is made out of wood, use the springs supplied. Fit the 4 springs (A) into the relevant seat under the box. Make an opening in the worktop, respecting the dimensions indicated in the enclosed product description sheet. Install the cooking hob in the worktop.
If the worktop is made out of marble or other materials (plastics, ceramics or stone), the cooking hob must be fixed by means of brackets (B) to be ordered from the After-sales Service (code 4819 310 18528). Align the brackets with the bores and fix them with the screws. Make an opening in the worktop, respecting the dimensions indicated in the product description sheet.
- Install the cooking hob in the worktop. Before installing the cooking hob, remove the plastic film that protects it, if present. The outer surfaces of the furniture or appliances adjoining the cooking hob must be heat resistant (heat protection "Y", according to standards EN 60335-2-6).
• Installation must comply with current local safety regulations.

DIMENSIONS AND DISTANCES TO BE MAINTAINED
ELECTRICAL CONNECTION
Electrical connection must be made before connecting the appliance to the electricity supply.
Installation must be carried out by qualified personnel who know the current safety and installation regulations. Specifically, installation must be carried out in compliance with the regulations of the local electricity supply company.
Make sure the voltage specified on the data plate located on the bottom of the appliance is the same as that of the home.
Regulations require that the appliance be earthed: use conductors (including the earth conductor) of the appropriate size only.
CONNECTION TO THE TERMINAL BLOCK
For the electrical connection, use an H05-RR-F cable as specified in the table below.
| SUPPLY VOLTAGE | CONDUCTORS (NUMBER AND SIZE) |
| 230V ~ + | 3 x 2,5 mm 2 |


The appliance must be connected to the electricity supply by means of an all-pole disconnect switch with minimum contact gap of 3 mm.
ATTENTION: the power supply cable must be long enough to allow the cooktop to be removed from the worktop and must be positioned so as to avoid damage or overheating caused by contact with the base.
CONNECTION TO TERMINAL BOARD
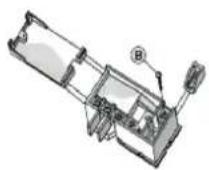
- Open the cover of the terminal board and loosen screw (A) by means of a tool, as shown in the figure.
- Unsheathe the cable for about 70 mm.
- Peel off the internal cables for about 10 mm, loosen cable clamp screw (B), and insert the cable in the cable clamp. The terminal board has 4 terminals:
• 1-2 interconnected (line)
• 3 (neutral)
• 4 (earth): marked with symbol
- Connect the cable to the terminal board, following the indications of the connection diagram punched on the bottom of the cooking hob. Fasten the cable clamp and close the cover.
PRODUCT DESCRIPTION

- Rapid hotplate ∅ 180 - 2000 W
- Normal hotplate ∅ 145 - 1000 W
- Normal hotplate ∅ 180 - 1500 W
- Normal hotplate ∅ 145 - 1000 W
- Rapid hotplate control knob ∅ 180
- Normal hotplate control knob ∅ 145
- Normal hotplate control knob ∅ 180
- Normal hotplate control knob ∅ 145
- Hotplate operation control lamp \~
DAILY USE
SWITCHING THE HOB ON/OFF
- Set the knob to one of positions 1-6, which correspond to different temperatures.
- To switch off the hotplate, set the knob to position "0".
MAINTENANCE AND CLEANING
⚠️ Disconnect the appliance from the power supply.
CLEANING THE HOB SURFACE
- Stainless steel surfaces may be stained by calcareous water or aggressive detergents if left in contact for too long. Any food spills (water, sauce, coffee, etc.) should be wiped away before they dry.
- Clean with warm water and neutral detergent, and then dry with a soft cloth or chamois. Remove baked-on dirt with specific cleaners for stainless steel surfaces. NOTE: clean stainless steel only with soft cloth or sponge.
- Do not use abrasive or corrosive products, chlorine-based cleaners or pan scourers.
- Do not use steam cleaning appliances.
- Do not use flammable products.
- Do not leave acid or alkaline substances, such as vinegar, mustard, salt, sugar or lemon juice on the hob.
CLEANING THE ELECTRIC HOTPLATES
- The electric hotplates must be cleaned when they are lukewarm. Wipe them with a cloth moistened with water and salt, and polish with a cloth moistened with oil.
TROUBLESHOOTING
If the hob will not operate correctly, before calling the After-Sales Service, refer to the Troubleshooting Guide to determine the problem.
- Read and follow the instructions given in the section "Daily use".
- Check that the electricity supply has not been shut off.
- Turn the hob off and on again, to make sure that the problem has been solved.
- Make sure that the knob is not turned to "0". Turn the multi-pole switch to "Off" for a few minutes and then turn it back to "On".
- The hob will not switch off: disconnect the hob immediately from the power supply.
If after the above checks the fault still occurs, get in touch with the nearest After Sales Service.
AFTER-SALES SERVICE
In order to receive more complete assistance, please register your product on www.indesit.com/register.
BEFORE CALLING THE AFTER-SALES SERVICE:
- See if you can solve the problem by yourself with the help of the suggestions given in the TROUBLESHOOTING.
- Switch the appliance off and back on again to see if the fault persists.
IF AFTER THE ABOVE CHECKS THE FAULT STILL OCCURS, GET IN TOUCH WITH THE NEAREST AFTER-SALES SERVICE.
To receive assistance, call the number shown on the warranty booklet or follow the instructions on the website www.indesit.com.
When contacting our Client After sales service, always specify:
- a brief description of the fault; • the type and exact model of the appliance;

- the service number (number after the word Service on the rating plate). The service number is also indicated on the guarantee booklet;

- your full address;
- your telephone number.
If any repairs are required, please contact an authorized after-sales service (to guarantee that original spare parts will be used and repairs carried out correctly).
- PERMITTED USE
- INSTALLATION
- ELECTRICAL WARNINGS
- CLEANING AND MAINTENANCE
- DISPOSAL OF PACKAGING MATERIALS
- DISPOSAL OF HOUSEHOLD APPLIANCES
- ENERGY SAVING TIPS
- DECLARATION OF CONFORMITY
- PLACING THE HOB
- ELECTRICAL CONNECTION
- CONNECTION TO THE TERMINAL BLOCK
- CONNECTION TO TERMINAL BOARD
- PRODUCT DESCRIPTION
- DAILY USE
- SWITCHING THE HOB ON/OFF
- MAINTENANCE AND CLEANING
- CLEANING THE HOB SURFACE
- CLEANING THE ELECTRIC HOTPLATES
- TROUBLESHOOTING
- AFTER-SALES SERVICE
- BEFORE CALLING THE AFTER-SALES SERVICE
- IF AFTER THE ABOVE CHECKS THE FAULT STILL OCCURS, GET IN TOUCH WITH THE NEAREST AFTER-SALES SERVICE
Brand : INDESIT
Model : TI 60 X
Category : Cooker