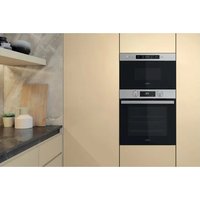
W7MW461UK - Microwave WHIRLPOOL - Free user manual and instructions
Find the device manual for free W7MW461UK WHIRLPOOL in PDF.
| Product type | Microwave oven |
| Brand | Whirlpool |
| Model | W7MW461UK |
| Microwave power | 900 W (max) |
| Grill power | 3 levels (high, medium, low) |
| Capacity | 25 L (estimate) |
| Display type | Digital display |
| Main functions | 6th Sense (Reheat, Steam, Cooking), Crisp Fry, Hot Air, Grill, Microwave, Jet Defrost, Smart Clean, Keep Warm, Dough Proofing, Timer |
| Supplied accessories | Glass turntable, turntable support, Crisp plate, Crisp plate handle, metal rack, rectangular baking tray, steamer (base, basket, lid) |
| Cleaning | Smart Clean steam function, manual cleaning with microfiber cloth |
| Safety | Keylock, automatic stop when door is opened |
| Demo mode | Available in settings (does not run cooking) |
| Eco mode | Reduces screen brightness and turns off lamp after 1 minute |
| Number of favorite functions | Up to 9 |
| Defrost | Jet Defrost by weight (meats, poultry, fish, vegetables, bread) and Frozen Crisp Bread function |
| Steam cooking | 6th Sense Steam with supplied steamer |
| Settings | Language, clock, eco, demo, reset |
Frequently Asked Questions - W7MW461UK WHIRLPOOL
User questions about W7MW461UK WHIRLPOOL
0 question about this device. Answer the ones you know or ask your own.
Ask a new question about this device
Download the instructions for your Microwave in PDF format for free! Find your manual W7MW461UK - WHIRLPOOL and take your electronic device back in hand. On this page are published all the documents necessary for the use of your device. W7MW461UK by WHIRLPOOL.
USER MANUAL W7MW461UK WHIRLPOOL
THANK YOU FOR PURCHASING A WHIRLPOOL PRODUCT
To receive more comprehensive help and support, please register your product at www.whirlpool.eu/register

You can download the Safety Instructions and the Use and Care Guide by visiting our website docs.whirlpool.eu and following the instructions on the back of this booklet.

Before using the appliance carefully read the Health and Safety guide.
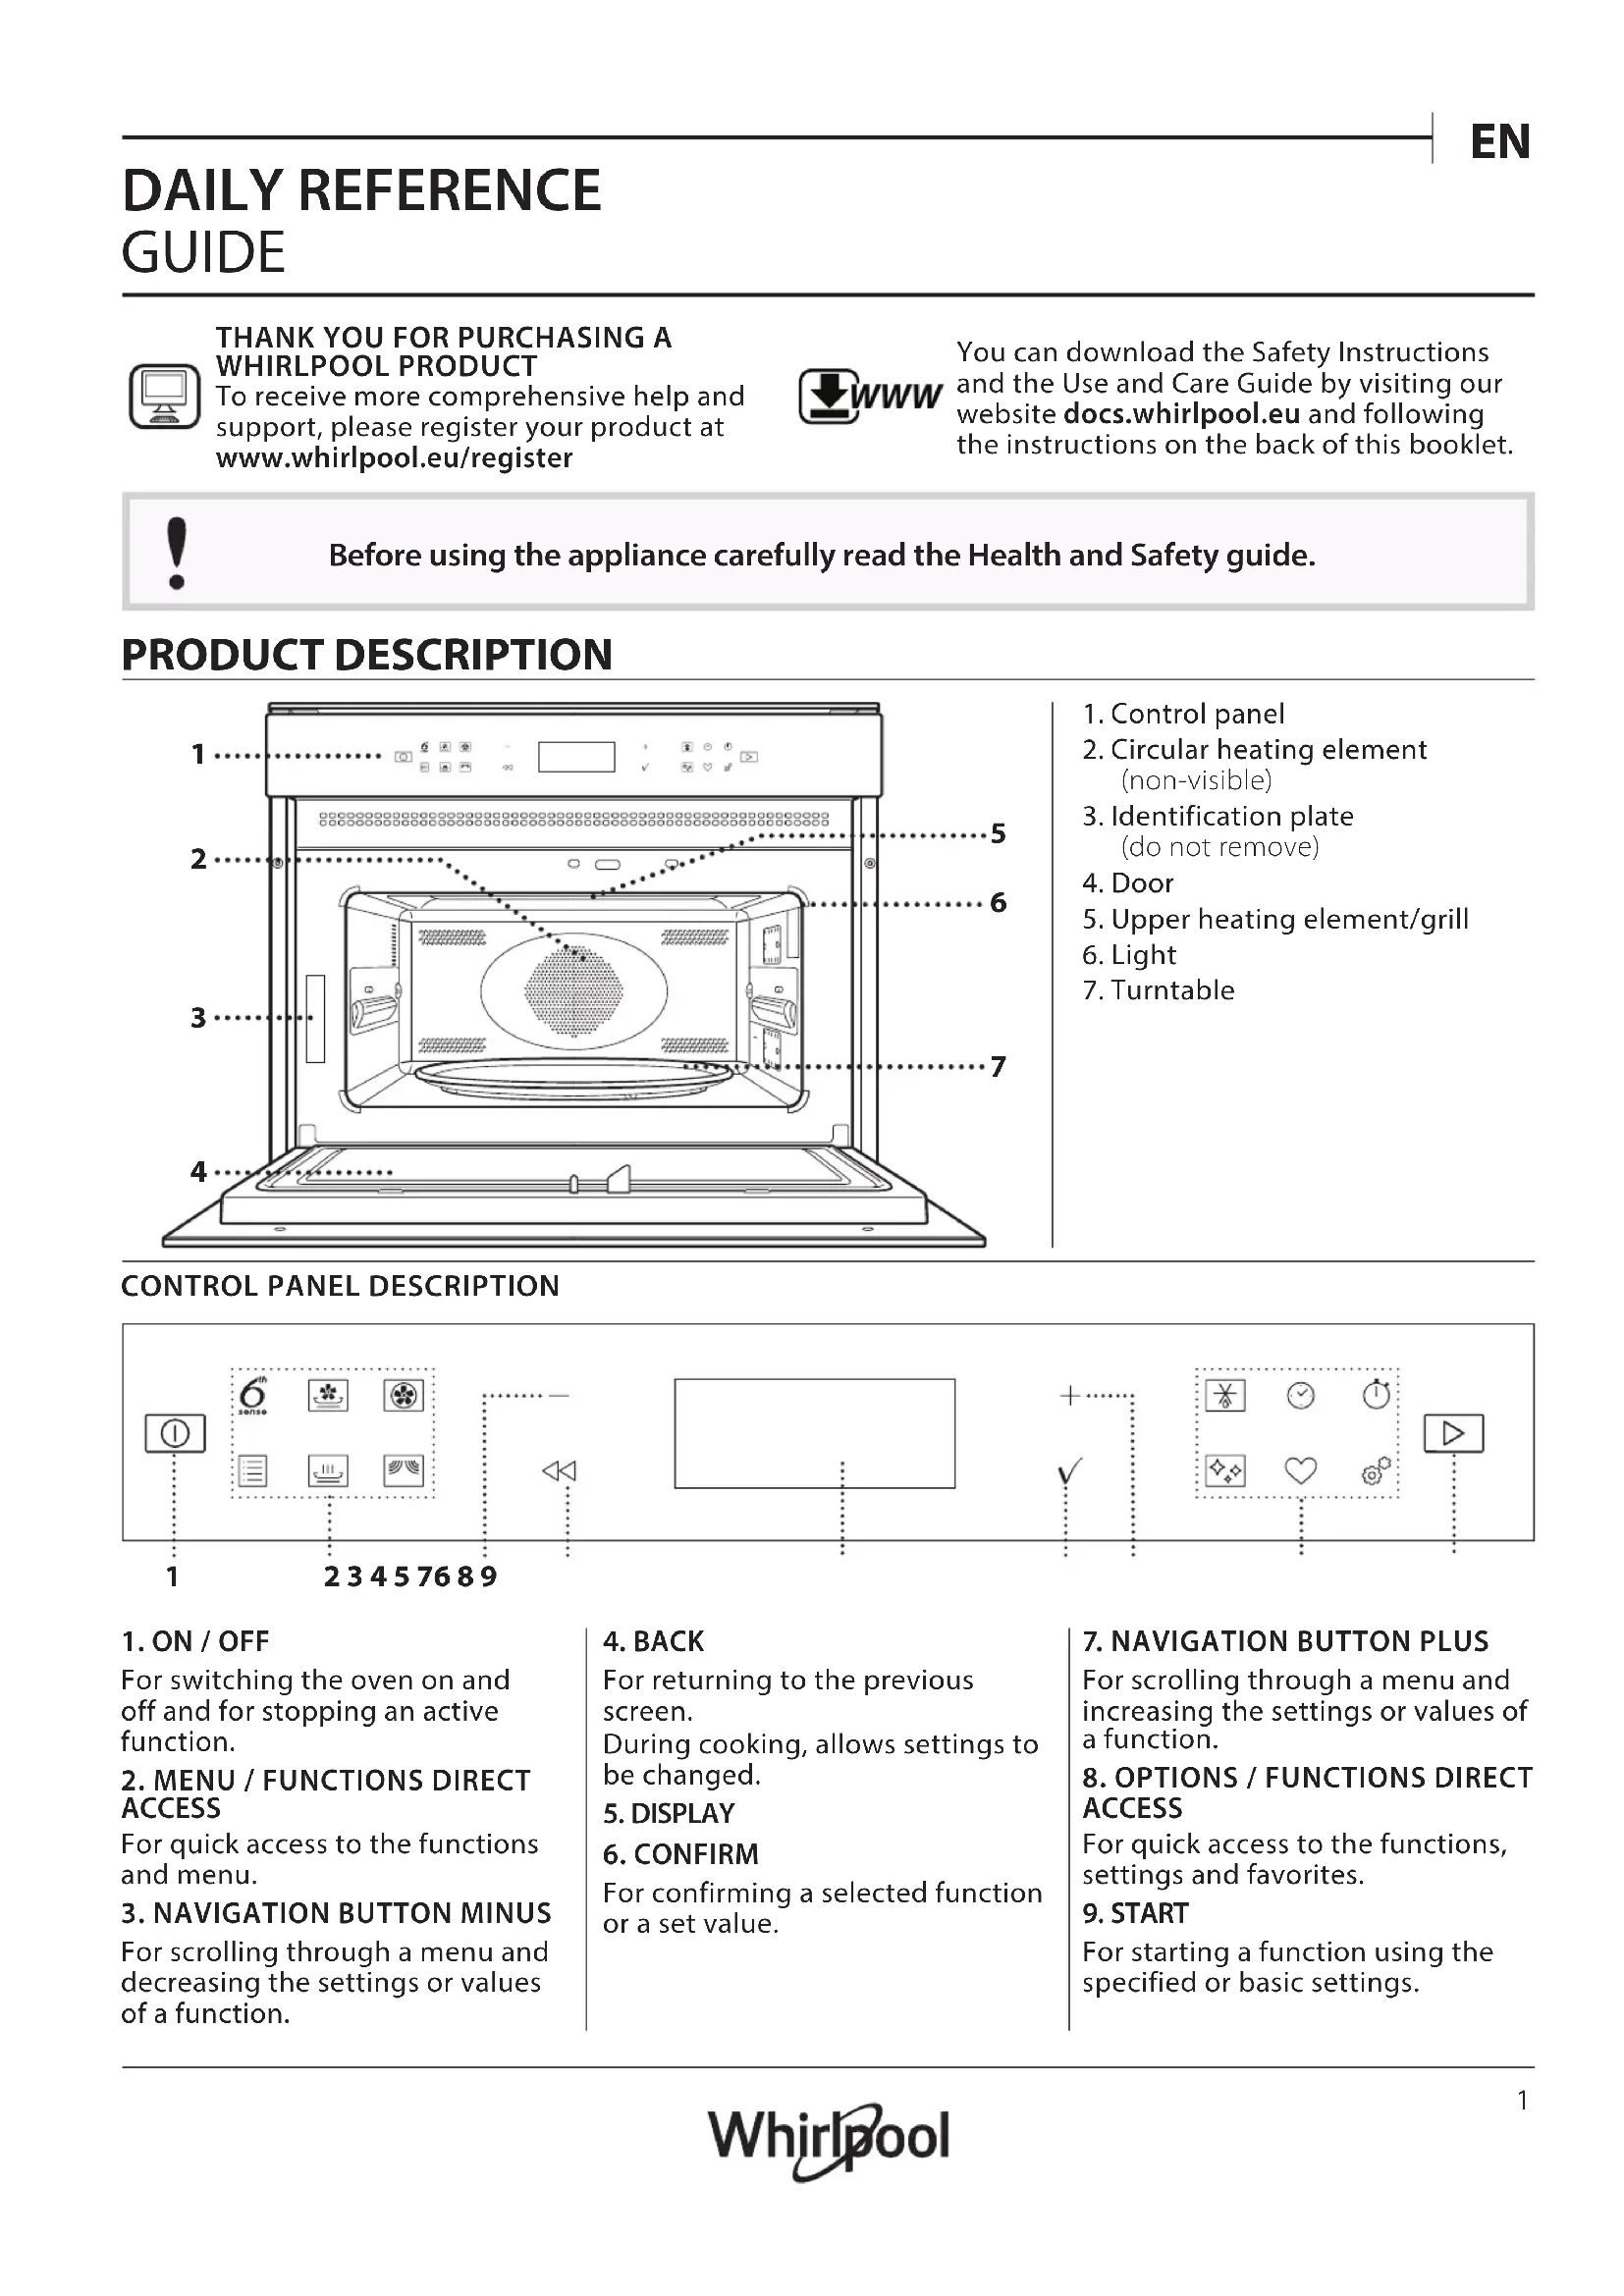
PRODUCT DESCRIPTION
- Control panel
- Circular heating element (non-visible)
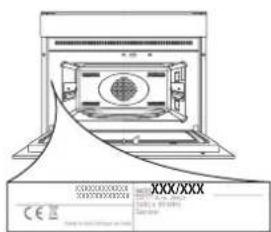
- Identification plate (do not remove)
- Door
- Upper heating element/grill
- Light
- Turntable

CONTROL PANEL DESCRIPTION
1.ON/OFF
For switching the oven on and off and for stopping an active function.
2. MENU / FUNCTIONS DIRECT ACCESS
For quick access to the functions and menu.
3. NAVIGATION BUTTON MINUS
For scrolling through a menu and decreasing the settings or values of a function.
4. BACK
For returning to the previous screen.
During cooking, allows settings to be changed.
5.DISPLAY
6. CONFIRM
For confirming a selected function or a set value.
7. NAVIGATION BUTTON PLUS
For scrolling through a menu and increasing the settings or values of a function.
8 OPTIONS / FUNCTIONS DIRECT ACCESS
For quick access to the functions, settings and favorites.
9. START
For starting a function using the specified or basic settings.
ACCESSIONS
TURNTABLE

Placed on its support, the glass turntable can be used with all cooking methods.
The turntable must always be used as a base for other containers or
accessories, with the exception of the rectangular baking tray.
TURNTABLE SUPPORT

Only use the support for the glass turntable.
Do not rest other accessories on the support.
CRISP PLATE

Only for use with the designated functions.
The Crisp plate must always be placed in the centre of the glass turntable and can be pre-heated
when empty, using the special function for this purpose only. Place the food directly on the Crisp plate.
HANDLE FOR CRISP PLATE

Useful for removing the hot Crisp plate from the oven.
WIRE RACK
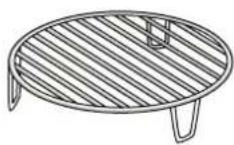
This allows you to place food closer to the grill, for perfectly browning your dish and allows an optimal air circulation.
It must be used as base for the
crisp plate in some "Crisp Fry" functions.
Place the wire rack on the turntable, making sure that it does not come into contact with other surfaces.
The number and the type of accessories may vary depending on which model is purchased.
There are a number of accessories available on the market. Before you buy, ensure they are suitable for microwave use and resistant to oven temperatures.
Metallic containers for food or drink should never be used during microwave cooking.
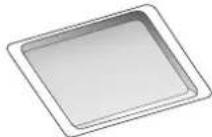
RECTANGULAR BAKING TRAY

Only use the baking tray with functions that allow for convection cooking; it must never be used in combination with microwaves. Insert the plate horizontally,
resting it on the rack in the cooking compartment.
Please note: You do not need to remove the turntable and its support when using the rectangular baking tray.
STEAMER
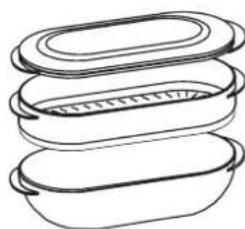
To steam foods such as fish or vegetables, place these in the basket (2) and pour drinking water (100ml) into the bottom of the steamer (3) to achieve the right amount of steam. To boil foods such as potatoes, pasta, rice or cereals, place
these directly on the bottom of the steamer (the basket is not required) and add an appropriate amount of drinking water for the amount you are cooking.
For best results, cover the steamer with the lid (1) provided.
Always place the steamer on the glass turntable and only use it with the appropriate cooking functions, or with microwave function.
The steamer bottom has been designed also to be used in combination with the special steam clean function.
Other accessories that are not supplied can be purchased separately from the After-sales Service.
Always ensure that foods and accessories do not come into contact with the inside walls of the oven.
Always ensure that the turntable is able to turn freely before starting the oven. Take care not to unseat the turntable whilst inserting or removing other accessories.
FUNCTIONS

6^th SENSE
These functions automatically select the best temperature and cooking method for all types of food.
-6 ^th SENSE REHEAT
For reheating ready-made food that is either frozen or at room temperature. The oven automatically calculates the settings required to achieve the best results in the shortest amount of time. Place food on a microwave-safe and heatproof dinner plate or dish. Take out from packaging being careful to remove any aluminium foil. At the end of reheating process, leaving to stand for 1-2 minutes will always improve the result, especially for frozen food. Do not open the door during this function.
-6 ^th SENSE STEAM
For steam-cooking foods such as vegetables or fish, using the steamer provided. The preparation phase automatically generates steam, bringing the water poured into the bottom of the steamer to the boil. Timings for this phase may vary. The oven then proceeds with steamcooking the food, according to the time set. Set 1-2 minutes for soft vegetables such as broccoli and leek or 4-5 minutes for harder vegetables such as carrots and potatoes. Do not open the door during this function.
Required accessories: Steamer
6 sensecook
For cooking several kind of dishes and foods and achieving optimal results quickly and easily. To get the best from this function, follow the indications on the relative cooking table.

CRISP FRY
This healthy and exclusive function combines the quality of crisp function with the properties of the warm air circulation. It allows crunchy, tasty frying results to be achieved, with a remarkable reduction of oil needed compared to the traditional way of cooking, even removing the need for oil in some recipes. It is possible fry a variety of preset foods, either fresh or frozen. Follow the following table to use the accessories as indicated and obtain the best cooking results for each type of food (fresh or frozen).
| FOOD | WEIGHT (g) PORTIONS |
| FRESH FOOD | |
| Breaded chicken fillets | |
| Coat lightly in oil before cooking. Distribute evenly on the crisp plate. Set plate on wire rack. | 100 - 500 |
| Aubergine | |
| Chop, salt and let rest for 30 min. Wash, dry and weigh. Brush with olive oil (5%). Distribute evenly on crisp plate. Set plate on wire rack. Turn when prompted. | 200 - 600 |
| Courgette | |
| Slice, weigh and brush with olive oil (5%), Distribute evenly on crisp plate. Set plate on wire rack. | 200 - 500 |
| FOOD | WEIGHT (g) PORTIONS |
| FROZEN | |
| Chicken nuggets Distribute evenly on the crisp plate. Set plate on wire rack. Cheese-sticks Distribute evenly on the crisp plate. Set plate on wire rack. Onion rings Distribute evenly on the crisp plate. Set plate on wire rack. Fish & chips Distribute evenly on the crisp plate. Mixed Fried Fish Distribute evenly on the crisp plate. Fish Fingers Distribute evenly on the crisp plate. Tum when prompted. French Fries Distribute evenly on the crisp plate. Tum when prompted. | 200 - 600 |
| 100 - 400 | |
| 100 - 500 | |
| 1 - 3 | |
| 100 - 500 | |
| 100 - 500 | |
| 200 - 500 |

FORCED AIR
For cooking dishes in a way that achieves similar results to using a conventional oven. The baking plate or other cookware that is suitable for oven use can be used to cook certain foods.
| FOOD TEMP (°C) DURATION (min.) | |
| Soufflé 175 30 - 35 | |
| Cheese Cupcake 170*25 - 30 | |
| Cookies 175*12 - 18 | |
*Preheat needed
Recommended accessories: Rectangular baking tray / Wire rack

TRADITIONAL
GRILL
For browning, grilling and gratins. We recommend turning the food during cooking.
| FOOD GRILL LEVEL DURATION (min.) | ||
| Toast 35-6 | ||
| Prawns | 2 | 18-22 |
Recommended accessories: Wire rack
GRILL+MW
For quickly cooking and gratinating dishes, combining the microwave and grill functions.
| FOOD | POWER (W) | GRILL LEVEL | DURATION (min.) |
| Potatoes gratin | 650 | 2 | 20 - 22 |
| Jacket Potatoes | 650 | 3 | 10 - 12 |
Recommended accessories: Wire rack
TURBO GRILL
For perfect results, combining the grill and oven air convection. We recommend turning the food during cooking.
Chicken Kebab 3 25-35
Recommended accessories: Wire rack
TURBO GRILL+MW
For quickly cooking and browning your food, combining the microwave, grill and the oven air convection.
FOOD GRILL LEVEL DURATION (min.)
| FOOD | POWER (W) | GRILL LEVEL | DURATION (min.) |
| Cannelloni [Frozen] | 650 3 20 | -25 | |
| Pork Chops 350 3 30 - 40 | |||
Recommended accessories: Wire rack
FORCED AIR + MW
To prepare oven dishes in a short time. It is suggested to use the rack in order to optimize the air circulation.
| FOOD | POWER (W) | TEMP (°C) | DURATION (min.) |
| Roasts | 350 | 170 | 35 - 40 |
| Meat Pie | 160 | 180 | 25 - 35 |
Recommended accessories: Wire rack
SPECIALS
>>FAST PREHEAT
For quickly preheating the oven before a cooking cycle. Wait for the function to finish before placing food inside the oven.
Once preheating has finished, the oven will select the "Forced Air" function automatically.
> KEEP WARM
For keeping just-cooked food hot and crisp, including meat, fried foods or cakes.
RISING
For optimal proving of sweet or savoury dough. To maintain the quality of proving, do not activate the function if the oven is still hot following a cooking cycle.
CRISP
For perfectly browning a dish, both on the top and bottom of the food. This function must only be used with the special Crisp plate.
| FOOD | DURATION (min.) |
| Leavened cake | 7 - 10 |
| Hamburger | 8 - 10* |
*Turn food halfway through cooking.
Required accessories: Crisp plate, handle for the Crisp plate

MICROWAVE
For quickly cooking and reheating food or s.
POWER(W) RECOMMENDED FOR
| 900 | Quickly reheating drinks or other foods with a high water content. |
| 750 | Cooking vegetables. |
| 650 | Cooking meat and fish. |
| 500 | Cooking meat sauscs, or sauces containing cheese or egg. Finishing off meat pies or pasta bakes. |
| 350 | Slow, gently cooking. Perfect for melting butter or chocolate. |
| 160 | Defrosting frozen foods or softening butter and cheese. |
| 90 | Softening ice cream. |
| ACTION | FOOD | POWER (W) | DURATION (min.) |
| Reheat | 2 cups | 900 | 1 - 2 |
| Reheat | Mashed potatoes (1 kg) | 900 | 10 - 12 |
| Defrost | Minced Meat (500 g) | 160 | 15 - 16 |
| Cook | Sponge cake | 750 | 7 - 8 |
| Cook | Egg custard | 500 | 16 - 17 |
| Cook | Meat loaf | 750 | 20 - 22 |

JET DEFROST
For quickly defrosting various different types of food simply by specifying their weight. Always place the food directly on the glass turntable for best results.
CRISP BREAD DEFROST
This exclusive Whirlpool function allows you to defrost frozen bread. Combining both Defrost and Crisp technologies, your bread will taste and feel as if it were freshly baked. Use this function to quickly defrost and heat frozen rolls, baguettes & croissants. The Crisp Plate must be used in combination with this function.
| FOOD | WEIGHT |
| CRISP BREAD DEFROST | 50 - 800 g |
| MEAT | 100 g - 2.0 kg |
| POULTRY | 100 g - 3.0 kg |
| FISH | 100 g - 2.0 kg |
| VEGETABLES | 100 g - 2.0 kg |
| BREAD | 100 g - 2.0 kg |

TIMERS
For editing function time values.

MINUTEMINDER
For keeping time without activating a function.

SMART CLEAN
The action of the steam released during this coal cleaning cycle allows dirt and food residues moved with ease. Pour a cup of drinking water, the supplied steamer bottom (3) only or on a wave proof container and activate the function
Required accessories: Steamer

FAVORITE
For retrieving the list of 10 favorite functions.

SETTINGS
For adjusting the appliance settings.
When "ECO" mode is active the brightness of the display will be reduced to save energy and lamp switches off after 1 minute. It will be reactivated automatically whenever any of the buttons are pressed.
When "DEMO" is "On" all commands are active and menus available but the oven doesn't heat up. To deactivate this mode, access "DEMO" from " SETTINGS" menu and select "Off". By selecting "FACTORY RESET", the product switches off and then it returns to first switch on. All settings will be deleted.
FIRST TIME USE
1. SELECT THE LANGUAGE
You will need to set the language and the time when you switch on the appliance for the first time: "English" will show on the display.

Press or to scroll through the list of available languages and select the one you require.
Press to confirm your selection.
Please note: The language can subsequently be changed by selecting "LANGUAGE" in "SETTINGS" menu, available by pressing .
2. SET THE TIME
After selecting the language, you will need to set the current time: The two digits for the hour will flash on the display.

Press to set the current hour and press : The two digits for the minutes will flash on the display.
Press + or to set the minutes and press to confirm.
Please note: You may need to set the time again following lengthy power outages. Select "CLOCK" in "SETTINGS" menu, available by pressing .
3. HEAT THE OVEN
A new oven may release odours that have been left behind during manufacturing: this is completely normal. Before starting to cook food, we therefore recommend heating the oven with it empty in order to remove any possible odours.
Remove any protective cardboard or transparent film from the oven and remove any accessories from inside it.
Heat the oven to 200^ for around one hour, ideally using the "Fast preheat" function. Follow the instructions for setting the function correctly.
Please note: It is advisable to air the room after using the appliance for the first time.
DAILYUSE
1. SELECT A FUNCTION
Press to switch on the oven: the display will show the last running main function or the main menu. The functions can be selected by pressing the icon for one of the main functions or by scrolling through a menu. To select a function contained in a menu, press + or - to select the desired one, then press to confirm.

Please note: Once a function has been selected, the display will recommend the most suitable level for each function.
2. SET THE FUNCTION
After having selected the function you require, you can change its settings. The display will show the settings that can be changed in sequence. Pressing allows you to change the previous setting again. POWER / TEMPERATURE / GRILL LEVEL

When the value flashes on the display, press to change it, then press to confirm and continue with the settings that follow (if possible).
In the same way, it is possible to set the grill level: There are three defined power levels for grilling: 3 (high), 2 (mid), 1 (low).
DURATION

When the icon flashes on the display, press or + to set the cooking time you require and then press to confirm.
Please note: You can adjust the cooking time that has been set during cooking by pressing : press or to amend it and then press to confirm.
In non-microwave functions you do not have to set the cooking time if you want to manage cooking manually (untimed): Press or to confirm and start the function.
By selecting this mode, you cannot program a delayed start.
END TIME (START DELAY)
In functions which do not activate the microwave such as "Grill" or "Turbogrill", once you have set a cooking time you can delay starting the function by programming its end time. In microwave functions the end time is equal to the duration.
The display shows the end time while the icon flashes.

Press to set the time you want cooking to end, then press to confirm and activate the function. Place the food in the oven and close the door: The function will start automatically after the period of time that has been calculated in order for cooking to finish at the time you have set.
Please note: Programming a delayed cooking start time will disable the oven preheating phase: The oven will reach the temperature your require gradually, meaning that cooking times will be slightly longer than expected. During the waiting time, you can press + or to amend the programmed end time or press to change other settings. By pressing , in order to visualize information, it is possible to switch between end time and duration.
.6th SENSE
These functions automatically select the best cooking mode, power, temperature and duration for all the dishes available.

When required, simply indicate the characteristic of food to obtain an optimal result.
WEIGHT / PORTIONS

To set the function correctly, follow the indications on the display, when prompted, and press + or to set the required value then press to confirm.
Some 6^th Sense functions do not require quantity inputs: thanks to a smart humidity sensor, the oven can automatically adjust the cooking time to the food amount.
DONENESS
In 6^th Sense functions it is possible to adjust the doneness level.

When prompted, press to select the desired level between Light/Low (-1) and Extra/High (+1). Press or to confirm and start the function.
3. ACTIVATE THE FUNCTION
At any time, if the default values are those desired or once you have applied the settings you require, press to activate the function.
Every time the is pressed again, the cooking time will be increased by a further 30 seconds (5 minutes steps in functions which do not activate the microwave).
During the delay phase, by pressing the oven will skip this phase, starting immediately the function.
Please note: At any time you can stop the function that has been activated by pressing 0
If the oven is hot and the function requires a specific maximum temperature, a message will be shown on the display. Press to return to previous screen and select a different function or wait for a complete cooling.
JET START
When the oven is switched off, press to activate cooking with the microwave function set at full power (900 W) for 30 seconds.
4. PREHEATING
The forced air function requires a preheating phase: Once the function has started, the display indicates that the preheating phase has been activated.
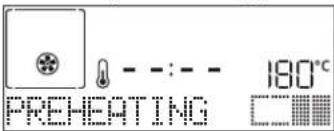
Once this phase has finished, an audible signal will sound and the display will indicate that the oven has reached the set temperature, requiring food to be added.
At this point, open the door, place the food in the oven, close the door and start cooking.
Please note: Placing the food in the oven before preheating has finished may have an adverse effect on the final cooking result. Opening the door during the preheating phase will stop pause it.
The cooking time does not include a preheating phase. You can always change the temperature you want the oven to reach using + or
5. PAUSE COOKING / ADD, TURN OR CHECK ON FOOD
PAUSE
By opening the door, the cooking will be temporarily paused through deactivating heating elements.
To resume the cooking, close the door and press.
Please note: During "6th Sense" functions open the door only when prompted.
ADD, TURN OR STIR FOOD
Some 6^th Sense Cook recipes will require the food to be added after the preheating phase or ingredients to be added to complete cooking. In the same way, there will be prompts to turn or stir the food during cooking.

An audible signal will sound and the display shows the action to be done.
Open the door, do the action prompted by the display and close the door, then press to continue cooking.
Please note: When turning or stirring is needed, after 2 minutes, even if no action is performed, the oven will resume the cooking. The "ADD FOOD" phase last 2 minutes: if no action is taken, the function will be ended.
6.END OF COOKING
An audible signal will sound and the display will indicate that cooking is complete.

Press to continue cooking in manual mode adding time in steps of 30 seconds (in microwave functions) or 5 minutes (without microwave) or press + to extend the cooking time by setting a new duration. In both cases, the cooking parameters will be retained. By pressing the cooking starts again.
. FAVORITE
To make the oven easier to use, it can save up to 9 of your favorite functions.
Once cooking is complete the display will prompt you to save the function in a number between 1 and 9 on your list of favorites.

If you would like to save a function as a favorite and store the current settings for future use, press otherwise, to ignore the request press
Once has been pressed, press or to select the number position, then press to confirm.
Please note: If the memory is full or the number chosen has already been taken, the oven will ask you to confirm overwriting the previous function.
To call up the functions you have saved at a later time, press : The display will show your list of favorite functions.

Press to select the function, confirm by pressing , and then press to activate.
SMART CLEAN
Remove all accessories (with the exception of the glass turntable) from the microwave oven before activating the function.
Press to access the "Smart clean" function.

Press to activate the cleaning function: the display will prompt in sequence actions to be performed before starting the cleaning. Press anytime when done.
When required, pour a cup of drinking water into the supplied steamer bottom or in a microwave resistant container, then close the door.
After the last confirmation, press to start the cleaning cycle.
Once finished, remove the container, finish the cleaning with the help of a smooth cloth and then dry the oven cavity using a damp microfibre cloth.
. MINUTEMINDER
When the oven is switched off, the display can be used as a timer. To activate this function, make sure that the oven is switched off and press + or :The icon will flash on the display.

Press or to set the length of time you require and then press to activate the timer.
An audible signal will sound and the display will indicate once the minuteminder has finished counting down the selected time.
Please note: The minuteminder does not activate any of the cooking cycles. Press + or t change the time set on the timer.
Once the minuteminder has been activated, you can also select and activate a function. Press to switch on the oven and then select the function you require. Once the function has started, the timer will continue to count down independently without interfering with the function itself.
During this phase, it isn't possible to see the minuteminder (only the icon will be displayed), that will continue counting down in background. To retrieve the minuteminder screen press 0 to stop the function that is currently active.
. KEYLOCK
To lock the keypad, press and hold for at least five seconds. Do this again to unlock the keypad.

Please note: This function can also be activated during cooking. For safety reasons, the oven can be switched off at any time by pressing ①.
FOOD CATEGORY / RECIPES ACCESSORIES QUANTITY COOKING INFO
| CASSEROLE & BAKED PASTA | Lasagna | 4-10 portions | Prepare according to your favorite recipe. Pour bechamel sauce on top and sprinkle with cheese to get perfect browning | |
| Lasagna frozen | 500 g - 1.2 kg Take out from packaging being careful to remove any aluminium foil | |||
| RICE, PASTA & CEREALS | Rice 100 - 400 g* | Set recommended cook time for rice. Add salted water and rice into the steamer bottom and cover with lid. Use 2-3 cups of water for each cup of rice | ||
| Pasta | 1-4 portions* | Set recommended cook time for the pasta. Add pasta when oven prompts and cook covered. Use approximately 750ml of water for each 100g of pasta | ||
| Quinoa | 100 - 400 g | Add salted water and cereal into the steamer bottom and cover with lid. Use 2 cups of water for each cup of quinoa | ||
| Spelt | 100 - 400 g | Add salted water and cereal into the steamer bottom and cover with lid. Use 3-4 cups of water for each cup of spelt | ||
| Barley | 100 - 400 g | Add salted water and cereal into the steamer bottom and cover with lid. Use 3-4 cups of water for each cup of barley | ||
| Cous Cous | 100 - 400 g | Add salted water and cereal into the steamer bottom and cover with lid. Use 2 cups of water for each cup of cous cous | ||
| Oat porridge | 1-2 portions* | Add salted water and oat flakes into a container with high edges, mix and insert into the oven | ||
| Beef | Roast beef | 800 g - 1.5 kg | Brush with oil and rub with salt and pepper. Season with garlic and herbs as you prefer. At the end of cooking let rest for at least 15 minutes before carving | |
| Steak | 2-6 pieces | Brush with oil and rosemary. Rub with salt and black pepper. Distribute evenly on the wire rack | ||
| Hamburgers frozen | 100 - 500 g Lightly grease the crisp plate before preheating | |||
| Pork | Roast pork | 800 g - 1.5 kg | Brush with oil or melted butter. Rub with salt and pepper. At the end of cooking let rest for at least 15 minutes before carving | |
| Ribs | 700 g - 1.2 kg | Brush with oil and season as you prefer. Rub with salt and pepper. Distribute evenly in the crisp plate with the bone side downwards | ||
| Bacon | 50 - 150 g Distribute evenly in the crisp plate | |||
| Roast chicken 800 g - 2.5 kg | Brush with oil and season as you prefer. Rub with salt and pepper. Insert into the oven with the breast side up | |||
| Pieces | 400 g - 1.2 kg | Brush with oil and season as you prefer. Distribute evenly in the crisp plate with the skin side down | ||
| Steam fillets | 300 - 800 g * Distribute evenly in the steamer basket | |||
| Breaded Fillets Fry | 100 - 500 g Brush with oil. Distribute evenly in the crisp plate | |||
| Meat dishes | Hot dog 4-8 pieces * Add hot dog in the steamer bottom and cover with water. Cook uncovered | |||
| Meat loaf | 4-8 portions | Prepare according to your favorite recipe and shape into a loaf container pushing to avoid the formation of air pockets | ||
| Sausages & Wurstel | 200 - 800 g | Lightly grease the crisp plate before preheating. Pierce the sausages with a fork to prevent bursting | ||
- Suggested quantity. Do not open door during cooking.
| ACCESSIONS | Mw/Oven proof container | Steamer (Complete) | Steamer (Bottom + Lid) | Steamer (bottom) | Wire rack | Rectangular baking tray | Crisp Plate |
FOOD CATEGORY / RECIPES ACCESSORIES QUANTITY COOKING INFO
| FISH ROasted | Whole fish 600 g - 1.2 kg Brusch with oil. Season with lemon juice, garlic and parsley | ||
| Fish fillets | 300 - 800 g * Distribute evenly in the steamer basket | ||
| Fish steak | 300 - 800 g * Distribute evenly in the steamer basket | ||
| Mussels | 400 g - 1.0 kg Season with oil, pepper, lemon garlic and parsley before cooking. Mix well | ||
| Shrimps | 100 - 600 g Distribute evenly in the steamer basket | ||
| Whole fish | 600 g - 1.2 kg Brush with oil. Season with lemon juice, garlic and parsley | ||
| Gratin-frozen | 600 g - 1.2 kg Take out from packaging being careful to remove any aluminium foil | ||
| Fried | Fish & chips-frozen | 1-3 portions | Distribute evenly in the crisp plate alternating the fish fillets and the potatoes |
| Mixed fish-frozen | 100-500 g Distribute evenly in the crisp plate | ||
| Breaded stick-frozen | 100-500 g Distribute evenly in the crisp plate | ||
| Fish steak | 300 - 800 g | Lightly grease the crisp plate before preheating. Season fish steaks with oil and cover with sesame seeds | |
| Roasted | Potatoes pieces | 300 g - 1.2 kg | Cut in pieces, season with oil, salt and flavor with herbs before placing into the oven |
| Potato wedges | 300 - 800 g | Cut in wedges, season with oil, salt and flavor with herbs before placing into the oven | |
| Vegetables-stuffed | 600 g - 2.2 kg | Scoop out the vegetable and fill with a mixture of the vegetable flesh itself, minced meat and shredded cheese. Season with garlic, salt and flavor with herbs as you prefer | |
| Veg burger-frozen | 2-6 pieces Lightly grease the crisp plate | ||
| Gratin | Potatoes | 4-10 portions | Slice and place into a large container. Season with salt, pepper and pour over cream. Sprinkle cheese on top |
| Broccoli | 600 g - 1.5kg | Cut in pieces and place into a large container. Season with salt, pepper and pour over cream. Sprinkle cheese on top | |
| Cauliflower | 600 g - 1.5 kg | Cut in pieces and place into a large container. Season with salt, pepper and pour over cream. Sprinkle cheese on top | |
| Gratin-frozen | 400 g - 800 g Take out from packaging being careful to remove any aluminium foil | ||
| Steamed | Vegetables-frozen 300 - 800 g Distribute evenly in the steamer basket | ||
| Potatoes | 300 g - 1 kg * Cut | in pieces. Distribute evenly in the steamer bottom | |
| Broccoli | 200 - 500 g * Cut | in pieces. Distribute evenly in the steamer basket | |
| Carrots | 200 - 500 g * Cut | in pieces. Distribute evenly in the steamer basket | |
| Cauliflower | 200 - 500 g * Cut | in pieces. Distribute evenly in the steamer basket | |
| Fried | Potatoes-frozen | 200 - 500 g | Distribute evenly in the crisp plate |
| Aubergine | 200 - 600 g | Chop and soak in cold salted water for 30 minutes. Wash, dry and weigh. Mix with oil, approximately 10g for each 200g of dry eggplant. Distribute evenly in the crisp plate | |
| Courgette | 200 - 500 g | Slice, weigh and mix with oil, approximately 10g for each 200g of dry zucchini. Season with salt and black pepper. Distribute evenly on crisp plate | |
- Suggested quantity. Do not open door during cooking.
ACCESSIONS
Mw/Oven proof
container

Steamer
(Complete)

Steamer
(Bottom + Lid)

Steamer
(bottom)

Wire rack

Rectangular
baking tray

Crisp Plate

FOOD CATEGORY / RECIPES ACCESSORIES QUANTITY COOKING INFO
| DESSERTS & PASTRIES | Chocolate cookies 1 batch | Make a batter of 250g flour, 150g butter, 100g sugar, 1 egg, 25g cocoa powder, salt and baking powder. Add vanilla essence. Let cool down. Spread to reach 5mm thickness, shape as required and distribute evenly in the crisp plate | |
| Fruit Pie | Make a pastry of 180g flour, 125g butter and 1 egg. Line the crisp plate with the pastry and fill with 700-800g sliced fresh fruit mixed with sugar and cinnamon | ||
| Fruit Pie-frozen | out from packaging being careful to remove any aluminium foil | ||
| Fruit compote | 300-800 ml * Peel and core the fruit. Cut in pieces and place in the steamer basket | ||
| Baked apples | 4-8 pieces Remove the core and fill with marzipan or cinnamon, sugar and butter | ||
| Hot chocolate | Prepare according to your favorite recipe into a single container. Flavor with vanilla or cinnamon. Add maize starch to increase density | ||
| Brownies | 1 batch | Prepare according to your favorite recipe. Spread batter on the baking tray covered with baking paper | |
| CAKES & BREAD | Fruit filled pie | + | Line a pie dish with the pastry and sprinkle the bottom with bread crumbs to absorb the juice from the fruit. Fill with chopped fresh fruit mixed with sugar and cinnamon |
| Muffins | 1 batch | Prepare a batter for 16-18 pieces according to your favorite recipe and fill in paper moulds. Distribute evenly on the baking tray | |
| Sponge cake in tin | + | Prepare a fatless sponge cake batter of 500-900g. Pour into lined and greased baking tray | |
| Rolls-frozen | 1 batch Take out from packaging. Distribute evenly on the baking tray | ||
| Sandwich loaf in tin | Prepare dough according to your favorite recipe for a light bread. Form into a loaf container before rise. Use the oven's dedicated rise function | ||
| Scones | into one scone or in smaller pieces on greased crisp plate | ||
| PIZZA & PIEZES | Pizza 2-6 portions | Prepare a pizza dough based on 150ml water, 15g yeast, 200-225g flour, oil and salt. Leave it to rise using the oven's dedicated function. Roll out the dough into a lightly greased baking tray. Add topping like tomatoes, mozzarella and ham | |
| Thin pizza-frozen | 250-500 g * Take out from packaging being careful to remove any aluminium foil | ||
| Thick pizza-frozen | 300-800 g * Take out from packaging being careful to remove any aluminium foil | ||
| Pizza-chilled | 200-500 g | ||
| Quiche lorraine | 1 batch | ||
| Quiche lorraine-frozen | 200-800 g Take out from packaging being careful to remove any aluminium foil | ||
| Quiche | + | 1 batch | |
| Veg strudel | 800 g - 1.5 kg | ||
| EGGS & SNACKS | Popcorn | - | 90-100 g* Always place the bag directly on the glass turntable. Pop only one bag at a time |
| Chicken wings-frozen | 300-600 g * Distribute evenly in the crisp plate | ||
| Chichen nuggets-frozen | + | 200-600 g Distribute evenly in the crisp plate | |
| Cheese sticks-frozen | 100-400 g Brush the cheese with a little oil before cooking. Distribute evenly in the crisp plate | ||
| Onion rings-frozen | + | 100-500g Distribute evenly in the crisp plate | |
| Scrambled eggs | 2-10 pieces Prepare according to your favorite recipe into a single container | ||
| Fried eggs | 1-6 pieces Lightly grease the crisp plate before preheating | ||
| Omelette | 1 batch Lightly grease the crisp plate before preheating |
- Suggested quantity. Do not open door during cooking.
| ACCESSIONS | Mw/Oven proof container | Steamer (Complete) | Steamer (Bottom + Lid) | Steamer (bottom) | Wire rack | Rectangular baking tray | Crisp Plate |
CLEANING
Make sure that the appliance has cooled down before carrying out any maintenance or cleaning.
Never use steam cleaning equipment.
Do not use wire wool, abrasive scourers or abrasive/corrosive cleaning agents, as these could damage the surfaces of the appliance.
INTERIOR AND EXTERIOR SURFACES
- Clean the surfaces with a damp microfibre cloth. If they are very dirty, add a few drops of pH-neutral detergent. Finish off with a dry cloth.
- Clean the glass in the door with a suitable liquid detergent.
- At regular intervals, or in case of spills, remove the turntable and its support to clean the bottom of the oven, removing all food residue.
- Activate the "Smart clean" function for an optimum cleaning of the internal surfaces.
- The grill does not need to be cleaned as the intense heat burns away any dirt. Use this function on a regular basis.
ACCESSIONS
All accessories are dishwasher safe with the exception of the Crisp plate.
The Crisp plate should be cleaned using water and a mild detergent. For stubborn dirt, rub gently with a cloth. Always leave the Crisp plate to cool down before cleaning.
TROUBLESHOOTING
| PROBLEM POSSIBLE CAUSE SOLUTION | ||
| The oven is not working. | Power cut. | Check for the presence of mains electrical power and whether the oven is connected to the electricity supply. Turn off the oven and restart it to see if the fault persists. |
| Disconnection from the mains. | ||
| The oven makes noises, even when it is switched off. | Cooling fan active. | Open the door or hold or wait until the cooling process has finished. |
| The display shows the letter “F” followed by a number. | Software fault. | Turn off the oven and restart it to see if the problem persists. Try to perform the “FACTORY RESET”, selectable from “SETTINGS”. Contact you nearest Client After-sales Service Centre and state the number following the letter “F”. |
| The oven does not heat up. | When “DEMO” is “On” all commands are active and menus available but the oven doesn’t heat up. DEMO appears on display every 60 seconds. | Access “DEMO” from “SETTINGS” and select “Off”. |
PRODUCT FICHE
The product fiche with energy data of this appliance can be downloaded from Whirlpool website docs.whirlpool.eu
HOW TO OBTAIN THE USE AND CARE GUIDE
Download the Use and Care Guide from our website docs.whirlpool.eu (you can use this QR Code), specifying the product's commercial code.
Alternatively, contact our Client After-sales Service.
CONTACTING OUR AFTER-SALES SERVICE
You can find our contact details in the warranty manual. When contacting our Client After-sales Service, please state the codes provided on your product's identification plate.

DAGLIG BRUGERVEJLEDNING

TAK FORDI DU HAR KØBT ET WHIRLPOOL PRODUKT
3. NAVIGATIETOETS MIN
RECHTHOEKIGE BAKPLAAT
8. VALINNAT / SUORA PÄASY TOIMINTOIHIN
MERCI D'AVOIR ACHETÉ UN PRODUIT WHIRLPOOL
8. ACCES DIRECT AUX OPTIONS / FONCTIONS
Accessoires recommends :Grille metallique
TURBO GRIL+MICRO-ONDES
Accessoires recommends :Grille metallique
- CHALEUR PULSEEE+MICRO-ONDES
DANKE, DASS SIE SICH FÜR EIN WHIRLPOOL PRODUKT ENTSCHIEDEN HABEN
TAKK FOR AT DU HAR KJØPT ET WHIRLPOOL-PRODUKT
SLUTFID (UTSATT START)
CÓMOPONERSE EN CONTACTO CON NUESTROSERVICIO POSTVENTA
TACK FÖR ATT DU KÖPT EN PRODUKT FRÄN WHIRLPOOL
Angkokare (botten+lock)

Angkokare (botten)

Ugnsgaller

Rektangular bakplat

Crisppanna

MATKCLASS / RECEPT TILLBEHÖR MÄNGD TILLAGNINGSINFORMATION
b0g jll 1jll aale ll piai i
Jd

jglsl jglsl zale

CRISP 1
Crisp 12014 12014 12014 12014 12014 12014 12014 12014 12014 12014 12014 12014 12014 12014 12014 12014 12014 12

.Crisp jaiil 1
CRISP 1
Cissaaal 1y a y Pn Crisp

a5^3 = a1 · 2^5
yglal yjplabll g, 11
elglg jglplabll glalnl
Jkyl
"Crisp Fry"

()
AiooIooie 00 000000000000000000000000000000000000000
Aiyjil jll jlll lglg 1
.
aai 1 aai i 1 1 1 1 1 1 1 1 1 1 1 1 1 1 1 1 1 1
aal 111 aai 111 g plal 111 ggl
1 1
1 1
(6THSENSE) 6THSENSE REHEAT
j 6th Sense 6th sense (C)DONENESS
6 DUNENESS
y jll gswll Jg 1c Jnally a cia 1
/) High/Extra (1-) (Jao/L) Low/Light
aill jiee g 1sill D 1vle bai.(1+)(
2xy + 2y - 1 = 0
J 1 J 1 J 1 J 1 J 1 J 1 J 1 J 1 J 1 J 1 J 1 J 1 J 1 J 1 J 1 J 1 J 1 J 1 J 1 J 1 J 1 J 1 J 1 J 1 J 1 J 1 J 1 J 1 J 1 J 1 J 1 J 1 J 1 J 1 J
[ ] - - - - 180°c FORCED AIR + M
s gannn nnnn nn nnnn nnnn nnnn nnnn nnnn nnnn nnnn nnnn nnnn nnnn nnnn nnnn nnnn nnnn nnnn nnnn nnnn nnnn nnnn nnnn nnnn nnnn nnnn nnnn nnnn nnnn nnnn nnnn nnnn nnnn nnnn nnnn nnnn nnnn nn
a_i a b
aal jaiis 11 jaii aai iia g yg yg yg yg yg yg

15 Cai 5 j (y y y all 30 15 J
j 5 j j j j + 15 bai j (y y y all j
j j j j j j j j j j j j j j j j j j j j j j j j j j j j j j j j j j j j j j
(FAVORITE)
= 1
JET START
aabg laibgall jaiil 10 biai aagai laoic 30 900 aalss
(sal) PREHEATING .4
2y j 1000 10000000000000000000000000000000000000000000000

a a a a a a a a a a a a a a a a a a a a a a a a a a a a a a a a
1 1
Aie yjy jnll clal jno elgii Jia paleball gao: abdo y jy 11sclasly aIac eli iui iia gaiil gaii iic iia jiu
a j 1 a 1 1 1 1 1 1 1 1 1 1
paleal yae g yuaiy i plab ael / gaaal cagall 5
Cgai
ailll aai! 12n no aiai gai jialgall iay yll lll sic. jusill
1 6th Sense"
a a a a a a a a a a a a a a a
iiil
(ji) MINUTEMINDER.
aasssssssssssssssssssssssssssssssssssssssssssssssssssssssssssssssssssss
1 1
. 129
001
MINUTE-MINDER
e biai i aie aiill sall jbi yaiy
S木弟形 COBD = S COD + S_ BDO
g 1
aall aall jll lla jilal
1
aal a baaal aai
| 10-4 | + | (Lal)JY)Lasagna | |
| 2.1 - 500 | Lasagna frozen (الصعاد) (الصعاد) (الصعاد) | ||
| * 400-100 | (R)Rice | ||
| * 4-1 | (M)S### (Pasta) | ||
| * 400-100 | (Q)I (Quinoa) | ||
| * 400-100 | (P)Spelt | ||
| * 400-100 | (R)Barley | ||
| * 400-100 | (S)Cous Cous | ||
| * 400-100 | (Oat porridge) (空心菜) | ||
| 2-1 | (B)Beef | ||
| 5.1 - 800 | + | Roast beef (辣椒) | |
| 6-2 | (S)Steak | ||
| 500-100 | Hamburgers frozen (空心菜) | ||
| 5.1 - 800 | + | Roast pork (辣椒) | |
| 2.1 - 700 | (S)Ribs | ||
| 150-50 | (B)Bacon | ||
| 5.2 - 800 | Roast Chicken (空心菜) | ||
| 2.1 - 400 | (S)Pieces | ||
| * 800-300 | Steam fillets (空心菜) | ||
| 500-100 | + | Breaded Fillets Fry (空心菜) | |
| 8-4 | (H)Hot dog | ||
| 8-4 | Meat loaf (空心菜) | ||
| 800-200 | Sausages & Wurstel (空心菜) |
| sl#l | a#ll | a#ll | a#ll | a#ll | a#ll | a#ll | a#ll | a#ll | a#ll | a#ll |
| "Crisp" |