Serie 6 BGS41K432 - Vacuum Cleaner BOSCH - Free user manual and instructions
Find the device manual for free Serie 6 BGS41K432 BOSCH in PDF.
Download the instructions for your Vacuum Cleaner in PDF format for free! Find your manual Serie 6 BGS41K432 - BOSCH and take your electronic device back in hand. On this page are published all the documents necessary for the use of your device. Serie 6 BGS41K432 by BOSCH.
USER MANUAL Serie 6 BGS41K432 BOSCH
Please note The mains socket must be protected by at least a 16 amp circuit breaker. If a circuit breaker is tripped when you switch on the vacuum cleaner, this may be because other electri- cal appliances which have a high current draw are connected to the same power circuit. To prevent the circuit breaker from tripping, select the lowest power setting before switching the ap- pliance on, and increase the power only once it is running. Disposal information Packaging The packaging is designed to protect the vacuum cleaner from being damaged during transportation. It is made of environmentally friendly materials and can therefore be recycled. Dispose of packaging that is no longer required at an appropriate recycling point. Old appliance Old appliances still contain many valuable materials. Therefore, please take appliances that have reached the end of their service life to your retailer or recyc- ling centre so that they can be recycled. For current disposal methods, please enquire at a retailer or your local council. Disposal of filters and dust bags Filters and dust bags are manufactured from envi- ronmentally friendly materials. Provided they do not contain substances that are not permitted in household waste, you can dispose of them with your normal household waste.
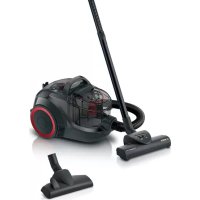
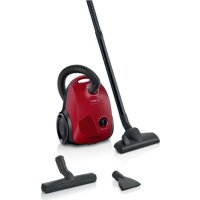
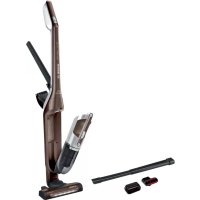
Achtung: Keine Scheuermittel, Glas- oder Allzweckreiniger verwenden. Staubsauger niemals in Wasser tau- chen. Technische Änderungen vorbehalten. Congratulations on your purchase of a Bosch vacuum cleaner from the GS41 – Serie 6 series. This instruction manual describes various GS41 – Se- rie 6 models, which means that some of the equipment features and functions described may not apply to your model. You should only use genuine Bosch accessories – these have been specially developed for your vacuum cleaner to achieve the best possible vacuuming results. Please keep this instruction manual for future refe- rence. When giving the vacuum cleaner to a third party, please also pass on this instruction manual. Please fold out the illustrated pages. Description of the appliance 1 Adjustable floor nozzle* (For the same functions, the appearance of the nozzle may differ from the picture) 2 Telescopic tube with adjusting sleeve and accessory connection* 3 Accessories holder for multi-purpose nozzle* 4 Multi-purpose nozzle* 5 Telescopic tube with sliding switch but without acces- sory connection* 6 Telescopic tube with sliding switch and additional air point* 7 Handle* 8 Ergonomic handle* 9 Premium ergonomic handle* 10 Flexible hose 11 Mains cable 12 Rear flap release button 13 Rear flap 14 Filter control indicator (SmartSensor Control)* 15 Parking aid on the side of the appliance 16 Dust container carrying handle 17 Dust container 18 Dust container release button 19 On/off button with electronic suction regulator 20 Carrying handle 21 Fluff filter 22 Storage aid on the underside of the appliance 23 Animal-hair nozzle* 24 Hardfloor nozzle with folding edge-cleaning bristles* 25 Furniture brush* 26 Crevice nozzle* 27 Upholstery nozzle* 28 Drill dust nozzle* 29 Mattress nozzle*
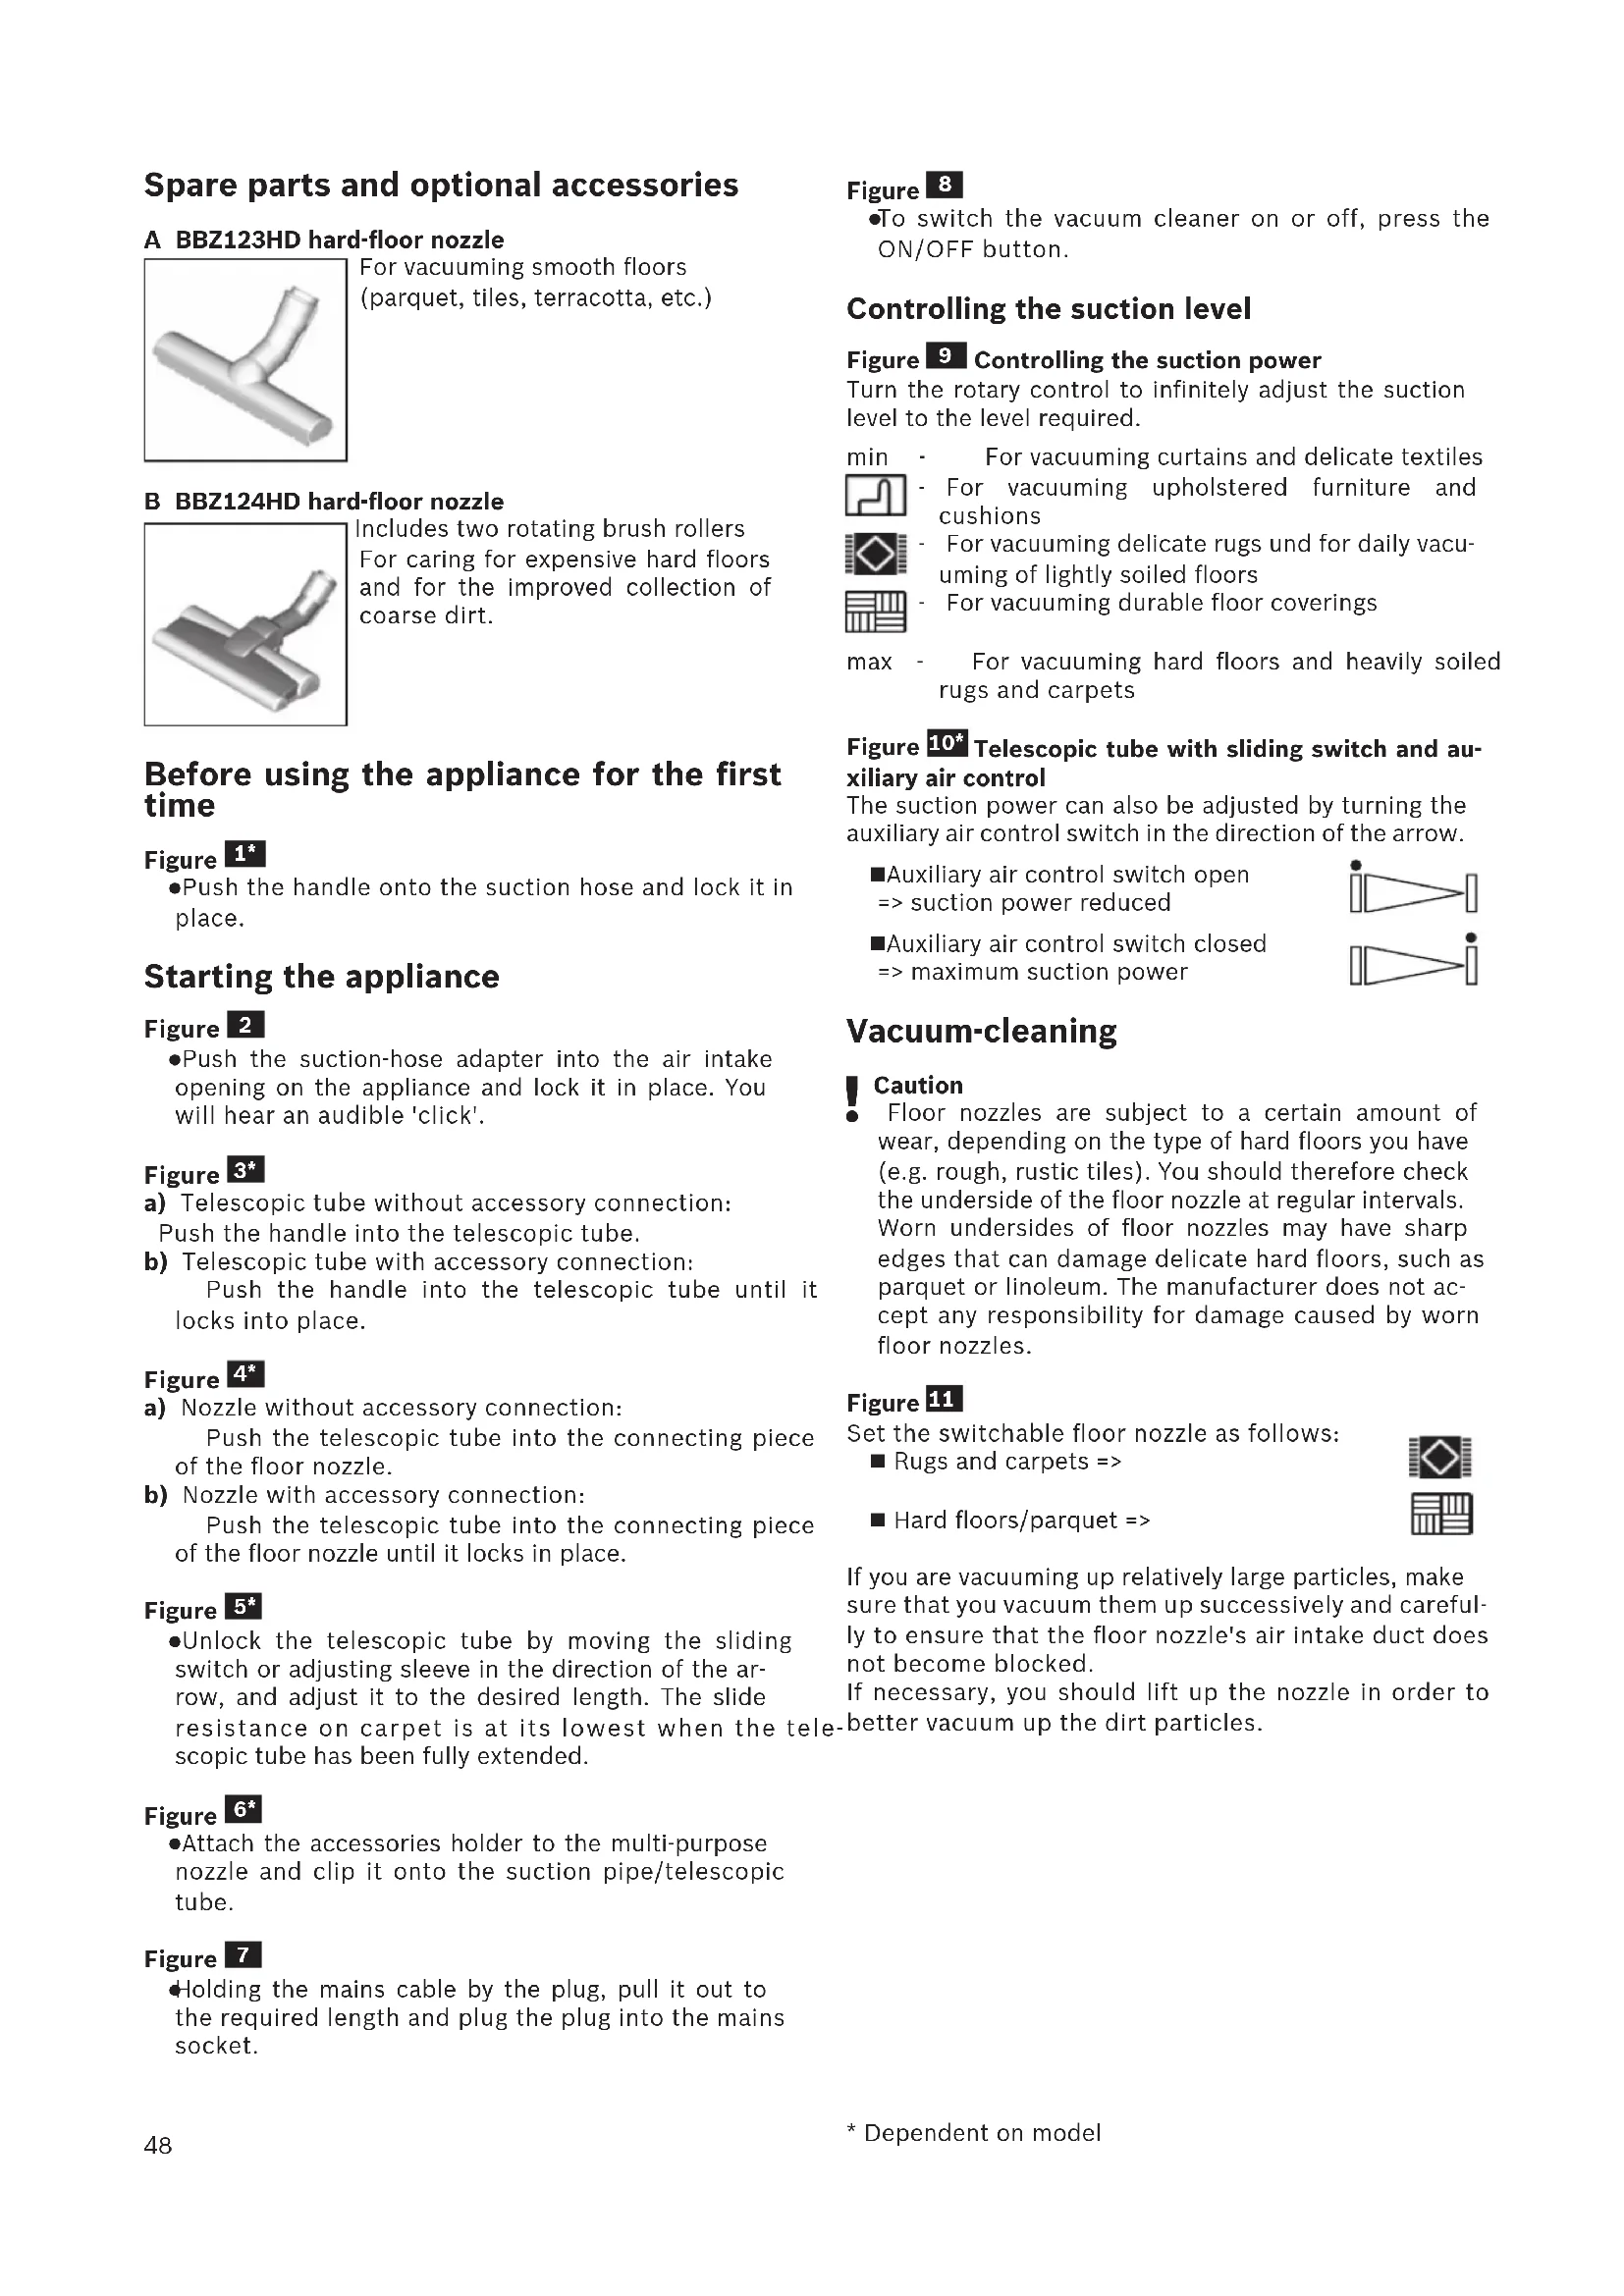
Includes two rotating brush rollers For caring for expensive hard floors and for the improved collection of coarse dirt. Before using the appliance for the first time Figure
Push the handle onto the suction hose and lock it in place. Starting the appliance Figure
Push the suction-hose adapter into the air intake opening on the appliance and lock it in place. You will hear an audible 'click'. Figure
a) Telescopic tube without accessory connection: Push the handle into the telescopic tube. b) Telescopic tube with accessory connection: Push the handle into the telescopic tube until it locks into place. Figure
a) Nozzle without accessory connection: Push the telescopic tube into the connecting piece of the floor nozzle. b) Nozzle with accessory connection: Push the telescopic tube into the connecting piece of the floor nozzle until it locks in place. Figure
Unlock the telescopic tube by moving the sliding switch or adjusting sleeve in the direction of the ar- row, and adjust it to the desired length. The slide resistance on carpet is at its lowest when the tele- scopic tube has been fully extended. Figure
Attach the accessories holder to the multi-purpose nozzle and clip it onto the suction pipe/telescopic tube. Figure
Holding the mains cable by the plug, pull it out to the required length and plug the plug into the mains socket. Figure
To switch the vacuum cleaner on or off, press the ON/OFF button. Controlling the suction level Figure
Controlling the suction power Turn the rotary control to infinitely adjust the suction level to the level required. min - For vacuuming curtains and delicate textiles - For vacuuming upholstered furniture and cushions - For vacuuming delicate rugs und for daily vacu- uming of lightly soiled floors - For vacuuming durable floor coverings max - For vacuuming hard floors and heavily soiled rugs and carpets Figure 10* Telescopic tube with sliding switch and au- xiliary air control The suction power can also be adjusted by turning the auxiliary air control switch in the direction of the arrow. Auxiliary air control switch open => suction power reduced Auxiliary air control switch closed => maximum suction power Vacuum-cleaning
Caution Floor nozzles are subject to a certain amount of wear, depending on the type of hard floors you have (e.g. rough, rustic tiles). You should therefore check the underside of the floor nozzle at regular intervals. Worn undersides of floor nozzles may have sharp edges that can damage delicate hard floors, such as parquet or linoleum. The manufacturer does not ac- cept any responsibility for damage caused by worn floor nozzles. Figure
Set the switchable floor nozzle as follows: Rugs and carpets => Hard floors/parquet => If you are vacuuming up relatively large particles, make sure that you vacuum them up successively and careful- ly to ensure that the floor nozzle's air intake duct does not become blocked. If necessary, you should lift up the nozzle in order to better vacuum up the dirt particles.49
- Dependent on model Vacuuming with accessories Figure 12* Attach the nozzles to the suction pipe or handle as re- quired: a) Hard-floor nozzle* - with clip-in edge-cleaning bristles: of hard floor coverings (tiles, parquet, etc.) - without edge-cleaning bristles: For cleaning dirt in gaps and cracks
The edge-cleaning bristles can be removed by pushing the two catches in the direction of the ar- rows. b) Crevice nozzle* for vacuuming crevices and corners, etc. c) Upholstery nozzle* for vacuuming upholstered furni- ture, curtains, etc. After each use, reinsert the combination nozzle into the accessories holder. d) Furniture brush For cleaning window frames, cabinets, mouldings, etc. e) Mattress nozzle* For cleaning mattresses, upholstery, etc. Drill dust nozzle Figure 13*
Fasten the drill dust nozzle onto the handle and po- sition it on the wall so that the drill hole opening on the nozzle is placed directly over where the hole is to be drilled.
Set the appliance to the lowest power level and then switch it on.
The drill dust nozzle is held in the required position by suction. Depending on the condition of the wall to be drilled, you may need to adjust to a higher power setting to ensure that the drill dust nozzle remains in place. During drilling, the fine dust is automatically vacu- umed up. Figure
You can use the parking aid on the side of the appliance if you want to stop vacuuming for a short time.
After switching off the appliance, slide the hook on the floor nozzle into the parking aid. Figure
When vacuuming stairs, the appliance must be positi- oned at the bottom of the stairs. If it does not reach far enough, the appliance can also be carried using the carrying handle.After vacuuming Figure
a) Switch off the appliance.
Release the telescopic tube by moving the sliding switch or adjusting sleeve in the direction of the ar- row, and slide one tube into the other. Figure
To store/transport the appliance, you can use the sto- rage aid on the underside of the appliance. a) Prop up the appliance on the hose or dust container handle. b) Slide the hook on the floor nozzle into the storage aid.
In order to save space and to facilitate transport, wind the suction hose around the appliance and the telescopic tube. c) The appliance can also be transported using the handle on the dust container. Disassembly Figure
To remove the suction hose, press the two catches together and pull out the hose from the appliance's air intake opening. Figure 20* a) Telescopic tube without accessory connection: To release the connection, turn the handle slightly and pull it out of the telescopic tool. b) Telescopic tube with accessory connection: To release the connection, press the locking collar on the telescopic tube and and pull out the handle. Figure 21* a) Nozzle without accessory connection: To release the connection, turn the telescopic tube slightly and pull it out of the floor nozzle. b) Nozzle with accessory connection: To release the connection, press the locking collar and pull the telescopic tube out of the floor nozzle. Cleaning and maintenance Emptying the dust container Figure
In order to achieve the best possible vacuuming results, the dust container should be emptied after every use or, at the latest, when dust in the dust container has reached the marking at any point. The display lights up red (SmartSensor Control) if the dust container has to be emptied. Figure
Caution The dust container can only be removed when the appliance is in a horizontal position. Therefore, place the appliance on the floor to unlock the re- lease button. Figure
a) Hold the dust container at the handle and press on the release button to remove it from the appliance. b) Release the lid from the dust container by pulling on the tab, and open the dust container. c) Remove the lid from the dust container and empty the dust container. d) Check the fluff filter and rinse it under running wa- ter, if necessary. Allow to dry before putting it back in the dust container. Close and lock the lid.50
- Dependent on model e) Put the lid back on the dust container so that it clicks into place. f) Insert the dust container into the appliance. Maintaining the dust-collection system Figure 24* Your appliance is equipped with a SmartSensor Con- trol indicator. This function constantly monitors whe- ther your vacuum cleaner is working at its optimum power level. The indicator lights up blue when the appliance is wor- king optimally. If the indicator turns red and flashes, the plate filter needs to be cleaned. The appliance is automatically adjusted back to the lowest power set- ting. Cleaning the filter in the dust container Switch off the appliance. Figure
Remove the dust container from the appliance. Figure
a) Open the bottom plate of the dust container by pulling on the lower catch. b) Fold out the filter cartridge with filter foam. c) Remove the filter foam from the bottom plate of the dust container. d) Tapping out the filter foam is all that is required to be able to stop the suction process. e) Then clean the filter foam under running water. f) Alternatively, the filter can be cleaned in a wa- shing machine at max. 30 °C using a gent- le programme and the lowest spin speed. TIP: To protect the filter, place it in a laundry bag. g) Allow the filter foam to dry completely for at least 24 hours and then place both filters back in the bottom plate of the dust container. h) Close and lock the bottom plate.
i) Insert the dust container into the appliance.
Maintaining the exhaust filter The exhaust filter is designed so that it does not need to be replaced, provided the appliance is used as inten- ded in the household. To ensure that the vacuum cleaner is working at its op- timum power level, the exhaust filter should be washed after one year. The filtering action of the filter remains intact, even if the filter surface becomes discoloured. Figure 26* a) Open the rear flap by pressing on the release button. b) Pull the locking tab in the direction of the arrow to release the (H)EPA filter and remove it from the ap- pliance. c) Remove the filter foam from the rear flap. d) Tap out the filter unit and filter foam and rinse them under running water. Alternatively, the unit can be cleaned in a wa- shing machine at max. 30 °C using a gent- le programme and the lowest spin speed. TIP: To protect other laundry items, put the filter unit into a laundry bag. e) Once the (H)EPA* filter has dried completely (at least 24 hours), insert it back into the appliance and lock it in place. f) Insert the filter foam and close the rear flap. After vacuuming fine dust particles (e.g. gypsum, ce- ment, etc.), clean the motor protection filter by tapping it out or, if necessary, replace the motor protection fil- ter and exhaust filter. Cleaning instructions Always switch off the vacuum cleaner and unplug the mains plug before cleaning the vacuum cleaner. The va- cuum cleaner and plastic accessories can be cleaned with standard plastic cleaner.
Attention: Do not use abrasive cleaning products, glass clea- ner or multi-purpose cleaning products. Never im- merse the vacuum cleaner in water. Subject to technical modifications.51
Central Branch Service
North Block, Skyway House,
for exact charges. IL Israel,
- Mo-Sa: 8.00am to 8.00pm
BOSCH Service centre,