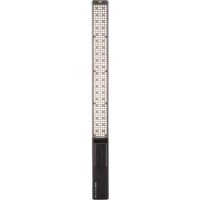
LED Slim Video Light SVL180 PB - Lamp Dörr - Free user manual and instructions
Find the device manual for free LED Slim Video Light SVL180 PB Dörr in PDF.
User questions about LED Slim Video Light SVL180 PB Dörr
0 question about this device. Answer the ones you know or ask your own.
Ask a new question about this device
Download the instructions for your Lamp in PDF format for free! Find your manual LED Slim Video Light SVL180 PB - Dörr and take your electronic device back in hand. On this page are published all the documents necessary for the use of your device. LED Slim Video Light SVL180 PB by Dörr.
USER MANUAL LED Slim Video Light SVL180 PB Dörr
THANK YOU for choosing this DORR quality product.
Please read the instruction manual and safety hints carefully before first use.
Keep this instruction manual together with the device for future use. If other people use this device, make this instruction manual available. This instruction manual is part of the device and must be supplied with the device in case of sale.
DORR is not liable for damages caused by improper use or the failure to observe the instruction manual and safety hints.
01 SAFETY HINTS
- Do not look directly into the LED and do not direct the light beam into the eyes of humans or animals. CAUTION: Looking into the light for an extended period of time may cause an irreversible damage to the retina.
- Only for the illumination for photographic purposes. Not suited for permanent room lightning.
- During the operation the aluminum housing and the LEDs will warm up.
- Protect the device from rain, moisture, direct sunlight and extreme temperatures.
- Never leave the light unattended while charging the battery. After charging, disconnect the light from power supply.
- Turn off the light after use.
- Do not submerge or throw the light into water. Do not throw the light into fire - risk of explosion!
- If device is not in use for a long period of time, we recommend to charge the battery to about 75% . The storage of an empty or fully charged battery will shorten its life.
- The built-in battery and the LEDs cannot be replaced.
- Do not operate or touch the device with wet hands.
- Protect the device against impacts. Do not use the device if it has been dropped. In this case a qualified electrician should inspect the device before you use it again.
- Do not attempt to repair the device by yourself. Risk of electric shock! When service or repair is required, contact qualified service personnel.
People with physical or cognitive disabilities should use the device with supervision. - People with cardiac pacemakers, defibrillators or any other electrical implants should maintain a minimum distance of 30~cm , as the device generates magnetic fields.
- This device is not a toy. To prevent accidents and suffocation keep the device, the accessories and the packing materials away from children and pets.
- Protect the device against dirt. Never use aggressive cleansing agents or benzine to clean the device. We recommend a soft, slightly damp microfiber cloth to clean the outer parts of the device. Before cleaning make sure to switch off the device and take off from power supply!
- Store the device in a dust-free, dry and cool place.
If the device is defective or without any further use, dispose of the device according to the Waste Electrical and Electronic Equipment Directive WEEE. For further information, please contact your local authorities.
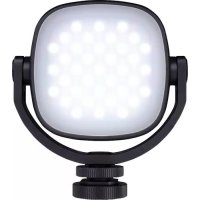
02 | PRODUCT DESCRIPTION
- Ultra-fi at LED continuous light for photo and video recordings
with powerbank function
For DSLR, DSLM & camcorder with hot shoe mount
- Brightness dimmable in 5% steps
High-grade aluminum housing, with clear structured LED display
Colour temperature adjustable from 3200 - 5600 K
- Supplied with universal flash shoe with 143 tripod socket, USB-C charging cable, Mini USB charging adapter, diff usor plate, storage pouch
03|NOMENCLATURE
1 1 / 4 connection thread
2 LCD display
3 On/Off /Menu button
4 Button +
5 Button -
6 Mini USB output socket,5V out
7 USB-C,5V in* charging socket
8 Micro USB .5V in° charging socket.
9 180 high power LEDs
10 Diff usor plate
10a) Holder for diffusor plate
11 USB-C charging cable
12 Mini USB charging adapter for external devices
13 Universal flash hot shoe
13a) Locking screw
14 Storage pouch
04 | BUILT-IN LI-POLYMER BATTERY
04.1 BEFORE FIRST USE, PLEASE FULLY CHARGE THE BUILT-IN LI-PO BATTERY:
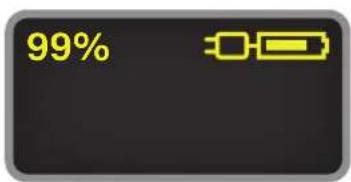
Connect the USB-C charging cable (11) with the USB-C .5V in" charging socket (7) of the video light. While charging you will see the actual charging status on the LCD display (2).
After charging, remove the USB-C charging cable (11) from the video light and the USB charging source. When the battery is totally empty, the charging time by PC is about 2½ hours.
04.2 BATTERY CAPACITY LEVEL
While charging the battery charging status indicator and the symbol will be shown in the display (2).
If LED video light is not in use for a long period of time, we recommend to charge the battery to about 75% to avoid deep-discharge of battery.
05|OPERATION
Press On/Off /Menu button (3) for about 3 seconds in order to turn on the LED video light.
Press On/Off /Menu button (3) shortly to switch from brightness to colour temperature and back. The arrow symbol shows the selected menu point.

Press button + for adjustments (4) to increase brightness and colour temperature.
Press button - for adjustments (5) to decrease brightness and colour temperature.
Brightness is adjustable in 5% steps, while colour temperature is adjusted in 100^ steps.
During operation the display (2) show the remaining battery power in h (hours) or m (minutes).
The battery symbol shows the battery capacity graphically.

Press On/Off/Menu button (3) for approximately 3 seconds in order to turn off the video light.
Powerbank function
Plug the Mini USB charging adapter for external devices (12) into the Mini USB output socket "5V out" (6) to use the powerbank function. Now you are able to charge all your devices over USB (we always recommend to use original high-quality USB cables of the respective devices/manufacturers).
- You may use the powerbank function without turning on the video light. Just plug in any USB device - no further action necessary.
- It is possible to use video light at 100% power and charge an external device at the same time. This drains the battery empty more quickly.
NOTE
- During operation the housing and LEDs will warm up, especially when you use the video light and powerbank function at the same time.
- Turn off the device after usage by using On/Off/Menu button (3).
- Disconnect the Mini USB charging adapter for external devices (12) from Mini USB output socket „SV out" (6) – the video light will charge any device connected even if the video light is switched off.
- Let the device cool down completely, before placing it in the storage pouch.
06 | MOUNTING
06.1 MOUNTING ON A CAMERA/CAMCORDER WITH FLASH HOT SHOE
Screw the universal flash hot shoe (13) into the 14 connection thread (1) of the video light.
Then slide the universal flash hot shoe (13) into the hot shoe mount of your camera or your camcorder. Tighten the locking screw (13a).
06.2 MOUNTING/UNMOUNTING THE DIFFUSOR PLATE
The white diffuser plate (10) provides soft light and reduces harsh shade
Slide the diffusor plate (10) from above until it is centred on the front panel (9) of the video light. The holders of the diffusor plate (10a) must not cover the control buttons (3,4,5).
Push the diffuser plate (10) upwards to remove it from LED front panel again.
07 | CLEANING AND STORAGE
Never use aggressive cleansing agents or benzine to clean the device. We recommend a soft, slightly damp microfiber cloth to clean the outer parts of the device. Before cleaning make sure to switch off the device and take off from power supply! Store the device in a dust-free, dry and cool place. This device is not a toy - keep it out of reach of children. Keep away from pets.
08 | TECHNICAL SPECIFICATIONS
| SVL-180 PB | |
| Number of LEDs 180 | |
| LED Power max. 12 W | |
| Colour temperature 3200 - 5600 K (±300 K) | |
| Illumination power approx. 1000 Lux/1 m | |
| Dimmer 5 - 100% | |
| Colour Rendering Index (CRI) > 96 R | a |
| Power supply | 3.85 V, 4040 mAh Built-in Lithium Polymer battery |
| Runtime full power (withly charged battery) | approx. 1,5 hours |
| Charging current 5V 1A / 5V 2A | |
| Port USB-C & Micro USB | |
| Output power 5V 2A via USB-A | |
| Dimensions 15 x 8 x 1 cm | |
| Weight ca. 190 g | |
09 | CONTENT
1x SLIM LED Video Light SVL-180 PB
1x Universal flash hot shoe
1x USB-C charging cable
1x Mini USB charging adapter
1x Diffusor plate white
1x Storage pouch
1x Safety hints
10 | DISPOSAL, CE MARKING

10.1 DISPOSAL OF BATTERIES/ACCUMULATORS
Batteries are marked with the symbol of a crossed out bin. This symbol indicates that empty batteries or accumulators which can no longer be charged should not be disposed of with household waste. Waste batteries may contain harmful substances that can cause damage to health and to the environment. Please use the return and collection systems available in your country for the disposal of the waste batteries.

10.2 WEEE INFORMATION
The Waste Electrical and Electronic Equipment Directive (WEEE Directive) is the European community directive on waste electrical and electronic equipment, which became European law in February 2003. The main purpose of this directive is to prevent electronic waste. Recycling and other forms of waste recovery should be encouraged to reduce waste. The symbol (trash can) on the product and on the packing means that used electrical and electronic products should not be disposed of with general household waste. It is your responsibility to dispose of all your electronic or electrical waste at designated collection points. Disposing of this product correctly will help to save valuable resources and it is a significant contribution to protect our environment as well as human health. For more information about the correct disposal of electrical and electronic equipment, recycling and collection points please contact your local authorities, waste management companies, your retailer or the manufacturer of this device.
10.3 ROHS CONFORMITY
This product is compliant with the European RoHS directive for the restriction of use of certain hazardous substances in electrical and electronic equipment and its amendments.

10.4 CE MARKING
The CE marking complies with the European standards and indicates that the product meets the requirements of the applicable EU directives.

10 | GESTION, MARCA CE