40000 - Cooker NOVY - Free user manual and instructions
Find the device manual for free 40000 NOVY in PDF.


User questions about 40000 NOVY
0 question about this device. Answer the ones you know or ask your own.
Ask a new question about this device
Download the instructions for your Cooker in PDF format for free! Find your manual 40000 - NOVY and take your electronic device back in hand. On this page are published all the documents necessary for the use of your device. 40000 by NOVY.
USER MANUAL 40000 NOVY
EN Operation Instructions
p. 2
S. 34
p. 50
40 00x Novy Up
NOVY
40 00x Novy Up
INHOUD
1 ALGEMENE INFORMATIE 3
2VEILIGHEID 3
3 BESCHRIJVING VAN HET APPARAAT 5
3 BESCHRIJVING VAN HET APPARAAT
5.1.3 Detection de recipient
Commanded aspiration
222
2.1 Precautions for use of the device 51
2.2 Using the device 51
2.3 Precautions against damage 52
2.4 Precautions to be taken in the event of a fault with the device 52
2.5 Other precautions 52
3 DESCRIPTION OF THE DEVICE 53
3.1 Technical specifications of the induction hob 53
3.2 Principle of induction 53
3.3 Noise caused by induction 53
3.4 Global overview 54
3.5 Hob types 54
4 INDUCTION HOB ONE POWER 54
4.1 Hob control panel 54
4.1.1 Control panel 54
4.1.2 Switch on and off 54
4.1.3 Pan detection 55
4.1.4 Indication of residual heat 55
4.1.5 Power function 55
4.1.6 Timer function 55
4.1.7 Locking the controller 56
5 INDUCTION HOB ONE PRO 56
5.1 Control Panel extraction hood 56
5.1.1 Control panel 56
5.1.2 Switch on and off 56
5.1.3 Pan detection 56
5.1.4 Indication of residual heat 57
5.1.5 Power function and Super Power function 57
Management of maximum power: 57
5.1.6 Timer function 57
5.1.7 Manual Bridge function 58
5.1.8 Locking the controller 58
6.3 Switch on and off and run-out function 59
6.4 Increase and decrease the power level 59
6.5 Low extraction position 59
6.6 High extraction position 59
6.7 Auto-stop 60
6.8 Concentration of the ventilation 60
7 CLEANING INDICATIONS 60
7.1 Cleaning indication for grease filter 60
7.2 Replacement indicator monoblock filter (only with recirculation) 60
8 COOKING ADVICE 60
9 CLEANING AND MAINTENANCE 61
9.1 Maintenance of the hob 61
In case of stubborn stains 61
9.2 Removing and replacing the extraction tower and emptying the reservoir 62
9.3 Cleaning the grease filters and the ventilation tower glass 62
10 TROUBLESHOOTING MINOR FAULTS 63
10.1 Messages on the hob 63
10.2 The cooker hood does not extract well. What can be the cause of this problem? 63
10.3 Miscellaneous 63
OVERVIEW OF THE FUNCTIONS NOVY UP 64
1. GENERAL INFORMATION
- Carefully read the user manual and the mounting instructions before installing this device and putting it into operation. These contain important information for mounting and using the device.
- This device is only suitable for household use.
- Check the status of the device and the mounting materials as soon as you have unpacked them. Carefully remove the device from the packaging. Do not use sharp knives to open the packaging. Do not install the device when damaged; should it be damaged, contact Novy.
- Store this manual carefully and pass it on to the next person to use the device after you.
- Store the stickers with the serial number of the device carefully. You will need this serial number when reporting a problem with the device.
Recycle the transport packaging and the old device:
The materials used are not hazardous to the environment and suitable for recycling. Choose an environment-friendly way to dispose of the packaging. The device also contains many recyclable materials.
Therefore separate used devices from other waste. This way, the recycling of the devices organised by the manufacturer is carried out under the best conditions in accordance with the European directive 2002/96/EG concerning electrical and electronic waste. Ask your municipality or dealer for the nearest collection place for your old devices.
This manual makes use of a number of symbols. The meanings of these symbols are given below.
| SymbolMeaning | ||
| Indication Explanation of an indication on the device. | ||
| Information/Warning | This symbol indicates an important tip or a dangerous situation | |
Follow these instructions to avoid injury and material damage.
2 SAFETY
2.1 Precautions for use of the device
- Remove all labels and stickers from the glass.
- Do not modify or change the unit.
- The cooking plate must not be used as a base or work surface.
- Safety can only be guaranteed if the unit is connected to an ground wire in accordance with the required regulations.
- Do not use an extension cord to connect to the electricity grid.
2.2 Using the device
- Before the first use, clean the glass plate with a damp cloth and dry it off. Do not use detergent; this can result in a bluish haze appearing.
- Metal objects such as knives, forks, spoons and covers must not be placed on the glass cooking surface because it can get become hot.
- Ensure electrical cables from fixed or mobile devices do not come into contact with the hot cooking surface or a hot cooking pan.
- Use only suitable cooking pots/pans. Other materials may melt or catch fire.
- Never cover the device with a cloth or a protective sheet. This could cause it to overheat or catch fire.
- Turn off the heat source after use.
- Always take care with recipes that contain oils and fats because these can catch fire quickly.
- Magnetically-sensitive items (credit card, smartphone, etc.) must not be in the immediate vicinity of the working device.
- Beware of burns both during and after the use of the device.
- Children under the age of 8 years, people with limited psychological and/or mental abilities, as well as people with insufficient knowledge, can only use this device under supervision or if they have been trained in the safe use of this device.
- The device is not intended for use by people with diminished physical, sensory or mental capacities, or people who lack experience and knowledge, unless they are under supervision or have been given instructions about the safe use of the device from someone responsible for their safety.
- Children must be accompanied to be sure they do not play with the device.
2.3 Precautions against damage
- Damaged cooking pans or cooking pans with rough bases (cast iron without enamelling) can cause damage to the glass.
- Sand or other abrasive materials may cause damage to the glass.
- Do not allow items (even small ones) to fall on the glass.
- Avoid the impact of cooking pans against the edge of the glass.
- Ensure the device ventilation is installed in accordance with the instructions of the manufacturer.
- Do not place or leave empty cooking pans on the hob.
- Avoid contact of sugar, synthetic substances or aluminium foil with the hot zones. These substances can crack or affect the vitro ceramic surface while it cools down: switch off the appliance and remove them immediately from the hot zones (beware: risk of burns)
- Risk of burns! Do not place items on the hob.
- Never place a hot pan on the control zone.
- If there is a drawer under the built-in device, ensure there is adequate distance (2 cm) between the contents of the drawer and the bottom of the device to provide good ventilation.
- Do not put flammable objects (for example, sprays) in the drawer under the hob. If the drawer contains a cutlery holder, this must be made from heat-resistant material.
2.4 Precautions to be taken in the event of a fault with the device
- Upon discovering a fault, turn off the device and turn off the electrical supply.
- Immediately switch off the electrical power to the device if a crack or split is discovered in the vitro-ceramic glass, then notify the after-sales service.
- Repairs must only be carried out by specialised personnel. Never open the device yourself.

WARNING: If the glass cooking surface is broken, turn off the device to prevent possible electric shock.
2.5 Other precautions
- Ensure the cooking pan remains in the middle of the cooking zone at all times. The bottom of the cooking pan must cover as much of the cooking zone as possible.
- A magnetic field can affect electronic equipment. People with a pacemaker must first consult the distributor or a doctor.
- Do not use synthetic or aluminium cooking pans: these can melt on the cooking zones while they are still hot.
- Never use water to put out a fire. Turn off the cooking zone.
Gently cover flames with a cover, fire blanket, or something similar.

The use of unsuitable pots and pans, or the use of removable pan warming accessories that are unsuitable for use with induction hobs, is not covered by the guarantee conditions. The manufacturer cannot be held responsible for any damage caused to the hob and its surroundings that result from this.
3 DESCRIPTION OF THE DEVICE
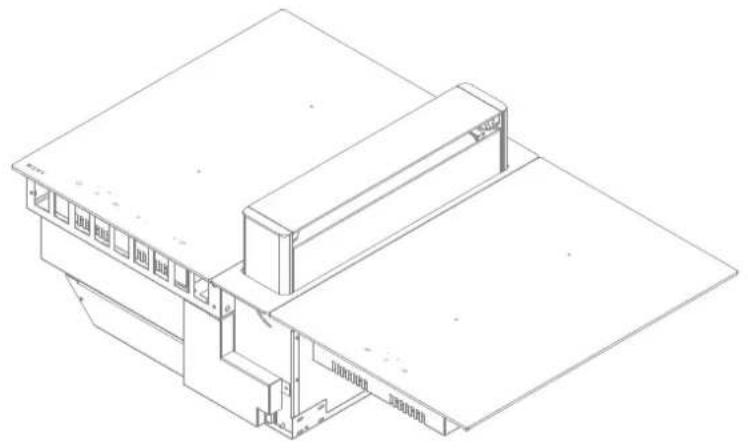
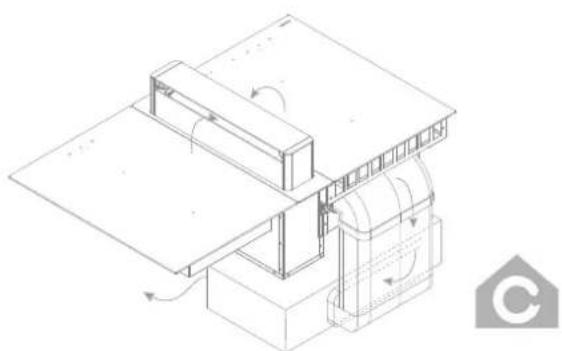
The device is an induction cooking plate with integrated worktop extraction. The induction hob has 4 cooking zones with an integrated ventilation tower located at the back of the hob for the removal of cooking fumes. The hob and cooker hood can be operated separately. You will find an explanation of the operation of the device further in this manual.
3.1 Technical specifications of the induction hob
| Type Power Comfort | ||
| Total power 7400 W 7400 W Energy consumption of the EChob cooking plate** | 178 Wh/kg | |
| Cooking zone in front left 240x200 mm Minimal detection Ø 90 mm Ø 90 mm Nominal power* 1600 W 1400 W Extra Power* 1850 W Super Power* Standardised category of cookware** Energy consumption ECcw** 177.6 Wh/kg 210 Wh/kg mm | ||
| cooking zone at the back left 240x200 mm Ø 210 mm Minimum detection Ø 100 mm Ø 100 mm Nominal power* 2100 W 2300 W Extra Power* 3200 W 3000 W Super Power* Standardised category of cookware** Energy consumption ECcw** | ||
| Type Teppanyaki Wok | ||
| Cooking zone at the back right Minimal detection - Nominal power* 1400 W 2000 W Extra Power* 2500 W Super Power* Standardised category of cookware** Energy consumption ECcw** | Ø 145 mm | Ø 314 mm |
| 3200 W | ||
| cooking zone in front right Minimal detection - Nominal power* 1400 W Extra Power* Super Power* Standardised category of cookware** Energy consumption ECcw** | Ø 145 mm | |
- the power transfer may vary, dependent on the sizes and the materials of the cooking pans ** calculated following the methods for measuring the performance (EN 60350-2)
3.2 Principle of induction
There is an induction coil under each cooking zone. When this is on, it produces a variable electromagnetic field that produces an induction current in the bottom of the cooking pan. This results in the warming up of the cooking pan on the cooking zone.
Of course, suitable cooking pans are required for this:
- Recommended cooking pans include those with a magnetic base (you can check this using a magnet): a cast iron kettle, black iron pan, enamelled metal cooking pans, stainless steel pans with magnetic base, etc.
- Unsuitable cooking pans include copper, stainless steel, aluminium, glass, wood, ceramics, pottery, stainless steel without magnetic base, etc.
The induction cooking zone immediately takes the size of the cooking pan into account. If the diameter is too small, the cooking pan will not work. The diameter varies in function of the diameter of the cooking zone. Should the cooking pan not be adjusted to the hob, the symbol will continue to flash.
3.3 Noise caused by induction
When using an induction hob, all kinds of noises may occur. These noises are dependent on the construction and the materials of the bottom of the cooking utensils.
Humming
This occurs when cooking at a higher power and this is caused by the amount of energy that is transferred from the hob to the cooking utensils. The noise disappears or becomes weaker when you set the hob to a lower setting.
Sputtering
This noise occurs when the utensils consist of layers of different materials. The noise is caused by vibrations in the areas where the different material layers touch each other.
Whistling
Such noises generally arise when cooking with utensils consisting of layers of different materials and when two adjacent cooking zones are used simultaneously at maximum power. The whistling noise disappears or becomes weaker when you set the hob to a lower setting.
Clicking
At lower power settings clicking noises may occur at electronic switches.
Buzzing
A buzzing sound may occur when the fan is switched on. This fan cools the electronics at intensive use of the hob. When the temperature is too high, the fan will keep running after the hob has been switched off.
3.4 Global overview
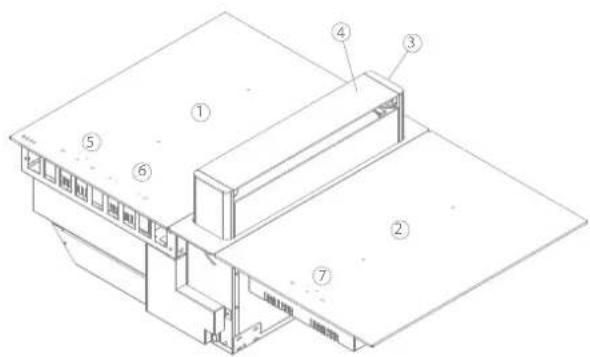
| 1 Induction hob left |
| 2 Induction hob right (40 002-8) |
| 3 Extraction tower |
| 4 Valve |
| 5 Controlling the cooking zones left |
| 6 Controlling the extractor |
| 7 Controlling the cooking zones right |
3.5 Hob types
| Links Rechts | |
| Induction hob Comfort Induction hob Comfort | |
| Induction hob Power Induction hob Power | |
| Teppanyaki | |
| Wok | |
4 INDUCTION HOB ONE POWER
4.1 Hob control panel
4.1.1 Control panel
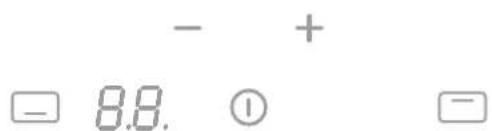
| Hob control | |
| Switch hob on/off | ① |
| Power level indication | 8. |
| Select cooking zone | □ |
| Increase power level | + |
| Reduce power level | - |
4.1.2 Switch on and off
| Switching the hob on and off: | |
| Switch on | |
| Press and hold for 2 seconds. Cooking zones display lights up. | |
| Switch off | |
| Press ①. Cooking zones display extinguishes. | |
| Switching a cooking zone on and off | |
| Set up | Display |
| Press the cooking zone selection button. | ▶○ |
| Switch off | |
| Press the cooking zone selection buttons and — simultaneously until the display shows 0 or H = “hot”. | ○ H |
If there is no control input within 20 seconds, the electronics will return in standby setting.
4.1.3 Pan detection
The cooking zone that has been switched on is only active when a cooking pan is detected by the pan detection system.
The induction hob does not work:
- If there is no pan on the cooking zone or if the pan is unsuitable for induction. In this case, it is impossible to put the power on and the symbol will flash on the display.
- The operation is suspended when the pan is removed from the cooking zone during cooking. The symbol will flash on the display. The symbol will disappear when the pan is placed back onto the cooking surface. The cooking will then continue at the same power level as selected previously.
Switch off the cooking zone after use.
4.1.4 Indication of residual heat
After the cooking zone or hob has been switched off completely, the hob glass will still be warm, which can be seen by H. The H symbol disappears when the cooking zone glass can be handled without danger.

WARNING: As long as the residual heat indication remains active, the cooking zone(s) must not be touched and no heat-sensitive items should be placed on the cooking zone. Risk of fire and burns.
4.1.5 Power function
Power function P boosts the power to the back cooking zone. If this function is activated, these cooking zones will be subjected to considerably higher power for 10 minutes.
The Power function is designed to quickly heat large quantities of water, for pasta for example.
| Switching Power on and off | |
| Switch on power | Display |
| Press the cooking zone selection button. | P |
| Press the [−] button and then the [+] button until P | |
| Switch off Power | 9-0 |
| Press on the [−] button | |
Management of maximum power:
If this power limit is exceeded when switching to a high selected cooking heat or switching the power setting on, the power management module reduces the cooking position of the relevant cooking zone. This cooking zone will first flash, and it is then automatically reduced to the maximum possible cooking heat
If simultaneous cooking is taking place on the 2 zones, the power of 3700W is divided between these 2 zones.
| Cooking zone in | cm | Power (W) |
| Front Ø 17,5 | Normal: 1400 | |
| Back Ø 21 | Normal: 2300 Power: 3000 |
| Power limit | Display |
| Selected cooking zone with Power function | P |
| Power limit activated | |
| [9] reduced to [8] and flashes | 8 |
4.1.6 Timer function
The timer function allows all cooking zones to be used simultaneously for different periods of time (0 to 99 minutes) for each zone.
| Timer function | |
| Setting or changing the cooking time | Display |
| Press the cooking zone selection button Press [-] and [+] at the same time. | 1-P |
| Select the timer | |
| Press [-] and [+] at the same time. | 00 |
| Reduce the time | 30-29... |
| Press [-] on the timer | |
| Increase the time | 01-02... |
| Press [+] on the timer | |
A point next to the power level display of the selected zone lights up to show the activation of the timer.
The time has been selected and the countdown has begun.
| Switch off the timer function | |
| Select the timer | Display |
| Press the cooking zone selection button Press [−] and [+] at the same time. | The lamp for that zone lights up |
| Stop the timer | |
| Keep pressing [−] on the timer until the timer displays 00 | 00 |
The timer can also be used as an independent cooking alarm without selecting a cooking zone. If the hob is to be switched off, the independent cooking timer will continue until the end of the set time.
| Using the timer without cooking | |
| Timer without cooking | Display |
| Switch on the hob | |
| Press ① for 2 seconds | |
| Select the time | |
| Press [−] and [+] simultaneously | 00 |
| Reduce the time | 30- |
| Press [−] on the timer | 29... |
| Increase the time | 01- |
| Press [+] on the timer | 02... |
The time has been selected and the countdown has begun.
Turn off automatically at the end of the cooking time:
As soon as the selected cooking time is complete, the display will flash 00, an audible sign will be heard, and the cooking zone will turn off. To stop the buzzer and flashing light, press a control button.
4.1.7 Locking the controller
To avoid a hob selection being changed, during cleaning for example, the controller must be locked (except the on/off button).
| Locking | |
| Lock | Display |
| 1. Switch on the hob using the ① button.2. Press the [−] and ② of the back zone simultaneously.3. Press the ③ button of the back zone again. | L |
| Unlock: | |
| 1. Switch on the hob using the ④ button.2. Press the [−] and ⑤ of the back zone simultaneously.3. Press the [−] button again. | O |
5 INDUCTION HOB ONE PRO
5.1 Control Panel extraction hood
5.1.1 Control panel
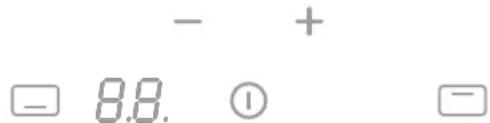
| Hob control | |
| On/off control key for the hob | ① |
| Power level indication | ② |
| Cooking zone selection | ③ |
| Increase power level | + |
| Reduce power level | - |
5.1.2 Switch on and off
| Switching the hob on and off: | |
| Switch on | |
| Press and continue to hold for 2 sec | |
| The LED will light up | |
| Switch off | |
| Press ① | |
| LED goes out | |
| Switching a cooking zone on and off: | |
| Set up | Display |
| Press the cooking zone selection button. | →○ |
| Switch off | |
| Press the cooking zone selection buttons and — simultaneously until the display shows or H = “hot”. | ○H |
If there is no control input within 20 seconds, the electronics will return in standby setting.
5.1.3 Pan detection
This hob is equipped with an interactive control system that makes using the hob even easier.
When you place a pan on the hob, it is automatically detected. You will also see a to show you which slider to use for the zone in question. The pan detection ensures optimum safety.
The induction hob does not work:
- If there is no pan on the cooking zone or if the pan is unsuitable for induction. In this case, it is impossible to put the power on and the U symbol will flash on the display.
- The operation is suspended when the pan is removed from the cooking zone during cooking. The U symbol will flash
on the display. The symbol will disappear when the pan is placed back onto the cooking surface. The cooking will then continue at the same power level as selected previously.
Switch off the cooking zone after use. The pan detection will no longer be active.
5.1.4 Indication of residual heat
After the cooking zone or hob has been switched off completely, the hob glass will still be warm, which can be seen by H. The H symbol disappears when the cooking zone glass can be handled without danger.

WARNING: As long as the residual heat indication remains active, the cooking zone(s) must not be touched and no heat-sensitive items should be placed on the cooking zone. Risk of fire and burns.
5.1.5 Power function and Super Power function
The Power function P increases the power rating of the selected cooking zone. If this function is activated, these cooking zones will be subjected to considerably higher power for 10 minutes. The Power function is designed to quickly heat large quantities of water, for pasta for example.
| Switching Power on and off: | |
| Switch on power | Display |
| Press the cooking zone selection button. | P |
| Press the [−] button and then the [+] button until P | |
| Switch off Power | 9-0 |
| Press on the [−] button | |
Management of maximum power:
If this power limit is exceeded when switching to a high selected cooking heat or switching the power function on, the power management module reduces the cooking position of the relevant cooking zone. This cooking zone will first flash, and it is then automatically reduced to the maximum possible cooking heat
The maximum individual power for each zone is 3700 W.
| Cooking zone in | cm | Power (W) |
| Front 24 x 20 | Normal: 1600 Power: 1850 | |
| Back 24 x 20 | Normal: 2100 Power: 3000 |
| Power limit | Display |
| Selected cooking zone with Power function | P |
| Power limit activated | |
| [9] reduced to [8] and flashes | B |
5.1.6 Timer function
The timer function allows all cooking zones to be used simultaneously for different periods of time (0 to 99 minutes).
| Timer function | |
| Setting or changing the cooking time | Display |
| Press the cooking zone selection button Press [-] and [+] at the same time. | 1-P |
| Select the timer | |
| Press [-] and [+] at the same time. | 00 |
| Reduce the time | 30-29... |
| Press [-] on the timer | |
| Increase the time | 01-02... |
| Press [+] on the timer | |
A dot next to the indication of the power setting of the selected zone lights up to activate the timer. The time is selected and the countdown begins.
| Switch off the timer function | |
| Select the timer | Display |
| Press the cooking zone selection button Press [−] and [+] at the same time. | Dot is on |
| Stop the timer | |
| Keep pressing [−] on the timer until the timer displays 00, or set the power of the cooking zone to 0 | 00 |
The timer can also be used as an independent cooking alarm without selecting a cooking zone. If the hob is to be switched off, the independent cooking timer will continue until the end of the set time.
| Using the timer without cooking: | |
| Timer without cooking | Display |
| Switch on the hob. Press 2 sec. on ① | |
| Select the timer | 00 |
| Press [−] and [+] simultaneously on the timer | |
| Reduce the time | 30-29... |
| Press [−] on the timer | |
| Increase the time | 01-02... |
| Press [+] on the timer | |
After a few seconds the LED no longer flashes [min]. The time has been selected and the countdown has begun.
Turn off automatically at the end of the cooking time:
As soon as the selected cooking time is up, the display will flash 00, an audible sign will be heard, and the cooking zone will turn off. To stop the audible signal and the flashing light, press [-] or [+] on the timer.
5.1.7 Manual Bridge function
This function allows you to link the 2 left and 2 right zones so they operate as 2 large zones. This function can only be activated manually when a large pot/pan is placed on the cooking surface.
| Bridge function | |
| Manual activation | Display |
| Simultaneously press on both cooking zone selection buttons + of both zones to be linked. | 0 ∩ |
| Increase the power | 0-9 |
| Press the [+] or [-] button | |
| Switch bridge function off | 0 |
| Simultaneously press on both cooking zone selection buttons + of both linked zones. | |
5.1.8 Locking the controller
To avoid a hob selection being changed, during cleaning for example, the controller must be locked (except the on/off button).
| Locking | |
| Lock | Display |
| 1. Switch on the hob using the ① button. | |
| 2. Press the [−] and ② of the back zone simultaneously. | L |
| 3. Press the ③ button of the back zone again. | |
| Unlock: | |
| 1. Switch on the hob using the ④ button. | |
| 2. Press the [−] and ⑤ of the back zone simultaneously. | O |
| 3. Press the [−] button again. | |
6.1 Extractor hood control panel

| Extraction control | |
| Switch on/lift | ∞ |
| Decrease extraction speed | - |
| Extraction speed indication | . . . . |
| Increase extraction speed | + |
| Cleaning indication for recirculation filter (optional) | [+] |
6.2 User modes
This device can be used in the exhaust or recirculation mode (standard setting upon delivery)
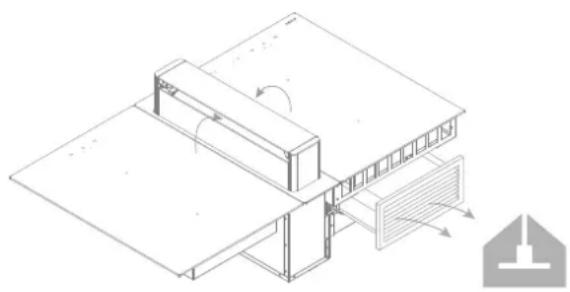
6.2.1 Exhaust mode
The air sucked in is first cleaned by the grease filters before being removed to the outside. This can be achieved by making use of a series of channels connected between the device and a wall exhaust cover.
To set the device in exhaust mode, press and hold the key combination [+ and [-] for 3 seconds when the extraction tower is closed.
The 3^rd green LED indication for recirculation filter will blink 5x.
6.2.2 Recirculation mode
The air sucked in is first cleaned by the grease filters. The scents are then removed in the recirculation filter before re-entering the kitchen.
To set the device in recirculation mode (default setting), press and hold the key combination ([+] and ([-]) for 3 seconds when the extraction tower is closed. The red LED will blink (5x).
i INFO: Provide adequate ventilation in the kitchen for optimal efficiency of the recirculation system.
6.3 Switch on and off and run-out function
| Extraction tower | |
| Switch on | Display |
| Press | LED lights up |
| or turn on valve. | |
| or press the extraction tower upwards. | |
| Switch on run-out function | 1st LED blinks |
| Press | |
| Switch off | LED off |
| Press | |
| or close the valve. | |
| or press the extraction tower downwards. | |
Run-out function: This function starts at the end of cooking. For a fixed time, the remaining cooking vapours will be extracted from the kitchen by the extraction tower at low extraction mode. When recirculation is selected, the filters are also dried.
The run-out time is set to 30 minutes by default in the recirculation mode and 10 minutes in exhaust mode. It is recommended to carry out this function completely. At the end of the run-out time, the motor and the extraction tower will automatically switch off.
6.4 Increase and decrease the power level
The extraction tower can be set to 3 levels + power, indicated via the 4 LEDs with increasing intensity per level.
Activate a higher power level if strong odours or vapours are present. The extraction tower then works at a higher flow rate.
| Adjusting the power level: | |
| Increase the power | Brighter LED(s) |
| Press [+] | |
| Decrease the power | LED(s) dim |
| Press [-] | |
6.5 Low extraction position
The extraction can be started by tilting the valve on the extraction tower.
The extraction speed can be set by the [+] and [-] button on the hood touch control.
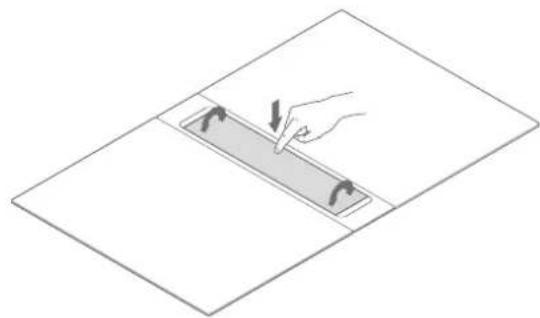
| Low extraction position |
| Switch on |
| Turn valve towards the desired position |
| Switch off |
| Close valve |
6.6 High extraction position
The extraction can be started by pressing the valve of the extraction tower.
The tower automatically moves to a position of 10cm
The extraction speed can be set by the [+] and [-] button on the hood touch control
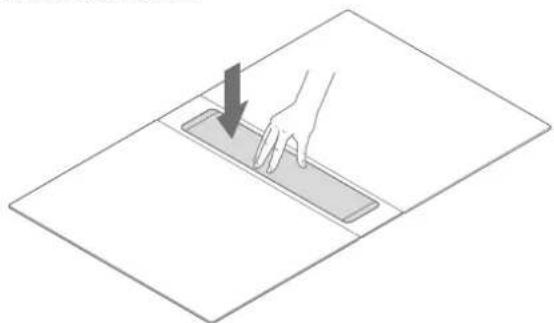
| High extraction position |
| Switch on |
| Press the extraction tower upwards |
| Switch off |
| Press the extraction tower downwards |
6.7 Auto-stop
In order to ensure the extraction does not keep running, the motor switches off automatically after 3 hours (if the controller has not been changed during these 3 hours).
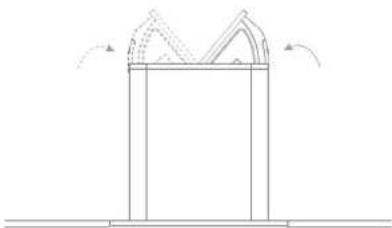
6.8 Concentration of the ventilation
When cooking only on one side of the cooking plate, you can concentrate the extraction of fumes on this side. Using the switch you can concentrate the extraction of fumes on the left or on the right side. This even further increases the efficiency of the unit.
7 CLEANING INDICATIONS
7.1 Cleaning indication for grease filter

Indication: 4 LEDs lights are blinking
After 20 cooking hours, the 4 LEDs on the hood touch control are blinking.

Follow the cleaning instructions as described in the chapter 'Cleaning'.
After having cleaned and replaced the grease filters, reset the cleaning indication.
Reset: press the control key for 3 seconds.
7.2 Replacement indicator monoblock filter (only with recirculation)

Indication: red LED blinks
After a fixed time, the red LED on the hood touch will start to blink. This indicates that the recirculation filter needs to be replaced.

Follow the cleaning instructions described in the recirculation box / filter manual.
A new monoblock filter can be obtained from a speciaist dealer or from the Novy website.
After replacing the recirculation filter, reset the cleaning indication. Reset: press the control key for 3 seconds.
8 COOKING ADVICE
Quality of the pots and pans
Suitable cookware, pots and pans include: steel, enamelled steel, cast iron, stainless steel with magnetic base, aluminium with magnetic base (100 mm). Unsuitable pans include: aluminium and stainless steel without magnetic base, copper, brass, ceramics, porcelain. The manufacturers will state whether their products are suitable for induction.
In order to ensure your pans are suitable:
- Pour a little water in a pan and place it on an induction cooking zone set to 9. The water should be hot within a few seconds.
- Hold a magnet to the base of the pan. The magnet should stick.
Some cooking pots hum when they are placed on an induction cooking zone. This does not mean the device is faulty, and it will not affect operation. This noise decreases when you adjust the power.
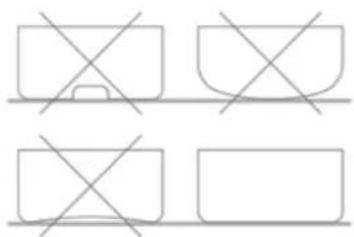

Lift the pans up when you want to move them to avoid stains and scratches.
- As often as possible, prepare meals with the pan lid on.
Dimensions of the cooking pans
The cooking zones can (to a certain extent) automatically adapt to the diameter of the pan. The base of the pan must have a minimum diameter for working with the selected cooking zone. Place the pan in the middle of the cooking zone in order to optimise the energy transfer. If the diameter of the pan is much larger than the zone, this will not result in an optimal cooking result.
Only the surface of the pan above the induction coil will then generate the heat. The rest of the surface that is not above the induction coil will receive heat via conduction through the pan surface.
Therefore, if the pan is much larger than the cooking zone, it is advised to set the cooking zone to a slightly lower level setting to allow the heat to be divided up more evenly.
Examples of power control
(The values indicated below are only indicative)
| Application Display | |
| Melting Warming up | - Saues, butter, chocolate, gelatine 1-2 - Pre-prepared meals |
| Rising Defrosting | - Rice pudding and pre- prepared meals - Vegetables, fish, frozen products |
| Steaming - Vegetables, fish, meat | 3-4 |
| Water - Boiled potatoes, soups, pasta | 4-5 |
| - Fresh vegetables | |
| Simmering - Meat, liver, eggs, grilled sausages - Goulash, rolled meat, black/white pudding | 6-7 |
| Cooking Roasting | - Potatoes, fritters, flat biscuits 7-8 |
| Roasting Bringing to cooking temperature | - Steaks, omelettes - water |
| Cooking - Bringing large quantities of water to the boil | P |
9 CLEANING AND MAINTENANCE

Follow all instructions described in the 'Safety' chapter

Before cleaning, check the cooking plate has been fully switched off and the glass above the cooking zones has cooled down.

Follow the cleaning instructions below for a long life and optimum functioning of the device.
9.1 Maintenance of the hob

First let the device cool down, otherwise there is a risk of burns.

Never use "steam" or "pressure" equipment.

Never use objects that could damage the vitro-ceramic glass such as an abrasive sponge, abrasive cleaning liquid or aggressive cleaning agents.
Clean the glass of the cooking plate
Wipe the surface clean with some washing-up liquid on a damp cloth or sponge (it is best to do this after every use), then dry the hob by rubbing with a dry cloth or with kitchen paper. Always make sure that all cloths used are clean in order to avoid scratching the surface.
In case of stubborn stains
Heavy contamination and stains (limescale stains, pearl-like shiny spots) are best removed while the hob is still warm. For this apply common cleaning agents and cleaning methods. If this does not work well enough, you can use a specific cleaning product for cleaning vitro-ceramic glass (for example, Vitroclen)
Boiled-over food should first be soaked with a wet cloth; the contamination residues should then be removed with a glass scraper that is specially designed for ceramic hobs. After this, clean the hob as described under "Cleaning glass hob".
Burnt-on sugar and melted plastics are best removed immediately - while still hot - with a glass scraper. After this, clean the hob as described under "Cleaning glass hob". Grains of dirt/sand may fall on the cooking plate while peeling potatoes or washing vegetables and may cause scratches when moving the pans. Therefore, ensure there are no grains left on the surface.
Discolouration of the hob does not have any influence on the operation or strength of the vitro-ceramic. It is not a form of damage to the hob, but it is a result of residues that have not been removed and have therefore burnt-in.
Shiny spots occur as a result of wear caused by the base of the pans, in particular when using cooking pans with an aluminium bottom or when using the wrong cleaning agents. These can only be removed with great difficulty using common cleaning agents. If necessary, repeat the cleaning several times.
Due to the use of aggressive cleaning agents and scratching caused by the pan bases, the glass surface is rubbed off over the course of time, leaving dark stains.
Do not use the cooking plate as a table top or for putting utensils on.
Always lift up the pans/pots and do not slide them along the glass plate.
9.2 Removing and replacing the extraction tower and emptying the reservoir
If liquid has entered the intake opening, it will be
Collected in the fixed watertank (capacity of 150ml).
- Remove the extraction tower from the lift system.
- Clean/remove the contents in the fixed watertank
- Replace the extraction tower in the lift system.
9.3 Cleaning the grease filters and the ventilation tower glass
After 20 hours of cooking, the 4 LEDs on the hood touch control will start to blink.
The grease filter is located in the extraction tower, the entire tower can be cleaned in the dishwasher together with the grease filter.
The grease filter can also be removed separately from the extraction tower for cleaning, follow the steps below.
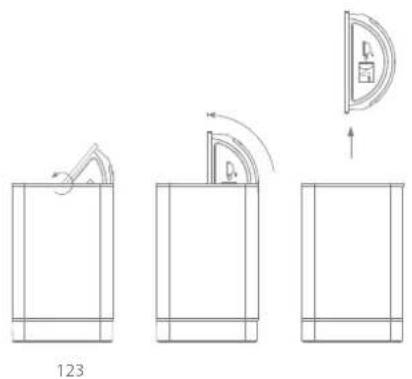
The filter can be cleaned as follows:
In the dishwasher

INFO: Clean the grease filters using a standard dishwashing programme at low temperature.
By hand: Immerse the filter in a mixture of boiling water and grease-cutting dishwashing liquid. Use warm water to rinse the filter under the tap, then leave it to dry.
- Clean the extraction tower with a damp cloth with, if necessary, a pH-neutral detergent

WARNING: If the instructions described above are not followed, residue in the filter may cause a fire.
After cleaning:
- Replace the filter in the extraction tower
- Replace the tilting cover in the extraction tower.
- Replace the extraction tower in the lift system.
- Press the control key [D] for 3 seconds.
10 TROUBLESHOOTING MINOR FAULTS
10.1 Messages on the hob
| Code | |
| U | - There is no cooking pan on the cooking zone. - The cooking pan is not suitable for induction. - The diameter of the bottom of the cooking pan is too small when compared to the cooking zone. |
| E | - The electronic system is disrupted. - Disconnect and reconnect the hob. - Call the after-sales service. |
| E2 | The hob has overheated, leave to cool, then switch back on. |
| E8 | The fan air supply is blocked. Unblock it. |
If one of these error messages remains visible, you can contact the after-sales service.
The hob or the cooking zone does not work:
- The hob has been poorly connected to the electrical power supply.
- The safety fuse has blown.
- Check the locking key has been enabled.
- The touch control keys have been splashed with water or fat.
- There is an object on the touch control keys.
A single zone or all zones are not working:
- The safety device has been operated.
- This shall engage when a cooking zone has been left on unintentionally.
- The safety shall also engage when one or more touch control keys are covered.
- A pan is empty and the base has overheated.
- The hob also has an automatic power reducer and automatic shut-down in the event of overheating.
The fan continues to operate after the hob has switched off:
- This is not a defect, the fan is protecting the electronic equipment.
- The fan will stop automatically.
The automatic cooking controller does not seem to be working:
- The cooking zone is still warm [] .
- The maximum cooking level has been selected [9].
- The cooking level was selected using the control key [-] .
10.2 The cooker hood does not extract well. What can be the cause of this problem?
- Check the grease filter. Follow the cleaning indication. On average, the filter must be cleaned every two weeks to ensure the extraction works correctly.
- Check the air supply in the house. As soon as the cooker hood is switched on, make sure that air is supplied by opening the grates in the windows or by opening a window.
- Check the duct for blockages or constrictions which prevent proper extraction of the air.
10.3 Miscellaneous
Fault: In the event of a fault, please do not hesitate to contact our Repair Service:
Belgium: Tel.: +32 (0)56 36 51 02
France: Tel.: +33 (0)3 20 94 06 62
Germany: Tel.: +49 (0)511.54.20.771
The Netherlands: Tel.: +31088-0119110
Spain: Tel.: +34 938 700 895
Italy: Tel.: +39 039.20.57.501
For all other countries, contact your local Novy installation engineer in Belgium: Tel.: +32 (0)56/36.51.02
For a proper and prompt handling the Repair Service needs to know the type of your device. This information can be found on the type plate on the inner frame of the extraction unit.
Stick the provided sticker with the type plate and serial number here.
OVERVIEW OF THE FUNCTIONS NOVY UP
Controlling the extractor
222
High extraction mode/ Run-out function
一
Decrease extraction speed
+
Increase extraction speed
*
Extraction indication
Cleaning indication for recirculation filter (optional)
Hob control
①
On/off control key for the hob

Power level indication

cooking zone selection

Increase power level

Reduce power level
Switch hob on/off
Press and hold for 2 seconds.
Cooking zones display lights up.
Press Cooking zones display extinguishes.
Switching a cooking zone on and off
Press the cooking zone selection button
Press the cooking zone selection button and [-]
simultaneously until the display shows 0 or H = "Hot".
Switching Power on and off
IN - Press cooking zone selection button

Press the [-] button and then the [+] button until P .
OFF - Press the [-] button.
Power limit
Selected cooking zone with Power function [P].
Power limit activated
[9] is reduced to [8] and flashes [8].
Locking the controller
- Switch on the hob using the ① button.
- Press the [-] and button of the back zone simultaneously.
- Press the button of the back zone again.
Unlocking the controls
- Switch on the hob using the ① button.
- Press the [-] and button of the back zone simultaneously.
- Press the [-] button again.
Timer function
Press [-] and [+] at the same time.
Reduce the time
Press [-]
Increase the time
Press [+]
Switch off the timer function
Press the cooking zone selection button

Press [+ and [-] at the same time.
Stop the timer
Press [-] until timer is set to 00.
Using the timer without cooking
Switch on the hob.
Press ① for 2 seconds.
Select the timer
Press [-] and [+] at the same time.
Reduce the time
Press [-] on the timer.
Increase the time
Press [+ ] of the timer.
Operate bridge function manually
ON - Simultaneously press the 2 cooking zone selection buttons

OFF - Simultaneously press the 2 activated cooking zone selection
buttons
Extractor hood - Switch on
Press
or turn valve.
or press the extraction tower upwards.
Extraction hood - Run-out function/Switch off
SWITCH ON: Press
SWITCH OFF: Press again.
Hood - Switch off
Press
or close the valve.
or press the extraction tower downwards.
NOVY nv reserves the right to change the construction and prices of its products at all times and without notice.