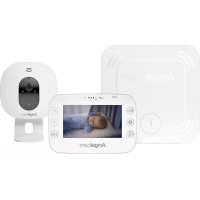
AC423D - Baby monitors ANGELCARE - Free user manual and instructions
Find the device manual for free AC423D ANGELCARE in PDF.
| Product Type | Baby monitor with audio transmission and additional features |
| Brand | Angelcare |
| Model | AC423D |
| Power Supply - Parent Unit | 3 AAA NiMH rechargeable batteries (600 mAh) included + 7.5 V DC power adapter |
| Power Supply - Baby Unit | 4 AAA alkaline batteries (not included) + 7.5 V DC power adapter |
| Range | Up to 250 meters in open field |
| Number of Channels | 8 channels (C1 to C8) |
| Transmission Frequency | 864 MHz |
| Out of Range Function | Audible alarm and flashing icon when connection is lost |
| Nightlight | Integrated in baby unit, activation via button |
| Temporary Mute Mode | Sound off for 2 minutes, automatic reactivation |
| Temperature Display | Displays room temperature of baby's room (in °C) |
| Channel Selection | Manual via buttons on both units |
| Microphone Sensitivity Adjustment | Rotary knob on the back of the baby unit |
| Temperature Unit | Degrees Celsius (factory setting) |
| Minimum Safety Distance | 1 meter between baby unit and baby's crib |
| Cleaning | Unplug before cleaning; use a dry cloth, do not immerse |
| Operating Temperature | 10 °C to 40 °C |
| Rechargeable Batteries Included | 3 AAA NiMH (600 mAh) batteries for the parent unit |
| Power Adapters Included | 2 AC adapters (model T07505F002 for Germany) |
| Certifications | RED 2014/53/EU, ÖKO-TEST (sehr gut), Ktipp Testsieger |
Frequently Asked Questions - AC423D ANGELCARE
User questions about AC423D ANGELCARE
0 question about this device. Answer the ones you know or ask your own.
Ask a new question about this device
Download the instructions for your Baby monitors in PDF format for free! Find your manual AC423D - ANGELCARE and take your electronic device back in hand. On this page are published all the documents necessary for the use of your device. AC423D by ANGELCARE.
USER MANUAL AC423D ANGELCARE
natural_image
Two Angelcare medical devices with digital displays and control buttons, one displaying a circular dial indicator (no readable text or symbols on device body)natural_image
Illustration of a baby with a stethoscope crossed out, enclosed in a circle with a camera and no text or symbols.text_image
Safety warning symbol for child protection using a camera and no signnatural_image
Line drawing of a baby lying in a metal crib (no text or symbols)
WICHTIG!
natural_image
Simple line drawing of a table with a lamp and a hanging object connected by a dashed line (no text or symbols)natural_image
Simple line drawing of a device with a bulb and cable, no text or symbols present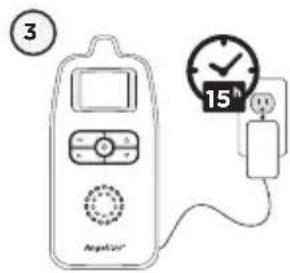
text_image
3 15h NepA201text_image
G H I 7.5xAnsicht Rückseite
text_image
Diagram showing battery charging process with labeled components and battery stack arrangement
text_image
2 1 m 3natural_image
Diagram of a car's side profile showing front, rear, and side views with an arrow indicating direction (no text or symbols)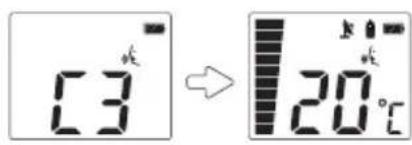
text_image
C3 → 20℃
natural_image
Line drawing of a simple electrocardiogram device connected to a power plug (no text or symbols)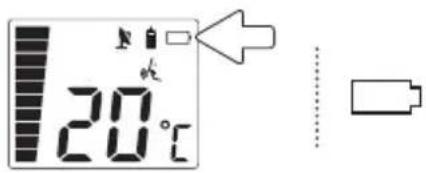
text_image
20°CALARM NIEDRIGER BATTERIESTATUS AM EMPFÄNGER
NUN KÖNNEN SIE IHR Babyphone AC423-D VERWENDEN
natural_image
Simple line drawing of a symmetrical object resembling a stylized face or mask, with no text or symbols present.text_image
Diagram illustrating a lighting switch mechanism with labeled components and directional arrow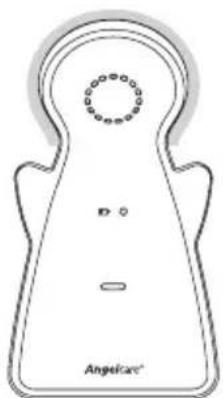
natural_image
Line drawing of a stylized symmetrical object with circular top and base, labeled 'Angelicae' at bottom (no other text or symbols)natural_image
Two Angelcare medical devices with digital displays and control buttons, one displaying a circular dial indicator (no readable text or symbols on device body)DE
2
FR
23
EN
43
text_image
Safety warning symbol for child using a camera and no plug, indicating no protection or disinfection.text_image
Safety warning symbol for child using a camera and no phone, indicating no protection or disinfection.natural_image
Line drawing of a sleeping baby in a metal crib (no text or symbols)
natural_image
Simple line drawing of a table with a lamp and a hanging object connected by a dashed line (no text or symbols)ETAPE 1 - CHARGE DE L'UNITÉ DES PARENTS (15 HEURES)
text_image
1 AAA 12V - AAA 12V - AAA 12V -AVERTISSEMENT
natural_image
Simple line drawing of a device with a bulb and cable, no text or symbols present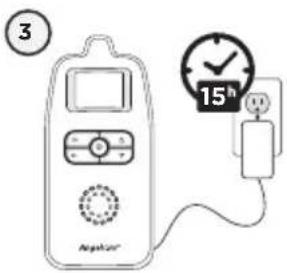
text_image
③ AteKan 15htext_image
G H I 7.50 mmFace arrière
text_image
Diagram showing a device with a screwdriver and battery pack, alongside its internal component layout.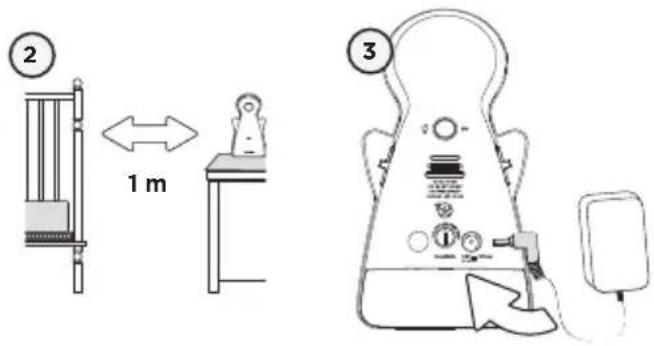
text_image
2 1 m 3flowchart
graph LR
    A[" "] --> B[" "]
    B --> C[" "]
    style A fill:#fff,stroke:#000
    style B fill:#fff,stroke:#000
    style C fill:#fff,stroke:#000
COMMENT CHARGER LES PILES RECHARGEABLES DANS L'UNITÉ DES PARENTS :
natural_image
Line drawing of a simple electronic device with a screen, rotary knob, and plug (no text or symbols)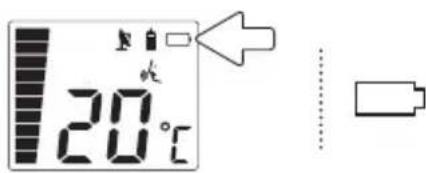
text_image
20°CALARME DE PILES FAIBLES DE L'UNITÉ DES PARENTS
text_image
Diagram illustrating a lighting experiment with labeled components including a light source, switch, and detector setup.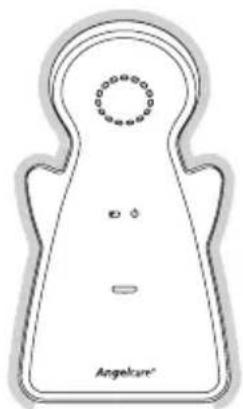
natural_image
Simple line drawing of a symmetrical shape with a circular top and two small dots, labeled 'Angelcare' at the bottom (no other text or symbols)natural_image
Line drawing of a symmetrical abstract shape with concentric circles and a small horizontal bar, labeled 'Angelicae' at the bottom (no other text or symbols)AUCUN SON N'EST TRANSMIS
Sound Monitor AC423-D
Instruction manual
ÖKO-TEST
Angelcare
Babyphon AC423-D
sehr gut
ÖKO-TEST-Magazin 07/2017
Ktipp
Testsieger
natural_image
Two Angelcare medical devices with digital displays and control buttons, one displaying a circular dial indicator (no readable text or symbols on device body)DE
2
FR
23
EN
43
This owner's manual applies to the German model of the Angelcare ^® Sound Monitor AC423-D. Beyond the narrow limits of copyright law, any use of this owner's manual, and particularly any duplication hereof, without the consent of Funny Handel GmbH & Co. KG, is prohibited and subject to prosecution.
TABLE OF CONTENT
Warnings....45
AC423-D SETUP REQUIREMENTS....49
STEP 1 - Charge Parent Unit ....50
STEP 2 - Setup Nursery Unit....51
STEP 3 - Turn on your Monitor....52
STEP 4 - Test and get to know your Monitor....53
STEP 5 - Activate and deactivate additional functions ....56
Troubleshooting 58
Technical Customer Service / Contact 60
Technical specifications....60
GERMAN 2
FRENCH 23
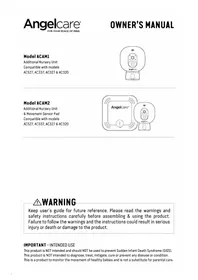
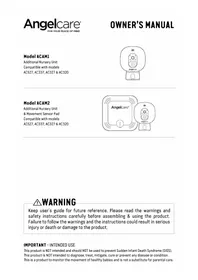
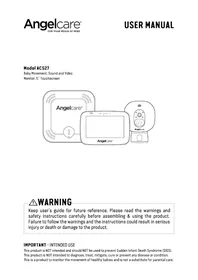
OWNER'S MANUAL
KEEP YOUR OWNER'S MANUAL FOR FUTURE REFERENCE.
PLEASE READ THE WARNINGS AND INSTRUCTIONS CAREFULLY BEFORE ASSEMBLING & USING THE PRODUCT.
FAILURE TO FOLLOW THE WARNINGS AND THE INSTRUCTIONS COULD RESULT IN SERIOUS INJURY OR DEATH OR DAMAGES TO THE PRODUCT.

WARNING
Adult assembly required.
Keep small parts away from children when assembling.
WARNING
-
THIS PRODUCT CANNOT REPLACE RESPONSIBLE ADULT SUPERVISION. This product is designed to aid in the monitoring of your child. When using the monitor, you must still provide the supervision necessary for the continued safety of your child.
-
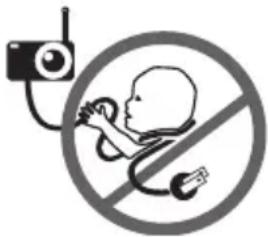
STRANGULATION HAZARD. Children have been STRANGLED in cords. Keep the
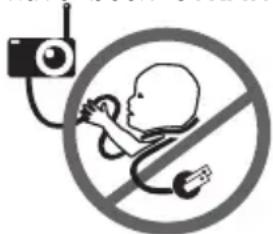
text_image
Safety warning symbol for child using a stethoscope and radio, with no text presentAdapter cords out of the reach of children. Because of the serious strangulation risk to infants and toddlers, parents and caregivers should never place the
Nursery Unit within 1 meter of a crib.
- NEVER use extension cords with AC Adapters. ONLY use the AC Adapters provided.
- When an AC Adapter is plugged into an electrical outlet, DO NOT touch the exposed end.
- ALWAYS be sure that both the transmitter and receiver are working properly and are within range of each other. Test monitor before first use, periodically and when changing location of the Nursery Unit.
- ALWAYS be sure to immediately check on baby whenever an alarm sounds.
- DO NOT use monitor near water (such as bath tub, sink, etc.).

text_image
CAUTION RISK OF ELECTRIC SHOCK DO NOT OPEN DO NOT EXPOSE TO RAIN OR MOISTURE-
Keep monitor AWAY from heat sources (such as stoves, radiators, etc.).
-
ALWAYS place both the Nursery Unit and Parent Unit on a flat surface in an upright position and allow for proper ventilation. DO NOT place on sofas, cushions, beds, etc. which may block ventilation.
- This monitor uses public airwaves to transmit signals. The Parent Unit may pick up signals or interference from other nursery monitors in your area. Your monitor may even be picked up by other households. To protect your privacy, make sure both units are turned OFF when not in use. If you experience interference, change the channel on both units.
- This product is NOT a toy. DO NOT allow children to play with it.
- This product contains small parts. Adult assembly required. Exercise care when unpacking and assembling the product and keep small parts away from children.
- Use and store the monitor at a temperature between 50^ F ( 10^ C) and 104^ F ( 40^ C).
BATTERY WARNING
- Use ONLY AAA RECHARGEABLE batteries for the Parent Unit. DO NOT mix old and new batteries. DO NOT mix alkaline, standard or rechargeable batteries. Insert batteries with correct polarity. DO NOT short-circuit supply terminals. ONLY use the recommended batteries or equivalent (volts and size) and the correct adapter. Remove batteries when product is stored for long periods of time or when batteries are exhausted. Dispose exhausted batteries properly. DO NOT recharge non-rechargeable batteries. Rechargeable batteries are ONLY to be charged under adult supervision. Keep all batteries away from children.
IMPORTANT SAFETY INSTRUCTIONS
15.1 Read these instructions - All the safety instructions should be read before the product is operated.
15.2 Keep these instructions. The safety and operating instructions should be retained for future reference.
15.3 Heed all warnings - All warnings on the product and in the operating instructions should be adhered to.
15.4 Follow all instructions - All operating and use instructions should be followed.
15.5 Water and moisture - DO NOT use this apparatus near water. For example, near a bath tub, wash bowl, kitchen sink, laundry tub, in a wet environment or near a swimming pool and the like. Care should be taken so that objects DO NOT fall onto units and that liquids are not spilled into unit through its openings.
15.6 Cleaning - Disconnect all units before cleaning. DO NOT immerse in water any part of the Nursery Unit, Parent Unit. Clean only with dry cloth. DO NOT spray with cleaning products or solvents.
15.7 Ventilation - DO NOT block any ventilation openings. Allow for proper ventilation when units are in use. DO NOT cover the Nursery Unit or Parent Unit with any object such as a blanket. DO NOT place it in a drawer or in any location which would muffle the sound or interfere with the normal flow of air.
15.8 Heat sources - DO NOT install near any heat sources such as radiators, heat registers, stoves, TVs or other apparatus (including amplifiers) that produce heat. Heat can damage the case or electrical parts.
15.9 Power cord protection - Protect the Adapter's power cord from being walked on or pinched by furniture or other items - Power supply cords should be routed so that they are not likely to be walked on or pinched by items upon or against them, paying particular attention to cords and plugs, convenience receptacle, and the point where they exit from the product.
15.10 Accessories - Only use attachments/accessories specified by the manufacturer. DO NOT place this product on an unstable cart, stand, tripod, bracket or table. The product may fall, causing serious injury to a child or adult and serious damage to the product. Use ONLY with a cart, stand, tripod, bracket or table recommended by the manufacturer or sold with the product. Any mounting of the product should follow the manufacturer's instructions.
15.11 Unplug this appliance during lightning storms or when not used for long periods of time.
15.12 Servicing - DO NOT attempt to service this product yourself as opening or removing covers (except battery doors) may expose you to dangerous voltage or other hazards.
15.13 Replacement parts - When replacement parts are required, be sure the replacement parts specified by the manufacturer have the same characteristic as the original part. Unauthorized substitution may result in fire, electric shock or other hazards.
15.14 Usage - This baby monitor is intended as an aid. It is NOT a substitute for responsible and proper adult supervision and should not be used as such. Use this appliance ONLY for its intended use as described in this manual.
15.15 Power Sources - Operate this product only from the type of power source indicated on the type plate of the adaptor. If you are unsure of the type of power supply to your home, consult your dealer or local power company.
15.16 Overloading - DO NOT overload wall outlets, extension cords or integral convenience receptacles as this can result in a risk of fire or electric shock.
15.17 Object and Liquid Entry - NEVER push objects of any kind into this product through casing slots as they may touch dangerous voltage points or short out parts that could result in a risk of fire or electric shock. NEVER spill liquid of any kind on the product.
15.18 Antenna - The antenna used for this transmitter must be installed to provide a separation distance of at least 20 cm (7.9") from all persons and must not be collocated or operating in conjunction with any other antenna or transmitter.
15.19 Power Lines - An outside antenna system should NOT be located in the vicinity of overhead power lines or other electric light or power circuit, or where it can fall into such power lines or circuits as contact with them may be fatal.
15.20 STRANGULATION HAZARD. Children have been STRANGLED in cords. Keep the
text_image
Safety warning symbol for child using a camera and no phone, indicating no protection or disinfection.Adapter cords out of the reach of children. Because of the serious strangulation risk to infants and toddlers, parents and caregivers should NEVER place
the Nursery Unit within 1 meter of a crib.
15.21 NEVER use extension cords with AC Adapters. ONLY use the AC Adapters provided.
15.22 Interference - This monitor uses public airwaves to transmit signals. The Parent Unit may pick up signals or interference from other nursery monitors in your area. Your monitor may even be picked up by other households. To protect your privacy, make sure both units are turned OFF when not in use. If you experience interference, change the channel on both units.
IMPORTANT SAFETY INSTRUCTIONS RELATED TO USE OF BATTERIES
16.1 Use ONLY the type and size of batteries specified in the owner's manual. There is a risk of explosion if batteries are replaced with an incorrect type.
16.2 Use ONLY AAA rechargeable batteries and/or the AC Adapters provided for the Parent Unit. You must use only rechargeable batteries in the Parent Unit. DO NOT use alkaline batteries or you will severely damage the unit.
16.3 Charge the batteries for 15 hours prior to first use. Be sure to have the monitor in the OFF position during this period. ONLY use the AC Adapters included with your monitor.
16.4 DO NOT use these adapters with any other equipments.
16.5 When unplugging the AC Adapter from the Nursery Unit, be sure it is switched to the OFF position. If it isn't, the unit will revert to battery mode if batteries are installed.
16.6 DO NOT use rechargeable batteries in the Nursery Unit. Use alkaline batteries ONLY.
16.7 DO NOT dispose batteries in fire. They may explode. Check with local regulations for possible special disposal instructions.
16.8 Exercise care in handling batteries in order not to short out the batteries with conducting materials such as rings, bracelets and keys. Overcharging, short circuiting, reverse charging, mutilation, or incineration of batteries must be avoided to prevent one or more of the following occurrences: release of toxic materials, release of hydrogen and/or oxygen gas, rise in surface temperature.
16.9 DO NOT attempt to recharge batteries provided with or identified for use with this product that are not intended to be charged. The batteries may leak corrosive electrolyte or explode.
16.10 DO NOT attempt to rejuvenate the batteries provided with or identified for use with this product by heating them. Sudden release of battery electrolyte may occur, causing burns or irritation to eyes or skin.
16.11 If and when necessary, the batteries must be replaced with identical new ones or equivalent (volts and size). If a battery to be replaced is connected with other batteries in series, replace the other batteries at the same time as well. DO NOT mix old and new batteries.
16.12 Reverse polarity installation of the batteries in the end product must be avoided. Reverse insertion of batteries can cause charging, and that may result in leakage or explosion.
16.13 Remove batteries from this product if you store the product over 30 days because the batteries could leak and damage the product.
16.14 Discard 'dead' batteries as soon as possible since 'dead' batteries are more likely to leak in a product. If a battery has leaked
or vented, it should be replaced immediately using protective gloves.
16.15 DO NOT store this product, or the batteries provided with or identified for use with this product, in high-temperature areas.
SETUP REQUIREMENTS
SOUND MONITOR
Model AC423-D
INCLUDED:
Rechargeable Parent Unit
Nursery Unit
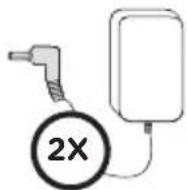
2 AC Adapters

3 AAA rechargeable batteries for Parent Unit
WHAT YOU WILL NEED (NOT INCLUDED):
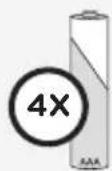
4 AAA Alkaline Batteries for Nursery Unit
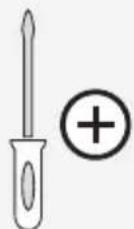
Miniature Philips
Screwdriver
BABY'S ROOM:
IMPORTANT
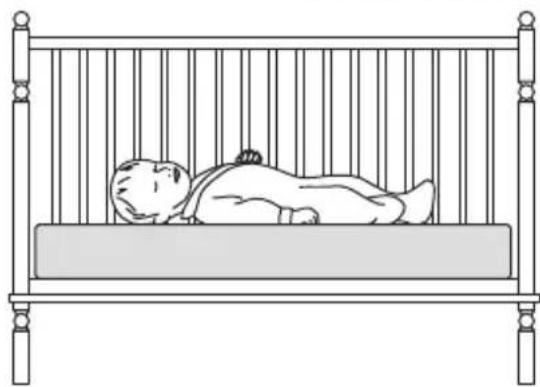
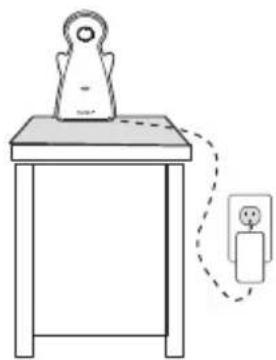
Install the Nursery Unit on a flat, stable surface facing the crib at a distance of at least 1 meter. Make sure to plug the adapter to the socket outlet nearest to the equipment and that is easily accessible.
natural_image
Line drawing of a sleeping baby in a metal crib (no text or symbols)
IMPORTANT
Keep at least 1 m apart
natural_image
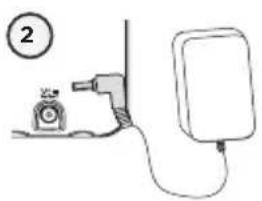
Simple line drawing of a table with a lamp and a hanging object connected by a dashed line (no text or symbols)STEP 1 - CHARGE PARENT UNIT (15 HOURS)

text_image
1 AAA 1.2V + AAA 1.2V - AAA 1.2V +WARNING:
Never use regular alkaline batteries in the Parent Unit; they may explode.
natural_image
Simple line drawing of a device with a bulb and cable, no text or symbols present
text_image
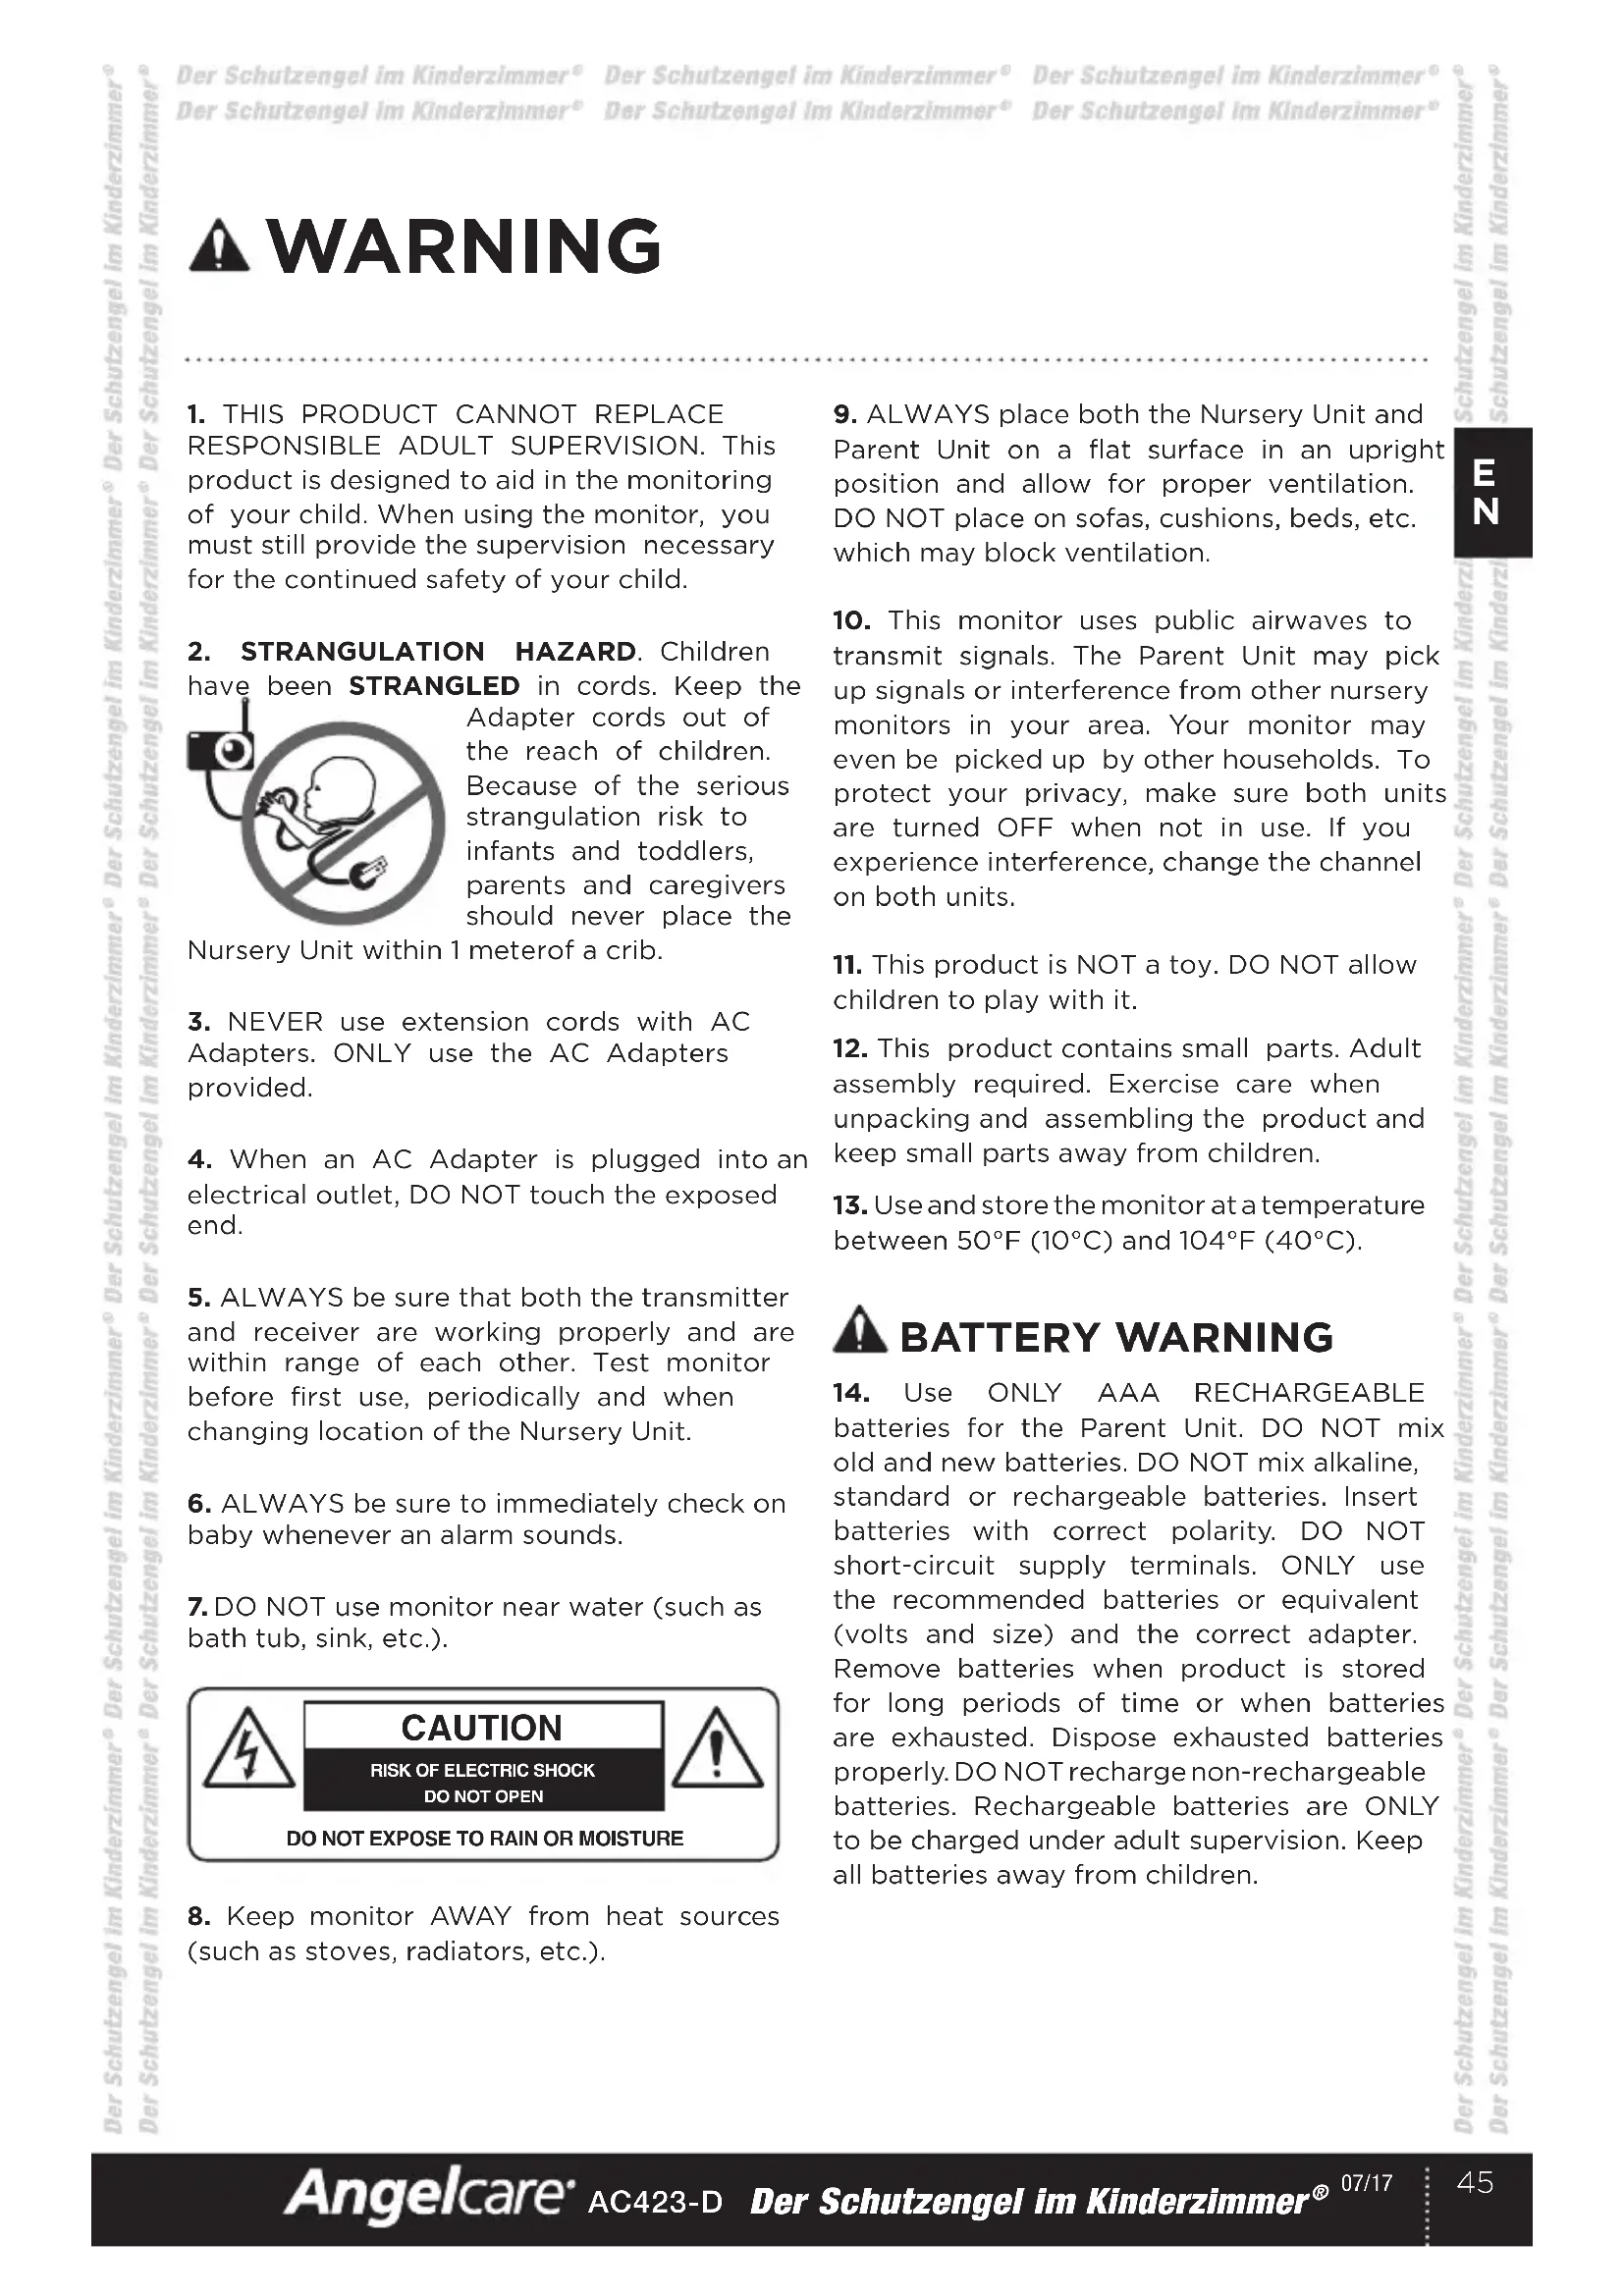
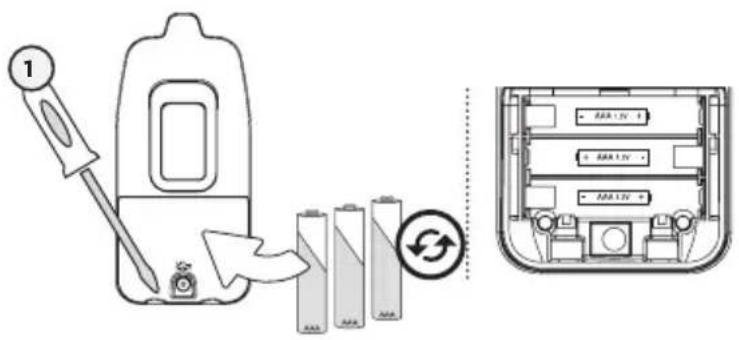
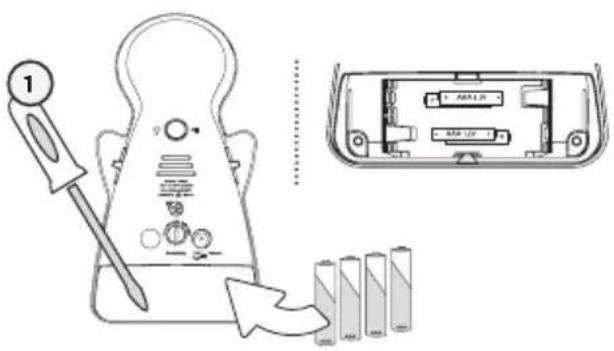
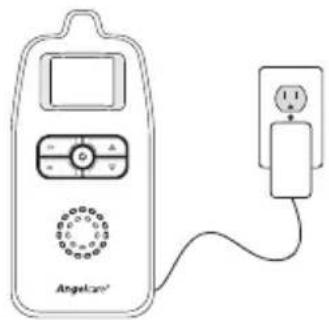
③ Analog/247 15h1) Remove the battery cover and insert the Rechargeable Batteries (included).
2) Connect the AC Adapter to the Parent Unit and into an electrical outlet.
3) Charge the unit for 15 continuous hours (prior to first use).
NOTE:
To optimize your battery performance please refer to Battery Guidelines in the Trouble Shooting section p.56.
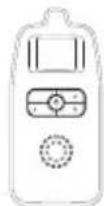
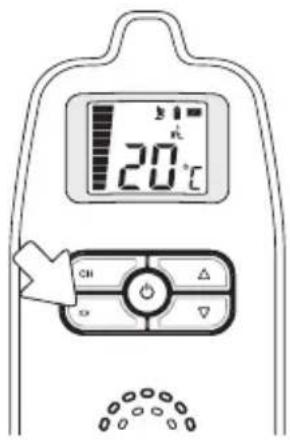
PARENT UNIT:

text_image
A 20°C B C D E F Angelcare®Front View Rear View
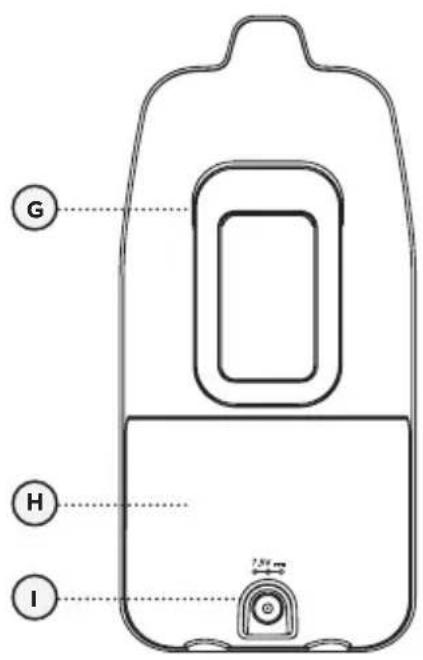
text_image
G H I 1.5V
STEP 2 - SETUP NURSERY UNIT
text_image
Diagram showing a battery testing setup with a tool and battery pack, alongside its internal component layout.
text_image
2 1 m 31) Remove the battery cover and insert 4 AAA Alkaline Batteries (not included).
2) Place the Nursery Unit at a minimum of 1m (3ft) away from the crib.
3) Connect the AC Adapter to the Nursery Unit and plug into an electrical outlet.
NOTE:
The batteries maintain power supply in case of power outage.
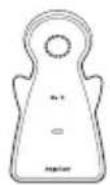
NURSERY UNIT:
text_image
C E D F G H IRear View
A) Microphone
B) Low Battery Indicator / Power ON Indicator
C) Out-of-Range Switch ON/OFF
D) Power ON/OFF
E) Night Light Button / Channel Selection
F) Slots for ventilation
G) AC Adapter Outlet
H) Volume Sensitivity Dial
I) Battery Cover
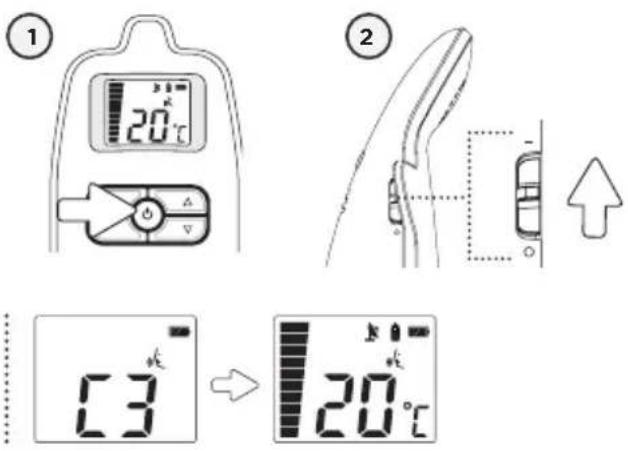
STEP 3 - TURN ON YOUR MONITOR
If there is a lost connection between the 2 units (refer to troubleshooting p. 56):
• The Out-of-range icon (if activated) will blink on the screen and the Parent Unit will beep.
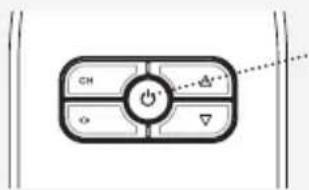
1) Press the Parent Unit ON/OFF button for 2 seconds.
2) Slide ON the Nursery Unit Power ON/OFF button.
NOTE:
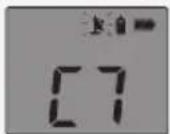
The screen of the Parent Unit will show the channel of transmission (C1 to C8). Then temperature reading will replace the channel display.
If there is no temperature display, turn OFF and then ON the Nusery Unit again. The channel display will then turn to temperature reading in one minute.
CHANNEL SELECTION
text_image
1 GH CH △ ▽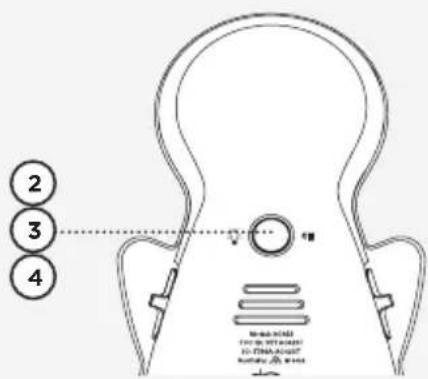
text_image
2 3 410000
10000
10000
10000
10000
10000
10000
10000
10000
10000
10000
10000
10000
10000
10000
10568
10568
10568
10568
10568
10568
11974
11974
11974
11974
11974
12366
12366
12366
12366
12366
12366
12366
12366
12366
12366
12366
12366
12366
23458
23458
23458
23458
23458
23458
23458
23458
23458
23458
23458
23458
23458
12777
12777
12777
12777
12777
12777
12777
12777
12777
12777
12777
12777
12777
23458
23458
23458
23458
23458
23458
23458
23458
23458
23458
23458
23458
32999
32999
32999
32999
32999
32999
32999
32999
32999
32999
32999
32999
32999
42458
42458
42458
42458
42458
42458
42458
42458
42458
42458
TO SELECT THE CHANNEL:
1) Press the Channel button to enter the channel mode.
The Antenna icon will blink.
2) Press and hold the Nusery Unit back button until the Night Light flashes.
The Antenna icon will blink with present of the channel number display
3) Press and release the Nusery Unit back button to change the channel your monitor transmits on (C1 to C8).
4) Press and hold the Nusery Unit back button until the Night Light stops flashing to confirm your channel selection and quit to normal mode.
NOTE :
If the transmission is not clear, or if you hear interference sounds, you should change the channel.
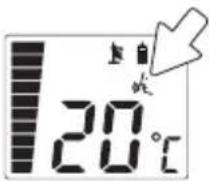
IMPORTANT ICONS

Nursery Unit:
Appears when the Nusery Unit battery is low

Out-of-Range:
Indicates the loss of connection between the Parent Unit and Nursery Unit.

Parent Unit:
Appears only when the Parent Unit is in channel selection mode.

Sound:
Indicates sound activation. Flashing when speaker is muted.

Temperature Display:
Indicates room temperature

Channel Display:
Indicates selected channel

Volume/Microphone Sensitivity Level:
Indicates speaker volume and sound level.
Battery Level icon:
Indicates battery level


Charging
STEP 4 - TEST AND GET TO KNOW YOUR MONITOR
4.1 - SOUND
TO TEST SOUND:
Ask someone to speak into the Nursery Unit or place the unit near a radio to ensure that sound is being picked up.
IMPORTANT
To avoid feedback (whistling), keep both units at least 3 meters apart (10 feet).
- Check that both units are switched on.
- Check that both units are plugged into functioning electrical outlets.
- Check the batteries in both units (replace or recharge them as necessary per unit).
- Bring the Parent Unit closer to Nursery Unit.
PUT IN TEMPORARY MUTE MODE
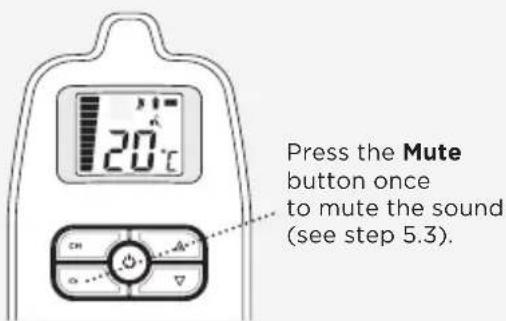
text_image
Press the Mute button once to mute the sound (see step 5.3).4.2 - BATTERIES
HOW TO CHECK THE BATTERIES:
Unplug the AC Adapters from both units.
- If the Nursery Unit Power Indicator does not show or if the Low Battery Indicator does show, replace the batteries.
- If the Parent Unit screen does not light up or it switches off, recharge the batteries.

The Power Indicator on the Nursery Unit

The Low Battery Indicator on the Nursery Unit
text_image
20°C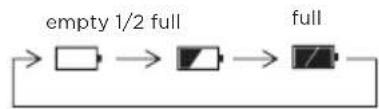
flowchart
graph LR
    A[" "] --> B[" "] --> C[" "] --> D[" "]
HOW TO CHARGE THE BATTERIES IN THE PARENT UNIT:
Plug the AC into the Parent Unit and a working electrical outlet. Your Parent Unit can function with the batteries at 1/2 capacity but it is recommended that they are fully charged before unplugging from the AC Adaptor and power outlet for maximum use.
natural_image
Line drawing of a simple analog device with a digital display and connected to a power plug (no text or symbols)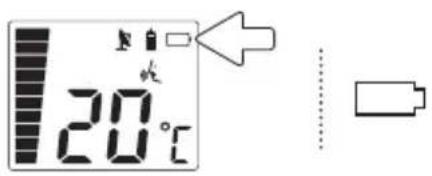
text_image
20°CPARENT UNIT BATTERY ALARM
- Alarm activates when batteries need to be recharged.
- Parent Unit will emit a beep sound every 15 seconds.
- Battery Alarm icon will show on screen.
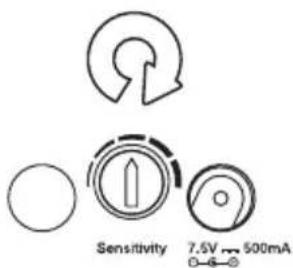
4.3 - MICROPHONE SENSITIVITY LEVEL
TO ADJUST THE MICROPHONE SENSITIVITY LEVEL:
You can adjust the Nursery Unit sensitivity dial to change your microphone from less sensitive to very sensitive. This sensitivity dial is located on the back of the Nursery Unit.
text_image
Sensitivity 7.5V ~ 500mAYOU ARE NOW READY TO USE YOUR MONITOR
The Angelcare ^® monitor can be used with the pre-program factory settings or you can also customize your settings to your preference.
DEFAULT SETTINGS

Temperature Unit: Celsius

Out of Range: OFF

Speaker Volume Level: 3
Microphone Sensitivity Level: Middle

Night Light: OFF
text_image
20°C CH dQx Angelcare®IMPORTANT
- Test your monitor before first use.
- Test your monitor regularly to ensure it is functioning correctly.
STEP 5 - ACTIVATE AND DEACTIVATE ADDITIONAL FUNCTIONS
The Angelcare® monitor can be used with the pre-program factory settings or you can also customize your settings to your preference.
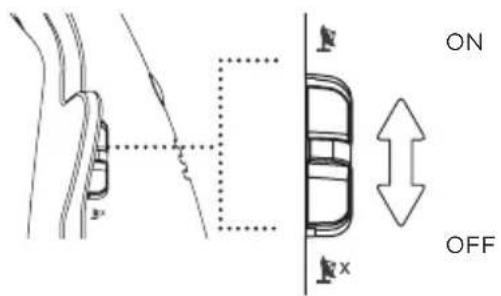
5.1 - OUT-OF-RANGE
Your monitor has an Out-of-Range function that advises you when the Parent Unit cannot receive the signal from the Nursery Unit. Out-of-Range situations can be caused by distance or by physical interferences.
RANGE:
Up to 250 meters (open field)
TO ACTIVATE THIS FUNCTION:
Slide the Out-of-Range button on the Nursery Unit to turn it ON or OFF.

The Out-of-Range Indicator will blinks on the Parent Unit.
text_image
ON OFFOUT-OF-RANGE ALARM
- Alarm activates when your two units are not communicating.
- The Parent Unit will emit a double beep every 8 seconds.
- Out of Range Icon will flash on the screen.
The Out-of range Icon will also flash when channel is being changed or the unit is reconnecting
IMPORTANT
If the Parent Unit is OFF after out of range function being set ON, it is needed to reset and reactivate the function to ON again. To reset it, make sure the Parent Unit is ON again and slide the Nursery Unit switch to OFF and then slide the switch to ON again as to reactivate the Out of range function.
TO STOP THE OUT-OF-RANGE ALARM:
text_image
CH → ← → → →Press 2 seconds to turn the Parent Unit OFF
OR

text_image
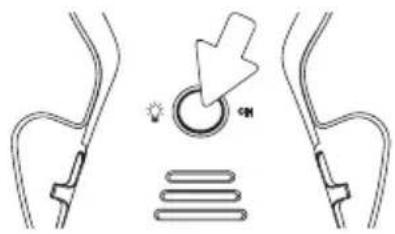
Turn the Nursery Unit ONPress the Night Light button on the back of the Nursery Unit to turn it ON or OFF.
text_image
Diagram illustrating a lighting switch mechanism with labeled components and directional arrow
natural_image
Simple line drawing of a symmetrical object resembling a stylized face or mask, with no text or symbols present.When the Nusery Unit power source is the adapter, the night light is illuminated from all edge sides of the Nusery Unit body.

natural_image
Line drawing of a symmetrical abstract shape with a central dot pattern and two horizontal lines, labeled 'Angeface' at the bottom (no other text or symbols)When it is used with battery only, the night light is illuminated only from top edge of the Nusery Unit.
5.3 - TEMPORARY MUTE
Allows you to put your monitor in temporary Mute mode.
TO ACTIVATE MUTE:
Press the Mute button.
TO DEACTIVATE MUTE:
Press the Mute button again to hear sounds.
text_image
20°C CH ON CH ON CHAfter 2 minutes the sound function will be automatically reactivated.
If you press too long on the Sound/OFF button it will shut down the Parent Unit.

NOTE:
The Sound Icon will blink on the Parent Unit whilst the Temporary MUTE is activated.
TROUBLESHOOTING
- Ensure that you fully charge your batteries for 15hrs before their first use.
- To maintain maximum battery life it is recommended that you fully discharge your batteries periodically. Battery performance can be diminished by leaving the batteries constantly charging. If your parent unit is not in use, please turn it off.
- Inadequate battery power can impair the performance of your monitor. If you are not happy with the performance of your Parent Unit/Monitor please replace the rechargeable batteries (3 x NiMH Rechargeable Batteries).
- It is advisable to change the batteries every 6 months.
LOSS OF CONNECTIVITY
In the case of loss of connectivity, the first step is to bring the Parent Unit and Nursery Unit closer together and make sure that both units are ON to restore the connection. If there is still no connection and no out of range warning after the above has been done, then and only then should the re-connection procedure below be done.
Re-connection procedure:
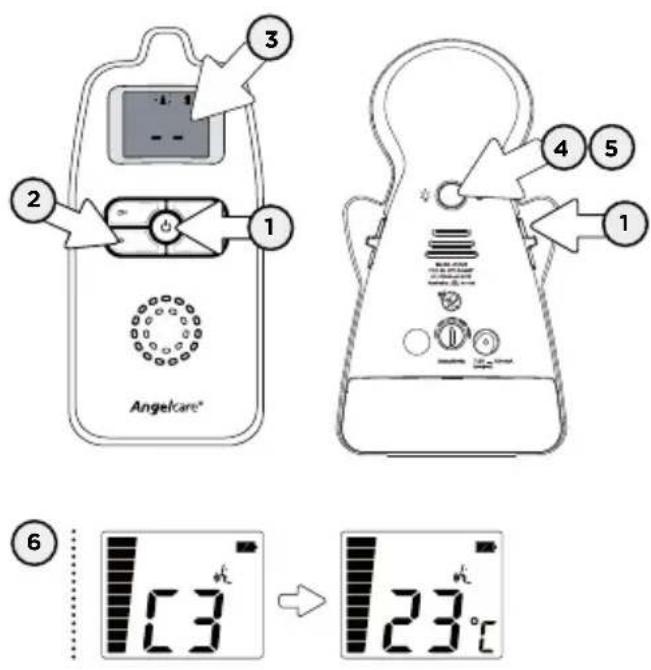
text_image
3 2 1 Angelcare® 4 5 1 6 13 °C → 23°C- Turn ON both the Nursery Unit and the Parent Unit.
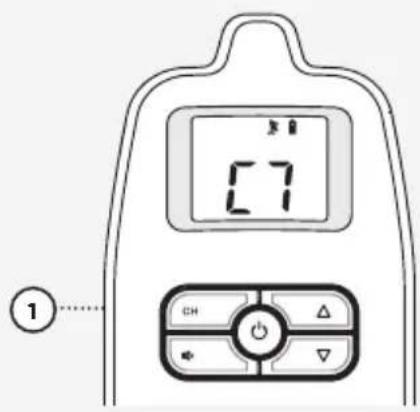
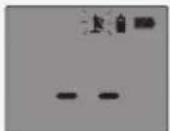
- By pressing and holding for 3 seconds the Parent Unit "CHANNEL KEY (CH)" button, the Parent Unit will be set in to connectivity mode.
- LCD will only show ‘—’ to indicate that the Parent Unit is in the channel selection mode with back light on and the Antenna icon will flash.
- To set the Nursery Unit into connectivity mode, press and hold the Page button for 4 seconds (on the back of the Nursery Unit). The Power LED will flash to indicate the channel selection mode is on. On the Parent Unit, you will then see the channel being used by the Nursery Unit.
- Press and hold the back button of the Nursery Unit again to confirm the registration.
- When the Parent Unit and Nursery Unit are connected, the Parent Unit emits a confirmation tone and will show the channel number which will be replaced by the temperature (normal screen) a few seconds later.
Note: If step 4 is not followed within the duration, the Parent Unit will exit the connectivity mode and you will need to start this process again.
NO SOUND IS BEING TRANSMITTED
- Change to the following as some text regarding MUTE is duplicated:
- Ensure that both units are switched ON.
- Check that the sound has not been turned down on the Parent Unit. Increase the volume level on the Parent Unit, refer to step 4.1.
- Check on the Parent Unit screen to see if the monitor is in temporary MUTE mode instead of ON mode. Deactivate the temporary MUTE function, refer to step 5.3.
- If there is no power to any unit check/replace the batteries, recharge the Parent Unit & check the AC Adaptors are working. Change electrical outlets if required.
- Bring the Parent Unit and Nursery Unit closer together.
NURSERY UNIT POWER ON INDICATOR (GREEN LIGHT) DOES NOT LIGHT UP
- Switch OFF and back ON the Nursery Unit.
- Check connections or change to another electrical outlet.
WEAK RECEPTION
- Bring units closer together.
- Change the position of one or both units.
- Place units on a flat surface away from baby's reach.
- Replace the batteries or recharge Parent Unit.
STATIC, DISTORTION, INTERFERENCES (FROM OTHER MONITORS, WIRELESS PHONES, WALKIE-TALKIES, ETC...)
- Rotate Parent Unit or move it away from source of interference.
- Try a different channel, refer to step 3.
FEEDBACK (LOUD NOISES EMITTED FROM THE PARENT UNIT)
- Move units farther apart (at least 3 meters apart).
• Decrease volume on Parent Unit.
THE PARENT UNIT SCREEN IS BLACK (PARENT UNIT IS OFF)
- Turn the Parent Unit back ON by pushing and holding the power button.
- Replace the batteries or recharge Parent Unit.
IMPORTANT: Please do not return this product to the store!
If you have questions or need help, please contact us directly. Just a quick phone call - we will call you back. Often, operating errors or justified complaints can be cleared up directly on the phone and we can send you the necessary spare parts immediately where appropriate:
Technical Customer Service:
Tel. +49 2102 / 1 25 77 -66
THIS DEVICE IS INTENDED FOR USE IN GERMANY, AUSTRIA AND SWITZERLAND. Exclusive sale in Germany, Austria and Switzerland:
Up to 250 meters (open field)
Number of Channels:
8 channels
Power Supply:
4 AAA alkaline batteries (not included) or 100-240V AC/7.5V DC adapter for Nursery Unit.
3 AAA rechargeable batteries and 100-240V AC/7.5V DC adapter for the Parent Unit.
Caution: To reduce the risk of electric shock, do not expose this product to rain or moisture.
Danger of explosion if batteries are incorrectly replaced. The included Batteries


are 3 AAA NIMH rechargeable batteries, manufactured by GPI INTERNATIONAL LIMITED (GN60AAAHC, 1.2V 600mAh) or by HIGHPOWER TECHNOLOGY CO., LTD (HFR-44AAAJ600, 1.2V 600mAh).
They may only be replaced by 3 AAA NIMH rechargeable batteries.
Batteries:
• DO NOT mix old and new batteries.
- DO NOT mix alkaline standard (carbon-zinc), or rechargeable (NI-CD, NIMH, etc) batteries.
Transmission:
864 MHz
Hereby, Angelcare Monitors Inc declares this baby monitor is in compliance with the essential requirements and other relevant previsions of Directive 1999/05/EC.
The Declaration of Conformity for this monitor can be found at www.angelcare.de
PROTECT THE ENVIRONMENT
This electronic equipment contains reusable material and must not be disposed with domestic waste. Please take it to a collecting point for electric and electronic equipment (ask your local authorities for details).
ErP COMPLIANCE
GERMANY
Use only Angelcare® Brand power supply-model number T07505F002
Angelcare®
IMPORTANT! information Update to accompany Manual PLEASE KEEP FOR FUTURE REFERENCE
- Adaptor information in compliance with ErP
USE ONLY THE FOLLOWING ANGELCARE® BRAND POWER SUPPLY MODEL NUMBERS:
For Monitor Models - AC1300/AC1320/AC701/AC720 use -
EU - T05005V001
UK - T05005B001
Germany -- T05005F002
For Monitor Models - AC1100/AC1120/AC601/AC620/AC403/AC423/AC401/AC420 use
EU - T07505V001
UK - T07505B001
Germany -- T07505F002
• Radio Equipment Directive (RED) 2014/53/EU
Hereby, Angelcare Monitors Inc., declares that this Baby Monitor is in compliance with Directive 2014/53/EU The full text of the EU declaration of conformity is available at the following internet address: www.angelcarebaby.com
- Transmission
For Monitor Models - AC1100, AC1120, AC1300, AC1320
Maximum RF Power Transmitted = 20dBm (100mW)
For Monitor Models - AC701 & AC720
Maximum RF Power Transmitted = 24dBm (250mW)
For Monitor Models - AC401, AC420, AC403, AC423, AC601, AC620
Maximum RF Power Transmitted = 10dBm (10mW)
www.angelcare.de