
CH64DXT - Cooker CANDY - Free user manual and instructions
Find the device manual for free CH64DXT CANDY in PDF.
| Product type | Ceramic hob |
| Brand | Candy |
| Model | CH64DXT |
| Number of cooking zones | 4 |
| Dimensions (W x D x H) | 580 x 510 x 50 mm (approx) |
| Weight | Approximately 10 kg (approx) |
| Power supply | 220-240 V~, 50/60 Hz, up to 7.2 kW depending on configuration |
| Power cable | H05V2V2-F, section according to power (3x2.5 mm² or 4x1.5 mm²) |
| Connection | Single-phase, two-phase or three-phase as per diagram |
| Power management function | Adjustable from 2.5 kW to max power (up to 7.2 kW) |
| Timer | Up to 99 minutes |
| Child lock | Yes, activation by pressing + and - keys |
| Overflow safety | Automatic shutdown if key pressed >5 s, display F1/F2 |
| Automatic shutdown | According to heating level (1 h at level 1, 2 h at level 9) |
| Residual heat indicator | Displays "H" for each zone |
| Bridge function | Yes, to link two zones |
| Zone extension (double/triple) | Depending on model, extension keys |
| Control type | Touch control |
| Cleaning | Specific ceramic detergent, scraper with blade (angle 30°) |
| Maintenance of metal border | Wash with water and soap, dry with soft cloth |
| Surface material | Glass ceramic |
| Error codes | F0, Fc, Ft, FE, Fb, FU/FJ, FA, FC/Fd, Fr (see manual) |
| Warranty | Warranty certificate provided, free repair at after-sales service |
| Installation | Built-in or flush mount, minimum distance above: 700 mm |
Frequently Asked Questions - CH64DXT CANDY
User questions about CH64DXT CANDY
0 question about this device. Answer the ones you know or ask your own.
Ask a new question about this device
Download the instructions for your Cooker in PDF format for free! Find your manual CH64DXT - CANDY and take your electronic device back in hand. On this page are published all the documents necessary for the use of your device. CH64DXT by CANDY.
USER MANUAL CH64DXT CANDY
MATERIALS IN COMPLIANCE WITH REQUIREMENTS OF EU DIRECTIVE 2002/95/CE + AMENDMENTS
ALL RIGHTS RESERVED, THE REPRODUCTION OF ANY PART WITHOUT OUR WRITTEN CONSENT IS FORBIDDEN
| E | |||||
| D | |||||
| C | |||||
| B | |||||
| A | 06.07.22 | FR dîlne logo ekendii/Logo added to FR language. | |||
| CL N° | REV. DATE | MODIFY DESCRIPTION | MODIFIED BY | ||
| SPECIFICATION | DATE SIGNATURE | PROPERTIES OF CANDY•HOOVER GROUP | |||
| GENERAL TOLERANCE | 29.07.2021 DRAWN V.GULTURK | NAME | |||
| ISO 2768- m | 29.07.2021 CHECKED B.SERHATLI | USER MANUAL VC B18 | |||
| BASE CODE | FOR HOB | LOCAL LANGUAGE) KULANMA KILAVUZU VC B18 | |||
| Treatment | Weight SCALE | 7 0 0 5 1 6 4 | ECBR-0000196 | SC 000-000 | |
| Grey Scale | Kg. 1:1 | ||||
| MATERIAL | SIZE | REPLACE NO ORIGIN CL No Class Specification | |||
| Enzo Paper | A4 | ||||
| E | ||||||||
| E | ||||||||
| E | ||||||||
| E | ||||||||
| E | ||||||||
| E | ||||||||
| E | ||||||||
| E | ||||||||
| E | ||||||||
| E | 06.07.22 | |||||||
| GENERAL TOLERANCE ISO 2788-1 M | DRAWN Y, GUTURK | FRINE log element/ Log added to FR language | ||||||
| CHECKED B, SERHATU | PROPERTIES OF CANDY-HOVER GROUP | |||||||
| BASE CODE | FOR (H, LOCAL LANGUAGE) KULANMA KIAVAZU VC B18 | |||||||
| TREATMENT PRINTING Color | WEIGHT SCALE Kg | 1:1 | 7 0 0 0 5 1 6 4 | PART CODE | SHEET | ECBR-0000198 | SC 000-000 | |
| MATERIAL | SIZE | REPLACE NO ORIGIN CL No Class Specification | ||||||
CANDY
HOBS USERINSTRUCTIONS GB
UGRADNE PLOCE UPUTSTVO ZA UPOTREBU SR
BAPINbHI NOBEPXHI IHCTPYKlIg 3 EKCIIYATAUJI UA
KOTLOHNIHCTPYKLIM3A IOTPEBNTENBA
- Protection of the environment 05
2.Installation 05 - Electrical connection .05
4.Hob cookware advice .07
5.Use 07 - Cleaning and maintenance 09
- Problem solving 09
- Aftercare 09
INDICE
IT
We recommend you keep the instructions for installation and use for later reference, and before installing the hob, note its serial number in case you need to get help from the after sales service. WARNING: the appliance and its accessible parts become hot during use. Care should be taken to avoid touching heating elements. Children under 8 years of age must be kept away from the appliance unless they are continuously supervised.
WARNING: use only hob guards designed by the Manufacturer of the cooking appliance or indicated by the Manufacturer of the appliance in the instructions for use as suitable or hob guards incorporated in the appliance. The use of inappropriate guards can cause accidents.
WARNING: unattended cooking on a hob with fat or oil can be dangerous and may result in fire.
NEVER try to extinguish a fire with water, but switch off the appliance and then cover flame e.g. with a lid or a fire blanket.
WARNING: danger of fire: do not store items on the cooking surfaces.
WARNING: if the surface is cracked, do not touch the glass and switch off the appliance to avoid the possibility of electric shock.
This appliance can be used by children aged from 8 years and above and people with reduced physical, sensory or mental capabilities or lack of experience and knowledge if they have been given supervision or instruction concerning use of the appliance in a safe way and understand the hazards involved. Children should be supervised to ensure that they do not play with the appliance. Cleaning and user maintenance shall not be made by children without supervision.
CAUTION: the cooking process must be supervised. A short term cooking process has to be supervised continuously.
It is strongly recommended to keep children away from the cooking zones while they are in operation or when they are switched off, so long as the residual heat indicator is on, in order to prevent the risks of serious burns.
This appliance is not intended to be operated by means of an external timer or separate remote control system.
If present do not to stare into halogen lamp hob elements.
Connect a plug to the supply cable that is able to bear the voltage, current and load indicated on the tag and having the earth contact. The socket must be suitable for the load indicated on the tag and must be having the earth contact connected and in operation. The earth conductor is yellow-green in color. This operation should be carried out by a
suitably qualified professional. In case of incompatibility between the socket and the appliance plug, ask a qualified electrician to substitute the socket with another suitable type. The plug and the socket must be conformed to the current norms of the installation country.
Connection to the power source can also be made by placing an omnipolar breaker between the appliance and the power source that can bear the maximum connected load and that is in line with current legislation.
The yellow-green earth cable should not be interrupted by the breaker. The socket or omnipolar breaker used for the connection should be easily accessible when the appliance is installed.
The disconnection may be achieved by having the plug accessible or by incorporating a switch in the fixed wiring in accordance with the wiring rules.
If the supply cord is damaged, it must be replaced by Manufacturer, its service agent or similarly qualified people in order to avoid a hazard. The earth conductor (yellow-green) must be longer than 10mm on the terminal block side. The internal conductors section should be appropriate to the power absorbed by the hob (indicated on the tag). The type of power cable must be HO5V2V2-F.
Do not put metallic objects such as knives, forks, spoons or lids on the hob. They could heat up. Aluminum foil and plastic pans must not be placed on heating zones.
After every use, some cleaning of the hob is necessary to prevent the build-up of dirt and grease. If left, this is recooked when the hob is used and burns giving off smoke and unpleasant smells, not to mention the risks of fire propagation. Never use a steam or high pressure spray to clean the appliance.
Do not touch the heat zones during operation or for a while after use.
Never cook food directly on the glass ceramic hob.
Always use the appropriate cookware. Always place the pan in the center of the unit that you are cooking on.
Do not place anything on control panel.
Do not use the hob as a working surface.
Do not use the surface as a cutting board.
Do not store heavy items above the hob. If they drop onto the hob, they may cause damage.
Do not use the hob for storage of any items.
Do not slide cookware across the hob.
No additional operation/setting is required in order to operate the appliance at the rated frequencies.
Identification Plate (located under the hob's bottom casing)

1. PROTECTION OF THE ENVIRONMENT

This appliance is marked according to European Directive 2012/19/EU on Waste Electrical and Electronic Equipment (WEEE).
WEEE contains both polluting substances (which can cause negative consequences for the environment) and basic components which can be reused. It is important to have WEEE subjected to specific treatments, in order to remove and dispose properly all pollutants and recover and recycle all materials.
Individuals can play an important role in ensuring that the WEEE does not become an environmental issue; it is essential to follow some basic rules:
WEEE shall not be threatened as household waste.
- WEEE shall be handled over to the relevant collection points managed by the municipality or by registered companies. In many Countries, for large WEEE, home collection could be present.
- In many Countries, when you buy a new appliance, the old one may be returned to the retailer who has to collect it free of charge on a one-to-one basis, as long as the appliance is of equivalent typology and has the same functions as the supplied one.
2. INSTALLATION
Installing a domestic appliance it is a complicated operation which, if not carried out correctly, can seriously have impact on safety of goods, properties or people. For this reason, it should be carried out by a professionally qualified person in accordance with technical regulations.
In the event that this advice it is ignored and installation is carried out by an unqualified person, the Manufacturer declines all responsibility for any technical failure of the appliance whether or not it results in damage of goods or properties or in injury of people or animals.
After having removed the packaging please be sure that the appliance it is not damaged, otherwise contact the Retailer or Manufacturer After Sales Service.
Make sure that the furniture in which the appliance will be fitted and all other furniture in the nearby are made with materials which can withstand high temperatures (min 100^ ).
In addition, all decorative laminates should be fixed with high-resistance glue.
Appliance can be installed in a Built-in furniture in "Standard" (see Figure 1) or "Flush" (see Figure 2) mode.
Worktop thickness should be between 25 and 45mm
Note: Inner perimeter dimensions are same with standard installation
Leave a distance of at least 55mm between the hob and the back wall and of at least 150mm between the hob and the vertical furniture or walls in the lateral side. If a furniture is installed above the hob, the minimum distance required is 700mm .
When installing a hood above the hob, please consult the installation requirements specified for the hood but, in any case, the distance between the hob and the hood must not be lower than 700~mm (see Figure 3)
If the bottom part of the hob is adjacent to an area normally accessible for handling or cleaning operations, a separator it must be put 20mm below the bottom part of the hob. (see Figure 4)
When installing an oven under the hob, separator must not be put and the minimum distance between the bottom part of the hob and the oven must not be lower than 10mm . Do not install not cooled oven under this hob and install the oven following its own installation requirements. (see Figure 5)
A watertight seal gasket is supplied with the hob. Fit the seal gasket around the bottom hob as described and make sure that it is properly fitted to avoid any leakage into the supporting furniture. (see Figure 6)
Normal Fixing:
-
Get the fixing clips from accessory bag and screw them into the position shown on bottom box. (Do not tighten the screws to block clips, they should move freely) (see Figure 7)
-
Insert the hob in center position of cut out.
- Turn the clips and tighten them fully. (see Figure 8)
Quick Fixing: (Depending on model)
Get four springs form accesory bag and screw them onto bottom box as shown in figure. (see Figure 9)
Center and insert the hob.
Press the sides of hob until it is supported around its entire perimeter. (see Figure 10)
FLUSH INSTALLATION
After checking that the position of the hob is correct fill the gap between the worktop and the hob with silicone adhesive. Flatten the silicone layer with a scraper or with wet finger damped with water and soap before it forms.
Do not use the hob until the silicone layer it is completely dry. supported around its entire perimeter. (see Figure 11)
3. ELECTRICAL CONNECTION
- " + "
- " - "
- TIMER
- Additional cooking zone led
- Cooking zone programming indicator
- Selection of the zone
- Bridge
"Installation must conform to the standards & directives." Manufacturer declines all responsibility for any damage that might be caused by unsuitable or unreasonable use.
WARNING: Manufacturer cannot be held responsible for any incident or its consequences that may arise during the use of an appliance not linked to the earth, or linked to an earth whose continuity is defective. Before any electrical operation, please check the supply tension shown on the electricity meter, the adjustment of the circuit- breaker, the continuity of the connection to earth to the installation and that the fuse is suitable.
The electrical connection to the installation should be made according to the rated power of the Appliance; this should be made via an Omni pole cut-out switch.
If the appliance has a socket outlet, it must be installed so that the socket outlet is accessible.
The yellow/green wire of the power supply cable must be connected to the earth of both power supply and appliance terminals. For any questions regarding power supply cord refer to After Sales Service or a qualified technician.
If the hob is fitted with power supply cord, this shall be connected only to a power supply of 220 - 240V between phase and neutral.
It is however possible to connect the hob to:
Three Phase 220-240 V3
Three Phase 380-415 V2N
To proceed to the new connection, please follow below instructions: Before making the connection, make sure that the installation is protected by a suitable fuse, and that it is fitted with wires of a large enough section to supply the appliance normally.
Turn over the hob, glass side against the working top, taking care to protect the glass.
Open the cover in the following sequence:
1

2

3

- unscrew the cable clamp "1";
find the two tabs located on the sides; - put the blade of a flat screw-driver in front of each tab "2" e "3", push in and press;
- remove the cover.
To release the power supply cord:
- Remove the screws retaining the terminal block which contains the shunt bars and the conductors of the supply cord:
- Pull out the supply cord.
Note: make sure the terminal board screws are tight.
Operations to be carried out to make a new connection:
- Choose the power supply cable in accordance with the
recommendations in the table;
- Pass the power supply cable into the clamp;
- Strip the end of each conductor of the supply cord on a 10mm length, by taking in account the requested length of the cord for the connection to the terminal block;
- According to the installation and with the help of shunt bars which you should have recovered in the first operation, fix the conductor as shown on the chart;
Fix the cover:
- Screw the cable clamp.

ATTENTION:
If it should be necessary to replace the power supply cord, connect the wire in accordance with following colors/codes:
| BLUE | Neutral | (N) |
| BROWN | Live | (L) |
| YELLOW-GREEN | Earth | (⊕) |
Connection to the terminals on the terminal block
| LAY OUT "1-6" | LAY OUT "7" | |
| MONOPHASE or TWO PHASES 220-240 V~ | ||
| Cable HO5V2V2F | 3x2,5 mm² | 3x4 mm² |
| THREE PHASES 220-240 V3~ | ||
| Cable HO5V2V2F | 4x1,5 mm² | 4x1,5 mm² |
| THREE PHASES 380-415 V2N~ | ||
| Cable HO5V2V2F | 4x1,5 mm² | 4x1,5 mm² |

L1/L2/L3 = Phase N = Neutral PE = Earth
4. HOB COOKWARE ADVICE
Using good quality cookware is critical for setting the best performance from your hob.

-
Always use good quality cookware with perfectly flat and thick bases : using this type of cookware will prevent hot spots that cause food to stick. Thick metal pots and pans will provide an even distribution of heat.
-
Ensure that the base of the pot or pan is dry : when filling pans with liquid or using one that has been stored in the refrigerator, ensure that the base of the pan is completely dry before placing it on the hob. This will help to avoid staining the hob.
-
Use pans whose diameter is wide enough to completely cover the surface unit: the size of the pan should be no smaller than the heating area. If it is slightly wider the energy will be used at its maximum efficiency.
THE CHOICE OF COOKWARE - The following information will help you to choose cookware which will give good performance.
Stainless Steel : highly recommended. Especially good with a sandwich clad base. The sandwich base combines the benefits of stainless steel (appearance, durability and stability) with the advantages of aluminium or copper (heat conduction, even heat distribution).
Aluminium : heavy weight recommended. Good conductivity. Aluminium residues sometimes appear as scratches on the hob, but can be removed if cleaned immediately. Because of its low melting point, thin aluminium should not be used.
Cast Iron : usable, but not recommended. Poor performance. May scratch the surface.
Copper Bottom / stoneware: heavy weight recommended. Good performance, but copper may leave residues which can appear as scratches. The residues can be removed, as long as the hob is cleaned immediately. However, do not let these pots boil dry. Overheated metal can bond to glass hobs. An overheated copper pot will leave a residue that will permanently stain the hob.
Porcelain/enamel : Good performance only with a thiny smooth, flat base.
Glass-ceramic : not recommended. Poor performance. May scratch the surface.
5. USE
How to choose power management level
Through the "Power management" function, the user can set the maximum power that can be reached by the hob. Power management function is only available during first 30 seconds after switch on the hob. There is even the possibility to repeat this setting switching off and on the power plug. By setting the desired maximum power, the hob automatically adjusts the distribution in the various cooking zones so that this limit is never exceeded; with the added advantage of being able to simultaneously manage all the zones without overload problems. The customer can set the maximum power of hob between 2.5kW and the maximum related power of the hob (this can change according to the model) (for example if the maximum power of the hob is 7.2kW . The maximum power level for setting is between 2.5kW and 7.2kW ). At the time of purchase, the hob is set to maximum power. After connecting the appliance to the electrical power, within 30 seconds you can set the power level based on the points shown below:
1.- Switch on hob.
2.- Let touch control finish its initialization process.
3.- Before pass 30 seconds touch during 5 seconds key.
4.- After this moment, this message will appear on display.

5.- Using 'Plus' and 'Minus' keys Power management value can be adjusted. In this example case between 6500 and 2500w. When required value is selected, touch at the same time 'Plus' & 'Minus' keys during 5 seconds.

6.- When this process is finished, a long beep is heard and a reset is produced. Start-up process will be generated again.

7.- After start-up process, in timer display ECO power management will be showed.

After that, touch control won't allow any combination which can exceed this Eco limit.
Switch ON/OFF a heater zone

To switch ON a heater Touch any heater's zone during 400 msec. Long beep will be heard and "0" value will appear in target zone digit, indicating power level.
1) If any cooking stage is in position 0, this display will switch OFF automatically after 10 seconds and the zone OFF sequence will sound.
2) If there is residual heat indication in the display which is ON but in 0 power, "0" will appear changing over.
3) If lock function is active you cannot switch ON a zone.
To switch OFF a heater Touch any heater's zone during 1,2 sec. 3 Short beeps will be heard and nothing or "H" value will appear in target zone digit if residual heat exists. Zone will be OFF.
1) If any cooking stage is in position 0, this display will switch OFF automatically after 10 seconds and the zone OFF sequence will sound.
2) If there is residual heat indication in the display which is OFF, "H" will be displayed.
3) Even lock function is active you can switch OFF a zone.
4) If only one heater is active and this one is switched off, 4 Short beep will be heard indicating all cook top is Off.
Selecting a zone
When zone is already ON a lower lighting intensity for the not selected zones that are ON is produced.

If only one zone is ON, this zone is already selected by default, without needing to short press (150 msec) over selection key.
Increase / Decrease power level

With a short press on ^+ or - keys, Increase or decrease power in the selected zones digit: 0-1-2-3...9-P
- For Long Presses in + or - keys, power level increases /decreases continuously. With a fast increase, power stops at level 9, and for a higher power another short press is needed on the + key. No beep sound is heard with fast increase / decrease.
- Once arrived to P power level, pressing + key again does not change power level to 0.Once arrived to 0 power level, pressing - key again does not change power level to P.
- With a zone ON at 0 power level, if the zone is hot, 0 will blink alternatively. After 10 seconds, 0 will disappear an 'H' letter will appear fixed on display.
- When a heater is selected and +' & - keys are touched at the same time, power level will go to '0' but heater will maintain selected during 10 seconds. If heater was temporized, timer will go to Off. This action can only be developed in several cases depending on touch control configuration. The following examples are for information only. Personal experience should then let you adapt these settings to your taste and habit
Child Lock option

This action will be done when +! & -keys were touched at the same time.
Then, any time when a key will be touched, displays will show "L" during 2sec. heating remains at the same state.
To deactivate Child Lock, follow the same process explained before. Then Short beep will be heard and displays will show "n" letter. Hob will remain unlocked.
Note: An automatic child lock will produce in 15 minutes after total Switch OFF of the hob.
Double / Triple zones
To switch ON double extension ring, associated main zone must be already ON and indicating power level must be higher than 0.
8.1- Double zone ON
1st Short Press on extension key Switches ON extension ring. LED over extension key turns ON if Extension ring is ON.
2nd Short Press on extension key Switches OFF extension ring
Short beep each press on extension key.
8.2-Triple zone ON
1st Short Press on extension key Switches ON 1st extension ring. 1 LED over extension key turns ON if 1st extension ring is ON (left LED in case of triple zone, middle and only LED in case of double zone) 2nd Short Press on extension key Switches ON 2nd extension ring.
2 LEDs over extension key turn ON if 1st and 2nd extension rings are ON 3rd Short Press on extension key. Switches OFF 1st and 2nd extension rings.
Short beep each press on extension key.
Bridge function
The bridge can be enabled only when both heaters are off. One heater of the bridge has been selected, to activate bridge function touch bridge key.
A beep sounds and the zone LED is switched on if the zone is enabled. Both bridge heaters will be selected at the same time.
Once the heaters selected, if the power level is not the desired power level, by the + - keys.
Both bridge heater displays will show same power level.
The function will finish:
- If the bridge key is touched in setting mode
- If user selects power level "0"
Overflow security
Something (an object or a liquid) is pressing any key during more than 5s. 2 Short Beep + 1 Long beep every 30s while the key is pressed. Cook-top will turn Off. This symbol will maintain blinking while the matter persist.
Timer
Timer function can be activated with its own key.
Select the zone to be timed. Power level of the zone greater than 0. Static is displayed in the zone being timed. "0 0" in the digits reserved for the timer.
1) With "+" or "-" keys, timer time can be chosen. No Beeps at time change.
2) Pressing continuously timer key, the timer is cancelled (goes to 00).
3) If timer "+" or "-" keys is maintained pressed there is quick setting. 4) When setting timer time, it is possible to go from "00" to "99" with "-" key, and from "99" to "00" with "+" key.
5) Maximum time 99 minutes.
6) When the time is elapsed and the hob is beeping, press any key and the alarm and digit sequence will end.
7) It is possible to adjust the timer time while the timer is previously running.
8) Power of timed zone can be modified without consequences on the timer programming.
9) Last minute will be displayed by seconds (For Variants only visible if we enter the timer programming while the last minute of the countdown)
10) Pressing the Timer key without any selected zone and when no zone is being timed, does nothing.
11) Pressing the Timer key without any selected zone and when many zones are being timed, the time shown in time digits changes in a rotatory way, and shows the time whose power display has the decimal point ON.
12) Alternatively Power (5s) and (0,5s) is displayed in the zone being timed.
Remaining time is displayed in the digits reserved for the timer. If multiple zones are timed, the smallest remaining time is displayed, and the decimal point is displayed in the corresponding zone.
Residual Heat Indicator (In radiant heaters calculated)
The same indicators can be used for "residual heat" indication as well. A time table must be defined on this purpose: Rest Heat time=f (power level, working time).
While a temperature on the cook top glass surface is above 65^ (theory value), this condition will be shown in the associated display, by means of an "H".
To generate a temperature above 65 C a heating element has to be in operation for certain time, this time depends on the power level. Once this time has expired, the residual heat warning will be shown when the heating element is switched off.
Automatic Safety Off
If the power level is not changed during a preset time, the corresponding heater turns off automatically.
The maximum time a heater can stay on, depends on the selected cooking level.
| Power level | Max. time on (hours) |
| 1 | 10 |
| 2 | 5 |
| 3 | 5 |
| 4 | 4 |
| 5 | 3 |
| 6 | 2 |
| 7 | 2 |
| 8 | 2 |
| 9 | 2 |
| P | 2 |
NOTE: while an overheating situation should occur during the operation of the highest power levels, the Hob control will automatically adjust the power level in order to protect the hob from overheating.
6. CLEANING AND MAINTENANCE
. Before carrying out any maintenance work on the hob, allow it to cool down.
Only products, (creams and scrapers) specifically designed for aglass ceramic surfaces should be used. They are obtainable from hardware stores.
. Avoid spillages, as anything which falls on to the hob surface will quickly burn and will make cleaning more difficult.
It is advisable to keep away from the hob all substances which are liable to melt, such as plastic items, sugar, or sugar-based products.
.MAINTENANCE:
- Place a few drops of the specialised cleaning product on the hob surface.
- Rub any stubborn stains with a soft cloth or with slightly damp kitchen paper.
- Wipe with a soft cloth or dry kitchen paper until the surface is clean.
If there are still some stubborn stains:
- Place a few more drops of specialised cleaning fluid on the surface.
- Scrape with a scraper, holding it at an angle of 30^ to the hob, until the stains disappear.
- Wipe with a soft cloth or dry kitchen paper until the surface is clean.
- Repeat the operation if necessary.
A FEW HINTS:
Frequent cleaning leaves a protective layer which is essential to prevent scratches and wear. Make sure that the surface is clean before using the hob again. To remove marks left by water, use a few drops of white vinegar or lemon juice. Then wipe with absorbent paper and a few drops of specialised cleaning fluid.
The glass ceramic surface will withstand scraping from flat-bottomed cooking vessels, however, it is always better to lift them when moving them from one zone to another.
NB:

Do not use a sponge which is too wet.
Never use a knife or a screwdriver.
A scraper with a razor blade will not damage the surface, as long as it is kept at an angle of 30^ .
Never leave a scraper with a razor blade within the reach of children.
Never use abrasive products or scouring powders.
The metal surround: to safely clean the metal surround wash with soap and water, rinse, then dry with a soft cloth.
Any change in the colour of the glass-ceramic surface does not affect its operation or the stability of the surface. Such discolorations are mostly a result of burnt food residues or use of cookware made of materials such as aluminium or copper; these stains are difficult to remove.
7. PROBLEM SOLVING
The cooking zones do not simmer or only fry gently
Only use flat-bottomed pans. If light is visible between the pan and the hob, the zone is not transmitting heat correctly.
The pan bottom should fully cover the diameter of the selected zone.
The cooking is too slow.
Unsuitable pans are being used. Only use flatbottomed utensils, that are heavy and have a diameter at least the same as the cooking zone.
Small scratches or abrasions on the hob's glass surface
Incorrect cleaning or rough-bottomed pans are used; particles like grains of sand or salt get between the hob and the bottom of the pan. Refer to the "CLEANING" section; make sure that pan bottoms are clean before use and only use smooth bottomed pans. Scratches can be lessened only the cleaning is done correctly.
Metal marks
Do not slide aluminium pans on the hob. Refer to the cleaning recommendations.
You use the correct materials, but the stains persist.
Use a razor blade and follow the "CLEANING" section.
Dark stains
Use a razor blade and follow the "CLEANING" section.
Light surfaces on the hob
Marks from an aluminium or copper pan, but also mineral, water or food deposits; they can be removed using the cream cleaner.
Caramelisation or melted plastic on the hob.
Refer to the "CLEANING" section.
The hob does not operate or certain zones don't work
The shunts are not positioned correctly on the terminal board. Have a check made that the connection is done he control panel is locked. Unlock the hob.
The hob does not cut off.
The control panel is locked. Unlock the hob.
Frequency of on/off operations for cooking zones
The on-off cycles vary according to the required heat level:
-
low level: short operating time,
-
high level: long operating time.
The cooktop is not working.
Check the condition of the fuses / circuit breakers at your location. Check to see if you are experiencing a power failure.
The cooktop has turned itself off.
The main switch (ON/OFF key) was accidentally touched or there is any object above any key. Turn the unit on again without any object about the keyboard. Enter your settings again.
Display F and numbers
If F and numbers appear in the display, your unit has detected a fault.
The following table list actions you can take to correct the problem.
8. AFTERCARE
Before calling out a Service Engineer please check the
following:
that the plug is correctly inserted and fused;
If the fault cannot be identified switch off the appliance - do not tamper with it - call the Aftercare Service Centre. The appliance is supplied with a guarantee certificate that ensures that it will be repaired free of charge at the Service Centre.
Heater display Fault Action
| F0 | Touch control software error. | If error has occurred disconnected and connect again the cooktop to the power supply. If error persist, call after-sales service. If error appears suddenly in a normal operation, call after-sales service. |
| Fc | Touch control zone is too hot and has turned off all the heaters. | Wait until temperature goes down. Cook-top will automatically recovered when temperature reaches a normal value. |
| Ft | Touch control temperature sensor can be damaged. | Wait until temperature goes down. If message persist when temperature reaches an environment value, call after-sales service. |
| FE | Touch control temperature sensor can be damaged. | Wait until temperature goes down. If message persist when temperature reaches an environment value, call after-sales service. |
| Fb | Excessive sensitivity on any key. | See if cook-top is mounted correctly. Be sure that keys touch correctly the glass surface. |
| FU / FJ | Security keyboard error | This error is a keyboard auto-check. It disappears when autocheck return to secure value. If error persist, call after-sale service. |
| FA | Security software error | This error is a software auto-check. It disappears when auto-check return to secure value. If error persist, call after-sale service. |
| FC / Fd | Security software error | This error is a software auto-check. It disappears when auto-check return to secure value. If error persist, call after-sale service. |
| Fr | Relays security error | Any relay driver can have any problemn. Remove cook-top from the power supply, wait a minute and switch on again. If error persist, call after-sale service. |

"Valid only for Cyprus"
| BLU | Neutro | (N) |
| MARRONE | Fase | (L) |
| GIALLO VERDE | Terra | (♣) |


L1/L2/L3 = Phase N = Neutre PE = Terre
4. CONSEILS CONCERNANT LES USTENSILES DE CUISINE POUR LA TABLE DE CUISSON

L1/L2/L3=Fazis
N = Nulla
PE = Fold
4. A FOZOLAPON HASZNÁLT EDÉNYEKKEL KAPCSOLATOS JAVASLATOK

UKLAD NR 1-3
UKLAD NR 2-4
UKLAD NR 5
UKLAD NR 6
UKCAD NR 7
| A | B | C | D | |
| UK LAD NR 1-3 | 2300W | 1800W | 1200W | 1200W |
| UK LAD NR 2-4 | 1800W | 2500W | 1200W | - |
| UK LAD NR 5 | 1800W | 750+900+1050W | 1200W | - |
| UK LAD NR 6 | 1000+1200W | 1800W | 1200W | 1200W |
| UK LAD NR 7 | 1800W | 1800W | 1200W | 1800W |


L1/L2/L3 = Faza
N = Neutralny
PE = Uzlemienie
4. WSKAZOWKI DOTYCZACE GARNKÖW KUCHENNYCH UZYWANYCH NA PŁYCIE
NAVODILA ZA VARNO UPORABO
BEZBEDNOSNA UPUTSTVA
Preporucjemo vam da sačuvate uputstvo za ugradnju i upotrebu za upotrebu u budućnosti, a pre ugradnje ugradne ploče zapišite njen serijski broj u slučaju da vam zatreba pomoć postprodajnog servisa.
UPOZORENJE: Urej i njegovi delovi kojima se moze pristupiti zagrevaju se prilikom upotrebe. Obratite paznju da ne dirate delove koji se zagrevaju. Deca mlaa od 8 godina ne smeju da diraju urejukoliko nisu pod neprekidnim nadzorom.
UPOZORENJE: koristite isključivo one zašitne elemente za ugradne pločkoje je dizajnirao proizvodač uredaja za kuvanje ili koje je proizvodač uredaja naveo u uputstvu za upotrebu, kako je predvideno, ili one zašitne elemente za ugradne pločkoje ste dobili uz uredaj. Korisćenje neodgovarajućih zašitnih elemenata može dovesti do nasreca.
UPOZORENJE: kuvanje na uradnoj ploci bez nadzora uz upotrebu masti ili ulja predstavlja opasnost i moze dovesti do požara. NIKADA nemojtpe pokušavati daugasite vatrudom, vecisklujcite uredaj iPokrijte plamen, nth. Poklopcem ilivatrogasnim cebetom.
Ie npictpi He npn3HaueHn Ira BnKOpncTaHHa i3 3OBHIshIM TaMepom YN 3 BiDInbHOO CnCTeMOIO nCtAHcIHHO KepyBaHHa.
YHnKaIte npramoro norJy Ha ranoReHHi JamnBapnJIbHOI NOBepxHi.
PiKlHcyBnkydo3a3emJHeHO Ka6JIIO
XnBHeHHy,KnBnTpMHye HAnpyry,CTpym Ta
HaBaHTaxKeHH, BkA3aHi Ha npNIky. Po3etKa
NoBHNa 6ytN HanexHo 3a3emNeHO, a TAKoK
PnDAtHO DnHaBaHTaxKeHH, 3a3HaueHO Ha
ApNIky. PpOBI 3a3emNeHH No3HaueHO XOBTO-
3eHnM KOIbOpom. LpnoeDypa NobHHa
PpOBOIDNTcB iDnOBiHNM KBaIipIKOBAHm
PpaizIBnKOM. Y paazi HecymichocTi po3eKn Ta
BnKN npnnaNy, nonpocitb eNEKtpnka 3amHHTn
po3eKy Ha iHsy, yka BiJNOBiDaTnme Heo6xIDHomTy Tny. BnIka Ta po3eTKa NOBnHi BiJNOBiDaTn DIOUHM HOpMaB CbTAHOBJIeHHB KpaIH. IidKnIOUeHHa Do dKepeNa JINBJIeHHa TAKOX MOKe 3dInCHIOBATnCg UJXOM PO3MiueHHA BCENOLpHO RBMKAuA MIX PnJaDOM Ta DKepeLOM XINBJIeHHa, AKN MOKe BNTpIMyBaTN MaKcMaJIbHe NiKJIIOUeHe HABaHTaXeHHa I AKN D BiIOBIAc YHHOMy 3aKOHOdaBCTBy.
KOBTO-3eHn Ka6JIb 3a3eMJIeHH He NOBHeH nepePnBaTnc BnIMKaayem. Po3etka YN BCENOLJrPHn BmIKauch, Uo BNKOpNCToBYOTbcra DnI pIKLIOUeHH, NOBHHI 3aIIuWATucn CnerKOIOCTyNHmN nicra BCTaHOBJIeHH npNJady. BiKnIOUeHH MoKe 3diINCHIOBAtnc 3a paxyHOK DoctynHOCTi BuJKN a6O BkJIIOUeHH H Nepemikaya y oikcoahny npOBoDky BiINOBIHDn DO npabUN MOHTaxy.
3 MeToK yHnKHeHH He6e3neKn, 3aMiHa NOIKoJKeHOrO WHypa KINBJIeHH NOBHHa 3DiICHOBaTNC BnPo6HkOM, qaxiBcEM
cepBichoro ueHpy a60 iHwOIO KBaIipikOBaHOOCo6oIO. IOBXnHa npoBOy 3a3emNeHHra (XOBTO-3eJeHOro) MaE nepeBnUyBaTn 10 MM 3i cToPOHNKJEMHOI KOLOdKn. Nepepi BHyTpIHxHIX npoBiHNKIBNOBHeH BiNObiDaTu HAnpy3i, 10 NOrnHaEcTBcR NOBepxHeO (BkA3aHO Ha apNky). Tn Ka6eHIO XNBJIeHHra NobInHeH 6ytN HO5V2V2-F.
He knaitb metaIeBi npedMeTu Ha BapnIbHy NOBepxHIO, HApnKNaI, HOKi, BuJeIKN, loXKn a6o KpnuKn.BoH MoKyTb HarpiBaTncr.
He cnid po3irpiBaTu Ha BapnIbHi NOBepxHi Ixy B aIOMiHIEBi ΦoJIb3i YN B PnactIKOBUX KOHTeHepax.
Ioo6 3ano6iTn HakoOnuHHe 6pydy i KInpy, nicJy KOxHoro BnKOpNCtAHnBapNbHOI NOBepXHi II cnId OuyuBaTn. JaKIO CbOro He pOBHTn, To, nIac NOBTOPHo BnKOpNCtAHnBapNbHOI NOBepXHi, yci 3aNNkH HarpiBaTMUytbcra Ta BVdIJIaTmMyTb DmI I He npncMHI 3anaxn, He KaKyuN BKe npo PN3NK BnHKnHeHH NoKexi.
Hikon He BnKOpncToByte napoochnk a6o OuchnK BnCOKOr TnCKy dny OunuHn npnna. He TopkaTec30n HarpiBaHHn niJ yac po6Ot n BapnbHOI NOBepxHi Ta DeaKn Yac NiCJIy II BnKOpncTaHHn.
HikonHe roTyIte 6e3nocepEnbO Ha BapnIbHi NOBepxHi 3i CKNOKepaMIK.
3aBxN BnKOpncToByTe BiNoBIDHn Nocyd.
3aBKn CTaBte KactpyIHO NO ueHtri KoHOpKn, Ha kii BN roTyTe. Y KOHOMy paizi He KnaDiTb HiOro Ha naHeIb KepyBaHHra.
He BnKOpNCToBvIe BApNlBHy NOBepXHIO B JKOcTi po6oOoi 30H.
He BnKOpNCToBvIe NOBepXHIO B JKOCTI D0UKN IaHap3aHHa.
He 36epiraute BaKnx npEmtib. NaBapnIbHOIO NOBepxHeIO. PnnaHHi HaBapnIbHy NOBepxHIO, BOHN MOKyTb PpN3BecTN DO N0WkoJKeHHa.
He BnKOpNCToBvIe BapNlBHy NOBepXHIO nIa 36epirAHn6yNb-RAkNX npedMeTIB.
YHnKaIte KOB3aHHN NOcyDy NOBAPINbHi NoBepxHi.
Дя ekcnnyatau npnlaу 3 HOMHaJIbHIMN yactotam He notpioHi DoaTKOBI diI/ HanaSTyBaHH.
Po3ni3HabJIbHa Ta6JIuKHa (po3TaIOWaHa NiI HIXHIM NOKPITTM BapINbHOI NOBepXHi)

1.3AXNCT HABKOLINHbOFO CEPEIOBUNA

Дани пплад Мас МаркУВань BiДиовIDн Do ДиpeKТИВ EC 2012/19/EU zuOdo BiDxOДIB eIeKtpuHOrTo Ta eIeKtpoHOrO oblaHaHHa (BEEO).
BEEO MICTaTB JAK 3a6pydHIOUc peoBNH (raK MoKyTB BKNIkaTN HeraTUNHi HacnIDKn DnA HABKOINuHBOrO cepeoBNu), TAK I OCHOBHI KOMNoHeHTN (rki MoKyTB 6yTu NOBTOp
BnKOpncTaHi).BaxNBo niiDAtn BEEO neBHm npoceDpyam, 06
yCyHyTu Ta yTni3iByatn HaneXHm YHOM yci 3a6pyndHooi peOBHN, a TAKOX dIcTaTu Ta nepepo6bTu BCI MaTeplnn.
Di3uHi oO6n MoKyTB BiirpaBatn BaxKnBy poJb y 3a6e3neHeHHI Toro, 06 BEEO He cTaan npo6nmo Onna HabkONnHbOro cepeoBnua; Heo6XiHO DoTPmByaTcNEBHX OCHOBHX npabn:
BEEO He cnid nomiata npa30m 3 no6yTOBIMN BiXoJamn.
BEEONOBHHI6yTNpeepaHINyBIIDNOBDINyHKTN3bOpnyiD ynpabnHmMICbKOIBaDNABO3apecTPOBaHNXKOMNAHI.Y 6araTbox KpaIHAX,ДЯВENKHXBEO,MOKNBIM36IPBDAOMA. Y6araTbox KpAlHX,KoINBNKynyeTeHOBN npuJa,CTapn MOKe 6yTuNobPeHEnYTOuykPOaPbHOITOPRIBNI,JAKO NBNNHBe6KoWTOBHO3a6patn HOrO3a pHUNOM OOnHdo OOnHO,3a yMOBN JaIOe aHaONrHHe 0bNaDHaHHa,IAKe MaT JxФyHKU,IOHOBINpNJAD.
2.BCTAHOBJIeHHJ
BcTaHOBHeHH No6yToBOro npnIaMy MoKe 6yTu CKJaHIO npOeDpyo o, pNr HnpeBaINbHOMy BnKoHaHHi, MoKe cyTTeBO BnHInyTu Ha 6e3neKy IIOde NmMaHa. 3 ciE' npMHNH Noro cNiD BnKOByATn 3a DonomorHO KBaIipikOBaHOrO qaxIBra Ta 3 DOTpIMAHHM TEXHUYHX HOpM.
Y pa3i HeoTpImaHHpekOMeHdaui i 3diIcHHeHH BCTaHOBHeHH HeKbAiliΦikOBaHOO Oc06O, Bnpo6HnK 3HimaE 3ce6 6ydb-ky BiNobiDaIbHicTB 3a TexHiCyH HeCnpaBHicTB npuIaNy, He3aIexHo BiD TORO, uI rHa HecnpaBHicTB npu3Bena DO IOwKOJxHeHH TObApIB, MaHa a6o J HAeCNa TpaBMn φi3nHmO cO6am Y TBapINHAM.
Nicn BndaenHn ynakobKn nepekoHaTecb, 0o npnaad He noikokJeHo, B iHOMy pa3i 3BepHITbcra Do Tockn po3dpio6HOI TOpribni abo cepbichoro cHTpy Bnpo6Hnka.
IpekoHaTeCra, 0o Me6n, B JkNx npncpi 6yde BcTaHOBneHo, a TAKOX yci Hsi Me6n IIO6n3e BnroTOBneHi 3 MaTePiAniB, CTIKX Do BnCOKnx TemnepaTp (MIHIMY 100°C).
Kpim TOrO, Bci DeKopatNBHI NOKPITTR NOBHHI 6yTN 3aKpinneHi TepMOCTiIKIM KNeE.M.
PpIaM MoXHa BCTaHOBnTu y B6yOBoAHx Me6Jx y CTaHapTHOMy (INB.MaJIIOHOK 1)Yu B6yOBOAHOMy (INB.MaJIIOHOK 2)peKIMi.
TOBUNHACtINbHNIOBUNHCAtHOBNITN BID25do45MM.
Pumimka: P03mpu enympiuHbozo nepumempa odhakoei npu cmahdapmhi ycmaHOsui.
3aHnTpe npHaMHI 55 MM MIX BapInbHOIO NOBepxHeO Ta 3aHbOIO CTHO, a TAKOX UOAaHEMeHSe 150 MM MIX BapINbHOIO NOBepxHeO Ta BEpTKaJIbHM EJEMeHOM Me5NIB a6o 6iHOIO CTHOIO. RaIIO HA! BAPINbHOIO NOBepxHEO BCTAHOBNeIHUI eJEMeHTN Me5NIB, BiCTaHB Do HIX NOBHHA CTAHOBNTU OJHOaMEHSe 700 MM.
Iid yac BCTaHOBHeHn BNTXKN HaB BapINbHOIO NOBepxHeO CKOpNCTaTEcpeKOMeHdaUIMN 3i BCTaHOBHeHn BNTXKN, aIe B 6yDb-My pa3i BiDcTahb MIX BapINbHOIO NOBepxHeIO Ta BNTXKOIO NOBHnHa CTaHOBtN UoHaMeHne700 MM. (INB. MaJIHOK3)
KuHnKHeaCTHaBapInbHOIO NobepxHi MeKyE i3 30HO,ka Cacto BnKOpNCTOByeTbCra Ta OUnUyeTbcra, ToDi NtpiHo BcTaHOBNI npoknaKy Ha 20 MM HnKHe HnKHbOiet AcTHnH BapInbHOIO NobepxHi. (4)INB.MaJIHOK
PnBCTaHOBNeHHI DxyOBKn iD BapINbHOIO NOBepXHeIO He cnID BCTAHOBNBOATn PpOKNaKy, a MIHimaNBHa BiDcTaHB MIX HNXHBIOO YACTHOHO BAPINbHOI NOBEPXHi TA DxyOBKOHO NOBINHCA TcAHOBNTU OHAmHEe 10 MM. He BcTAHOBNIOTe Harpy DxyOBKY iD BAPINbHOIO NOBEXHEO Ta BIKOHYNTE BCTaHOBNEHHY DXYOBKN BIDNOBIDHO DO BIMOR IIOO II BCTaHOBNEHH. (5)DNB.MAHOHOK
BdoHepoHnKHe yuInbHeHH NoCTaayTbca pa3om i3 BapInbHOIO nobEpxHEO.3aikcyte yuiNbHeHH DOBKOna HmKb0I YaCTINH BapInbHOIO nobExHI, kOncaHO, i nepeKoHaTeC, 10 BOHO npabInbHO BCTaHOJIe, 106 yHNKHyTN BtOKy B onOpHi eJeMeHTM Me6nIB. (6)DN.B.MaHIOHOK
3BnuaHe 3akpinHnHa:
-BinmitbphiCyuOi 3aTnCKaYi i3 cyMkn 3 akcecyapamTa 3akpytib ix y Takomy noIOKeHHI, kIe 3o6paKeHo BnH3y. (He 3aTarynte rBnHTn, uO6 He 3a6NoKByATn 3aTnCKaHi, BOH NOBHHI BInbHO pyxatnc.) (DINB.MALHOHOK7)
- BctaHOBtB BapnIbHy NOBepXHIO B cHTpaIbHOMy NOnOKeHHI Bnpi3aHOro OTbOpY.
NoBepHb 3aTnckayi Ta 3aTyrHiTb IX NOBHCTHO (8)INB. MAJIOHOK
WbUke 3akpinneHHr: (3aJexHo BiM oMei)
BnmiTb QOTnpn npyKHH i3 cyMKn 3 akcecyapamTa 3akpinitb ix 3H3y, kR 306paKeHo Ha pncyHKy. (9)nIB.MaIOHOK
BupinHnTe Ta BCTaBe BapnIbHy nobepxHIO.
HaTnciHb Ha 6okn BapnIbHOI nobepxHi, nOKn BOHa He 6yJe
3akpinHe BAIOBk BCbOroNnWnWnWnWnWnWnWnWnWnWnWnWnWnWnWnWnWnWnWnWnWnWnWnWnWnWnWnWnWnWnWnWnWnWnWnWnWnWnWnWnWnWnWnWnWnWnWnWnWnWn
BByOBAHE BCTAHOBJIENHRA
IpeBipuBn npabunbHcTb po3aUyBaHHB aPunbHOIO NOBepxHi, 3anOBHtB 3a3Op MIX CINbHmEo TA BapunbHOIO NOBepxHeO CNIKOHOBIM KNEcM. 3arNaDBe CNIKOHOBIM WAP WKpe6Kom YN NaIbCEm, 3MOeHIM MNbHOIO BOHO, nepHI XIK BIN 3actrHHe. He BUNOPICTOByTe BAPUNbHY NOBepXHIO DO NOBHORO BUCNXAHH NcIKOHBOHOHOHOHOHO11)
3. ENEKTPNUEH NIKKIOUeyHH


PO3MIUEHHRA-24 PO3MIUEHHRA5 PO3MIUEHHRA6 PO3MIUEHHRA7
| A | B | C | D | |
| PO3MIISEHЯ 1-3 | 2300W | 1800W | 1200W | 1200W |
| PO3MIISEHЯ 2-4 | 1800W | 2500W | 1200W | - |
| PO3MIISEHЯ 5 | 1800W | 750+900+1050W | 1200W | - |
| PO3MIISEHЯ 6 | 1000+1200W | 1800W | 1200W | 1200W |
| PO3MIISEHЯ 7 | 1800W | 1800W | 1200W | 1800W |

BidnoiDIO moeJI
- "+"
- "-"
- TAIMEP
4.ДоаТКOBa CBITIOJIOHa NaMaNa BapINbHOI NOBepXHi - INdkaTop nporpaM npiroToBaHH Ha BapnBHi noBepxHi
6.Bn6ip30Hn - Mict
"BcTaHOBHeHHI pInaMy NOBHHO BiINOBiDaTn CTAHdApTAm i DnpeKTHBaM." Bnpo6Hk He Hece KdoHoi BiNObiDaJIbHoCTi 3a 6yIb-aki 3bNTKn, kki MoKyTB 6yTN 3aNoDiHi BHaCNIIOK HeBiIDNOIBHOrO Hn Hepo3CyDnIBORo BNKOpNCtAHH.
YBAGA:Bipob6nHK He Hece BiDnOBiDaIbHocTi 3a 6yDb-kyin iHUnJeHT a6o HacniK, kki MOKyTB BHNKHyTN Ni dac BNkOpNCaHH He3a3eMneHoro YHnepaBnBHO 3a3eMneHoro npnaNy.
Pepe npoBeHeHm 6yDb-kynx eJektpuHnx po6it 3aBXn
pebeBipraTe Hanpyr XNBHeHH, Bka3aHy Ha NnBHKy
eJIeKTPoeHeprii, perynIOBaHH BIMNKAa, 6e3nepePBHicTb 3a3eMneHHi BiIDNoBIDHcTb 3anO6xKnKa.
EneKtpnHe NiKKnHoueHH Nid Yac BCTaHOBNeHH NOBHHO 3diChOBatNCBa BiNObiDHO Do HOMHaNbHoI NOTyKHOCTI npNaJy; cci3pO6bTuYepe3 6araTOnoJIocHN BMIMKaU.
KIO npnaI Mae po3Eky, BIN NOBHeH 6yTn BCTaHOBneHn TaKIM YHOM, IO6 po3Eka 6yNa DOCTynHa.
KoBTH/3eJIeHn npOiD ka6eIIO XNBHeHH NOBHeH 6yTN 3a3eMneHn Rk DnA DkepeHa XNBHeHH, TAK I DnA KNeMHnx KOJNOOK npNJady.
Ypasi BnHnKHeHH 6yNb-8Knx 3aNtAhb, NOB'3aHnx i3 Ka6eIem KnBHeHH, 3BeptaTecra Do cepBicHoro ueHTpy a6o Do KBanipikobahoro qaxibua.
Kuo BapnIbHa nobepxHc OchaueHa KaBelem KINBHeHHr, TOni BOHa NOBHHa 6yTn nIKIOeHa TiNbKn Do DkKepeNa XINBNeHHr 3 HAnpyroo 220-240 B mix fao1o i Hyem.
BapnIbHy NOBepxHIO MoKHa nIKJIOHTN Do:
Tpua220-240V3
Tpua380-415V2N
Iio6 nepeTn Do HOBOro nIKIOueHHa, BUKOHaTe HabeHeH NIXKcye IHCtpykuii.
NpeepiiknloeHHm,nepekoHaTeec,0o yctaHOBka 3axnueHa BiINOBiDHN 3anobixHKNOMIOCHAUEHa npBOBADMDOCTAHTbORe nepepiy,io6 HopMaIbHO nocTaatn npuiaD KMBeHnHM. NpepeBepHtB BapInbHy NOBEPXHO,CKnHO CTOpHO DOHN3y, 3axnCTNBUnpeep TmCkIO.
BiKpnTe KpnKy B HacTynHnNoCnIOBHOcTI:

1

2

-BiDkpyTiB ka6eIbHn 3aTnck "1";
-3haiDITb DBA BucTynn,po3TaWOBaHHa CTopoHax;
- NomicItb Jne3o NIOCKOI BKNKpyTKn HABNpOTN KOXHORO BNCTyNy "2" i "3", TOni HaTNCHTb;
-3HIMITb KPNUky.
Toro, 3n KaBHe KMBeHHa
-BuDaiTb TBHHTN, kki yTpMHyIbKJIeMHy KOIOky, 10MiCTNTb 5yHT 6apn i npoBIDHKn Ka6eIIJXNBHeHH;
-ButrHITbKa6eBxKMBneHHA.
PpoeDpyn, Heo6xDiH dI rHOBOriNikKluOeHHa
-Bn6epitb ka6eIb jxNBHeHHa BiINOBiIDHO Do peKOMeHaui, HabeDeHnx y Tabniu.
- Nomictitb ka6eB jKBJHeHHB 3aTnCK.
-3aunctitb KHeBkoKHO npoBIDnKa KaBeIIO XNBneHHa HdoBXnHy 10 MM,6epyN Do yBaHn Heo6XiHy DOBXnHy KaBeIIO DnPiKnIOueHHN Do KNeMHOI KONoKn.
-BiNobIDHOIOHCTpyK3I BCTaHOBNEHHraTa 3aDOnOMOIOU WHT6apIB,AKI BN NOBHHI 6yIN BNTARHyTN iN ac nepwoI npoecdyn,3aFikcyTe npoBIDHK,IK NOKa3AHO Ha rpaqiKy.
-3akpiitb kpnkny.
-3akpyTItb Ka6eJbHn 3aTnCK.
PnIMtKa: nepekoHaItecra, 3aTnCKHI rBnHTN KJIeMHOI KOJNOKn Do6pe 3aTyrHyTI.
Ppoeayn, Heo6xidi HOBOr nikHoueHHa
-Bn6epitbKa6eBbKbIeHHBaINOBiINOHOdopekOMHaui, HabeDeHx y Ta6nui.
- POMictiKa6eJb XNBHeHHB 3aTnCK.
-3aHCTiB KHeCb KOxHOro npoBIDnka KaBeJIO XuBNeHHa Ha DOBXHy 10 MM,6epyN Do yBarn Heo6XiHy DOBXHy KaBeJIO DnI pIKIQUeHHDo KJIEMHOI KONoKn.
BIDNOBIDHOIOHCTpykui3I BCTAHOBNEHHra 3a donomoroo uHT6apib,aki BN nobHHi 6yInn BuTHyTu nD yac nepwoi npoedyn,3aikcyte npobidHK, kN okaahOHa rpaiky.
-3akpiitbKpnuKy.
-3akpyitbKa6eJbHn3aTnck.

YBAGA:
Ypa3i Heo6xidHocI 3aMInn Ka6eHHKJBNeHHN, iKnIOHITb npOBIy BiIOBIDHOCTI 3 HAcTyNHMM KOJbOpAMN/KoJam:
| СИНÍ | Нуль | (N) |
| КОПЧЕВÍN | Фаза | (L) |
| ЖОВTO-ЗЕLEHÍN | Замлеленя | (½) |
Piikluoyehnno KneHa KlmHni KOozi
| PO3MIISEHЯ "1-6" | PO3MIISEHЯ "7" | |
| ОДноФАХHE aбо ДВОФАЗHE 220-240 V~ | ||
| Кабел HO5V2V2F | 3x2,5 mm² | 3x4 mm² |
| ТРИФАЗHE 220-240 V3~ | ||
| Кабел HO5V2V2F | 4x1,5 mm² | 4x1,5 mm² |
| ТРИФАЗHE 380-415 V2N~ | ||
| Кабел HO5V2V2F | 4x1,5 mm² | 4x1,5 mm² |

L1/L2/L3=Φa3a


N = Hynb
PE=3a3eMJIeHHH
4. NOPADNI OIOO BVBOPY NOCUY DnRA BVKOPNCTAHH RA BAPNJbHI IOBEPXHI
BnKOpNCTaHHBnCOKoRiCKHO KxOHHO NOcyu Mae BnpiuaJIbHe 3HaueHHI ONTmAlbHOI PO60Tu BaIoI BApINbHOI NOBepXHi

3aBxHn BnKOpNCToByTe NocyD BnCOKoi JIKOCTI 3 IdeaJIbHO pIBHM Ta TOBCTNM DHom: BnKOpNCtAHN TaKOro TIny Nocdy nonepdJyE npriopahHc Ctpab. TobCTi MeTaneBi KAcTpyni Ta ckOBopiKn 3a6e3neHyOt bPiHOMIPn po3NoDIn Tenla.
- NepekoHaTeCnB Tomy, 00 dHo KAcTpyni nCKOBopidKc cyuHm: npri 3aONoHEnHi KAcTpyni pidyHoo a60 npri BNkOpNCTaHI KAcTpyni 3 xOIOINbHnka, nepeBCTaHOBHeHHM Ha BApINbHy NOBepxHIO, nepekoHaTeCn, 00 II OCHObE NOBHCTO cyxo. Lc DOJOMOKe YHNKHHTN BuHNKHeHHN PnIM HA BApINbHi NOBepxH.
Bukopnctobyte kactpyni,iametp knxE DocTaTHbO BEINKIM,0o NobHcTIO 3aKPTN OINH EInEMET BapnLbHO NOBepxHI:po3mip kactpyni nobHHeH 6yTu He MeHun, HIX nNoua Harpi BaHH. Ra 00BaHO TPOXu WpHa, eHepria 6yde BUKOPMCTOBYBAATNC3 MAKCMMAJbHOO eEeKTNBHcTIO.
BNSIP NOcyDy - HactynHa IHopmaui DOnOMOKe Bam o6paTkyxOHnnnnoSyd, knn 3a6e3neuHb ONTMaNbHy npOdyKTHBHCtB.
Nocyd 3 Hepxabioo tani: oocnbpekomehdyemcb. Oocnb0ekeTNbHn 3 noDbHnHM nHom. NodBHe nHO noeDHyC B cobi nepebarn hepXabioo tani (3OBHIiHi BnIyad, DOBRIHcHt Ta CTiKcHt) Ta anOMHiio a60MiDi (TeINONPBOIDHcTb, pIBHOMIPHN pO3IOJ Tenna).
Nocyd 3 anHomHIO: peKOMeHOyEmbcaeaKkuu nocyd. Xopowa npoBIDHcTb. AnHomHiEbi 3aIIuKn IHoDi 3'ABNHOtbcr y BNnIi noPpHH Na BapINbHI NOBepxHI, aIe IX MOXHa LWBnKO yCyHTN, kUo HeraiHo OHCTNTn NOBepxHO. Upe3 Hn3bky TempepaTy pIaBneHH, He cIid BkOpNCTOByBatn nocyd i3 TOHKOrO anHomHIO.
YabyHnn nocyd: MoxHa buKOpucmoeyamu, ane He peKoMeHdyemcbr. H3bKa npOdyKTnBhictb. Moxe npn3BecTn do BUNHKHeHH noDpRnH Ha nobepxHi.
Iocyd3MiHNM DNOM I KepamiuHn Nocyd: pekomehdyembcbaekku nocyd. Xopowa npoDyKTnBhicTb, aJe MOKJIbBi MiHi
3aJINsKMOKyTb npn3BecTN Do noRBN NOpPnH. Taki 3aJINsKMOKHa ycHyTu, RaUo HeaHIO OuNCNTN NOBepxHIO. KpIM UBoRo, He cnI DOnyckTaBnKmNAHH BODN 3 TAKO NOcyDu. NepepiTNI Metan MOKe npKneITcA Do cKnHOi BapInbHoI NOBepxHi. 3aJINsK BiD nepepiToM iMoHOT KAcTpPyI 3aJINsMaT b NnMn HA BapInbHi NOBepxHi. Nocyd 3 apOpopyeMan: Xopowa npOdykTNBHCtB tINbKn 3 TOHKIM, TJaDNKM Ta IIOCKM DNOM.
Nocyd3i cKnokepamikn: He peKoMeHdyembc. Hn3bKa npOyKTNBHcTb. MoKe np3BecTu Do BuHkHeHHa nopPnH Ha nobepxhi.
5. EKCNJYATAUJI NOBEPXHI
AKn6patn pibEnbynpaHINHHKnBnEHHM.
3a donomoroo yHKuii "YnpabnHHJ KINBHeHm" KopncTyBaH MOKe HanaIyBaTH MaKcMaJIbHNI pIBeH NoTyXHOCTi, DocxHN Ia BapnlbHOI naHeni.
Функцу уральпгд КИВЕнгд Мocstунна Лишп ротягом nepшх 30cekyн Nicra BBIMKHEHнв Барльhoанел.
Le hanaштуваимохнha 3mIHNTn 3HOy, BiD'edabwI wTeNceIb Bi
Mepexi enekTPOXINBEHnI I ue paz nii'deHabWn NOrO.
Ypa3i BCTaHOBNEHO MAKcIMaIbHO rPBnIOTyXHOCtI BAPINbHa
raHeNb ABTOMaTmHO peryIOe PO3NOJ IOTyXHOCtMI K
KOHΦOPKaM, 065 euePiEh He 6yNo nepeBnIeHo;
3aBdKNuOMy MOxHa OOnHAcHO KepyBaTN BCima KOHΦOPKaM, He
CTNkAHOCb 3 np6bEmoIO nepeBaHTaxEHn.
Kopnctybau moxe BCTaHOBtMaKcImaIbHnPiBeH NoTyXHocT IaBapInbHoI naHeni Bid 2,5 KBT Do 3HaueHHMaKcImaIbHoI BiHocHoi NoTyXHocT npUaNy (eHnnapameTp 3aJeKnTB Bid MoDeni npUaNy) (HaPnKnAad, RaIO MaKcImaIbHa NoTyXHcTB BApInbHOI naHen cKaJaac 7,2 KBT, MaKcImaIbHnPiBeH NoTyXHocT dna HanaWtYBaHHCTaHOBt BiD 2,5 KBT Do 7,2 KBT.
Ha npud6aHn BapunbHi nAHei BcTaHOBNeHO MaKcMaJIbHe 3NaueHH NoTyXHOctI.
Iicna niklueyHn npnady do enektpoxNBneHH npotrom 30 ckyHm MoXHa BCTaHOBHTn pBeHb NOTyKHOCTi Ha 6a3i 3a3HaueHnx HxKHe napaMeTpib:
1-YBIMKHiTb KOHdopky.
2-DaTe 3Mory ceHcOphOMy ynpabnIHIO 3aBepuHTN npoec iHiuiianisaui.
3-Перш HIX MInHe 30 cekyH, TopKHiTbcra Ha 5 cekyHd KnaBiWi " ( - ) (Mihyc).
4-Ha dncnnei 3'ABNTbcn HAcTynHe NOBIDOMNeHHA.

5- CkopncTabwnbc Knaibiamn "Plus" (Pnnoc) i "Minus" (Minyc), MOxHa BiDperyIIOBAtn ynpabNIHHXKINHeHm. Y daHomy npnkNadi nOtYxHicb peryIIOeTbc m6 6500 i 2500 Bt. Bn6paBn noTpiphe 3NaueHH, TopKHITBC BOHOac Knaib "Plus" n "Minus", ytpmyoucx ix npTgrom 5 ckyHd.

6- Picna 3akinueHHn ciie npoedynnpnyhae doBn ciHan i BiDyTebcncknDaHHncTeMn. NobTopntbc npoedypa zanycky.

7 - Picna 3anycky npoccy Ha dncnnei taMepa ECO bio6paunbcya npabniHHa KINBneHHm.

Iicra 2o20 ceHcOpHe ynpaenHH He do3eOnmb nepemukamucn ha 6yob-ky KOM6iHaUIO, uO moKe nepeBuaum dahe 2panuue 3haeHH Eco.
YbIMKHeHHBmKHeHH KOHΦopKn

Uo6 yeimkhymu KOHΦOPky, TopKHTbCt Ta yTpmyTe 3OHy 6yNb-koI KOHΦOPKn npTcrom 400 Mc. Bn nouyete DOBriN 3ByKOBni CnHAn, a Ha KOHΦOPkax 3'ABNTbc 3HaueHHa "0", 10 BaKa3yBaTmHe Ha pibeHb NOTyHKHOCTi.
1)Akyo niz yac 6ydb-koRO etany npiroTyBaHH pIBE hNOTyKHO tnepe6yBaTmE B NOJXeHHI O, cey dncnne ABOMaTHHO BIMKHeTBcra Hee3 10 cekyHd i npO3ByuHTb cepi 3BkyOBHX CnHaJIIB, IIO CBIDHTMNE PBO BIMKHeHH KOHFOPOK.
2) 阿卍o Ha yBIMKHeHOMy DnCnneI BiDobpaKaETbCra IHINKAtOp 3aNtkoBOrO Tenla, ano NTyKHiCTb 3hAxoDiNbCSHa pIBH O, ToDi Ha ekpahi NonepeMHHO 3'ABJIaTImeTbCra "0".
3) 阿图 60K21860K21860K21860K21860K21860K21860K21860K21860K21860K21860K21860K21860K21860K21860K21860K21860K21860K
Uo6 bumkhymu KOHΦOpy, TopKHTbCra Ta TpymMyTe 6yIb-ky30Hy KOHΦOPKn PnTcROM 1,2 c. Bn Nooye3 KOpOTKI 3ByKOBI CnHAni, a Ha ekpani KOHΦOpKn HiYoro He BiO6paKaTMMeTbCra abo JK BiO6paKaTMMeTbCra 3aueHHe "H" npn HaeBHOCTi 3aIIHKOBOr ToTnla. KoHΦOpKa BUMKHeTbCra.
1) Raio niaac 6ydb-ko ro etany npiroTybaHH pibeHb notyKHO nepe6yBaTmE B noJoxeHHI O, ciennne ABTomaTHo BIMKHeTcra che3 10 ckyHd i npO3ByuHTb cepir 3byKOBnx CunHaNIB, IIO CBiDHTmE IPO BIMKHeHH KOHpopok.
2) Y pa3i HaaBHOCTI 3aIIuKOBORo TennBa BmKHeHOI KOHΦOpKn, Ha DnCnnei BiIObpaKaTumMeTbc 3HaueHHa "H".
3) Habitb kIoo foYHKui 6nOKyBaHHa AKTNBOBaHa, BN MOKeTe BIMKHyTN KOHΦopKy.
4)JaKIO akTINBObAHa JnIe OJHa KOHΦopKa,a CE BVMKHeHO,BN NOHyete 4 KopoTI KByKOBI CnHaJI,Nki O3HaATMMyTb,IO BCAR BApINbHa NOBepxHRA BMKHeHa. BIDobpaKaTImTeCb 3HaYeHHa "H" npi HaRBocTi 3aIIuKOBOro Tena. KoHΦopKa BMKHeTcBcR.
1) Raio nia cac 6ydb-ko ro etany npiroTybaHH pibeHb notyKHO tnepe6byatme B noIOKeHH O, ciennne ABTomaTHO BmKHeTcra Hee3 10 ckyHd i npo3ByHTb cepi 3ByKObHex CnHaJIb, Ioo cbIqHTnme npo BmKHeHH KOHOpok.
2) Y paazi HaraBHocTi 3aIIuKOBOro TennBa BmKHeHOi KOHOpKn, Ha DCnPeI BiO6paKaTumetbcr 3HaueHHra "H".
3) Habit ykuo cyHKuia 6nokyBaHHa AKTNBObHa, BN MOKeTe BmKHyTu KOHOpky.
4)KaIooakTnBOBaHaJIiueOHaKOHΦopKa,aLcE BmMKHeHO,Bn noHyTe 4 KopoTki 3ByKOBI CnHaJI,aki O3HaHTMMyTb,IO BCa BapnIbHaNoBepxHBA BMkHeHa.
Bn6ip 30Hn
KoH3OHa AKTINBOBaHa, NiDCBiyBaHHI IHuNX yBIMKHyTNX aNe H Bn6paHnx 30H 6yDe MeHw IHTEHCBHM.

Kuio TINbKn OHa 30Ha yBIMKHeHa, 3OHa 6yde Bn6paHO 3a 3AMOBuyBaHHM, Bam He NtpiHo HaTnCKaTN (Ta yTpmyBaTN npTROM 150 MC) KhoNky Bn6opy.
36ilbweHH/3MeHweHHpIBHnotyXHOCTi

BMOxTe 36InbIbIyBaTn CH 3MeHbYBaTn pIBeHb NOTyXHOCTHa ekpaHI KOxHOI KOHOpKn 3a DOnOMOrHO KHONOK"+" "0-1-2-3...9-P
- PnHaTnCKaHHI Ta yTpmyBaHHI KHONOK "+" "n" -" pibeHb ToNYKHOCTI 36InbSyBaTMeTBcR/3MeHHyBaTMeTBcR NoCTiHo. PnP WbNkOMy 36InbSeHHI PbeHb NOTyKHOCTI 3ynHHTbCRA Ha No3HaCu9, ⅡnNoaBbWOrO 36InbSeHHN HNOtYKHOCTI NoTpi6HO 3diChHTN KOpOTK HiTaNCKAHH KNON "+". Pn WbNkOMy 36InbSeHHI/3MeHHeHH Bn He NoCHyTe 3ByKObX CnHAnB.
- DocryHyBn pIBH NOtyxHocti P, HATNCKAHH KONK "+ " He 3MInHb pIBeH NOtyxHocti Ha 0. DocryHyBn pIBH NOtyxHocti O, HATNCKAHH KONKn -" He 3MInHb pIBeH NOtyxHocti Ha P.
- KonoKoHOpKa BBIMKHeHa i pIBeHB NOTyXHOCTI nepe6yBaE Ha 0, Ha ekpaHi 6nMaTme 0, JaIO KOHOpKa rapra. Yepe3 10 cekyHd 0 3HNKe I ha ekpaHi 3'ABtBcS rItepa "H".
- Konn Bn6paHa NeBHa KOHΦopKa, OndOchae HaTnckAHH KHOHOK "+ i" HanaWtye pIBeHb NotyKHO npOTAROM 10 cekyHd. Konn Yac MHe, TaMep BnMKHeTcR. LIO dIO MOxHa 3JINCHHTB DEKJIbKOX BnAnKaX, 3aEnKHO Bd HanaWtBaHb ceHCOPHX enMeHTIB KepyBAHCTN. HAcTyNHI npKnAdn HabEDeHI TINBKN DnRA DoBiDN. OocnbHn DOCBID DO3BOJNTB Bam aadTByBatn Ci HanaWtBAHH BiNoBDHO DO CBOrO CMAky Ta 3BNUOK.
ФункцяблOKуBaHHЯBIDiTeH

Ld iB iD6yBaTbC npn OndHocAhMy HATNCKaHI KHOONo "+i"-."
PiCnI cIbOro, KOJI Bn TOPKHeTcE KHNKn, DnCnne BIDOppaXaTmme "L" npOTROM 2c, a HarpIBaHHra3aNIMITbc Ha TAKOMy X pIBHi.
Uo6 BUMKHytn fynKlIO bNOkyBaHH BId dTei, DoTPMnyTEcA anAnorHIN HCpykui. PiCnI zIbOro, BN nooyeK KopOTkn 3ByKOBn CmHAN, a Ha dnCnnie BIDOpba3ntbc nItepa "n". BapInbHa nobepxHr 3aIIuWATmMeTbC po36nOKOBaHOHO.
Pnmitka: FyHKui ABTomaTHORO 6IOKyBaHH BID iTei AKTByeTbcra yepe3 15 XBUNH NICN NOBHO BUMKHeHH BApINbHOI NOBepxHi. Lf FyHKui BMKAATMeTcBcA BtOMaTHUHO, aJe CnpSy II notpi6Ho 3anporpamyBaTn. DInB. nyHKT "HanaTuBaHH KopNCTyBaVa"
NoDbH/ NotpiH KoHΦopKn
IJI BAIMKHeHHa NOBBIHoro KINbUa KOHOpKn NOTpi6Ha KOHOpKa NOBHHa 6yTN nonepeHNbO BBIMKHeHO, a pIBeH bNtYxHocTi NOBHHEN 6yTN BnUIMM O.
8.1-YBIMKHeHHNoDBIHoiKOHOΦopKN
Pepue KOPOTKE HATNCKAHNA KHONK PO3UHNEHBA BMKAe DOJATOBE KINbue KOHOPKn. KaIOdoAtoBe KInbue BBIMKeHoCBITNOIDHN INDnKATOp CBITTNMeTbCS HAD KHONKOPO3UHNEHNA
Dpyre KOPOTKe HATNCKaHHK KHONKn PO3UInpeHHB MmNKaE DoaTkoBe KINbue KOHOpKPn. Bu noyTe KopoTkn 3ByKOBn CnHaI niCnJ KOKHOrO HATNCKaHHK HONKn PO3UInpeHH.
8.2-YBIMKHeHHNoTpiHoi KOHOpOpKn
Nepwe KopoTKe HATNCaHHK KHONK PO3WnpeHHB MKNKae nepwe DOaTKOBE KINbue KOHOpKn. RaIO nepwe DOaTKOBE KINbue BBIMKHeHO, HAD KHNKOo PO3WupeHH CBITNTmEtBCr 1 CBITNOiDHN IHNkAToP (NBIN CBITNOiDHN IHNkAToP y BnnaKy 3 NOTPIHNO KOHOpKO, cepeHi i EHNH CBITNOiDHN IHNkAToP y BNnAky 3 NOBIHNO KOHOpKO).
Dpyre KopoTke HaTnCKaHn KhoKN po3wnpeHHBmKAc Dpyre DoaTKOBe KInbue KOHpOpKn. JkIo Dpyre DoaTKOBe KInbue BBIMKHeHO, HAd KhoNkoIO po3wnpeHHCBiTnTMyTBc2 CBItnoDiOnHi IHINKaTopn.
TpTe KOPOTKe HATNCKAHH KNONK pO3WIPeHH BMMKaE nepwe i Dpyre DoaTkoBikIbura KOHΦopKn
Bn noyyeTe KopoTkn 3ByKOBu CnHaJI NiCnRA KOxHOro HaTuCKaHHa KHONKn po3wnpeHHra.
Функця моста
Mict MOKHa aKTbByBaTu TINbKn, RaIO O6nDbI KOHOpKn BUMKHeHO. RaIO Bu6paHa KOHOpKa MoCTa, Uo6 aKTbByBaTu FyHKUIO MocTa, NotpioHO HAtUCHTN KHONKY MoCTa
Bn noyetye KopoTkn 3ByKOBn CnHAn, a nicraakTbaui KoHΦopKn 3acBtntbc BITNOIOIDHN iHnKaTOp KOHΦopKn.
Ombi KOHOpKn B MoCTI 6yDyTB Bn6paHi OHOaCHO.
IicnBn6opy konfoopok HanaTuTe 6aKaHn pBeH nOtYKHOCTi 3a DOnOMrOIO KHOIOK" + i".
OmbBa DnCnnei KOHOpok y MoCTI BiIObpaKaATMyTb ODAKOBPiBeH NotyKHOCTI. PoBoTa FyHKuII pPIMNHITbc:
- Nicra HatnckaHHK HONKMOCTA BpeKMI HanaWtYBaHb
- KkO KoPncTyBaU Bbepe pIbeHb noTyKHOcTi "0"
3ano6irahnnepeinBaHHIO
Oocb (o6'ekT qH pHa) ytpmye KhONky npotarom 6InbH hix 5 c.
3ByaTMyTb 2 KopoTki 3ByKObi CnHann + 1 DoBm 3ByKOBn CnHan KOnHi 30 c, nokn KHonka 6yde HATNCHTa. BapnIbHa NOBepxHn BUMKHETbcra. LcE CNMBOJ npoOxBnTb 6NIMaTH, DOKn icHyc npo6nema.
Taimep
ФункюТаймера мохна akTNByBaTN 3a ДОпOMORO BOДиOBiHOI KнOKи ab6x OДнOHUacHOrO HATNCKAHHR KHOHOK "+" i"-".
B oBnDox BnnaKax BN NOBnHb BN6paTH KOHΦopky Ta BCTaHOBTN II pIBeH nOTyXhOCTI Bnue "0".
Bn6epitb KOHΦopky, IЯякоI notpi6Ho BCTaHOBtN TaIMep. PibeHb NOTyXHocTi KOHΦopKn BuIuN 3a 0. Ha ekpaHI KOHΦopKn 3i BCTaHOBJIeHM TaImePOM BiObaPaKaTImeTbC rTaTINHH CNMBON. "0"Ha ekpaII TaIMepa.
1) Yac Ha TaImepi MoXHa BCTaHOBnTH 3a DOnOMoROH KHOJOK "+"i" -". PpN 3miHi Yacy 3ByKOBI CnHAn He LyHaTHMyTb.
2) Bn mokeTe ckacyBaTu TaMep (BIO6paKaTaUMeTbc8O0), HATNCHYBUN OJHOaCHO IORO KHOPIK.
3)KaHoHaTnCHyTu TaYTPMByBAt KNHOKN "+""NpOTaROM Bn3HaueHOrO YAcV, MoKHa 3dIiCHHTu WbNDKi HanaUTyBaHH.
4)Пин HanaityBaHHi Yacy Taimepa Bn MoKeTe IpeeTN BiD "00"do "99" 3a DonomoroH KOHKn "-", a BiD "99" Do "00"- 3a DonomoroH KOHKn "+".
5) MaKcMaJbHm Yac CTAHOBnTb 99 XBUNH.
6) KOnI yac BnIwO I NyHaIOb KopoTki 3ByKOBI CnHAn, HATNCHTb 6yDb-ky KHOKNy, 106 3ynHHTN 3ByKOBN CnHAn Ta CkHHTN Yac Ha ekpaHI.
7) Bn mokeTe HanaTuBaTn Yac TaMepa, KOJI BIn npaioe 3a nonepedHbO BCTAHOBHeHMn HanaTuBaHHmN.
8) NToTyKHiCTb KOHΦOpKn,ДЯЯKOIT BCTaHOBNeHO TaMep,MOXHapeRyIIOBAtn 6e3 BnNBy Ha HanaUStYBaHHra TaMepa.
9) BiDnIK OCTaHbOY XBUNINH BECTIMETbCBA CekyIax (DNJDAEKNX BAPIAHTIB BIDOpBaKaTbCBA NIIe Pn HanaWtBuHHi TaIMepa Niac octaHbOY XBUNINH BiNDjkiy).
10)HaTnCKaHHK HONKN TaHMepe 6e3 BvBOpy 6yDb-RAKOI KOHOPKn Ta 6e3 BCTAHOBJIeHH TaHMepe IJN 6yNb-RAKOI KOHOPKn He DaCTb KODHOrO pe3yNbTaTy.
11)HaTnCKaHHK HonKn TaMepa 6e3 BnBOpy 6dyb-koI KOHΦopKn Ta nicr BCTaHOBHeHH TaIMepa dNk KInbKOx KOHΦopOK NOePROBO 3mHHTb Yac, BiObpaXeHn Ha ekpaHax, Ta BiObpaKaTUME qac TciE KOHΦopKn, De Ha ekpaHi pIBH NtOyXHOCT BBIMKHeHO DecrTKOBn PO3dIOHBaY.
12)Ha konΦopu,Je BcTaHOBnHO TaMep, noeproBO BiO6paXaTImEbCn NotyXhIcTB (5c)i(0.5c).
Ha ekpahi taHmepa BiOobpaxKaTmMeTbcra cac, 30 3aIIuINBCRA. RaIc TaMep BCTAHOBInEO dIg KINbKoX KOHOpOK, BiOobpaxKaTmMeTbcr Toi Yac, JAKoro 3aIIuINOCra HaMeHwe, a Ha BiNobIDHomy ekpahi BiOobpaxKaTmEeBcra DecaTKOBn po3dJIIOBaY.
IhdkaTOp 3aHnKOBOro Tenna (dna IHpaepBoHnx KOHphiopok-> po3paxoBaHo)
TixHnDnKaTopmMoKyTbTakOxBnKOpNCToByBaTnCgINo3HaueHHa 3aIIuKoBOrTeNna.ⅡnZbOroNtpiBHO BCTaHOBHTn rpaqik:Yac 3aIIuKoBOrTeNna=f (pibeHnNotyXHoCTi,po6ouh Yac).
Kkuo TemnepaTypa Ha cknHn BapnBn H nobepxhi nepeBnuy 65°C (TeopetnHe 3naehn), ce 6ynde n03naeHo Ha BiIOBIHNOMY dncnneI 3a donomoroio niterp "H".
IINBPO6HHeH TempeaTyPi NOHaD 65^ KOHOpKpa NOHHa npauOBatn npotarom NEbHOro nepiOy, Akn 3aJIeXHTb BID pIBHn notyHocti. Iicnra TorO, Raue Yac CnIMBE, nicr BmKHeHHa KOHOpKn 3'ABNTcB CINHAn npo 3aNIuKObe TENNO.
ABTomaTnUHe BmKHeHHA
KIO npOraOM 3aHaoro nepioy pibeHb NToYxHOCTI He 3miHOBaBC, BiNObiHa KOHcOpKa BmKHeTbC aBTOMaTHo. MakcImaJIbHn Yac, npOraOM koro KOHcOpKa MoKe IpaUOBaTn, 3aJeXHTB BiD Bn6paHOro peKIMy roTyBaHH.
| Ровenv notuykhocti | Мак. ча робт(юд) |
| 1 | 10 |
| 2 | 5 |
| 3 | 5 |
| 4 | 4 |
| 5 | 3 |
| 6 | 2 |
| 7 | 2 |
| 8 | 2 |
| 9 | 2 |
| P | 2 |
NIPMITKA:po6otaBapnIbHOI NOBepxHi Ha MaKcImaJIbHINX pIBHX NOTyJHOCti MOKe np3BecTNo neperpiBaHH, TOMy npuNaAD ABTomAtuHo BIDperyIOe PiBeHb NOTyJHocTi, 0o6 3axnCTtN BApnIbHy NOBepxHIO Bi NEperpiBaHH.
6. OuHsEHHr TA OBCJyROByAHHr
Ipeod noaykom npoedeHn 6yob-kuux po6im 3 o6cny2oyeaHn bapunbhoi noeepxHi, daume i oxonohymu.
Cnid eukopucmoeyamu minbku my npdykuio (kpmu i uke6ku), kna cneiahno pnu3hae n da knkoepamiuhux noepxohb. IT MOKHsHaum e MaazauHax 3 mexHiko.
UHukaume po3nueie, ockinbku 6yob-uo, uo nompanne Ha cepunbHy noepxHIO, wuDko npuaopae ma ycknaadHoe ii ouuueHH.
Pekomehodyemcbmpumamnodani eid cepunbhoi noeepxhi eci peoyuhu, kai Maomb 3dammcb nnaumuc, Hanpuknad, nnacmmacu, ukyop a6o uykpoi npodykmu.
OBCNYROBYBAHHRA
HaheciBk kInbKa kpanelb CneuiabHoro MIOOHO 3aco6y Ha BapnHy noBepxHIO.
Bntpi6ydb-9ki CTiKi Nm M'koTO KaHHO a6o 3nerKa BONORO cepBETKOIO.
- PpOtpaIte M'koT KaHHO a6o cyxoCepBcKO, DOKN NOBepxHr He cTaHe YnCTOIO.
Akuo 0ce ue 3anuunucr cmiuki nmau:
- DogaIte ue dekiIbka kpanelb cneiaIbHOI MIOOoi piINH H NOBepxHIO.
OuHCTIb uKpe6kOM, TpMaohy Ioro nID Kytom 30° no BIDHOWeHHHO Do BapnJIbHoT NOBepXHi, NOKN PJIaMn He 3HNKHyTb. - PpOtpaIte M'koHO TkaHnHO a6o cyxoHO cepBETKOHO, DOKNIOBepxHRe CTAHe YNUCTOIO.
- NOBTOPIT npoueDpy npn Heo6xHocTi.
DEKINbKA IOPAD:
Hacte ouuueHHa 3aIIuae 3axnCHm Wap, kM MaBaxnBE 3aHcHHeI dIra 3anobirAHn noiprrnni H 3ocy. PepeKoHaTecr, 10b BApINbHa NOBepxHry Chta nepeH HAcTyHMM BkOpncTaHHm npnnaJy. 106 no3abntncs Cnd BID BOHN, BkOpncToByTe deKInbKa Kpanenb biOno Ouy aObo NImOHoro coky. Notim npotpi NobepxHBOONORONIHHOCHOpEBTKOHO 3 KeKInbKOMA KpannMI CneiaJIbHoMIOUOPI pINH.
CklokepamiHa NOBepxHr E CTIOHO Do NOOPRnH BID Nocydy 3 PNOCKM HOM, nPoTe Kpaue 3aBXDN NiDHiMaTn OOro pN INepeMIeHHI 3 ONDIEKOHFOPKN Ha Ihu.
3anam'raTaIe:

He BnKOpncToBvIe HaITo BOIory ry6ky.
Hikon He BnKopncToByTe HIX Nn BnKpyTky.
Kpe60k 3 ne3om He noHKoNTb NOBepxHIO, KIO HOro TpMaTn iKDyTOM 30^
Hikonn He 3annwaiTe wKpe6ok 3 ne3om y DocTynHomy dna iTei micui.
Hikonn He BnKOpncToByTe a6pa3NBHI MNoChi 3ac06n a6o npOoWN DnA YnueHH.
MetaJebe o6pamHn: 06b63neHNO ONUCTIN MeTaJIeB eO6paHnHH, POMNIte HOrO BOIOO 3 MInOM, PpOMNIte Ta IPOTpIb CYXIO M'AKHO TKAHIOH.
BydJa Ka 3MiHa KOnbOpCy cKIOKepaMioHOJ NOBepXHi He BnHbae Ha pO6O TY CTIKICTb NOBepXHi. Taki 3MiHN KOJIbOpBy OCHOBHOMy epe3yIbTaTOM 3ropiINx 3aIIuXkIB iXo ABo BVKnOPCTAHN HocCyD 3 TaKx MaTepiAnB, kA aIHomHIn abo MiB; uNx PnIMn BAKKO no36TyHc.
7. MoXJIINBI IPIOBJEMN TA IX BNIPIJEHHRA
KoHΦopku He Kun'ammb a60 minbku cna60 cmaxamb
BnKopncToByTe Nnue Kactpyni 3 nnockm dHOM. RaMIX KactpyJeTO Ta BapNtBHOIO NOBepxHeO E npomixok, KOHOpka HnnpaBnIbHO po3nOinrTIme Teno. DHO KAcTpyni NOBHHo NOBHCTHO BkPbATn BeCb diameTp KOHOpkn.
PpuzomyeahnHaKi c Haidmo noinbHm
BnKOpNCTOBybTcB HeBIDNObiDHi KAcTpyni. BnKOpNCToByTe TINbKn Baxkni Nocy3 nOckm dHom, iAmEt pKoro BiNObiDae diAmeTpY KOHΦopKn.
He3nauHni noopnunu nu nomepmocmi Ha cknaii noepxhi npuna
PnunHO e HnpabInbHe OuyiueHH a6o BkOpncTahH Kactpybl 3 HepiBnM dHom; qactnHK, TaKi RK NiuHKn a6o CINb, notpanIaIOb MxK BapinbHy NOBepxu Ta HNkHIO qactnHy Kactpynl. nB.p03dn "OUYUeHH" nepeB kOpncTaHHm nepekoHaTeC, uioHO KAcTpYi c uCTmN i BkOpncTOByTe TInbKn KAcTpynl 3 rnaKIM dHom. Iopprnnn MoXHa 3MeHwNTn, TiBkn BkOHyUOHN ppabInbHe OHUeHHA
Memaneei cnidu
YHnKaIe KOB3aHHa anHomHiEBO rO nocyD no BapuNbHi nOBepxHi. 3BePHTcra Do peKoMeHdaui oOdo OunueHHr.
Bn BnKOpncToBye Te BiNobiDi MaTepiAn, ane nnMa BCE ue 3aIIuHOTbc. CkOpncTaItecS uKpe6Kom Ta doTpmyTec iHCTpyKui 3 po3diny "OUYUENHRA".
Temhi nJnMu
CkopncTaItecA Ikpe6kom Ta dOtpmMyTecA IHCTpyKuJi3 po3diy "OCHUENHRA".
Caimi 30Hu Ha eapunbHiu noepxHi
Le cnii BID aniomiHIEBHX YI MiHNX KAcTpyn, a TAKoK BiD MHepaJIbHnx, BOJAHnx YI XapOOBNX BiKNaJeHb; IX MoKHa N036yTnCRA 3a DOnOMORO KpEmOBOro MmHOrO 3acOBy.
Ha cepunbHni noeepxhi po3nnaueecyukop yu nnacmmaca. IINB.po3din "OCHUENHRA".
BapunbHa noepxHra buuua 3 naody a6o He npauioomb deaKi KOHphiopku
UHTNa KEmnKoIOni He BiDpyNboBaH.
Ipebeipte niknueHHra 6nokybaHH nahei ynpabinHH.
Po36JIOkyTe BapnIbHy IOBepxHIO.
BapunbHa noepxHHe iDknIOyAcmbcBid kuehEnn.
PanaHb ynpabnIHHa 3a6IokOBaHa. Po36NOKyTe BapInbHy nobepxHIO.
Yacmoma eeimKHeHH/umKHeHH KOHΦopok
LkNn BBIMKHeHHBIMKHeHH BIdpi3HJIObCByiIOBIDHO Do Heo6xioHO pIBH HarpibaHH:
- Hn3bKn pIeHb: KopoTkn Yac po60tN.
- BnCOKn pIeHb: DoBn Yac po60tN.
BapnIbHa noBepxHr He npauoc.
IpebeipTe CTaH 3anobixHKiB / BmNKauiy CBOeMy npMiuEHHI. IpebeipTe, Hn HeMa e nepenad Hanpyu.
BapnIbHa NOBepxHBAUMKHyJNacCaMoCTiHo.
Bn BnnaKBOHaTncHnyI rObHn BmNkau (kHONky ON/OFF) a6o X Ha KhoNzI 3haxoDITbcra CTOpOHHi ppeMeT. Pnp6epitb 6yNb-aykn CTOpOHHi ppeMeT i3 KHOIOK I BBIMKHITb npnna 3HOBy. YBeiTb NOBtpho CBoI HanaHTyBaHHa.
BIDOpaXeHHnJItePnF Ta Yncen
KaHoHaekpaH3'ABnEeTbcraIitepaFicncna,3NaHTb npnanaBid6yBC36i.HactynHaTabnucMaICTNbpeNikdi,KiMOxyTBBpiuNTnpobnemy.
8. NICJIAPDAXHE OBCJNYROBYAHH
Pepw HIX BKNKNAkTu PhaxIBu i3 cepBicHO 06cLyroByBaHHa, nepeBipTe HaCTynHe:
- ⅢO BUNKa npabunbHo BCTaBneHa, a TAKoX HArBHiCt b 3anobixnka;
KaIO Bu He MoKeTe BnBnTn PnHHy HecnpaBHOCTi, BmKHiTb npnaI - He TopkaiTeCnOro - BnKnMHTe aXibz3 nicJnpoJaXHorO oCbnyRoByBaHH. PpnaIad noCTaayetbc3 rapaHTIHMM TaIOHOM, kN 3a6e3neue 6e3KOuTOBnI peMOHT B Cepbichomy cHTpi.
| Ди检пей Конфорк | Пюблесma | Рiwенners |
| F0 | Поминka пограмного забешиени сенихгх сенимп. | У разовский наимлки, вдддддддддддддддддддддддддддддддддддддддддддддддддддддддддддддддддддддддддддддддддддддддддддддддддддд徳 Ящо пюблесma He biviiшпась, 3atelenefohyte B cepeicnch mцentр.Ящо пюблесma Виникac paNTOB пд ча звчайhoю роботи, 3atelenefohyte B cepeicnch mцentр. |
| Fc | Зona сенихх сенимп вадто разая i BCI кОнфоркь буно ВIMKHeNo. | Заучимь лу, пожи temпоратура He 3нзиитьс.Вариьна поBERPХЯ abTOMATUHNO bIDHOBITС BOY IO pO6OTy nicra.TORO,Я TempepaTура nobepHeTbCdo HOPMaMbHorO 3HAChENH. 3auekayte,пожи Tempepatура He 3нзиитьс.Ящо nobiDOMLeHry He 3NHKae nicrTo,Я TempepaTура docrHylna 3nauchenHЯ habKoIuHbOrO cepeodobuHa,3atelenefohyte B cepeicnch mцentр. |
| Ft | Датчik Tempeparура сенихого сенимTu можe byTN noшкODжehи. | Заучимь лу, пожи Tempepatура He 3нзиитьс.Ящо nobiDOMLeHry He 3NHKae nicrTo,Я TempepaTура docrHylna 3nauchenHЯ habKoIuHbOrO cepeodobuHa,3atelenefohyte B cepeicnch mцentр. |
| FE | Датчik Tempeparура сенихого сенимTu можe byTN noшкODжehи. | Заучимь лу,пожи Tempepatура He 3нзиитьс.Ящо nobiDOMLeHry He 3NHKae nicrTo,я TempepaTура docrHylna 3nauchenHЯ habKoIuHbOrO cepeodobuHa,3atelenefohyte B cepeicnch mцentp. |
| Fb | Надирна чуливICTь 6yd-яков Кноги. | Переконайтеся,ю вариьна nobeRPXHЯ bCTAHOBIIHЯ hANEXHIM YINHOM. ПepekoHai Teesя,ю KhoJIK правильно TopkaIoTBс cKJIAHOЛ nobeRPxHi. |
| FU / FJ | Поминka 6eznekn knabiatур | Цяnomинka stocyctbcr abTOMATUHoi pepeBirpkn knabiatур.Boha 3нзиakc NicrTo,я abTOMATUHn pepeBirpka nobePHTbCdo 6z3neuHORO 3nauchenHЯ.Jkuo pnoBemsma He biviiuHnac,3atelenefohyte B cepbicnHmцentр. |
| FA | Поминka 6eznekn knabiatур | Цяnomинka stocyctbcr abTOMATUHoi pepeBirpkn prorpamHoro 3a6e3neuHnH.Boha 3нзиakc NicrTo,я abTOMATUHn apepeBirpka nobePHTbCdo 6z3neuHORO 3nauchenHЯ.Jkuo pnoBemsma He biviiuHnac, 3atelenefohyte B cepbicnHmцentp. |
| FC /Fd | Поминka 6eznekn knabiatур | Цяnomинka stocyctbcr abTOMATUHoi pepeBirpkn prorpamHoro 3a6e3neuHnH.Boha 3нзиakc NicrTo,я abTOMATUHn apepeBirpka nobePHTbCdo 6z3neHORO 3nauchenHЯ.Jkuo pnoBemsma He biviiuHnac, 3atelenefohyte B cepbicnHmцentp. |
| Fr | Поминka 6eznekn pene | ЗБд-яйс imm драьером рete moxe trpantitcesь 6yd-яков розьема.Вidкнluчы bavilbyru nobeRPXHIO bID eNEKTPOmepexj, zazeKayite xBviliHny ta BBiMkhItb рппад 3noby.Ящо розьема He biviiuHnac, 3atelenefohyte B cepbicnHmцentp. |
NHCTPYKUN 3A BE3ONACHOCT
IpenopbUBAme BN Da 3ana3nTe INHCTpyKuInTe 3a MOHTax N da Tn H3NOJ3BaTe 3a CnpaBka NOKbCHO. IpeN Da MOHTupate roTbapckn pnot, OTBeJeXeTe HerOBnCepneH HOpE B cnYau, Che HanoXn Da Notbpcnte Cbbet CneInpdaXkBeHHoTdeN.
IPEyIPEKDEHNE:ypeBtN HerOBNTe DoCTbHNu cactn CTaBaT ropeu N O BpeMe Ha n3noJ3BaHe. BHMaBaTe Da He DOKOCBaTe HarpBaUnte eIemEnT. Na He ce Donycka DoCTbN Do ypeDa Ha Deua NOD 8-roDnHa Bb3paCT,OCBeH aKO He Ce HAbIOdaBat HenpeKbCHaTO OT Bb3paCTeH.
IPEyIPEKDEHNE: n3noJ3BaTe cMo npEJa3nTeJI 3a nIOToBE, ONpeJeENi OT npOn3BOJNTeJI Ha rotBapckn ypei nn Yka3aHn OT npOn3BOJNTeJI Ha ypeDa B INcTpyKUInTe 3a yNoTpe6a KaTO NOxOJaU, nn IpeJa3nTeJI 3a nIOToBE, BKIoUeHN B ypeJa. N3noJ3BaHeTo Ha HEnoXoJaU npeJa3nTeJI MoKe da DOBeDe Do 3IonoJnyKn.
IPEyPPEKDEHHE: roTBeHeTo 6e3 Ha30p Bbpy NlOT C Ma3HnHa NJIi MacNo MOKe Da e OnaCHO n da DoBeTe do noxap. HIKOFA He ONITBaTe Da NoracBaTe NOxap c BODa, a N3KNIOye Te UpeDa NOKPnTe PnAmbKa HanpIMep C KANak NJIi IpOTuBOOnoXapHO ODeJNo.
ПЕДУПЕЖDEHNE: onachocT OT NOЖAP: He Cьхранявайт e npeДмETN Bbpxy NOBbpxHOCTNTe 3a FOrTBHe.
IPEyIPEKDEHNE: ako nobbpxHOCTTa e HanykaHa, He dOKocBaIe CTbKlOTo u N3KJIIOUeTe ypeDa, 3a da n36BerHeTe pNcKa OT TKOB yIap. To3n ypeD MoKe Da ce n3noJ3Ba OTO deCa Ha 8 n NOBueYe rOINH NOT JInuCA C HAmaJeH Fn3 nuCeCKn, c E H3 OP H N IIN YM C TB EHN Bb3MOxHOCHTu INJIN JINCA Ha ONIT N3HaHnA, AKO e OCnrypeH HAd3Op INN INHCTpykTAX OTHOCHO n3NoJ3BaHETo Ha ypeDa NO Be3OnaceH NaHH N Te3n JInuca pa36upat NOTEHuaJNHTE OnACHOCTN. Deuata Tp8Ba Da Ce HApJIOdABat, 3a Da He ce DOnycka Da cn ngparT cypeDa. NouchTBaHETo IN TexHnueckata NoDpbXkHa He Tp8Ba Da ce N3BbPWBAT OT Deua 6e3 HAD3Op.
BHUMAHNE: npoecbT ha rotBeHe Tp6Ba da ce HabJIOdaBA. KpaKocpoHnT npoec Ha rotBeHe Tp6Ba da 6bJe HabJIOdaBnH enpeKbChaTO. HactoTeJHo Ce npenOpbYBa Da dbPxNte DeaTa DaJeU OT 3OHHe 3a RotBeHe, DOKato Te CE N3NOJ3BaT INI KOrATO Ca IN3KNIOUeHN, DOKaTO INDkAToPbT 3a OCTaTbUHa TOINHa e BKNIOUeH, 3a Da CE npedOTBpatn PNCKbT OT cepNo3HN IN3rpHn. To3n ypeD He e npedHa3NaueH da CE IN3NOJ3Ba Upe3 BbHWeH TaMep INI OTDeJHa CnCTema 3a INCTaHnOHeH KOHTPOJ.
He rIeJaTe DnpeKTHo B eIemEHTnte Ha XaIIOReHHaTa IaMna Ha IIIOTa, Ako NMa TaKaBa. CbByKeTe 8eNcEn KbM 3axpaHbAunr Ka6en, KOIT O E CBCTOJHne Da NOHeCe HAnpExeHHeTo, TOka N HAToBapBaHeto, yKa3aHN Ha Ta6eJIkata, INMA KOHTAKT 3a 3a3EmBAhe. UeNceIbT Tpr6Ba Da e NOxOJaU 3a HATOBapBaHeto, NOCoYeHO Ha ETUKeTA, IN Tpr6Ba Da e CbByP3aH KbM 3a3EmBaU KoHTAKT, KOIT O Da pa6OTn. 3a3EmBaUINr PPOBOHnE KblTO-3eEN Ha cBt. Ta3N Oepauu Tpr6Ba Da ce N3BbPwBa OT KBaInΦnupan CneuaNInCT. B cnyaH Ha HeCbBMeCTUMOCT Mekdy KOHTAKTa N ZeNCeNa Ha
ypea,ce o6bphTe KbM KBaIIHnIupaH eJekTpOExHnK, KOITo Da 3aMeHN KOHTaTcA C npyr nOxOJaTtN. UeNCeBt N KOHTaKTbT Tp8Ba Da OTROBapT Ha DeiCTBaUNTe HOpMN Ha O TlbPkaBATA Ha IHCTaNaIraTa.
Cbbp3BaHeTo KbM N3TOUHnKa Ha 3axpaHbaHe MOKe Da Ce N3BbpWu N Upe3 NOCTaBAre Ha YHNBepcaJen HpeKbcBaay MeKdy UpeDa N N3TOUHnKa Ha 3axpaHbaHe, KOHTo MOKe Da POHECE MaKcIMMaJHOTO Cbbp3aHO HAToBapBaHe N KOHTO E B CbOTBETCTBue C DeIeCTBaIoTO 3aKOHOdaTeJICTBO.
KbIto-3eHnT 3a3EmBaW Ka6eJ He Tp8Ba Da ce npekbcBA OT npekbcba. IHe3dOTo nn YHnBepcaHnT npekbcbau, N3No13BaHN 3a Bpb3kata, Tp8Ba Da ca JIeCHO DoCTbHH, KOrato ypeDbTe MOHTnpaH.
PpeKbcBaHTo Ha Bpb3KaTa MoKe Da Ce NOCTnHe Ype3 DoCTbNHOCT Ha UeNCeNa NIn Ype3 BKIOUBAHe Ha PpeBKKIOUBAteJ B HEnoDBNXHOTO OKa6eJIbaHe B CbOTBeTcTBue C npabUNaTa 3a OKa6eJIbaHe.
Ako 3axpaHbauT Ka6eI e NOBpeH, Toi Tp6Ba Da ce NODMeHN OT pON3BOUnteJIa,OT HerOB cepBn3EH npeDCTaBNTeJ nn NIOo6HO KBAHnCnupaHn Lnua, 3a Da ce N36eHe ONaCHOCT. 3a3EMNTeHNr TPOBOHnK (XbJTO-3eEN) Tp6Ba Da e no-DbNbr ot 10 mm ot CtpaHa Ha KNEMHaTa KyTna. Cekunra C BbTpEuHn PNOBOHnCt Tp6Ba Da e NOxOJaTa 3a MOuHocTTa, NOrbHnata OT rotBapckn Inot (yka3aHo Ha etnKeTa). Bndt Ha 3axpaHbauNk Ka6eI Tp6Ba Da e HO5V2V2-F.
He nocTabrTe MeTaHn npEdMeTu KaTo HOKOBe, BUNuN, JbXuN uN Kanau Nbpx y nnota. Te MoKe Da ce HappeT.
Bbpxharpraaute 30Hn He Tp6Ba da ce noctaba anymnhneBO FOJNO I NlaCTMACOBN cbdoBe. CJeI BcRAka ynoTpe6a e Heo6xoIMO n3BecTHO NOuCTBAHe Ha nNoTa, 3a Da Ce npedOTbpaTu HAtpyINBaHe Ha 3AmbpcraBaHHn Ma3HNHn.AKO Te3n 3AmbpcraBaHHn 6DaT OCTaBehn, Te ige CE Harpert NOBTOPOn IN3NOJ3BaHe Ha nNoTa n Ⅲe n3ROPaT, OTdJIaIKn NyweK n HenpnaTHa Mnpn3Ma, 6e3 Da ce cnoMeHaBat puckobete ot Bb3HNKBaHe Ha noXap.
Hnkora He n3non3BaIte npapa nn cnpen noBnCOKO HnIraHe 3a NOuCTBaHe Ha ypeJa. He DokocBaIte HarpeBaTeJHnTE 30HN NO Bpeme Ha pa6oTa nn N3BeCTHO Bpeme CneJ yNtpe6a. Hnkora He npiroTbIeXpaHa DnpeKTHO BbpxycTkNOKepaMnHn nnOT.
Bunharu n3noJ3BaIte noDxoJaIte roTbapckn CbIOBe.
Bunhar noctabraye cba B ceHTbpa Ha KOtloHa, Bbyx KoTo rotBnte. He noctabraye Hnso Bbyx naheJa 3a ynpabJeHne.
He n3noJ3BaIte IIOta KaTO pa6Otha NOBbpxHOCT. He n3noJ3BaIte NOBbpxHOCTTa KaTO DbCKa 3a pR3aHe.
He cbxpanhaBte TeKKn PpeMEn HaI NIOTa. Ako Te NaHaT Bbpxy NIOTa, Morat Da npuHnT NOBpeDa.
He n3noJ3BaIe nJota 3a cbXpaHHeHne Ha HnKaKBr npEiMeTn.
He nIb3raIte roTbapckn cbdoBe no nnota.
He neo6xOIma dOnbHnTeHa onepauia/HacTpoika,3a da ce pa6oTu cypeda npHOMnHaJIHNTeYeCTOTN.
IeHTnФkaHnHa Ta6EknA (pa3noXKeHa noD oJnHaTa 06WnBkA Ha nnota)

1.3AUNTA HA OKOHATA CPEDA

To3n ype3 e o6o3haen cbrnacho Ebponeckata
DinpekTnBa 2012/19/EC OTHOCHO TNaDbun OT
eJeKTPnuecko n eEKeTPOHNO O6OpyDahe (OEO).
OEO cBdbPka KaTO 3aMbpcBaUu BeUeCTBa
(KoNTo MOrAT Da IMAT OTrpuaTeINN NOcNEdNt 3a
OKOIHaTa CpeDA), Taka NbAOBOMKOHeHTN, KOENT
MOrat Da ce HnON3BAT NOBTOPH. BaxHo e da
NoIIOXnTE OEO HA cneUnPhHh O6pa6OtKa, 3a da
PnpeMaxhHeTe N Da N3XBpNITe PpaBnH0 BCNUK 3aMbpcNTEn N Da Bb3CTAHOBnTE N peUKNJnPaTe BCuKN MaTePnAJI. Xopata Morat Da nprarB TaBkHa pOnr npraHTupaHe, Ye OEEC HMA Da Ce PneBbPhe B E KcONrUmE H np6IeM; BaXHo e Da CNEBATE HKOON OCHOBn NpaBnla:
OEEO He Tp6Ba Da ce TpeTnpa KaTo 6ntoBA CmTe.
- OEEO Tp6Ba Da ce npdae Ha cBoTBeTHnTe cb6paTeHNnnyKTOBe, ynpaBnaBAHn OT 6uHcKn nIN OT pernCTpnpAHnKOMnAHn. B MHOrO dByPkABn MoKe da ce npdaRa c6bnpaHe n3BO3BaHe Ha OEEO no DoMOBe.
BMHORO DbpxkABn, KORATO KnyBaTe HOB ypeD, CTAPNRT MOKe Da CE BbPHe HA TbproBeua Ha Ipe6Ho, KOIT Tp6Ba Da Ro B3eMe 6e3nnatoB 3aMaHa Ha HOBu ypeD, DOKOKOTO ypeDbTe o EKBNAIeHTEH TIN N NMA CbUInTe FyHKnN KaKTo npedocTabehn
2. MOHTAK
MoHTnpaHTo Ha DomaknHcN ypeI e cNoXHa onepaun, KOrTo, Ako He ce n3BbPn npabnHIO, MoKe da NMa cepno3HO B3dienCTBVE Bbpxy 6e30NaChocTt Ha CTOKN, MmyuectBO mX npo Taan pnuHn MaHTnpaHTo Tp8Ba da Ce n3BbPwBA o npoepcnOHaHNO KBaMnFmupaHn Nua B CbOTBeTCTBNE cTexnuecknte peryaun.
B cnyaui, ye To3n CbBet 6bJe npene6peHnat n HcTaInpaHTo 6bJe 3NbBpweHO OT HeKBAuPmuaPAHO NJIe, PPO3BOIDTeJrT HMA Da HOc HNKAKBa OTROBOPHOCT 3a TexHueCKN NOpeiHa ypeDa, He3aBNCMO daJIe IO doBeDAt DO NOpeDa HA CTOKN INMMyECETO INN Do HapaHBAHe Ha Xopa ININ XIBOTHN.
CneD OCTpAHBAHe Na onakOBkATA ce yBepeTe,Ye ypeBt He e NOBpeHn. B npotInbEN CnyaH CE bckPte CTbProBaHa Ha dp6Ho nnn cbc CneNpOdoXBeHHo OTd H npOn3BOiNTeN.
YBepete Ce, Ye Me6eJIne, B KOnTO ue CE BrpaXda ypeIbT, KaKTo N BCNUKn DpyrMe6eJIbN B 6Jln3OcT, Ca N3pa6oTeHn OT MaTePnaHn, KOINTo MOrat Da H3dbpxkAT Ha BnCOKN TemnepaTyPi (MnH. 100°C).
B DonbHHeHne, BCnKn DeKopatNBn NaMnHaTn Tp8Ba Da 6bDaT fncnpaHn C BucKOcyTouNo JENNO.
YpeBt MoKeJa Ce MOHTnpa BbB BrpaDeHa Me6eJ B cTaHapTeH (BnKTe fHypata 1) nI3paBHeN (BnKTe fHypata 2) peXIM.
Ie6eHHaHa pa6oTHnI IIO Tp6Ba da e Mekky 25 n 45 mm.
3a6eJekka: Pa3mepume Ha ebmpueHnur nepumembp ca cbuume kamo npu cmahdapmHu MOhmax.
Octabete pa3ctoHne ot nohe 55 mm Mekdy nnoTa n 3aHaTa cTpaHa n nohe 150 mm MeKdy nnoTa n BepTKaHnTe Me6eN nn CTehn OT cTpaHnHaTa cTpaHa. Ako ca MoHTnpaHn Me6eN HaD nNoTa, MNHMnHTo Heo6xOIMo pa3ctoHne e 700 mm.
Pn MoHTnpaHe Ha 申PM HAD NToA, HAnpabeTe cnpBaKa C n3NCKBaHnraTa 3a MOHTax, NocOueHN 3a 申Pma, HO BbB BCEKn Cnyaip a3CToRnHnTo Mekdy NIOta HINPMA Tp8Ba Da e He No-MaIko OT 700 mm. (BIXTe fHypata3)
Ako donHaTa qact Ha nToa e B cBceCTBO C yAcTBK, KOITO oBnHOBeHo e DocTbNeH 3a pa60ta n NoocTBAHe, Tp8Ba da ce noCTaBn pa3dnteHa 20 mm noD doNHaTa qact Ha nToA. (BnKTe fHypata 4)
Pn MOHTnpaHe Ha FyPha NoI rotBapckn INot Tpr6Ba da ce nocTaBN pa3dEnHTe N MHNImaHTo p3cTOrHHe MeKdy DoHata Yact Ha IIOta Hpyhata Tpr6Ba Da e He No-Manko OT 10 mm. He MOHTnpaTe HeoxnaDeHa FyPha NoI To3N IIOt N MOHTpauTe FyPha Cnped HeHNITE Co6CTBeHN MoHTaxHH N3NUCKBAHn. (BxKTe fmypata 5)
C rotBapcknI pIOT ce npedocTABR BOHOENOCpyKnB yNbTHHTen. MoNTnpaIte yNtbnTHTeIe OKOIO dONHATA qACT Ha Nlota, KaKTo e OINCAHO, n CE yBepeTe, ye e IpabUNHO MOHTnpaH, 3a Da N36erHete TeOBE B NODbPkaUHe Me6eII. (BxKTe pfHypata 6)
HopmaJIHO qKcnpaHe:
-B3eMeTe ΦHKnpuNTe CkO6n OT pNnKa c npHaJneKHOu n 3aBnHTeTe B NOIOXKeHNeTO, NOKa3aHo Ha DoJIHATA KyTna. (He 3aTgAaTe BnHTOBeTe 3a 6bIoknPae HcKo6nTe, Te Tp6Ba Da ce DBrNKaT CBO6OdHO) (BnKteΦnypata7)
- NocTaBete Nnota B CEHTpAHHO NONOJHHe B IN3Pra3Hn yAcTbK. 3aBbPteTeCKoBtne Hn 3aTeHHeTe HaBnHO.(BnKte pIpypata8)
Бьрзфксранe: (В 3aBиСmoCТ OТ MоДЕЛа)
B3eMeTe YeTnpn npKHHN OT pINka C npHaJIeXHocTN I n 3aBHTeTe 3a DOJHaTa Kytna, KaKTo e Noka3aHo Ha fHypata. (BIXKTe fHyypata 9)
UeHTpnpaTe n BkapaTe PnToA.
HaTnCHHe CTpaHHTe Ha IINota, DOKaTO ToI CE OInpe Ha ZcENr Cn nepIMeTp.b.(BnKTeФmrypata10)
N3PABHEH MOHTAX
Cne npoBepka daHn no3uYra Ha nnoTa e npabInha, 3aNbJHeTe npolykata MeKdy pa60THN pNO T I rTOBapcknI pNO CbC cnIKHOBO JENINO. N3pABHete cnIKHOBOc cNoI cbc cKepepe mKOBp npbCT, HanoeH c BODa n canyH, PpeDn da ce oOpMn. He nONBAITE pNOta, DOKaTc cnIKHOBOrT cNoI He n3cbXHe HanblHo.(BxKTeFHypata11)
3. EJEKTPNUECKO CbBp3BAHE


PA3IIOJOKEHME 1-3PA3IIOJOKEHME 2-4 PA3IIOJOKEHME 5 PA3IIOJOKEHME 6 PA3IIOJOKEHME 7
| A | B | C | D | |
| PA3ПОЛOXЕHNE 1-3 | 2300W | 1800W | 1200W | 1200W |
| PA3ПОЛOXЕHNE 2-4 | 1800W | 2500W | 1200W | - |
| PA3ПОЛOXЕHNE 5 | 1800W | 750+900+1050W | 1200W | - |
| PA3ПОЛOXЕHNE 6 | 1000+1200W | 1800W | 1200W | 1200W |
| PA3ПОЛOXЕHNE 7 | 1800W | 1800W | 1200W | 1800W |

CnopeMmoJena
-
- TAIMEP
4.ДопьлнітеленLEDинікakot3a rotВapcka 30Ha - Погамен ИнданаTop 3a roТарcka зона
6.ИЗБОР Ha 3OHaTa - Moct
MOnTaXbT Tp86Ba Da e CbO6pa3eH Cbc CTaHdApTHe N DnpeKTHBNTe." PpOn3BoNDTeJrT He Hocn OTROBOPHOCT 3a HnKaKBn 5eTN, KOnTO MoRat Da 6bDat npuHHeHn OT HenoDxOyIa HIn Hepa3ymHa yNoTpe6a.
PPEyIPEKJEHNE: POn3BODnTeJIr He Noema OTROBOPHOCT 3a HIKaKBu INUdENT NIN NOCNeDCTNBOT TIX, KOITMOrAT Da Bb3HNKHaT NO BpeMe Ha nIIOJ3BaHe Ha ypeI, KOITHO e Cbbp3AH Cbc 3eMaTa NIN Cbbp3Ah CbC 3eM, YIrTO HeNpeKbCBAEMOCT e HApUSeHa.
Ppe npabota c enektpnuecTBO npoBepeTe HanpexeHneTo Ha 3axpaHbAHeTO, noka3aHO ha enekTpOpeMa, HAcpoKaTa HnpKcbCbAha Ha Bepurata, HenpeKcbChaTOCTTA Ha 3aEMeNTHaTa Bp3ka KbM INCTaNAUHTu ANDI npEpaN3NTeT e NOxOJa.
EneKtpnueckoto Cbbp3BaHe KbM NHCtanaunra Tpr6ba Da ce H3BbpW B CbOTBeTCTBne C HOMHHaHnHaT a MOuHocT Ha ypeDa;TOBa Tpr6Ba Da ce H3BbpW Upe3 NaKeTeH N3KnUoyBaTeI.
Ako ypeBt NMa uenceHa KyTn, T r Tp6Ba da ce MoHTnpa Taka, Ye uenceHata KyTn Da e DOCTbHa.
KbIto-3eHnT npoBOnHK Ha 3axpaHbuaaKaBeI Tp6Ba Da ce CbPke KaTO KbM 3a3EMNTeHa eNEKtpo3axpaHbAHeTo, Taka N KbM KEmITE Ha ypea.
3a BcKaKBr Bbnpoc OTHoCHO 3axpaHBaunr KaBn Ce o6pbuaTe KbM CneInpOdaKBeHn OToEN NIK KbM KBaINΦuNpAH TeXnK. Ako IIOtBT e MOHTnPah Cb 3axpaHBaun KaBn, ToI TpRbBa Da ce CbBpxe camo KbM 3axpaHBAhe OT 220-240 V Mxdy pf3a n HeyTpAINO NOXKeHnE.
Bb3MOxH0 e o6aHe nIOTbT da ce CbbpXe KbM:
Tpua3eH Tok 220-240 V3
Tnpa3eH Tok 380-415 V2N
3a da npoobnKeTe c HOBata Bpb3ka, cneDbaiTe nHCTpykunTe no-dony:
Ppei Da OcbueCTBnTE Bpb3kata, Ce yBepete, Ye MONTaxbTe 3aunTeH OT NDOxOJaI PpeDna3nteI e ChabEn C npoBOHNuHa DOCTaTbUHO roJMa Cekui 3a HopMaHNo 3axpaHBAHe Ha ypeDa.
O6bpHTe TnToTa, Taka Ye CTbKHeHaTc TpaHa Da e Cpeu paBoTHna TnOT, KATO BHIMAbate Da 3aunNTte CTbKnTO.
OTBopeTe Kanaka B cneHaTa nocJeDoBaTeHnOCT:


-OTBnHTeTeKa6enHataCKo6a,1"
- HamepeTe DBeTe yu, pa3nOJKeH NOTCTpaH;
- NOCTaBETe OCTpneTo Ha NnOcKa OTBePTKa PpeD BCsKO OT yWHTe
2" n 3", 6yTHeTe HABbTp e n HaTnCHete;
-OTCTpaHeteKanaKa.
3a da ocbo6oNDte 3axpaHbau nKa6eJ:
- OtctpaHete BnHTOBeTe, 3aIbPkaaN KJIeMHata KyTna, KOrTOcbIbPka WHTOBITE WHH N IpOBoHNuNTe Ha 3axpaHbauNkaben;
- N3dbpnaTe 3axpaHbuaaKa6eJ HABbH.
IeHCTBnKoHTO TpRA6Ba Da 6bDaT N3BbPseHn 3a OCbIeCTBBAHe HA HOBA Bpb3Ka:
- N36epete 3axpaHbuaaKa6eB Cb0tBeTCTBne C npenopbKnte or Ta6nucata;
- PpokapaiTe 3axpaHbauN Kaben npe3 cko6ata;
-Orone 10 mm ot KpaHbceKn npoBOnHK Ha 3axpaHbauinna Ka6en, Kato B3eMeTe NOB HBMaHne Heo6xOuMaTa DblxHa Ha Ka6ena 3a CbP3BaHe HA KJEMHaTkyTNIA; - Cnped MOHTaKa I C NOMOuTa Ha WHTOBnTe 1INH, NOyueHn B PpeuHaTa CTbNka, QKcnpaIe TPOBOHNuTe, KaKTo e nOKa3HO Ha rpaФnKaTa;
-ФИКСИРаTe KAnaKa; - 3aBnHTeTe Ka6enHaTa CkO6a.
3a6eKka: yBepeTe ce, ye BNHTOBete Ha KJIeMHHaTa KyTna 3a 3dpabo 3aTeHn.
IeHCTBnKoTTO Tp6Ba Da 6bDaT N3BbPseHN 3a OcBueCTBBAHe Ha HOBA Bpb3Ka:
- N36epete 3axpaHbuaa Kaben B Cb0TBETBNE C npenopbknte OT Ta6nUata
- PpokapaiTe 3axpaHbaunKa6en npesckoobaTata;
Orone 10 mm ot Kpa Ha Bcekn npoBOnHk Ha 3axpaHbaua nKa6eN, KaTO B3MeTe NOB HBMaHne Heo6xoDnMaTa DblnKHa Ka6ena 3a Cbbp3BaHe Ha KNMeHtA Kytna; - Cnpoe MoHTaxa N c nOmoTa Ha UHTOBnTE uHH, NOJyehn B npeuHaTa CTbNkA, fKNCpaTne PPOBdHnTKe, KaKTe e NOKa3Ho H rpaFnkata;
-ФИКСИРаTe KAnaKa; - 3aBnHTeTe Ka6enHaTa ckO6a.

BHIMAHHE:
AKe e Heo6xOdmo Da IIOMeHnTe 3axpaHbAunrKa6eI, CbBpxTe KUaTAt B CbOTBetCTBnE CbCneHnTe UBeTOBe/KoOBe:
BkIIOUyBaHe/H3KJIIOUyBaHe Ha HarpraBaaTa 3OHa
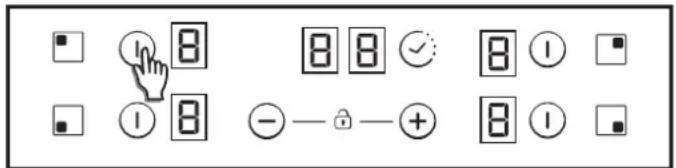
3a da eklnoyume HarpBeBaten DoKoCHete KOrTo n Da e HarpeBaTeHa 30Ha 3a 400 MMnncEkyHn. Ue ce yye npOdbJnxIteJeH 3ByKO BcHAn n CTOHOCCTTa,0" ue CE NOBn KaTO cNpPa B CKeNeBaT a 30Ha, Yka3BaAa HNBOTo HA MOUHOCTTa.
1) Ako etanbT Ha roTbeHe e B no3nue 0, To3n dncnne Ie ce n3KIOUH ABToMaTHUHO CNEI 10 cekyHn Ie npo3ByuH nocneObaTeHOCCTTA Ha N3KIOUYBaHe Ha 3OHata.
2) Ako mma nHnKau3a 0ctaTbUHa TOnJIuHa Ha dncIe, KOITo e BkNoyeH, HO C MoUHOCT O, ue ce NOBn PpeBKnOuBaUca ce ,0".
3) Ako e akTINBHa ΦyHKUa 3a 3aKIIIOuBaHe, He MOKeTe Da BKJIIOuHTe 3OHa.
3a da u3KnHoume HarpeBaTeI DoKoCHete KoTo n da e HArpeBaTeHa 30Ha 3a 1,2 cekyHn. Ie npO3ByuT 3 kpaTKn 3BykOBn CnHaja N B cIeNebTa 30Ha HMa Da CE NOBn HnIO OINIe Ce NOBn CTOnHOCT "H" aKO hMa oCTaTbUHa TONnHa. 3OHaTa Ie CE u3KnHouN.
1) Ako etanbT Ha rotBeHe e B no3nue 0, To3n dinCnneJ ue ce n3KnOuH aBTOMaTHUHO cNeD 10 cekyHn i ne npo3Byu nocneDoBaTeHNOCCTTa Ha n3KnIOvBaHe Ha 3oHaTa.
2) Ako IMA HINKACUHA 3a OCTaTbUHa TOnIINHa Ha DnCnJIe, KOITo e N3KNIOueH, Ue Ce TOBu, H.
3) Oopn ako e aKTINbHa FyHKun 3a 3aKIOUbaHe, MoKeTe Da N3KNIOHTe 3OHa.
4) Ako eakTINBEH cAmO eDIN HArpeBaTeN IToI e N3KJIIOUeH, Ue np03Byat 4 KpaTK 3ByKOBN CnHaIa, Yka3BaIu, Ye ceJInr TOrBapCKn PnOT e N3KJIIOUeH.
U36op Ha 30Ha
Korato eHa 30Ha e Buee BKJIIOUeHa, HEn36paHInTe 3OHN, KOnTO ca BKNIOUeHN, Ie CBETHaT C NO-HNCbK INHTeH3NTET.

Ako cmo eHa 30Ha e BkIIOHeHa, Ta3n 3OHa e BeYe n36paHa no
noJa36bnpaHe, 6e3 da e Heo6xOIMO da HaTNCHeTe 3a KpaTko (150
MNInceKyuHn) 6yToHa 3a n36Op.
YBeHnUaBaHe/HamAraBaHe Ha HNBOTo Ha MOuHOCT

C KpaTko HaTnCKaHe Ha 6byToHn +" mnn -ce yBeHnHaBa nHamaJIraBa MoUHocCTTa B m3bpaHnTe 30Hn: 0-1-2-3...9-P
1.C npoIbJnKInHO HATNCKaHe Ha 6yTOH,,+HIN,--" HNBOTO Ha MOUHCCTTa Ce yBENuHa/HaMaJIraHb HenpeKbCHaTo. PpI 6bp30 yBeNIuBaHae MOUcOCTTa CnIPA Ha HNB0 9,a 3a NO-BICOKo HNBo HA MOUHCCTTa e HeOBxOdmo DpyrKaTko HATNCAHe Ha 6yTOHa.+PpI 6bp30 yBeNIuBaHa/HaMaJIraBaHe He ce CyBa 3ByKOB CnHaN.
2.CneI doCTnraHe Ha HnBO Ha MOuHocTt P HAtNcKaHTo Ha 6yTOHa +OTHOBO HMa Da npOMEHN HbOTO Ha MOUHocTTa Ha O.CneI DOCTnraHe Ha HnBO Ha MOUHocTt O HA TnCKAHeTo Ha 6yTOHa -OTHOBO HMa Da npOMEHN HbOTO Ha MOUHocTt Ha P.
3. Пи Вклоча 30а с НИВО на мошонтta 0, поэота e ropeши, 0 ще пемига на дспney. Сnéд 10 секун 0 щe ИЗЧЕЗн ще ce NOТЯген ДССЛЕн Ha 6yKBaTа "H".
4. Korato e n36pan HarpeBaTeI n 6byToHnTe "+" n -" 6bDaT DOKOChaTn EJHOBpeMeHNO, HNBOTo HA MoUHOCCTTa ige cTaHe ,0", Ho HarpeBaTeIaT Ie NOIbIpbXa N36baPbA B pAMKIne Ha 10 cekyHn. Ako mHa 3aJaDeH Taimep 3a HarpeBaTeI, TaImePbT Ie Ce I3KnIOu. ToBa DeIcTBnE MoKe Ja Ce I3BbpNt CaMo B hKoN CnyaHn B3ABCIMoCt OT KOnpIgpyaunrta 3a ceH3OpEN KOHTpON. CneHNITE npImepn ca Camo 3a INHOpMaunr. NUnHnT Bn ONIT Ie BN No3BoIN Da aApANTnpaTe Te3n HAcTpOkn KbM BaUNBkC n HABuN.
Onu3a 3akIIOUBaHe 3a Deua

ToBa DeIcTBnE MoKe Da Ce I3BbPmN, KOraT0 KNaBnWnte ,+“ N ,-6bDaT DOKOCHaTN EHNOBpeMeHHO.
CneTOBa npn BCaKO HATNCKaHe Ha 6yToH DnCnNeT Ye NOKaKe ,L3a2 CekYHd. HarpaBaHeO OCTaba B cbIoTo CbCToHHe.
3a da DeakTNBnPaTe 3akNIOUbaHTo 3a Deua, CneBaIte Cbunna npoec, KaTc OONcaH No-rope. CneToba ue ce ye KpaTBK 3ykoB cHAn n DncnNeT ue nokaxe 6ykbTa "n". FOrTabcknT nnot ue octaHe He3akJIOUeyn.
3a6eKka: ABTomuHNo 3aknObaHe 3a deca ige ce aKtunbnpa 15 MNHTcneIbJIHO N3KIOUBAHe Ha IIOta. Ta3n cyHKua ige ce 3aJeCTBa ABtomauHo, Ho e Heo6xOIMO npEn ToBa da J porpamnPate. BuxTe TOKkata 3a NotpeBnteNCKn HAcTPOKn.
ДВОИНТРОИN3OHN
3a Da BKNIOHTe DBOEH yDbJIXeK KOTNOH, CbBp3aHaTa rnaBHa 30Ha Tpr6Ba Beue Da e BKNIOUeHa NINnKaunra Ta 3a HNBO Ha MOuHocT Tpr6Ba Da e NOBEe ot O.
KpaTbK 3ByKOB CnHAn Pnp BCaKO HATNCKaHe Ha yDbJKNTeJIeH 6yTOH. 8.2- TpoHa 3OHa BKnIOUeHa
1-BOTKpATKO HATNCKaHe Ha ydbJnKHTeHb 6yTOBkIouBa 1-BYdIbJIkeH KOTNOH.1 LED INDInKaTOp HA, ydbJnKHTeHHb 6yTOc BKNIOUBA, ako 1-BNt YbJnKHeH KOITNoH e BKNIOueH (JeBnT LED INHINKaTOp B CnyaHa Na TPOHa 3OHa, cpeHNrT n EINHCTBeH LED INHDInKaTOp B CNYaHa Na DBOHa 3OHa)
2-poTo KpaTko HaTnCKaHe Ha ydbJNKeTeneH 6yTOH n3KnIObBa 2-pna YdbJIkeH KOTnO.2 LED INHdMkaTopa HAd yDbJNKeTENmI 6yTOH ce BKNIOBAt, Ako 1-BnAT n 2-pnT ydbJIkeHn KOTnOHN Ca BKNIOeHN 3-TO T kPaTko HA TnCKaHe Ha ydbJNKeTeneH 6yTOH n3KnIOUba 1-BnI N 2-pna ydbJIkeH KOTnOHO
KpaTbK 3BykOB CnHAn PpN BcRAKO HATNUCKaHE Ha yDbJnxTeJIeH 6yTOH.
MocToBa yHkUa
MocTbT MoKe da ce akTNBupa cAmo KOrato N DbaTa HarpeBaTeNa ca n3KnIOHeH. N3bUpa ce eDINH HarpeBaTeHa MocTa, 3a da ce akTNBupa CE3OpHNrT MOCTOB 6yToH 3a MocTOBa cyHKnIpO3Byuaba 3ByOB CnHnI LED INNdkaTopbHa 30Hata ce BKNIOUBA, AKO 3OHaTA E BKNIOHeHa.
N Dbata MocToBn HarpeBaTeJy 6bDat N3paHn EINHOpeMeHHO. CneI KaTO 6bDat N3paHn HarpBeTaTeJNTe, Ako HbTOHa MOHOCCTTHeE JEAHOTo, peryJInpAte Ype3 6ytoHtE + n- . DcNJIeTe N Ha DbATA MoCToBn HarpeBaTeJy 6noka3BaT eHNaKBO HbO Ha MOUHOCCTT.A. OYHKUNTA y 6bJe npekPaTeHa:
-Ako6bIeHaTnCHaT MoCTOBnT 6yToH BpeKIM Ha HAcTpOJa.
-AKoNtpe6nteIaTn3bepeHbOHaMOUHOCTTa,0"
3aunTa cpeu npenBaHe
Heo (npemet nnn TeHocT) HATNcKa 6yToH 3a NOBue O T 5 ceKHyDn. 2 KpaTkn 3ByKOb CNHaHa + 1 npOdbKnTeHEn 3ByKOB cnHAn Ha BceKn 30 ckyHn, DOKato 6yToHbT e HATNCHaT. ToTbAPCKnT NNT Oe che NkKnOu. To3n CNMBOI ne npOdbKn da PpEMRBA, DOKAto CbCTOHRHeTo e AKTNBHO.
Taimep
Функцята 3a TaMep MoKeJa ceakTNBupa CbC CBOI CO6CTBEH 6byTOH NIM Ype3 EHNOBPeMeHHO DOKOCBaHE Ha 6byTOHTe+N. " I B DA tCnyA Tp8Ba Da 6bJe N36paH HarpeBaTe H HerOBOT O HNO HA MOUHcT Tp8Ba Da e NOBHe OT 0.
I36peTe 30HaTa 3a npnlaTHe Ha TaIMep. HbTO Ha MOHocT Ha 30HaTa e NOBHe O T. CtATuHo Ce IOKa3Ba B 30HaTa, 3a KOrTo 1e 6bJe npnIOKeH TaIMep. ^ B uNcPnTe, 3ana3EHn 3a TaIMepa 1) TaIMepbT MoKe Da ce I36peTe cKnabuWnte ^+ "nn -." He ce 4yBaT 3ByKOBu CnHaJNo Bpeme Ha npomraHata.
2) EJHOBpeMeHHOTo HAtUckaHe Ha 6yToHInTe Ha TaIMepa OTMeHa TaIMepa (npOMeHa ce Ha 00).
3) Ako 6ytoHnTe ,+ " uIN ," Ha TaMepa ce 3aDbPkaT HATNCHATN O Bpeme Ha ONpeJeHHeTO, NOJUyBaTe DoCTbI DO 6bp3a HAcTPOKa.
4)Korato HactpoBate BpeMeTo Ha TaImepa, e BB3MOxHO Da OTnDETeOTo99C6yToHaNOT99D0Oo6yToHa+
5) MaKcHMaJIHOTo BpeMe e 99 MHyTuN.
6) Cnei n3TuHaHe Ha BpemTo n Ipo3ByaBaHe Ha 3BykoB cHAn OT nIOTA HATNCHE Tpon3BOJeh ByToH n AnapMaTn UΦpObaTn OocneoBAtenHOCT ue 6dat npekpateni.
7) Bb3MOxH0 e da peryIuPaTe BpEmTo Ha TaIMepa, DOKaTO TaIMepbTe 6n3aJeNCTBaH npEi TOBA.
8) MoHocTHa Ha 3oHaTa C npINOKeH TaMep MoKe Da ce npomeH 6e3 nOcNeCTBnA Ype3 npOrpAmnpaHe Ha TaMepa.
9) NocneHaTa MInHyTa 6bDe noka3aHa B cekyHn (npa3NnuHN BapnaHTn E BuIMo CaMo aKO HABNe3eTe B nporpaMnpaHTo Ha TaMepa Ppe 1ocneHaTa MInHyTa Ha oTbpoBaHTo)
10) C HATNCKAHeTo Ha 6yToHa Ha TaMepa 6e3 N3bpaHa 3oHa N 6e3 npINOKeH TaMep KbM HKOra 3OHa He Ce N3BbPbBa Hnio.
11) C haTnckaHeTo Ha 6yToHa Ha TaIMepa 6e3 n36paHa 30Ha n C npInIOxHeh TaIMep KbM MHOrO 3OHN, NOKa3aHOTo Upe3 cUΦpnte BpeMe Ce IpOMeHr Ha PoTaUHOHeH PpINuN IN OKA3Ba BpeMeTo, uHTO DnCJIneH Ha MOUHOCTTa e C aKTINBupaH DeCEtUHeH 3HaK.
12) B 3oHaTa C npnIOxKeH TaIeMep ce peyBaT MoUHOCT (5 cekyHn) n (0,5 cekyHn).
OCTabaIOTO Bpeme Ce NOKa3Ba B UINPnTe, 3aNa3eHn 3a TaIMepa. Ako Ce npJNarA TaIMeP KbM HAKONKO 3oHn, CE NOKa3Ba Ha-NaIKOTO OCTabaIoo Bpeme IN DeceTnHnT 3HaK Ce NOKa3Ba B CbOTBeTHaTa 3OHa.
HnkaTop 3a ocTaTbHa TOnnHa (npn n3JIbYBaun HarpeBaTeN n3uNCneHo)
Cbnte HnDnKATOpN MoRat Da ce n3non3BAt n 3a yka3BaHe Ha,octaTbYHATA TOnnnHa". 3a Ta3n cen Tp86Ba Da ce HanpaBN pa3nncAHne: octabaAio BpeMe Ha HarpBaHe=f (HnBO Ha MoUHOCTTa, BpeMe Ha pa60ta).
Dokato TEmnpatypata HA CTbKJIeHaTn OOBpXHOCT Ha rotBapcKnaI NIOE HAD 65 C (TeOpETHnHA cTOHOC), TOBA cbCTOHRHe ue ce nOKaKe HcBOTBetTHn DUNCNNe Ype3.H
3a THeepnapeHa TemnepaTypa Ha 65 C HarpBaau eIeMeHT P7BbA da pabOTn ONpeDeNeHO BpeMe, KOeTO 3aBICN OT HIBOTO Ha MoUHocTt. CneI n3TuHa He TOBA BpeMe NpeDynpKdEHNTo 3a OCTaBuHa ToPnHa 1e Ce NOKaKe, KOraTO HarpBaunr EIeMeHT 6bJe n3KnOueH.
ABTomatuHO n3KIIouBaHe 3a 6e3oIaCHOCT
Ako HNBOTo Ha MOUHOCTTa He 6bJe IpOMEHeO B paMKTe Ha npEiBapITeIHO 3aJaDeH nepNoD, CbOTBeTHnT HarpeBaTeI CE nKIOuHa aBTOMaTHo.
MaKcHMaHHTO BpEme, npe3 KoEt DaHeH HarpeBaTe MoKe da OCTaHE BKJIIOUeH, 3aBNCN OT N36paHOTo HbO Ha rotBeHe.
| Иbero на MOUHOCTTA | Мakc. Врeme вов ВКПОЕно сьстаян(e) (ЧаСоBE) |
| 1 | 10 |
| 2 | 5 |
| 3 | 5 |
| 4 | 4 |
| 5 | 3 |
| 6 | 2 |
| 7 | 2 |
| 8 | 2 |
| 9 | 2 |
| P | 2 |
3A6ELEKKA: DOKATO MOKE Da Bb3HNIKHe CNTyaUNHa NperpRABaHe NO BpeMe Ha pa6Ota Ha Hau-BnCOKOTO HNBO Ha MOUHOCTTa, ROTBapCKNrT Nnot ABtOMaTHNO Ue peyIIPA HNBOTo HA MoUHOCTTa, 3a Da 3aunr Tn IIOTA OT NperpRABaHe.
6. NOUHCTBAHE IN TEXHNUECKA NOIDPbJKA
Ipeu da u36bpuume noucmeane unu nodpckna no oomeapcknnon, ocmae meo da ce oxnda.
Tp6a da ce u3non3am camo npodykmu (kpemoo6pa3Hu nouicmeau npenapamu u ckpenepu), cneuaanho npedha3nuehu 3a cmbkneho-kepamuyu noebpxhocmu. Te ce npednaam e Xene3apckume Maa3HU.
U3628aume pa3nueu, mbl kamo ecuyko, koemo nonadhe ebpyx no6bpxHocmma Ha nIoma, ue u32opu 6bp3o u ue Hapaeu noucmeaHemo no-mpydno.
Ipnopbya ce da dbpkmte daney om nnona ecuuk beuecmeba, KOUMO Mozam da ce paamonm, kamo nnacmmacobu npedMemu, 3axap u npodykuHa 3axapha OCHOEA.
TEXHNUECKA NOIDPbXKA:
- KanHe TnKoKo KaKn O t CneuHa3npaHn NoCTBaU npOyKT Bbpy NOBbPxHOCTTa Ha INoTA.
- N3tpkmaTe ynopntte netHa c Meka Kbpna mnn neko HABJAXHEHa KXYHHeHcKa XapTn.
- N36bpuTe C MEka Kbpna ININ cyxa KxHHeHcKa XapTnA, DOKaTO NOBbpxHocTTa e YNCTa.
Akoce oue umyynopumunemHa:
- Kanhe Oue HAKONKO KANKO OT CNEUANHpaHaTa NOuCTBaIa TeHQCT NOOBbpxHOCTTA.
- N3ctbpxte cbc ckpenep, kato ro nbpxnTe noD bRbI OT 30° CnpraMo Pnota, DOKaTO NeTHATA N3ue3HaT.
- N36bpuTe C MEka Kbpna ININ cyxa KyxHeHcKa XapTnA, DOKaTO NOBbpxHocTTa e YnCTa.
-ПОВTOpeTe DeIeCTBnETo, aKo e Heo6xoIuMo.
HRAKOKO CbBETA:HeCTO NOUcTBaHE OCTBa 3aunTeH cNoi, KOIto e Baxen 3a npedOTBpaTBAHe Ha HApackBaHeTo n 3HOBCaHeTO. YBepeTe Ce, Ye NOBbpXHocTTa e YnCTa, PpeN da n3NOJ3BaTe rTOBAPCKn IIOt OTHOBO. 3a da pEmaxHeTe CneDN OT BOa, INoJ3BaIte HRAKO KAnKn 6bn Oet Nn JIMMOHO Cok. CneT OBA n3bPwTe C nonNBaHa Xaptn HRAKO KaKN CneuJaIN3nPaHa NoCtBAua TeHOCr. CTbKnOKePAmNuHaTa NOBbpXHOCT ue n3DbPxHn Ha HApackBaHe OT rTOBAPCKn CboDe C nLOCKO DbHo, Ho e BNHaHn no-Dobpe Da rN NobDnArate, KOrATo m MeCTNTe OT EDHa 30Ha KbM dpyra.
3ABEJIEXKA:

He n3non3BaTe Tb6a, KOrTo e TBbpe MeKpa. HnKora He n3non3BaTe HOx HnN OTBepTKa. Ckpenep c 6pbchapcko HOxhe HnMA da NOBpeH NOBbpxHOCTTa, aKO ce dIbPXn NOd bbln ot 30^ . HnKora He octabnte Ckpenep c 6pbchapcko HOxhe TaM,KbTeO MoKe Da 6bDe OocTHat OT deca. HnKora He n3non3BaTe abpazNBn npodykTN nnooNCTBaU npax. MetanHata pamKa: 3a 6e3onacHOuNCTBaHE Ha MetanHata pamKa n3mnTe Cbc CanyH n Boda, n3PiakHete n3Cywete C Meka Kbpna.
PpomHaTa B CBeTa Ha CTbKnlokepaMnUHaTa NOBbpxHOCT He BnIe Ha HeHOTo FyHKUHOHPaHe NnCtAbNHOCT. TOba 06e3uBeTBAHe Ce DfJnx NpeDmH O HaOCTaTcN OT hropeHa XpHa Hnn N3noJI3BaHe Ha rotBapckn cbDoBe, H3pa6OteH OT MaTeepNa KaTO aYmHn NnMe; Te3n NeTHa Ca TpydH 3a IpemaxBaHe.
7.PA3PEUJABAHE HA IPOBJEMI
Tomeapckume 30Hu He u3nB4yam docmambya monnuHa 3a Kuneane uUu docmambyho u3nbpxeae Ha xpaHama
H3no3BaIte cAmO cbIObe C nIOCKo IbHO. AKO MEJy CbJa NnIOTa ce BxKDa CBETnHa, 3OHATA He npedaba TOnJIINHata npaBnIHoo.
HbHOTo Ha Cbda Tp86Ba HAnbNHO Da NOKPnBa DnAmEtbpa Ha 36paHaTa 30Ha.
FomeeHemo e npkeaJIeHO 6aHo
H3no13BaIe cBnOIOxOJaun CbIOBe. H3no13BaIe cMo CbIOBe C nIOCKo DbHO, KOnTO ca TeXKn N IMaT dNaMeTbp HaN-MaIKo paBEN HA rotBapCKaTa 30Ha.
Manku dpackomuhu uuu u3mbpkhaun no cmbknehama noebpxhocm ha nnona
PpIna ca He npabnHNo noCTBaHe nIe Ce n3non3BaT cbDoBe C rpy6bHO; cactuN Kato neCbunHKn HNN CON nonadat MeKdy IIOta NdbHoTo Ha cbDa. BnKTe ToCkA, "OOnCTBAHE"; yBepete ce, Ye dbHaTa Ha cbdoBe Ta cnptn ppeynynotpe6a n3no13BaIte camo cbDoBe c rnaKo Dho. DapckotnHte Morat da bDaat 36erHaTn cAmO aKO noCTBaHETo Ce n3BbPWBa npabnHNo.
Cneouom Meman
He nIb3raIte anyMnHneBn roTbapckn cbIOBe no nnota. BuxTe npenopbknte 3a nouchTahe.
N3no3BaTe noxOaMATEpnaHn,HO Bce Oue nMa neTHa. N3no3BaTe 6pbchapcKO HOXue N CneDbaTe npenopbKITE B ToYka "IOUHCTBAHE".
TbMHu nemHa
N3noJI3BaIte 6pbchapcKO HOXue N CneJBaIte npenOpbKInTe B ToYka "IOUHCTBAHE".
Cemnu noebpxhocmu no nnona
CneiOn anyMnHnEe HmMeDen CbD, Ho cbIoo N ocTaTbU O MTHePaNN, BOa I XpaHa; Te Morat Da 6bDaT PpeMaxHaTN C KpeMoO6paEn NoocTBAu npenapat.
Kapameu3upahe unu pa3moneHa nnacmaca no nnoma.
BnKTe ToKa ,IOUHCTBAHE".
Pnombm He pa6omu unOpedeeneHu 3ohHe pa6omam
UHTOBete He ca npabunHIO no3nHnpaHn B KneMaTa KyTna.
PpOBepTe DaNN BpB3KNTe Ca npaBnHIO OcBueCtBeHN I daNN naHeIbT 3a ynpaBJIeHne e 3akNKeH. OTKnOyTe Pnota.
Fomapckquam nnom He ce u3knouea.
PanaBt 3a ynpabneHne e 3aknoueH. OTKNouTe nnota.
Yeemoma ha deucmbura ma no 6knquhe/u3knquhe 3a 30Hu 3a 20mehe
LKNIte Ha BKNIOUbaHe N3KNIOUbaHe ce pa3NHaBaT B 3aBNCIMOCT OT JeJIaHOTo HnBO Ha TOnJIuHa:
- HNCKO HNBO: KpATKO BpeMe Ha pa60Ta,
-BNCOKO HNO: npoDbJxKInTeHb BpeMe Ha pa6ota.
TOrbapcknT PIOr He pa6oTH.
PpOBepTe CbCToHHeTo Ha npEaNa3nTeJIte/npEkbCBAuTe 3a nOmeueHHeTo. PpOBepTe DaHn HMa npEkbCBAHe Ha eJekTpo3axpaHbAHeTo.
TOrBapcknT nnot ce camOn3KIOUBa.
IJIABHnAT IpeKbCBaH (6yToH 3a BkIIOUBaHe/N3KIOUBaHe) e 6nI DOKOCHaT HeBOJHO NIN NMa dpyr IpeDMeT HAD HAKo 6yTOH. BKnIOUeTe OTHOBO ypeJa 6e3 HnKaBn IpeDMeTn OKoJIo 6yTOHtE. BBeTe HAcTpOKnITe OTHOBO.
Ioka3BaHe Ha F Ncnpn
AkoHa nucnner ce noBRT F u cnp, ypeBt e 3ackbl noBpea.
CneHnata Ta6nua n3bpoBa DeiCTBna, KOITo MOKeTe Da npednpemete, 3a da Kopurnapate npo6nema.
8.CJIENPPODAJKBEOHOOBCLNYKBAHE
IpeHn da ce 6aHTe Ha cepBn3e HnHexeHep, npOBepTe CneHTo:
-Даип ecceIbTe e npabInHO BkapaH Ie c npaBnHInTe npedna3nte;
Ako noBpeTa He MoKe Da ce onpeDen, n3KnHouTe ypeDa - He onITBaIte DaTo nOpaBAre - n Ce oBaIe Ta cepBN3NHa CEHTbp 3a cIeInpoAaxBeNo ocCnyBaHe. YpeIbT e ChabdeH C rapaHnOHeh cepTNKAt, KOItTO ocNpyraBa HerOBata 6e3PiATNa nOpPbKa B cepBN3NHa CEHTbp.
| Ди检пей на нагревател | Повреда | Демст新媒体 |
| F0 | Софтуерна решka в сензорна Контponа. | Ако e ветшихлара решка, ИЗвадете и Величete отоною сcentа на ratварckся п not кьм Едентрахваиму. Ако решkaразлжава, сьыржete c сеникова за сениковая обстужаве. Ако решkaраз ИЗнеде Величиму поHopмална pajobа, сьыржete c сениковая сениковая сениковая сениковая сениковая сениковая сениковая сениковая сениковая сениковая сениковая сениковая сениковая сениковая сениковая сениковая сениковая сениковая сениковая сениковая сениковая c c c c c c c c c c c c c c c c c c c c c c c c c c c c c c c c c c c c c c c c c c c c c c c c c c C c c c c c c c c c c c c c c c c c c c c c c c c c c c c c c c c c c c c c c c c c c c c c c c c c b c c c c c c c c c c c c c c c c c c c c c c c c c c c c c c c c c c c c c c c c c c c c c c c c c d d d d d d d d d d d d d d d d d d d d d d d d d d d d d d d d d d d d d d d d d d d d d d d d d d c c c c c c c c c c c c c c c c c c c c c c c c c c c c c c c c c c c c c c c c c c c c c c c c c e e e e e e e e e e e e e e e e e e e e e e e e e e e e e e e e e e e e e e e e e e e e e e e e e e c c c c c c c c c c c c c c c c c c c c c c c c c c c c c c c c c c c c c c c c c c c c c c c c c f f f f f f f f f f f f f f f f f f f f f f f f f f f f f f f f f f f f f f f f f f f f f f f f f f c c c c c c c c c c c c c c c c c c c c c c c c c c c c c c c c c c c c c c c c c c c c c c c c c g g g g g g g g g g g g g g g g g g g g g g g g g g g g g g g g g g g g g g g g g g g g g g g g g g c c c c c c c c c c c c c c c c c c c c c c c c c c c c c c c c c c c c c c c c c c c c c c c c c a a a a a a a a a a a a a a a a a a a a a a a a a a a a a a a a a a a a a a a a a a a a a a a a a a c c c c c c c c c c c c c c c c c c c c c c c c c c c c c c c c c c c c c c c c c c c c c c c c c r r r r r r r r r r r r r r r r r r r r r r r r r r r r r r r r r r r r r r r r r r r r r r r r r r c c c c c c c c c c c c c c c c c c c c c c c c c c c c c c c c c c c c c c c c c c c c c c c c c l l l l l l l l l l l l l l l l l l l l l l l l l l l l l l l l l l l l l l l l l l l l l l l l l l c c c c c c c c c c c c c c c c c c c c c c c c c c c c c c c c c c c c c c c c c c c c c c c c c m m m m m m m m m m m m m m m m m m m m m m m m m m m m m m m m m m m m m m m m m m m m m m m m m m c c c c c c c c c c c c c c c c c c c c c c c c c c c c c c c c c c c c c c c c c c c c c c c c c L L L L L L L L L L L L L L L L L L L L L L L L L L L L L L L L L L L L L L L L L L L L L L L L L L l l l l l l l l l l l l l l l l l l l l l l l l l l l l l l l l l l l l l l l l l l l l l l l l l L L L L L L L L L L L L L L L L L L L L L L L L L L L L L L L L L L L L L L L L L L L L L L L L L c c c c c c c c c c c c c c c c c c c c c c c c c c c c c c c c c c c c c c c c c c c c c c c c c t t t t t t t t t t t t t t t t t t t t t t t t t t t t t t t t t t t t t t t t t t t t t t t t t t c c c c c c c c c c c c c c c c c c c c c c c c c c c c c c c c c c c c c c c c c c c c c c c c c n n n n n n n n n n n n n n n n n n n n n n n n n n n n n n n n n n n n n n n n n n n n n n n n n n N C H N C H N C H N C H N C H N C H N C H N C H N C H N C H N C H N C H N C H N C H N C H N C H N C H N C H N C H N C H N C H N C H N C H N C H N C H N C H N C H N C H N C H N C H N C H N C H N C H N C H N H C H N C H N C H N C H N C H N C H N C H N C H N C H N C H N C H N C H N C H N C H N C H N C H N C H N C H N C H N C H N C H N C H N C H N C H N C H N C H N C H N C H N C H N C H N C H N C H N C H NC H N C H N C H N C H N C H N C H N C H N C H N C H N C H N C H N C H N C H N C H N C H N C H N C H N C H N C H N C H N C H N C H N C H N C H N C H N C H N C H N C H N C H N C H N C H N C H N C H N C N C H N C H N C H N C H N C H N C H N C H N C H N C H N C H N C H N C H N C H N C H N C H N C H N C H N C H N C H N C H N C H N C H N C H N C H N C H N C H N C H N C H N C H N C H N C H N C H N C H H N C H N C H N C H N C H N C H N C H N C H N C H N C H N C H N C H N C H N C H N C H N C H N C H N C H N C H N C H N C H N C H N C H N C H N C H N C H N C H N C H N C H N C H N C H N C H N C H N C h n c h n c h n c h n c h n c h n c h n c h n c h n c h n c h n c h n c h n c h n c h n c h n c h n c h n c h n c h n c h n c h n c h n c h n c h n c h n c h n c h n c h n c h n c h n c h n c h n c h n c n c h n c h n c h n c h n c h n c h n c h n c h n c h n c h n c h n c h n c h n c h n c h n c h n c h n c h n c h n c h n c h n c h n c h n c h n c h n c h n c h n c h n c h n c h n c h n c h n c hn c h n c h n c h n c h n c h n c h n c h n c h n c h n c h n c h n c h n c h n c h n c h n c h n c h n c h n c h n c h n c h n c h n c h n c h n c h n c h n c h n c h n c h n c h n c h n c h n c h n d c h n c h n c h n c h n c h n c h n c h n c h n c h n c h n c h n c h n c h n c h n c h n c h n c h n c h n c h n c h n c h n c h n c h n c h n c h n c h n c h n c h n c h n c h n c h n c h n c h n 1000000000000000000000000000000000000000000000000000000000000000000000000000000000000000000000000000020000000000000000000000000000000000000000000000000000000000000000000000000000000000000000000000000008000000000000000000000000000000000000000000000000000000000000000000000000000000000000000000000000000500000000000000000000000000000000000000000000000000000000000000000000000000000000000000000000000000060000000000000000000000000000000000000000000000000000000000000000000000000000000000000000000000000001000000000000000000000000000000000000000000000000000000000000000000000000000000000000000000000000008500000000000000000000000000000000000000000000000000000000000000000000000000000000000000000000000000875000000000000000000000000000000000000000000000000000000000000000000000000000000000000000000000000001505555555555555555555555555555555555555555555555555555555555555555555555555555555555555555555555555555. C34979679679679679679679679679679679679679679679679679679679679679679679679679679679679679679679679679679687967967967967967967967967967967967967967967967967967967967967967967967967967967967967967967967967966796796796796796796796796796796796796796796796796796796796796796796796796796796796796796796796796795875875875875875875875875875875875875875875875875875875875875875875875875875875875875875875875875875874874874874874874874874874874874874874874874874874874874874874874874874874874874874874874874874874874 |

L1/L2/L3=Phase
N = Nulleiter
PE = Masse
B cnyuae ero haHnuy, He peKOMeHdyeTcR cMOTpeTb Ha ranoreHHbI eJemeHTbl.
IoDCoeHNHe Bnky K ShHpy nTahnry, cnocobHomy BbIepKATb HapJxKeHne, TOK n Harpy3Ky, yka3aHHbIe Ha Ta6nUyke DaHHbIX, n NMeHOSeMy npOBODHK 3a3emJeHry. Po3ETKa DoJXHa 6bITb NOxOJaEe Iyra Harpy3Kn, yka3aHHoH Ha Ta6nUyke, n DOJXHa NMeTb NcnpabHbI KOHTaKT 3a3emJeHry. PpOBODHk
3a3eMneHnЯBJIeTcKJeITo-3eJIeHbIM.DaHHyO ONEpaunIO DOJKeH NPOBOIDtB CNeUaJIncT, IMeOuN COOTBeTCTByOuY KBaJIuФkaUIO. B Cnyuae HecOBMeCTmOcTm MExdy PO3eTKoN IN BUNKO, IONPOCITe 3JIeKTPnKa 3aMeHNTb PO3eTKy Ha DpyrO npiemeMnEtor Tuna. BUNKa n PO3eTKa DOJIKHbI OTBeuATb HOpMaM, DeIcTByUoIm B CTpaHe MOHTaKa.
IOnKIOUeHne K NCTOCHNY PtAHN TaKKe MOXHO BbIONHHTb NyTEM YCTaHOBKn ABTOMaTHueCKORO BbIKHouaTeJMy MExdy Pn6Opom N ICTOCHNKOM NITAHN, CNOco6HbIM BblEepKaTb MaKcImaJIbHyIO NOKIIQUeHHyIO Harpy3ky N OTBeuAOJIM Tpe6oBaHnA M DeINCTBVIOUeTO 3aKOHOaTeJIbCTBa.
KeIto-3eJIeHbI npoBoDNHK 3a3emHe H He DOnJKeH pa3MbIKaTBCB BbIKNIOUaTeJeM. IcNoJIb3yEmble dIra COeINHeHn PO3ETKa IINn ABToMaTnueckn BbIKNIOuATeJIb DOJXHbI HAXOITbcR B yD06HOJ 3OHe DCocRAeMOCTn pIn MoNTaxke npi6opa.
IINr OTKJIIOUeHn MOxHO IIN60 pa3MeCTNtB PO3ETKY B 3OHe DocraEMOCTn, IIN60 yCTaHOBNTb NpeKIIIOuATeNB Ha fHKCuPOBaHHOM npOBoDE cOrNaCHO ppaBUNAM UCTpOcTBA 3JIeKTPOyCTaHOBOK.
B cnyae noBpeKdHn Hhypa 3neKtpOnItAHn, nocJeHN dOJXeH 6bIb 3aMeHEn PpOu3BODInTeJIeM, eO cepBnCHbIM aReHtOM IIN JNlCtOM, BblCTyNaIOUcEM BCOXkem KaecTBe, BO n36ExKaHne PNCKOB.
3a3eMnIounn npOBoJ (XeJITo-3eJIeHbI) DOJIKeH 6bIT bINHHee Ha 10 MM co CTOpOHb I KIeMMHOJ KOJIOKn. BHyTpeHHee ceYeHne npOBoHNKOB DOJIxHO COOTBeTCTBOBaTb MOUHOCTN, NOTpeBnREMOB BapOCHn NaHeJIbH (yKa3aHa Ha Ta6JIuYke DaHHbIX).
Hyp nntaHn daJKeH 6bIt Ta H05V2V2-F
3anpeuaeTc nomeaatb Ha BapouHyo naHeIb MeTaNueckne npedMeTb, TaKne, KaHoxN, BNIKn, IooKnn Nn KpbiUKN, NOCKOJIbky OHI MOrTy HArpeBaTbcra. He KnaDnte Ha 30hbl HarpeBa aIIOHMHNBeByo qonbry n He CTaBbTe Ha HIX PnactMaccOByIO nocdy.
Iocne kaxdoRo nCnONb3OBAHn Heo6xOIMO npoBOnTb OunchTy BapouHoi naHeiN CTem, TTo6bl Ha He Hc octabJncb rpa3b N KnpOTNBOM clyuae npn CneDyUoUeBM BKJIOpueHn BapouHoi naHeiN MOrTy BblJeJIaTbCn Dblm Hn HnPnAHTbI 3anax. Kpome TorO, 3TO MoKET npnbECTN K NoXApY.
3anpeaetc nCnOb3OBaTb nap nn Ctpyn noB BbcOKIM DaBHeHem Jn OCHTKn H3dennr.
3aPpeuaeTc npKacatbck K 3OHAM HarpeBa BO Bpempa60tI HekOTOpoe Bpemnocne 3abepueHnpa60tI.
HnkOrda He roTOBbTe NmUy HEnOcpeDCTBeHHo Ha CTeKIOkepaMueeCKo BapOuHOn NaHeJN.
Bcerda nocnob3ynte dny 3toro noxoadyu nocdy. Bcerda nomeeaute nocdy no uehtpy harpeBaTeIbHoro 3JIemEnTa,Ha KOTOpOM Bbl roTobnte Nsiy.He nomeuaite Ha naHeb ynpabHeHnKaKne-1n60 npedMeTbl.
He nCnoJb3yIte BapOHyIO naHEnb B KaueCTBepa6ooye NOBepxHOCTN.
He nCNoJIb3yIte NOBepXHOCTb BapOCHn NaHEJN B KaueCTBe pa3dENoOH JOCKN.
He xpaHnTe nAd BapOchOn naneJbIO TjKeJIbe npedMeTb. B cnyae naDeHnO Hm Moryr NOBpeDntb BapOCHyIO naneJIb.
He nCnoNb3yIte BapOHyIO naHeJIb B KaueCTBe MecTaCKJIaDnPoBaHnI PpeDMeTOB.
HeDburraTeNoCydyNoBapouHOnnaHeJI.
ДяЗкплуataци npn6opa c HOMHaJIbHbIMu чacrToam He Tpe6yIOTc rdoONHHTeJIbHbIe ДeЯCTBnI/HaCTpoiKn.
TabnUka c daHbIMn (pacnoJoxKeHa B HxKHe yactn Kopnyca BapouHOI naHenn)

1.II PEOyPPEXDEHnO BcUeTeO XAPAKTEPA
CepTmDnKAT COOTBETCTBn

3To n3dennec COOTBeTCTByeTe XEHuecknM
perIameHTam TamoxeHHoro CoHO3a:
-TP TC 004/2011 «O COOTBETCTBHN HN3KOBOJbTHORO 6obopyoBaHn»
-TPTC020/2011《3neKtpomarHnTHaCOBMECTMIOCTbTexHHueCKNXcpeCDTB》
I3deneceptnphiunpoBaHObopraHneNoceptnphiKaaunnpoDyKuun ycnyr «POCTECT-MOCKBA», r. Mockba.
TnytB KOINIO ceptnoKATA COOTBeCTBnB BMOKeTe B Maar3nHe, rIe npno6peTANr TOBap nIN, HAnncab 3anpoc Ha 3neKTPOHHy noHTy candymow@candy.ru
2.M EPbI NO 3AUINTE OKPYKAIOUe CPEdbI

Ha daHHbI npH6Op HAnHeCeHa MapKIpOBKa B COOTBeTCTBnC DInpeKTHBoE EC 2012/19/EC o6 OTXoax 3JKeK TpUeCK Oro n 3JKeK TpoHHoro 6OboydoBaHna (WEEE).
OToDbl 3NeK TpuEckoro n 3nE K TpoHHOro
obopyoBaHnra CoepKaT Ka3 3arp3HNOuine
BeUeCTBa (KOToPbIE MOrY CTaTB npuHHO
HeratNBbIX NocneCTBIN DnI OKpyKaHOe CpeDb
TAK IN 6a30BbIe KOMNoHENTbl, KOToBle MoryT 6blb NOBtPOHO NCNoB3OBAHb. BaxHo, YTObbl OTXoBbl 3NEKTPWcckoro IN 3NEKTPoHHORO 6OBpyoBaHnN NOBepraHNC b CneuaHbHM CnOCobam OpaBoTkn, HauJIeJIHHBM HA N3BLeueHHe N IpaBUNbHYK yTNlN3aUHIO BCEx 3aqrpa3HNOuixn BeueCTB, a TAKKe N3BLeueHbBCex MaTePnaNoB, PnroDhbIg NpOBtHOrO NCNoB3OBAHnR. FpaXdAne MOrTOy BHTCn 6oBbUoBkNAD B To, YTObbl OTXoBbl 3NEKTPWcckoro IN 3NEKTPoHHORO 6OBpyoBaHnN (WEEE) He cTaII 3NoobHeBHO np6bEmoM nI dy OxaHbI kOpkyaOuJe CpeDb; dIIN 3TOr HOeOxOJIMO CJIeOBaTB HECKoJIbKM OCHOBHbIM IpabINAM:
- OTxObl 3neKtpnueckoro n 3neKtpoHHoro o6opyoBaHna He DonxHbI yTINN3npoBaTbcra, KaK bITOBble OTxObl.
- OTxOdbI 3JNEKtpnueckoro I 3JNEKtpoHHoro 06OpdyOBaHnI DOJNKBI nepeDabTbC B COOTBETCTByUcme NyHKTBi C6opa, HAXOJaUncEca NOy ynpabNeHem MyHUnnAInbHbIX BnacteN INI OΦuNaJIbHO 3apeNCTpnpoBaHHbx KOMNaH. Bo MHorix cTpaHax npakTKyEtc C6op rabapTHbIX OXTOOIB 3JNEKtpnueckoro I 3JNEKtpoHHoro 06OpdyOBaHnHa DOMy.
Bo MHorix cTpaHax, npn NOKyIke HOBO npbOpa, cTapB MOxHO BepHyTB p03NCHOMY npoDaBuHa YcNIOBnX OINH K ODNHY, eCN I Bo3BpAaemoe o6OpDobAHne 3KBNBaIeHTHO Tnna n 6Naadet TaKIM Je cyHKUHOHaOM, KaN NOCTabIeMoe o6OpDobAHne.
3.Y CTAHOBKA
YcTaHOBka 6bITOBoTexHKn ABnIeTcN CNOxHoI OepaueNe, KOTOPaB Cnyae HekOppeKTHOrO BblNOJIHeHnM, MoKeT npuHNHtB cepBe3Hb BpeN3dEHHO,eroXapKTePcNtKAM NIN PpECTaBNTb Yrpo3y DnA Be3oNaChocTN NoJe. No 3ToI npuHHe yCtaHOBka DoJHKa 6bITb BblIOJIHeHa KBaIINoFUnPOBaHHbM CneuaNlCTOM B COOTBcTBN C TexHnueckmIM TpeBOAHmN.
Bcnyae,ecn Bbl nphe6pern 3ToI peKomeHdaunne, n yctahOBka 6bna BblnoHeHa HekbalnphiuropoBaHHbIM nucom, PpO3BODHTe b CHMaet C c6eBCIO OTBETCTBEHOCtB 3a IIOyIO TexMHcECKyIO HEnCpabHOCTb NdJIeN, He3ABNCmIO OT TORO, 6yDet Nn Oha ABJTBcPnPHNOBpeXDeHnN3DJIeN INI erO CBOITB, INI Xe npNHHeHBApe JIOdM ININ XINBOTbIM.
IocIe cHrTHyNakOBKn npocm BAc y6eIITbCBA CEIOCTHOcN 3dennB, B pOtnBHom Cnyaae npocm CBra3aTbCBA KOMnAHneI npoabuom nncnykboepBnCHORO o6cnyKnBaHH.
Y6eHNTecbBTOM,HTO KxohHnA Me6enB,KOTOpyO 6yDet BCTpaHbTaBc Ba7a BapouHnA NOBepXHoCTb,paBHO KAK NBCr OCTaHbHnMe6enb,HaxoJuscaRb HENOCpeCTBeHHoB 6mN30CTN K BapouHn NaHeIN,N3ROTOBHeNA 3MaTePnAnOB,YCTOHNBBIMK BBICOKMM TemnePaTypam (MH.100°C).
Kpome 3Toro, BCE deKopaTHBhle PIIeHKn DOJIKHbI 6bITb PnIKJeeHbI TENIOCTOKHM Kneem.
I3eJIne MoKet 6bIb yCTaHOBHeO BO BCTpoEHo Me6eIN cTaHapTHbIM (cM. PucyHOK 1) uNn yToPnEHHbIM (cM. PucyHOK 2) cnoc6om.
ToIuHa CToneuHnUbI DoJNka 6bITb MeKdy 25 n 45 MM
Ppumeyaue: Pa3MepbI bHympeHHezo nepumempa udeHmuHbip a3Mepam npu cmaHapmHO ycmaHO8Ke
PaccToHHe MExdy BapOHy NaHEnbIO 3aDHe CTeHKo DOnKHO 6bTb KAK MNHmym 55 MM, a MEXdy BapOHy NaHEnbIO bEPTKaJIbHbIMC TcEHkAMMeBeIIN NIO GOKOBIMC cTeHaMn - KaMnHMym 150 MM. B Cnyae yCTaHOBKn MeBEN HAD BapOHy PAneJIbO, MNHMaJIbHOe pacCToHmE DoJXHO 6bTb 700 MM.
Pny yctahOBKe BbITxKn HaB BapOCHNo NOBepxHocTbHO, O3HaKoMbTeCb C Tpe6oBaHnMn KcTaHOBKe BbITxKn, HO, BJIHOOM CNYue, pacCToRHe MeJy BapOCHNo NOBepxHocTbIO N BbITxKKoI He DOnXHoe 6bIt MeHee 700 MM. (CM.PncyHOK3)
EcnHnKnHcSTOpOHa yCTaHOBHeHOB BApOHn NaHEn
pacnonaraetcB ObIacTn, K KOTopoN OcyIeCTBnIeTcN DOCTyn BO
BpemYbOpKn Hnn Dpyrnx onepaun, Hxke BApOHn NaHEn
peperopkny Ha pacctoHn 20 MM DoJXHa 6bITb npedycmTopeHa
peperopka. (cm.PncyhoK 4)
PnYcTaHOBKe dyXOBKn NOB BapOCHNO naHeNbIO, B nepeRopOKe HET HeOBxOdIMOCNTy, aMHMMaNbHOe paCCToAHne MEXy BapOCHNO nobEPXHOCTbNO I dYOBKOI DOJIHKo 6bITb HE MeHee 10 MM. 3aInpseAaTcYcTaHaBNIbA Tb HeocTbIBWHyO dyXOBKY NOB BapOCHNO raHENB. PnY cTaHOBKe dyXOBKn Co6bNDaJIe COOTBeTcBYIOUne CneuΦnueckne Tpe6oBaHn.(CM.PncyHOK5)
B komnne Tc BapOHOIO NOBepxHOCTbIO NocTabIeTcR repMeTmnpUPOJIApoKlAnKa.YCTaHOBITRe pReMtnpIpyUOyIO npkAnky no nepmEpy BapOHOI naHEn corlaCHO ONCaHIO IN y6eNTcB b TOM, Yo OHa YCTaHOBJIeNApaBILbO, BO n36ExaHHe npoteHek B wkaF noB BAPOHOI NaHEJbIO. (CM.PncyHok 6)
06bHnaaKcaua:
-DocTaHbTe KpenexHbIe CkObblnKOMnNeKTA akceccyapOB n3aKpeNITe INB NOLOKeHN, NOKa3aHHOM B HNXHeY qactN Kopo6Kn. (He 3aBnHcHbAte WpynbHa CkO6ax 6noka, OHn DOJnxHbCBO6oDHO dBVaTbc) (CM.PncyHok7)
BCTaBtBe BapouHyo NaHeIb no ceHTpy npOeMa B Me6en.
- NObepHnTe CkO6bl IN NOJHOCTbIO IN 3aBnHTnte. (CM.PucyHOK8)
PnmeaHHe: y6eDntecb, YTO Bce BnHTbI HaedXHO 3aTMyTbI. Oepauu nn BblONHeHH HOBOI NOKNIouHeHH:
- BbIePNTe KaBEn 3JNeKTpONITAHNBA COOTBeTCTBN C PEKOMEHaZaUNM, PpeDCTABJIENHBIIMN TBaSNIUE.
- PpOpyCTnTe uHyp nHTaHna Ype3 3aXm.
-3aHCTNTe KOHcBCEXPBOBOB
UHypa nHTAHnHa DnHHe 10 MM,
PnHHMaB Pacet DNHy UHpya
NHTAHna, HeoXODmYOp DnBbINOpHEHn
CoEHNHeHn Ha KNEmMHOn KONOKe. - BbnoHnTe noKnIoueHne npBOBnKOB NUYHTOB, KOtOpe 6bln CHrTb I npeblUype onepaun, B COOTBETCBN C TINOM JINHN
3JIeKTPoPNTaHnKaNIOKa3aHoB npeDCTaBHeHHOn HmKe TaBnue. - YcTaHOBInTe Ha MeCTO KpbIiKU KJIeMMHoi KOJIoKIN;
-3aKpeHnTe KpbIuKy C NOMOuB BO HHTOB.

BHIMAHHE:
B cnyae Heo6xOIMOCn 3aMeHb IuHpy nTuHa, NOKJIIOHTe KOHTyp B COOTBeTCTBnN CO CNeIyUOnMm UBeTaMn/KoJaMn:
| СИНД | Нейтpanь | (N) |
| КОПИЧEBBI | Фаза | (L) |
| ЖЕЛTO-3ЕЛECHБI | Земпя | (♣) |
IoiKJIIOUeHHe K 3axImaM Ha KJemMMoH KOJIOKe
| КOHФИГУРAZИА "1-6" | КOHФИГУРAZИА "7" | |
| ОДнофАЗНOE ини DBУХФАЗHOЕ ПОДКЛЮЧЕНИС 220-240 V~ | ||
| Кабель HO5V2V2F | 3x2,5 mm² | 3x4 mm² |
| ТPEXФАЗHOЕ ПОДКЛЮCHЕНИС 220-240 V3~ | ||
| Кабель HO5V2V2F | 4x1,5 mm² | 4x1,5 mm² |
| ТPEXФАЗHOЕ ПОДКЛЮCHЕНИС 380-415 V2N~ | ||
| Кабель HO5V2V2F | 4x1,5 mm² | 4x1,5 mm² |


L1/L2/L3=Φa3a
N = Heɪtpaɪb
PE = 3eMnA
5. PEKOMEHДAUH N OTHOCHTEJIbHO BbIbOPA NOcYdbI DJIBAPOUHON NOBEPXHOCTN
IcnoIb3oBaHne KaueCTBeHHo Nocybl IMeet nepBOOepeHoe 3NaueHne IJIa NOnyuHnro OTNnHOro pe3yNbTaT aB npoucece 3KcIpyataun Baew BapouHoi nobepxHoCTn.

Bcerda nCnojIb3yIte BbICOKKaueCTBeHHyIOncyDu C IeaiJbHO NIOCKIM INTOCTOCTeHHBM DHom: NcNoJIb3OBAHne TAKOI NOcyIbI pEIOITBpaIaIeT O6pa3OBAHne rOpAIX TOeK, B KOTOpBX 6yET NODropaTB Niua. NcNoJIb3OBAHne TOnCTOCTeHHbIX KAcTpIONB IN CKOBOPoDOK ObecneHT ODHopOHOe pacnPpeDeHHe TENIIa.
- Y6eIntecb B TOM, 4TO DOH KAcTpHIN HIN CCKOBOpObl cyXoe: Pn HAnOIHeHHK KAcTpHIN BODo HIN NcNOJIb3OBAHIN KAcTpHIN, KOtopa IIO TOTO HaxOIMJIacB XOIONJIbHNKe, NpeEi TEM, KAK NoCTaBNTe Ha BApOCHY IOBepxHOCTb, Y6eIntecb B TOM, 4TO DHO 3ToK CAcTpHIN COBepWeHNO cyXoe. 3To npedOTbpatNT O6pa30BaHne nIaTeH Ha BapOCHNIOBepxHOCTn.
Ponb3yntecb nocyo, dnaMeTp kOtopo no3BOnraretnoHoctb 3aKbItb 30Hy HarpeBa: pa3Mep nocdyd oJnKeH6bItb He MehIe 30Hb HarpeBa. Ecn dnaMeTp nocdybl HemHoro 6oJIbe dnaMeTp 3OHI harpeBa, To 3Heprna 6ydtncnObl3OBaTcBcCMAkCmAlbHO 300fKeTNIBHOCTbIO.
BbIbOP KXYOHHO NOCyMbI: PnBBeHeHna HNKe INHΦopMaunnoMoxket Bam Bb6paTb KxyOHHyO NOcyDc XopoUIMN3KcPnyatauONHHbIMXapaKTepNCkAMN.
Hepxabeoua cTalb: HacmoemJbHO peKOMeHyemc.
Oc6eHNO xopoIoo IOnxOoIT KxOHnA NOcya C MHOroCNoHBIM DNOM TINPA «C3HDBN», KOtOpoe O6beDnHReT B Ce6e pEmyUeCTBA HepKaeBHeUeCTaJI (PpNBLeKaTehBbHbB HBeHnB BnD, DIOJROBeeHOCbI NpOHnOCTb) N pEmyUeCTBa aJIOMHNH rMn Mei (BbICoKA TaIIPOnpOBdHocTb, paBHOMepHOe pacnPpeDeJeHne TempepaTypbl).
AnomnHn: peKomeHyemc uonl3o8ammbmkeynocdy. Blicokar TennnpobOHDctb.AnnmHneBa nocya Hnorga octabnaret h Bapoynahe cnebl, noxoxne Ha cepanHHb.H 3TN Cnebl NERgOaIaONTcE,ecnNCTKa BapouHO naHenn BbInOnHReTcHEMeJeNEHOncne IX oBpa3OBaHN.
H3-3a H3KoTEmpeatpyPiIaBneHnAJIOMMHnHe NcIOJIb3yTe TOHKoCTeHHyO aIOMMHnEByIO NOcydy.
UryH:MOxHO UcNoIb3OoAmb, Ho He peKOMeHyemc. Hn3Kne 3KcNpyatauOnHHbe xapakTePncTKn. MoXe npnbectn K 6bpa3ObaHIO capanIH Ha nobepxHocTn.
Nocya c MeHbIM dHom/KepaMnka: peKOMeHdyemcra UcnoIb306amb mKeJyHO nocydy. XopoWne 3KcnPnyaTaunOHhbIe XapakTePncTKn, HO MeIb MoXeT OCTAbnTb Ha NOBepxHOCTNb BApOHO Nanei CneDbI, NoXoxNe HA CpapanHbI. 3TN CneDbI MOryt 6bIT ydaJIeHbI, ECNI YnCTKa BApOHO Nanei BblONHReTcR HemeJeHHo NocLe Obpa3OBaHnRA 3TNX CneDbI. BIObOM cnUyae, He dOnyckaIte npCyrCTBna NyctO NOcyDbI Ha paBoTaIOSe BApOHO NOBepxHOCTN. NpePerpBi MTaII MOpET PnIPOPeTB K CTekNokepMaueckO NOBepxHOCTN. NpePerpTaNOcya C MeHbIM dHOM MOXe T OCTABnTb Ha CTekNokepaMueckO NOBepxHOCTN CneDbI, KOTOpbIE HeBO3MOXHO6yDetYdANITb.
ΦaΦpOba/3mAnipOBaHnA NOcyda: XoPOUHe 3KcNlJyataLIOHbIe XapAKTePNCIMTOJIbKO DnIPOCByCTOHKM,ITaDNIM,IIIOCKM DNOM.
CTeKIOkepaMueckar nocya:He peKoMeHdyemc.Hn3Kne 3KcPnyataUHOHHBe XapaKTepncTnK.MoKe TnpBecTu K 06pa3OBAHnU capanHH Ha NOBepxHOCtN.
6.3KcPiYATAUINIPINBOPA
Kak BbI6paTb ypoBHe bynpAbHnnaHTaHnEm.
C nOmoIbI OyHKcHn «YnpaBJIeHHe NITaHHeM» NOJb3OBaTeNb MoKeT 3aDaTb MaKcMaJIbHbI yPoBeHb MOUHocTn dIra BapOuHOI naHeII.
Функцу ynpabHeHn nTahmdoCTyHbTOlbKoBteeHne nepbbix 30cekyndnoCle BkIouHnBaOpHNo naHEn.
3Ty HactpoKy MoKHO N3MeHnTb ChOba,OTcoeHNHB BNky Ka6enr IITAHNOr OT 3JIeKTPocETn n eue pa3 NOkKnOuHNB ee.
PnycTaHOBHeHOM 3HaHeHm MAKCMmaIbHO MOnHoCTn BApOHaH naHeIb AToMaTnueckn pacPpeJenrE MoUHocTb MeKdy KOHOpKaMn, YTO6blOTnpedHe 6bl npeBbIeH;
6IarOapra 3tOMy MoXHO OJHOBpeMeHNO ynpaBnTb BCEMN KOHOpKaMn, He CTaKNBaCb C npoBneMaMn neperpy3Kn.
Iolb30BaTeNB MoKET 3aDaTb MaKcImaIbHbI yPoBeHb MOUHOCTn DnB BapOuHOB NaHEIN OT 2,5 KBT Do 3HaueHnMaKcImaIbHOH OTHOCITeNBHO MOUHOCTN BapOuHOH NaHEIN (3To 3HaueHne 3aBNCNT OT MOnEHN YCTPOINCTBA) (HanpIMep, eCN MaKcImaIbHra MOUHOCTb BapOuHOH NaHEIN CoCTaBnRET 7,2 KBT, MaKcImaIbHb I yPoBeHb MOUHOCTN DnRA HAcTpoIKn 6yDet nMeTB 3HaueHne OT 2,5 KBT Do 7,2 KBT).
Ha npno6peTeHHoB BapOHn PaHeJN yCTaHOBJeHO MaKcMaJIbHoe 3NaueHne MoUHocTn.
Iocne noKIOUOeHnY ycTpoiCtBa K 3JIeKToPoCeTN B TeueHne 30 CEkyHm MOxHO 3aDaTb yPOBeHb MoUHOCrN Ha OCHOBaHHu Yka3aHHbIX HnKe npaMeTpOB:
1-BKJIIOHHTe KOHOpOpKy.
2-DAIteBpeMceHCOPHMyynpaBHeHIO,3ABePHTbPiOeCC HnHnnaH3aHH.
3-Доисточеня 30 cekyнд КОСИТЕСь,Ha5cekyндКПаВишИ «(MunHyc).
4-Ha ncnnnee noarntcne dyuooee coo6eHne.

5-Bocnonb30abwncb KnaBnWamN «Plus» n «Minus», MoXHo oTperynpoBaTb ynpaBneHne nTuHaHem. B daHHom npImepe MoUHocThpeRynpyetcMexdy 3haueHnMaMn 6500BTn2500BT. BblpaB hyxHoe 3haueHne, KOCHNTecb OndOBpeMeHHO KnaBnW «Plus» n «Minus», ydepXnbar nx B TeueHene 5cekyHd.

6-10 Okohann 3ToI npOeDpybI npO3ByuNT dINHHbI cnHAn I npOn3oJET c6poc cnCTembl. NOBTOPnTc npOeDpya 3anycka.

7 - Поссе заусякna поцесca на диспjee таймера ECO отобразитсулразелно петанем.

Iocne 3mo2o cencophoe ynpaeneHue He no3eOnum nepeknouamcbra Ha kaKoe-nu6o coyemaHue, Komopoe moXem npebbicumb daHHoe npedeBhoe 3haueHue Eco.
BkHIOueHHe/BbIKNIOeHHe 3OHb HarpeBa

BKNIOUeyHn30HbHarpeBa ydepKnBaTe KHOKy BKNIOUeyHnB TeueHne 400 MceK. Bby ycblIuTe DnHHbI 3ByKOBo CNHaI, a B 3OHX HarpeBa BbcETITc3HaueHne "0", yka3bBAoOee Ha MOUHOCTb HarpeBa.
1) Ecnn cTadn npiroTOBHeHn HaxoHTcB NnoJoxeHN 0, dncnn otKIOHTcABTomATueckn uepe3 10 ckyH, n 6yJeT noan 3ByKOBo CnHaI O 3aBepWeHN IpOceca.
2) B cnyucae npncyTcTBnO OCTaTOHOro Tenna,Ha BKJIQUeHHOM DnCnnee npn HynEBoM MOUHOCrN HarpeBa,BbICBeTNTcMIRaUoI MmBBOl "0".
3)PnAaTbUPOBaHNOH 1BbIKUOeyHn30HbHarpeBaDoTpoHBtEcBdoIIO6o30HbI HarpeBaTeueHnE12cK. BbyycblWnte3KopoTKnx3ByKOBbIX CnHaHa. Ha dncnnee 3aDenCTBOBaHNo 30HbHnHe OBeBETnCnn BBcBETnCnMBOn"H"BCnyae npCytCTBnOCTaTOHOro Tnna.Pocne yero 30HaHarpeBaBBkHOHTCn.
1) Ecnn Ctaa n npiroToBHeHn HaxoOnTcB N noJooKeHN 0, dncnne OTKIOHTcABTomAtuCeckn Ype3 10 ckyHn, n 6yJeT noan 3BykoBo CnHaI O 3aBepWeHN Ipocceca.
2) B cnyuae npncyTCTBnO OCTaTOOHOro TenIa, Ha BBIKNIOUeHHOM dncnnee NOBNTCnMBONJ "H".
3) BbIKIOHTb 30Hy HArpeBa MoXHO DaKe npa AKTINBnPOBaHHoI ΦyHKUIN 6NoKInPOBKn.
4) B cnyuae escnn aktnBupobaHa 6bET TOnbko Odna 3OHa HarpBa, nOHa 6bET BbIKIOHe, YeTbeP KOpOTKINX 3ByKObIX CNrHAna N3BeCTrO TOM, YTO CBA BApOVAH PAHeNb BbIKIOHeA.
Bb6op 30HbI HarpeBa
Pnye BkHIOueHHo3OHe HArpeBa,30HbHarpeBa,KOTOpBle 6ydyT BKNHOeHb,HO pN3OM He 6yDyTBbIbpaHb,6yDy NTMeMb Mehbuyo CTeneHbOCBeUeHn.

Bb6paHaNo yMOJTuHaHnO, 6e3 Heo5xoDmOCtn KopoTkoTo HaKaTn (150 MceK) Ha KhoNky Bb6opa.
YBeIuHHe / yMeHbIeHne MoUHOCTn HaPeBa

Быстрын Наим Кнонok +'ил -' Bbl можete увелочьиу MeHbWITb MOUHOCt b HarpeBa Bbl6paHHbIX 30H HarpeBa Dnana3oHe: 0-1-2-3...9-P
1.ПиДИТЕЛБHOM HAXATIN KHOHOK'+'ИИN'-'уpoBEHB HarpeBa 6ydt NOCTOHHO yBENHIBATbCRA / yMeHbIaTbCRA.ПибICTpOM yBENHCHEN yPOBEHB HARpeBA OCTAHOBITcRA Ha yPOBHe 9,дЯ[euple 6BoJbIeO yPOBHa HARpeBA bICTpO HAKMITE Ha KHOHky +'.bICTpoe yBENHCHHe / CHIXeHHe yPOBHa HARpeBa He cOpBOXdAeTcRA 3ByKObIM CINHaIOM.
2.Пи дocнжehн мошногн HarpeBa ypoBnP,пр nOBtOpHOM haxaTmN KhoNkN +' ypoBeHb moUHocTn He BepHeTcR K 0.Пи 3haeHm ypoBnMoUHocTn O, noBtOpHoe HaxaTne KhoNkN -' He n3MeHnYpoBHe MoUHocTn Do 3haeHnPaP.
3.ПиВКIOUHHOI3OHeHARpeBa,IMeIOUIyPoBHeH HArpeBa0,ecIN3OHaHARpeBaOCTaETcRTopaYeN,CIMBOJ06yDetMIRATb.Yepe310ceKHyD CIMBOJ0NCHe3HT,NaDnCnPeE OTO6pa3ITcRnoCToHHb CIMBOJ'H'.
PnBb6paHHO 3OHe HArpeBa N ODHOBpeMeHHOM HaKaTHN KHOHOK +n',yPoBeHB HArpeBa CTAHeT 0',pN3OTM 3OHa HArpeBa 6yJeT octabTa CBb6paHHO B TeueHne 10 CekyH. EcN 3OHa HArpeBa 6blya ZanporpAMMPOBaHa No BPeMeH, TaMep BbIKNoHTc. 3Ta opeRaMOeT MeMeT Bo MeCTo TOnbKO B HeCKoJIbKIN CnyJax B 3aBNCIMoCTn OT KOHfMypaun CEHCOPHOrO ynpabJIeHn.
OnncnHbIe Hxke npImepbl npBedeHb ToJbKO nIa CnpaBKn.Co BpemHeM Bb Hayntecb npAunbHo NOpBipatb yctAHOBKn HaPeBa B COOTBeCTBm CO CBOIMN BKycAMN INPnBbUHKAMN.
ФункцяблOKнрВК OТдTeH

OCTHraetc OJHOBpeMeHHbIM HaxKaTHeM KHOHOK' +' n-. 3aTeM, kaxdIpa3 npn HaxKaTHN KHOKN Ha dncJIee 6ydet OTO6paxTaBCr INHdkATop "L" B TeueHne 2 cek. YPOBeHb HArpeBa 6yDet OCTaBaTcBcR B 30m Jx CoCToHN. Ipy De3AKTbAUu PhYHKUu BNoKupOBKn OT DeTei, CNeDynte npoueccy, onNCaHHomByIe. NocYeero Bby ycblwnTe KOPOTKm 3ByKOBOc CMHnHa Hn DaCnJIee BbICeTNTcR INHdkATop "n". BapOCHNaHEb 6yDet pa3bNOknpoBaHa.
PnmeuHne: PnmeuHne: aBOMaTnuecka 6JokpoBka OT DeTeB 6ydet NMeTB MeTo Yepe3 15 MNHT NocLe NfHOro BblKIOHeHnBapOuyHn NaHEn. 3Ta FyHKnue 6ydet CpaBaTBaTB aBOMaTmUeCKn, HO mHaayanbHo ee HxKHO 3AnporpaMMnpoBAb. CmOpnte pa3Den POnb3OBaTeNbckne HAcTPOKn.
HdkaTop ocTaToCHoro HarpeBa (B paHaANTHO3OHe HArpeBa->paccHTbIBaETc)
3TNJHINKaTOpbMoryTNCNOB3OBAbC8nIINHINKaUIN OCTaTOCHORHOHPeBa.YcTaHOBITE BpEmnIcnElyIOeIeIN: OCTaOnHHARpeBf(ypoBeHbMOuHOCtN,BpEmpa60Tb). KordaTeMNepaTp a 3oHbHarpeBa npBbIaAET 65oC (TeOpEtNueckarBEInuHa),HaDCnPee NOABJIeTcN INHINKaTOP "H". DnI DOCTNXeHn TMEpApTypb Bblwe 65oC,HarpeBaTeNbHbI 3NeMeHT DoJXeH 6blb BkIOUeHHbIM HeKOTOpoe BpEm, KOTOpoe 3ABNCIT OT YPOBnMoUHocTn.Pocne TOR,KAKOTnpOMexyTOK BpEMEH 3ABEPWHTcN HARpeBaTeNbHbI 3NEmENT OTKNIOHTcN, BBICBTNTcPpeDynpExdHeNcOCTaTOCHORHOHPeBa.
ABTomatnueeckoepdoxpaHntbHoe BblnOeHne
B clyuae ecn ypoBeH moUHocTn He 6bln n3MeHe H TeueHn
IpeyctaHOBneHHoro BpemHe, COOTBeTCTByIOua 3OHa HarpeBa
BbIKIOHTcA BtOMaTHueCKn.
MaKcImaJIbHoe Bpem, B TeueHne KOToPOrO 3OHa HarpeBa 6ydet
OCTaBaTbCBA KluOeHHo, 3aBNCIT OT bblpaHHO r OPOBn HArpeBa.
BapouhnaheIbHee biknouaemc.
KoHTpOJIbHa NaHeJIb 3a6IokIpOBAHa. Pa3IokpyTe BapOHyIO naHeJIb.
Yacmoma uukno8 knoeHue/ebknoeHue 30n Haepeea
Yactota zIKIOB BKIOH /BbIKIOHn 3aBNCNT OT yCTaHOBKn yPOBHa HArpeBa:
- Hn3kn ypoBeHb HarpeBa - KopoTkoe Bpempa60Tbl,
- BbICOKn ypoBeHb HArpeBa -DInTeJbHoe BpeMa paOToBtI.
30Ha HarpeBa He pa6oTaE.
PpOBeBpTe cocToHHe pNaBkx npedoxpaHTeNe / pa3MbkaTeNe B Dome. Y6eDntecb B Tom, qTo HET nepe6oBn PoJaue 3NeKTPo3Heprm
30Ha HarpeBa camOCToTeNbHO BbIKNoyaeTc.
HeuahHoe HaxaTne IaBHO BbIKIOUaTeIe (KHOIIa BKJI./BbIKI.) HnHa KHOKe JEXKT KAKOI-NIO6o NpeDMet. Y6epITe NpeDMet c KHOKN I NOBTOPO H BKNIOUHTe PnI6Op. BBeNTe HAcTPOKn IOBTOPO.
BbCBeuNbBaTeC F CmBOJ uΦpbl
B cnyae korga bblcbeuBaetc nHnkaTOp F nUcPbI, Bau np6op 6hapuykn Own6ky. B tabnue Hnke nIIOKeHbI DeiCTBn, KOtOpble Heo6xoDIMO npedpnHrtb IrapeWeHn np6bnMbl.
9. NOCJIENPODAJKHOE OBCJNYKUBAHNE
Ipeed TEM KAK Bb3BaTb CneuaHnCTa NO TEXHueckomy 06cIyKBAHnO, npocm y6eDnTbC B TOM,
TO BUNka UHypa 3NEKtpoNTaHnna PpaBnIbHO BCTaBHeBa 3NEKtpuYeCKyIO po3ETky, IN PpeOxpaHnteB BKNoUeH; EcIn BBy He MoKeTe CaMOCToAteBHO OnpdeJeNtB npuHy HEnCnpaBnOcTn, BBkIoUHTe 3NEKtpoPnp6Op n He NItaTeCb OTpMeOHToPoBaT erO CaMOCToTeBHO. No3BOHnte B ceHTp nocIepnoJaXHo 06cnyKbAHnna. 3NEKtpoPnp6Op IMeet rapaHTnIO 6ydt OTpeMOHTpObaH B cepBuChOM ueHTpe 6ecnNaTHO.

L1/L2/L3 = Fáza
N = Neutral
PE = Uzemnenie
4. ODPORUCANY RIAD
7. RIESENIE PROBLEMOV
Varné zony nevariajemne alebo lenjemne smazia

Figure 6 Figure 7 Figure 8


Figure 9 Figure 10 Figure 11


aal l aal
Jnll 2
aai jai eai, ai jai
yjlll 0 jllg yjllg lgljllg jllg jllg
iJaaLac:Jiaa:Jia
yjoo joe o jao jao
2.2.2.18 gall
jai 1i 1n
aill
a a a a a a a a a a a a a a a a a a a a a a a a
Jalldy aasssll alaill jai yai, lalai sall sll
aall
jie 1
aaii 1
gai jia gai jia gai jia gai jia gai jia gai jia gai jia gai jia gai jia gai jia gai jia gai jia gai jia gai jia gai jia gai jia gai jia gai jia gai jia gai jia gai jia gai jia
"all 1
0 1
00000000000000000000000000000000000000000000000
juiie ci jiuu jiuuuiy."-" y"++ "juiiui iuiuui uaiuui 1
.(00g)
e 3
"199" 00" 4 4 4 4 4 4 4 4 4 4 4 4 4 4 4 4 4 4 4 4 4 4 4 4 4 4 4 4 4 4 4 4 4 4 4 4 4
99 99 99
e 6
Jilu bai jie cai yall Jae lii jai jia jao 7
a a a a a a a a a a a a a a a a a a a a a a a a a a a a a a a a a a a a a a
jlll 1111 1111 1111 1111 1111
yLoic,iaioa yjol jocgall cio 10
11 1
LED 1. yaiyaiyaiyaiyaiyaiyaiyaiyaiyaiyaiyaiyaiyaiyaiyaiyaiyaiyaiyaiyaiyaiyaiyaiyaiyaiyaiyaiyaiyaiyaiyaiyaiyaiyaiyaiyaiyaiyaiyaiyaiyaiyaiyaiyaiyaiyaiyaiyaiyaiyai
LED aae e 1s yll sall aea 1e yll l 1e yaa aabn Jl J
aLL aee LED ael) 1e yll 1e yll aal 1e 1e yll 1e 1e yll
. (204) jll aebial llg LED aol g 1e yll g 1e yll aebial
aeg e aag aai iell aal 1e yll 1e yll 1e yll aebia 1e 1e yll
aayll g 1e yll 1e yll 1e yll 1e yll 1e yll
LED
yall yall yall g 1e yll 1e yll 1e yll aebia 1e 1e yll
yall yll g 1e yll 1e yll 1e yll
上
aagg g aagaaagaaagaaagaaagaaagaaagaaagaaagaaagaaagaaagaaagaaagaaagaaagaaagaaagaaagaaagaaagaaagaaagaaagaaagaaagaaagaaagaaagaaagaaagaaagaaagaaagaaagaaagaaagaaagaaagaaagaaagaaagaaagaaagaaagaaagaaagaaagaaagaaagaaagaaa
y
y 10
jbjjj jbjjj
5 5 5 5 5 5 5 5 5 5 5 5 5 5 5 5 5 5 5 5 5 5 5 5 5 5 5 5 5 5 5 5 5 5 5 5 5 5 5 5 5 5 5 5 5 5 5 5 5 5
Eco 1 jy

aaiy 1
1 1
1 2
Jia 3
y 1 1 1 1 1 1 1 1 1 1 1 1 1 1 1 1 1 1 1 1 1 1 1 1 1 1 1
1
.H" 1
Jaa Jaa Jaa Jaa Jaa Jaa Jaa Jaa Jaa Jaa Jaa Jaa Jaa Jaa Jaa Jaa Jaa Jaa Jaa Jaa Jaa Jaa Jaa Jaa Jaa Jaa Jaa Jaa Jaa Jaa
a111
C 1

aalll 2 aaii jai 1 1 1 1 1 1 1 1 1 1 1 1 1 1
aall g jia jia jia +jz jle bai all jia jia P aillg jia jia jia 2
1 -jz jie jia jia jia jia jia jia jia jia jia jia jia jia jia jia jia jia
3 1
aegd gae 1e 1
Ae 1
aai 1
p11.5
jlll llll jjj jssall gllll
yjia jyaiyaiyaiyaiyaiyaiyaiyaiyaiyaiyaiyaiyaiyaiyaiyaiyaiyaiyaiyaiyaiyaiyaiyaiyaiyaiyaiyaiyaiyaiyaiyaiyaiyaiyaiyaiyaiyaiyaiyaiyaiyaiyaiyaiyaiyaiyaiyai
a a a a a a a a a a a a a a a a a a

:dyag uusjut aqtnch
gill gill 1
1
tuii iia 100
Jyj 1
JSLJLJLJLJLJLJLJLJLJLJLJL
aaiy jy g a lai, yagai
1 1
follal
4
j j 11
| (N) | \( \mathrm{J}\overline{\mathrm{a}}\overline{\mathrm{c}}\overline{\mathrm{b}}\overline{\mathrm{c}} \) | \( \mathrm{J}\overline{\mathrm{a}}\overline{\mathrm{c}}\overline{\mathrm{b}}\overline{\mathrm{c}} \) |
| (L) | \( \left( {x,y}\right) = \) | \( \frac{1}{2} \) |
| (3) | \( \frac{1}{2}\overrightarrow{AD} \) | \( \frac{1}{2}\overrightarrow{AD} \) |

jdl
“+”.1
"-".2
.3
4
gabla alea 50
aaii jaii.6
().7
gall glll jaiy."glgllgllgllgllgllgllg
aaii aai iai aiiaai
a a a a a a a a a a a a a a a
y
a aae aee
100 1
1
J 1
J 1
jll jll jll jll jll jll jll jll jll jll jll jll jll jll jll jll jll jll jll jll jll jll jll jll jll jll jll jll jll jll jll jll jll jll jll jll jll jll jll jll jll jll jll jll jll jll jll jll jll jll jll
Aldia Jia, jiyuall, cllally all alal
Jill 11.
4y1y2y3y4y5y6y7y8y9y10.3
The manufacturer will not be responsible for any inaccuracy resulting from printing or transcript errors contained in this brochure. We reserve the right to carry out modifications to products as required, including the interests of consumption, without prejudice to the characteristics relating to safety or function.
IT
- CANDY
- INDICE
- IT
- PROTECTION OF THE ENVIRONMENT
- INSTALLATION
- Normal Fixing:
- Quick Fixing: (Depending on model)
- FLUSH INSTALLATION
- ELECTRICAL CONNECTION
- Open the cover in the following sequence:
- ATTENTION:
- Connection to the terminals on the terminal block
- HOB COOKWARE ADVICE
- USE
- How to choose power management level
- Switch ON/OFF a heater zone
- Selecting a zone
- Increase / Decrease power level
- Child Lock option
- Double / Triple zones
- Bridge function
- Overflow security
- Timer
- Residual Heat Indicator (In radiant heaters calculated)
- Automatic Safety Off
- CLEANING AND MAINTENANCE
- If there are still some stubborn stains:
- A FEW HINTS:
- NB:
- Do not use a sponge which is too wet.
- Never use a knife or a screwdriver.
- PROBLEM SOLVING
- The cooking zones do not simmer or only fry gently
- The cooking is too slow.
- Small scratches or abrasions on the hob's glass surface
- Metal marks
- Dark stains
- Light surfaces on the hob
- Caramelisation or melted plastic on the hob.
- The hob does not operate or certain zones don't work
- The hob does not cut off.
- Frequency of on/off operations for cooking zones
- The cooktop is not working.
- The cooktop has turned itself off.
- Display F and numbers
- AFTERCARE
- Before calling out a Service Engineer please check the
- following:
- CONSEILS CONCERNANT LES USTENSILES DE CUISINE POUR LA TABLE DE CUISSON
- A FOZOLAPON HASZNÁLT EDÉNYEKKEL KAPCSOLATOS JAVASLATOK
- WSKAZOWKI DOTYCZACE GARNKÖW KUCHENNYCH UZYWANYCH NA PŁYCIE
- NAVODILA ZA VARNO UPORABO
- BEZBEDNOSNA UPUTSTVA
- 1.3AXNCT HABKOLINHbOFO CEPEIOBUNA
- 2.BCTAHOBJIeHHJ
- 3BnuaHe 3akpinHnHa:
- WbUke 3akpinneHHr: (3aJexHo BiM oMei)
- BByOBAHE BCTAHOBJIENHRA
- ENEKTPNUEH NIKKIOUeyHH
- "BcTaHOBHeHHI pInaMy NOBHHO BiINOBiDaTn CTAHdApTAm i DnpeKTHBaM." Bnpo6Hk He Hece KdoHoi BiNObiDaJIbHoCTi 3a 6yIb-aki 3bNTKn, kki MoKyTB 6yTN 3aNoDiHi BHaCNIIOK HeBiIDNOIBHOrO Hn Hepo3CyDnIBORo BNKOpNCtAHH.
- BiKpnTe KpnKy B HacTynHnNoCnIOBHOcTI:
- Toro, 3n KaBHe KMBeHHa
- PpoeDpyn, Heo6xDiH dI rHOBOriNikKluOeHHa
- PnIMtKa: nepekoHaItecra, 3aTnCKHI rBnHTN KJIeMHOI KOJNOKn Do6pe 3aTyrHyTI.
- Ppoeayn, Heo6xidi HOBOr nikHoueHHa
- YBAGA:
- Piikluoyehnno KneHa KlmHni KOozi
- NOPADNI OIOO BVBOPY NOCUY DnRA BVKOPNCTAHH RA BAPNJbHI IOBEPXHI
- EKCNJYATAUJI NOBEPXHI
- AKn6patn pibEnbynpaHINHHKnBnEHHM.
- YbIMKHeHHBmKHeHH KOHΦopKn
- Bn6ip 30Hn
- 36ilbweHH/3MeHweHHpIBHnotyXHOCTi
- ФункцяблOKуBaHHЯBIDiTeH
- NoDbH/ NotpiH KoHΦopKn
- 8.1-YBIMKHeHHNoDBIHoiKOHOΦopKN
- 8.2-YBIMKHeHHNoTpiHoi KOHOpOpKn
- Функця моста
- 3ano6irahnnepeinBaHHIO
- Taimep
- IhdkaTOp 3aHnKOBOro Tenna (dna IHpaepBoHnx KOHphiopok-> po3paxoBaHo)
- ABTomaTnUHe BmKHeHHA
- OuHsEHHr TA OBCJyROByAHHr
- OBCNYROBYBAHHRA
- Akuo 0ce ue 3anuunucr cmiuki nmau:
- DEKINbKA IOPAD:
- 3anam'raTaIe:
- MoXJIINBI IPIOBJEMN TA IX BNIPIJEHHRA
- KoHΦopku He Kun'ammb a60 minbku cna60 cmaxamb
- PpuzomyeahnHaKi c Haidmo noinbHm
- He3nauHni noopnunu nu nomepmocmi Ha cknaii noepxhi npuna
- Memaneei cnidu
- Temhi nJnMu
- Caimi 30Hu Ha eapunbHiu noepxHi
- BapunbHa noepxHra buuua 3 naody a6o He npauioomb deaKi KOHphiopku
- BapunbHa noepxHHe iDknIOyAcmbcBid kuehEnn.
- Yacmoma eeimKHeHH/umKHeHH KOHΦopok
- BapnIbHa noBepxHr He npauoc.
- BapnIbHa NOBepxHBAUMKHyJNacCaMoCTiHo.
- BIDOpaXeHHnJItePnF Ta Yncen
- NICJIAPDAXHE OBCJNYROBYAHH
- Pepw HIX BKNKNAkTu PhaxIBu i3 cepBicHO 06cLyroByBaHHa, nepeBipTe HaCTynHe:
- NHCTPYKUN 3A BE3ONACHOCT
- 1.3AUNTA HA OKOHATA CPEDA
- MOHTAK
- HopmaJIHO qKcnpaHe:
- Бьрзфксранe: (В 3aBиСmoCТ OТ MоДЕЛа)
- N3PABHEH MOHTAX
- EJEKTPNUECKO CbBp3BAHE
- BHIMAHHE:
- BkIIOUyBaHe/H3KJIIOUyBaHe Ha HarpraBaaTa 3OHa
- U36op Ha 30Ha
- YBeHnUaBaHe/HamAraBaHe Ha HNBOTo Ha MOuHOCT
- Onu3a 3akIIOUBaHe 3a Deua
- ДВОИНТРОИN3OHN
- MocToBa yHkUa
- 3aunTa cpeu npenBaHe
- HnkaTop 3a ocTaTbHa TOnnHa (npn n3JIbYBaun HarpeBaTeN n3uNCneHo)
- ABTomatuHO n3KIIouBaHe 3a 6e3oIaCHOCT
- NOUHCTBAHE IN TEXHNUECKA NOIDPbJKA
- TEXHNUECKA NOIDPbXKA:
- Akoce oue umyynopumunemHa:
- 3ABEJIEXKA:
- 7.PA3PEUJABAHE HA IPOBJEMI
- Tomeapckume 30Hu He u3nB4yam docmambya monnuHa 3a Kuneane uUu docmambyho u3nbpxeae Ha xpaHama
- FomeeHemo e npkeaJIeHO 6aHo
- Manku dpackomuhu uuu u3mbpkhaun no cmbknehama noebpxhocm ha nnona
- Cneouom Meman
- TbMHu nemHa
- Cemnu noebpxhocmu no nnona
- Fomapckquam nnom He ce u3knouea.
- TOrbapcknT PIOr He pa6oTH.
- TOrBapcknT nnot ce camOn3KIOUBa.
- Ioka3BaHe Ha F Ncnpn
- 8.CJIENPPODAJKBEOHOOBCLNYKBAHE
- IpeHn da ce 6aHTe Ha cepBn3e HnHexeHep, npOBepTe CneHTo:
- 1.II PEOyPPEXDEHnO BcUeTeO XAPAKTEPA
- 2.M EPbI NO 3AUINTE OKPYKAIOUe CPEdbI
- 3.Y CTAHOBKA
- 06bHnaaKcaua:
- PnmeaHHe: y6eDntecb, YTO Bce BnHTbI HaedXHO 3aTMyTbI. Oepauu nn BblONHeHH HOBOI NOKNIouHeHH:
- IoiKJIIOUeHHe K 3axImaM Ha KJemMMoH KOJIOKe
- PEKOMEHДAUH N OTHOCHTEJIbHO BbIbOPA NOcYdbI DJIBAPOUHON NOBEPXHOCTN
- 6.3KcPiYATAUINIPINBOPA
- Kak BbI6paTb ypoBHe bynpAbHnnaHTaHnEm.
- BkHIOueHHe/BbIKNIOeHHe 3OHb HarpeBa
- Bb6op 30HbI HarpeBa
- YBeIuHHe / yMeHbIeHne MoUHOCTn HaPeBa
- ФункцяблOKнрВК OТдTeH
- HdkaTop ocTaToCHoro HarpeBa (B paHaANTHO3OHe HArpeBa->paccHTbIBaETc)
- ABTomatnueeckoepdoxpaHntbHoe BblnOeHne
- BapouhnaheIbHee biknouaemc.
- Yacmoma uukno8 knoeHue/ebknoeHue 30n Haepeea
- 30Ha HarpeBa He pa6oTaE.
- 30Ha HarpeBa camOCToTeNbHO BbIKNoyaeTc.
- BbCBeuNbBaTeC F CmBOJ uΦpbl
- NOCJIENPODAJKHOE OBCJNYKUBAHNE
- ODPORUCANY RIAD
- RIESENIE PROBLEMOV
- Varné zony nevariajemne alebo lenjemne smazia
- 上
- jbjjj jbjjj
- Eco 1 jy
- a111
- p11.5
Brand : CANDY
Model : CH64DXT
Category : Cooker