
Sky GTX - Stroller HARTAN - Free user manual and instructions
Find the device manual for free Sky GTX HARTAN in PDF.
| Product type | Stroller |
| Brand | Hartan |
| Model | Sky GTX |
| Recommended age (seat) | From 6 months up to 15 kg |
| Recommended age (XL carrycot) | 0 to 12 months, max weight 9 kg |
| Maximum supported weight (seat) | 15 kg |
| Tires | Pneumatic, pressure 1.2 to 1.5 bar max |
| Brake | Locking brake (red button to tighten, green to release) |
| Suspension | Spring adjustable (soft or sporty) |
| Handlebar | Telescopic height adjustable (rotating handle) |
| Front wheels | Swiveling with lock (red dot = locked, green = free) |
| Rear wheels | Fixed |
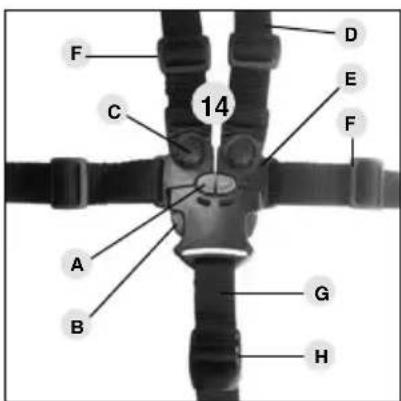
| Safety harness | 5-point system |
| Canopy | With climate zone (open tabs for ventilation) |
| Backrest adjustment | 2 reclining positions (lever at the back) |
| Footrest adjustment | Activate both red dots and lower |
| Folding | Unfolding: lift the handlebar; folding: turn the handle and activate the release |
| Fabric care | Machine wash at 30° (delicate wash) |
| Suspension maintenance | Clean and lightly lubricate all axles every 4 weeks |
| Safety | Do not use for jogging or rollerblading; always use the harness; never leave unattended |
| Warranty | 2 years |
| Standard | Öko-tex 100 for textiles |
Frequently Asked Questions - Sky GTX HARTAN
User questions about Sky GTX HARTAN
0 question about this device. Answer the ones you know or ask your own.
Ask a new question about this device
Download the instructions for your Stroller in PDF format for free! Find your manual Sky GTX - HARTAN and take your electronic device back in hand. On this page are published all the documents necessary for the use of your device. Sky GTX by HARTAN.
USER MANUAL Sky GTX HARTAN
Phone (with area code):
e-mail:
Colour of fabric (design):
Zubehor /Accessories:
Kaufdatum / Date of purchase:
Salesperson (name in block letters)

*VWt#eR 102001/1/11/11/11/11/11/11/11/11/11/11/11/11


Suitable from 6 months, up to 15kg
Under 6 months only in connection with an appropriate carrycot.
These models may not be used while jogging or skating.
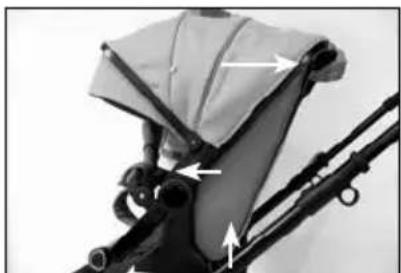
1 Handle
2 Handlebar catch
3 Twist grip for telescopic adjustment
4 Wheel retention
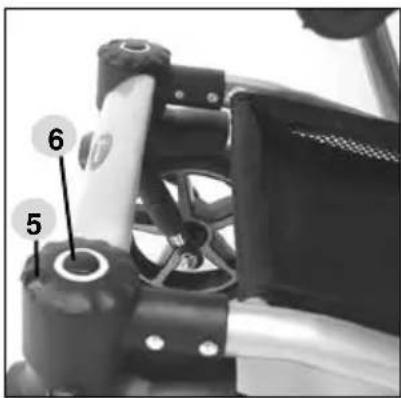
5 Lock-type-swivel wheels
6 Swivel wheel holder
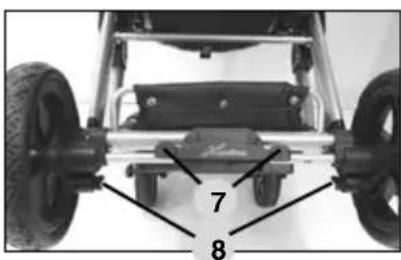
7 Parking brake
8 Adjustable suspension system
9 Crotch strap
10 Climatic zone
11 Safety bar adjustment
12 Hood bar and safety bar removal
13 Tilt-adjustable backrest
14 Safety belts
15 Adjustable footrest
Automatic lock for upper section
17 Sun visor
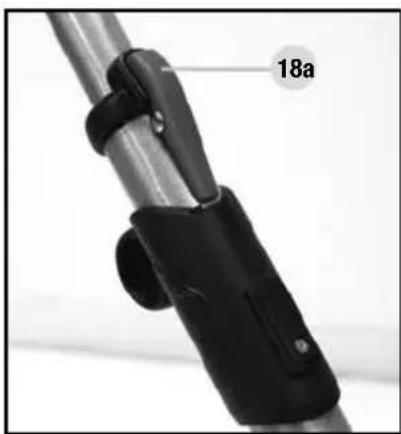
18 Chassis unlatching
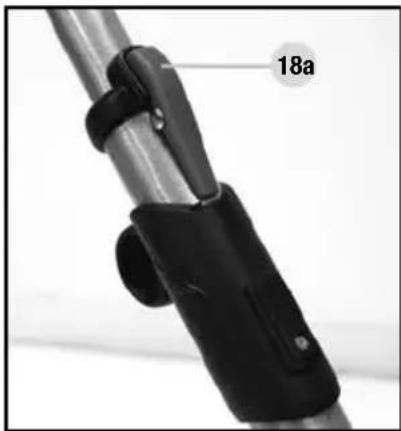
18a Safety catch to unlock the frame
19 Sun canopy
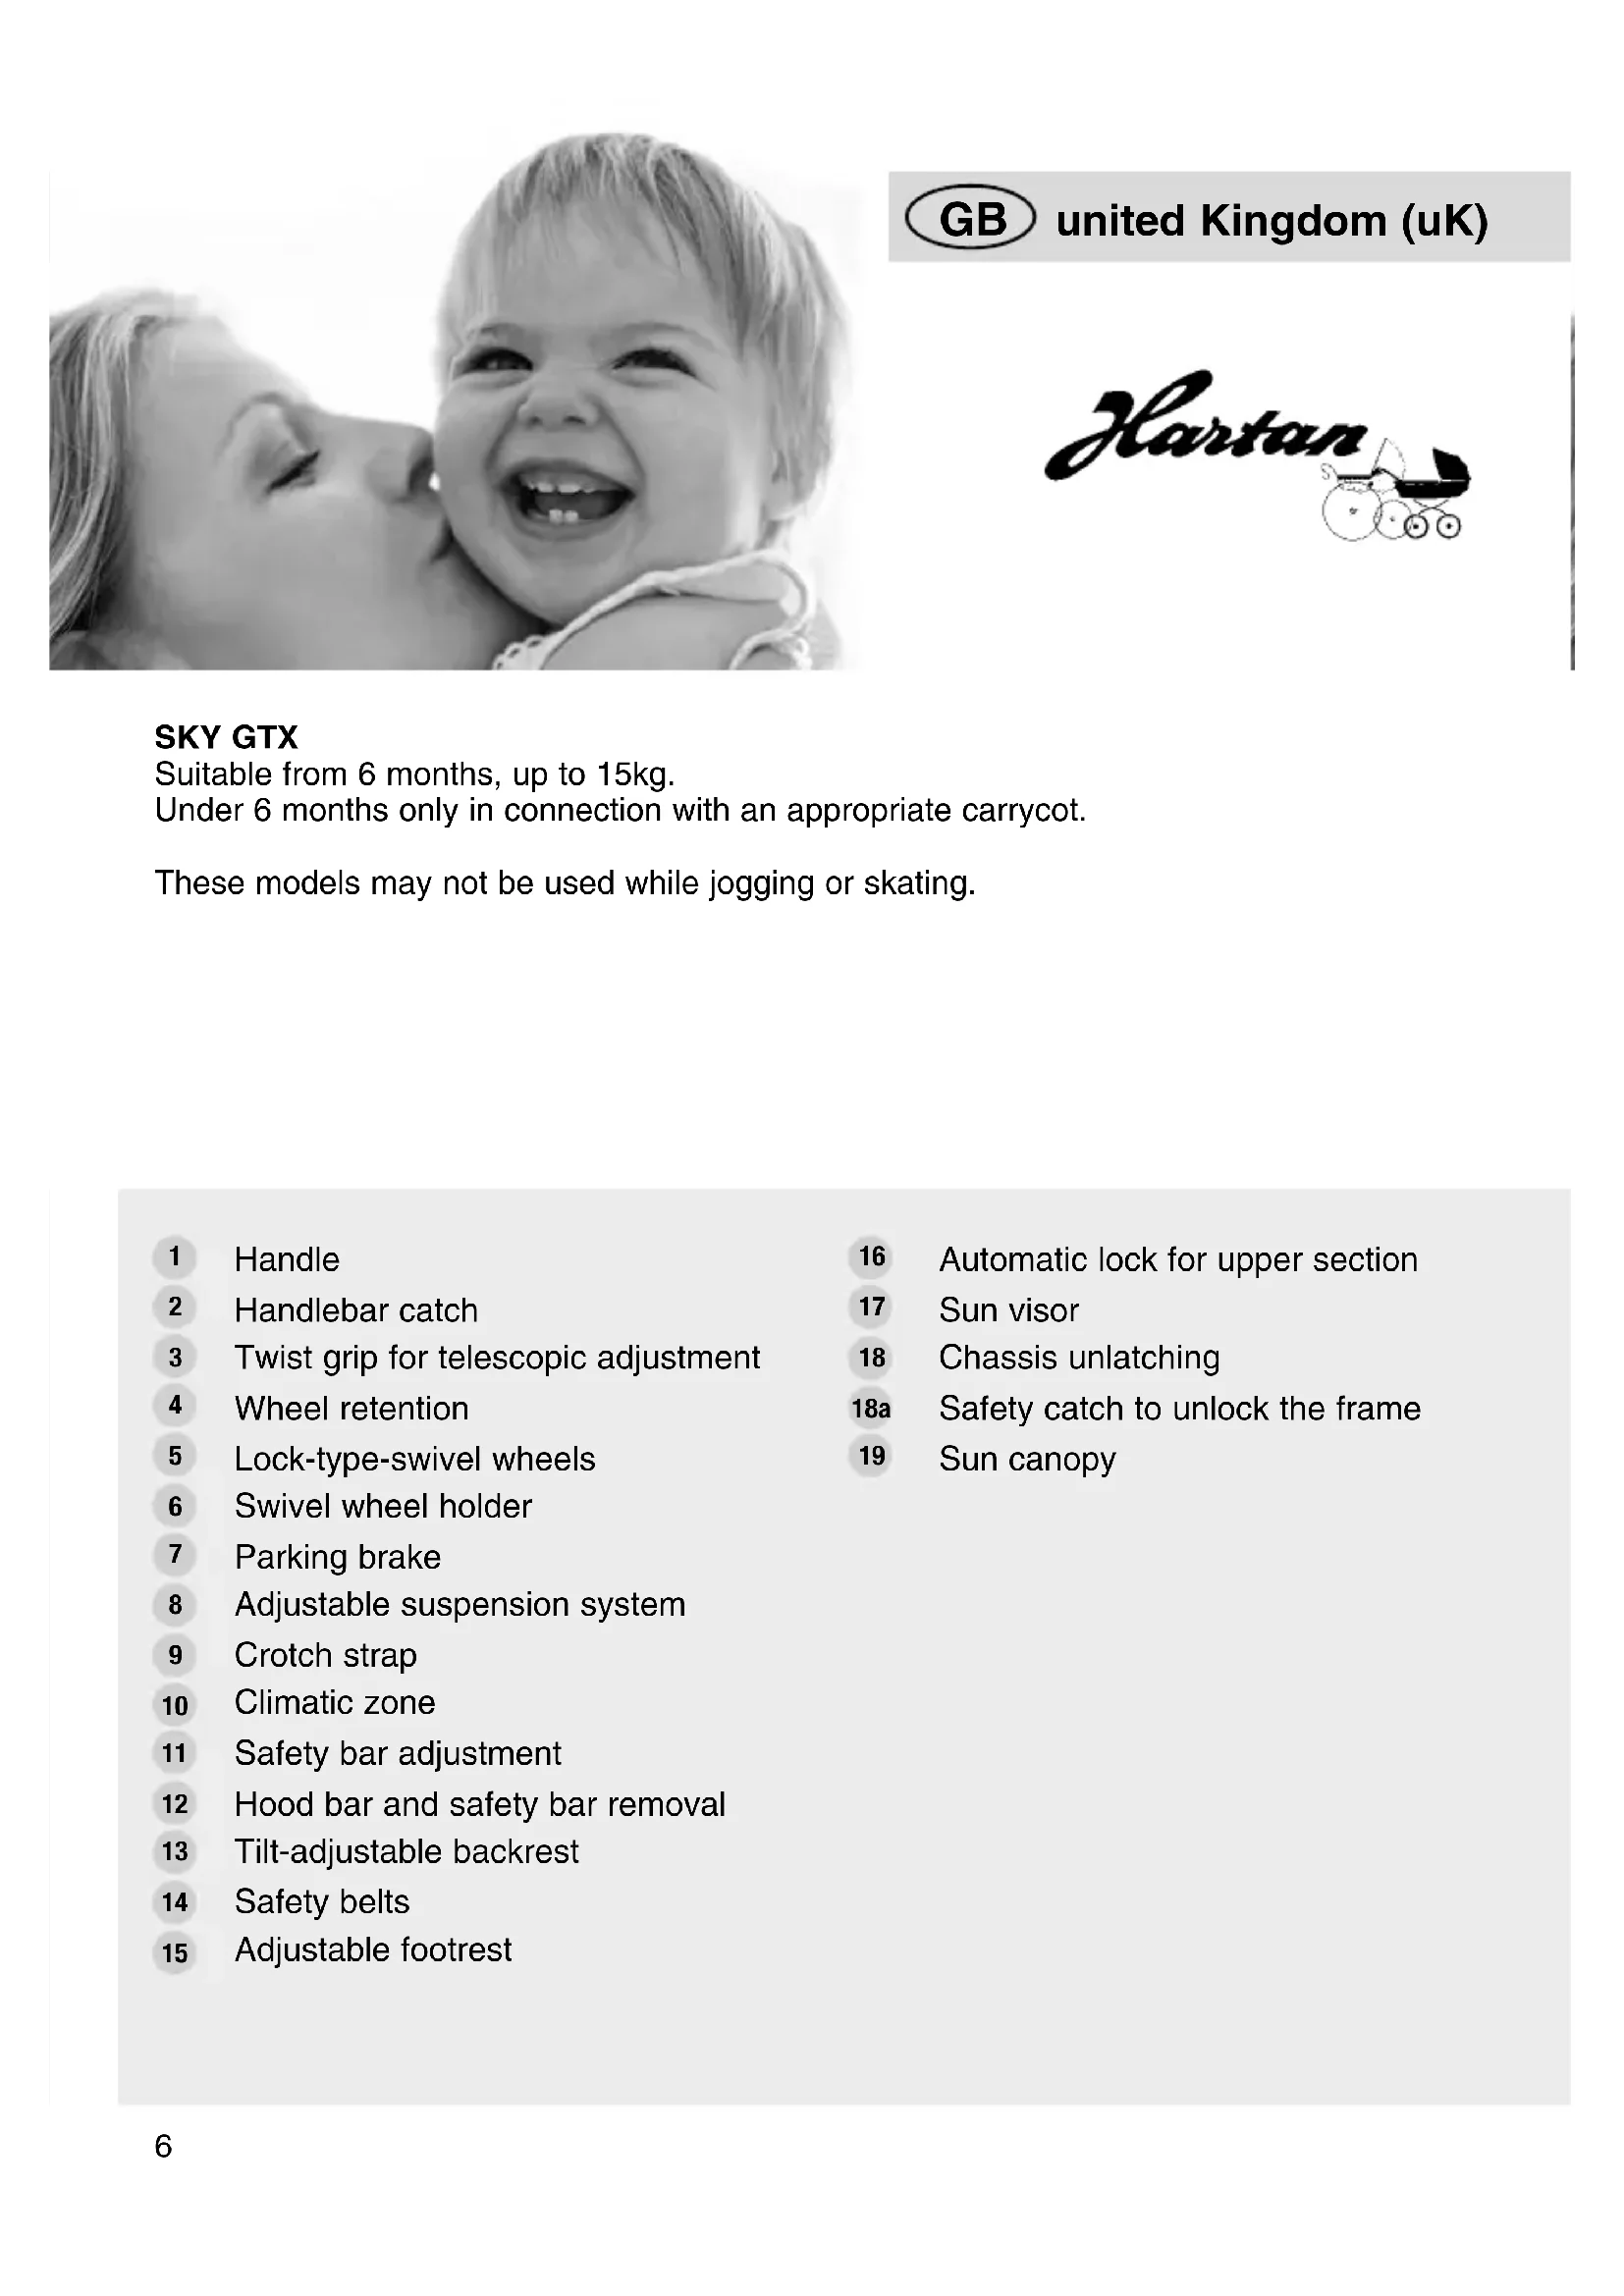
Congratulations on your purchase
You want your baby to feel safe and secure, that's why you have purchased a high-quality product. You have made an excellent choice. Products are manufactured with the greatest possible care and monitored constantly by rigorous quality control assuring that your pram will provide life-long satisfaction. The textiles used for our products have been tested for harmful substances (chemical residues) according to the industry's own, Oko-Tex-Standard 100^ to guarantee that all the fabric parts of your pram are safe for your baby.
importantly! Please do not use this pram before reading the instructions carefully, and keep these instructions for queries or future reference. Your child's safety may be affected if you do not follow these instructions.
If you do not understand the instructions or if you require more detailed information, contact your dealer. Please ensure that other users are also informed about the functions of the carriage and the notes on safety.
For the safety of your child
WaRnIng! - Before use, conduct an initial check of the carriage, and do not use it if it is damaged or if parts are torn or broken.
WaRnIng! - Make sure when unfolding the pram and folding it together that your child is at a safe distance, to avoid any injuries
Warning! - Never leave your child unattended in the pram.
WaRnIng! - Make sure before using it that the carrycot or the seat unit or the child's car seat is correctly latched into place.
WaRning! - Negotiating stairs or steps as well as overloading may damage the pram and endanger your child.
WaRrInG! - When parking the pram, make sure the brake is engaged.
When using public transport, ensure the pram stands safely.
WaRnIng! - A pram, stroller or carrycot is not a substitute for a cradle or a bed. It is intended to be used exclusively as a means of transport.
WaRnIng! - Using this pram while jogging, skating, etc. can be dangerous and is therefore not allowed.
WaRnIng! - Do not allow children to play either near or with the pram.
WaRnIng! - Always use the restraint system.
WaRnIng! - Fix no bags, handbags or other loads to the handle, backrest or sides of the carriage, as this will affect its stability.
WaRning! - This model has been designed for 1 child.
WaRning! - A second child seat is not allowed for this model.
WaRnIng! - The seat unit and carrycot are not to be used for transporting in a car.
WaRnInG! - The rain cover may not be used when the hood is taken off (danger of suffocation). Never expose the rain cover hood to sun while the child is in the carriage (overheating).
WaRnIng! - Keep the carriage away from open fires or other sources of heat.
WaRnIng! - Remove immediately all film packaging, and do not allow your child to play with it (asphyxiation).
WaRning! - Accessories and spare or replacement parts not approved by the manufacturer must not be used.
Instructions for use
WARNING! When folding and unfolding the chassis there is a risk of injuries due to jamming. Take care that you keep your child's body parts at a safe distance.
Unfolding the carriage
Lift the handle 1 until the two lateral handle catches 2 have engaged.
WARNING! Before using the pram, make sure all catches are
locked.
Fold down the pram
Turn handle 3 inwards and at the same time push the telescopic handle downwards until it reaches the stop. Press the safety catch 18a, then at the same time pull the unlocking lever 18 upwards and fold the chassis together downwards.
Height-adjustable Telescopic handle
Turn the twist grip 3 inwards and slide the handle 1 in the desired position until it engages on both sides.
Changing the rear wheels
Release the parking brake 7. Depress push button 4 and pull the wheel off. Push the wheel right to the axle's stop, while pressing down the button. Make sure, all wheels are held in place properly.
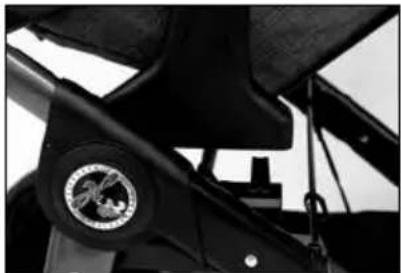
Lock-type-swivel wheels
Turn the caps 5 so that the red point becomes visible to pre-select the straight-line motion mode, which will be activated the moment the wheels point in forward direction. Turn the caps 5 so that the green point becomes visible to release the swivel lock. To remove the wheel, press the push-button 6 in the centre of the cap 5 and pull the wheel off the holding device. To assemble the wheel, insert the fastening pin in the holding device, and engage it by a forcible push, which is indicated by a click sound. On extremely uneven surfaces, and when going very fast, we recommend locking the swivel movement, to prevent the wheels from blocking.
Parking brake
Push the red brake button 7 to engage the brake. Having parked the pram, try to push it to check the brake. Push the green brake button 7 to release the brake.
WARNING! Make sure the brake is always closed when placing the baby in the carriage or taking it out of it.
Adjustable suspension system
By turning the selector 8, a "hard" or "soft" position can be selected for suspension.
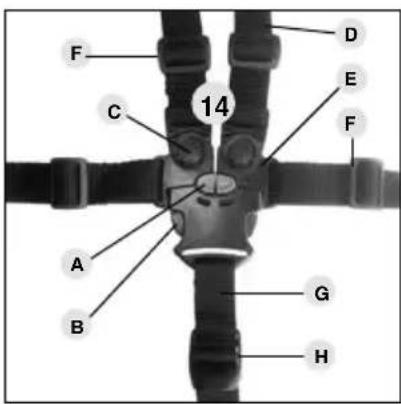
Safety belt WARNING!
Secure your child with the five-point harness system 14.
Make sure the shoulder straps D are plugged in and that the belt is securely fastened. The length of the belt can be adjusted with sliding buckle F, the length of the crotch strap G can be adjusted with quick-release slider H.
To undo the harness: press the two tongues B together using your thumb and forefinger, then press the red button A, so that you can pull the two plugs E out upwards. To undo the shoulder straps you then press button C.
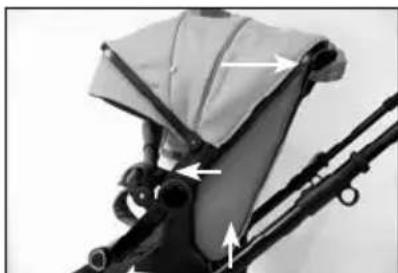
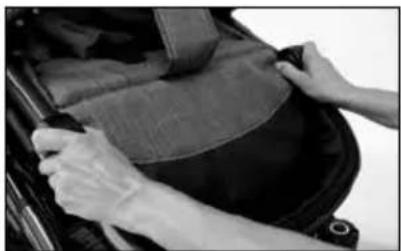
Hood and safety bar
Press the button 12 to extend the canopy or the hoop guard. When inserting it, make sure the safety bar locks into place correctly and be careful not to pinch any of the fabric parts. By pressing the buttons, the safety bar position can be changed.
WARNING! You cannot carry the weight of the buggy using the canopy hoop.
Adjust the back rest to incline the seat frame
Tilt the adjustment lever 13 at the rear to bring the seat frame from the sitting to the lying position in two stages.
Adjusting the footrest
By pressing the two red safety buttons 15 at the same time, the footrest can be lowered. When lifting it, adjustment of positions is effected automatically.
Automatic locking of the upper section
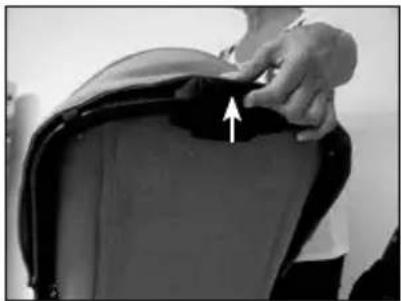
Place the seat frame on the chassis so that the two upper fastening components rest on the locking bolts provided for this purpose. Both sides of the lock mechanism 16 will automatically close when you press the seat frame down.
WARNING! Ensure that the seat frame is securely in place before use!
To release the lock mechanism, press the safety button to the right of the release button on the back of the inclining seat frame and then press the release button until the release is activated.
Grasp the hoop guard with your other hand to remove the seat frame.

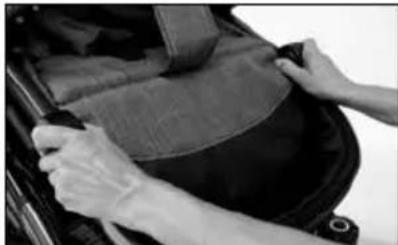


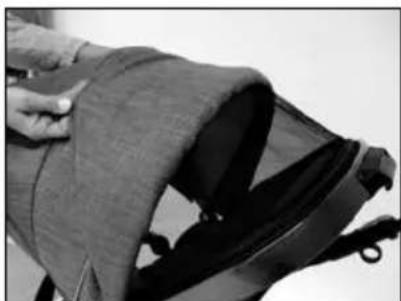
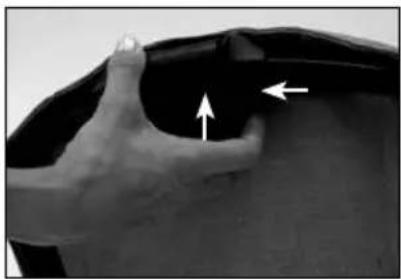
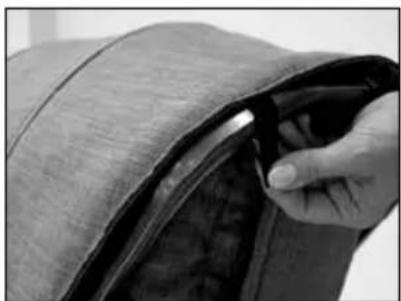
Sun and weather protection 10 on the canopy
Open the two brackets on the rear canopy hoop to extend the canopy hoop forwards over the canopy

Instructions for use
Suitability for the child
The seat unit is designed for a child from 6 months, and weighing up to 15kg (33 lbs).
WARNING!
Only use the seat unit once your child can sit up on its own.
For children under six months, only in conjunction with a suitable carrycot.
The XL carrycot is designed for children from 0-12 months, maximum weight 9kg
Checking and care instructions
All the materials we use can easily be cared for.
Care of the fabric parts
Clean soiled fabrics when dry using a clothes-brush or lukewarm water (then use hair dryer). Do not rub fabrics extensively. Remove tenacious stains using a soft detergent. All removable fabric parts may be machine washed in lukewarm water at a gentle setting and reduced agitation, at 30^ . Let's say you have encountered a heavy rain shower. Dry your carriage with the hood still on in a dry and airy room using a cloth. This prevents marking as well as the underlining fabrics from moist soaking in through the seams. As a guaranteed protection against rain, we recommend that you use our rain cover, which is either included or can be purchased at your dealer's. Our fabrics have quite a number of distinctive features. However, they are very sensitive to excessive sunlight. That's why you should park your carriage in the shade whenever possible.
Care of the chassis
The chassis requires regular care. You should clean and slightly lubricate the wheel axles at a regular 4-weeks interval. Before oiling the wheels and push-in axles, make sure these are absolutely clean and free of sand etc., in order not to compromise the proper working of the locking mechanism. Use a silicone based lubricant spray for all moving plastic parts to maintain them in an operative condition. Keep all coated and chrome-plated metal parts in dry condition, and use a finish restorer or chrome paste if necessary. Remove smaller chassis paint damages by means of a touch-up applicator. Do not use high-pressure cleaners when cleaning your carriage, due to risk of damaging the ball bearings of the wheels (greased) and other functional parts (grinding and creaking noise). Wheels: Overpressure may result in accidents and personal injuries. Replace worn plain wheel bearings and springs in time. Replace worn plain wheel bearings and springs in time. Little stones in the thread, etc. may just as well damage the floor covering. When parking the carriage in the blazing sun or cramming it in the boot at temperatures of above 40^ , the semi pneumatic tires may flatten or become deformed.
For pneumatic tires
When using pneumatic wheels, make sure they have got enough air in the tire. Specified tire inflation pressure should be between 1.2 and 1.5bar max.
WARNING! Max. tire pressure will be reached quickly. Tires tend to lose
air over time. When blowing up a flat tire, inflate it only halfway first, and make sure the tire is evenly seated, to avoid "wobble". Replace worn plain wheel bearings and springs in time. Then continue to inflate it to the proper pressure.
2 YEARS WARRANTY
This product is guaranteed for a period of 2 years by your contract partner. For possible submission of proof, please keep your receipt, the completed warranty card as well as the hand-over check bearing your signature for the length of the warranty period. These documents must be submitted to qualify for service under the warranty.
IN CASE OF WARRANTY CLAIM
This product is warranted against defects in materials and workmanship that existed at the time it was handed over.
THIS WARRANTY DOES NOT COVER ....
We disclaim liability for defects in the object of purchase that are beyond our control.
This especially applies to:
natural wear and tear (wear-related defects) and defects due to excessive stress
■ consequential defects, originally caused by neglect of defects/damages but developing into conditions necessitating a more difficult repair
defects due to improper or inappropriate use (see Instructions)
defects due to incorrect assembly or operation
■ defects due to negligent handling or lack of maintenance of the product
defects due to improper alteration of the product.
WARRANTY CLAIM - YES OR NO?
Rust: To provide a proper basic protection of the chassis, it has undergone a rust-proofing treatment. However, rust-stains may be found when lacking maintenance. This case will not be covered by the warranty.
Scratches: Scratches caused by wear and tear will not be covered by the warranty.
Mould formation: Fabric parts, having become wet, should be dried properly to prevent mould formation (see Instructions). Mould formation will not be covered by the warranty.
Bleaching of the fabrics: We confirm that the fabrics comply with the established standards. It cannot be ruled out that colours of the fabrics may fade while the parts are exposed to direct sunlight, washed too frequently, come into contact with sweat and detergents, or suffer abrasive wear (especially on those parts where the pram is handled). Consequently, colour fading is excluded from the warranty. It is unavoidable that colours sometimes differ slightly from one individual batch to the next, which is why this case will not be covered under the warranty.
Knob formation on fabrics: We recommend that you apply general clothes care. As with woollen sweaters, the knobs can easily be removed by using a clothes-brush or burling machine.
Tearing of seams, fabrics, press studs : At the time of purchase, please check carefully that all the fabric parts, seams and snap fasteners have properly been sewn and fastened. In case of a possible complaint concerning seams/defective snap fasteners, a claim must immediately be reported to your dealer after the defect has been discovered.
Wheels: As wheels used on prams will not be balanced, they may show slight run-outs (wobbles). Worn tires will be regarded as natural wear and tear. No claim can be raised if your pram, using pneumatic tired wheels, has a "flat". This will be attributed to extraneous causes - a small hole caused by a pointed object, or pushing the pram about when it has not got enough air in the tire. This case will not be covered by the warranty.
WHAT TO REMEMBER WHEN BUYING YOUR PRAM
Check that your pram is complete when it is handed over and no parts are missing. Check the function of all parts and confirm this by signing the hand-over check.
WHAT TO DO IN CASE OF A COMPLAINT
Call your dealer, from whom you bought the pram, to file the complaint and to discuss how to handle the matter. In case of defects concerning safety regulations, your complaint must be filed at your dealer within a 30 days period from the date the defects have occurred, otherwise these defects will not be warranted for. When handling your warranty claims, we will apply product-specific depreciation rates. We refer you to our general terms and conditions displayed at our premises.
Make sure that the pram is in a clean condition before being sent in for repair. Repairs will not be carried out on prams which are in a dirty condition.
USE, CARE AND MAINTENANCE
To maintain the original quality of your pram as a means of transportation for your child, it requires care and maintenance according to the instructions.

La France
SKY GTX
Lamplighet for barnet
Sittenheten ar avsedd for barn fran 6 manaders alder upp till 15kg
O CEMU MORATE VODITI RACUNA PRILIKOM KUPNJE
Provjerite da li su kolica kompletna prilikom isporuke i da li nedostaju neki dijelovi. Provjerite da li sve funkcije kolica fungkioniraju u potpunosti i potvrdite ovo na listi o primopredaji.
POSTUPAK KOD REKLAMACJE
This product is guaranteed for a period of 2 years by your contract partner. For possible submission of proof, please keep your receipt, the completed warranty card as well as the hand-over check bearing your signature for the length of the warranty period. These documents must be submitted to qualify for service under the warranty.
IN CASE OF WARRANTY CLAIM
This product is warranted against defects in materials and workmanship that existed at the time it was handed over.
THIS WARRANTY DOES NOT COVER ....
We disclaim liability for defects in the object of purchase that are beyond our control.
This especially applies to:
■ natural wear and tear (wear-related defects) and defects due to excessive stress
■ consequential defects, originally caused by neglect of defects/damages but developing into conditions necessitating a more difficult repair
defects due to improper or inappropriate use (see Instructions)
defects due to incorrect assembly or operation
■ defects due to negligent handling or lack of maintenance of the product
defects due to improper alteration of the product.
Je garancija upravicena ali ne?
WADY OBJECTE GWARANCJA
BbCTabIeMbmyMoynb npyKnn
Bpaaay pyky nepectableny 8, moKHO nepectabTb npyKnHb B mKn N cOpTnBbl MoDyc.
PemeHb 6e3oNaChOCTn BHIMAHHE!
PnCTeHnTe pe6EhKa nTTOUeYhbIM pemHem 6eOsnacHOCTn 14.
O6paTHe BHMaHne Ha To, 4To6blI NLeueBbIe peMHN D 6blIn BCTabIeHbI n peMeHb PnIOTHo npINerA.I. IINHy peMHei MOxHO I3MeHNrBc NOMOUsIO nepeDIBKHBIX nprJKe F, IINHy naxOBoro peMHa G MoXHo OTrpeYlnpObaTb C NOMOUsIO NOJ3yHka perylnpOBKn dInHb H.
PaccterHbAHne pemn: 60bnmmykazatehBbIM naIbCaAMoNHOHOBpeMeHHO HaxMnte Ha oba BbCTyNa B, a 3aTeMa KpaCHyKONKY A, dIra TOrO yTO, yTO6bl BbItaunb oba oikcaTopa E Habepx. YTO6bl paCteRHTb IneueBoi peMeHb, HaxMnte KONky C.


CknpaHOBBepxN3aunTHnaDyra
Iocne HaKaTnHa KONky 12 MoXHO BbIDBHyTB cKJaDHoBepx HnnpedoxpaHnteJbHyO cKO6y. Pn BCTaBKe O6patnte BHMaHne Ha To, YTO3aunTHa Dya DoJnxHa CTAb Ha CBOE MeCTo N npOBepTe, He nnonaII B 3aMOK MaTePnAn. HaKIma Ha KONKnpecTaBJeHn, BO3MOxHoN3MeHrTa HaKIOH 3aUnTHoH dYr.
BHIMAHHE!Iyra TeHTa 10 cOpTbHOro aBtOMO6nJIr He npedHa3NaHeHa dIra erO nepeHoCKn.
PerynnpBka cnnHKn n nobopot yawn cndeHbA
PerynpoBouhim pbyarom 13 Ha 3aHHe CnIHKe HAKIOH cIeHbMyoKet 6bItb OtperynpoBaH B Dba 3TaHa - n3 NpOKeHHcNIA B NpOKeHne leka.
IpeecTaHOBkaIOHOKK
Pn OJHOBpeMeHHOM HaKaTHN DByX KpaChbIX 3aUHTbIX KOHOK 15 MOKHO NOHOCbIO ONyCTNTb NOHOKKy. Pn NOHARTHN NOHOKKN BbICTABNEHne N03nI pONCXODNT ABOTMATueCKN.
ABTomatnueckaФнкcaиВерхнeчactn
YCTaHOBHTe 6nOK cnDeHbHa Ha WacCH TaKIM O6pa3OM, YTO6bl OBe BepXHne
actn KpePJIeHnO kA3aJIncb Ha IpeDyCMOTpeHHbIX dIIN 3TOrO fHKCaTOPax.
PiN HauKATn Ha 6nOK cnDeHbHa 3AMKn 16 aBTOMaTHueCKn 3aKpbBaIOTcN C
o6Enx CTOpOH.
BHIMAHHE! IpeJ nCNoIb3OBAHHe m y6eHnTEcb, uTO 6JOK cnHehna HaedKHO 3aKpenJIeH!
YTO6bI OTKpbITb 3aMKn, HAXMNTe CTONOPHyO KHONky Ha IpaBOI CTOpOHe KJIaBNI pa36IOKINPOBKN, KOtOPa HaxODNTcH Na 3aDHei CInHKe IOBOPOTHO rCnDeHbA, a 3aTeM HAXMNTe KHNky pa36IOKINPOBKN Do ynopa.
Btopo pyKo Bo3bMntecb 3a npedoxpaHHTeIbHyO cKOby: Tenepb Bbl MOKeTe CHrTb 6nok cndeHb.
KJHMaTnuecka 3oHa 10 B cKnJaHOM BepXe
OTkpOte o6e npntctErHytbe HaKlaKnHa 3aDHeI dyre TeHTa I NOTAHnTe 3JeMeHr CKlaHOro Bepxa Bneped HAD CKNaHbIM BepxOM.

Bocpactn Bec pe6eHka
TapaHTnHbI clyaH nn HeT?
PxabunHa: Kopnyc o6paobTah coCTaBOM, npeoTbpaauOuim npoueCC noRbEnHpykABuHbI, OTCyTcBne 0cbnyKBAHn KOLrCKN MoKeT npNBecTI NOBLeHIO MeC, nopaxeHHbIX pKabHNo. Ha Takne clyaan rapaHTn He paacnpocTpaHaretc.
UapannHbI:NoBHeHHe BXoNt B CnyaH,Ha KOTOpbIe pacnpocpTaHReTcra papaHTn,T.K. OHN ABJIOTc HOpMaJbHbIMn np3HaKaMn N3Hoca.
06pa3oBaHne rpi6ka: B clyae ecn MaTeepnAn KOJcKc NcIbHo npomok, ero Heo6xoJIMO TuaTeNbHO npocuWntb, YTo6bl npedotBpArTb 6pa3oBaHne rpi6ka. POnBHeHne rpi6ka He aBJIeTcra paaHTnHbIM Cnyaem.
BbucBaHne MaTePnaNoB:Bce MaTePnaIbI, nCIOJIb3yIOUeNcE B HauINx I3JeINrX, COOTBeTCTBYOT TEkyuIM HopMaM.
BcIeCTBnBE 03deNCTBnCOnHehBxIyueH n CInuKOM YactoR OMbItb He NCKIOUeHO BblCBeTahne MaTePnAa, n 3TO He ABJIeTc npUnHoi peKlAmauu. H3NaHTeNbHoe OTmUne MeJdy pa3nnHbIMn YactrMn IpOdykTa He BcerDa ydaetc H36exKaTb npn pOn3BODCTBe, no3tOMy TAKNe CnyuHn TakKe He RBAJOTc npUnHoi peKlAmauu.
CkatabaHne TkaHn: Cnyan cKaTbHaHne TkaHn He OTHoCTc K rapaHTnHBIM CnyaAM, OHN MOyT 6bIT ydaJIeHbI CTaHapTHbIM CNOCO6aMn no yxody 3a wepctraHbIMn n CNTHTneCKmM BeaAMn, C NOMOuBIO CNEuaJBHOUIETKN IIN MaunHKN.
PacxoxkdeHne wBOB: IoxaIyIcTa, npOBepbTe Wbbl N KONKn npn NOKyn N3dJIeN. B cIyae o6hApyeHn NOBpeJckHeHn WBOB nI KHOK, He3AmEInTEJbHO O6paTntEcB MAr3IN, rIe 6blIO npno6peTeHO n3dJIeN.
Koneca: TAK KAK KOleca Ha KOJrAe He 6aHaHcnpyOTc, BO3MoKeH IerKn Dc6bAnaHC. CTeptBle KOleca RaJIrOTc HAtypaJIbHbIM n3HOCOM. IpOKoJIb B KOlecax MOrYT 6bITb BB13BaHbI TOJIbKO BHeuHM BO3DeiCTBnEM, NO3TOMy BCE 3TN CInyauH He RAJIrOTc rapaHTnHbIMN.
Kak cIeJyET ce6B CeTn B Clyuae peKlaMaun
He3aMeIeJIteBn COo6Ute O npOBeM B CneuaHIn3HpoBaHHb MaarH, B KOTOpOM Bbl npNo6peN KOJcKy, npeCTabTeB Maar3Ha COo6uNT O TOM, KaK DeiCtBOBaTb DaJIbWe. Ha HEnOJaKn, CB3aHNbIe C 6eOanachOCTbIO, O KOTOpBX He 6bIIO 3aBHeo B CneuaHIn3HPOBaHHb Maar3H N TeueHne 30 DHe c DaTb I NOKyIKI rapaHTnE He paacnpocTaPareTcR.
C noDpo6HCTaMn CBA3aHHbIMn C o6pa6oTKo peKlamauONHbIX 3aBHeHn, kacaIOxxCra npOyKcHn HaWe HpMbI, Bbl MoKeTe O3HaKOMITbcR B YcTaBe HaWero npEepnptTna.
Ha yTo cIeJyET o6paTntb BHMaHne npn nokynke.
IpoBepbTe ynaKOBky c npno6peTeHHoN KOJACKoH Ha HalaUne Bcex Heo6xoJIMbIX 3aunacte n pa60TOcNOc6HOCTb BCex YHKUNOHaJIbHbIX qacTei.
IcnoIb3OBAHne, yXoN o6cLyXnBaHne.
Kolnka YBJIeTcR cpeCTBOM TpaHcnpTnpOBKn BaWero pe6eHka, nOaTomy 3a Hei Heo6xOIMo yXaJINBaTb B COOTBeTCTBnC INHCTpyKUneI NO 3KcIIyaTaUIn, UTO6bl COxpaHHTb ee N3HaayalbHOe KaueCTBO.
Pn OtnpabKe cIeIb 3a TeM, yTo6bl KOJIaCKa 6bla YIcTOn. rpa3HbIe KOJIaCKn Ha peMOHT He npHHMaOTcra.
ΦOPMUYIAP KOHTPOJI IPN IOKYIKE
MoeJIbTeTCKOKNOLACKN
UBeT
ДаТа ПOKуПКи
I npOBepn I KOMnEeKTHoCTb DeTcKO J KOJIaCKN IN NOHocTbIO yDOCTOBepnIC, YTO KOJIaCKa nepeDaHa MHe B NOHOM KOMnEKeTe N BCE ee yHKuN DeiCTBYOT B NOHOM O6beMe
YIyHIOIOIOIOIOIOIOIOIOIOIOIOIOIOIOIOIOIOIOIOIOIOIOIOIOIOIOIOIOIOIOIOIOIOIOIOIOIOIOIOIOIOIOIOIOIOIOIOIOIOIOIOIOIOIOIOIOIOIOIOIOIO
Iopnnscb nokynatela
IITamnpnoa/npnnscb
- Completeness
- Functor
Folding mechanism
Road behaviour
Wheels
Adjusting mechanism
Brakes check
Suspension check - Intactness
Frame check
Fabric check
Plastic parts check
I have checked the product and have ascertained that it is supplied
complete, has no external, visible faults and that all functions are intact.
I have received sufficient information concerning the product and its functions before purchase and have been instructed on care and maintenance.


- Congratulations on your purchase
- For the safety of your child
- Instructions for use
- Unfolding the carriage
- Fold down the pram
- Height-adjustable Telescopic handle
- Changing the rear wheels
- Lock-type-swivel wheels
- Parking brake
- Adjustable suspension system
- Safety belt WARNING!
- Hood and safety bar
- Adjust the back rest to incline the seat frame
- Adjusting the footrest
- Automatic locking of the upper section
- WARNING! Ensure that the seat frame is securely in place before use!
- Sun and weather protection 10 on the canopy
- Suitability for the child
- WARNING!
- Checking and care instructions
- Care of the fabric parts
- Care of the chassis
- For pneumatic tires
- WARNING! Max. tire pressure will be reached quickly. Tires tend to lose
- YEARS WARRANTY
- IN CASE OF WARRANTY CLAIM
- THIS WARRANTY DOES NOT COVER ....
- WARRANTY CLAIM - YES OR NO?
- WHAT TO REMEMBER WHEN BUYING YOUR PRAM
- WHAT TO DO IN CASE OF A COMPLAINT
- USE, CARE AND MAINTENANCE
- La France
- SKY GTX
- Lamplighet for barnet
- O CEMU MORATE VODITI RACUNA PRILIKOM KUPNJE
- POSTUPAK KOD REKLAMACJE
- Je garancija upravicena ali ne?
- WADY OBJECTE GWARANCJA
- BbCTabIeMbmyMoynb npyKnn
- PemeHb 6e3oNaChOCTn BHIMAHHE!
- CknpaHOBBepxN3aunTHnaDyra
- PerynnpBka cnnHKn n nobopot yawn cndeHbA
- IpeecTaHOBkaIOHOKK
- ABTomatnueckaФнкcaиВерхнeчactn
- BHIMAHHE! IpeJ nCNoIb3OBAHHe m y6eHnTEcb, uTO 6JOK cnHehna HaedKHO 3aKpenJIeH!
- KJHMaTnuecka 3oHa 10 B cKnJaHOM BepXe
- Bocpactn Bec pe6eHka
- TapaHTnHbI clyaH nn HeT?
- Kak cIeJyET ce6B CeTn B Clyuae peKlaMaun
- ΦOPMUYIAP KOHTPOJI IPN IOKYIKE
Brand : HARTAN
Model : Sky GTX
Category : Stroller