IAN 296095 - Faucet MIOMARE - Free user manual and instructions
Find the device manual for free IAN 296095 MIOMARE in PDF.
User questions about IAN 296095 MIOMARE
0 question about this device. Answer the ones you know or ask your own.
Ask a new question about this device
Download the instructions for your Faucet in PDF format for free! Find your manual IAN 296095 - MIOMARE and take your electronic device back in hand. On this page are published all the documents necessary for the use of your device. IAN 296095 by MIOMARE.
USER MANUAL IAN 296095 MIOMARE
text_image
PDF online www.lidl-service.comSPÜLTISCH-ARMATUR / KITCHEN MIXER TAP / MITIGEUR D'ÉVIER
DE AT CH
SPÜLTISCH-ARMATUR
Assembly, operating and safety instructions
NL BE
KEUKENKRAAN
natural_image
Line drawing of a pair of pliers (no text or symbols)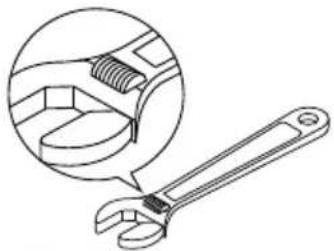
natural_image
Line drawing of an adjustable wrench with a magnified inset showing internal components (no text or symbols)A
text_image
16 2 6 3a 3b 4 5 1a 1b 1bB
text_image
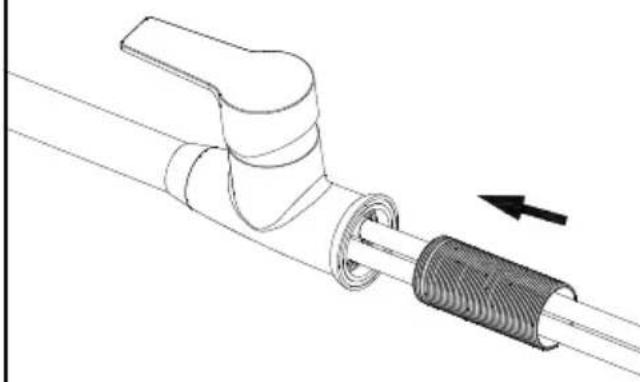
Technical diagram of a pipe fitting with labeled components and directional arrows indicating assembly or movement.C
natural_image
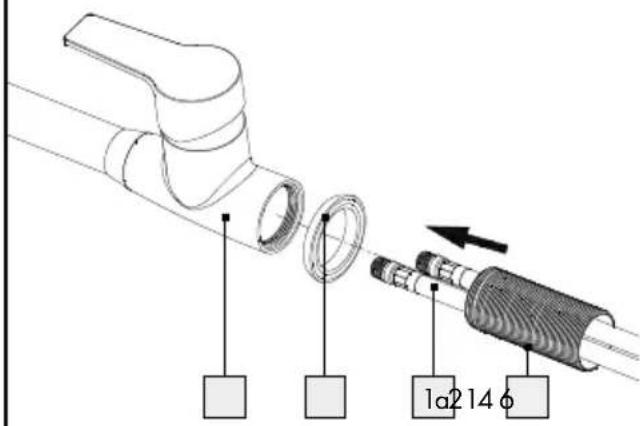
Technical line drawing of a mechanical component with a threaded end and directional arrow (no text or symbols)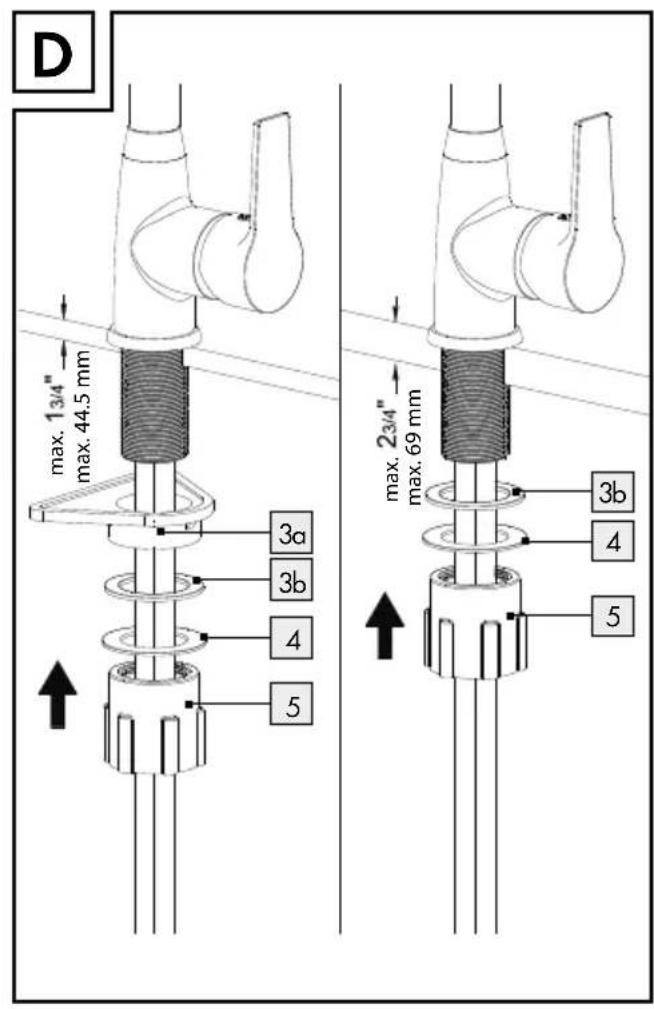
text_image
D max. 13/4" max. 44.5 mm max. 23/4" max. 69 mm 3a 3b 4 5 3b 4 5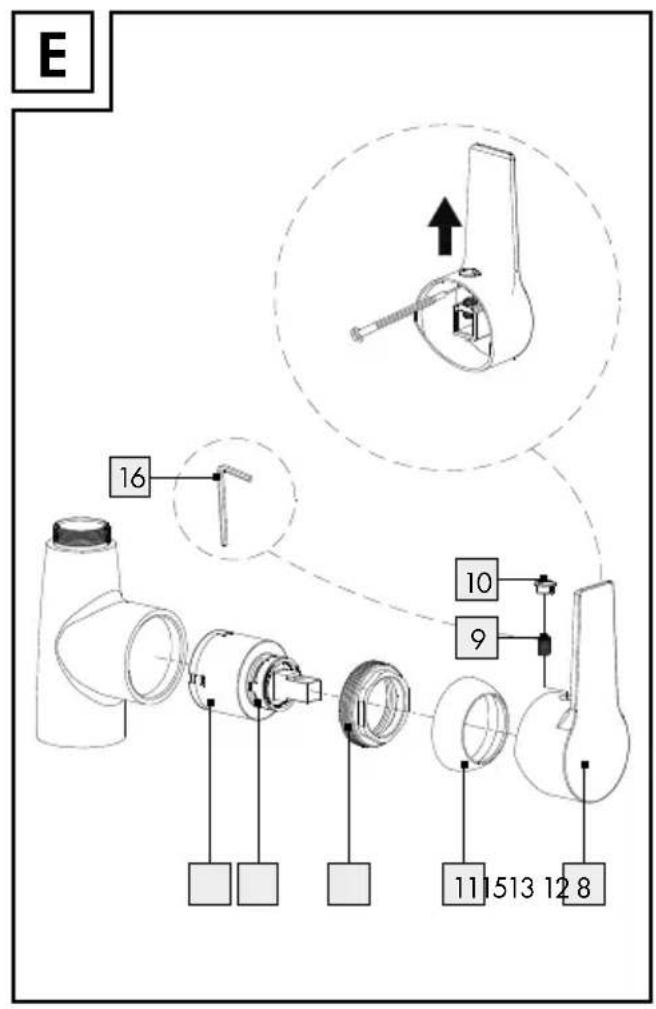
text_image
E 16 10 9 11 513 12 8
text_image
F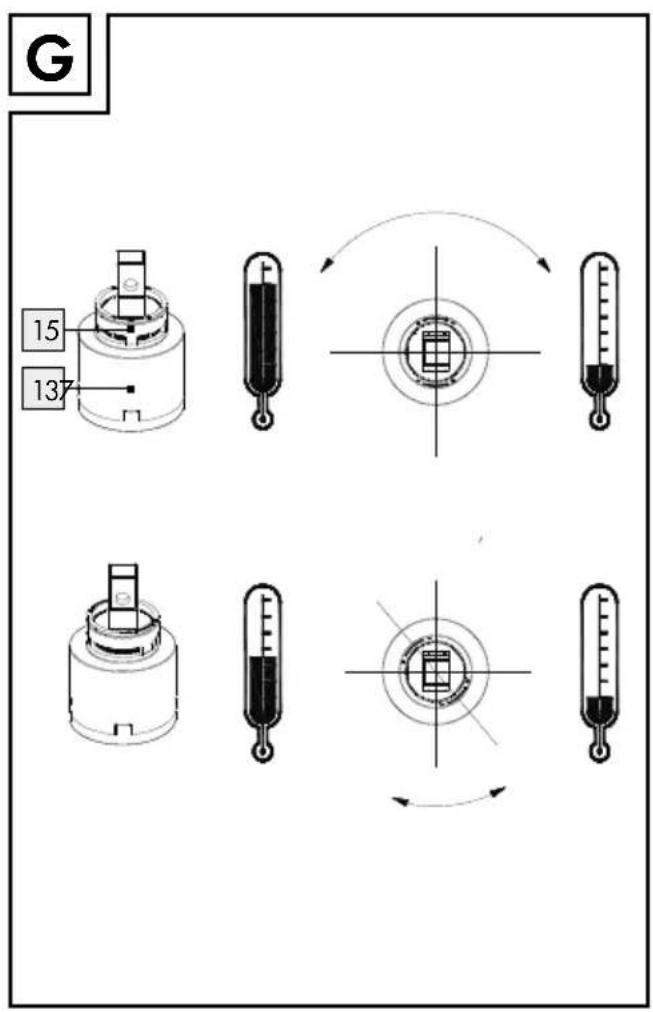
text_image
G 15 13Spültisch-Armatur
Einleitung
Anschlüsse: G ^3/8 " (ca. 17 mm)
We congratulate you on the purchase of your new product. You have chosen a high quality product. Familiarise yourself with the product before using it for the first time. In addition, please carefully refer to the operating instructions and the safety advice below. Only use the product as instructed and only for the indicated field of application. Keep these instructions in a safe place. If you pass the product on to anyone else, please ensure that you also pass on all the documentation with it.
Properuse
This product is suitable for all pressure-tight hot water systems such as central heating boilers, instantaneous water heaters, pressurised boilers and the like. It is not suitable for low-pressure water heaters such as wood or coal burning bath geysers, oil or gas bath geysers, open electrically heated water tanks. If in doubt please seek the advice of a plumber or heating engineer. Any use other than that described here or modification to the product is not permitted and may lead to damage to persons or property. There is also the risk of injury and loss of life. The product is intended for personal use only and not for medical or commercial use. The manufacturer accepts no liability for loss or damage arising from improper use.
• Description of parts
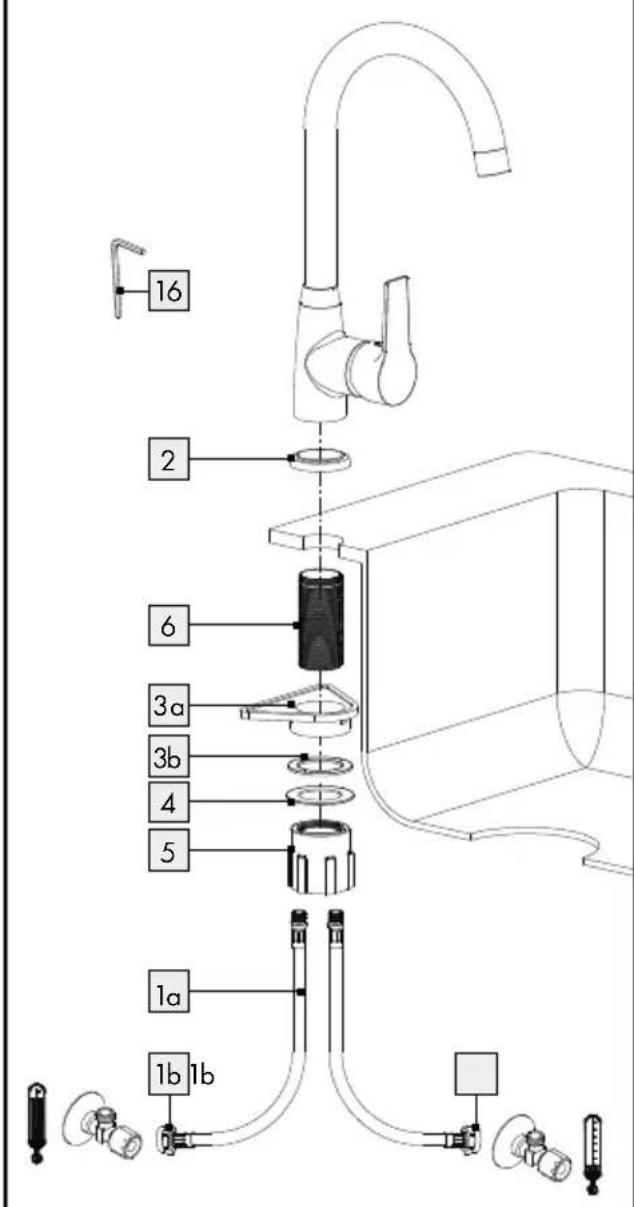
1a 1 Flexible hose cold water / hot water
1b 1 Locking nut
2 1 Base with sealing ring
3a 1 Plastic triangle
3b 1 Plastic seal
4 1 Metal washer
5 1 Plastic nut
6 1 Metal rod
7 1 Mixer nozzle
8 1 Control lever
9 1 Locking screw
10 1 Hot/cold label
11 1 Cartridge end ring
12 1 Cartridge locking ring
13 1 Cartridge
14 1 Tap body
15 1 Setting ring
16 1 Hexagonal key
●Technicaldata
Connections:G ^3/8 (approx. 17"mm)
Water connection nut: approx. 19 mm
Hot water temperature: max.: 85 °C

Safety advice
RISK ADEWROSSING!
OF LIFE OR ACCIDENT TO INFANTS AND CHILDREN! Neve


CAUTION! RISK OF DAMAGE TO
PROPERTY! Have the installation done by experienced persons only. Leaks or escape of water can lead to serious damage to buildings or household fittings and furniture. Check all connections for leaks carefully.
Ensure that all seals are correctly seated to prevent leakage of water.
The spout can be swiveled to your desired position. Make sure the spout is always positioned within the area of the sink, otherwise escape of water can lead to serious flooding to your house or building.
CAUTION! DANGER OF SCALDING!
When making the hot water setting please ensure that the temperature of the water is not too high.
■ Before installation, make yourself familiar with all the existing services, e.g. water connection and stopcocks.
Please read carefully through these operating instructions before installing and using the product. Keep all the safety advice and instructions in a safe place for future reference!
●Installation
- Installing the tap
■ Turn off the main water supply to prevent serious leakage of water. Allow any remaining water in the pipework to drain.
□ Install the tap as shown in Figs. A–D.
⚠️ CAUTION! Do not bend the hoses or place them under tension. Otherwise material damage could result.
- Flushing the tap
☐ The tap must be flushed through before first use to remove any dirt. To do this, follow these steps (see Fig. F):
□ Screw the mixer nozzle 7 off.
☐ Open the main water supply and allow the water to run for two minutes.
☐ Then screw the mixer nozzle 7 on again.
Operation
- Bringing into use
Note: If the tap has not been used for a long period flush the pipes through thoroughly in order to avoid stagnation and build-up of residues in the drinking water supply.
□ Open the main water supply.
☐ Lift the control lever 8 and swing it to the right or left in order to regulate the speed or temperature of the water flow.
- Setting the temperature limiter
The cartridge 13 in this unit has a temperature limiter. This function is not activated in the factory (neutral setting).
CAUTION! Change the temperature limiter setting only after the tap has been installed.
□ Follow Fig E. to set the temperature limitation.
☐ Turn off the main water supply.
☐ Remove the red/blue hot/cold label 10 carefully by a small flat screwdriver.
☐ Release the locking screw 9 by turning it anticlockwise using the Hexagonal key 16.
CAUTION! Do not take the screw completely out; just loosen it until the control lever 8 can be easily taken off.
☐ Take off the control lever 8.
☐ Loosen the cartridge end ring 11 by hand. Then, screw off the cartridge locking ring 12 by using a pipe wrench.
☐ Now pull the setting ring 15 upwards with the help of a screwdriver.
Note: Do not remove the cartridge 13.
Place the setting ring 15 in the desired position (see Fig. G).
Note: The setting ring can limit the turning angle of the handle, so that the amount of hot water can be limited.
☐ Tighten the cartridge locking ring 12 onto the tap body 14 again by using a pipe wrench. Then, tighten the cartridge end ring 11 by hand.
Place the control lever 8 back on to the tap body 14. Tighten the locking screw 9 by turning it clockwise using the Hexagonal key 16.
☐ Press the red/blue hot/cold label 10 into the opening.
☐ Turn on the main water supply and check the temperature limiter.
● Maintenance and cleaning
Tap care and cleaning
☐ Please note that sanitary fittings require special care and attention. Therefore you should follow the following advice:
☐ Never use corrosive or alcohol-based materials for cleaning, as these could damage the product.
□ Clean your fittings with clean water, mild detergent and a soft cloth or leather only.
☐ Screw out the mixer nozzle 7 at regular intervals and remove lime deposits or foreign bodies.
☐ Non-observance of the above care advice can be expected to result in damage to the surface of the fittings. In this event your rights under the warranty may be invalidated.
●Disposal
The packaging is wholly composed of environmentally friendly materials that can be disposed of at a local recycling centre.
Contact your local refuse disposal authority for more details of how to dispose of your worn-out product.
Information
- Potability of mains water
☐ Find out about the potability of your mains water supply. Your local water authority or water supply company will be able to inform you.
The following general recommendations apply to the potability of the water from your pipework:
- Let the water run freely for a short time if it has been stagnating in the pipework for more than four hours. Do not use any of this stagnant water in the preparation of food or for drinking. This applies particularly as far as babies and infants are concerned. Failure to observe this advice may result in risks to health. Fresh water can be readily distinguished from stagnant as fresh water is noticeably cooler.
Do not use stagnant water from chromium-plated pipework for the preparation of food or for drinking or for personal hygiene if you are allergic to nickel. This water may contain high quantities of nickel and trigger an allergic reaction. - Do not use water from lead pipework for preparing food or drink for babies or infants. Do not use it for preparing food or drink during pregnancy. Lead dissolves in drinking water and is particularly damaging to the health of babies and young children.
Warranty
The product has been manufactured to strict quality guidelines and meticulously examined before delivery. In the event of product defects you have legal rights against the retailer of this product. Your legal rights are not limited in any way by our warranty detailed below.
The warranty for this product is 5 years from the date of purchase. Should this product show any fault in materials or manufacture within 5 years from the date of purchase, we will repair or replace it - at our choice - free of charge to you.
The warranty period begins on the date of purchase. Please keep the original sales receipt in a safe location. This document is required as your proof of purchase. This warranty becomes void if the product has been damaged, or used or maintained improperly.
The warranty applies to defects in material or manufacture. This warranty does not cover product parts subject to normal wear, thus possibly considered consumables (e.g. batteries) or for damage to fragile parts, e.g. switches, rechargeable batteries or glass parts.