
TP503R04 - Coffee maker SIEMENS - Free user manual and instructions
Find the device manual for free TP503R04 SIEMENS in PDF.
| Brand | Siemens |
| Model | TP503R04 |
| Product type | Automatic coffee machine with grinder |
| Dimensions (H x W x D) | 37.3 x 27.6 x 45.2 cm |
| Empty weight | 8-9 kg |
| Power supply | 220-240 V ~, 50 Hz, 1500 W |
| Maximum pump pressure | 15 bar |
| Water tank capacity | 1.7 L (without filter) |
| Bean hopper capacity | 270 g |
| Grinder type | Adjustable ceramic grinder |
| Main functions | Espresso, coffee crema, cappuccino, latte macchiato, milk froth, hot water, ground coffee, two cups simultaneously |
| Customizable settings | Coffee intensity (5 levels + Double Shot), coffee quantity, milk quantity, coffee temperature, water hardness |
| Milk system | Milk hose with suction tube, automatic rinsing after each use |
| Water filter | Removable filter (model TZ70003), lifespan 2 months |
| Display | Color screen with menus and status messages |
| Child safety | Touch lock (long press on ml) |
| Automatic shut-off | Adjustable (programmable time) |
| Cup warming | Integrated (depending on equipment) |
| Maintenance programs | Milk system cleaning, descaling, cleaning, calc'nClean (combined descaling and cleaning) |
| Cleaning | Removable brew unit washable with water, drip tray and grounds container dishwasher-safe |
| Power cord length | 100 cm |
| Included accessories | Milk hose, suction tube, cleaning and descaling tablets, water hardness test strip, water filter |
| After-sales service | E-Nr and FD number on rating plate, spare parts available for 7 years |
Frequently Asked Questions - TP503R04 SIEMENS
User questions about TP503R04 SIEMENS
0 question about this device. Answer the ones you know or ask your own.
Ask a new question about this device
Download the instructions for your Coffee maker in PDF format for free! Find your manual TP503R04 - SIEMENS and take your electronic device back in hand. On this page are published all the documents necessary for the use of your device. TP503R04 by SIEMENS.
USER MANUAL TP503R04 SIEMENS
Register your product on My Siemens and discover exclusive services and offers. siemens-home.bsh-group.com/welcome
The future moving in.
2
natural_image
Illustration of a hand pressing down on a cylindrical device in a container, with blue arrows indicating motion (no text or symbols)3
4
natural_image
Illustration of a hand pressing down on a blue plastic container with an upward arrow (no text or symbols)5
natural_image
Diagram of a showerhead spraying water, with a blue checkmark indicating a water level (no text or symbols present)6
7
natural_image
Illustration of a hand holding a blue mechanical device inside a kitchen appliance (no text or symbols visible)8

9
natural_image
Diagram showing a faucet pouring liquid into a square basin with a water drop, accompanied by a cross symbol indicating no text or symbols.10

11
flowchart
graph TD
    A["Robot"] -->|CLICK| B["Device"]
    B --> C["Checkmark"]
12
natural_image
Illustration of a hand inserting a device into a device with blue arrows indicating direction (no text or symbols present)13
natural_image
Diagram of a kitchen appliance with a blue upward arrow indicating airflow or movement (no text or symbols present)The image is too blurry to recognize any text content.
15

natural_image
Illustration of a mechanical device with blue components and a downward arrow, no visible text or symbolsThe image is too blurry to recognize any text content.
17
natural_image
Diagram of a kitchen appliance with faucet spraying water, showing internal components and a no-smoking symbol (no text or labels)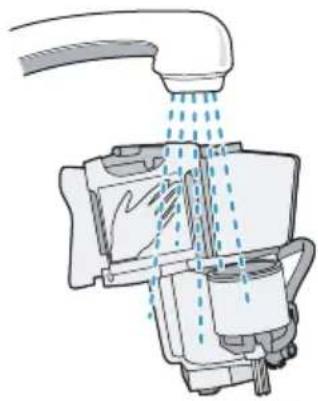
natural_image
Diagram of a kitchen appliance with a hand washing inside, showing liquid flow from a faucet to a cup (no text or symbols)
19
natural_image
Illustration of a robotic arm operating a machine with a blue upward arrow (no text or symbols)The image is too blurry to recognize any text content.
21
Table of contents
Safety.... 8
General information.... 8
Intended use.... 8
Restriction on user group...... 8
Safety information.... 9
Environmental protection and saving energy.... 12
Disposing of packaging 12
Tips for saving energy...... 12
Installation and connection...... 12
Scope of delivery.... 12
Installing and connecting the appliance.... 12
Familiarising yourself with your appliance.... 13
Appliance 13
Controls 13
Display.... 13
Drinks overview 14
Accessories.... 14
Before using for the first time ..... 15
Perform the initial start-up ..... 15
Fill the water tank 15
Fill coffee bean container...... 15
Setting the language 15
Setting the water hardness 16
General information.... 16
Basic operation ...... 17
Switching the appliance on or off.... 17
Dispensing drinks.... 17
Dispensing a coffee drink made from fresh beans 17
Dispensing a coffee drink made from ground coffee.... 18
Dispensing drinks with milk froth ... 18
Dispensing coffee drinks with milk froth.... 19
Dispensing special drinks 19
Dispensing milk froth 19
Dispensing hot water 19
Drink settings 20
Water filter 21
Childproof lock.... 22
Activating the childproof lock...... 22
Deactivating the childproof lock..... 22
Cup heater ^1 22
Basic settings.... 23
Overview of the basic settings ..... 23
Changing the basic settings ...... 24
Cleaning and servicing.... 24
Dishwasher-safe components ..... 24
Cleaning agent 24
Cleaning the appliance 25
Cleaning the drip tray and coffee dregs container 25
Cleaning the ground coffee compartment 26
Cleaning the milk system...... 26
Cleaning brewing unit 27
Service programmes...... 27
Troubleshooting.... 31
Information on display panel...... 31
Malfunctions 33
Problem with results...... 34
Transportation, storage and disposal 37
Activate frost protection 37
Disposing of old appliance 37
Customer Service.... 37
Product number (E-Nr.) and production number (FD) 38
Warranty conditions.... 38
Technical specifications.... 38

Safety
Please read the safety information to ensure that you use the appliance safely.
General information
You can find general information about this instruction manual here.
- Read this instruction manual carefully. Only this will ensure you use the appliance safely and efficiently.
■ This manual is intended for the user of the appliance.
■ Follow the safety instructions and warnings. - Keep the instruction manual and the product information safe for future reference or for the next owner.
- Check the appliance after unpacking it. Do not connect the appliance if it has been damaged in transit.
Intended use
Please read the information on intended use to ensure that you use the appliance correctly and safely.
Only use this appliance:
■ As specified in this instruction manual.
■ for preparing hot drinks.
■ In private households and in enclosed spaces in a domestic environment.
■ Up to an altitude of max. 2000 m above sea level.
Disconnect the appliance from the power supply when:
■ cleaning the appliance.
Restriction on user group
Avoid risks to children and vulnerable persons.
This appliance may be used by children aged 8 or over and by people who have reduced physical, sensory or mental abilities or inadequate experience and/or knowledge, provided that they are supervised or have been instructed on how to use the appliance safely and have understood the resulting dangers.
Children must not play with the appliance.
Children must not perform cleaning or user maintenance unless they are at least 8 years old and are being supervised.
Keep children under the age of 8 years away from the appliance and power cable.
Safety information
Follow these safety instructions when using the appliance.

WARNING – Risk of suffocation!
■ Children may put packaging material over their heads or wrap themselves up in it and suffocate.
- Keep packaging material away from children.
▶ Do not let children play with packaging material.
■ Children may breathe in or swallow small parts, causing them to suffocate.
- Keep small parts away from children.
▶ Do not let children play with small parts.

WARNING – Risk of electric shock!
■ Improper installation is dangerous.
- Connect and operate the appliance only in accordance with the specifications on the rating plate.
- Connect the appliance to a power supply with alternating current only via a properly installed socket with earthing.
- The protective conductor system of the domestic electrical installation must be properly installed.
■ If the appliance or the power cord is damaged, this is dangerous.
▶ Never operate a damaged appliance.
▶ Never operate an appliance with a cracked or fractured surface.
en Safety
▶ Never pull on the power cord to unplug the appliance. Always unplug the appliance at the mains.
▶ If the appliance or the power cord is damaged, immediately unplug the power cord or switch off the fuse in the fuse box.
▶ "Call Customer Service." → Page 37
▶ Repairs to the appliance should only be carried out by trained specialist staff.
■ Improper repairs are dangerous.
▶ Repairs to the appliance should only be carried out by trained specialist staff.
▶ Only use genuine spare parts when repairing the appliance.
▶ If the power cord of this appliance is damaged, it must be replaced by the manufacturer, the manufacturer's Customer Service or a similarly qualified person in order to prevent any risk.
■ An ingress of moisture can cause an electric shock.
▶ Never immerse the appliance or the power cord in water.
- Liquids must not be spilled on the appliance plug connection.
▶ Only use the appliance in enclosed spaces.
▶ Never expose the appliance to intense heat or humidity.
- Do not use steam- or high-pressure cleaners to clean the appliance.
⚠ WARNING – Risk of fire!
■ The appliance will become hot.
▶ Ventilate the appliance adequately.
▶ Never operate the appliance in a cupboard.
■ It is dangerous to use an extended power cord and non-approved adapters.
▶ Do not use extension cables or multiple socket strips.
▶ If the power cord is too short, contact Customer Service.
▶ Only use adapters approved by the manufacturer.
⚠ WARNING – Risk of burns!
Some parts of the appliance become very hot.
▶ Never touch hot appliance parts.
- Allow hot appliance parts to cool down before touching them.
⚠ WARNING – Risk of scalding!
Freshly prepared drinks are very hot.
▶ Leave drinks to cool down if necessary.
- Do not let escaping liquids or steam come into contact with your skin.
⚠ WARNING – Risk of injury!
■ Improper use of the appliance may endanger the user.
▶ Use the appliance only for its intended purpose.
■ Trapped fingers when closing the appliance door.
▶ Be careful of your fingers when closing the appliance door.
■ The grinder rotates.
▶ Never reach into the grinder.
⚠ WARNING – Danger: Magnetism!
The appliance contains permanent magnets. These may affect electronic implants, e.g. pacemakers or insulin pumps.
▶ People with electronic implants must stand at least 10 cm away from the appliance.
- This minimum distance of 10 cm must also be observed for the water tank when removed.
⚠ WARNING – Risk of harm to health!
Dirt on the appliance may be dangerous to health.
▶ Follow the cleaning instructions for the appliance.
Environmental protection and saving energy
Help protect the environment by using your appliance in a way that conserves resources and by disposing of reusable materials properly.
Disposing of packaging
The packaging materials are environmentally compatible and can be recycled.
- Sort the individual components by type and dispose of them separately.
Information about current disposal methods are available from your specialist dealer or local authority.
Tips for saving energy
If you follow these instructions, your appliance will use less power.
Set the interval for automatic switch-off to the smallest value.
- If the appliance is not being used, it will switch itself off earlier.
→ "Basic settings", Page 23
Do not interrupt the dispensing process prematurely.
+ The amount of water or milk that is heated is used optimally.
Descale the appliance regularly.
+ Limescale deposits increase the appliance's energy consumption.
Installation and connection
You can find out where and how best to install your appliance here. You will also learn how to connect your appliance to the power supply.
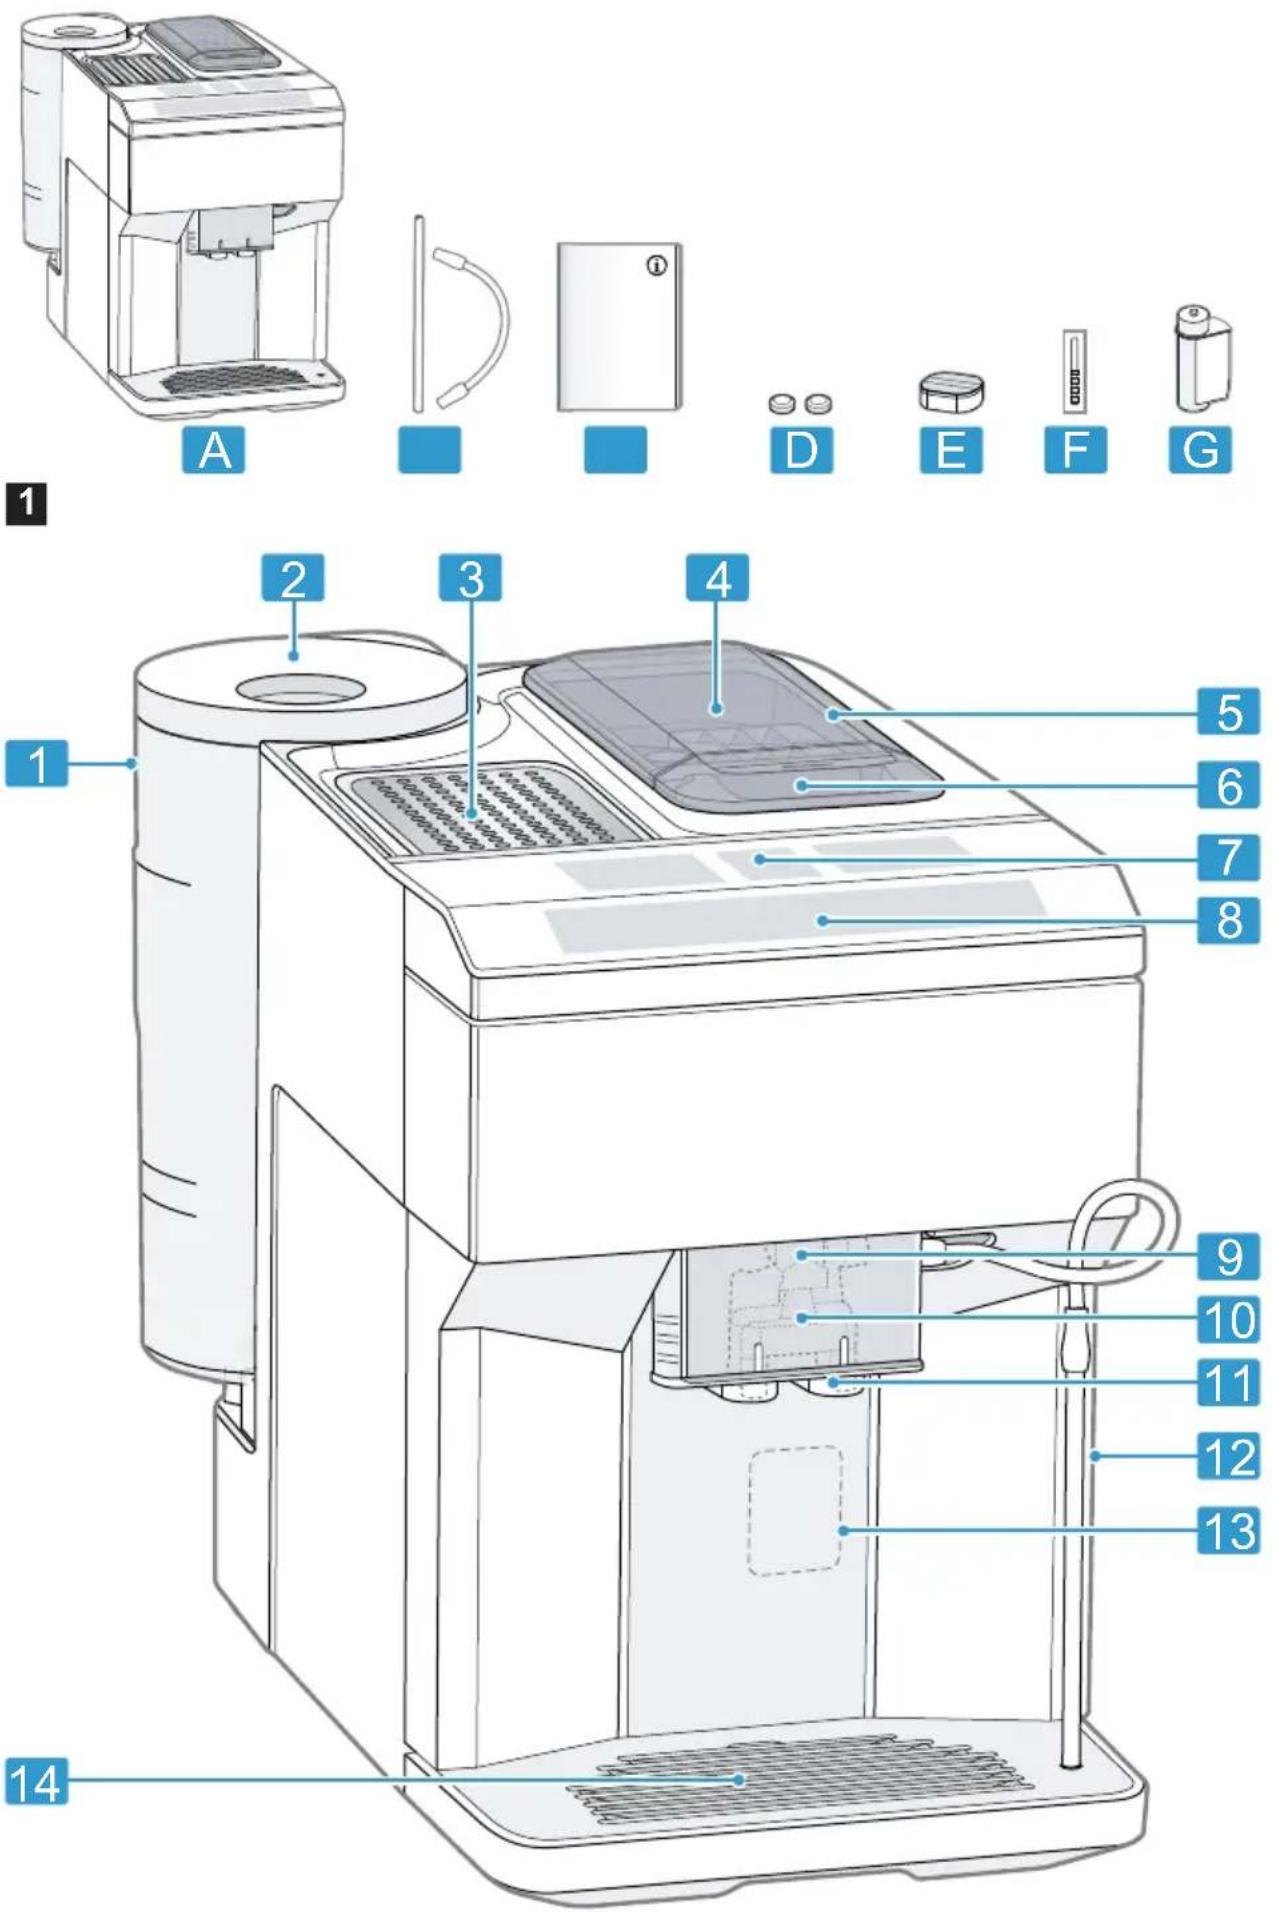
Scope of delivery
After unpacking all parts, check for any damage in transit and completeness of the delivery.
→ Fig. 1
| A | Fully automatic coffee machine |
| B | Milk tube and suction pipe |
| C | Instruction manual |
| D | Cleaning tablets1 |
| E | Descaling tablets1 |
| F | Water hardness testing strip |
| G | Water filter1 |
^1 Depending on the appliance specifications
Installing and connecting the appliance
ATTENTION!
Risk of damage to the appliance. If the appliance is not started up correctly, it may be damaged.
▶ Use the appliance in frost-free rooms only.
▶ If the appliance has been transported or stored below 0 °C, wait 3 hours at room temperature before starting it up.
▶ After plugging in, always wait approx. 5 seconds.
-
Remove the protective film.
-
Place the appliance on a level, water-resistant surface that is capable of bearing its weight.
- Using the mains plug, connect the appliance to an earthed socket that has been correctly installed.
Familiarising yourself with your appliance
Familiarise yourself with the parts of your appliance.
Appliance
You can find an overview of the parts of your appliance here.
Note: Individual details and colours may differ, depending on the appliance model.
→ Fig. 2
| 1 | Water tank |
| 2 | Cover for water tank |
| 3 | Cup heater ^1 |
| 4 | Aroma lid |
| 5 | Bean container |
| 6 | Ground coffee compartment |
| 7 | Display |
| 8 | Control panel |
| 9 | Cover |
| 10 | Milk system |
| 11 | Outlet system |
1 Depending on the appliance specifications
| 12 | Brewing chamber door |
| 13 | Rating plate |
| 14 | Drip tray |
^1 Depending on the appliance specifications
Controls
Here you can find an overview of the symbols on your appliance. Press the symbols to make a selection, start the dispensing process or make/adjust a setting.
| Symbol | Explanation |
| Switch the appliance on or off. | |
| menu | Open or exit the menu.Note:The menu buttons are only visible when the menu is open. |
| Navigate up in the menu. | |
| Navigate down in the menu. | |
| ok | Confirm in the menu or save. |
| Go back in the menu. | |
| Dispense two cups. | |
| Select the coffee strength. | |
| ml | Adjust the quantity. |
| start stop | Start or stop the process. |
Display
The display shows the selected drinks, settings and setting options, as well as messages about the appliance's operating status.
The display shows additional information and action steps. The information is hidden after a short period, or by pressing a button. The action steps are hidden when they have been completed.
Drinks overview
You can prepare a wide range of different drinks with your appliance.
Quick selection
| Symbol Designation Explanation Category | ||
 | Espresso Concentrated coffee. Best served in small, thick-walled cups. Preheat cups with hot water. | → "Dispensing a coffee drink made from fresh beans", Page 17→ "Dispensing a coffee drink made from ground coffee", Page 18 |
 | Caffe crema Coffee with a crema layer or large cup of coffee prepared using espresso method. | → "Dispensing a coffee drink made from fresh beans", Page 17→ "Dispensing a coffee drink made from ground coffee", Page 18 |
 | Cappuccino Espresso with frothed milk. Best served in small cups. | → "Dispensing coffee drinks with milk froth", Page 19 |
 | LatteMacchiato Coffee speciality with three layers: warm milk at the bottom, espresso in the middle, and milk froth on top. Best served in a glass. | → "Dispensing coffee drinks with milk froth", Page 19 |
 | Special drinks Dispense other drinks. | → "Dispensing special drinks", Page 19 |
Accessories
Only use original accessories. These have been made especially for your appliance. Here, you can find an overview of your appliance's accessories.
| accessories Retail Customer service | ||
| Cleaning tablets TZ80001A | TZ80001B | 0031209700312098 |
| Descaling tablets TZ80002A | TZ80002B | 0031209400312095 |
| Water filter TZ70003 00575491 | ||
| Water filter pack of 3 TZ70033 - | ||
accessories Retail Customer service
| Microfibre cloth - 00460770 | ||
| Care set TZ80004A | TZ80004B | 0031210500312106 |
Before using for the first time
Configure the basic settings. Clean the appliance and individual parts.
Perform the initial start-up
▶ After connecting the appliance to the power supply, configure the settings for initial start-up.
Note: The automatic display for selection of the language and water hardness only appears when the appliance is switched on for the first time.
Tip: You can change the settings at any time.
→ "Basic settings", Page 23
Fill the water tank
Fill the water tank each day with fresh, cold, non-carbonated water.
- Open the lid.
- Remove the water tank using the recessed grip.
- Rinse the water tank.
- Fill the water tank up to the "max" mark.
- Insert the water tank into the holder, keeping it straight.
- Close the lid.
Fill coffee bean container
ATTENTION!
Unsuitable beans can block up the grinder.
- Only use pure, roasted bean mixes that are suitable for use in fully automatic coffee or espresso machines.
▶ Do not use glazed coffee beans. - Do not use caramelised coffee beans.
-
Do not use coffee beans that have been treated with additives containing sugar.
▶ Do not add ground coffee. -
Open the lid.
-
Fill with the coffee beans.
The appliance will adjust to the coffee beans with the next dispensing process.
- Close the lid.
Tip: To keep the coffee beans at their best, store them in a sealed container in a cool place. You can keep the coffee beans in the bean container for a number of days without them losing their aroma.
Setting the language
- Press ☐ to switch on the appliance.
√ The display will show the language that is preset. - Press or until the display shows the desired language.
- Press ok
en Before using for the first time
Tip: You can change the language at any time.
→ "Overview of the basic settings", Page 23
Setting the water hardness
It is important to set the water hardness correctly, so that the appliance indicates in good time that it needs descaling. You can use the enclosed test strip to determine the water hardness, or ask your local water company.
- Briefly dip the test strip in fresh tap water.
- Allow the water to drip off the test strip.
√ The test strip will indicate the water hardness after 1 minute.
3. If a water softening system is installed in your house, select "Softening system".
4. Press or until the display shows the desired water hardness. The table shows the allocation of the levels to the different degrees of water hardness:
| Level German degrees in °dH | Total hardness in mmol/l |
| 1 1-7 0.18 - 1.25 | |
| 2 8-14 1.42 - 2.49 | |
| 3 15-21 2.67 - 3.74 | |
| 4^1 | 22-30 3.92 - 5.34 |
^1 Factory setting (may vary according to model)
- Press ok
- Check whether the bean container has been filled.
- Check whether the water tank has been filled.
- Press ok
√ The appliance rinses itself.
Tip: You can change the water hardness at any time.
→ "Overview of the basic settings", Page 23
General information
Please bear this information in mind so that you can get the best out of your appliance.
Notes
■ The appliance has been programmed at the factory with standard settings for optimum operation.
- The grinder has been factory-set for optimum operation. If coffee is only dispensed drop by drop or is too thin and with too little crema, you can adjust the grinding level when the grinder is running.
→ "Adjusting the grinding level", Page 21
■ The appliance will switch off automatically if it has not been operated for a given period of time. "You can change the duration in the basic settings." → Page 23
■ Water droplets may form on the ventilation slits and the lid of the ground coffee compartment while the appliance is in use.
■ For technical reasons steam can escape from the appliance.
natural_image
Illustration of a kitchen appliance with cloud-shaped appliances and a grater (no text or symbols)Tips
■ "You can switch off the button tones in the basic settings."
→ Page 23
- When you use your appliance for the first time or run a service programme, or if your appliance has not been used for a long time, the first drink will not have its full aroma and should not be consumed.
■ Once you have started up your appliance and made a few cups, you will then achieve a thick, fine-pored crema every time.
Basic operation
You can find out everything you need to know about operating your appli-ance here.
Switching the appliance on or off
- Switch the appliance on or off with ⏻.
When the appliance switches on, the display shows the Siemens logo. When the appliance is switched on or off, it will rinse itself automatically. When switched off, the appliance will emit steam into the tray for cleaning. During the rinsing process, the display shows a drop. If the appliance is still warm when switched on, or if no drink was dispensed before it was switched off, the appliance doesn't rinse itself.
Dispensing drinks
Find out how to prepare a drink of your choice.
WARNING Risk of scalding
Freshly prepared drinks are very hot.
- Leave drinks to cool down if necessary.
- Do not let escaping liquids or steam come into contact with your skin.
Tips
■ You can directly select the drink you want using the quick-selection buttons. The display shows you the drink and the current settings.
- Your appliance has other drinks besides the ones that you can obtain via the quick-selection buttons. → "Dispensing special drinks", Page 19
■ You can adapt your drink to your personal taste.
→ "Drink settings", Page 20
Notes
■ If you do not change any settings for approx. 5 seconds, the appliance will exit settings mode. The settings will be automatically saved.
■ With a number of settings your coffee is prepared in several steps. Wait until the process is fully completed.
Dispensing a coffee drink made from fresh beans
- Place your pre-warmed cup under the outlet system.
- Press the drinks symbol for a coffee drink without milk.
√ The display will show the drink and your current settings. → "Drink settings", Page 20 - Change the settings where necessary:
en Basic operation
- Use m to adjust the amount.
→ "Adjusting the amount", Page 20 - Use ☉ to adjust the coffee strength.
→ "Adjusting the coffee strength", Page 20
4. Press start stop
The coffee beans are freshly ground for each brewing process.
√ The coffee is brewed and then dispensed into the cup.
Tips
■ You can press ^start stop to stop the dispensing process prematurely.
■ Find out how to make coffee drinks with milk.
→ "Dispensing drinks with milk froth", Page 18
Dispensing a coffee drink made from ground coffee
ATTENTION!
The ground coffee compartment can become blocked.
▶ Do not use coffee beans.
▶ Do not use instant coffee.
▶ Use a soft brush to gently direct the ground coffee residue into the shaft.
Note
When using ground coffee, the following selections are not available:
■ Two cups at once
■ Coffee strength
■ "doubleshot"
- Place your pre-warmed cup under the outlet system.
- Press the symbol for your desired drink.
- Press ⑨ repeatedly until the display shows "Gr. coffee".
-
Open the ground coffee compartment.
-
Add a maximum of 2 level teaspoons of ground coffee, max. 12 g.
-
Close the ground coffee compartment.
-
Press start stop
√ The coffee is brewed and then dispensed into the cup.
Tips
■ You can press ^start stop to stop the dispensing process prematurely.
■ If you would like another drink with ground coffee, repeat the process.
■ Always add the ground coffee just before making the drink.
Dispensing drinks with milk froth
You can use your appliance to dispense coffee drinks with milk froth.
WARNING
Risk of burns!
The milk system can become extremely hot.
▶ Never touch the milk system when it is hot.
- Allow the hot milk system to cool down before touching it.
ATTENTION!
Milk residues can dry on surfaces and are difficult to remove.
- Clean the milk system after every use.
→ "Cleaning the milk system", Page 26
Tip: You can also use plant-based alternatives to milk, e.g. soya milk.
Note: The quality of the milk froth depends on the type of milk or plant-based alternative used.
Dispensing coffee drinks with milk froth
Requirements
■ The milk tube is connected.
■ The suction pipe is connected.
-
Insert the suction pipe in the milk.
-
Place your pre-warmed cup under the outlet system.
-
Press the symbol for a coffee drink with milk.
√ The display will show the drink and your current settings.
→ "Drink settings", Page 20
-
Change the settings where necessary:
-
Use m to adjust the amount.
→ "Adjusting the amount", Page 20 - Use ☐ to adjust the coffee strength.
→ "Adjusting the coffee strength", Page 20 -
Use the ground coffee compartment.
→ "Dispensing a coffee drink made from ground coffee", Page 18 -
Press start and wait until the process is complete.
After preparing the drink, the milk system will automatically clean itself with a short jet of steam.
Tip: If you want to stop the dispensing process early, press start stop if you want to stop the dispensing process altogether, press ⏻
Dispensing special drinks
Your appliance has other drinks besides the ones that you can obtain via the quick-selection buttons.
▶ Press several times.
→ "Drinks overview", Page 14
Dispensing milk froth
WARNING
Risk of burns!
The milk system can become extremely hot.
▶ Never touch the milk system when it is hot.
- Allow the hot milk system to cool down before touching it.
Requirements
■ The milk tube is connected.
■ The suction pipe is connected.
-
Insert the suction pipe in the milk, e.g. Tetra Pak carton.
-
Place your pre-warmed cup under the outlet system.
-
Press repeatedly until the display shows "Milk froth".
-
Change the setting if necessary:
-
Use mto adjust the amount.
→ "Adjusting the amount", Page 20 -
Press start stop
√ The milk froth will run out of the outlet system.
- Press start to stop the dispensing process.
Dispensing hot water
WARNING
Risk of burns!
The milk system can become extremely hot.
▶ Never touch the milk system when it is hot.
- Allow the hot milk system to cool down before touching it.
Note: If the milk system has not been cleaned, small amounts of milk may be dispensed with the water.
en Basic operation
Requirements
■ The milk system has been cleaned.
→ "Cleaning the milk system", Page 26.
■ The milk tube has been removed.
-
Place your pre-warmed cup under the outlet system.
-
Press repeatedly until the display shows "Hot water".
-
Change the setting if necessary:
- Use mIo adjust the amount. → "Adjusting the amount", Page 20
- Press start stop If the following message appears: "Please remove suction hose.", remove the milk tube and press start stop
√ Hot water will run out of the outlet system.
- Press start step stop the dispensing process.
Drink settings
Prepare a drink according to your taste.
Adjusting the coffee strength
- Press the symbol for your desired drink.
- To select the strength of the coffee, press ☐
You can select the following coffee strengths: - "mild"
- "regular"
- "strong"
- "very strong"
- "doubleshot"
Note: The setting "doubleshot" is not available for every drink and drink volume.
Tip: For a strong taste of coffee, select a high coffee strength when setting a large capacity.
Selecting ground coffee
- Press the symbol for your desired drink.
- Press repeatedly until the display shows "Gr. coffee".
→ "Dispensing a coffee drink made from ground coffee", Page 18
AromaDouble Shot
You can make your coffee extra strong by using the setting "doubleshot".
The longer coffee is brewed, the more bitter substances and undesirable aromas are released. These bitter substances and undesirable aromas affect the taste and digestibility of the coffee. To ensure that only pleasant-tasting and easily digestible aromatic substances are released, fresh coffee beans are ground and brewed when half the quantity has been prepared.
Note: The setting "doubleshot" is not available for every drink and drink volume.
Adjusting the amount
- Press the symbol for your desired drink.
- Press mepeatedly until the desired volume is shown on the display.
Dispensing two cups at once
Depending on the appliance model, you can make two cups at the same time for certain drinks.
Note
The "Double cup" function is not available for the following selections:
■ "Gr. coffee"
■ "doubleshot"
■ Volume smaller than 35 ml
- Press the symbol for your desired drink.
2. Press

√ The setting is shown on the display.
- Place two cups on the left and right under the outlet system.
4. Press

The drink is prepared in 2 steps. The beans are ground in 2 grinding operations.
√ The drink is brewed and then runs into the cup.
- Wait until the process is completed.
Grinder
Your appliance has an adjustable grinder, which you can use to customise the grinding level of your coffee beans.
Adjusting the grinding level
Set the desired grinding level while the coffee beans are being ground.

WARNING
Risk of injury!
The grinder rotates.
▶ Never reach into the grinder.
ATTENTION!
Risk of damage to the grinder. The grinder may be damaged if the grinding level is not set properly.
▶ Only set the grinding level when the grinder is running.
▶ Select the grinding level using the rotary selector step by step.
Grinding level Setting
Fine grinding level for dark-roasted beans.
Turn rotary selector counter-clockwise.

Grinding level Setting
Coarse grinding level for light-roasted beans.
Turn rotary selector clockwise.

The setting only has an effect after the second cup of coffee.
Tip: If the coffee is only dispensed drop by drop, set a coarser grinding level.
If the coffee is too thin with too little crema, set a finer grinding level.
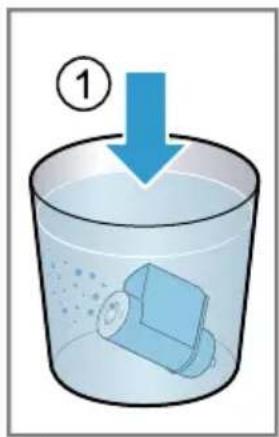
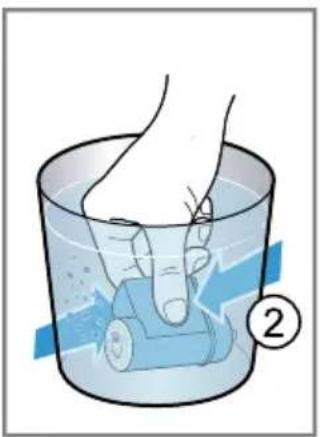
Water filter
You can use a water filter to minimise limescale deposits and reduce impurities in the water.
Inserting and activating the water filter
ATTENTION!
Possible damage to the appliance due to limescale build-up.
▶ Change the water filter in good time.
▶ Change the water filter after 2 months at the latest.
Note: If "Replace water filter" is shown on the display, replace the water filter.
If you are not inserting a new filter, select "No filter" and follow the instructions on the display.
-
Immerse the water filter in a glass of water and press the sides together lightly until no more air bubbles rise to the surface. → Fig. 3
-
Press menu
- Use or to select "Water filter" and press ok
en Childproof lock
-
Use or to select "New filter" or "Replace water filter" and press ok
-
Note: If you are not inserting a new filter, select "No filter" in the menu settings.
Push the water filter firmly into the water tank and press ok → Fig. 4
-
Fill the water tank up to the "max" mark and press ak
-
Connect the milk tube to the milk system and the suction pipe.
-
Insert the end of the suction pipe in the drip plate.
-
Place a container with a capacity of 1 litre under the outlet system and press ok
√ The filter will be rinsed and the following message displayed: "Rinsing complete.".
√ The appliance is ready to use.
Tips
■ You should also change your water filter for reasons of hygiene.
■ With a water filter you need to de-scale your appliance less frequently.
■ If your appliance has not been used for a long time, for example if you were on holiday, you should rinse the water filter before use by dispensing a cup of hot water.
■ The water filter can be purchased from retailers or customer service. → "Accessories", Page 14
- Learn how to insert the water filter. → "Inserting and activating the water filter", Page 21
Childproof lock
You can lock the appliance, to protect children against scalding and burns.
Activating the childproof lock
- Press and hold mbr at least 3 seconds.
√ The following message will be displayed: "Child lock active. To deactivate press "ml" for 3 sec".
Deactivating the childproof lock
- Press and hold mbr at least 3 seconds.
√ The following message will be displayed: "Child lock deactivated.".
Cup heater ^1
You can use the cup heater to pre-heat your cups.
WARNING Risk of burns!
The cup heater can become very hot.
▶ Never touch the cup heater when it is hot.
- Allow the hot cup heater to cool down before touching it.
Tips
■ You can activate and deactivate the cup heater in the basic settings.
→ "Overview of the basic settings", Page 23
■ Place the cups with their base on the cup heater to heat the cups perfectly.
Basic settings
You can configure your appliance to meet your needs and call up additional functions.
Overview of the basic settings
| Setting Selection Description | ||
| Cleaning and care Milk system | DescaleCleancalc'nClean | Start service programme.→ "Service programmes",Page 27 |
| Cup warmer1 | Cup warmer off2 Cup warmer on | Switch cup heater on or off.→ "Cup heater", Page 22 |
| Water filter New filter | No filter | Set use of the water filter. |
| Coffee temp. normal | highmax. | Set the temperature for coffee drinks.Note: The setting is effective for all preparation types. |
| Languages See options on the appliance. Set menu language. | Changes are immediately displayed. | |
| Autom. switch-off See options on the appliance. Set how long the appliance should wait after preparing the last drink before automatically switching itself off. | ||
| Water hardness 1 (soft) | 2 (medium)3 (hard)4 (very hard)2Water-softening system | Set the appliance to the local water hardness.→ "Setting the water hardness",Page 16 |
| Key tones Key tones on | 2Key tones off | Switch the button tones on or off. |
| Factory settings Full reset? | Continue: OKCancel: ← | Restore settings to the factory settings.Note: All individual settings will be deleted and reset to the fact-ory settings. |
| 1 Depending on the appliance specifications2 Factory setting (may vary according to model) | ||
Changing the basic settings
-
Press menu
-
Use or to select the desired basic setting and press ok
√ The display will show the setting options and the navigation symbols will light up. The display indicates the current setting.
3. Use or to make the desired selection and press ok
√ The setting is now saved.
4. Use ↩ to go back.
5. Press menu at the menu.
Cleaning and servicing
To keep your appliance working efficiently for a long time, it is important to clean and maintain it carefully.
Dishwasher-safe components
Find out which components can be cleaned in the dishwasher.
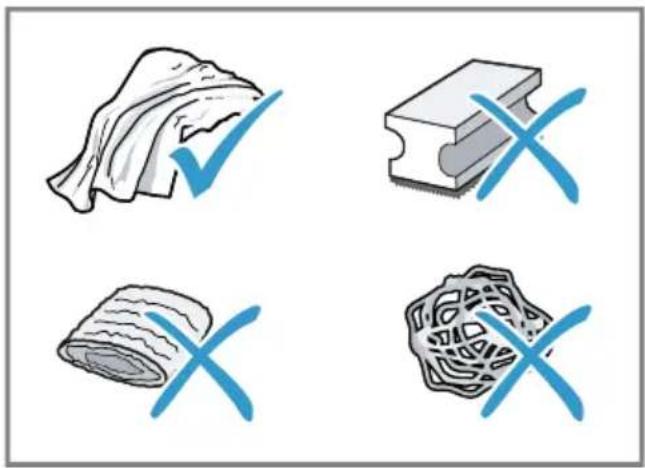
ATTENTION!
Some components are sensitive to heat and may be damaged if they are cleaned in a dishwasher.
- Follow the operating instructions of the dishwasher.
▶ Only put dishwasher-safe components in the dishwasher.
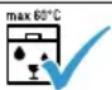
▶ Only use programmes that do not heat the water above 60 °C.
Dishwasher-safe components:
■ Drip tray
- Drip plate
- Drip grate
- Coffee dregs container
- Mechanical fill level indicator
■ Milk system with adapter
■ Ground coffee compartment with hinged lid
Not dishwasher-safe:
■ Water tank
■ Water tank lid
■ Aroma lid
■ Brewing unit
■ Beverage dispenser cover

Cleaning agent
Find out which cleaning agents are suitable for your appliance.
WARNING
Risk of serious harm to health!
Cleaning liquids may lead to health impairments.
▶ Never drink the cleaning liquids.
▶ Use descaling and cleaning agents as described in the instructions and observe the relevant safety information.
ATTENTION!
Unsuitable cleaning products may damage the surfaces of the appliance.
- Do not use harsh or abrasive detergents.
- Do not use cleaning agents containing alcohol or spirits.
- Do not use hard scouring pads or cleaning sponges.
- Do not use citric acid, vinegar or any vinegar-based agents to de-scale the appliance.
- For cleaning and descaling, only use suitable tablets.
- Do not use descaling agent with phosphoric acid.
natural_image
Four symbolic illustrations: a rolled-up document, a rectangular block with X marks, a rolled-up dough, and a textured food item (no text or symbols present)Tips
■ Use descaling and cleaning tablets that have been specially developed for your appliance. You can buy tablets from our customer service.
→ "Accessories", Page 14
■ Wash new sponge cloths thoroughly to remove any salt adhering to them. Salt can cause a rust film to develop on stainless steel surfaces.
■ Always remove any residues of limescale, coffee, milk, cleaning and descaling solutions immediately, to prevent the formation of corrosion.
Cleaning the appliance

WARNING
Risk of electric shock!
An ingress of moisture can cause an electric shock.
▶ Never immerse the appliance or the power cord in water.
- Liquids must not be spilled on the appliance plug connection.
- Do not use steam- or high-pressure cleaners to clean the appliance.

WARNING
Risk of burns!
Some parts of the appliance become very hot.
▶ Never touch hot appliance parts.
- Allow hot appliance parts to cool down before touching them.
- Disconnect the appliance from the power supply.
- Clean the housing, the high-gloss surfaces and the control panel with a microfibre cloth.
→ "Accessories", Page 14
- Clean the outlet system with a soft, damp cloth after drinks have been dispensed.
- If the appliance has not been used for a long time, due to holiday for example, clean the entire appliance including the outlet system, milk system, trays and brewing unit.
Note: The appliance will rinse itself automatically if you switch it on when it is cold or switch it off after it has dispensed coffee. The system is therefore self-cleaning.
Cleaning the drip tray and coffee dregs container
Clean and empty the drip tray and coffee dregs container every day to prevent deposits.
- Detach the milk tube from the outlet system.
- Open the door.
- Pull the drip tray and the coffee dregs container forwards and out.
- Remove and clean the drip plate.
- Empty and clean the drip tray and coffee dregs container.
- Clean the appliance interior and the drip tray holder.
en Cleaning and servicing
7. Tip
If you press both brackets in, you can then remove the mechanical fill level indicator more easily.
Remove the mechanical fill level indicator and clean with a damp cloth.
- Assemble the drip tray, drip plate, coffee dregs container and mechanical fill level indicator and insert in the appliance.
- Close the door.
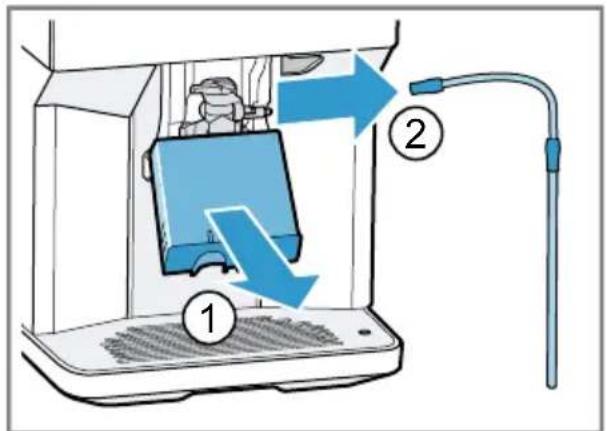
Cleaning the ground coffee compartment
Tip: You can clean the ground coffee compartment in the dishwasher.
- Pull out the ground coffee compartment by the open lid. → Fig. 5
- Clean the ground coffee compartment with washing-up liquid. → Fig. 6
- Dry the ground coffee compartment and insert it into the appliance.
Cleaning the milk system
Clean the milk system regularly.

WARNING
Risk of burns!
The milk system can become extremely hot.
▶ Never touch the milk system when it is hot.
- Allow the hot milk system to cool down before touching it.
ATTENTION!
The appliance may be damaged by improper cleaning.
- Do not put the cover of the outlet system in the dishwasher.
Tips
■ If you want to give the milk system a particularly thorough clean, you can use the "Clean milk system" service programme.
→ "Using the milk system cleaning programme", Page 28
■ All of the milk system's components are dishwasher-safe.
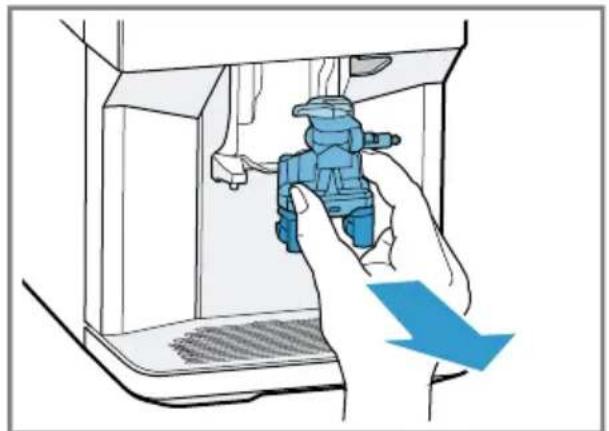
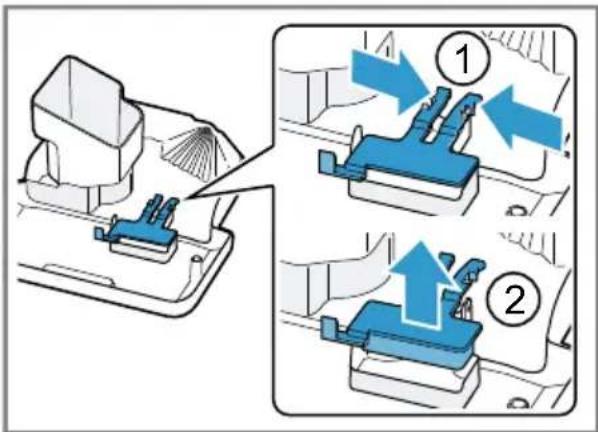
- Slide the outlet system right down.
- Pull the cover forwards and remove the milk tube.
→ Fig. 7
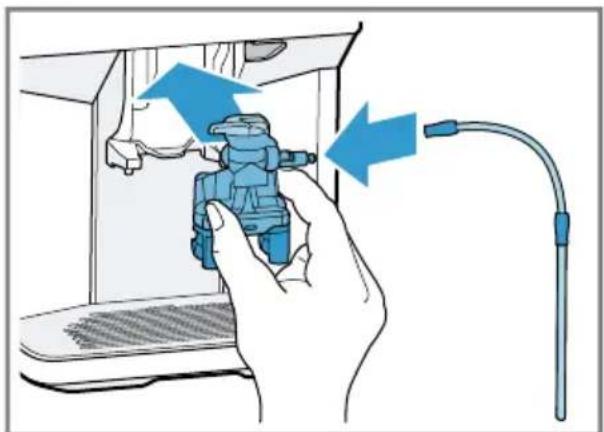
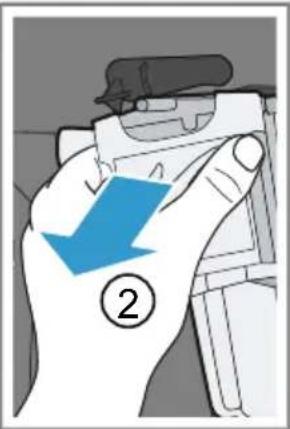
- Remove the milk system by pulling straight forwards.
→ Fig. 8
- Take the top and bottom section of the milk system apart.
→ Fig. 9
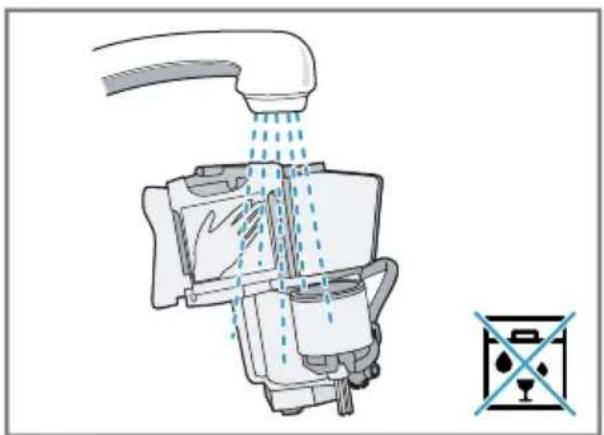
- Detach the milk tube from the suction pipe.
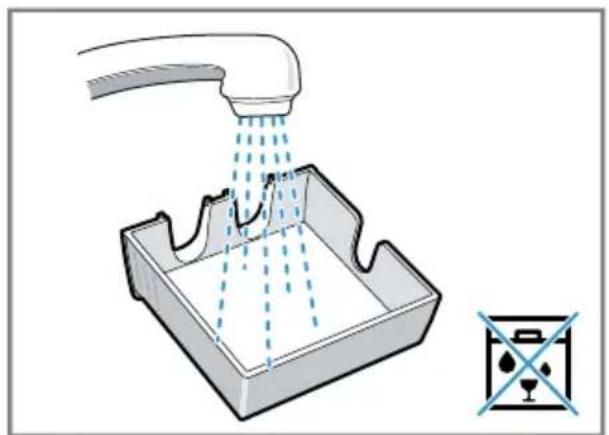
- Clean the components with detergent solution and a soft cloth.
→ Fig. 10
- Rinse all components with clean water and dry.
→ Fig. 11
-
Any detergent residues in the milk system must be completely removed following the rinsing process.
-
Assemble the top and bottom section of the milk system.
→ Fig. 12 -
Fit the milk tube.
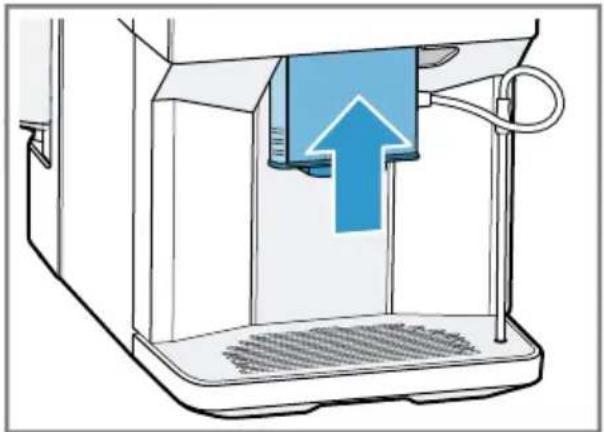
11.Slide the outlet system right down.
- Place the milk system back in the appliance from the front, making sure it is straight.
→ Fig. 13
- Replace the cover.
14.Slide the outlet system all the way up.
→ Fig. 14
Cleaning brewing unit
In addition to the automatic rinsing process, regularly remove and clean the brewing unit.
WARNING
Risk of burns!
Some parts of the appliance become very hot.
▶ Never touch hot appliance parts.
- Allow hot appliance parts to cool down before touching them.
ATTENTION!
The appliance may be damaged by improper cleaning.
▶ Do not use washing-up liquid.
- Do not use cleaning agents containing vinegar or acids.
▶ Do not clean in the dishwasher.
- Detach the milk tube from the outlet system.
→ Fig. 7
-
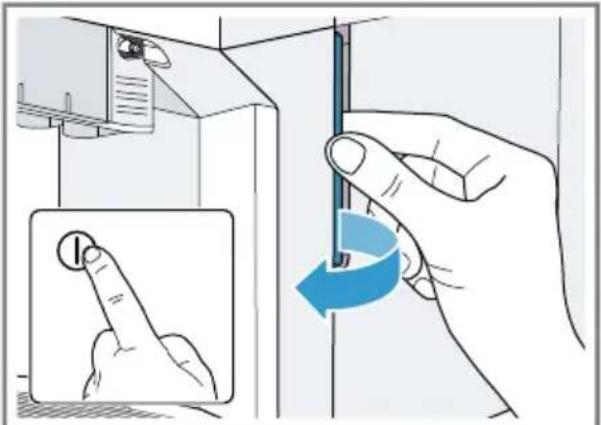
Press ☐ to switch the appliance off.
-
Open the door of the brewing chamber.
→ Fig. 15
- Remove the drip tray with the coffee dregs container.
→ Fig. 16
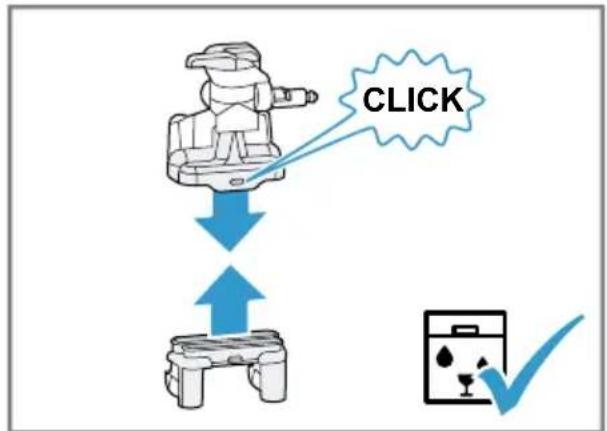
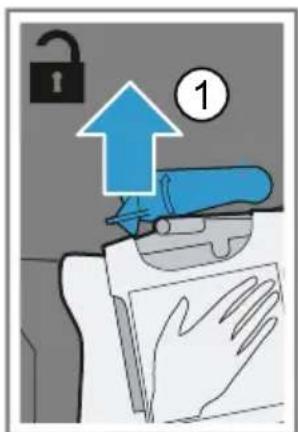
- Push the red lever upwards.
-
Hold the brewing unit by the handle and carefully pull forwards and out.
→ Fig. 17 -
Clean the brewing unit thoroughly under warm running water.
→ Fig. 18
-
Clean the appliance interior with a damp cloth and remove any coffee residues.
-
Leave the brewing unit and the appliance interior to dry.
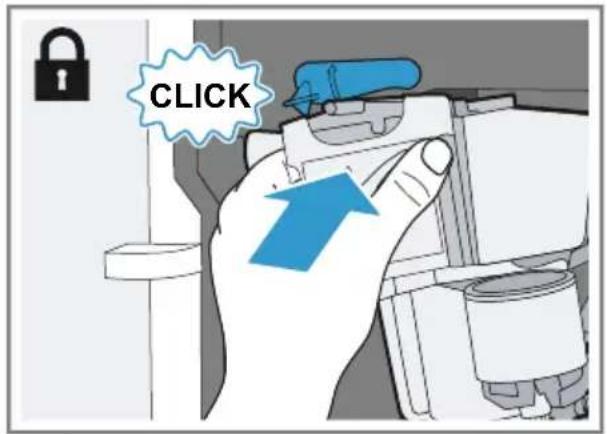
10.Hold the brewing unit by the handle.
11.Push the red lever upwards.
- Position the brewing unit under the lever and slide it back as far as it will go.
→ Fig. 19
√ The lever will click into place.
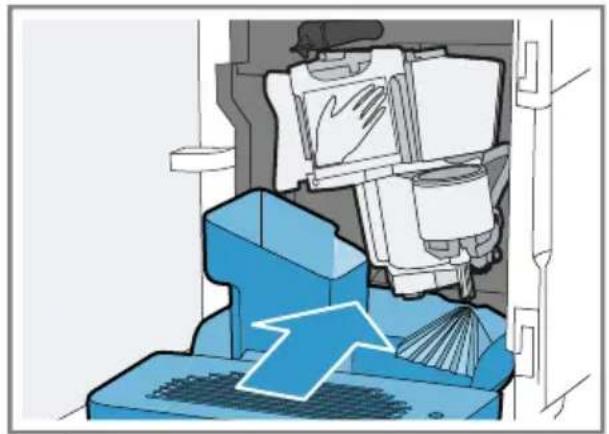
- Insert the drip tray with the coffee dregs container.
→Fig.20
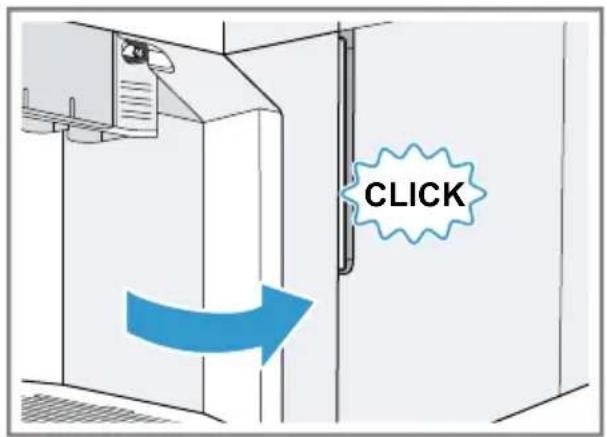
- Close the door.
→ Fig. 21
The door can only be closed if the brewing unit and drip tray are inserted correctly.
Service programmes
After certain time intervals, your appliance will recommend that you use the service programmes. Use the service programmes to clean your appliance thoroughly.
ATTENTION!
Improper cleaning and descaling or a delay in doing so may damage the appliance.
- Immediately perform the descaling process in accordance with the instructions.
- Do not put any descaling tablets or other products into the ground coffee compartment.
en Cleaning and servicing
Depending on the water hardness and use of the appliance, the display will show the following messages after prior notification:
■ "Please rinse milk system."
■ "Descaling necessary. Please press menu for 3 sec."
■ "Cleaning necessary. Please press menu for 3 sec."
■ "calc'nClean nec. Please press menu for 3 sec."
Notes
■ The display indicates the progress of the descaling or cleaning process.
■ If your appliance is not descaled in good time, the display will show the following message: "Descaling overdue. Appliance is locked. Please press menu for 3 sec.".
■ If your appliance has been locked, you can only operate it again once the descaling process has been carried out.
If you accidentally interrupt the service programme, you must reset it. → "Resetting service programmes", Page 28
Tips
■ If you use a water filter, this prolongs the time interval until a service programmes needs to be performed.
■ You can combine the cleaning and descaling programmes using the calc'nClean service programme. → "Using calc'nClean", Page 29
■ Clean your appliance with a soft, damp cloth immediately after a service programme to remove any descaling solution residues and prevent corrosion.
Resetting service programmes
Perform the following steps if a service programme is interrupted, e.g. due to a power failure.
- Empty the container and put the end of the suction pipe in the container.
- Rinse out the water tank.
- Fill the water tank with fresh, non-carbonated water up to the "max" marking.
- Press ok
√ The appliance will rinse itself for approx. 2 minutes.
- Empty and clean the drip tray.
- Insert the drip tray and close the door.
- Restart the service programme.
Using the milk system cleaning programme
Rinse the milk system with water, if necessary. The rinsing process takes approx. 1 minute.
- Press menu
- Use and to select "Cleaning and care" and press ok
- Use and to select "Milk system" and press ok
- To start the programme, press ok
√ The display will guide you through the programme.
- Place an empty glass under the outlet system and insert the end of the suction pipe in the glass.
- Press ok
√ The milk system will now clean itself automatically.
- Empty the glass and clean the suction pipe.
√ The program has ended and the appliance is ready for operation.
Tip: If you want to clean the milk system particularly thoroughly, clean it regularly by hand.
→ "Cleaning the milk system", Page 26
Using the descaling programme
Run the descaling programme when your appliance prompts you. The process takes approx. 30 minutes.
Requirement: The brewing unit is cleaned.
→ "Cleaning brewing unit", Page 27
- Press menu
- Use and to select "Cleaning and care" and press ok
- Use and to select "De-scale" and press ok
- To start the programme, press ok
√ The display will guide you through the programme.
5. Empty and insert the drip tray.
6. If there is a water filter, remove it.
7. Press ok
8. Empty the water tank.
9. Fill a container with 0.5 l lukewarm water.
10. Add a Siemens descaling tablet to the water and stir until the tablet is fully dissolved.
11. Pour the descaling solution into the water tank up to the calc mark and press ak
12. Place a container with a capacity of min. 0.5 l under the outlet system.
13. Place the end of the suction pipe in the container and press ok
√ The descaling programme will run for approx. 20 minutes.
- Rinse the water tank.
- Press ok
- If there is a water filter, insert the water filter.
→ "Inserting and activating the water filter", Page 21
- Press ak
- Fill the tank with fresh water up to the "max" mark.
19. Press ak
√ The descaling programme takes approx. 1 minute and rinses the appliance.
20. Empty and insert the drip tray.
21. Thoroughly clean the suction pipe of the milk system.
√ The program has ended and the appliance is ready for operation.
Using the cleaning programme
Run the cleaning programme when your appliance prompts you. The process takes approx. 9 minutes.
Requirement: The brewing unit is cleaned.
→ "Cleaning brewing unit", Page 27
- Press menu
- Use and to select "Cleaning and care" and press ok
- Use and to select "Clean" and press ok
- To start the programme, press ok
√ The display will guide you through the programme.
5. Empty and insert the drip tray.
6. Open the ground coffee compartment.
7. Place one Siemens cleaning tablet into the ground coffee compartment.
8. Close the ground coffee compartment and press ok
9. Place a container with a capacity of min. 0.5 l under the outlet system and press ok
√ The cleaning programme takes approx. 7 minutes.
- Empty and insert the drip tray.
√ The program has ended and the appliance is ready for operation.
Using calc'nClean
You can combine the cleaning and descaling programmes using the calc'nClean service programme. Run
en Cleaning and servicing
the calc'nClean programme when your appliance prompts you. The process takes approx. 43 minutes.
Requirement: The brewing unit is cleaned.
→ "Cleaning brewing unit", Page 27
- Press menu
- Use and to select "Cleaning and care" and press ok
- Use and to select "calc'nClean" and press ok
- To start the programme, press ok
√ The display will guide you through the programme.
5. Empty and insert the drip tray.
6. If there is a water filter, remove it.
7. Press ok
8. Empty the water tank.
9. Fill a container with 0.5 l lukewarm water.
10. Add a Siemens descaling tablet to the water and stir until the tablet is fully dissolved.
11. Pour the descaling solution into the water tank up to the calc mark and press ok
12. Place a container with a capacity of min. 0.5 l under the outlet system.
13. Place the end of the suction pipe in the container and press ok
√ The descaling programme will run for approx. 20 minutes.
- Rinse the water tank.
- Press ak
- If there is a water filter, insert the water filter. → "Inserting and activating the water filter", Page 21
- Press ok
-
Fill the tank with fresh water up to the "max" mark.
-
Press ak
√ The programme takes approx. 1 minute and rinses the appliance.
20. Empty and insert the drip tray.
21. Open the ground coffee compartment.
22. Place one Siemens cleaning tablet into the ground coffee compartment.
23. Close the ground coffee compartment and press ok
24. Place a container with a capacity of min. 0.5 l under the outlet system and press ok
√ The cleaning programme takes approx. 7 minutes.
25. Empty and insert the drip tray.
26. Thoroughly clean the suction pipe of the milk system.
√ The program has ended and the appliance is ready for operation.
Troubleshooting
You can rectify minor faults on your appliance yourself. Read the troubleshooting information before contacting after-sales service. This will avoid unnecessary costs.

WARNING
Risk of electric shock!
Improper repairs are dangerous.
- Repairs to the appliance should only be carried out by trained specialist staff.
▶ Only use genuine spare parts when repairing the appliance.
If the power cord of this appliance is damaged, it must be replaced by the manufacturer, the manufacturer's Customer Service or a similarly qualified person in order to prevent any risk.
Information on display panel
| Fault Cause troubleshooting | ||
| Display shows "Close" despite the fact that the door is closed. | Door is not properly closed. | ► Press the door firmly shut. |
| Appliance is too hot. 1. Disconnect the appliance from the mains.2. Wait 1 hour so the appliance can cool down. | ||
| Display shows "Please empty drip tray and reinsert." despite the fact that the drip tray is empty. | Appliance is switched off and does not detect emptying. | 1. Switch the appliance on, and remove the drip tray.2. Re-insert the drip tray. |
| Drip tray is soiled. | ► Clean the drip tray thoroughly. | |
| Display shows "Please refill water tank" despite the fact that the water tank is full. | Water tank is wrongly inserted. | ► Insert the water tank correctly. |
| Carbonated water is in the water tank. | ► Fill the water tank with fresh tap water. | |
| Float is stuck in the water tank. | 1. Remove the water tank.2. Clean the water tank thoroughly. | |
| New water filter was not rinsed as per instructions. | 1. Rinse the water filter according to the instructions.→ "Inserting and activating the water filter", Page 212. Place the water filter into operation. | |
| Air is in the water filter. | 1. Immerse the water filter in water with the opening facing upwards until no more air bubbles escape. | |
| Display shows "Please refill water tank" despite the fact that the water tank is full. | 2. Reinsert the filter.→ "Inserting and activating the water filter", Page 21 | |
| Water filter is old. | ► Insert a new water filter. | |
| Limescale deposits in the water tank are blocking the system. | 1. Clean the water tank thoroughly.2. Start the descaling programme.→ "Using the descaling programme", Page 29 | |
| Display shows "Please clean brewing unit, replace and close door.". | Brewing unit is soiled. | ► Clean the brewing unit.→ "Cleaning brewing unit", Page 27 |
| Mechanism of brewing unit is stiff. | ► Clean the brewing unit.→ "Cleaning brewing unit", Page 27 | |
| Too much ground coffee in the brewing unit. | ► Use no more than 2 level measuring spoons of ground coffee.→ "Cleaning brewing unit", Page 27 | |
| Display shows "Voltage (V) incorrect.". | Voltage in the house system is incorrect. | ► Only operate the appliance at 220 - 240 V. |
| Display shows "Please re-start appliance.". | Brewing unit is heavily soiled or cannot be removed. | ► Restart the appliance.► Clean the brewing unit.→ "Cleaning brewing unit", Page 27 |
| Appliance has a fault. 1. Pull out the mains plug and wait 10 seconds.2. Re-insert the mains plug. | ||
| Display very frequently shows "calc'nClean". | Decalcified water still contains small amounts of lime. | 1. Insert a new water filter.→ "Inserting and activating the water filter", Page 212. Set the corresponding water hardness.→ "Setting the water hardness", Page 16 |
| Incorrect or too little descaling agent used. | ► When descaling, only use suitable tablets. | |
| Service programme has not been carried out in its entirety. | ► Reset the service programme.→ "Resetting service programmes", Page 28 | |
Malfunctions
| Fault Cause troubleshooting | ||
| Appliance no longer re-sponds. | Appliance has a fault. 1. Pull out the mains plug and wait 10 seconds.2. Re-insert the mains plug. | |
| Appliance only dispenses water, not coffee. | Empty bean container is not detected by the appliance. | Pour in coffee beans. |
| Coffee shaft on brewing unit is blocked. | Clean the brewing unit.→ "Cleaning brewing unit", Page 27 | |
| Beans are too oily and are not falling into the grinder. | Gently tap the bean container.Change the coffee variety.Do not use oily beans.Clean the empty bean container with a damp cloth. | |
| Brewing unit is not inserted properly. | Slide the brewing unit right back. | |
| Appliance is not dispensing milk froth. | Milk system is soiled. | Clean the milk system in the dish-washer.→ "Cleaning the milk system", Page 26 |
| Milk tube not immersed in milk. | Use more milk.Check whether the milk tube is im-mersed in the milk. | |
| Heavy build-up of limescale in the appliance. | Descale the appliance.→ "Using the descaling pro-gramme", Page 29 | |
| No milk intake by the milk system. | The milk system is as-sembled incorrectly. | Assemble the milk system cor-rectly.→ "Cleaning the milk system", Page 26 |
| Milk tube not immersed in milk. | Use more milk.Check whether the milk tube is im-mersed in the milk. | |
| Milk froth is too cold. Milk is too cold. | Use lukewarm milk. | |
| Appliance is not dispensing hot water. | Milk system is soiled. | Clean the milk system in the dish-washer.→ "Cleaning the milk system", Page 26 |
| Appliance is not dispensing drinks. | Air is in the water filter. | 1. Immerse the water filter in water with the opening facing upwards until no more air bubbles escape.2. Reinsert the filter.→ "Inserting and activating the water filter", Page 21► Firmly press the water filter straight down into the tank connection. |
| Residues of limescale re-mover are blocking the water tank. | 1. Remove the water tank.2. Clean the water tank thoroughly. | |
| There is dripping water on the inner floor of the appliance. | Drip tray was removed too soon. | ► Wait a few seconds after the last drink was dispensed before removing the drip tray. |
| Brewing unit cannot be removed. | Brewing unit is not in the removal position. | ► Switch the appliance back on. |
| Appliance cannot be operated.Change displays. | Appliance is in demo mode. | 1. Remove the water tank and fill with fresh cold water.2. Reinsert the water tank. |
| Grinder won't start. | Appliance is too hot. | 1. Disconnect the appliance from the mains.2. Wait 1 hour so the appliance can cool down. |
| Grinder is not grinding any coffee beans despite full bean container. | Beans are too oily and are not falling into the grinder. | ► Gently tap the bean container.► Change the coffee variety.Do not use oily beans.► Clean the empty bean container with a damp cloth. |
Problem with results
| Fault Cause troubleshooting | ||
| Coffee or milk froth quality varies widely. | Build-up of limescale in the appliance. | ▸ Descale the appliance.→ "Using the descaling pro-gramme", Page 29 |
| Milk froth quality varies widely. | Milk froth quality depends on the type of milk or plant-based alternative used. | ▸ Optimise the result through the se-lection of the milk or vegetable-based drink type. |
| Coffee is not dispensed or has slowed to a trickle. Set quantity is not reached. | Grinding level is set too fine. | ► Set a coarser grinding level. → "Adjusting the grinding level", Page 21 |
| Heavy build-up of limescale in the appliance. | ► Descale the appliance. → "Using the descaling pro-gramme", Page 29 | |
| Air is in the water filter. | 1. Immerse the water filter in water with the opening facing upwards until no more air bubbles escape.2. Reinsert the filter. → "Inserting and activating the wa-ter filter", Page 21 | |
| Appliance is soiled. | ► Clean the brewing unit. → "Cleaning brewing unit", Page 27► Descale and clean the appliance. → "Using calc'nClean", Page 29 | |
| Coffee strength is set too high. | ► Reduce the strength of your coffee to e.g. "regular". → "Adjusting the coffee strength", Page 20 | |
| Coffee has no crema. Type of coffee is not optimal. | ► Use a coffee variety with a higher proportion of Robusta beans.► Use beans with a darker roast. | |
| Coffee is too acidic. Grinding level is set too coarse. | ► Adjust the grinder to a finer setting. → "Adjusting the grinding level", Page 21 | |
| Type of coffee is not optimal. | ► Use a coffee variety with a higher proportion of Robusta beans.► Use beans with a darker roast. | |
| Coffee is too bitter. Grinding level is set too fine. | ► Set a coarser grinding level. → "Adjusting the grinding level", Page 21 | |
| Coffee tastes burnt. Grinding level is set too fine. | ► Set a coarser grinding level.→ "Adjusting the grinding level",Page 21 | |
| Type of coffee is not optimal. ► Change the coffee variety. | ||
| Coffee temperature setting is too high. ► Set the coffee temperature lower.→ "Overview of the basic settings",Page 23 | ||
| Coffee grounds are not compact and are too wet. | The grinding level is not set optimally. | ► Adjust the grinder to a coarser or finer setting.→ "Adjusting the grinding level",Page 21 |
| Too little ground coffee. | ► Use 2 level measuring spoons of ground coffee. | |
| Beans are too oily. | ► Use a different type of bean. | |
Transportation, storage and disposal
You can find out here how to prepare your appliance for transportation and storage. You will also find out how to dispose of old appliances.
Activate frost protection
Protect your appliance from frost during transport and storage.
ATTENTION!
Residues of liquid in the appliance may damage it during transport or storage.
- Empty the pipe system before transport or storage.
Requirements
■ The appliance is ready to use.
■ The water tank has been filled.
-
Remove the milk container.
-
Clean the brewing unit. → "Cleaning brewing unit", Page 27
-
Place a large container under the outlet system.
-
Press repeatedly until the display shows "Milk froth".
-
Press ml repeatedly until the display shows 240 ml.
-
Press start stop
-
Wait until steam escapes from the appliance.
-
Remove the water tank.
√ The appliance drains itself automatically.
-
If the message "Please refill water tank" appears, ignore it.
-
Empty and clean the water tank and drip tray.
-
Insert the water tank and drip tray.
-
Switch the appliance off and disconnect it from the power supply.
Disposing of old appliance
Valuable raw materials can be re-used by recycling.
- Unplug the appliance from the mains.
- Cut through the power cord.
- Dispose of the appliance in an environmentally friendly manner.
This appliance is labelled in accordance with European Directive 2012/19/EU concerning used electrical and electronic appliances (waste electrical and electronic equipment - WEEE). The guideline determines the framework for the return and recycling of used appliances as applicable throughout the EU.
Customer Service
If you have any queries, are unable to rectify faults on the appliance yourself or if your appliance needs to be repaired, contact Customer Service. You can solve many problems yourself by consulting the information on troubleshooting in these instructions or on our website. If this is not the case, contact our after-sales service. We always find an appropriate solution.
With any warranty claims, we will make sure that your appliance is repaired by trained after-sales technicians using genuine spare parts, including after the manufacturer's warranty has expired.
Function-relevant genuine spare parts according to the corresponding Eco-design Order can be obtained from Customer Service for a period of at least 7 years from the date on which
your appliance was placed on the market within the European Economic Area.
Note: Under the terms of the manufacturer's warranty the use of Customer Service is free of charge.
Detailed information on the warranty period and terms of warranty in your country is available from our after-sales service, your retailer or on our website.
If you contact Customer Service, you will require the product number (E-Nr.) and the production number (FD) of your appliance.
The contact details for Customer Service can be found in the Customer Service directory at the end of the manual or on our website.
Product number (E-Nr.) and production number (FD)
You can find the product number (E-Nr.) and the production number (FD) on the appliance's rating plate.
Make a note of your appliance's details and the Customer Service telephone number to find them again quickly.
Warranty conditions
You can make warranty claims for your appliance under the following conditions.
The guarantee conditions for this appliance are as defined by our representative in the country in which it is sold. Details regarding these conditions can be obtained from the dealer from whom the appliance was purchased. The bill of sale or receipt must be produced when making any claim under the terms of this guarantee.
Technical specifications
Facts and figures for your appliance can be found here.
| Voltage 220-240 V ~ | |
| Frequency 50 Hz | |
| Connection rating 1500 W | |
| Maximum static pump pres-sure | 15 bar |
| Maximum capacity of water tank (without filter) | 1.7 l |
| Maximum capacity of bean container | 270 g |
| Length of the power cable 100 cm | |
| Appliance height 37.3 cm | |
| Appliance width 24.9 cm | |
| Appliance depth 42.8 cm | |
| Weight, empty 8-9 kg | |
| Type of grinder Ceramic | |
Table des matières
Sécurité...... 41
natural_image
Illustration of a kitchen appliance with cloud-shaped heat exchanger and grating (no text or symbols)Conseils
- "doux"
- "normal"
- "fort"
- "très fort"
- "Double Shot"
natural_image
Four symbolic illustrations: a rolled parchment, a rectangular block with X marks, a rolled parchment, and a textured rectangular block with X marks (no text or symbols present)Conseils
⚠ WAARSCHUWING – Verstikkingsgevaar!
⚠ WAARSCHUWING – Risico van brand!
⚠ WAARSCHUWING – Risico van verbranding!
⚠ WAARSCHUWING – Gevaar door magnetisme!
⚠ WAARSCHUWING – Gezondheidsrisico!
natural_image
Illustration of a kitchen appliance with two cloud-shaped items on top (no text or symbols)Tips
⚠ WAARSCHUWING Risico van verbranding!
natural_image
Four symbolic illustrations: a rolled-up document, a rectangular block with X marks, a rolled-up dough, and a textured surface (no text or symbols)Tips
natural_image
Illustration of a kitchen appliance with two cloud-shaped items on top (no text or symbols)Rady
natural_image
Four symbolic illustrations: a rolled-up document, a rectangular block with X marks, a rolled-up dough, and a textured food item (no text or symbols present)Rady
natural_image
Illustration of a kitchen appliance with cloud-shaped appliances and grilles (no text or symbols)Rady
natural_image
Four hand-drawn icons showing different types of household items: a roll of cheese, a block of cheese, a rolled-up cheese, and a woven basket (no text or symbols)Rady
natural_image
Illustration of a kitchen appliance with cloud-shaped heat exchanger and grating (no text or symbols)Советы
natural_image
Four symbolic illustrations: a rolled document, a rectangular block, a rolled paper, and a textured surface with blue X marks (no text or symbols present)Советы
natural_image
Illustration of a kitchen appliance with two cloud-shaped items on top (no text or symbols)Tipps
natural_image
Four symbolic illustrations: a rolled document, a block with X marks, a rolled cloth, and a textured pattern (no text or symbols)Tipps
Central Service Contacts
AE United Arab Emirates, إِمْلَعْرِابِيُ المَتَّحَدَة
BSH Home Appliances FZE
Round About 13, Plot Nr MO-0532A
Jebel Ali Free Zone - Dubai
Tel.: 04 881 4401*
mailto:service.uae@bshg.com
www.siemens-home.bsh-group.com/me
*Sun-Thu 8am to 5 pm (exclude public holidays)
AM AM Armenia, Zujwumufi
ZIG ZAG LLC
Charenci str. 25
Yerevan 375025
Tel.: 010 55 60 10
mailto:service@zigzag.am
www.zigzag.am
www.siemens-home.bsh-group.at
Gate 1, 1555 Centre Road
Clayton, Victoria 3168
Tel.: 1300 167 425*
mailto:aftersales.au@bshg.com
www.siemens-home.bsh-group.com/au
*Mo-Fr: 24 hours
AZ AZ Azärbaycan Respublikası, Azerbaijan
Baku Service Company MMC
Azadliq Pr. 116
Baku
Tel.: 12 530 90 35
mailto:info@ser-cen.az
www.ser-cen.az
AZ Azärbaycan Respublikası, Azerbaijan
Yurd Service MMC
50, Bakikhanov Str.
Baku, AZ1007
Tel.: 12 480 33 01
mailto:info-service@yurd.az
www.yurd.az
www.siemens-home.bsh-group.com/be
Salman Highway, Tubli-701; Bahrain
Manama
Tel.: 01 753 11 11*
mailto:info@bahraingas.bh
*Sun-Thu 8am to 6pm (exclude public
holidays)
www.siemens-home.bsh-group.com/ch
CN China, 中国
BSH Home Appliances Service Jiangsu
Co. Ltd.
19F, Jinling Asia Pacific Tower, No.2 Han-
zhong Road, Gulou District
210005 Nanjing, Jiangsu Province
Service Tel.: 400 8899 999*
mailto:careline.china@bshg.com
www.siemens-home.bsh-group.cn
*phone rate depends on the network used
CY Cyprus, Kúnpoc
BSH Ikiakes Syskeves-Service
39, Arh. Makaariou III Str.
2407 Egomi/Nikosia (Lefkosia)
Tel.: 777 78 007
mailto:EGO-CYCustomerSer-
vice@bshg.com
CYN
Turkish Rep. Of North Cyprus
Argas Limited Company
37 Osman Paşa Cad. K. Çiltlik
Lefkoşa
Tel.: 0228 40 70
mailto:argas.teknik@yar-group.com
Turkish Rep. Of North Cyprus
Semson Ticaret Sti. Ltd
Bedrettin Demirel Cad. no 17
Girne
Tel.: 0816 04 94
mailto:m.defterali@ercantangroup.com
www.siemens-home.bsh-group.com/dk
GB Great Britain BSH Home Appliances Ltd. Grand Union House, Old Wolverton Road, Wolverton Milton Keynes MK12 5PT To arrange an engineer visit, to order spare parts and accessories or for product advice please visit www.siemens-home.bsh-group.com/uk Or call Tel.: 0344 892 8999* *Calls are charged at the basic rate, please check with your telephone service provider for exact charges
GE Georgia, U5J6030mm Elit Service Ltd. Vake-Saburtalo district, Intersection of Al. Kazbegi ave. and Kavtaradze Str. 0186, Kavtaradze str. 1 Tbilisi Tel.: 32 300 020 mailto:info@es.ge
GR Greece, Ελλάς BSH Ikiakes Siskeves A.B.E. Central Branch Service 17 km E.O. Athinon-Lamias & Potamou 20 14564 Kifisia Τηλέφωνο: 210 4277 600 Τηλέφωνο: 210 4277 701 mailto:nkf-CustomerService@bshg.com www.siemens-home.bsh-group.com/gr
HK Hong Kong, 香港 BSH Home Appliances Limited 香港新界荃灣青山公路388號中染 大廈23樓07室 Unit 07, 23/F, CDW Building, 388 Castle Peak Road, Tsuen Wan, New Territories, Hong Kong Tel.: 2565 6151 (HK) Toll free 0800 030 (Macao) mailto:siemens.hk.service@bshg.com www.siemens-home.bsh-group.com.hk
IE Republic of Ireland BSH Home Appliances Ltd. M50 Business Park, Ballymount Road Upper, Walkinstown Dublin 12 To arrange an engineer visit, to order spare parts and accessories or for product advice please call Tel.: 01450 2655* www.siemens-home.bsh-group.com/ie *Calls are charged at the basic rate, please check with your telephone service provider for exact charges
IL Israel C/S/B/ Home Appliance Ltd. 1, Hamasger St., North Industrial Park Lod, 7129801 Tel.: 08 9777 222 mailto:csb-serv@csb-ltd.co.il www.siemens-home.bsh-group.com/il
IN India, Bhārat, भारत BSH Household Appliances Mfg. Pvt. Ltd. Arena House, Main Bldg, 2nd Floor, Plot No. 103, Road No. 12, MIDC, Andheri East Mumbai 400093 Toll Free 1800 209 1850* www.siemens-home.bsh-group.com/in *Mo-Sa 8am to 8pm (exclude public holidays)
IS Iceland Smith & Norland hf. Noatuni 4 105 Reykjavik Tel.: 0520 3000 www.sminor.is
IT Italia, Italy BSH Elettrodomestici S.p.A. Via. M. Nizzoli 1 20147 Milano (MI) Tel. 02 412 678 200 mailto:info.it@siemens-home.bsh-group.com www.siemens-home.bsh-group.com/it
KG Kyrgyzstan, Кыргыз Республикасы OcOO Alfa Systems Jibek Jolu str. 40 Bishkek Tel.: 0702 98 53 53 mailto:alfas-service@mail.ru
LU Luxembourg BSH électroménagers S.A. 13-15, ZI Breedeweues 1259 Senningerberg Tel.: 26349 821 Reparaturen: lux-repair@bshg.com Ersatzteile: lux-spare@bshg.com www.siemens-home.bsh-group.com/lu
MT Malta Aplan Limited The Atrium The Atrium Mriehel by Pass BKR3000 Birkirkara Tel.: 025 495 122 mailto:services@theatrium.com.mt
NL Nederland, Netherlands BSH Huishoudapparaten B.V. Taurusavenue 36 2132 LS Hoofddorp Storingsmelding: Tel.: 088 424 4020 Onderdelenverkoop: Tel.: 088 424 4020 mailto:siemens-contactcenter@bshg.com mailto:siemens-onderdelen@bshg.com www.siemens-home.bsh-group.nl
NO Norge, Norway BSH Husholdningsapparater A/S Grensesvingen 9 0661 Oslo Tel.: 22 66 05 73 Tel.: 22 66 06 00 mailto:Siemens-Service-NO@bshg.com www.siemens-home.bsh-group.com/no
BSH group is a Trademark Licensee of Siemens AG. Manufacturer's Service for Siemens Home Appliances.
BSH Hausgeräte GmbH
Carl-Wery-Straße 34
81739 München
GERMANY
www.siemens-home.bsh-group.com
Manufactured by BSH Hausgeräte GmbH under Trademark License of Siemens AG

- Table of contents
- Safety.... 8
- Environmental protection and saving energy.... 12
- Installation and connection...... 12
- Familiarising yourself with your appliance.... 13
- Drinks overview 14
- Accessories.... 14
- Before using for the first time ..... 15
- Basic operation ...... 17
- Childproof lock.... 22
- Cup heater 1 22
- Basic settings.... 23
- Cleaning and servicing.... 24
- Troubleshooting.... 31
- Transportation, storage and disposal 37
- Customer Service.... 37
- Technical specifications.... 38
- Safety
- General information
- Intended use
- Restriction on user group
- Safety information
- WARNING – Risk of suffocation!
- WARNING – Risk of electric shock!
- en Safety
- ⚠ WARNING – Risk of fire!
- ⚠ WARNING – Risk of burns!
- ⚠ WARNING – Risk of scalding!
- ⚠ WARNING – Risk of injury!
- ⚠ WARNING – Danger: Magnetism!
- ⚠ WARNING – Risk of harm to health!
- Environmental protection and saving energy
- Disposing of packaging
- Tips for saving energy
- Installation and connection
- Scope of delivery
- Installing and connecting the appliance
- ATTENTION!
- Familiarising yourself with your appliance
- Appliance
- Controls
- Display
- Drinks overview
- Accessories
- Before using for the first time
- Perform the initial start-up
- Fill the water tank
- Fill coffee bean container
- Setting the language
- en Before using for the first time
- Setting the water hardness
- Notes
- Tips
- Basic operation
- Switching the appliance on or off
- Dispensing drinks
- WARNING Risk of scalding
- Dispensing a coffee drink made from fresh beans
- en Basic operation
- Press start stop
- Dispensing a coffee drink made from ground coffee
- Note
- Dispensing drinks with milk froth
- WARNING
- Risk of burns!
- Dispensing coffee drinks with milk froth
- Requirements
- Dispensing special drinks
- Dispensing milk froth
- Dispensing hot water
- Drink settings
- Adjusting the coffee strength
- Selecting ground coffee
- AromaDouble Shot
- Adjusting the amount
- Dispensing two cups at once
- Press
- Press
- Grinder
- Adjusting the grinding level
- Risk of injury!
- Grinding level Setting
- Water filter
- Inserting and activating the water filter
- en Childproof lock
- Childproof lock
- Activating the childproof lock
- Deactivating the childproof lock
- Cup heater 1
- WARNING Risk of burns!
- Basic settings
- Changing the basic settings
- Cleaning and servicing
- Dishwasher-safe components
- Cleaning agent
- Risk of serious harm to health!
- Cleaning the appliance
- Risk of electric shock!
- Cleaning the drip tray and coffee dregs container
- en Cleaning and servicing
- Tip
- Cleaning the ground coffee compartment
- Cleaning the milk system
- Cleaning brewing unit
- Service programmes
- Resetting service programmes
- Using the milk system cleaning programme
- Using the descaling programme
- Requirement: The brewing unit is cleaned.
- Press ak
- Using the cleaning programme
- Using calc'nClean
- Troubleshooting
- Malfunctions
- Transportation, storage and disposal
- Activate frost protection
- Disposing of old appliance
- Customer Service
- Product number (E-Nr.) and production number (FD)
- Warranty conditions
- Table des matières
- Sécurité...... 41
- Conseils
- ⚠ WAARSCHUWING – Verstikkingsgevaar!
- ⚠ WAARSCHUWING – Risico van brand!
- ⚠ WAARSCHUWING – Risico van verbranding!
- ⚠ WAARSCHUWING – Gevaar door magnetisme!
- ⚠ WAARSCHUWING – Gezondheidsrisico!
- ⚠ WAARSCHUWING Risico van verbranding!
- Rady
- Советы
- Tipps
- Central Service Contacts
Brand : SIEMENS
Model : TP503R04
Category : Coffee maker