HD 511 EX Plus Classic - Pressure washer Kärcher - Free user manual and instructions
Find the device manual for free HD 511 EX Plus Classic Kärcher in PDF.
| Product type | High pressure cleaner |
| Brand | Kärcher |
| Model | HD 511 EX Plus Classic |
| Dimensions (L × W × H) | 350 × 330 × 880 mm |
| Weight (without accessories) | 21 kg |
| Supply voltage | 220-240 V / 50 Hz |
| Connected load | 2.2 kW |
| Protection type | IPX5 |
| Working pressure | 110 bar (11 MPa) |
| Maximum pressure | 160 bar (16 MPa) |
| Water flow rate | 500 l/h (8.4 l/min) |
| Max. feed temperature | 40 °C |
| Max. feed pressure | 10 bar (1.0 MPa) |
| Min. feed flow rate | 720 l/h (12 l/min) |
| Standard nozzle | Size 036 |
| High pressure hose length | Not specified in manual, standard length approx. 10 m (estimate) |
| Sound pressure level (LpA) | 76 dB(A) |
| Sound power level (LWA) | 91 dB(A) |
| Hand-arm vibration | 2.27 m/s² (uncertainty K=1.5 m/s²) |
| Supplied equipment | High pressure gun, spray lance, high pressure nozzle, high pressure hose, water filter, crank (for hose reel), rotary lance (EX Plus), push handle |
| Detergent cleaning function | Possible with optional foam lance |
| Safety devices | Safety lever on gun, overflow valve, safety lock |
| Maintenance | Weekly cleaning of water filter, oil change every 500 h |
| Warranty | According to country conditions, material or manufacturing defects |
Frequently Asked Questions - HD 511 EX Plus Classic Kärcher
User questions about HD 511 EX Plus Classic Kärcher
0 question about this device. Answer the ones you know or ask your own.
Ask a new question about this device
Download the instructions for your Pressure washer in PDF format for free! Find your manual HD 511 EX Plus Classic - Kärcher and take your electronic device back in hand. On this page are published all the documents necessary for the use of your device. HD 511 EX Plus Classic by Kärcher.
USER MANUAL HD 511 EX Plus Classic Kärcher
natural_image
Line drawing of a mechanical device with a cylindrical handle and wheels (no text or symbols)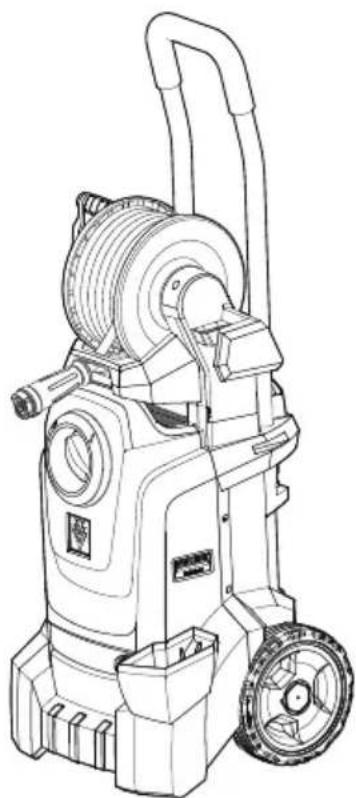
natural_image
Line drawing of a manual pressure tool with coiled spring and wheels (no text or symbols)Deutsch 6
English 11
Français 17
Italiano 22
Español 28
Português 33
Nederlands 39
Türkçe 44
Svenska 49
Suomi 55
Norsk 60
Dansk 65
Eesti 70
Latviešu 75
Lietuviškai 80
Polski 86
Ελληνικά 129
Magyar 91
Čeština 97
Slovenčina 102
Slovenščina 108
Românește 113
Hrvatski 119
Srpski 124
Русский 135
Українська 141
Български 147
Việt 153
Bahasa Melayu 158
Indonesia 164
natural_image
Illustration of an open book with a black arrow indicating rotation (no text or symbols)A
B
natural_image
Technical line drawings of two different handheld devices labeled a. and b., showing internal components and assembly lines (no text or symbols beyond labels)
natural_image
Mechanical assembly diagram showing a pulley system with a mechanical clamp and directional arrow (no text or labels)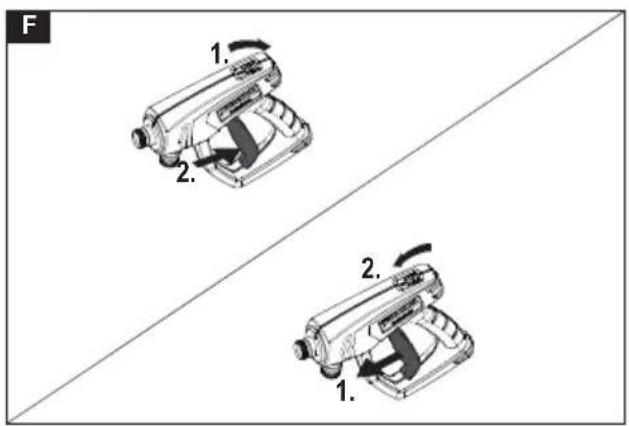
natural_image
Illustration of a cylindrical container pouring liquid into a base (no text or symbols)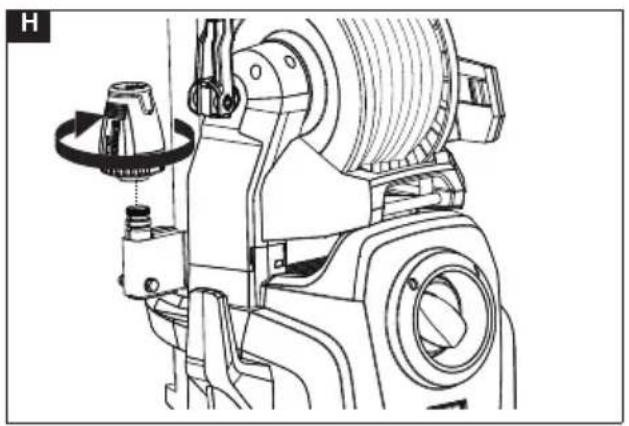
natural_image
Technical line drawing of a mechanical device with gears and housing (no text or symbols)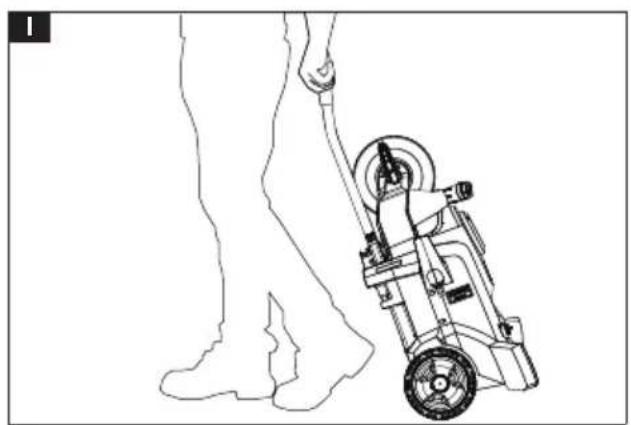
natural_image
Line drawing of a person pushing a small wheeled cart (no text or symbols)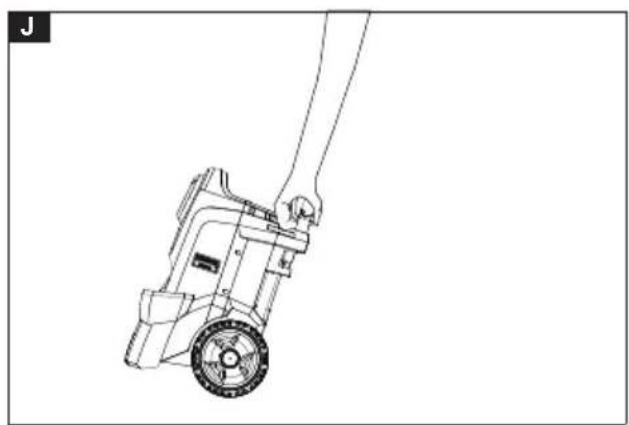
natural_image
Line drawing of a mechanical device with a hand operating it, no text or symbols presentInhalt
Chairman of the Board of Management

S. Reiser
Director Regulatory Affairs & Certification
71364 Winnenden (Germany)
Tel.: +49 7195 14-0
Fax: +49 7195 14-2212
Winnenden, 01.01.2019
Contents
General notes.... 11
Intended use.... 11
Environmental protection.... 12
Accessories and spare parts 12
Scope of delivery.... 12
Safety instructions 12
Safety devices 12
Symbols on the device 12
Description of the device.... 12
Initial startup.... 13
Operation 13
Transportation 14
Storage.... 14
Care and service.... 14
Troubleshooting guide.... 15
Warranty.... 15
Technical data 15
EU Declaration of Conformity.... 16
General notes
Read these original operating instructions and the enclosed safety instructions before using the device for the first
time. Proceed accordingly.
Keep both books for future reference or for future owners.
Intended use
The high-pressure cleaner with high-pressure jet is intended only for the cleaning of objects, including:
- Machines, vehicles, structures, tools, facades, terraces and garden equipment.
Detergent can be added with optional accessories. We recommend using a dirt blaster as a special accessory for stubborn soiling.
Water supply limit values
ATTENTION
Dirty water
Premature wear and tear or deposits in the device Supply the device using only clean water, or recycled water that does not exceed the specified limit values.
The following limit values apply to the water supply:
- pH value: 6.5-9.5
- Electrical conductivity: Conductivity of fresh water + 1200 S/cm, maximum conductivity 2000 S/cm
- Settleable particles (sample volume 1 l, settling time 30 minutes): < 0.5 mg/l
- Filterable particles: < 50 mg/l, no abrasive substances
• Hydrocarbons: < 20 mg/l - Chloride: < 300 mg/l
- Sulphate: < 240 mg/l
• Calcium: < 200 mg/l - Total hardness: < 28^ dH, < 50^ TH, < 500ppm (mg CaCO_3/I )
- Iron: < 0.5 mg/l
- Manganese: < 0.05 mg/l
• Copper: < 2 mg/l
• Active chloride: < 0.3 mg/l
• Free of unpleasant odours
Environmental protection

The packing materials can be recycled. Please dispose of packaging in accordance with the environmental regulations.

Electrical and electronic devices contain valuable, recyclable materials and often components such as batteries, rechargeable batteries or oil, which - if handled or disposed of incorrectly - can pose a potential danger to human health and the environment. However, these components are required for the correct operation of the device. Devices marked by this symbol are not allowed to be disposed of together with the household rubbish.
Notes on the content materials (REACH)
Current information on content materials can be found at: www.kaercher.de/REACH
Accessories and spare parts
Only use original accessories and original spare parts. They ensure that the appliance will run fault-free and safely.
Information on accessories and spare parts can be found at www.kaercher.com.
Scope of delivery
Check the contents for completeness when unpacking. If any accessories are missing or in the event of any shipping damage, please notify your dealer.
Safety instructions
- It is essential that you read the safety instructions 5.951-949.0 before initial start-up.
- Observe the national regulations for liquid jet cleaners.
- Observe the national accident prevention regulations. Liquid jet cleaners must be tested regularly. The test result must be recorded in writing.
- Do not modify the device or accessories.
Safety devices
△CAUTION
Missing or modified safety devices
Safety devices are provided for your own protection. Never modify or bypass safety devices.
Safety lever
The safety lever on the high-pressure gun prevents the device from being switched on inadvertently.
Overflow valve
If the high-pressure gun is closed, the overflow valve opens and the entire water volume will flow back to the pump suction side.
The overflow valve is set by the manufacturer and sealed. Setting shall only be carried out by Customer Service.
Symbols on the device
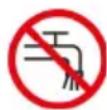
Do not aim the high-pressure jet at persons, animals, live electrical equipment or the device itself.
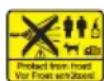
Protect the device against frost.
According to applicable regulations, the device must never be used with the drinking water network without a system separator. Ensure that the connection to your house water system, with which the high-pressure cleaner is operated, is equipped with a system separator according to EN 12729 type BA. Water that has flowed through a system separator is classified as undrinkable. Always connect the system separator to the water inlet and never directly to the device.

⚠ WARNING
The high nozzle outlet speed of the high-pressure water jet results in a high noise level that can cause discomfort or hearing damage (e.g. tinnitus) to persons in the immediate vicinity. A continuously high noise level can result in deafness.
- Wear the prescribed personal protective equipment.
- High noise levels can impair vocal communication and impair or prevent your ability to perceive acoustic warning signals. Never work alone. A second person must be present outside the work area.
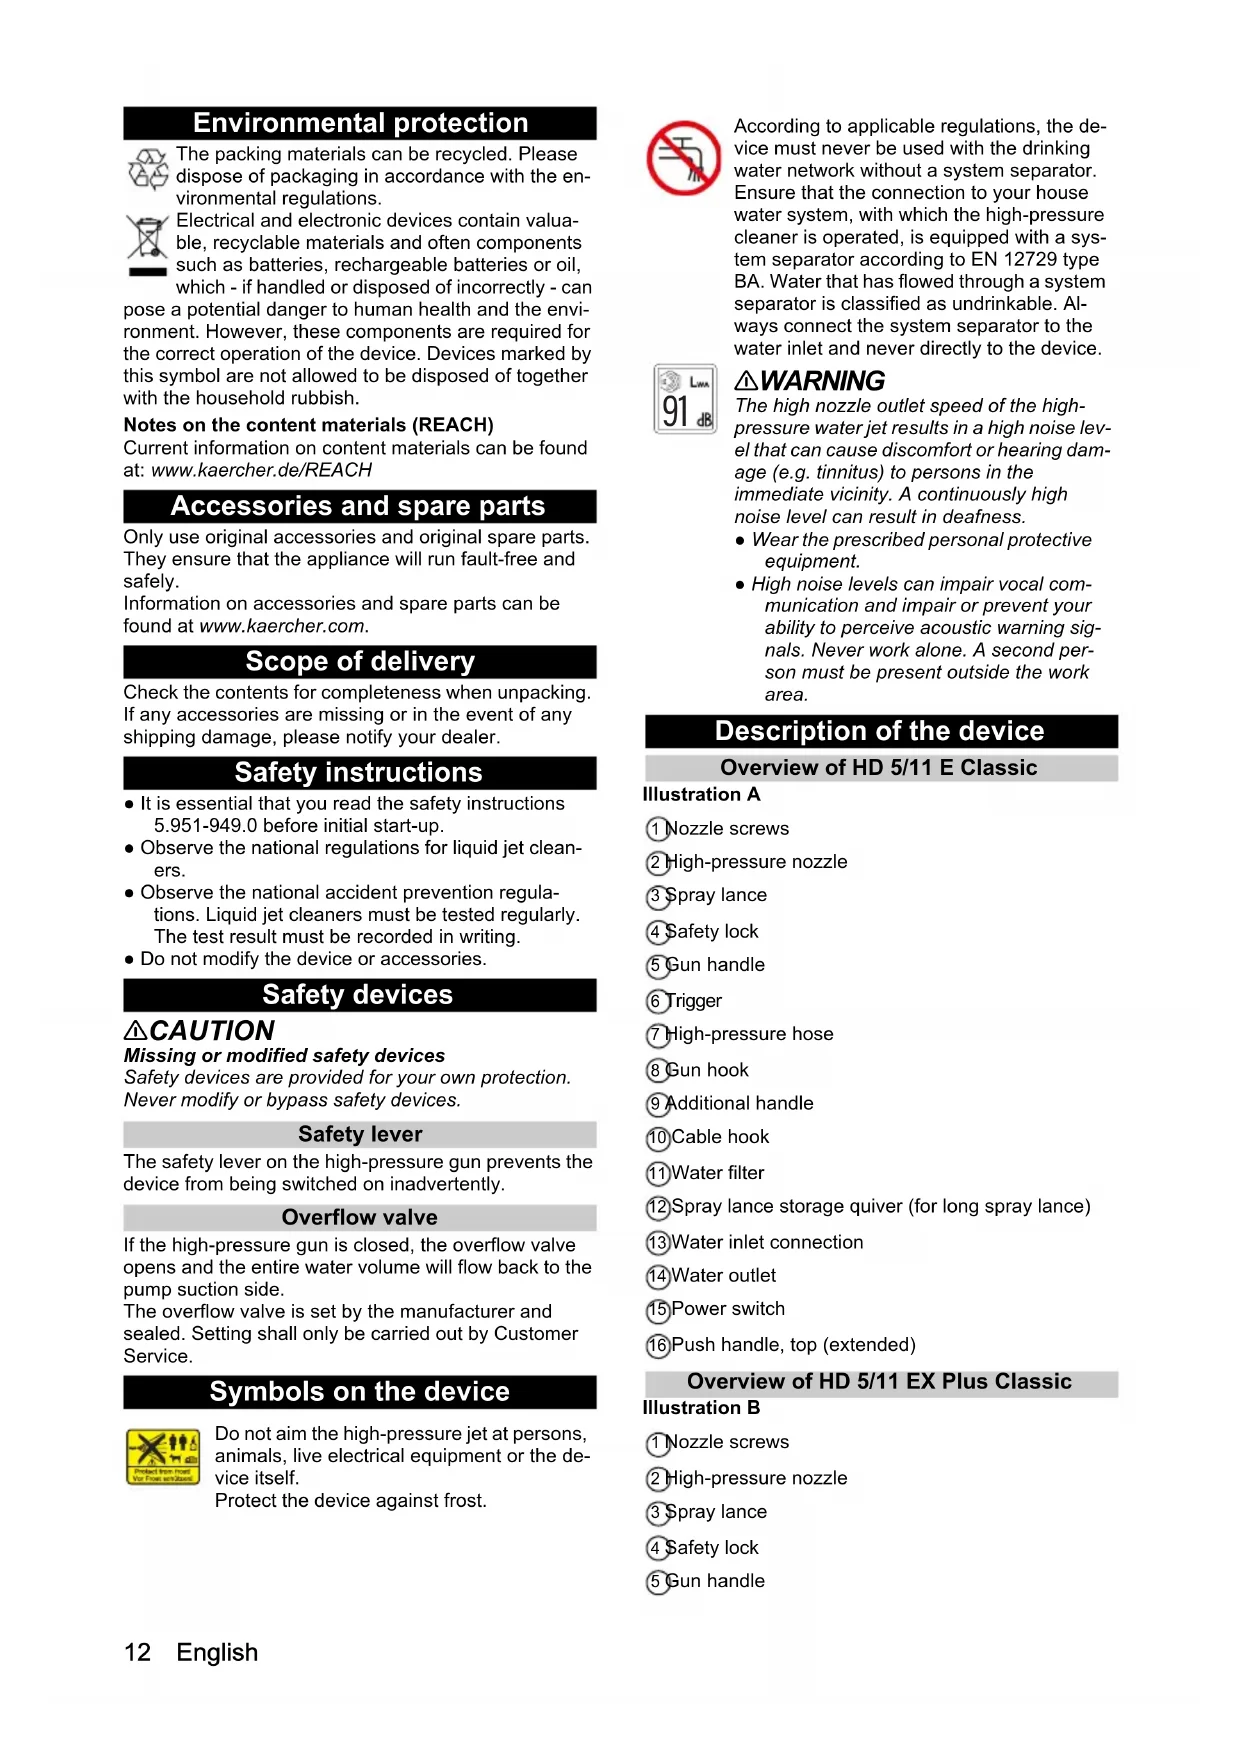
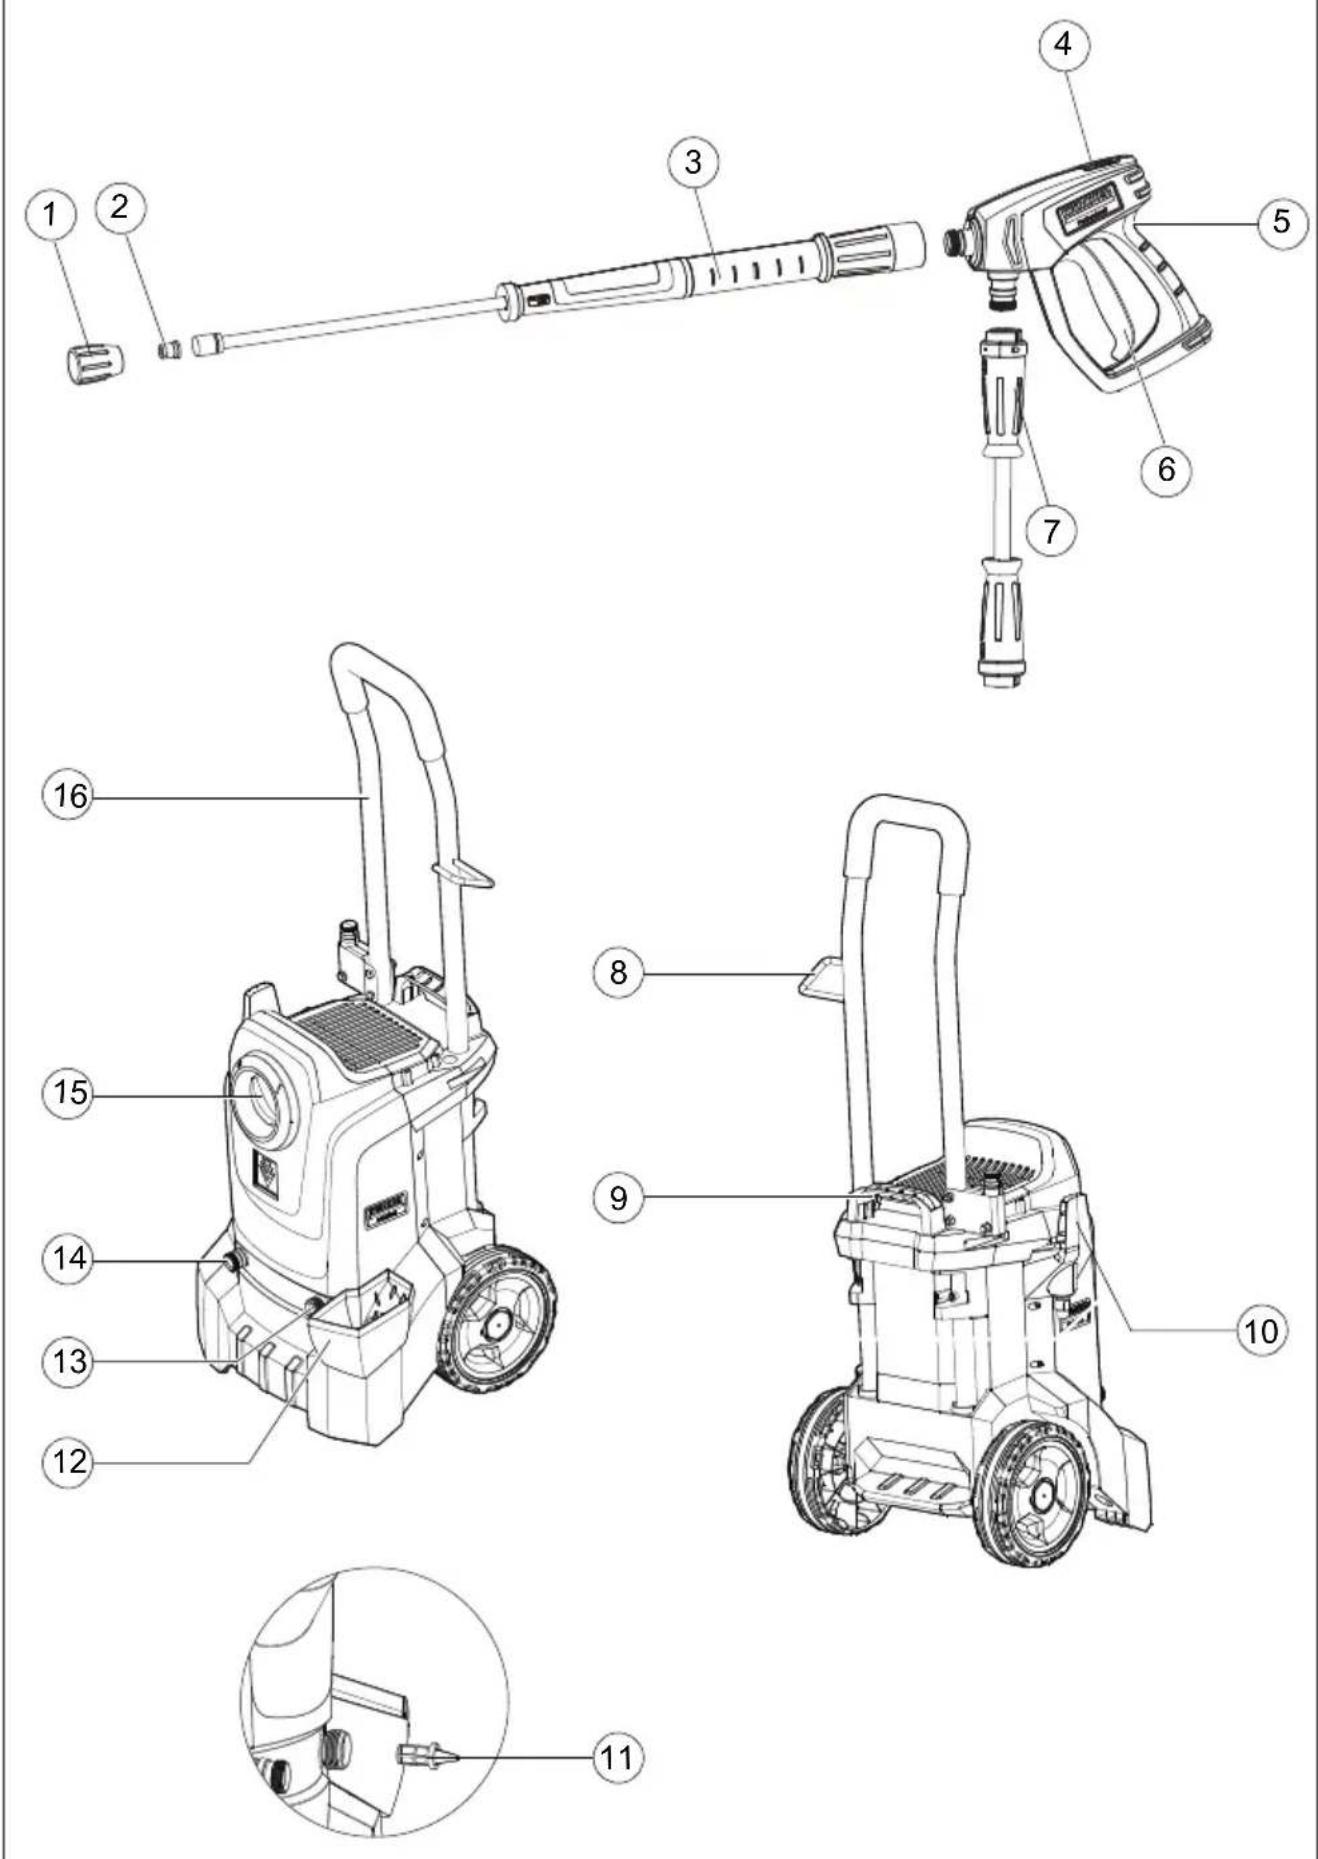
Description of the device
Overview of HD 5/11 E Classic
Illustration A
① Nozzle screws
② High-pressure nozzle
③ Spray lance
④ Safety lock
⑤ Gun handle
⑥ Trigger
⑦ High-pressure hose
⑧ Gun hook
⑨ Additional handle
⑩ Cable hook
⑪ Water filter
⑫ Spray lance storage quiver (for long spray lance)
⑬Water inlet connection
⑭Water outlet
⑮Power switch
⑯Push handle, top (extended)
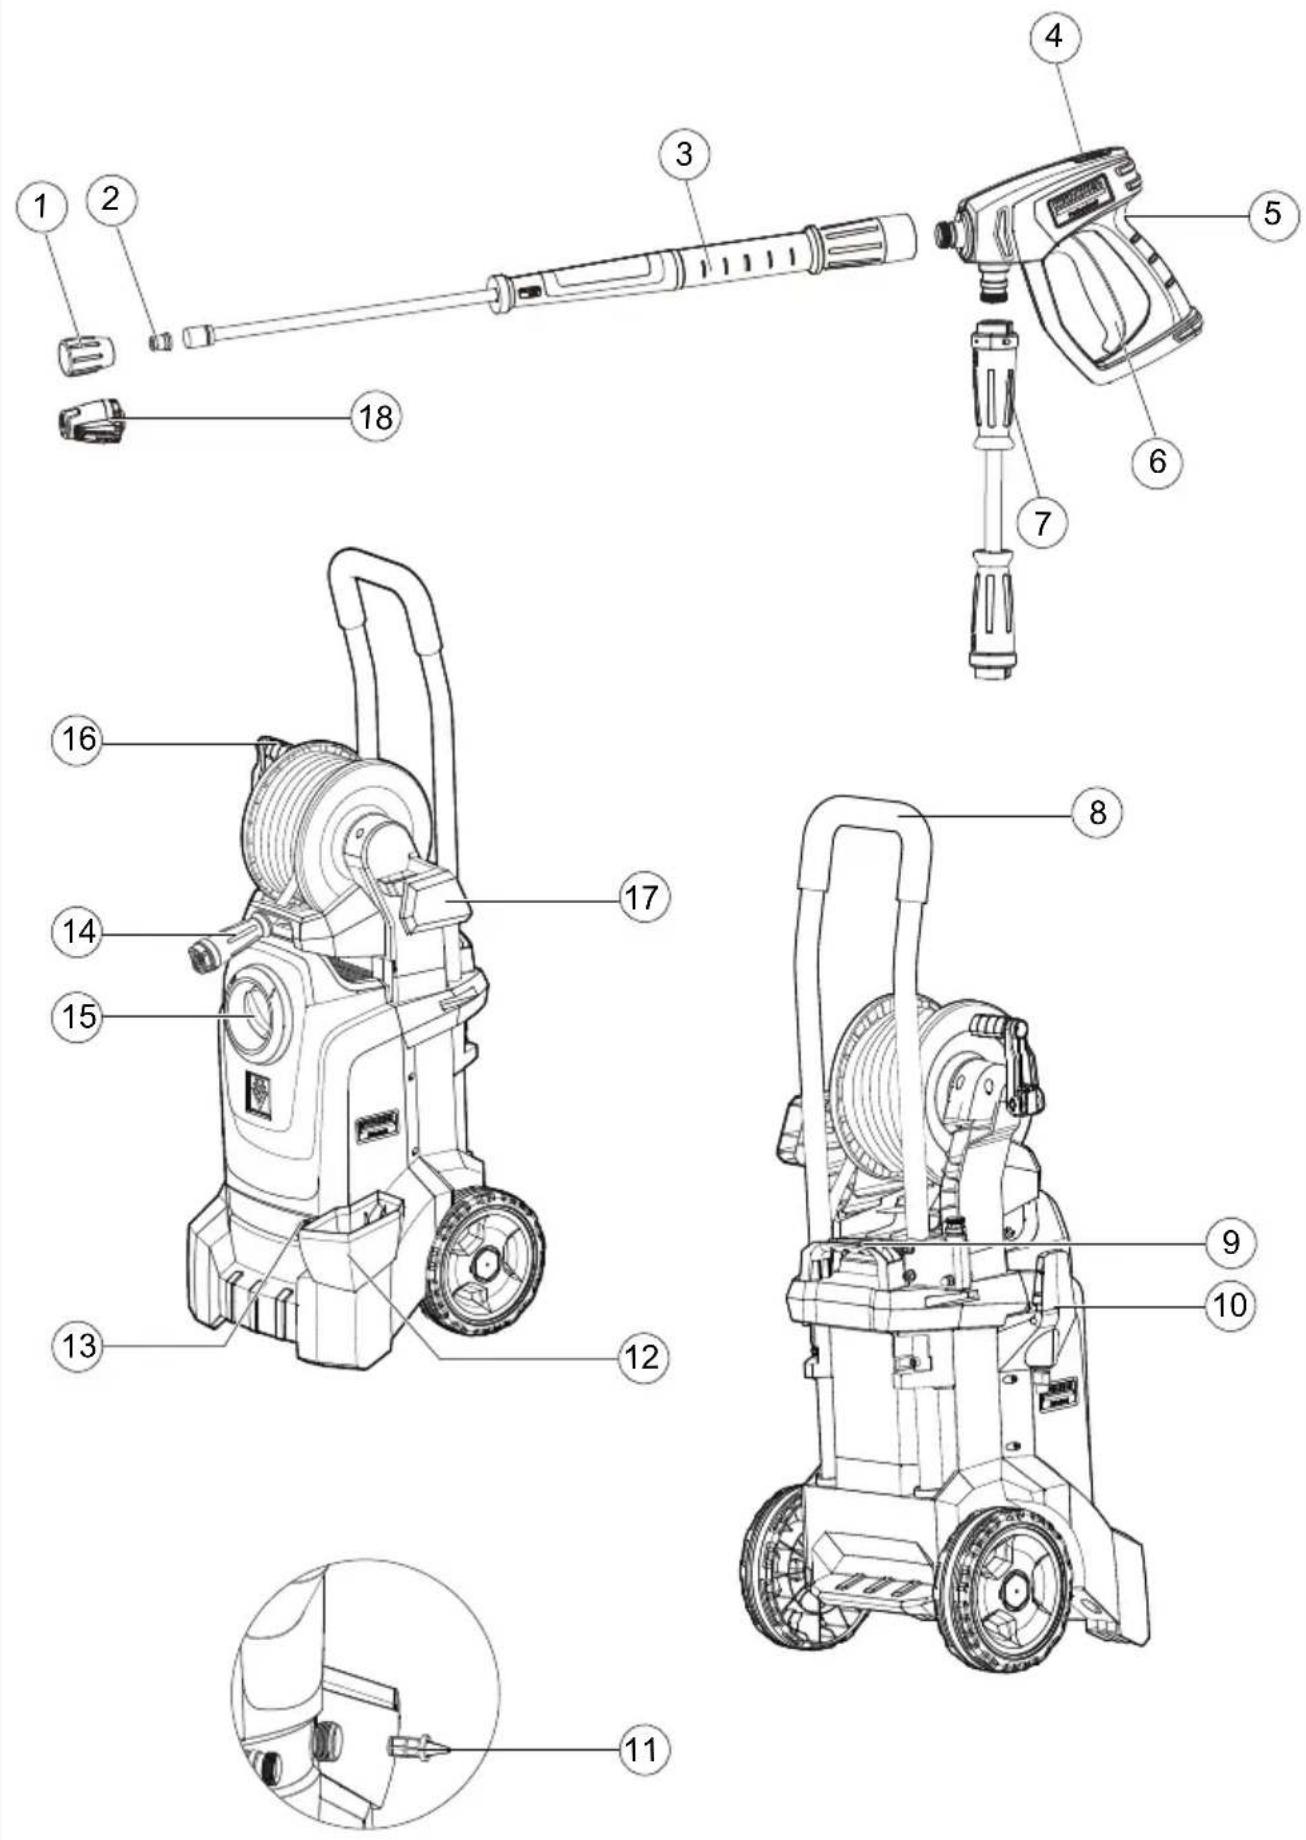
Overview of HD 5/11 EX Plus Classic
Illustration B
① Nozzle screws
② High-pressure nozzle
③ Spray lance
④ Safety lock
⑤ Gun handle
⑥Trigger
⑦ High-pressure hose
⑧ Push handle, top (extended)
⑨ Additional handle
⑩ Cable hook
⑪ Water filter
⑫ Spray lance storage quiver (for long spray lance)
⑬ Water inlet connection
⑭ Water outlet
15 Power switch
⑯Hand crank
⑰ Spray lance holder
⑱ Dirt Blaster
Initial startup
⚠️DANGER
Danger of injury from electric shock
Only allow authorised technical specialists to install the water supply, electrical connections and high-pressure network.
Colour coding
- Control elements for the cleaning process are yellow.
Unpacking
- Check the contents of the package when unpacking.
- Notify the dealer immediately in the case of shipping damage.
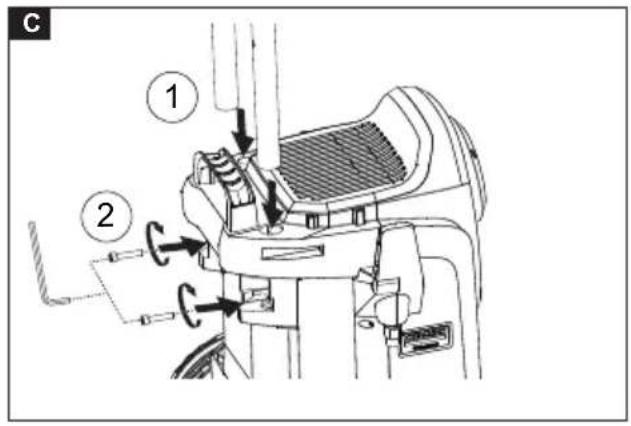
Installing the accessories
- Insert the push handle into the machine and insert the screws into the handle. Illustration C
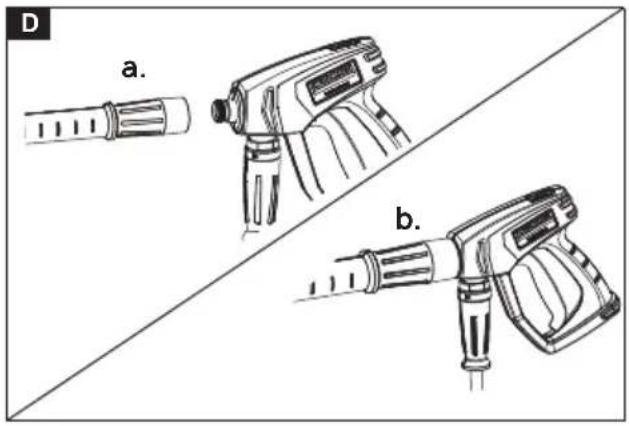
- Install the nozzle with the nozzle screws at the spray lance.
- Connect the spray lance to the high-pressure gun. Illustration D
- Screw the high-pressure hose to the high-pressure gun.
- Only HD 5/11 E Classic: Fasten the high-pressure hose to the water outlet.
- Only HD 5/11 EX Plus Classic: Push the hand crank into the hole of the hose reel and make sure the hand crank is secure.
Illustration E
Electrical connection
⚠️DANGER
Risk of injury from electric shock
Use a plug to connect the device to the mains grid. Permanent connection to the mains grid is prohibited. The plug is used for disconnection from the mains.
See the type plate or technical data for the connection values.
- Unwind the mains cable and place it on the ground.
- Plug the mains plug into the socket.
Water connection
Connection to a water line
⚠ WARNING
Health risk from return flow of contaminated water into the drinking water network.
Observe the regulations of your water supply company.
- Check the feed pressure, input temperature and input amount of the water supply. See Chapter Technical data for the requirements.
- Connect the system separator and water connection of the device with a hose (minimum length 7.5 m, minimum diameter 3/4").
The supply hose is not included in the scope of delivery.
- Open the water inlet.
Venting the device
- Open the water inlet.
- Remove the high-pressure nozzle.
- Switch on the device.
- Allow the device to run until the escaping water is free of air bubbles.
- Switch off the device.
- Fit the high-pressure nozzle.
Operation
⚠️DANGER
Risk of explosion!
Do not spray flammable liquids.
If the device is used in hazardous areas (e.g. filling stations), the corresponding safety regulations must be observed.
Opening / closing the high-pressure gun
- Push back the safety lock and actuate the trigger. Illustration F
The high-pressure gun opens.
- Release the trigger and push the safety lock forward.
Then the high-pressure gun closes.
High-pressure operation
Note
- The device can be operated vertically.
- The device is equipped with a pressure switch. The motor only starts up when the high-pressure gun is open.
-
The high-pressure hose should be kept away from sharp edges.
-
For a device with the hose reel: unfold the high-pressure hose completely from the hose reel.
-
Open the water supply.
- Set the power switch to "1".
- Open the safety lock of the high-pressure gun.
- Open the high-pressure gun.
- Aim the high-pressure gun at the object to be cleaned and start the cleaning operation.
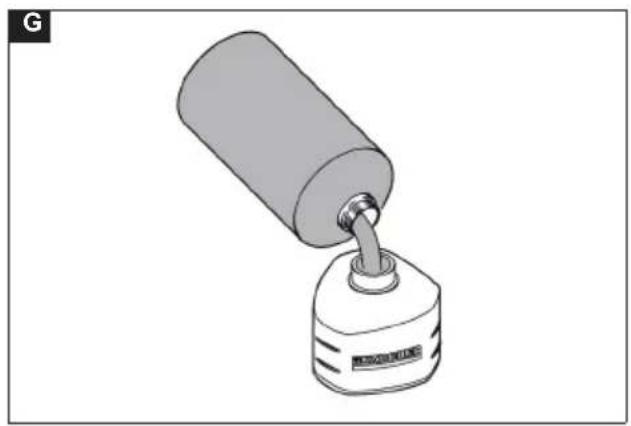
Operation with detergent
Note
A foam lance (optional) is needed for operating with detergent.
⚠ WARNING
Incorrect handling of detergents
Health risk
Adhere to the safety instructions stated on the detergent packaging.
ATTENTION
Unsuitable detergents
Damage to the device and the objects to be cleaned Use only detergents approved by KÄRCHER.
Observe the dosing recommendations and notes provided with the detergent.
Use detergents sparingly to help conserve the environment.
KÄRCHER detergents ensure fault-free operation.
Please feel free to request a consultation, our catalogue or our detergent information sheets.
- Fill the detergent into the container of the foam lance. (Follow the dosage instructions on the detergent bottle.) Illustration G
Recommended cleaning method
-
Spray the detergent sparingly on the dry surface and let it work for a while (do not let it dry).
-
Rinse off the loosened dirt with the high-pr essure jet.
After operation with detergent
- Flush the foam lance with clear water for approx. 30 seconds.
Replacing the nozzle
⚠️ DANGER
Risk of injury!
Switch the device off prior to replacing nozzle and do not activate hand spray gun until the device is pressure-less.
1 Secure the high-pressure gun. To do so, push the safety lever towards the front.
2 Unscrew nozzle screws and remove the nozzle.
3 Put on a new nozzle.
4 Only HD 5/11 EX Plus Classic: Screw on the dirt blaster and tighten them by hand.
Dirt Blaster Storage
- Screw the dirt blaster onto the yellow connector. Illustration H
Interrupting operation
Note
When the device is shut down, the water pressure will be reduced, which can reduce the operating force of the high-pressure gun and improve the service life of the equipment.
- Close the high-pressure gun, the device will interrupt.
- Push the safety lock forward to close the safety lock of the high-pressure gun.
- Push the safety lock back to open the safety lock of the high-pressure gun.
- Open the high-pressure gun, the device will switch on again.
Finishing operation
- Shut off the water supply.
- Open the high-pressure gun.
- Set the power switch to "1" and let the device run for 5 to 10 seconds.
- Set the power switch to "0".
- Close the high-pressure gun.
- Unplug the power supply from the device with dry hands.
-
Remove water inlet.
-
Close the safety lever of the high-pressure gun and push the safety lock forward.
Transportation
⚠CAUTION
Failure to observe the weight
Risk of injury and damage
Be aware of the weight of the device during transportation.
- Place the spray lance with the high-pressure gun on the hooks.
- Wind the power cable around the cable hooks.
- Without hose reel: Wind up the high-pressure hose and hang it over the hook. With hose reel: Wind the high-pressure hose onto the hose reel.
- When transporting the device in vehicles, secure the device against shifting and tipping over.
- For short distance transportation, pull the telescopic handle to drag the device. Illustration I
- When going up stairs, hold the additional handle and lift the device up. Illustration J
Storage
△CAUTION
Failure to observe the weight
Risk of injury and damage
Be aware of the weight of the device during storage.
Store the device indoors only.
Frost protection
ATTENTION
Frost destroys the device if it is not completely drained of water.
Store the device in a frost-free location.
If frost-free storage is not possible:
- Drain excess water.
- Pump commonly available anti-freeze through the device.
- Allow the device to run for a maximum of 1 minute until the pump and lines are empty.
Note
Use commonly available, Glycol-based vehicle anti-freeze. Observe the handling instructions of the anti-freeze manufacturer.
Care and service
⚠️DANGER
Inadvertently starting up the device
Risk of injury, electric shock
Switch off the device immediately and unplug the mains plug before performing work.
Note
Old oil may only be disposed of at designated collection points. Please dispose of any old oil at these locations. Polluting the environment with old oil is punishable by law.
Safety inspection/maintenance contract
You can agree on regular safety inspections or close a maintenance contract with your dealer. Please seek advice on this.
Maintenance intervals
Each time before use
- Check the power cable for damage and have a damaged cable replaced immediately by the authorised Customer Service or a qualified electrician.
- Check the high-pressure hose for damage and replace a damaged high-pressure hose immediately.
- Check the device for leaks. 3 drops of water per minute are permissible. Contact Customer Service in the case of more serious leaks.
Weekly
- Clean the water filter, see Chapter Cleaning the water filter.
Every 500 operating hours, at least once annually
Have the oil changed by Customer Service.
Maintenance work
Cleaning the water filter
Check the water filter for damage before inserting it into the water connection.
-
Pull the water filter out.
-
Clean the water filter under running water.
-
Re-insert the water filter into the water connection.
Troubleshooting guide
⚠️DANGER
Risk of injury due to inadvertently starting up device and also due to electric shock.
Switch off the device immediately and unplug the mains plug before performing work.
Have electrical components checked and repaired by the authorised Customer Service.
In case of any malfunctions not mentioned in this chapter, contact the authorised Customer Service when in doubt or when you have been explicitly advised to do so.
ATTENTION
Damaged water filter in the water connection
Damage to the device through contaminated water
| Fault Remedy | |
| Device does not start | Check the power cable for damage.Check the mains voltage.If the device overheats:a Set the power switch to "0".b Allow the device to cool for at least 15 minutes.c Set the power switch to "1".Contact Customer Service in case of electrical faults. |
| Device not building up pressure | Fit the standard nozzle (size specified, see Chapter Technical data).Clean / replace the high-pressure nozzle.Vent the device (see Chapter Venting the device).Clean the water filter (see Chapter Cleaning the water filter).Clean all inlet pipes to the pump.Check the water supply volume (see Chapter Technical data). |
| Pump leakingUp to 3 drops of water per minute are permissible. | In case of more serious leaks, have the device checked by Customer Service. |
| Pump knocking Clean | the water filter.Check the water supply line for leaks.Vent the device (see Chapter Venting the device).Contact Customer Service if necessary. |
Warranty
The warranty conditions issued by our sales company responsible apply in all countries. We shall remedy possible malfunctions on your device within the warranty period free of cost, provided that a material or manufac-
turing defect is the cause. In a warranty case, please contact your dealer (with the purchase receipt) or the next authorised customer service site.
(See overleaf for the address)
Technical data
| HD 5/11 E Classic HD 5/11 EX Plus Classic | |||
| Electrical connection | |||
| Voltage V 220 - 240 220 - 240 | |||
| Phase | ~ | 1 | 1 |
| Frequency | Hz | 50 | 50 |
| Power rating | kW | 2.2 | 2.2 |
| Degree of protection | IPX5 | IPX5 | |
| Power protection (slow-blowing) | A 15 | 15 | |
| Extension cable, 30 m | mm ^2 | 2.5HD 5/11 E Classic | 2.5HD 5/11 EX Plus Classic |
| Water connection | |||
| Feed pressure (max.) MPa (bar) 1.0 (10) 1.0 (10) | |||
| Input temperature (max.) °C 40 40 | |||
| Input amount (min.) l/h (l/min) 720(10) 720 (12) | |||
| Suction height (max.) m 1.0 1.0 | |||
| Device performance data | |||
| Nozzle size of standard nozzle 036 | 036 | ||
| Water flow rate | l/h (l/min) 500 (8.4) | 500 (8.4) | |
| Operating pressure | MPa (bar) 11 (110) | 11 (110) | |
| Operating pressure (max.) | MPa (bar) 16 (160) | 16 (160) | |
| High-pressure gun recoil force | N | 20.4 | 20.4 |
| Dimensions and weights | |||
| Weight (without accessories) | kg | 18 21 | |
| Length x width x height | mm | 350 x 330 x 880 | 350 x 330 x 880 |
| Determined values in acc. with EN 60335-2-79 | |||
| High-pressure gun hand-arm vibration value | m/s ^2 | 2.27 | 2.27 |
| Uncertainty K | m/s ^2 | 1.5 1.5 | |
| Sound pressure level L _pA | dB(A) | 76 76 | |
| Uncertainty K _pA | dB(A) | 2.5 2.5 | |
| Sound power level L _WA + uncertainty K _WA | dB(A) | 91 91 | |
Subject to technical modifications.
EU Declaration of Conformity
We hereby declare that the machine described below complies with the relevant basic safety and health requirements in the EU Directives, both in its basic design and construction as well as in the version placed in circulation by us. This declaration is invalidated by any changes made to the machine that are not approved by us.
Product: High-pressure cleaner
Type: 1.520-xxx
Currently applicable EU Directives
2000/14/EC
2006/42/EC (+2009/127/EC)
2011/65/EU
2014/30/EU
Harmonised standards used
EN 60335-1
EN 60335-2-79
EN 55012: 2007 + A1: 2009
EN IEC 63000:2018
EN 62233: 2008
Applied conformity evaluation method
2000/14/EG: Annex V
Sound power level dB(A)
HD 5/11 E Classic
Measured: 89.8
Guaranteed: 92
HD 5/11 EX Plus Classic
Measured: 91.3
Guaranteed: 93
The undersigned act on behalf and under the power of attorney of the company management.

H. Jenner
Chairman of the Board of Management
S. Reiser
Director Regulatory Affairs & Certification
Documentation supervisor:
S. Reiser
Alfred Kärcher SE & Co. KG
Alfred-Kärcher-Str. 28 - 40
71364 Winnenden (Germany)
Ph.: +49 7195 14-0
Fax: +49 7195 14-2212
Winnenden, 2019/01/01
Contenu
2006/42/CE (+2009/127/CE)
2011/65/UE
2014/30/UE
Chairman of the Board of Management

S. Reiser
Director Regulatory Affairs & Certification
71364 Winnenden (Germany)
Winnenden, 01/01/2019
Indice

H. Jenner
Chairman of the Board of Management

S. Reiser
Director Regulatory Affairs & Certification
71364 Winnenden (Germany)
Tel.: +49 7195 14-0
Fax: +49 7195 14-2212
Winnenden, 01/01/2019
2006/42/CE (+2009/127/CE)
2011/65/UE
2014/30/UE
Chairman of the Board of Management

S. Reiser
Director Regulatory Affairs & Certification
71364 Winnenden (Germany)
Tel.: +49 7195 14-0
Fax: +49 7195 14-2212
Winnenden, 2019/01/01
Índice
2006/42/CE (+2009/127/CE)
2011/65/UE
2014/30/UE

H. Jenner
Chairman of the Board of Management

S. Reiser
Director Regulatory Affairs & Certification
Chairman of the Board of Management
S. Reiser
Director Regulatory Affairs & Certification
71364 Winnenden (Germany)
Tel.: +49 7195 14-0
Fax: +49 7195 14-2212
Winnenden, 2019/01/01
İçindekiler
2006/42/AT (+2009/127/AT)
2011/65/AB
2014/30/AB
Chairman of the Board of Management

S. Reiser
Director Regulatory Affairs & Certification
Winnenden, 2019/01/01
Innehåll
Allmän information 49
H. Jenner
Chairman of the Board of Management
S. Reiser
Director Regulatory Affairs & Certification
D-71364 Winnenden (Germany)
Tfn: +49 7195 14-0
Fax: +49 7195 14-2212
Winnenden, 2019-01-01
Sisältö
Yleisiä ohjeita 55
Käyttötarkoitus 55
H. Jenner
Chairman of the Board of Management
S. Reiser
Director Regulatory Affairs & Certification
71364 Winnenden (Germany)
Puh.: +49 7195 14-0
2006/42/EF (+2009/127/EF)
2011/65/EU
2014/30/EU
Harmoniserte standarder brukt
EN 60335-1
EN 60335-2-79
EN 55012: 2007 + A1: 2009
EN IEC 63000:2018
EN 62233: 2008
Anvendt samsvarsevalueringsmetode
2000/14/EU: Vedlegg V

H. Jenner
Chairman of the Board of Management
S. Reiser
Director Regulatory Affairs & Certification
71364 Winnenden (Germany)
Tlf.: +49 7195 14-0
Winnenden, 01/01/2019
Indhold
2006/42/EF (+2009/127/EF)
2011/65/EU
2014/30/EU
Chairman of the Board of Management
S. Reiser
Director Regulatory Affairs & Certification
71364 Winnenden (Germany)
Tlf.: +49 7195 14-0
Fax: +49 7195 14-2212
Winnenden, 2019/01/01
Sisukord
Üldised juhised 70
Sihtotstarve 70
Keskkonnakaitse 70
Lisavarustus ja varuosad.... 70
Tarnekomplekt 70
Ohutusjuhised 70
Ohutusseadised 71
Toode: Körgsurvepesur
Tüüp: 1.520-xxx
2006/42/EÜ (+2009/127/EÜ)
2011/65/EL
2014/30/EL
Chairman of the Board of Management

S. Reiser
Director Regulatory Affairs & Certification
71364 Winnenden (Germany)
Tel: +49 7195 14-0
Winnenden, 2019/01/01
Saturs
H. Jenner
Chairman of the Board of Management
S. Reiser
Director Regulatory Affairs & Certification

H. Jenner
Chairman of the Board of Management
S. Reiser
Director Regulatory Affairs & Certification
2006/42/WE (+2009/127/WE)
2011/65/UE
2014/30/UE
Chairman of the Board of Management

S. Reiser
Director Regulatory Affairs & Certification
71364 Winnenden (Germany)
Tel.: +49 7195 14-0
H. Jenner
Chairman of the Board of Management
S. Reiser
Director Regulatory Affairs & Certification
2006/42/ES (+2009/127/ES)
2011/65/EU
2014/30/EU
Chairman of the Board of Management

S. Reiser
Director Regulatory Affairs & Certification
Winnenden, 2019/01/01
Obsah
Všeobecné upozornenia.... 102
2006/42/ES (+2009/127/ES)
2011/65/EÚ
2014/30/EÚ
H. Jenner
Chairman of the Board of Management

S. Reiser
Director Regulatory Affairs & Certification
71364 Winnenden (Germany)
Tel.: +49 7195 14-0
Fax: +49 7195 14-2212
Winnenden, 2019/01/01
Kazalo
Splošna navodila.... 108
Predvidena uporaba.... 108
Zaščita okolja 108
Pribor in nadomestni deli.... 108
Obseg dobave.... 108
Varnostna navodila.... 108
Varnostne naprave 108
Simboli na napravi.... 108
Opis naprave.... 109
Prvi zagon 109
Delovanje 110
Prenašanje in prevažanje.... 110
Shranjevanje 111
Nega in servis 111
2006/42/ES (+2009/127/ES)
2011/65/EU
2014/30/EU

Chairman of the Board of Management
S. Reiser
Director Regulatory Affairs & Certification
Winnenden, 1. 1. 2019
Cuprins
Directive UE relevante
2000/14/UE
2006/42/UE (+2009/127/UE)
2011/65/UE
2014/30/UE
Standarde armonizate utilizeate
EN 60335-1
EN 60335-2-79
EN 55012: 2007 + A1: 2009
EN IEC 63000:2018
EN 62233: 2008
Applied conformity evaluation method
2000/14/CE: Anexa V
Chairman of the Board of Management

S. Reiser
Director Regulatory Affairs & Certification
71364 Winnenden (Germania)
Tel.: +49 7195 14-0
Sadržaj
Opće napomene.... 119
Namjena 119
Zaštita okoliša 119
2006/42/EZ (+2009/127/EZ)
2011/65/EU
2014/30/EU
Chairman of the Board of Management
S. Reiser
Director Regulatory Affairs & Certification
Opunomoćenik za dokumentaciju:
S. Reiser
Alfred Kärcher SE & Co. KG
Alfred-Kärcher-Str. 28 - 40
71364 Winnenden (Njemačka)
Tel.: +49 7195 14-0
Telefaks: +49 7195 14-2212
Winnenden, 1.1.2019.
Sadržaj
Opšte napomene.... 124
Predviđena upotreba.... 124
2006/42/EZ (+2009/127/EZ)
2011/65/EU
2014/30/EU
Korišćeni harmonizovani standardi
EN 60335-1
EN 60335-2-79
EN 55012: 2007 + A1: 2009
EN IEC 63000:2018
EN 62233: 2008
Chairman of the Board of Management

S. Reiser
Director Regulatory Affairs & Certification
Lice ovlašćeno za dokumentaciju:
S. Reiser
Alfred Kärcher SE & Co. KG
Alfred-Kärcher-Str. 28 - 40
71364 Winnenden (Germany)
Tel.: +49 7195 14-0
Winnenden, 1. 1. 2019.
Περιεχόμενα
Chairman of the Board of Management

S. Reiser
Director Regulatory Affairs & Certification
71364 Winnenden (Germany)
Tηλ.: +49 7195 14-0
Φαξ: +49 7195 14-2212
Winnenden, 01/01/2019
Содержание
Chairman of the Board of Management
S. Reiser
Director Regulatory Affairs & Certification
71364 Winnenden (Germany)
Тел.: +49 7195 14-0
Факс: +49 7195 14-2212

H. Jenner
Chairman of the Board of Management
S. Reiser
Director Regulatory Affairs & Certification
71364 Winnenden (Germany)
Тел.: +49 7195 14-0
Факс: +49 7195 14-2212

H. Jenner
Chairman of the Board of Management
S. Reiser
Director Regulatory Affairs & Certification
71364 Winnenden (Germany)
Тел.: +49 7195 14-0
Факс: +49 7195 14-2212
Winnenden, 01.01.2019 r.
Nội dung
Chairman of the Board of Management
S. Reiser
Director Regulatory Affairs & Certification
Winnenden, 01/01/2019
Isi Kandungan
Nota Umum 158
Chairman of the Board of Management
S. Reiser
Director Regulatory Affairs & Certification
Penyelia dokumentasi:
S. Reiser
Alfred Kärcher SE & Co. KG
Alfred-Kärcher-Str. 28 - 40
71364 Winnenden (Jerman)
Ph.: +49 7195 14-0
Winnenden, 2019/01/01
Daftar Isi

H. Jenner
Chairman of the Board of Management

S. Reiser
Director Regulatory Affairs & Certification
Winnenden, 01/01/2019

natural_image
Black and white line drawing of a hand giving a thumbs-up gesture (no text or symbols)THANK YOU!
MERCI! DANKE! iGRACIAS!

Register your product and benefit from many advantages.
www.kaercher.com/welcome


Rate your product and tell us your opinion.
natural_image
Icon showing a gear and wrench inside a square frame (no text or symbols)www.kaercher.com/dealersearch
Alfred Kärcher SE & Co. KG
Alfred-Kärcher-Str. 28-40
71364 Winnenden (Germany)