
X6 - Vacuum Cleaner MIDEA - Free user manual and instructions
Find the device manual for free X6 MIDEA in PDF.
| Product type | Floor cleaner / Vacuum mop |
| Brand | MIDEA |
| Model | X6 |
| Recommended use | Hard indoor floors (tile, wood, marble, etc.) |
| Cleaning modes | Standard, High, Quick suction |
| Self-cleaning function | Yes (long press on the button) |
| Power supply | Rechargeable lithium-ion battery |
| Charging time | Approximately 5 hours |
| Battery type | Lithium-ion (non-removable) |
| Clean water tank capacity | Approximately 500 ml (estimate) |
| Waste water tank capacity | Approximately 400 ml (estimate) |
| Roller brush | Yes, removable and washable |
| Filter | Sponge filter, recommended replacement every 6 months |
| Included accessories | Charging base, adapter, cleaning brush, accessory holder |
| Safety | Automatic shutdown in upright position, overheat protection |
| Regular maintenance | Cleaning waste water tank, brush and filter after each use |
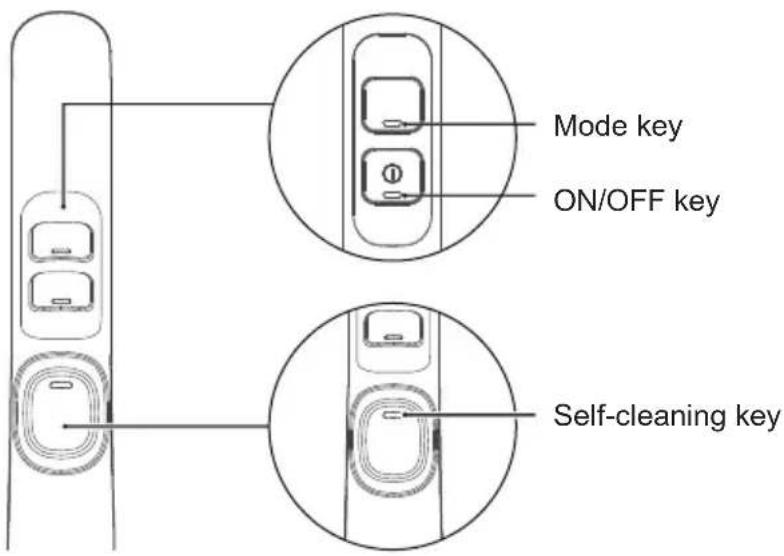
| LED indicators | ON/OFF button (battery level), mode selector, self-cleaning |
| Full tank alarm | Self-cleaning button LED flashes when waste water reaches the MAX line |
| Warranty | Consult your retailer |
Frequently Asked Questions - X6 MIDEA
User questions about X6 MIDEA
0 question about this device. Answer the ones you know or ask your own.
Ask a new question about this device
Download the instructions for your Vacuum Cleaner in PDF format for free! Find your manual X6 - MIDEA and take your electronic device back in hand. On this page are published all the documents necessary for the use of your device. X6 by MIDEA.
USER MANUAL X6 MIDEA
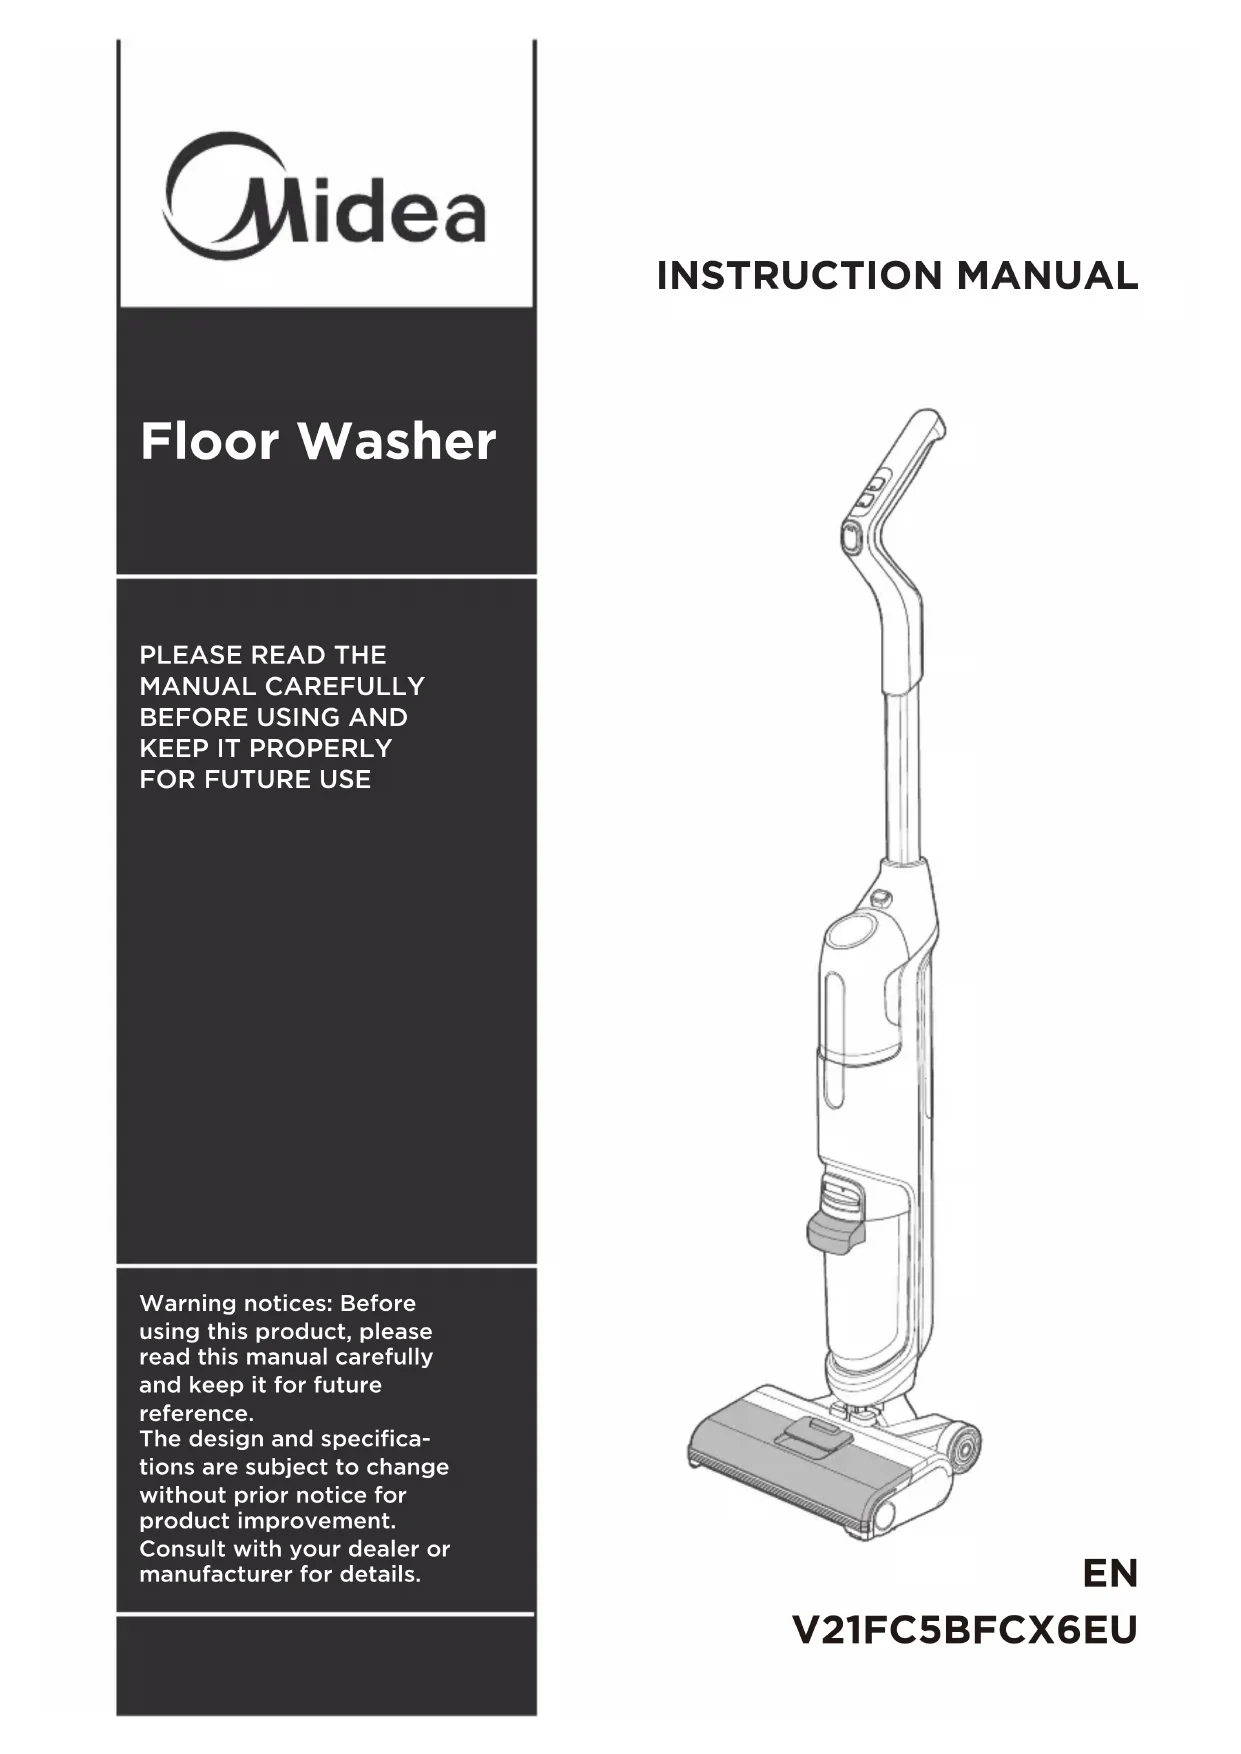
PLEASE READ THE MANUAL CAREFULLY BEFORE USING AND KEEP IT PROPERLY FOR FUTURE USE
Warning notices: Before using this product, please read this manual carefully and keep it for future reference. The design and specifications are subject to change without prior notice for product improvement. Consult with your dealer or manufacturer for details.
INSTRUCTION MANUAL

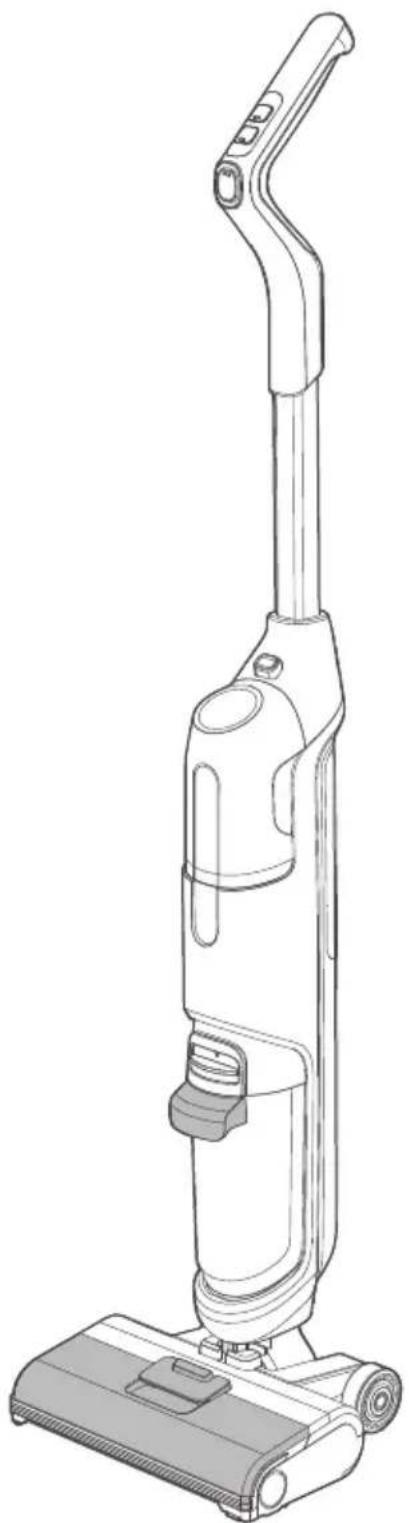
natural_image
Line drawing of a vacuum cleaner with handle and base (no text or symbols)EN
V21FC5BFCX6EU
Safety Instructions
Please read all the contents of this manual carefully before using the product and install the machine by following the steps in this manual. Keep this manual in a safe place. If you pass the product on to a third party for use, please include this manual with the machine. Any operation not in accordance with this manual may result in damage to the product or serious personal injury. The product is only suitable for operation in normal household conditions but not for industrial or outdoor use.
Products are not intended for use by persons with physical, sensory or intellectual impairments or persons lacking experience and common sense (including children) unless supervised or instructed to ensure that they can be used safely.
- This product is suitable for hard floors in the indoor environment, including waxed floors, stone floors, rubber floors, marble floors, granite floors, terrazzo floors, solid wood floors, composite floors, bamboo floors, as well as glazed tiles, ceramic facing tiles and other flat ground. It may not achieve the best results if the product is used on uneven ground surface.
- Do not use this product near or on the surface of flammable and explosive objects, which may cause fire and explosion. Do not use this product near a working fireplace or heater to prevent deformation of the machine casing.
- Do not use it to clean high-temperature substances (unextinguished cigarette butts, matches or hot ash, etc.), ultra-fine substances (such as lime, cement, wood chips, gypsum powder, ashes, charcoal, etc.), dangerous substances (such as solvents, descaling agents, etc.), chemical substances (such as acidic substances, detergents, etc.) and other substances with uncertain physical properties.
- Do not use this scrubber to absorb detergent, kerosene, gasoline, alcohol, paint or perfume, or else it may cause short-circuit, fire or explosion.
- Do not use this scrubber to absorb toner used in laser printers and copiers, or else it may cause fire or explosion.
- Do not use this scrubber to absorb sharp or large objects, such as glass shards, small toys, pins, paper clips, stones, plaster and large pieces of paper, or else it may block up and damage the machine.
- Do not use this scrubber to absorb any burning or smoking objects, such as soot from the unextinguished heat source, burning cigarette butts or matches. This product can't be used to clean stains of strong grease, strong viscosity, or strong dyeing properties such as shoe polish, paint, and pigments.
- Do not touch the plug or any live part of the product with wet hands to avoid the risk of electric shock. Stop using it if the plug is damaged. Please call our service personnel for replacement in order to avoid hazards.
- Please keep the airflow channels and moving parts of this product away from long hair, loose clothing, fingers and other parts of the body. Do not point the suction tube, accessory tip or tool to the eyes or ears, or put them in the mouth.
- Please use the cleaning agent produced by our company and the manufacturer approved by us. Do not add other solutions to avoid generating toxic and harmful gases. If electric leakage, motor over-temperature, abnormal noise, peculiar smell or weak suction is found during use, stop using it immediately and call our service personnel. After using the machine, please clean the waste water tank in time to avoid peculiar smell, and keep the ventilation path unobstructed, so as to avoid obstruction, or else it will cause the suction power to drop, the motor to heat up, and will affect the service life of the scrubber. After using the machine, please store it in a dry place. A humid place will affect the insulation and service life of the appliance. Do not soak or rinse the scrubber or floor brush in water.
Safety Instructions
- Please check the suction nozzle regularly. If there is a blockage, please clear it in time to avoid decrease in suction and affecting the performance of the machine.
- Turn off the power before replacing the brush.
-
In the following situations, do not use the machine, and send it to designated service department for inspection and repair in time:
-
Obvious damage or abnormal operation caused by drop;
-
Power cord is damaged.
- Do not disassemble the enclosed machine without permission. There are no user serviceable parts.
Do not try to change the performance of the machine, or else it will cause danger.
- Using a voltage that does not match the specifications will cause damage to the product and more likely to cause harm to the user. The correct rated voltage is marked on the nameplate.
- When cleaning the stairs, be extra cautious to prevent falling.
- Do not shake or impact the machine up and down to prevent waste water from flowing into the motor.
- When the motor is working, do not lift or carry the appliance up and down, and do not put the machine on its side to prevent the waste water from entering the motor.
- To prevent tip-over, place the machine against the wall after use.
Warning
- Read the manual before use
- This appliance can be used by children aged from 8 years and above and persons with reduced physical, sensory or mental capabilities or lack of experience and knowledge if they have been given supervision or instruction concerning use of the appliance in a safe way and understand the hazards involved.
Cleaning and user maintenance shall not be made by children without supervision.
Children should not play with the appliance.
- The instructions for appliances incorporating a battery that contains materials that are hazardous to the environment shall give details on how to remove the battery and shall state that
– the battery must be removed from the appliance before it is scrapped;
– the appliance must be disconnected from the supply mains when removing the battery;
– the battery is to be disposed of safely.
- The instructions for appliances incorporating batteries that are intended to be replaced by the user shall include the following:
– the type reference of the battery;
– the orientation of the battery with regard to polarity;
– the method of replacing batteries;
– details regarding safe disposal of used batteries;
– warning against using non-rechargeable batteries;
– how to deal with leaking batteries.
Product Introduction
Introduction to Parts
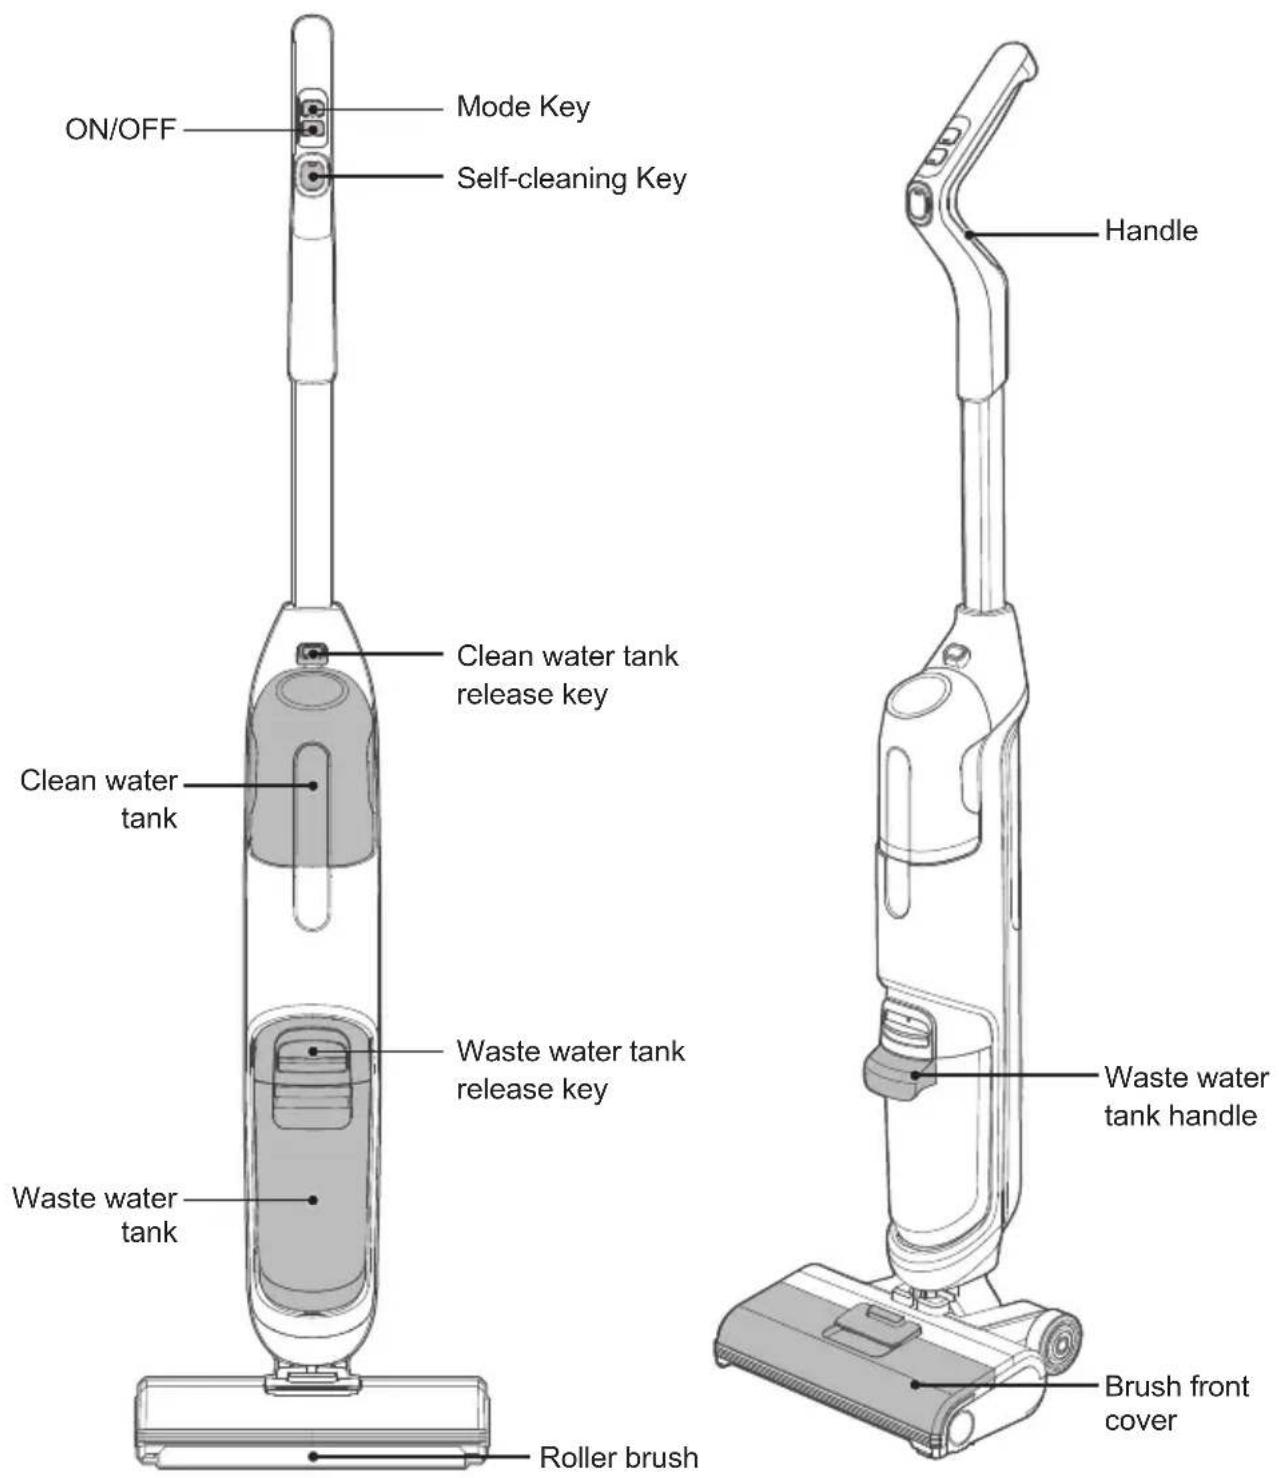
Description of LED
List of Accessories
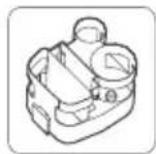
Base×1
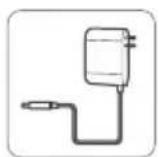
Adapter×1
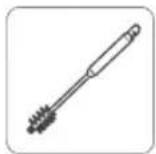
Cleaning brush×1
Manual×1
Accessory rack×1
Description of Accessories
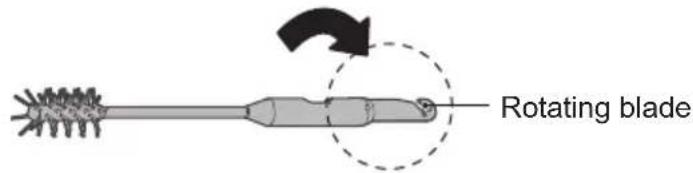
1 Cleaning brush
- A hair brush at one end, which is used to clean stubborn dirt attached to the waste water tank and pipes below.

- A rotating blade at the other end, which is used to clear tangled hairs from the roller brush.
2 Accessory rack
- Insert the accessory rack protrusion against the base recess.
• Used to store roller brush, cleaning brush and filter.
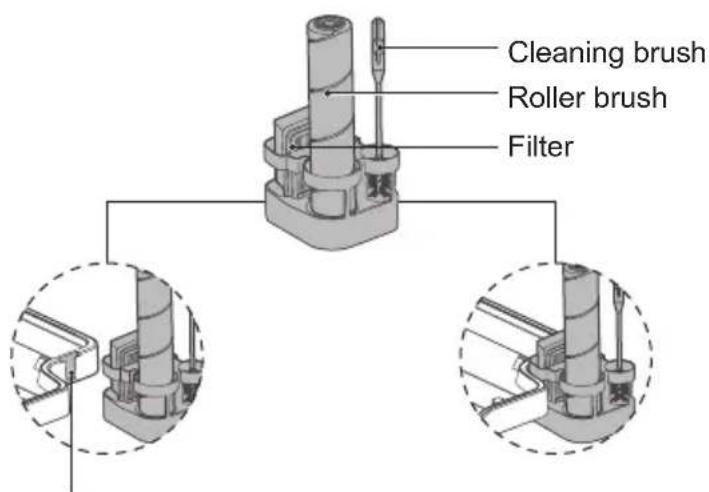
Recess (both left and right)
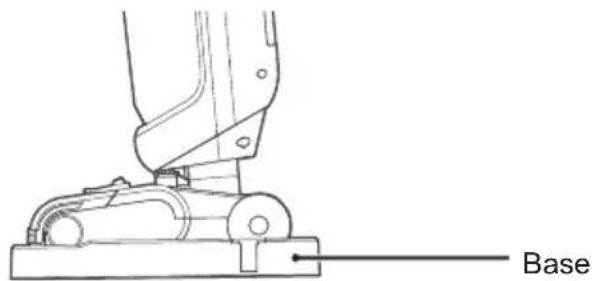
3 Base
- Used to store the floor cleaner and to be used in conjunction with the self-cleaning function of the cleaner.
Preparation for Use
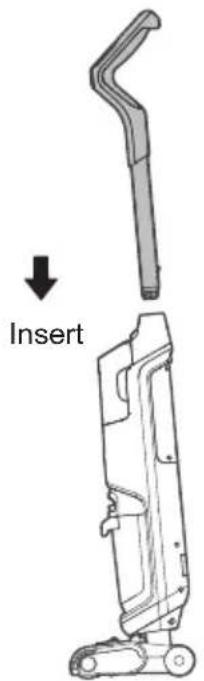
Installation and removal of the handle
To install:
Insert the end of the handle into the port of the main unit in the vertical direction until there is a click sound, which indicates that the installation is successful.
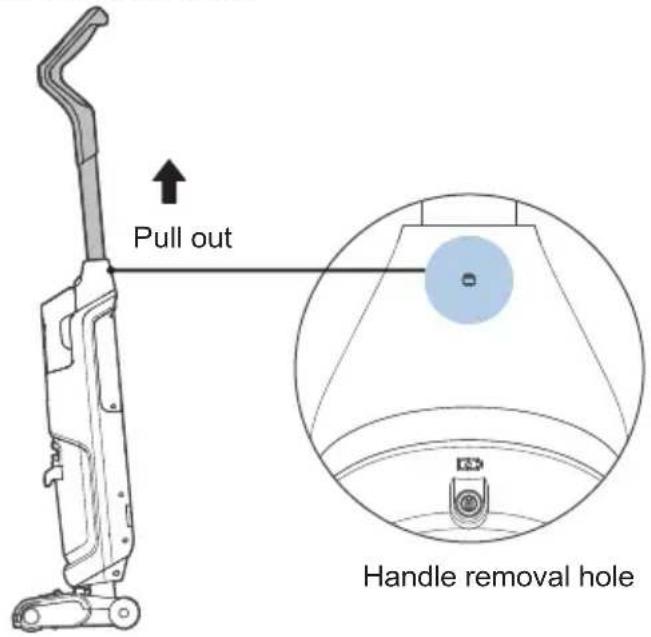
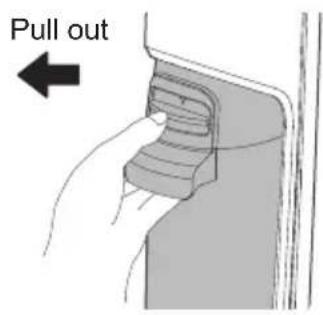
To remove:
To remove and store, find the round hole on the back of the unit, insert a screwdriver or other tool into the round hole to the bottom, and pull out the handle in the vertical direction at the same time.
Charging the machine
Note: Charge the product before first use.
- Place the machine on the base.
- Insert the charging end of the adapter into the charging port (as shown in the figure), and connect to the power supply. The ON/OFF key indicator is always ON and stays blue during charging.
- It takes approximately 5 hours to fully charge the unit. When the battery is fully charged, the ON/OFF key indicator goes out.
- When charging, keep it close to the corner of the wall to avoid tripping and other injuries.

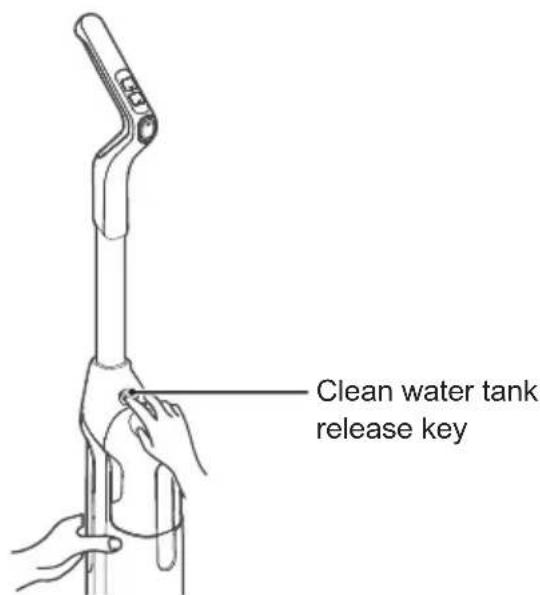
Filling clean water tank
Note: Only the clean water tank needs to be filled.
-
Put the machine in upright state, hold down the release button of the clean water tank with one hand, and remove the tank with the other hand.
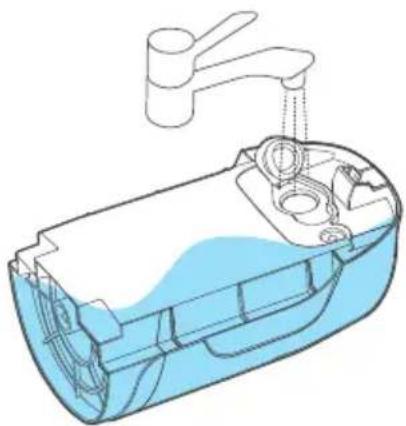
-
Open the cover of the clean water tank, pour tap water into the tank, and then put on the cover.
- Put on the cover of the clean water tank.
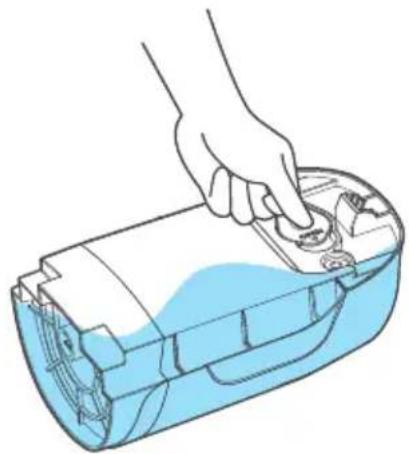
natural_image
Cross-sectional diagram of a water dispenser with faucet and internal components (no text or labels)- Install the clean water tank on the machine with the cover side inward until there is a click sound, which indicates that the installation is successful.
natural_image
Illustration of a hand inserting a component into a blue plastic device (no text or symbols)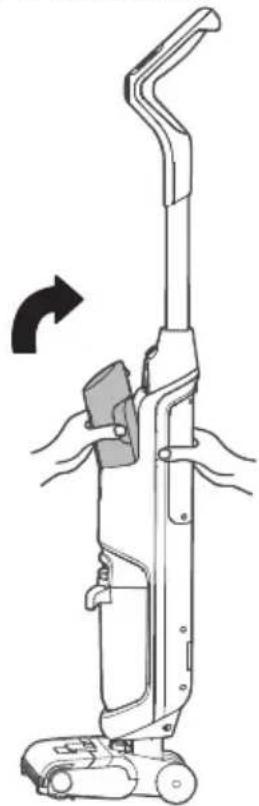
natural_image
Line drawing of a vacuum cleaner with hand blades and handle, showing mechanical components and motion direction (no text or symbols)Turn on and clean
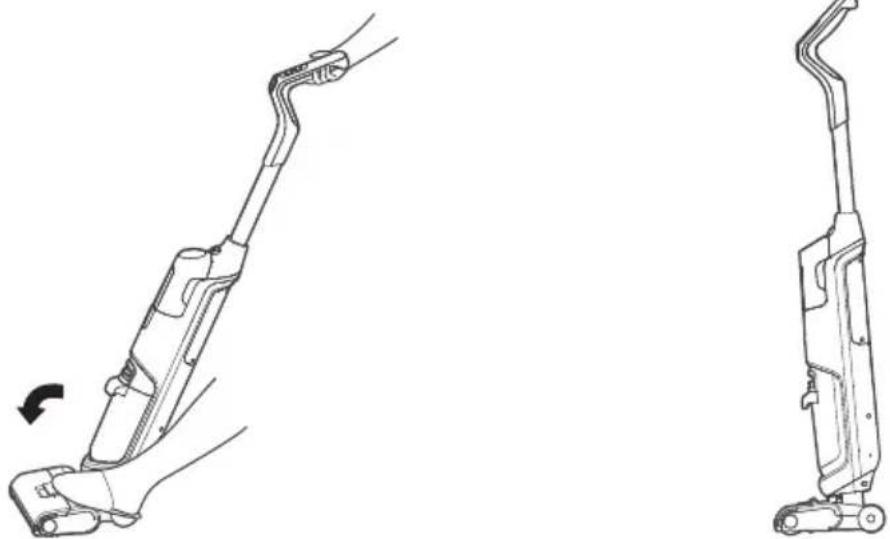
- Put the machine into standby mode with the foot on the floor brush and the handle pulled diagonally.
natural_image
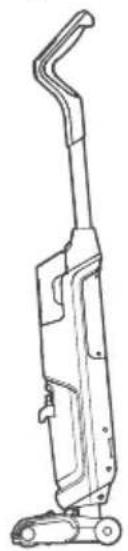
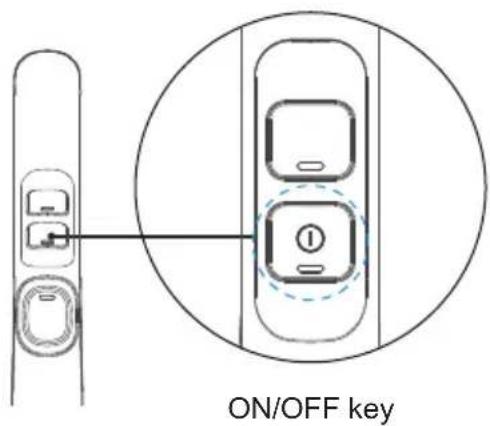
Line drawing of a mechanical device with a curved handle and base (no text or symbols)- Turn the machine ON or OFF by pressing the ON/OFF key briefly. (There will be a 3s delay when the machine is switched off; please do not repeat the operation.)
natural_image
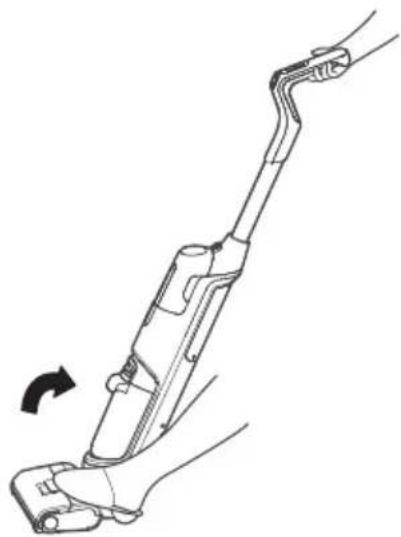
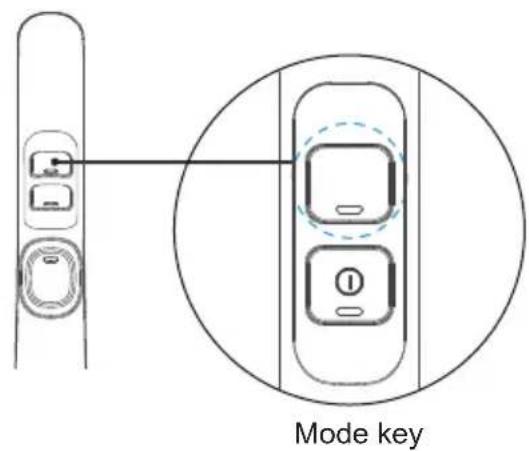
Line drawing of a handheld vacuum cleaner with a hand operating it, showing motion direction (no text or symbols)- Standard mode by default; press on the Mode key to switch between high mode and fast suction mode.
Modes and Application Scenarios
| Status | Suction | Water Volume | Application |
| Standard Mode | Low | Small | Cleaning of lightly stained floors |
| High Mode | High | Large | Cleaning of stained floors |
| Fast Suction Mode | High | / | Cleaning of dry rubbish or residual water on the floor |
Upright and Pause
When you step on the brush and put the handle upright in the working state, the machine stops working and enters standby mode; if there is no operation within three minute of standby, the machine will enter the shutdown state.
natural_image
Technical line drawing of a two-step robotic vacuum cleaner assembly (no text or symbols)Self-cleaning
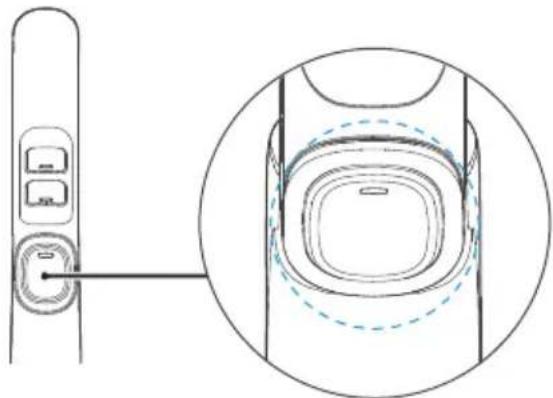
After cleaning, place the machine on the base, press and hold the self-clean button for about 3 seconds, and the machine starts self-cleaning. After self-cleaning, please clean the waste water tank in time. If there are residual stains on the base, please clean up in time. To stop the self-cleaning function in advance, press the Self-clean button or the ON/OFF button.
natural_image
Diagram showing a device with ports and a close-up of its internal structure (no text or symbols)Self-cleaning Key
Note:
- Place the machine on the base when self-cleaning to avoid injuries from tipping.
- There will be a 3 second delay when the machine stops self-cleaning. Please do not repeat the operation.
- For better cleaning of the brush, the side walls of the suction port and the pipes, a large volume of water is used, and it is normal for a small amount of water to be left in the base when the self-cleaning is finished.
Waste water detection alarm
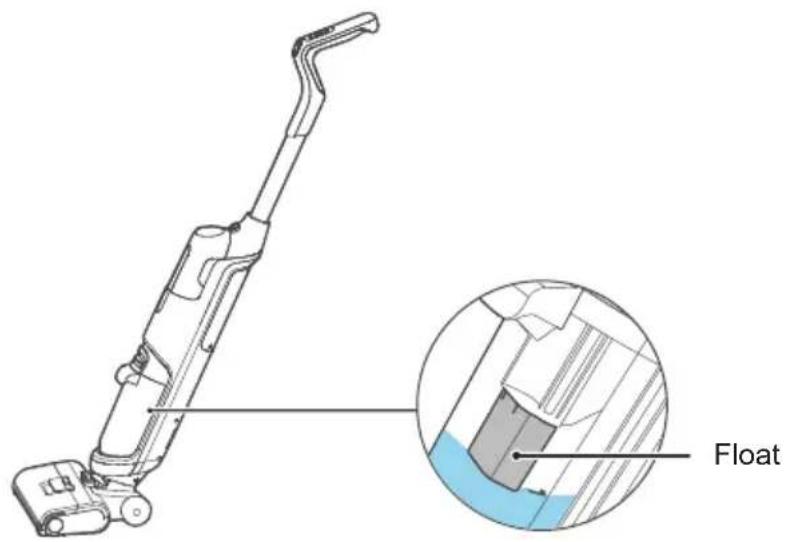
When the waste water reaches the MAX line and the float floats up to block the suction port, and the self-cleaning key LED flashes blue. Please clean the waste water tank in time before using it.
LED Instructions
Note:
-
The machine must not be tilted so much that the brush is lifted off the ground, as this will cause waste water to be sucked in by the vacuum motor and then sprayed out and back onto the ground.
-
It is prohibited to suck in larger pieces of rubbish when the machine is working, so as not to block the suction port or the pipe and cause a weakening of the suction power or stop the machine from working properly.
-
Before handling or transporting the machine, make sure that both the clean water tank and the waste water tank are emptied of water, otherwise the machine will be damaged by water ingress.
| Machine Status | ON/OFF key LED Mode key LED Self-cleaning key LED | ||
| Standard mode | Display according to remaining battery level | Blue LED always ON / | |
| High mode | Display according to remaining battery level | Blue LED flashing / | |
| Fast suction mode | Display according to remaining battery level | / | / |
| Self-cleaning / / | Blue LED always ON | ||
| Abnormal reminder | / | / | Blue LED flashes and goes out after 10 sec |
| Charging (adapter connected) | Blue LED always ON / / | ||
| Charging finished (adapter connected) | / / / | ||
| Fault alarm | Red LED flashes and goes out after 10 sec | / | / |
| Battery level alert | Blue LED always ON for 40% or above battery levelPurple LED always ON for 10% - 40% battery levelPurple LED always ON for above 10% battery level | / | / |
Cleaning waste water tank
Note:
- Cut off the power supply and allow the machine to stop working before cleaning the waste water tank.
- Scrub with water or a neutral detergent; always wring out the cleaning cloth before scrubbing and do not allow water to penetrate inside the electrical components of the machine.
- After cleaning, it is recommended to leave the machine on its base. Take care not to place it in direct sunlight or in a humid place.
- It is advisable to maintain the machine's components regularly in order not to affect its performance.
-
It is recommended to replace the filter every 6 months.
-
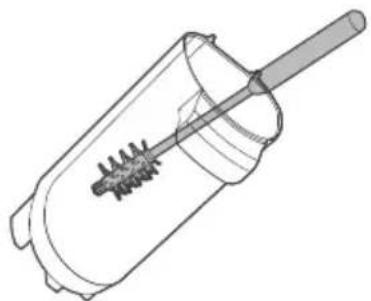
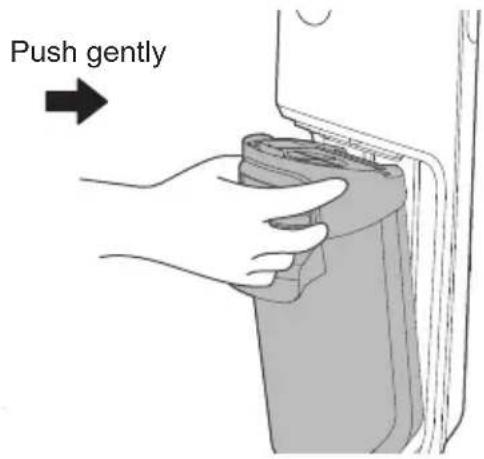
Push the button of the waste water tank downwards with the thumb and pull it out at the same time to remove the tank.
- When pour out the waste water, if there is stubborn dirt on the inner wall of the tank, please clean it directly with the cleaning brush.
natural_image
Technical line drawing of a mechanical component with a threaded rod and internal spring-like structure (no text or symbols)- Hold the tank with one hand and pull out the upper cover of the tank with the other hand.
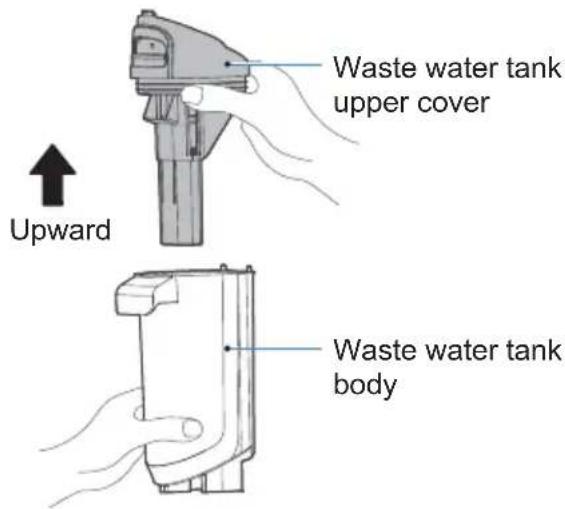
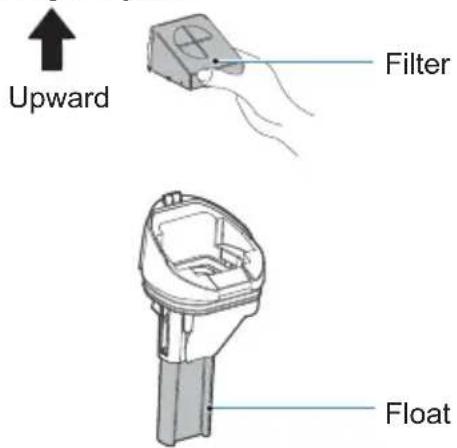
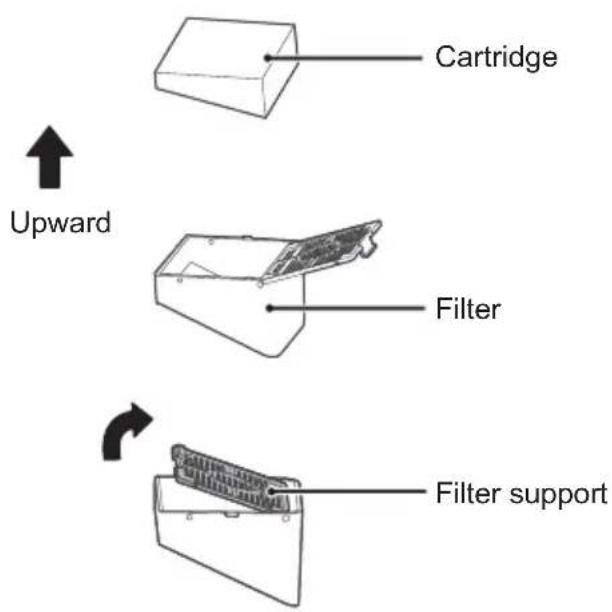
- Take out the filter from the waste water tank and check whether the float is stuck by foreign objects.
-
Open the filter holder, and take out the sponge from the filter.
-
Rinse with clean water after taking it out, dry it thoroughly and put it back into the waste water tank as it is.
- Install the waste water tank back into the machine after you hear a click, which indicates that the installation is successful. (It is recommended to hold the machine with the other hand to avoid tipping when installing the waste water tank.)
Cleaning front cover of roller brush
Note:
-
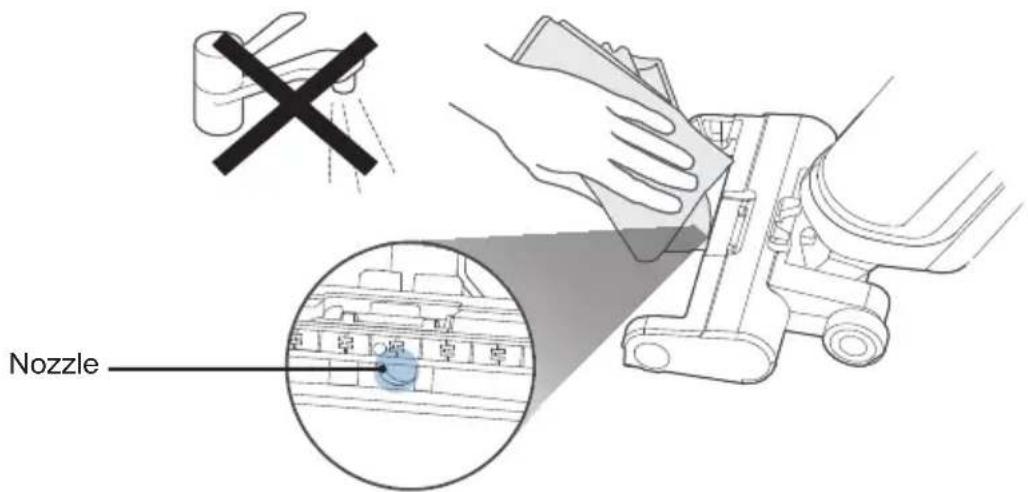
If any residual stains are found on the spout, wipe with a damp rag and do not rinse with water.
-
It is recommended to clean and dry the roller brush cover and brush after each use to keep it clean and tidy.
-
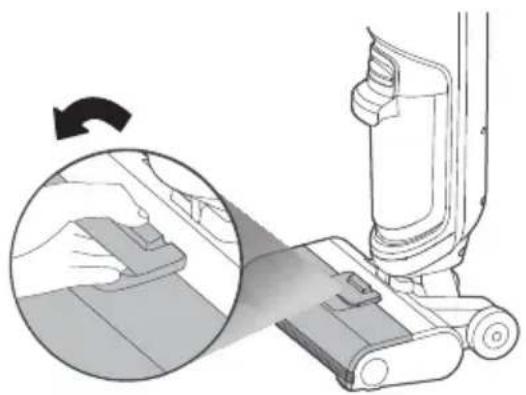
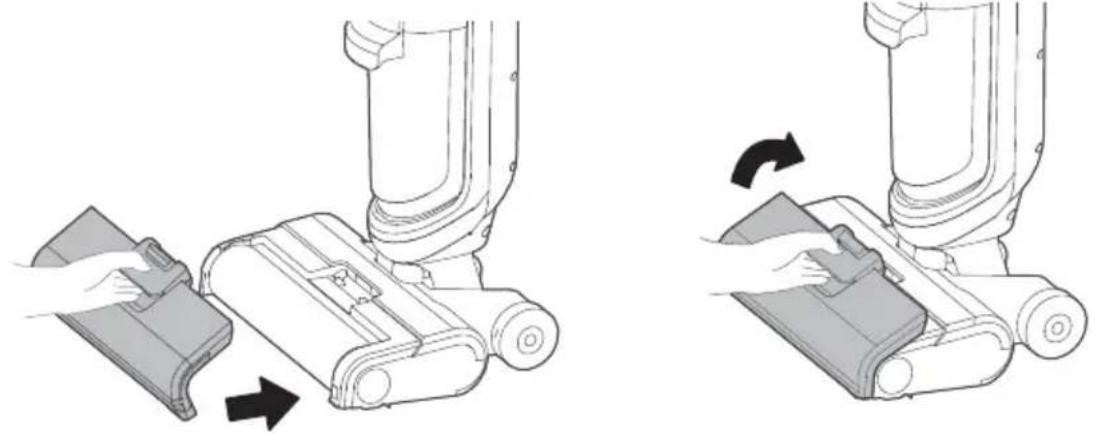
Press the buckle as shown in the figure and remove the front cover of the roller brush.
-
Pull up the handle on the left end of the roller brush and remove the roller brush, and then place it in a cool and dry place to keep it dry and avoid unpleasant odors.
natural_image
Illustration of a hand holding a small object next to a vacuum cleaner's arm, showing mechanical components and motion direction (no text or symbols)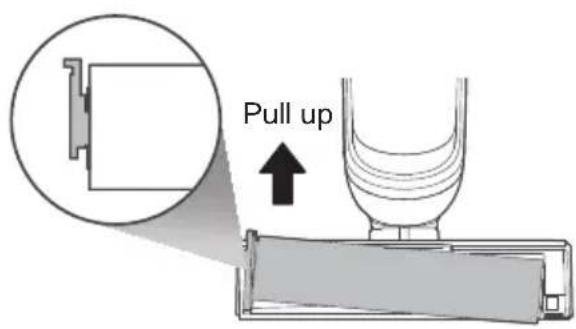
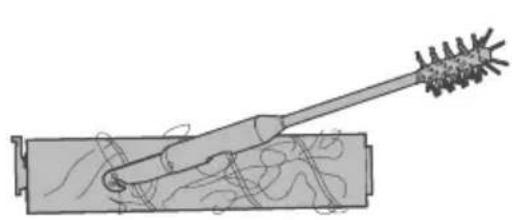
3 a. After self-cleaning, if there is any entanglement such as hair on the roller brush, clear with scissors or a blade.
b. For heavy dirt cleaning (such as ketchup, soy sauce, etc.), if there are still dirt residues on the roller brush after self-cleaning, perform self-clean again, or take out the roller brush and rinse it with water.
natural_image
Diagram of a mechanical device with a lever and internal components (no text or symbols)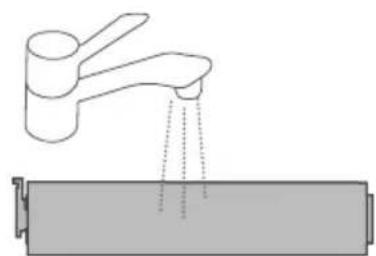
natural_image
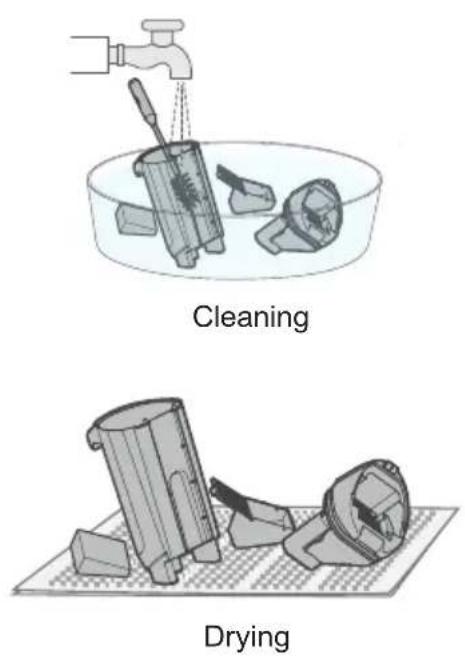
Diagram showing a faucet releasing liquid into a battery (no text or symbols present)- After self-cleaning, if the front cover of the roller brush is found to have stains and residues, rinse it with clean water, and place it in a ventilated place to dry thoroughly.
natural_image
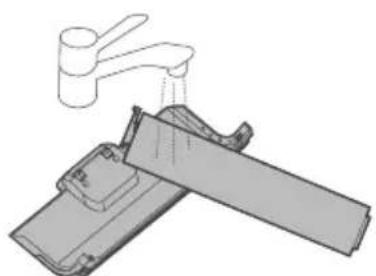
Diagram of a faucet lifting a metal bracket (no text or symbols)Clean

natural_image
Illustration of a mobile phone on a checkered floor next to a rectangular device (no text or symbols visible)Air dry
- After self-cleaning, if there is any residual stain on the nozzle, please wipe it with a damp cloth, and do not rinse with water.
- After cleaning, hold the handle of the roller brush with your hand, align the other side of the roller brush with the right cover, then put the handle end into the slot; if not used immediately, put the brush in a ventilated place to dry before installation.
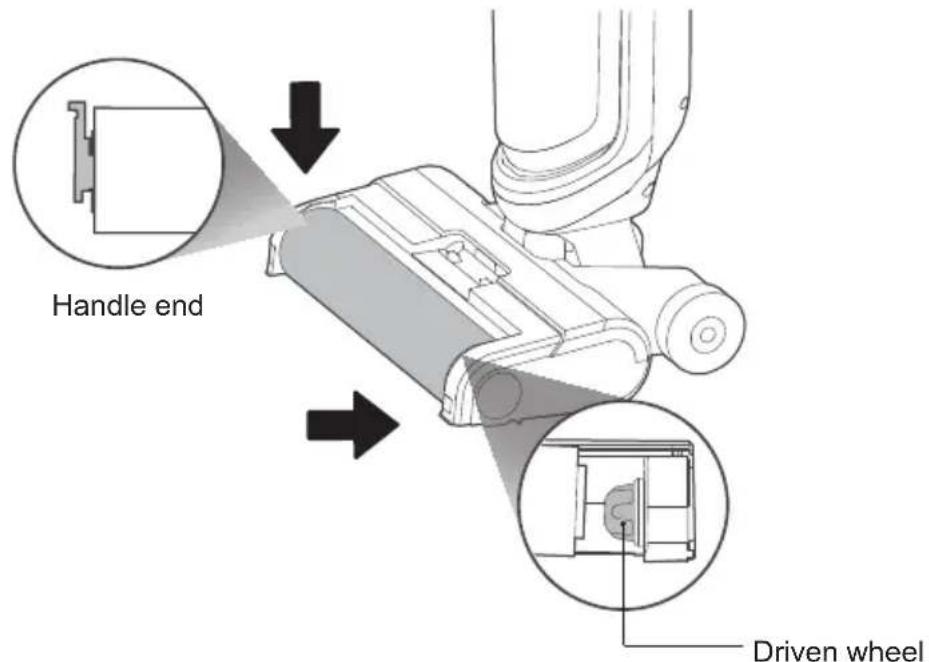
- After cleaning, align the clips at both ends of the front cover of the roller brush with the slots at both ends of the brush, rotate and press the handle of the flip cover of the brush until there is a click, which indicates that the installation is successful.
natural_image
Illustration of two steps of a vacuum cleaner's installation, showing hand positioning and tool movement (no text or symbols)Troubleshooting
Please check the following table in case of any abnormal conditions when using the product.
| Problem Possible cause Solution | ||
| The scrubber does not work | - The rolling brush is entangled with hair and other objects | - Clean the rolling brush |
| - The waste water tank is full | - Clean up the waste water tank | |
| - Low battery | - Charge | |
| - The pipe is blocked | - Clean up the pipe under the waste water tank | |
| Suction power is weakened | - Rolling brush, rolling brush cover, and waste water tank are not installed properly | - Re-install |
| - The rolling brush is entangled with hair and other objects | - Clean the rolling brush | |
| - The nozzle or pipe is blocked | - Clean up obstacles in the nozzle or pipe | |
| - Waste water tank filter is dirty or missing | - Clean or install the filter | |
| Noise during fan running | - The nozzle is blocked | - Clean up obstacles in the nozzle |
| Noise during water pump running | - The clean water tank is lack of water | - Add water to the clean water tank |
| - The clean water tank is not installed in place | - Reinstall the clean water tank | |
| Floor brush doesn't have water | - The clean water tank is lack of water | - Add water to the clean water tank |
| - The clean water tank is not installed in place | - Reinstall the clean water tank | |
| - The machine is in quick suction mode | - Press the mode button once again | |
| Water leaking from air outlet | - The waste water tank float is stuck by foreign objects | - Clean up foreign objects at the float |
| Water leakage at the bottom of the floor brush | - Waste water tank or waste water tank filter isn't installed | - Install waste water tank and filter |
natural_image
Line drawing of a vacuum cleaner with handle and base (no text or symbols)DE
V21FC5BFCX6EU
Sicherheitshinweise
natural_image
Illustration of a hand inserting a component into a blue plastic device (no text or symbols)natural_image
Cross-sectional diagram of a water dispenser with faucet and internal components (no text or labels)natural_image
Line drawing of a vacuum cleaner with hand blades and handle, showing mechanical components and motion direction (no text or symbols)natural_image
Line drawing of a mechanical device with a curved handle and base (no text or symbols)natural_image
Line drawing of a handheld vacuum cleaner with a hand operating it, showing no text or symbolsnatural_image
Technical line drawing of a two-view robotic vacuum cleaner (no text or symbols)Selbstreinigend
natural_image
Diagram showing a device with ports and a circular inset view of the interior space (no text or symbols)natural_image
Technical line drawing of a mechanical component with a threaded rod and spring-like base (no text or symbols)natural_image
Illustration of a hand using a vacuum cleaner to adjust or install a component, showing a magnified view of the device (no text or symbols present)
natural_image
Diagram of a tool interacting with a cylindrical object, showing internal structure and motion lines (no text or symbols)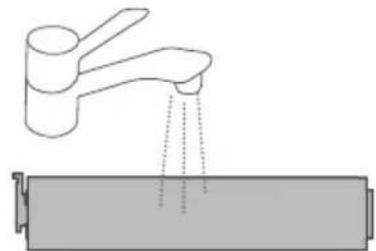
natural_image
Diagram showing a faucet releasing liquid into a battery (no text or symbols)natural_image
Diagram of a faucet lifting a metal bracket (no text or symbols present)natural_image
Illustration of a mobile phone on a checkered floor next to a rectangular device (no text or symbols visible)natural_image
Illustration of two steps of a vacuum cleaner's installation, showing hand positioning and angle adjustment (no text or symbols)Fehlersuche
MANUEL D'INSTRUCTIONS
natural_image
Line drawing of a vacuum cleaner with handle and base (no text or symbols)FR
V21FC5BFCX6EU
2 Support d'accessoires
natural_image
Cross-sectional diagram of a water dispenser with faucet and internal components (no text or labels)natural_image
Illustration of a hand inserting a component into a blue plastic device (no text or symbols)
natural_image
Line drawing of a vacuum cleaner with hand blades and handle, showing mechanical components and motion direction (no text or symbols)Allumer et nettoyer
natural_image
Line drawing of a vacuum cleaner with attached clamped components (no text or symbols)natural_image
Line drawing of a handheld vacuum cleaner with a hand operating it, showing motion direction (no text or symbols)natural_image
Technical line drawing of a vacuum cleaner's side view showing left and right views with no text or symbolsAuto-nettoyage
natural_image
Diagram showing a device with three ports and a close-up of its internal cavity, no text or symbols present.natural_image
Line drawing of a mechanical component with a handle and internal spring-like structure (no text or symbols)natural_image
Illustration of a hand using a vacuum cleaner to adjust or install a component, showing a magnified view of the device (no text or symbols present)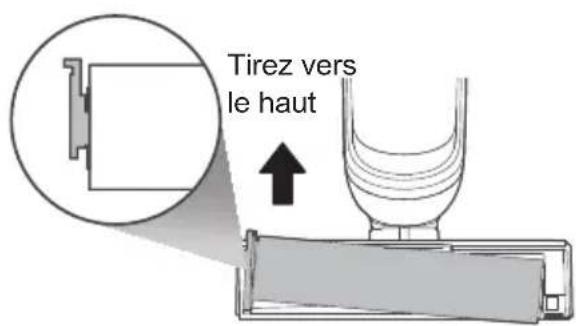
natural_image
Diagram of a mechanical tool interacting with a cylindrical component (no text or symbols present)
natural_image
Diagram showing a faucet pouring liquid into a battery (no text or symbols)natural_image
Diagram of a faucet lifting a rectangular object, showing mechanical components without any text or symbols.
natural_image
Illustration of a mobile phone on a checkered floor next to a rectangular device (no text or symbols visible)natural_image
Illustration of two steps of a vacuum cleaner's lift, showing how to move or adjust the component (no text or symbols present)Dépannage
natural_image
Line drawing of a vacuum cleaner with handle and base (no text or symbols)ES
V21FC5BFCX6EU
natural_image
Cross-sectional diagram of a water dispenser with faucet and internal components (no text or labels)natural_image
Illustration of a hand inserting a component into a blue plastic device (no text or symbols)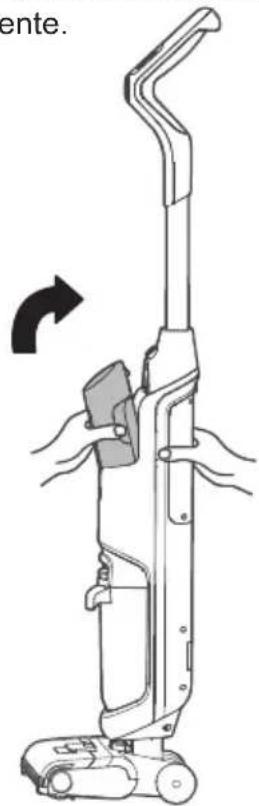
Enciende y limpia
natural_image
Line drawing of a vacuum cleaner with attached clamped components (no text or symbols)natural_image
Line drawing of a handheld vacuum cleaner with a hand operating it, showing motion direction (no text or symbols)natural_image
Technical line drawing of a vacuum cleaner's side view showing front and rear views with no text or symbolsAutolimpieza
natural_image
Diagram showing a device with three ports connected to a terminal block, and an inset view of a circular component with concentric layers (no text or symbols)natural_image
Line drawing of a mechanical component with a threaded rod and spring-like base (no text or symbols)natural_image
Illustration of a hand using a vacuum cleaner to adjust or install a component, showing a magnified view of the device (no text or symbols present)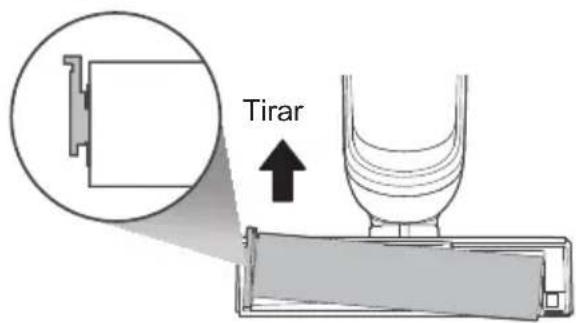
natural_image
Diagram of a mechanical tool interacting with a cylindrical component (no text or symbols present)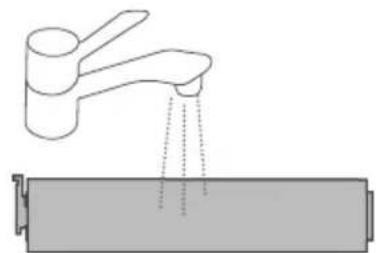
natural_image
Diagram showing a faucet pouring liquid into a battery (no text or symbols)natural_image
Diagram of a faucet lifting a metal bracket (no text or symbols)natural_image
Illustration of a mobile phone on a checkered floor next to a rectangular device (no text or symbols visible)natural_image
Line drawing of a vacuum cleaner with handle and base (no text or symbols)IT
V21FC5BFCX6EU
natural_image
Illustration of a hand inserting a component into a blue plastic device (no text or symbols)natural_image
Cross-sectional diagram of a water dispenser with faucet and internal components (no text or labels)natural_image
Line drawing of a vacuum cleaner with hand blades and handle, showing mechanical components and motion direction (no text or symbols)natural_image
Line drawing of a vacuum cleaner with extended arm and mounting base (no text or symbols)natural_image
Line drawing of a handheld vacuum cleaner with a hand operating it, showing no text or symbolsnatural_image
Diagram showing a device with three ports and a close-up of its internal structure, no text or symbols present.Tasto autopulizia
Note:
natural_image
Illustration of a hand using a vacuum cleaner to adjust or install a component, showing a magnified view of the device (no text or symbols present)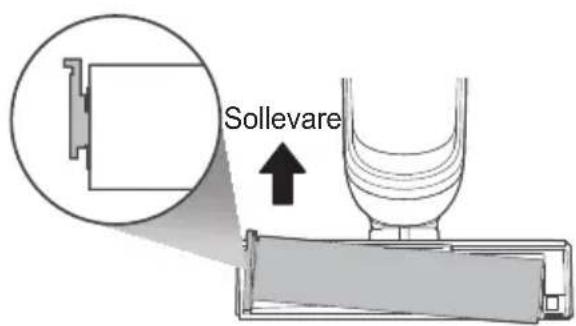
natural_image
Diagram of a mechanical tool interacting with a cylindrical component (no text or symbols present)
natural_image
Diagram showing a faucet pouring liquid into a battery (no text or symbols)natural_image
Diagram of a faucet lifting a metal bracket (no text or symbols)Pulire Asciugare

natural_image
Illustration of a mobile phone on a checkered floor next to a rectangular device (no text or symbols visible)natural_image
Illustration of two steps of a vacuum cleaner's lift, showing how to adjust the component (no text or symbols present)MANUAL DE INSTRUÇÕES

natural_image
Line drawing of a vacuum cleaner with handle and base (no text or symbols)PT
V21FC5BFCX6EU
natural_image
Cross-sectional diagram of a mechanical device with a faucet and internal components (no text or symbols)natural_image
Illustration of a hand inserting a component into a blue plastic device (no text or symbols)natural_image
Line drawing of a vacuum cleaner with hand blades and handle, showing mechanical components and motion direction (no text or symbols)Ligar e limpar
natural_image
Line drawing of a vacuum cleaner with extended arm and mounting base (no text or symbols)natural_image
Line drawing of a handheld vacuum cleaner with a hand operating the lever (no text or symbols)natural_image
Technical line drawing of a vacuum cleaner with two views (top and side), showing internal components and motion direction (no text or symbols)Auto limpeza
natural_image
Diagram showing a device with two ports and an inset view of a circular component with internal contours (no text or symbols)natural_image
Technical line drawing of a mechanical component with a threaded rod and internal spring-like structure (no text or symbols)natural_image
Illustration of a hand holding a small object next to a vacuum cleaner's arm, showing mechanical components and motion direction (no text or symbols)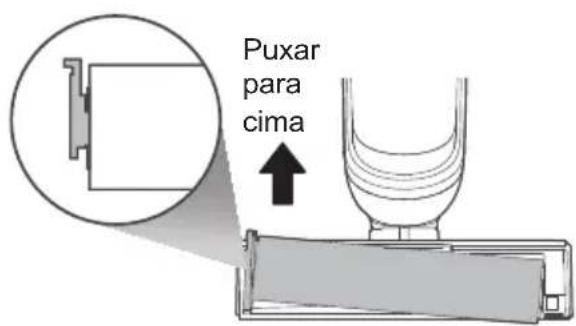
natural_image
Diagram of a mechanical device with a lever and internal components (no text or symbols)