MPO6AUBK - Vacuum Cleaner MIDEA - Free user manual and instructions
Find the device manual for free MPO6AUBK MIDEA in PDF.

User questions about MPO6AUBK MIDEA
0 question about this device. Answer the ones you know or ask your own.
Ask a new question about this device
Download the instructions for your Vacuum Cleaner in PDF format for free! Find your manual MPO6AUBK - MIDEA and take your electronic device back in hand. On this page are published all the documents necessary for the use of your device. MPO6AUBK by MIDEA.
USER MANUAL MPO6AUBK MIDEA
natural_image
Line drawing of a single vacuum cleaner with handle and mounting bracket (no text or symbols)VACUUM CLEANER
USER MANUAL
MPO6AUBK
Warning notices: Before using this product, please read this manual carefully and keep it for future reference. The design and specifications are subject to change without prior notice for product improvement. Consult with your dealer or manufacturer for details. The diagram above is just for reference. Please take the appearance of the actual product as the standard.
THANK YOU LETTER
Thank you for choosing Midea! Before using your new Midea product, please read this manual thoroughly to ensure that you know how to operate the features and functions that your new appliance offers in a safe way.
CONTENTS
THANK YOU LETTER 01
SAFETY INSTRUCTIONS 02
PRODUCT OVERVIEW 06
PRODUCT INSTALLATION 07
OPERATION INSTRUCTIONS 09
CLEANING AND MAINTENANCE 12
TROUBLE SHOOTING 16
TRADEMARKS, COPYRIGHTS AND LEGAL STATEMENT 17
DISPOSAL AND RECYCLING 18
DATA PROTECTION NOTICE 19
SAFETY INSTRUCTIONS
Intended Use
The following safety guidelines are intended to prevent unforeseen risks or damage from unsafe or incorrect operation of the appliance. Please check the packaging and appliance on arrival to make sure everything is intact to ensure safe operation. If you find any damage, please contact the retailer or dealer. Please note modifications or alterations to the appliance are not allowed for your safety concern. Unintended use may cause hazards and loss of warranty claims.
Explanation of Symbols
 | DangerThis symbol indicates that there are dangers to the life and health of persons due to extremely flammable gas. |
 | Warning of electrical voltageThis symbol indicates that there is a danger to life and health of persons due to voltage. |
 | WarningThe signal word indicates a hazard with a medium level of risk which, if not avoided, may result in death or serious injury. |
 | CautionThe signal word indicates a hazard with a low degree of risk which, if not avoided, may result in minor or moderate injury. |
 | AttentionThe signal word indicates important information (e.g. damage to property), but not danger. |
 | Observe instructionsThis symbol indicates that a service technician should only operate and maintain this appliance in accordance with the operating instructions. |
Read these operating instructions carefully and attentively before using/commissioning the unit and keep them in the immediate vicinity of the installation site or unit for later use!
IMPORTANT SAFETY INSTRUCTIONS
This section contains safety instructions that will help protect from risk of personal injury or property damage. Failure to follow these instructions invalidates the given warranty.
- This appliance complies with international safety standards.
- Children shall not play with the appliance. Cleaning and user maintenance shall not be made by children without supervision.
- If the adapter or the appliance itself is damaged, do not use it. Contact an authorised service centre.
- Prevent damage to the power cable by not squeezing, bending, or rubbing it on sharp edges.
- Do not touch the appliance or its plug when it is plugged if your hands are damp or wet.
- Do not pull the power cable when unplugging the appliance.
- Do not vacuum flammable materials and when vacuuming cigarette ash, make sure that it has cooled down.
- Do not vacuum water or other liquids.
- Protect the appliance from rain, humidity and heat sources.
- Never use the appliance in or near places where combustible or flammable environments are present.
- Unplug the appliance before cleaning and maintenance.
- Do not immerse the appliance in water for cleaning.
- Do not attempt to dismantle the appliance.
-
Use the original parts or parts recommended by the manufacturer only.
-
Do not attempt to vacuum particles such as cement, plaster and compressed paper in order to prevent the filter from being clogged and the motor being damaged.
- If the adapter is damaged, it must be replaced by the manufacturer or its agent or similarly qualified person in order to avoid hazard.
- Use the appliance only with the power adapter supplied.
- Do not use the appliance without filters fitted, otherwise it can get damaged.
- If you keep the packaging materials, store them out of the reach of children.
- This appliance is not intended for use by persons (including children) with reduced physical, sensory or mental capabilities, or lack of experience and knowledge, unless they have been given supervision or instruction concerning use of the appliance by a person responsible for their safety.
- Children should be supervised to ensure that they do not play with the appliance.
- The appliance is only to be used with the power supply unit provided with the appliance.
- The adapter must be removed from the socket-outlet and the battery pack must be removed from the appliance before cleaning or maintaining the appliance
- Keep fingers, hair and loose clothing from moving parts and openings whilst using the vacuum cleaner.
- The battery must be removed from the appliance before it is scrapped;
-
Please dispose of used batteries according to local laws and regulations.
-
This appliance contains batteries that are only replaceable by skilled persons.
- The supply terminals are not to be short-circuited.
PRODUCT OVERVIEW

natural_image
Technical line drawing of a mechanical component with no visible text or symbolsFloor head

natural_image
Line drawing of a door handle with two buttons and a central vent (no text or symbols)wall bracket

natural_image
Simple line drawing of a vertical cylindrical object with a protruding handle (no text or symbols)Extension tube
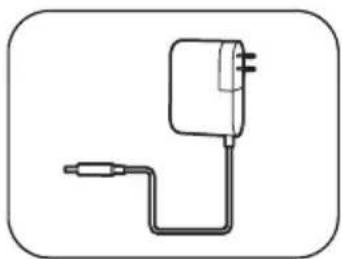
natural_image
Simple line drawing of a connected charger with a cable (no text or symbols)Adaptor/charger
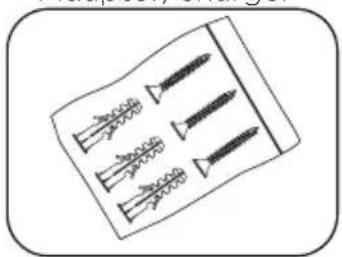
natural_image
Illustration of four different screw fasteners arranged on a rectangular base (no text or symbols)Wall fixings Crevice nozzle

natural_image
Line drawing of a mechanical connector or connector (no text or symbols)Combination nozzle
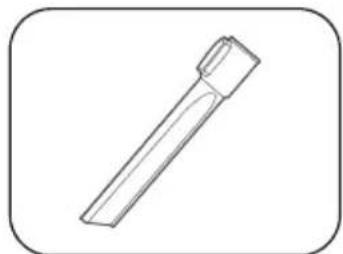
natural_image
Simple line drawing of a cylindrical object with a tapered tip, enclosed in a rounded square frame (no text or symbols)Part Identification

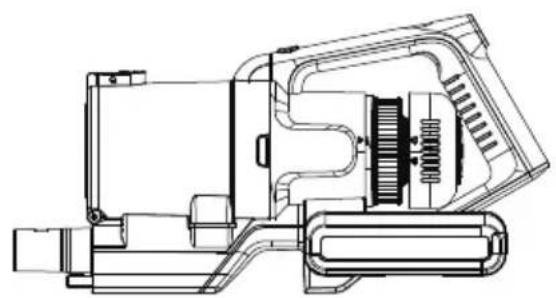
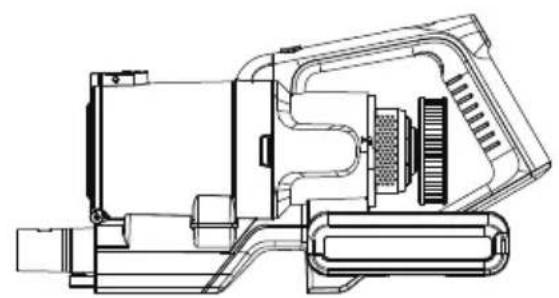
text_image
1 2 3 4 5 6 7 8 9 10 11 121 Accessory attachment point
2 Collection container lid
3 Dust release button
4 Dust container release button
5 Battery indicator light
6 Mode button
7 Power on/off button
8 Handle
9 Filter cover
10 Motor filter
11 Mounting Recess
12 Dust container
PRODUCT INSTALLATION
Assembly
- Insert the extension tube onto the body of the vacuum as shown (fig. 1) and push to secure, a click will be heard.
- Push fit the floor head onto the etexnsion tube (fig. 1), a click will be heard. The crevice nozzle and combination nozzle can be fitted in place of the floor head.

text_image
Release button Release button Fig. 1Fig. 1
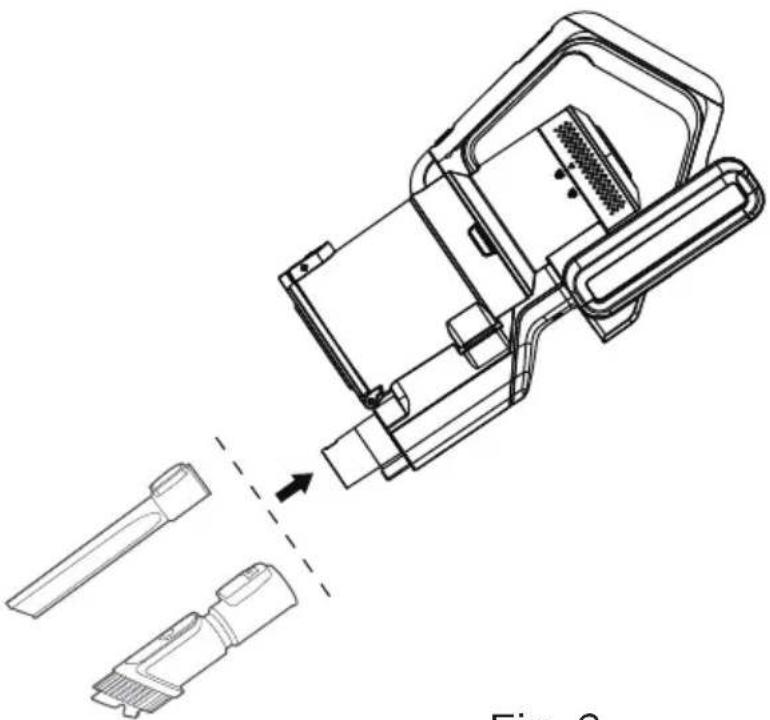
- Alternatively, do not use the extension tube and fit the crevice nozzle or combination nozzle directly onto the body of the vacuum cleaner (fig. 2). The floor head can be fitted in a similar manner, but if using in this configuration ensure hands are kept away from the floor head during operation - due to a potential entrapment hazard.
natural_image
Technical line drawing of a mechanical device with two ports and a dashed alignment line (no text or symbols)Fig. 2
- To remove the all parts press the release button and accessories firmly pull apart.
Getting Started
-
Fit the correct nozzle for the cleaning application, ensure that the battery has sufficient charge.
-
Click power button once to start, the LED lights on the floor head (if fitted) will illuminate and the vacuum cleaner will start with Middle power mode. Use Low/Middle/High button to switch between modes. The vacuum cleaner may be used for up to 8 mins with High power mode, 25 minutes with Middle power and 45 mins with Low power mode.
-
Click the power button again to stop the vacuum cleaner after use.
-
Store the vacuum in the wall bracket when not in use.
text_image
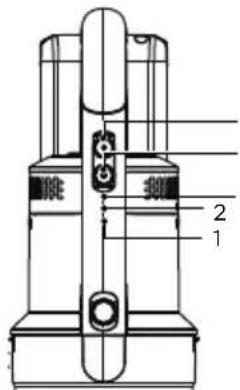
Technical diagram of a mechanical device with labeled parts 1 and 2Power button Low/Middle/High button Low/Middle/High indicator lights*

NOTE
Low power mode is indicated with no indicator lights. Middle power mode with the white indicator light and High power mode, with the Blue indicator light.
OPERATION INSTRUCTIONS
Charging The Vacuum
This vacuum uses a rechargeable 25.2V DC Lithium battery. We recommend to fully charge before using for the first time. It takes 4-6 hours.
- Place the body of the cleaner onto a flat surface either a table or fit into the wall bracket.

natural_image
Technical line drawing of a mechanical device with a power outlet and internal components (no text or symbols)Fig. 3 Fig. 4
text_image
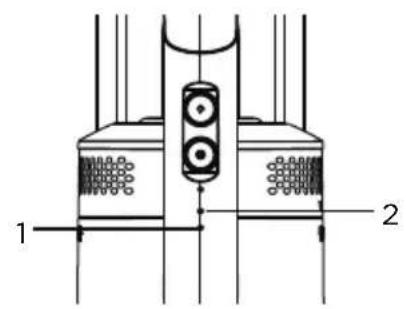
1 2-
Insert the adaptor cord into the DC jack at the end of the cleaner handle and plug the adaptor into the mains supply socket (fig.3).
-
The light indicator shows the status (Fig 4): Charging: Light 1 flash, light 2 off Half charged: Light 1 on, light 2 flash Fully charged: Light 1 & 2 on, then off in 10 mins Low battery: Light 1 flash, light 2 off

NOTES
-
Light indicator 1(Fig 4) will flash when the battery is running low and needs to be recharged, If recharge is not commenced, the vacuum will power off.
-
Only charge or recharge the vacuum indoors.
-
Do not recharge the battery when the air temperature is below 0°C or above 37°C.
-
Batteries become hot after heavy use and will become difficult to charge.
Allow to cool after use and wait about an hour between recharges.
Assembling Your Vacuum
Bringing it all together
Safety
- Before drilling into wall surface, check for hidden cables or pipes.
- Wear safety goggles and dust mask when drilling.
- The use of a residual current device (RCD) is recommended when working with power tools.
Tools required
- Drill fitted with a 6mm masonry drill bit
- Screwdriver
- Pencil
- Ruler
-
Spirit level
-
Choose a suitable location for the wall bracket away from areas where it will get wet or knocked and close to a socket outlet. Check that the charge cable will reach the mains socket (180cm distance max) and that there is sufficient space above and below the bracket (approx.125cm below) for the fully assembled vacuum cleaner to be inserted. No part of the vacuum cleaner should touch the floor when fitted into the bracket (fig 7).
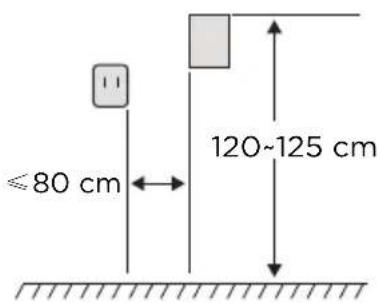
text_image
≤80 cm 120~125 cmFig. 5
text_image
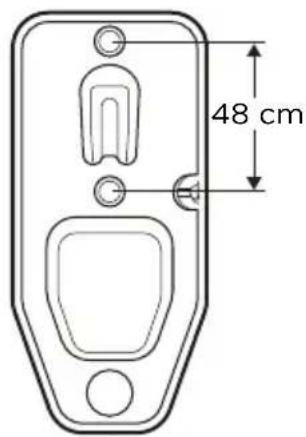
48 cmFig. 6 Fig. 7

text_image
≈ 5cm Floor Floor-
Place the bracket in the desired position and using a pencil, mark the position for the two screw holes. Using a ruler, draw a line joining the points marked for the two screws and using a spirit level, check that it is on the same level.
-
If fixing to a masonry wall, use a masonry drill bit, drill holes to a depth of 30mm and insert the wall plugs.
-
If fixing to ceramic tiles, use a tile and glass drill bit to drill through the tile and then drill holes to a depth of approximately 32 mm using a masonry drill bit. Insert the wall plugs beyond the depth of the tile.
-
Hold the bracket into position, align the fixing holes in the bracket with the wall plugs and insert the screws until the bracket is held firmly into position.
-
Fit the nozzles onto their storage posts, and insert the assembled vacuum cleaner into the bracket (fig.8).
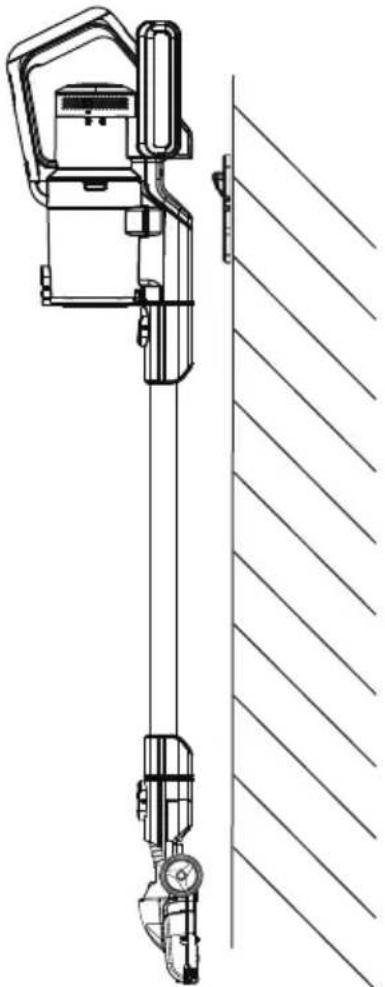
natural_image
Technical line drawing of a vertical mechanical device with a side-mounted sensor or actuator, connected to a diagonal wall (no text or symbols present)Fig. 8

NOTES
-
If fixing the bracket to timber, follow the directions above, but only drill a small pilot hole for each screw and do not use wall plugs. This fitting is not suitable for mounting onto doors.
-
If fixing to hollow plasterboard walls, use a drill bit suitable for wood and use wall anchors suitable for cavity walls. For maximum strength locate into wall studs and cross braces if possible.
CLEANING AND MAINTENANCE
Maintenance
Disconnect the charger from the vacuum cleaner before carrying out cleaning and maintenance.
To ensure your vacuum cleaner works at optimum efficiency, keep the ventilation holes and vacuum cleaner surface free from dirt.
Ensure that the dust container is emptied and the air filters are washed regularly.
- Wipe the outside of the vacuum cleaner and accessories with a damp (not wet) cloth and then wipe dry. Do not use detergents, solvents or abrasives as these may scratch or damage the surface.
- Never immerse the vacuum cleaner, battery or charger in water.
- When not in use, store in a cool, dry place.
Emptying The Dust Container
- When the dust container reaches the MAX line marked on the container (fig 9) or when the suction power is reduced, it is time to empty the dust container.
- Position the dust container over a refuse bin, then press the lever at the front of the container to open the base (fig. 10) and empty the container. Gently tap the container against the side of the bin to remove any stubborn dust.

text_image
Dust fullFig. 9 Fig. 10
- The inside of the dust container maybe wiped clean with a damp cloth. Dry with a soft dry cloth before closing the flap. A click will be heard when it is correctly engaged.
Cleaning The Filters
- The frequency that the filters should be cleaned will depend on appliance usage. For maximum efficiency the filter within the dust container should be cleaned every time the dust container is emptied and the exhaust filter at the top every three months.
- Click the dust container release button, located on the front of the handle just above the dust container and pull dust container out (Fig 11).
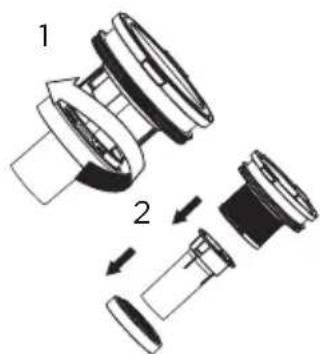
- Lift out the cyclone from dust container (Fig 12), lift out pre-motor filter and shake off dust frequently. Every three months rinse filter and dry thoroughly (Fig 13), turn the filter assembly head anti-clockwise to disassemble the inner filter (Fig 14), wash with running water, and make sure it is dry before next use (Fig 15).

Fig. 11 Fig. 12 Fig. 13
text_image
Technical diagram showing a mechanical assembly with numbered components and directional arrows indicating motion or assembly.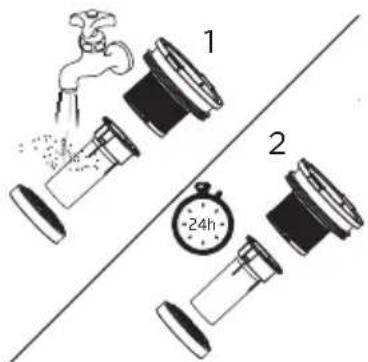
text_image
1 2 +24hFig. 14 Fig. 15
- Tap the filter against a dustbin to remove most of the dust and then wash the filter in cold running water until the water runs clear. Allow to air dry fully. Using a damp or wet filter will reduce the suction and damage the motor.
- The filter assembly can also be washed under running water if needed.
- When the filter and assembly are completely dry, reverse the above steps and refit the filter into the dust container and close the flap.
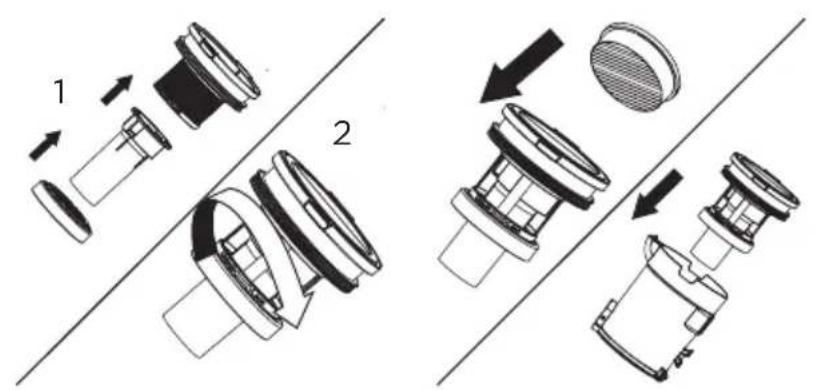
- To clean or replace the post-motor filter, turn the cover anticlockwise and lift off the cover (fig. 17), remove the filter (Fig.18), wash and dry the filter in accordance with step 4.
- Refit the filter and cover onto the cleaner.
text_image
Technical diagram showing two mechanical assembly steps with labeled components and directional arrows indicating movement.Fig. 16
natural_image
Technical line drawing of a mechanical device with internal components (no text or symbols)Fig. 17 Fig. 18
natural_image
Technical line drawing of a mechanical device with internal components (no text or symbols)Cleaning The Brush
- The frequency that the brush should be cleaned will depend on appliance usage. Always stop the vacuum and clean the brush head if the indicators turn white or if the floor head brush stops rotating.
- Remove the floor head from the cleaner (fig. 19).
- Push the small lever at the side of the brush in the direction of the front of the floor head and lift off the retaining plate (fig. 20).
- Lift out the roller brush (fig. 21) and remove any thread, fluff or other obstructions. The brush roller can also be washed under running water if needed. Allow to fully dry.
- Refit the bush roller and secure into position by fitting the retaining plate.

text_image
PushFig. 20 Fig. 21 Fig. 19
TROUBLE SHOOTING
| Common failure Possible cause Solutions | ||
| The vacuum doesn't work | ·Product has powered off or battery is low | ·Please charge the product before use |
| ·Product suction port is blocked | ·Cleaning product suction mouth | |
| Suction is too weak | ·Dust barrel & filter assembly is dusty/full | ·Clean the dustbin and filter material |
| ·Rolling brush is wrapped around the hair and other objects | ·Clean roller brush | |
| ·Tube has an obstruction | ·Carefully clean and check for blockages | |
| Different motor operation sound | ·The tube is partially blocked | ·Carefully clean and clear |
| ·Filter assembly is blocked | ·Thoroughly clean the filters | |
| Product can not be charged | ·Charger not properly connected | ·Please check connections |
| ·Mains supply is not switched on | ·Check the mains supply is switched on | |
| ·Situation still remains | ·Check with a service centre | |
TRADEMARKS, COPYRIGHTS AND LEGAL STATEMENT
Midea logo, word marks, trade name, trade dress and all versions thereof are valuable assets of Midea Group and/or its affiliates (“Midea”), to which Midea owns trademarks, copyrights and other intellectual property rights, and all goodwill derived from using any part of an Midea trademark. Use of Midea trademark for commercial purposes without the prior written consent of Midea may constitute trademark infringement or unfair competition in violation of relevant laws.
This manual is created by Midea and Midea reserves all copyrights thereof. No entity or individual may use, duplicate, modify, distribute in whole or in part this manual, or bundle or sell with other products without the prior written consent of Midea.
All the described functions and instructions were up to date at the time of printing this manual. However, the actual product may vary due to improved functions and designs.
DISPOSAL AND RECYCLING
Important instructions for environment
Compliance with the WEEE Directive and Disposing of the Waster Product: This product complies with EU WEEE Directive (2012/19/EU). This product bears a classification symbol for waster electrical and electronic equipment (WEEE).
This symbol indicates that this product shall not be disposed with other household wastes at the end of its service life. Used device must be returned to official collection point for recycling of electrical electronic devices. To find these collection systems please contact to your local authorities or retailer where the product was purchased. Each household performs important role in recovering and recycling of old appliance. Appropriate disposal of used appliance helps prevent potential negative consequences for the environment and human health.

natural_image
Symbol of a trash bin crossed with no text or numbers, representing waste sorting or disposal (no text present)Compliance with RoHS Directive
The product you have purchased complies with EU RoHS Directive (2011/65/EU). It does not contain harmful and prohibited materials specified in the Directive.
Package information
Packaging materials of the product are manufactured from recyclable materials in accordance with our National Environment Regulations. Do not dispose of the packaging materials together with the domestic or other wastes. Take them to the packaging material collection points designated by the local authorities.

natural_image
Recycling symbol with three chasing arrows forming a triangle (no text or labels)DATA PROTECTION NOTICE
For the provision of the services agreed with the customer,
we agree to comply without restriction with all stipulations of applicable data protection law, in line with agreed countries within which services to the customer will be delivered, as well as, where applicable, the EU General Data Protection Regulation (GDPR).
Generally, our data processing is to fulfil our obligation under contract with you and for product safety reasons, to safeguard your rights in connection with warranty and product registration questions. In some cases, but only if appropriate data protection is ensured, personal data might be transferred to recipients located outside of the European Economic Area.
Further information are provided on request. You can contact our Data Protection Officer via MideaDPO@midea.com. To exercise your rights such as right to object your personal date being processed for direct marketing purposes, please contact us via MideaDPO@midea.com. To find further information, please follow the QR Code.

text_image
Mideamake yourself at home