FingerTIP ID Board G8314001 - Computer Keyboard Cherry - Free user manual and instructions
Find the device manual for free FingerTIP ID Board G8314001 Cherry in PDF.
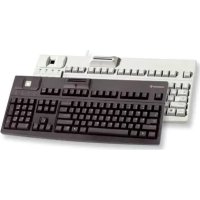
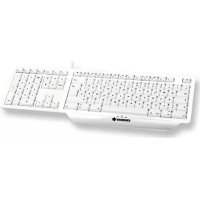
| Product Type | Keyboard with fingerprint reader and smart card reader (model G83-14000) |
| Dimensions (W x D) | 458 x 195 mm |
| Weight | Approximately 1.5 kg |
| Power Supply | USB, 5 V ±5 %, max. 500 mA |
| Interface | USB |
| Operating Temperature | 0 °C to +50 °C |
| Storage Temperature | -20 °C to +60 °C |
| Fingerprint Reader | Yes, for biometric identification |
| Smart Card Reader | Yes (model G83-14000) |
| Supported Operating Systems | Windows NT4, 98, ME, 2000 |
| Main Functions | Fingerprint login, digital signature, home banking, internet payment, access control, encryption |
| Compliance | CE, VCCI, Class B |
| Cable Length | Approximately 1.8 m |
| Package Contents | Keyboard, CD-ROM with software and user manual |
| Maintenance | Clean with a soft dry cloth, avoid liquids |
| Safety | Only connect low-power devices (<100 mA) to the upstream USB ports |
Frequently Asked Questions - FingerTIP ID Board G8314001 Cherry
User questions about FingerTIP ID Board G8314001 Cherry
0 question about this device. Answer the ones you know or ask your own.
Ask a new question about this device
Download the instructions for your Computer Keyboard in PDF format for free! Find your manual FingerTIP ID Board G8314001 - Cherry and take your electronic device back in hand. On this page are published all the documents necessary for the use of your device. FingerTIP ID Board G8314001 by Cherry.
USER MANUAL FingerTIP ID Board G8314001 Cherry
natural_image
Exterior view of a vintage computer keyboard with black keys and a silver casing (no visible text or symbols)natural_image
Exterior view of a vintage computer keyboard with blue keys and a silver top (no visible text or labels)1 Printed and online information
Information on the setup, operation and configuration of the keyboard FingerTIP ID Board is contained partially in this brief user guide and partially in an online version (in the form of an electronic operating manual). Please also observe the license agreement and general user information on our product included therein.
The information is presented according to the following criteria:
- The operating manual provides you with detailed information to operate the keyboard and software. If you would like to read the documentation on paper, you can call up the PDF version of the operating manual (CD-ROM:\"Operating System"\DOC\ "Language"\UserGuide_Keyboard.pdf) and print the contents desired.
- The brief user guide provides you with all the information you need to assemble the keyboard and install the software. By presenting only the most essential information on paper, we are reducing the unnecessary use of paper and thus making our contribution towards environmental protection.
2 Advantages of the FingerTIP ID Board
The keyboard FingerTIP ID Board gives you security and comfort during the logon procedure with your PC: you no longer need to log on with your PC, domain or network with a password. The keyboard identifies you or other authorized users by means of your fingerprint.
You can use the G83-14000 model with Chipcard Reader for the following tasks, provided you have the necessary application software:
- Digital signature
• Home banking - Internet payment
- Access control
• Public Key Infrastructure (digital signature at the company or inter-company level) - Data encryption
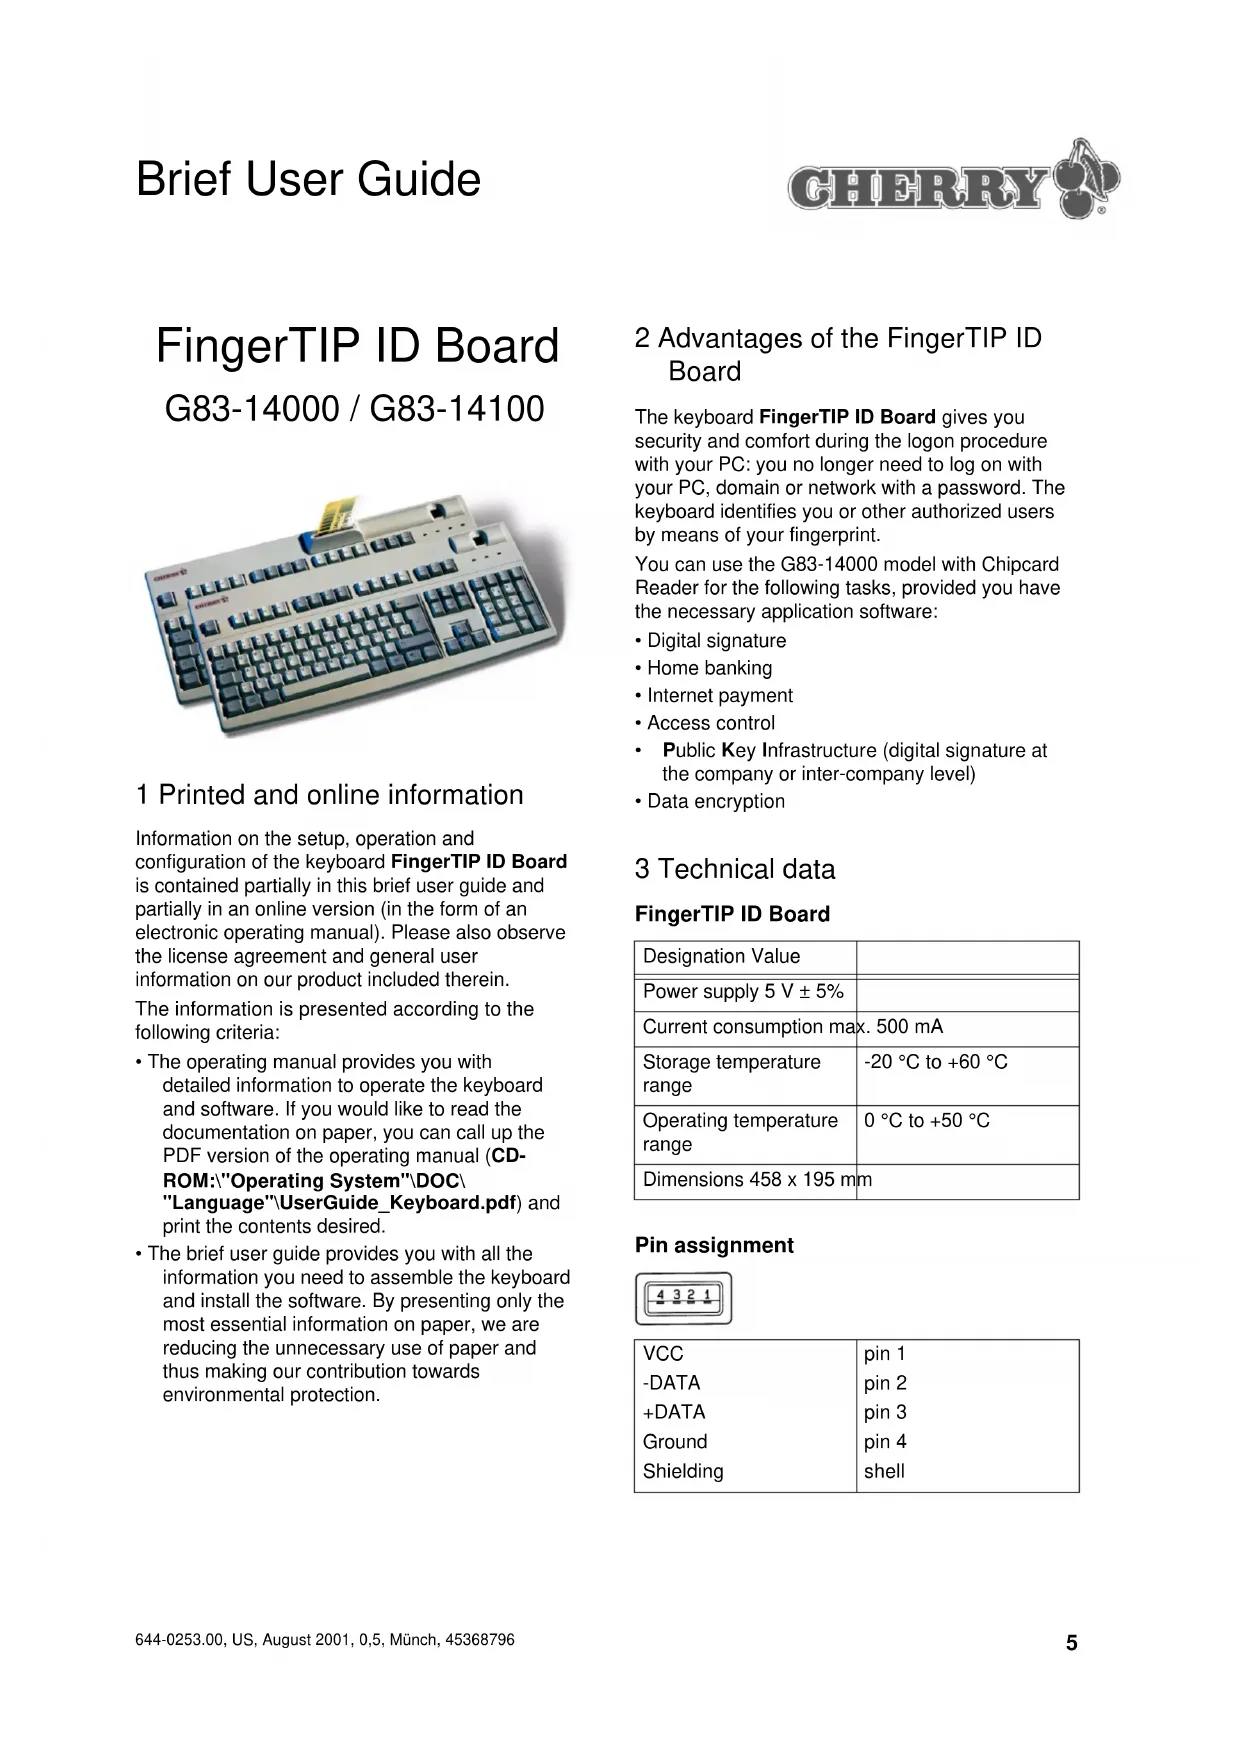
3 Technical data
FingerTIP ID Board
| Designation Value | |
| Power supply 5 V ± 5% | |
| Current consumption max. 500 mA | |
| Storage temperature range | -20 °C to +60 °C |
| Operating temperature range | 0 °C to +50 °C |
| Dimensions 458 x 195 mm | |
Pin assignment
| 4 | 3 | 2 | 1 |
| VCC | pin 1 |
| -DATA | pin 2 |
| +DATA | pin 3 |
| Ground | pin 4 |
| Shielding | shell |

Caution
Danger if the current intensity is too high.
The connection of defective devices or other components not intended for the purpose can cause a short-circuit and subsequent damage.
- Connect only Low Power Devices with a maximum current consumption of 100mA to the Down Stream Ports.
4 Installing the software and connecting the keyboard
The following installation instructions refer to the Siemens software for the Cherry FingerTIP ID Board. If you use a different software, follow the installation instructions provided by the manufacturers.
4.1 Windows NT4.0

USB under Windows NT4.0
As standard, Windows NT 4.0 does not support USB technology. However, special USB drivers are installed with the FingertiplD Board software. These drivers allow you to you use the USB port for the Cherry keyboard.
Preconditions:
- Windows NT 4.0 Service Pack 3 or later must be installed on your PC.
- If USB support can be activated in the BIOS of your PC, it must be activated in the BIOS Setup.
To activate the USB support in the BIOS
1 Restart your PC or switch it on.
2 While the PC powers up, pay attention to the messages on the screen and press the specified key to enter the BIOS Setup.
3 In the BIOS Setup select the menu item USB Legacy Support in the menu Advanced.
4 Select the setting Enabled.
5 Save the changed setting and quit the BIOS Setup.
To install the software under Windows NT 4.0
Precondition: A functioning keyboard must be connected to your PC.

Caution
USB is not supported by Windows NT4.
If USB devices are installed that do not come from Siemens or Siemens partners, malfunctions can occur.
- Deinstall these USB devices.
1 Place the Cherry CD in your CD-ROM drive. The CD-ROM starts automatically. The page Welcome to the FingerTIP ID Board setup opens up on the screen.
-OR-
If the CD-ROM does not start automatically, select the CD-ROM drive in the Microsoft Explorer and double-click with the left mouse button on the file Setup.exe.
The page Welcome to the FingerTIP ID Board setup opens up on the screen.
2 Follow the installation instructions on the screen.
3 When the installation is complete, power down your PC.
To connect the Cherry keyboard to your PC
1 Disconnect the plug of the keyboard you have been using up to now from the PC.
2 Connect the USB plug of the Cherry keyboard with the USB port of your PC.
The keyboard is ready for use.
3 Restart your PC or switch it on.

Logging on for the first time
When logging on for the first time after installation of the software, you must log on with a password. This is because your fingerprint is not yet available.
To install the Chipcard Reader from model G83-14000
1 Select the directory CD-ROM:\FingerTIPIDBoard\WinNT4 and double-click on the file Setup.exe. During the setup, you will be asked which reader you wish to install.
2 Select the entry CardMan 2020.
4.2 Windows 98/ME/2000
The operating systems Windows 98, 2000 and ME support the USB technology. For this reason, you can plug in the new Cherry keyboard while the PC is running, without having previously installed the keyboard drivers.
To connect the Cherry keyboard to your PC
1 Connect the USB plug of the Cherry keyboard with the USB port of your PC. The operating system recognizes the Cherry keyboard. The message New hardware component found is displayed on the screen.
2 The dialog box Required files then appears, informing you which file is needed.
3 Place the Cherry CD in your CD-ROM drive.
4 From the list Copy files from, s ROM drive as source.
5 Follow the driver installation instructions on the screen.
To install the software underWindows 98/ME/2000

Automatic CD start
After the Cherry CD is placed in the drive (during the installation of the drivers), the CD starts automatically if the Autostart function of your CD-ROM drive is activated. The page Welcome to the FingerTIP ID Board setup is displayed.
1 If the Cherry CD has not started automatically during the driver installation, open the Microsoft-Explorer.
2 In the Explorer, select the CD-ROM drive and double-click with the left mouse button on the
file Setup.exe.
The page Welcome to the FingerTIP ID Board setup opens up on the screen.
3 Follow the software installation instructions on the screen.
5 Operating the keyboard and the software
After the installation has been completed and the PC has been restarted, the entry FingerTIP ID Board appears in the Start menu under Start | Programs.
This entry opens up a group with the following menu items:
- Install Acrobat Reader: Installs the viewer Acrobat Reader for the operating manual. This entry only appears if the Acrobat Reader is not already installed on your PC. - Operating manual (HTML version): Opens the operating manual with the standard browser of your PC. - Operating manual: Opens the operating manual in PDF format with the Acrobat Reader.
or Deinstallation FingerTIP ID Board: Deinstalls the software for the FingerTIP ID Board.
- User ID administration: Allows the user identification codes to be changed. - Read me: Displays important information in brief. - FingerTIP ID Board User Manager: Central administration program that files new user fingerprints and administrates them.

Information on operating the keyboard and software
Detailed information on operating the fingerprint sensor and the software can be found in the operating manual (HTML or PDF version).
6 Support
To help you with any problems you may encounter in the installation of the keyboard or the software, we provide you with a free support service.
Under http://support.cherry.de, you can contact the CHERRY INTERNET SUPPORT SYSTEM (CISS). There, you can submit your questions to us directly around the clock and seven days a week.
If you do not have an Internet connection, please contact us at the following address or under the following telephone or fax numbers:
CHERRY GmbH
Cherrystrasse
D-91275 Auerbach
Hotline:
Tel.: +49(0)9643-18-206
Fax: +49(0)9643-18-545.
We are available to help you Monday to Thursday from 07:15 to 16:00 and Friday from 07:15 to 13:30 (GMT + 1h).
natural_image
Exterior view of a vintage computer keyboard with blue keys and a silver top (no visible text or labels)2 Declaration of CE Conformity
We, Cherry GmbH, hereby declare that the keyboards RS14000USB-FPR and RS14100USB-FPR accord with the following requirements: Low-Voltage Directive 73/23/EEC tested in accordance with EN 60950 and the EMC Directive 89/336/EEC, ensured via testing in accordance with EN 61000-4-2 Level 2, EN 61000-4-3 Level 2, EN 61000-4-6 Level 2, specified in EN 55024 (1998) and EN 55022 (1998) Class B.
Tested according to the standard Cherry testing procedures.
4 Federal Communications Commission (FCC) Radio Frequency Interface Statement
Information to the user: This equipment has been tested and found to comply with the limits for Class B digital device, pursuant to Part 15 of the FCC Rules. These limits are designed to provide
reasonable protection against harmful interference in a residential installation. This equipment generates, uses and can radiate radio frequency energy and, if not installed and used in accordance with the instructions, may cause harmful interference to radio communications. If this equipment does cause harmful interference to radio or television reception, which can be determined by turning the equipment off and on, the user is encouraged to try to correct the interference by one or more of the following measures:
• Reorient or relocate the receiving antenna
- Increase the separation between the equipment and receiver
- Connect the equipment into an outlet on a circuit different from that to which the receiver is connected
- Consult the dealer or an experienced radio/TV technician for help
Caution: Cherry is not responsible for any radio or television interference caused by unauthorized modifications of this equipment or the substitution or attachment of connecting cables and equipment other than those specified by Cherry! Such unauthorized modifications, substitutions, or attachments may void the user's authority to operate the equipment. The correction of interferences caused by such unauthorized modifications, substitutions, or attachments will be the responsibility of the user. Use only shielded interface cables to ensure compliance.
5 Canadian Radio Interface Regulations
This digital apparatus does not exceed the Class A limits for radio noise emissions from digital apparatus set out in the Radio Interference Regulations of the Canadian Department of Communications.
This digital apparatus does not exceed the Class A limits for radio noise emissions from digital apparatus set out in the Radio Interference Regulations of the Canadian Department of Communications.