
VT40163 - Fan V-TAC - Free user manual and instructions
Find the device manual for free VT40163 V-TAC in PDF.

| Product type | Pedestal fan |
| Brand | V-TAC |
| Model | VT40163 |
| Number of speeds | 3 (low, medium, high) |
| Oscillation | Yes, push/pull oscillation control |
| Adjustable height | Yes, via chrome telescopic pole |
| Tilt | Yes, tilting of the protective grille |
| Base material | Reinforced plastic |
| Pole material | Chrome steel |
| Protective grille | Front and rear, snap-on |
| Blade fixing | Reverse thread retaining nut |
| Control type | Push buttons on the base |
| Power supply | Mains (standard plug) |
| Intended use | Domestic, indoor only |
| Cleaning | Soft damp cloth, unplug before |
| Safety | Do not immerse, do not use with external timer |
| Repairability | Reserved for qualified electrician |
| Minimum user age | 8 years with supervision |
Frequently Asked Questions - VT40163 V-TAC
User questions about VT40163 V-TAC
0 question about this device. Answer the ones you know or ask your own.
Ask a new question about this device
Download the instructions for your Fan in PDF format for free! Find your manual VT40163 - V-TAC and take your electronic device back in hand. On this page are published all the documents necessary for the use of your device. VT40163 by V-TAC.
USER MANUAL VT40163 V-TAC
When using electrical appliances, basic safety precautions should always be followed. These instructions should be saved for future reference:
-
Read and familiarise yourself with all operating instructions before using this Pedestal Fan.
-
Before plugging your unit into the mains, visually check that the unit is intact and has not suffered any transit damage.
-
Do not use this product with a programmer, timer, separate remote-control system or any other device.
-
Check that the voltage indicated on the data plate corresponds with that of the local network before connecting the appliance to the mains power supply.
-
This appliance can be used by children aged from 8 years and above and persons with reduced physical, sensory or mental capabilities or lack of experience and knowledge if they have been given supervision or instruction concerning use of the appliance in a safe way and understand the hazards involved. Children shall not play with the appliance. Cleaning and user maintenance shall not be made by children without supervision.
-
This appliance is not intended for use by persons (including children) with reduced physical, sensory or mental capabilities, or lack of experience and knowledge, unless they have been given supervision or instruction concerning use of the appliance by a person responsible for
their safety. And Children should be supervised to ensure that they do not play with the appliance
- Do not immerse the appliance or its cord in water or any other liquids.
- Do not leave the appliance unattended during use.
- Do not leave the appliance unattended whilst connected to the mains supply.
- Always use this appliance on a solid, level, surface.
- Do not use this appliance outdoors.
- It is imperative to unplug the power cord after the appliance has been used, before it is cleaned and whilst being repaired.
- Repairs to electrical appliances should only be performed by a qualified electrician. Improper repairs may place user at serious risk.
- Do not operate this appliance with a damaged plug or cord, after a malfunction or after being dropped or damaged in any way.
- Regular, periodic checks should be carried out on the mains cable to ensure no damage is evident. Should there be any signs of damage the appliance should not be used.
- If the power cable is damaged, it should only be replaced by the manufacturer or a suitable qualified after-sales-service in order to avoid a hazard.
- Do not allow the mains cable to hang over sharp edges or come in contact with hot surfaces.
- Do not run the mains cable under carpets, rugs, etc.
-
This appliance is intended for household use only and should not be used for industrial purposes.
-
Do not use any accessories or attachments with this appliance other than those supplied or recommended by the supplier.
- Do not use this appliance for anything other than its intended use.
- Do not push objects (including fingers) into the fan grill or any openings as this could risk injury, damage to the appliance and/or electric shock.
- Unplug after each use. Grasp the plug, not the cord.
- Please make sure to turn off the power before starting the installation.
- Installation should only be done by a certified electrician.
This marking indicates that this product should not be disposed of with other household wastes.
Caution, risk of electric shock.
INTRODUCTION & WARRANTY
Thank you for selecting and buying V-TAC product. V-TAC will serve you the best. Please read these instructions carefully before starting the installation and keep this manual handy for future reference. If you have any another query, please contact our dealer or local vendor from whom you have purchased the product. They are trained and ready to serve you at the best.
WEEE Number: 80133970
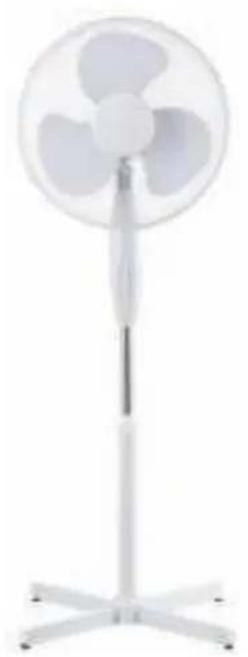
INSTRUCTION MANUAL STAND FAN
TECHNICAL DATA
| MODEL | VT-4016-5 |
| WATTS | 40W |
| FAN SPEED | LOW-MED-HIGH |
| OSCILLATION | LOW-MED-HIGH |
| STAND FAN | 16 INCHES STAND FAN |
| HEIGHT | 1.2M |
| ADJUSTABLE HEIGHT | 120CM MAX |
| GROSS WEIGHT | 2.6 KGS |
| DIMENSION | 600x600x120mm |
| BASE | 600mm CROSS BASE |
| INPUT POWER | AC: 220-240~, 50/60Hz |

MULTI-LANGUAGE MANUAL QR CODE
Please scan the QR code to access the manual in multiple languages.
DESCRIPTION OF PARTS
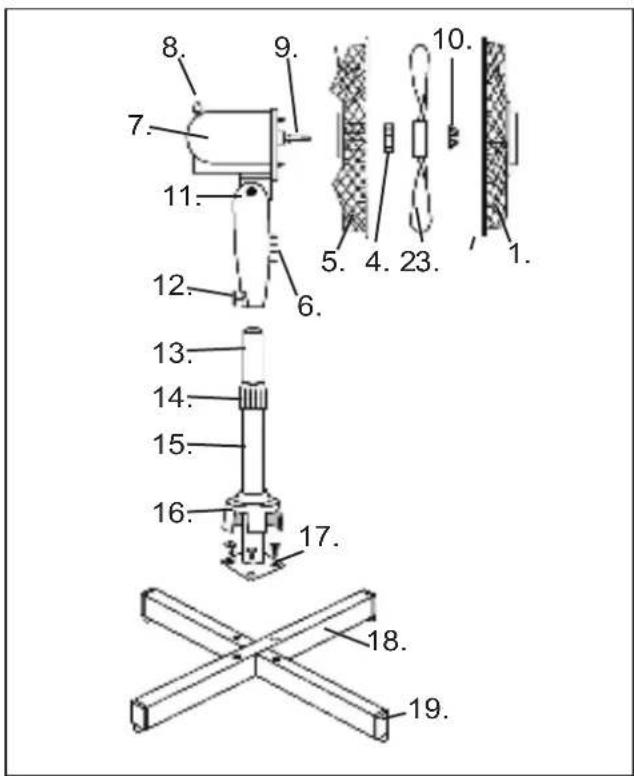
- Front Guard
- Guard Nut and Screw
- Fan Blade
- Rear Guard Central Fixing Nut
- Rear Guard
- Speed Control Switches
- Motor Housing
- Oscillation Control
- Motor Spindle
- Blade Retaining Nut
- Pivot Screw
- Pole Retaining Screw
- Adjustable Pole
- Pole Clamp
- Lower Base Pole
- Screw Cover
- Base Fixing Screws
- Base
- Base End Caps
PRODUCT ASSEMBLY
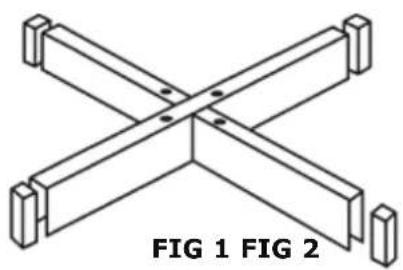
Step 1. Take the two base cross members (18) and push the 4 base end caps (19) into the ends if not already fitted and then cross them over together.
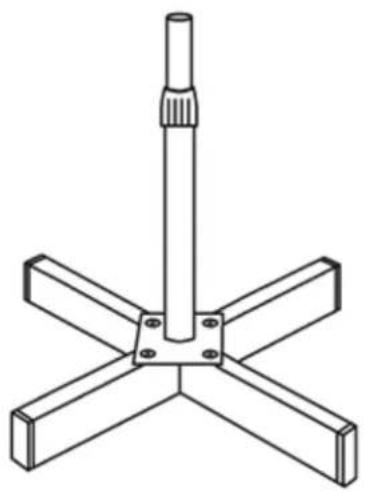
Step 2. Remove the four screws from the two base members and attach the lower base pole (15) to the base using a pozidrive screwdriver (not supplied).
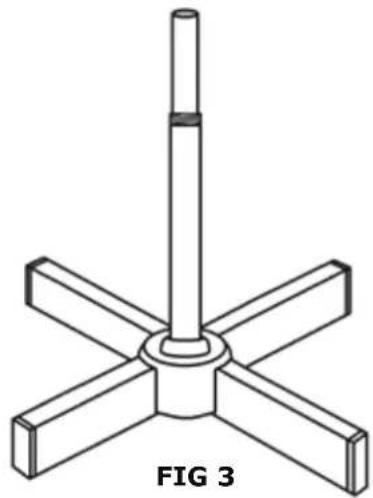
Step 3. Unscrew and remove the pole clamp (14 - shown in step 2 above) and slide the screw cover (16) down over the adjustable and lower base pole (13 & 15) until it is in place over the screws.
Step 4. Replace the pole clamp (14) and at the same time raise the chrome adjustable pole (13) then tighten the clamp (14).
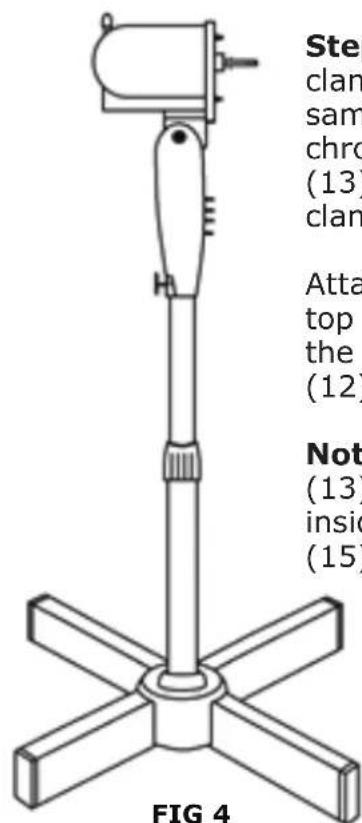
Attach the fan assembly on top of the pole and tighten the pole retaining screw (12).
Note: the adjustable pole (13) can sometimes slip inside the lower base pole (15) during transit.
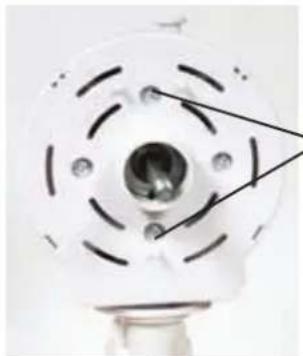
FIG 5
Guard locating pins
Step 5. Note the Rear Guard locating pins on the Motor Housing (7).
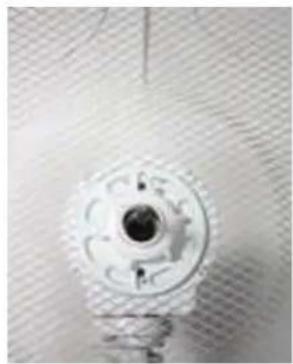
FIG 6
Step 6. Place the rear guard (5) over the pins on the motor housing (7) and replace the Rear Guard Central Fixing (4) nut by screwing it back clockwise. Note: the carry handle is at the top:
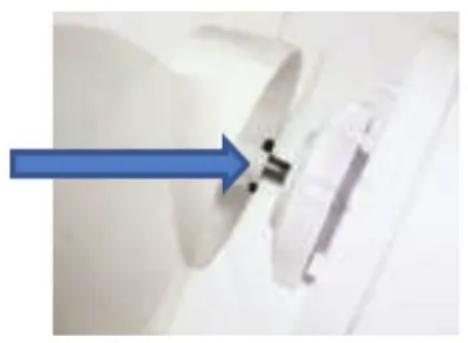
FIG 7
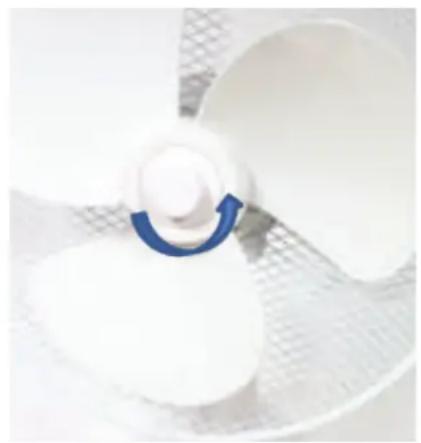
FIG 8 FIG 9
Step 7. Take the fan blade (3) and slide it onto the motor spindle (9) ensuring that notches on the rear of the fan blade line up with the splines on the spindle.
Note: Rear Guard removed for clarity (see figure 7).
Step 8. Secure the fan blade to the motor spindle by screwing on the Blade Retaining Nut (10) in an anticlockwise direction.
Note: the retaining nut is reverse threaded (see figure 8).
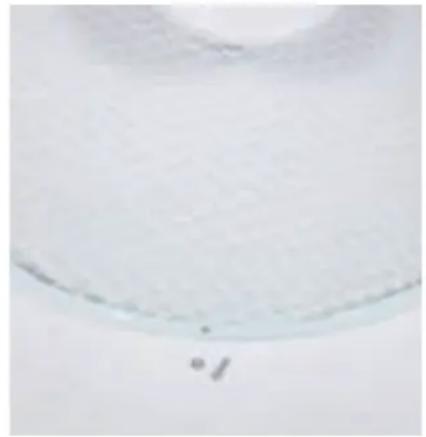
Step 9. Remove the small Guard Nut & Screw (2) from the front guard (1) (see figure 9).
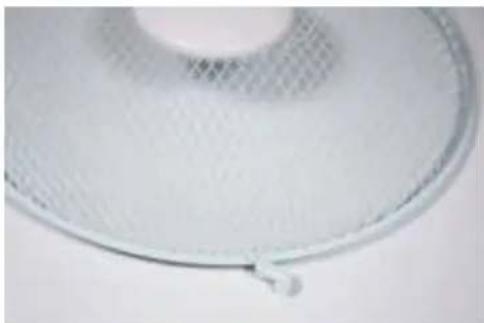
FIG 10
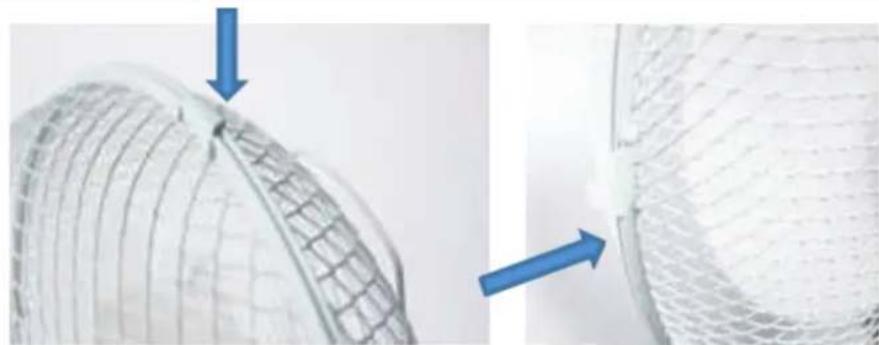
FIG 11 FIG 12
Step 10. Move the clips around the outside edge of the front guard outwards (see figure 10).
Step 11. Hang the front guard (1) over the top of the rear guard (5) (see figure 11).
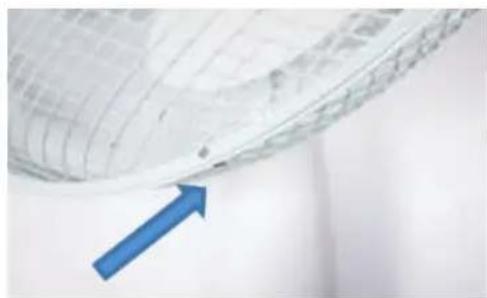
FIG 13
Step 12. Bring the front guard down to meet the rear guard and push the clips inwards until the front guard is fastened to the rear guard (see figure 12).
Step 13. Finally fit the guard nut and screw (arrowed) through the holes in the bottom edge of the guards and tighten with a suitable pozidrive screwdriver (not supplied). Note: this screw and nut must be fitted so that the guard cannot be removed (see figure 13).
OPERATING INSTRUCTIONS
- Place the fan in the desired position ensuring that it is level and stable.
- If desired, the fan guard can be tilted up and down to alter the direction of the airflow.
Note: do not adjust the fan whilst connected to the mains and/or switched on.
Slacken the Pole Clamp (14) and adjust the fan to the desired height using the Adjustable Pole (13), tighten the pole clamp once the desired height is set.
Note: the adjustable pole (13) can sometimes slip inside the lower base pole (15) during transit.
Press the '0' button on the pedestal to ensure the fan is off.
Insert the mains plug into the nearest socket.
- Press the 1 button for fan low speed.
- Press the 2 button for fan medium speed
- Press the 3 button for fan high speed
Note: Press the '0' button to switch off the fan.
- Press the oscillation control (8) down to enable the fan to oscillate from side to side.
- Pull the control up to stop the fan oscillating.
CARE AND USE OF YOUR FAN
- Ensure that the fan is not connected to the mains supply before cleaning.
- Wipe the fan body with a clean, soft damp cloth.
- Do not immerse the fan or its cord in water or any other liquid.
In case of any query/issue with the product, please reach out to us at: support@v-tac.eu For More products range, inquiry please contact our distributor or nearest dealers. V-TAC EUROPE LTD. Bulgaria, Plovdiv 4000, bul.L.Karavelow 9B
MESURES DE SECURITE
[FR] INTRODUCTION & GARANTIE
(13), cIeI KOeTo 3aTeHHeTe cKo6aTa (14).
PpNkpePeTe 6Ioka Ha BeHTnlaTopa B rOpHaT aCt Ha cToiKaTa n 3aTeHHeTe 3aCToOpBaunia BnT (12).
3a6eJekka: Perynnpyemata cTouka (13) npn TpaHcnpTupane nohKa moKe da BJe3e BdoHaTa cToiKa Ha OCHOBATA
(15).
CTbIka 5. Ot6eJekTe fKcnpaunTe BnHTObe Ha 3aHnnaPpeDn3ntel Ha Kopnyca Ha DInrataTena (7).
Ctbnka 6. NocTabete 3aHnI npednaHTe (5) Hnd uNfTOBeTe Ha Kopnyca Ha DnRaTeTg (7), noCTabete ceHTpaHaTa
fHKcapaa raKa (4) Ha 3aHnI npedna3nte I y 3aBnTe No YacOBHKOBaTa CTpeKka.
3a6eJekka: Dpbkkata 3a HocHe e B rOpHaTa qact.
CTbNka 7. B3eMeTe IonaTka Ha BeHTnlaTopa (3) n a IIb3HeTe Ha poTopa Ha DBnraTeIa (9), KaTo ce yBepnte, Ye npope3nTe Ha 3aHaTa n CTpaHa ca NOpBaBHeHc SiNoHKnTe Ha poTopa. 3a6enEcka: 3a no-rolma JCHota 3aHnT npeJna3nTeI He e nokaah (Bk. fInypa 7).
Ctbnka 8. Pnikpenete IonoTkata Ha BeHTnilaTopa Kb m poTopa Ha DnRaTeI, KaTo 3abneTe 3actonopBaata raKa Ha IonoTkata (10) o6paTHo Ha yacOBnKOBaTa CTpeIka. 3a6eJek: 3actonopBaata raiKa e c o6paTha pe36a (Bx. fHypa 8).
CTbNka 9. CbaIeTe MaJIKeTe raiKa n BnHT (2) ot npedHn npedNa3nten (1) (Bk. fHrypa 9).
Ctbnka 10. PpemecTeTe cko6nte no BbHnHnpa6 Ha npednnaepda3nteB nocoka HABh (Bx. hpya 10).
Ctbnka 11. Okayete npednna npedna3nten (1) nad ropnata qact Ha 3aHnnpedna3nten (5) (Bx. fIpya 11).
Ctbnka 12. CnycheTe npednna npedna3nte, dokato ToH He DocTrHe 3aHnna npedna3nte, n npemecTe cko6nte B noCoka HABTpe, 3a da npikpenTe npednna npedna3nte KbM 3aHnna npedna3nte (Bx. fIgypa 12).
Ctbnka 13. N haKpaar noctabete raKaTa n BnHTa Ha npedna3nte (cbc cTpeIka) npes OTBOpTe B doHnra Kpa H npedna3nte I rna 3aterhe Tc nmoOuaHa ndoXoJa KaPbctata PZ OTBepTKa (He e BkNoyeHa B doCTabKaTa). 3a6eJekka: BnHTbT n raKaTa Tp8Ba Da ce MoHTnpat TaKa, Ye npedna3nteIa T a He moKe da 6bJe n3BaDeH (Bx. fynypa 13).
HCTpyKun 3a ekCnloataun
- IocTaBete BeHTnlaTopa B XeJahOTo nNoXKeHne, KaTo ce yBepnte, Ye Toe 6aJahCnpaH n Cta6nJIenH.
Ako e keaTeHo, HauonHe TpeNa3nte Ha BHTnlaTopa Harope nHaOny, 3a da npomeHnte nocokata Ha Bb3DywnnnoTOK.
3a6eIekKa: He perylnpaIte BeHTnlaTopa,doKaTo e Cbbp3aH cMpexKaTa n/nn E BkIoueH.
Pa3xla6te cko6ata Ha cToiKaTa (14) n perylnpaTe BENTnlaTopa Ha JeaHaTBAuOcHnA, KaTO n3NoI3BaTe
perynpymata ctoka (13), n cne kaTo ro yctaHOBnTe Ha JxelaHATA BnCOuHnHa, 3aterHeTe ckObata Ha cToKaTata.
3a6eJexka: PerynpyemaTcToKa (13) npn TpaHcnopTpHaNe NOHkora MoKe Da BHe3e B DoHaTa CToKa Ha OCHoBaTa.
HaTnche 6yToHa '0' Ha noCTaBkata, 3a da n3KJIouHte BeHTnJaTopa.
Bkluoyete 3axpaHbauinKa6eB Hn-6n3kn KoHTaKT.
- HaTnchete 6yToHa 13a HnCKa ckopoCT Ha BeHTnlaTopa.
- Hatnche 6ytoHa 23a cpeHa ckopoCT Ha BeHTnataTopa.
- HaTnchTe 6yToHa 33a BnCoka ckopoCT Ha BeHTnlaTopa.
3a6eIekka: HatncheTe 6yToHa '0', 3a da n3KIOUHTe BEHTnlaTopa.
BbptHe Ha BeHTnlaTopa B pa3nHn nocokn
- HaTnchHepepyNaTopaHaBbPteHTo(8)HaDony,3a da no3BoJInTeHaBeHTnAToPa da ce 3aBbPta Bpa3JInuHn NocOKn.
- BytthepeperyaTopaHarope,3a Da npeyctahOBnTe BbPteHeTo Ha BeHTnlaTopa.
IopdpbXka n3no3BaHe Ha BENTnlaTopa
- Ppei Da 3aOnuHe Te NouchBaHe Ce yBepaBnTe, Ye BENTnAToPbT He e Cbbp3Ah cEneKtp03axpaHbHaTeO.
- 136bpcBaIe Kopnyca Ha BENTnlaTopa C YnCTa, MeKa, BlaXHa Kbpna.
- He notanayte BeHTnlaTopa nn Ka6ena My BbB Boa nn KaKBaTo n da 6nlo npyra TeuHocT.
MJERE SIGURNOSTI
[PL] WSTEP I GWARANCJAD
[RO] INTRODU CERE, GARANTIA

Brand : V-TAC
Model : VT40163
Category : Fan