
VT-5566 - Fan V-TAC - Free user manual and instructions
Find the device manual for free VT-5566 V-TAC in PDF.


| Product Type | Robot Laser Vacuum |
| Model | VT-5566 |
| Brand | V-TAC |
| Dimensions | Diameter 330 mm, Height 80 mm |
| Net Weight | 2.7 kg (5.94 lbs) |
| Battery | 14.8V, 3000 mAh rechargeable lithium battery |
| Charging Time | Approximately 6.5 hours (full charge) |
| Runtime | About 150 minutes |
| Dust Box Capacity | 600 ml |
| Cleaning Modes | Auto, Single Room, Edge, Spot, Mopping |
| Mopping Function | Yes, with water tank and mopping pad |
| Navigation System | Laser navigation (LDS) |
| App Control | Smart Life app (iOS/Android) with Wi-Fi connectivity |
| Voice Control | Compatible with Alexa and Google Assistant (via app) |
| Virtual Wall / Restricted Zone | Yes, via app |
| Schedule Cleaning | Yes, via app |
| Filter Type | HEPA filter with prefilter |
| Side Brushes | 2 sets included |
| Auto Return to Dock | Yes, when battery low or cleaning complete |
| Safety Sensors | Anti-fall, cliff, collision, and wall sensors |
Frequently Asked Questions - VT-5566 V-TAC
User questions about VT-5566 V-TAC
0 question about this device. Answer the ones you know or ask your own.
Ask a new question about this device
Download the instructions for your Fan in PDF format for free! Find your manual VT-5566 - V-TAC and take your electronic device back in hand. On this page are published all the documents necessary for the use of your device. VT-5566 by V-TAC.
USER MANUAL VT-5566 V-TAC
Important Safety Instructions
- To reduce the risk of injury or damage, read these safety instructions carefully and keep them at hand when setting up, using, and maintaining this device.
- Any operation not conforming to this manual may cause damage to this product.

WARNING SYMBOLS USED
This is the safety alert symbol. This symbol alerts you to potential hazards that could result in property damage and/or serious bodily harm or death.
- This device can be used by children aged from 8 years and above and persons with reduced physical, sensory or mental capabilities or lack of experience and knowledge if they have been given supervision or instruction concerning use of this device in a safe way and understand the hazards involved.
- Children should be supervised to ensure they do not play with this device.
-
Cleaning and maintenance shall not be performed by children without adult supervision.
-
This device is only to be used with the power supply unit provided.
- For the purposes of recharging the battery, only use the detachable power supply unit provided with this device.
- The battery must be removed from this device before this device is disposed of. To remove the battery from this device, first remove the screws on the bottom, then remove the battery by disconnecting the quick connector.
- The used battery should be placed in a sealed plastic bag and disposed of safely according to local environmental regulations.
- The external flexible cable or cord of the power supply unit cannot be replaced; if the cord is damaged, the power supply unit shall be disposed of.
• This device is for indoor use only. - This device is not a toy. Do not sit or stand on this device. Small children and pets should be supervised when this device is operating.
- Store and operate this device in room temperature environments only.
- Clean with a cloth dampened with water only.
-
Do not use this device to pick up spills of bleach, paint, chemicals, or anything wet.
-
Before using this device, pick up objects like clothing and loose paper. Lift up cords for blinds or curtains, and move power cords and fragile objects out of the way. If this device passes over a power cord and drags it, an object could be pulled off a table or shelf.
- If the room to be cleaned has a balcony, a physical barrier should be used to prevent access to the balcony and to ensure safe operation.
- Do not place anything on top of this device.
- Be aware that this device moves around on its own. Take care when walking in the area where this device is operating to avoid stepping on it.
- Do not operate this device in areas with exposed electrical outlets on the floor.
- Do not expose the electronics of this device, its battery, or the integrated Charging Base. There are no user-serviceable parts inside.
- Do not use this device on an unfinished, unsealed, waxed or rough floor. It may result in damage to the floor and this device. Use only on hard floor surfaces or lowpile carpet.
-
This device has been designed to be used on floors without scratching them. We still recommend that you test this device on a small area of the room to be cleaned to ensure no scratches are made before cleaning the whole room.
-
Ensure that the robot laser vacuum is not connected to the mains supply before cleaning.
- Remove the plug from the socket outlet before cleaning or maintaining the appliance.
- Only authorized technicians can disassemble this product. Users are not recommended to disassemble this product by themselves.
- Do not touch wires, sockets or power adapter when your hands are wet.
- Clean the product after charging.
- Do not use the product in a humid environment.
- Do not place the product where it is easy to fall off(such as tables, chairs etc)
- Check carefully that the power adapter is connected with the socket before use. Otherwise it may result in damaging the battery.
- When the dust box is full, empty the dust box before using the product.
- Use only the original rechargeable battery and docking station provided in the package. Do not use non-rechargeable batteries. For battery specifications, see "Product Specifications".
-
Do not use the product in an extremely hot (above 40^ ) or extremely cold (below 0^ ) environment.
-
Keep the hair, clothes, fingers and other parts of the human body away from the opening or operating parts of the product.
- Do not use the product to vacuum any items that may block the product, such as stones and waste paper.
- Do not use the product to vacuum any flammable materials, such as gasoline and toner used in printers or copying machines. Do not use the product in clean areas with flammable materials.
- Do not use the product to vacuum any burning items, such as cigarettes, matches, ashes and other items that may cause fire.
- Do not place any articles at the suction port. Do not use the product when the suction port is blocked. Remove the dust, cotton wool and hair from the suction port to ensure smooth air circulation at the suction port.
- Do not use a damaged docking station.
Notice
This symbol on the device or its packaging indicates: Do not dispose of electrical appliances as unsorted municipal waste; use separate collection facilities. Contact your local authority for information regarding the collection systems available. If electrical appliances are disposed of in landfills or dumps, hazardous substances can leak into the groundwater and get into the food chain, damaging your health and well-being. When replacing old appliances with new ones, the retailer is legally obliged to take back your old appliance for disposal at least free of charge.
V-TAC
Meaningful Innovation.
WEEE Number: 80133970
INSTRUCTION MANUAL
ROBOT LASER VACUUM (VT-5556)
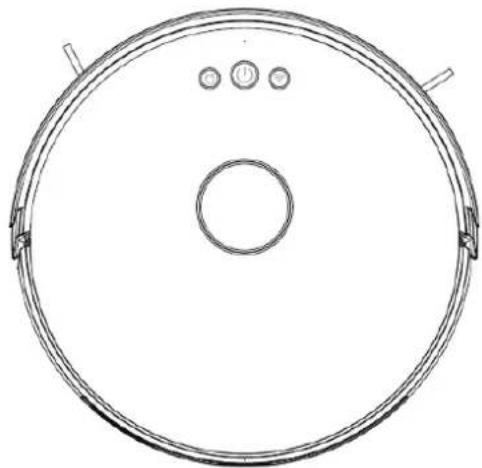
natural_image
Top-down line drawing of a circular device with three circular components and a central hole (no text or symbols)


INTRODUCTION
Thank you for selecting and buying V-TAC product. V-TAC will serve you the best. Please read these instructions carefully before starting the installation and keep this manual handy for future reference. If you have any another query please contact our dealer or local vendor from whom you have purchased the product. They are trained and ready to serve you at the best.

MULTI-LANGUAGE MANUAL QR CODE
Please scan the QR code to access the manual in multiple languages.
Table of Contents
| Important Safety Instructions | 1 |
| Package Contents | 6 |
| Product Composition / Part Name | 7 |
| Product Usage - Preparation | 9 |
| Charging The Product | 10 |
| Using The Water Tank | 11 |
| Installation | 12 |
| Usage Instruction | 13 |
| Description of App Icons and Buttons | 17 |
| APP Installation | 18 |
| Cleaning & Maintenance | 26 |
| Maintenance - Dust Box | 26 |
| Maintenance - Water Tank & Mopping Pad | 28 |
| Maintenance - Rolling Brush and Side Brush | 29 |
| Maintenance - Charging Electrode and Anti-fall Sensor | 30 |
| Troubleshooting & Frequently Asked Questions | 31 |
| Product Parameters | 34 |
Package Contents
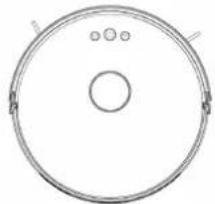 Robot Robot | 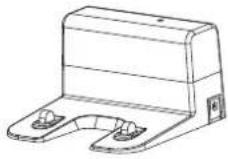 Docking Station Docking Station | 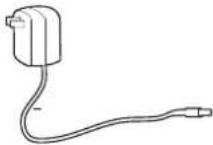 Power Adapter Power Adapter | 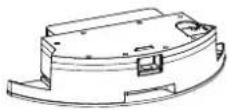 Water Tank Water Tank |
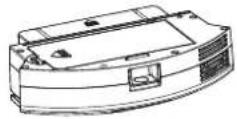 Dust Box Dust Box | 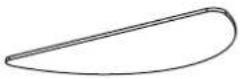 Mopping Pad Mopping Pad | 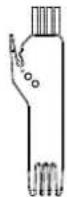 Cleaning Brush Cleaning Brush | 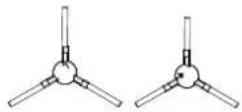 Side Brush (2 sets) Side Brush (2 sets) |
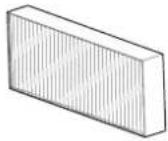 Hepa filter Hepa filter |  Instruction manual Instruction manual | ||
Product Composition / Part Name
Front Laser Robot
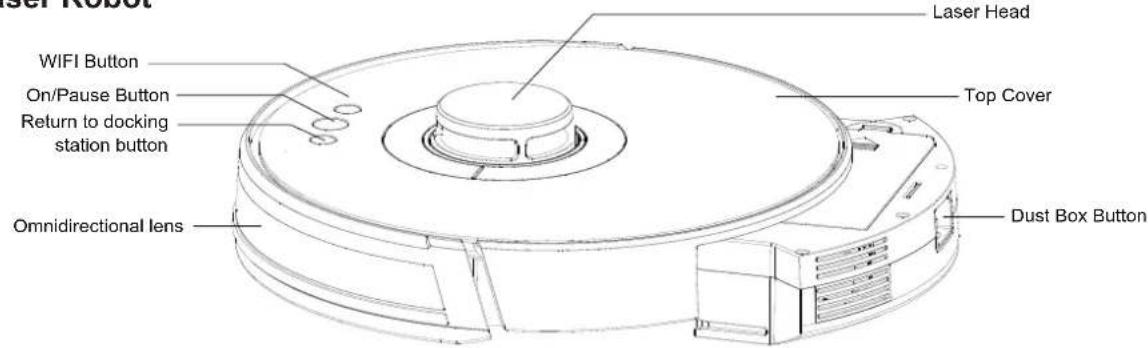
Press and hold Wi-Fi button for 3 seconds to enter the Wi-Fi settings for pairing the device.
Back Laser Robot
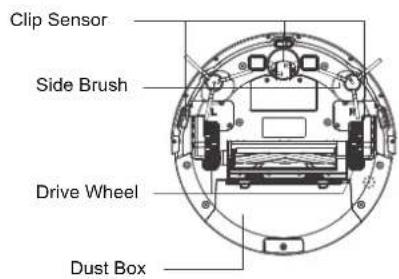
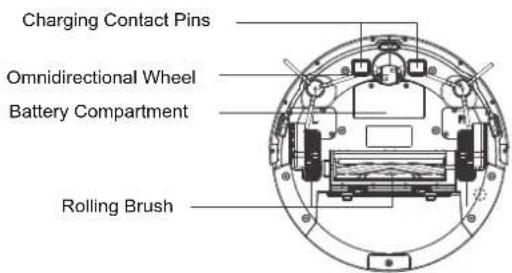
Product Composition / Part Name
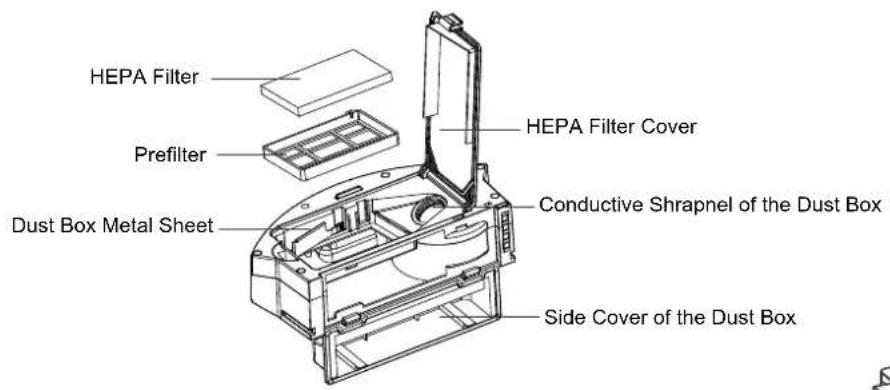
Dust Box
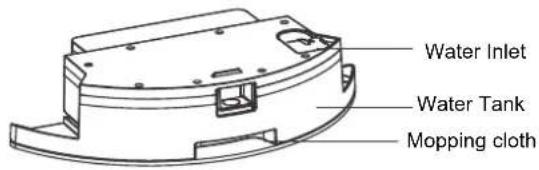
Water Tank
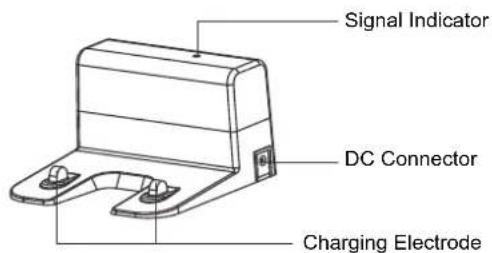
Docking Station
Product Usage - Preparation
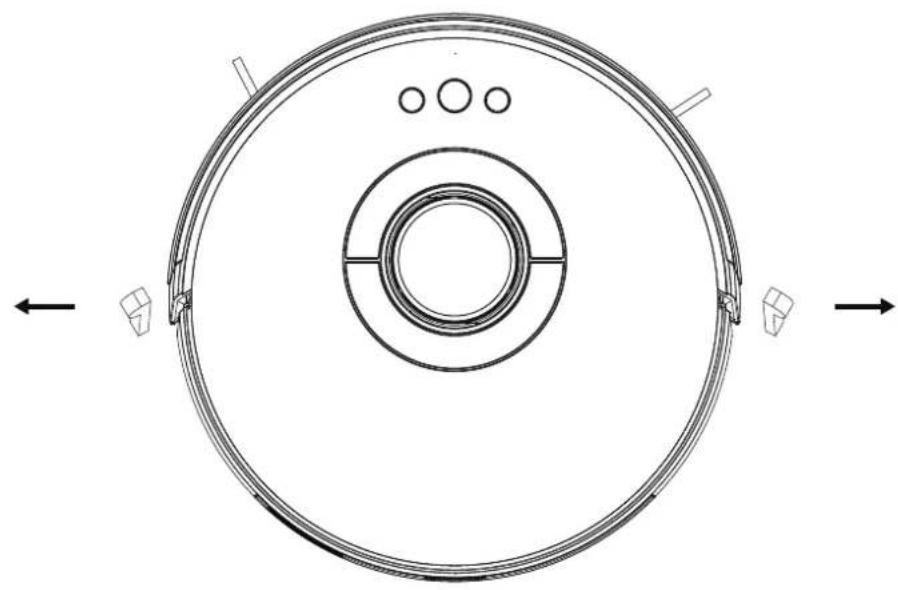
Before using the Laser Robot, remove the protective strip from the Robot
Remove Protection
natural_image
Technical line drawing of a circular mechanical component with three circular features and directional arrows (no text or symbols)Charging The Product
① Place the docking station on the flat ground against the wall. Do not place any articles 0.5m to the left and right of the docking station and 1.5m in front of the docking station.
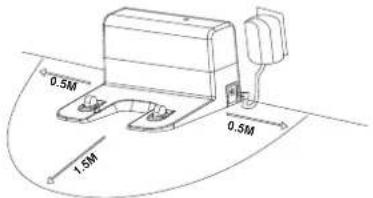
② Connect the docking station to the power supply.
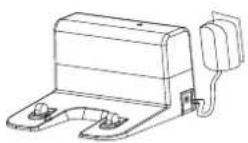
Install the Charging Base in a location that Robot can easily access. Please place the Charging Base against a wall, and on a hard-level surface rather than on rugs or carpets.
- Always keep the Charging Base plugged in, otherwise Robot will not automatically return to it.
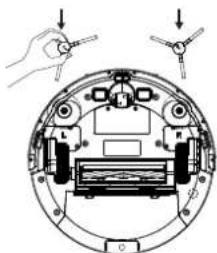
③ Install the side brushes before use.
natural_image
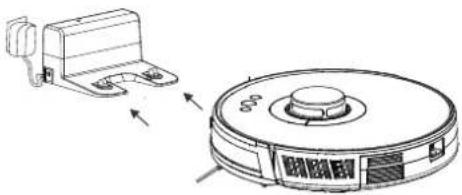
Diagram of a mechanical assembly with labeled components and directional arrows (no text or symbols)④ Place the vacuum on the docking station to charge. During charging, the indicator blinks. When charging is completed, the indicator is steady on. It takes about 6.5 hours to fully charge the robot vacuum. During the cleaning process, the robot vacuum automatically checks its power level. If the power is insufficient, the vacuum activates the "Return to docking station" mode, and automatically returns to the docking station for charging. Alternatively, you can tap the "Return to docking station" button on the app to activate the "Return to docking station" mode.
natural_image
Technical line drawing of a vacuum cleaner with mounting bracket and circular housing (no text or symbols)Note: Do not use the docking station in a highly reflective environment such as environment exposed to direct sunlight or with mirrors nearby.
To ensure the normal working time of the vacuum cleaner ensure to charge the device before use. It takes about 6.5 hours to fully charge the robot vacuum.
To ensure the safety of charging and prevent the damp cloth from damaging the floor, remove the water tank before charging the vacuum.
Using The Water Tank

Do not use mopping function with any carpet floor
➢ Please remove mopping cloth and clean it after mopping is completed.
Please empty the water tank after each use.
natural_image
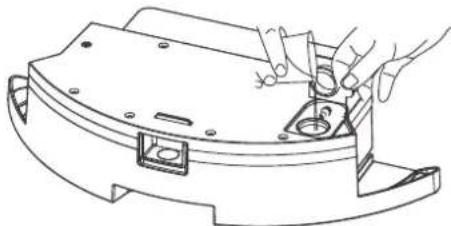
Line drawing of hands assembling a mechanical component with mounting holes (no text or symbols)① Open the water inlet cover, add water slowly into the water tank
natural_image
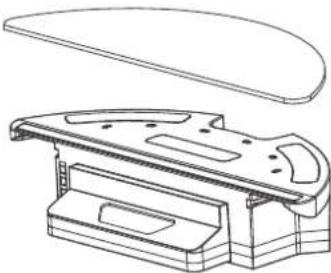
Technical line drawing of a mechanical assembly with a curved top component and a rectangular base (no text or symbols)② Take out the mopping cloth and place it on the water tank. Press the mopping cloth gently to ensure it stick firmly with water tank.
natural_image
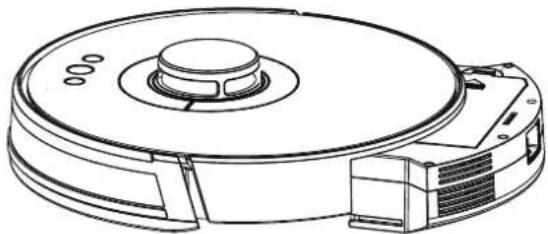
Technical line drawing of a mechanical device with a central hub and mounting bracket (no text or symbols)③ Replace the dust box of the robot with the water tank and start mopping the floor.
Installation

Notes
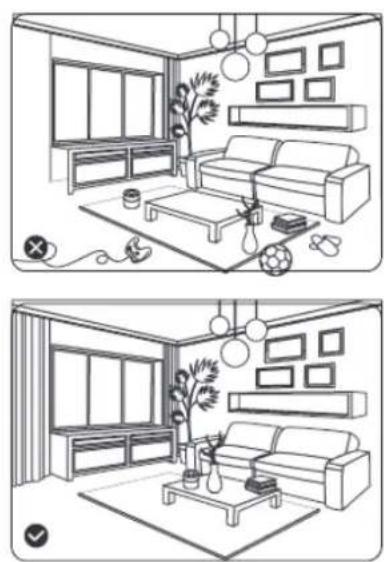
- Before starting the vacuum cleaner, clean up wires and sundries scattered on the ground, and remove easy-to-fall, fragile, valuable, and potentially dangerous items. Avoid objects which can be entangled, jammed, dragged, or knocked down by the main unit; otherwise it may result in personal or property damage.
natural_image
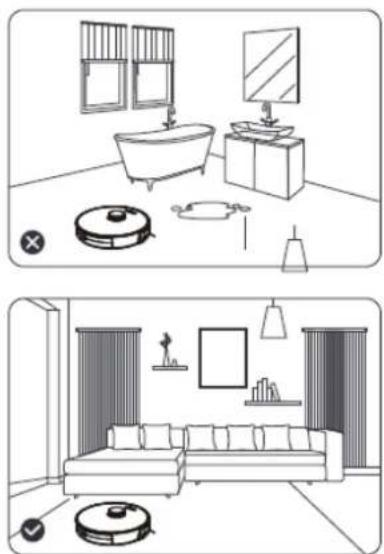
Two line drawings of a modern living room interior, one with sofa and coffee table, the other with sofa and coffee table (no text or symbols)- Avoid using this product in the wading area; otherwise, the fan may be damaged, affecting the performance of the vacuum cleaner.
natural_image
Two line drawings of a modern living room layout: top shows a bathtub, microwave, and a monitor; bottom shows a sofa with a vacuum cleaner and wall-mounted fixture (no text or symbols)Usage Instruction
Tap and hold the "☐" button for 3 seconds to power ON the vacuum cleaner. The power indicator is ON and the vacuum cleaner enters the standby state.
When the vacuum cleaner is in a static state, press and hold the "()" button for 3 seconds to power off the machine and stop the current cleaning task.
NOTE: When the vacuum cleaner is in charging state it cannot be powered off.
START CLEANING
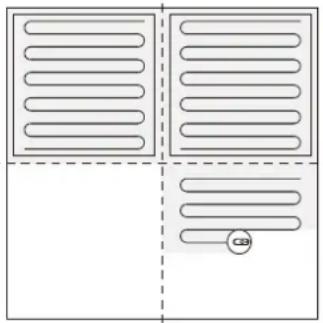
Press the "(1)" button to start cleaning. The vacuum cleaner dynamically plans the cleaning route according to the map generated after scanning and completes cleaning of different zones one by one. In each zone, the vacuum cleaner first sweeps the floor along the wall, and then moves in zigzag mode to clean the remaining part of the zone in an orderly and efficient manner.
Zone 1: Cleaned ; Zone 2: Cleaned
natural_image
Pure diagram of four rectangular panels with horizontal lines and a small circular symbol in the bottom-right corner (no text or labels)Zone 4: To be cleanec
Zone 3: Cleaning
NOTE:
- If the power is too low, the vacuum cleaner will not start cleaning. Please ensure to charge the vacuum cleaner before starting it.
- Before using the vacuum cleaner, tidy up all kinds of wires on the ground (including the power cord of the docking station). Otherwise this may result in the vacuum cleaner to drag the wires while cleaning, which may cause power failures of other electric appliance or damage to items or wires.
- If the cleaning area is less than 2 square meters, the vacuum cleaner will clean the area twice by default.
- If the power is insufficient in the cleaning process, the main unit will automatically return to the docking station for charging. After the power is sufficient, the main unit will automatically return to the interrupted point to continue cleaning (ensure that you have enabled the resumable cleaning function).
PAUSE CLEANING
If you need to add water to the water tank or wash the mopping cloth while the vacuum cleaner is working, press the "💡" button to pause. Once you are done adding the water/changing the mopping cloth press the "💡" button to resume cleaning or press the "💡" button to return to the docking station and stop the current cleaning task.
NOTE: In the pause state, if the vacuum cleaner returns to the docking station for charging, the current cleaning task is stopped.
SLEEP MODE
If no operation is performed within 10 minutes, the vacuum cleaner automatically enters sleep mode, and the power indicator blinks every few seconds. In sleep mode, you can press any button to wake up the vacuum cleaner.
NOTE: • When the vacuum cleaner is being charged at the docking station, it cannot enter the sleep mode.
- If the vacuum cleaner is in sleep mode for more than 12 hours, the vacuum cleaner automatically powers off.
Usage Instruction
CHARGING THE VACUUM CLEANER
- Auto mode: After completing cleaning, the vacuum cleaner automatically returns to the docking station for charging.
- Manual mode: In pause state, you can press the "☐" button to activate the "Return to docking station" mode. When the vacuum cleaner is being charged, the power indicator blinks.
NOTE: If the vacuum cleaner fails to find the docking station, it automatically returns to the starting point. In this scenario, you will need to manually place the vacuum cleaner back to the docking station.
Faulty state:
If the vacuum cleaner encounters a fault while working, the power indicator blinks quickly in red, and a voice prompt is generated. For details about troubleshooting method, please refer to the "Troubleshooting" section.
NOTE:
- In faulty state, if no operation is performed in 10 minutes, the vacuum cleaner automatically enters sleep mode.
- In faulty state, if the vacuum cleaner returns to the docking station for charging, the current cleaning task is stopped.
RESET THE Wi-Fi SETTINGS
If your mobile phone fails to connect to the vacuum cleaner due to reasons such as change of router settings and password forgotten, re-pair the vacuum cleaner with the mobile phone according to the Wi-Fi connection instructions.
NOTE: If the vacuum cleaner is in wait-to-connect state for more than 2 minutes, its Wi-Fi function is automatically disabled. To reconnect the vacuum cleaner to your mobile phone, reset the Wi-Fi settings.
PIN N GO
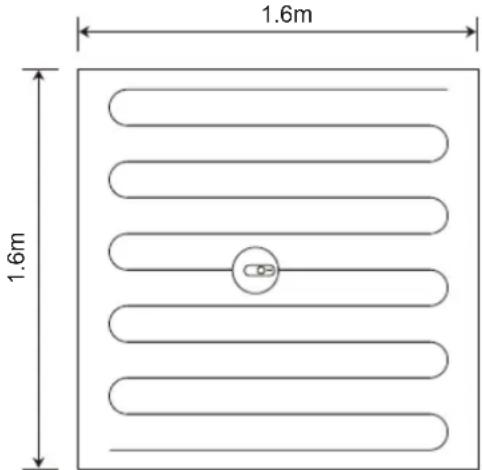
You can use the mobile app to specify a target point on the map. The vacuum cleaner will automatically plan the route and move to the specified point. If you specify a target point in the app when the vacuum cleaner is in standby or pause state, the vacuum cleaner will clean 1.6mx1.6m square zone centered on this point. After cleaning, the vacuum cleaner will automatically return to the starting point and stop working.
NOTE: If you activate partial cleaning when the vacuum cleaner is in pause state, the current cleaning task will be stopped.
Usage Instruction
SET A RESTRICTED ZONE OR VIRTUAL WALL
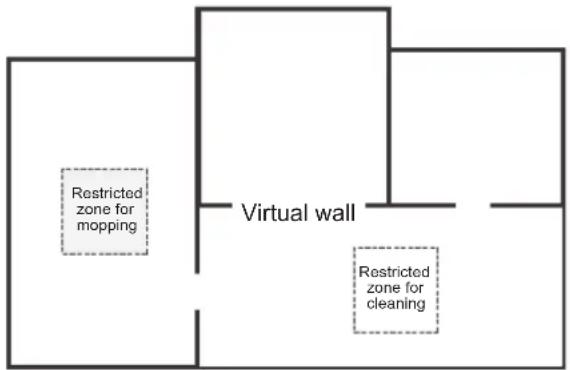
You can use the mobile app to set a restricted zone or virtual wall. After the setting is completed, the vacuum cleaner will not enter the restricted zone or cross the virtual wall for cleaning.
NOTE:
- Before using this function, you need to enable the map save mode for the vacuum cleaner in the mobile app.
- This function is only used to divide cleaning zones but cannot be used to block dangerous zones.
- If the vacuum cleaner is moved or there are significant changes in the home environment, the map may become invalid and the settings of the virtual wall or restricted zone may be lost.
MORE APP FUNCTIONS
| Real-time map update | Volume adjustment |
| Cleaning record viewing Map management | |
| Robot voice changing Firmware update | |
| Robot positioning Robot status viewing | |
NOTE:
The functions and details of the app may change slightly due to continuous development and upgrading of the app. The specific functions and details of the app are subject to the actual version
Usage Instruction
ZONE CLEANING
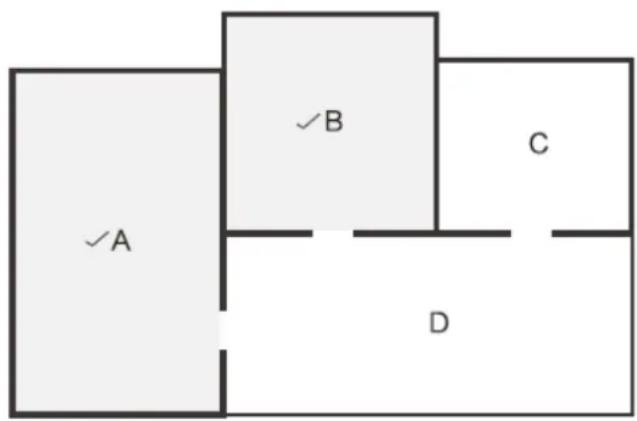
You can use the mobile app to select one or more zones for cleaning. The vacuum cleaner will clean one or more rooms based on the zone that you select on the app map.
NOTE:
- Before using this function, you will need to enable the map save mode for the vacuum cleaner on the mobile app, and the vacuum cleaner generates a map for cleaning.
• After cleaning starts, the vacuum may move to a place beyond the selected zone. Make sure that you have cleared all the obstacles from the ground and around the selected zone.
SCHEDULED CLEANING
You can use the mobile app to set schedule the vacuum to start cleaning on a specific time. When the specified time arrives, the vacuum cleaner will automatically start cleaning and return to the docking station after the cleaning has been completed.
CONFIGURED ZONE CLEANING
You can use the mobile app to configure a zone for cleaning. The vacuum cleaner will start cleaning based on the zone that you plan in the mobile app.
NOTE: After cleaning starts, the vacuum may move to a place beyond the configured zone. Make sure that you have cleared the obstacles on the ground around the configured zone.
CLEANING MODE
You can use the mobile app to select different modes offered by the device such as Energy saving – Standard - Strong mode. The Standard mode is selected by default.
DND MODE
During the Do-Not-Disturb (DND) period, the vacuum cleaner will not automatically continue cleaning or play the voice prompt. The power indicator dims. You can use the mobile app to disable the DND mode, or change the DND time range.
Description of App Icons and Buttons
| ICONS AND DESCRIPTIONS | |
 | Entire house cleaning: The vacuum cleaner generates a map of the entire house through sensor scanning, and automatically plans the optimal cleaning path. |
 | Configured zone cleaning: You can configure a zone in a certain place on the app map. Then, the vacuum cleaner will automatically move to the zone for cleaning. |
 | PIN N GO: You can specify a point on the app map. Then, the vacuum cleaner will automatically move to the point,and clean the 1.6mx1.6m zone centered on this point. You can click or drag on the map to set the target point. |
 | Selected zone cleaning: After the vacuum cleaner generates a map of the entire house, you can select one or more zones for cleaning through the app. |
 | Set a restricted zone for cleaning. |
 | Return to docking station: When this icon is steady on, the vacuum cleaner automatically returns to the docking station for charging. When this icon blinks, the vacuum cleaner stops returning to the docking station. |
 | Scheduled mode: You can make a reservation to carry out a scheduled cleaning task in 24 hours within 7 days through the app. |
| Button | Description Function | Function Description | |
 | Power Button | Press this button to power on the machine. | Press and hold this button for 3s to power on the machine |
| Press and hold this button to power off the machine. | Press and hold this button for 3s to power off the machine. | ||
| Press this button to plan the cleaning path. | Press this button for 0.3s. | ||
| Press this button to pause. | Press this button for 0.3s. | ||
 | "Return to docking station button" | Press this button to return to the docking station. | Press this button for 0.3s. |
| Press this button during the "return to docking station" process to pause this process. | Press this button for 0.3s. | ||
 | Wi-Fi Button | Wi-Fi fast connection (EZ mode) | Press and hold this button for 3s. |
| Hotspot pairing (AP mode) | Press and hold this button for 6s. | ||
APP INSTALLATION INSTRUCTIONS
Scan the given QR code, or download "Smart Life" from the App Store (iOS) or the Google Play Store (Android).

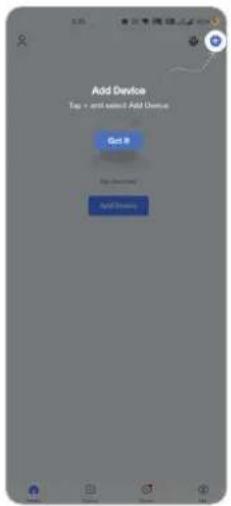
- Enable Bluetooth and Home Wifi for the device to access your wifi connection for pairing
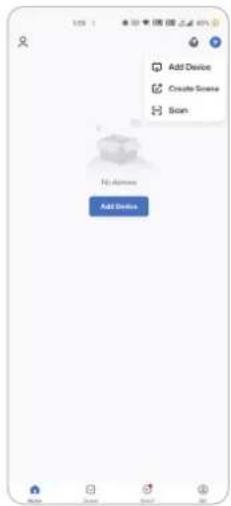
- Click "Add a device" or "+" in the top right corner.
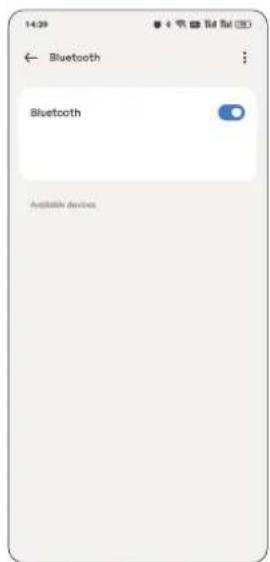
- Bluetooth ON in the mobile
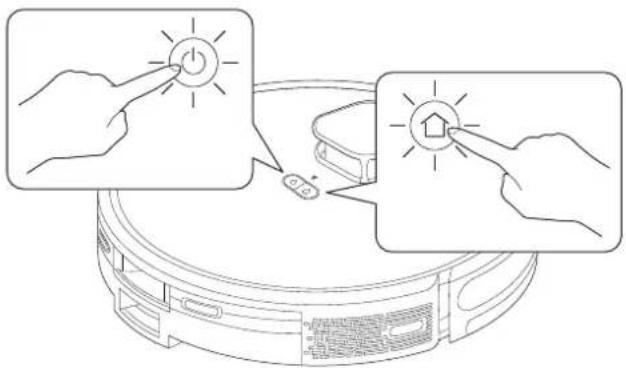
- First start the robot vacuum cleaner, press and hold the ⏻ and ⚠ keys on the main unit at the same time for 3 seconds, and when you hear the voice prompt of "AP mode" and the WiFi indicator light flashes slowly, it means that the machine has entered the networking mode.
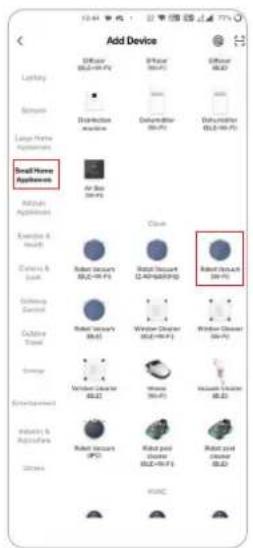
- Click on the Lighting choose "Light Source (Wi-Fi)"
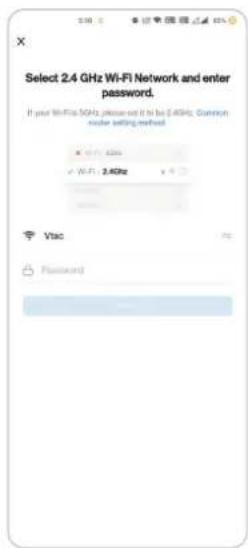
- Select 2.4GHz Wi-Fi network and enter the password
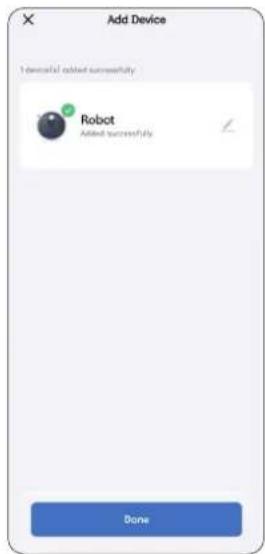
- Click on DONE to complete the connection
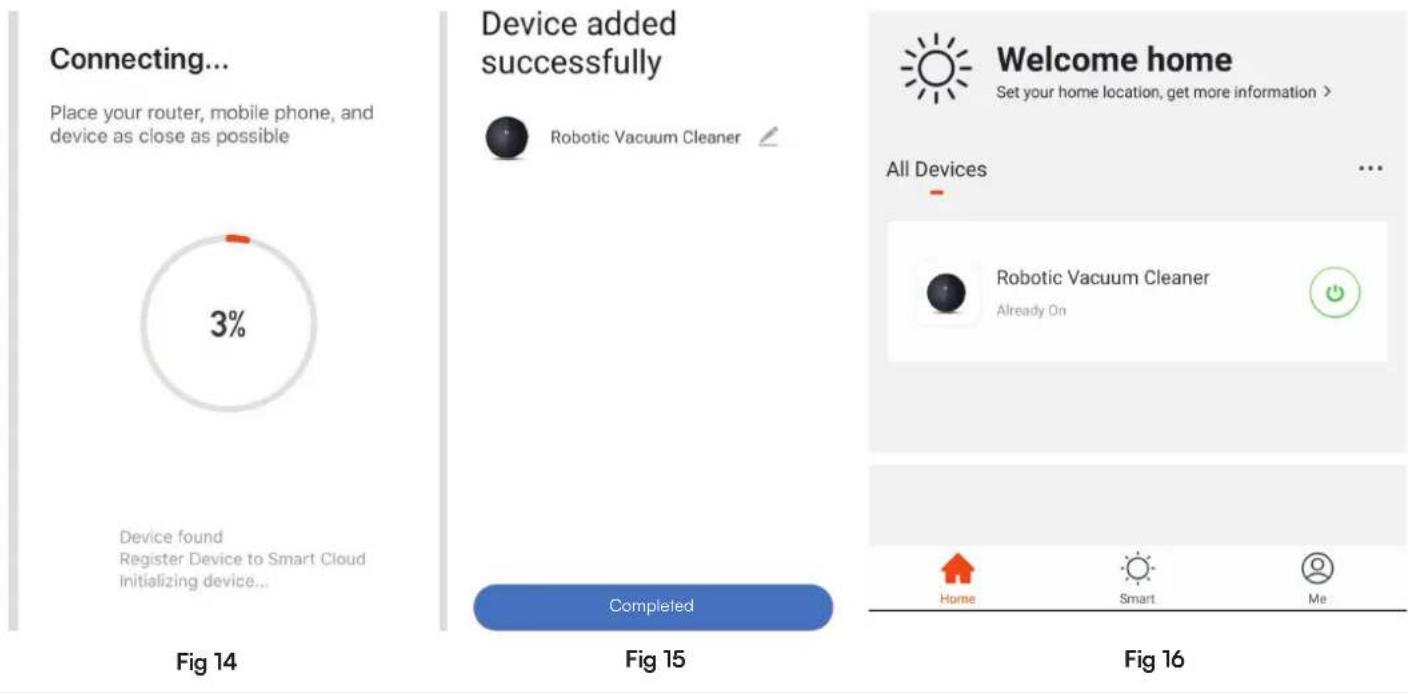
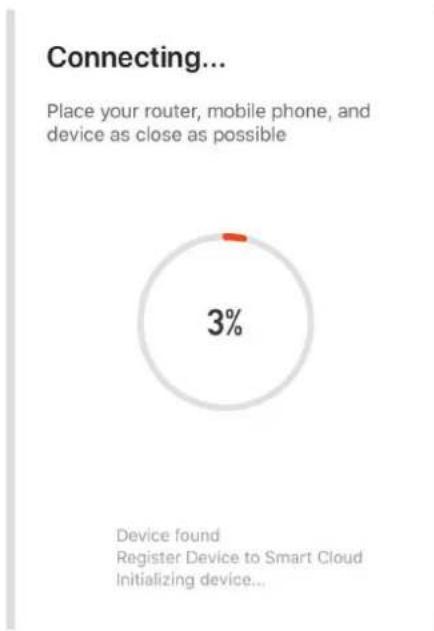
Step 9: Once you have successfully completed step 8, you will be redirected to "Connecting Now" page, where the App searches, registers and initializes the device (ref Fig 14). Once it is completed your device will be successfully paired.
Step 10: Once your device is successfully paired, rename the device to your preference. And then tap on completed. (Ref Fig 15)
Step 11: You can now start controlling your device with the App. Tap the device name on the home page to enter the controls and features of the device. (Ref Fig 16)
- Enter your Wi-Fi name and password (Fig 11)
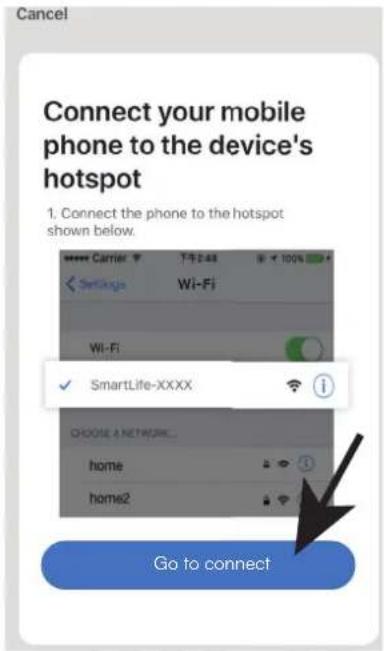
- Tap on "Go to Connect" (Fig 12)
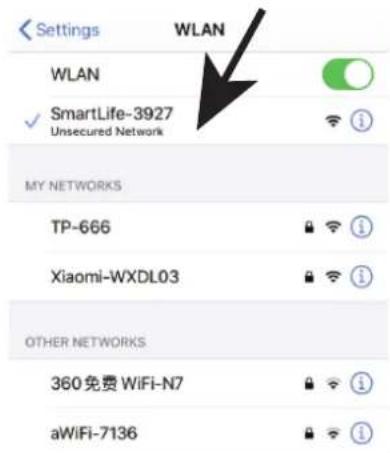
- Select the Wi-Fi name SmartLife-XXXX hotspot. (No Password required).
- Upon successful connection of the Hotspot Smartlife-XXX. Return to the APP.
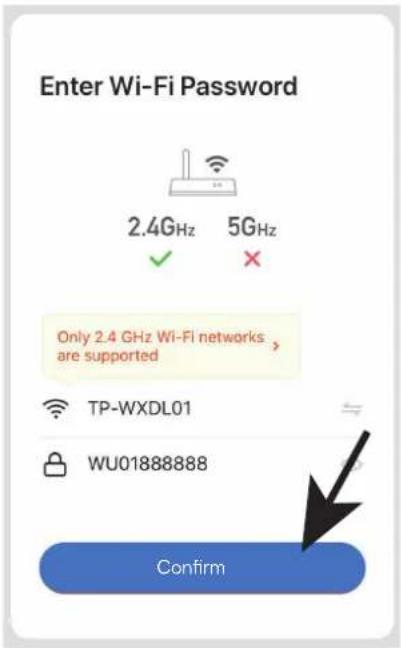
Fig 11 Fig 12 Fig 13
Step 9: Once you have successfully completed step 8, you will be redirected to "Connecting Now" page, where the App searches, registers and initializes the device (ref Fig 14). Once it is completed your device will be successfully paired.
Step 10: Once your device is successfully paired, rename the device to your preference. And then tap on completed. (Ref Fig 15)
Step 11: You can now start controlling your device with the App. Tap the device name on the home page to enter the controls and features of the device. (Ref Fig 16)
pie
Connecting... Place your router, mobile phone, and device as close as possible | Device found | | :--- | | Register Device to Smart Cloud Initializing device... | | 3% |Fig 14
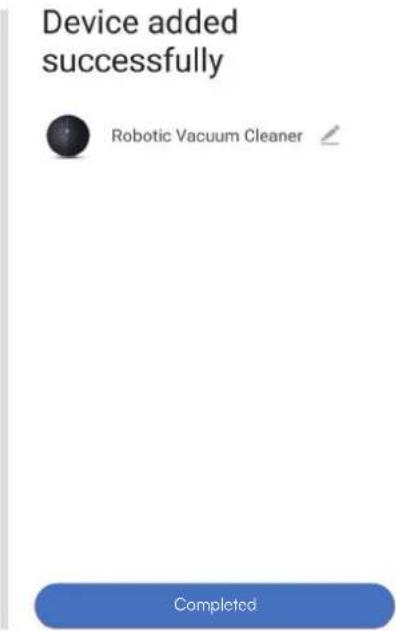
Fig 15
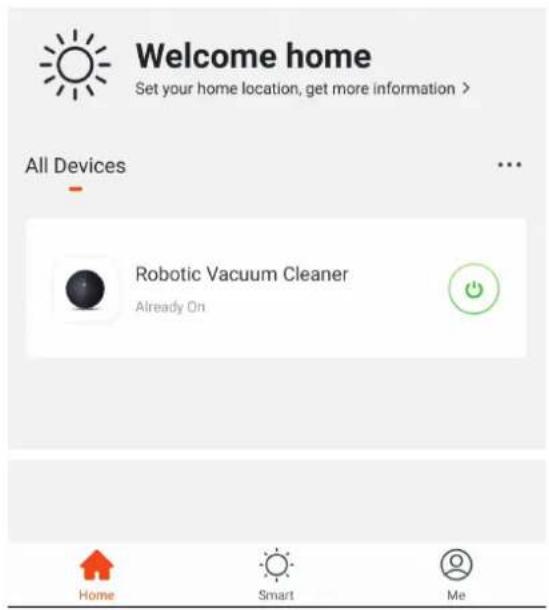
Fig 16
Step 12: Modes And Features
- APP interface page allows you to control the device remotely offering multiple features (Ref Fig 17).
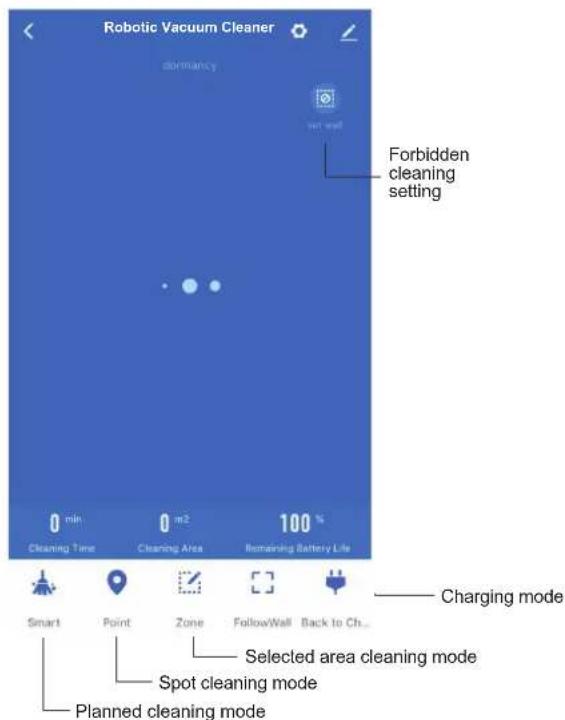
Fig 17
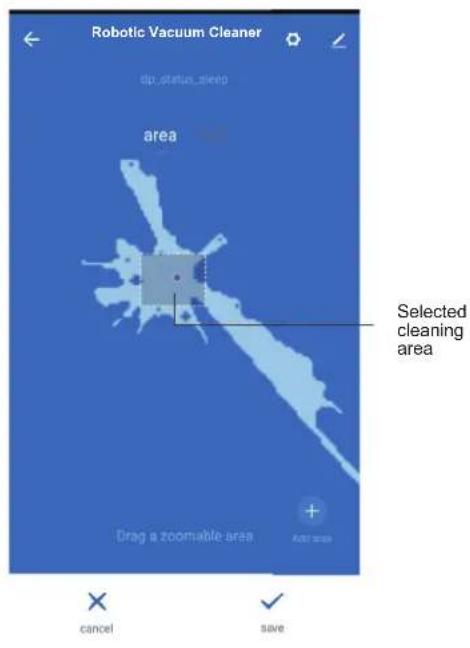
Fig 18
Device Sharing:
To Share device please tap on "Share Device" on the screen, then Tap on "Add Sharing" on the page and add the registered phone number or email id of the person you want to share the device with. (Ref Fig19, 20 and 21)
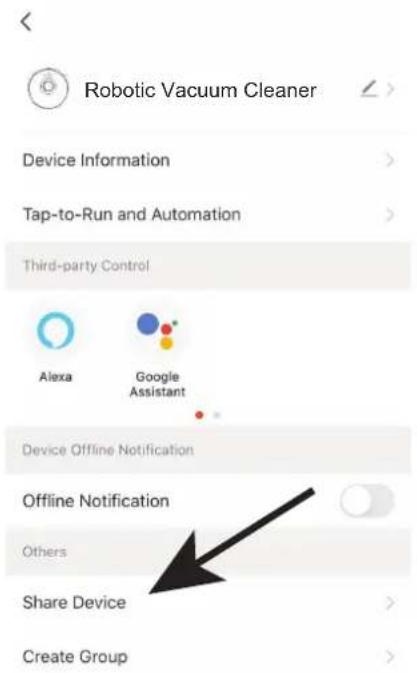
Fig 19
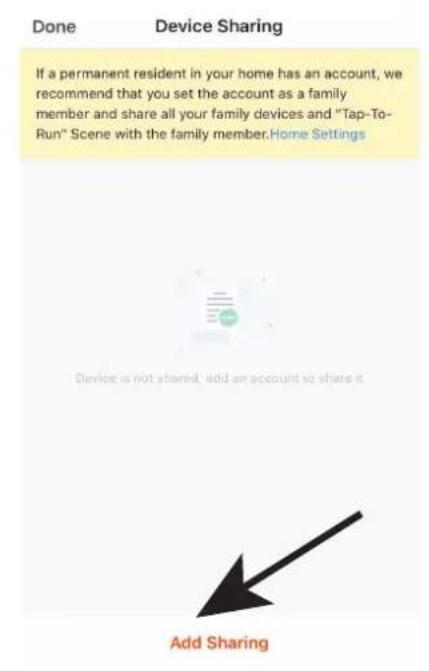
Fig 20
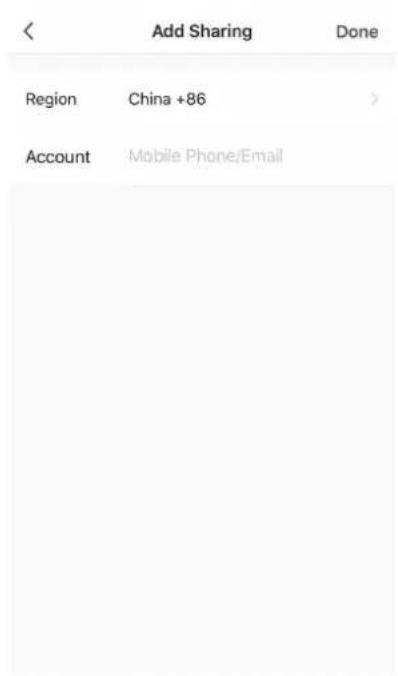
Fig 21
Cleaning & Maintenance
Maintenance - Dust Box
For optimal performance, follow the instructions below to clean and maintain Robot regularly. The cleaning/replacement frequency will depend on your usage habits of Robot.
Recommended cleaning/replacement frequency:
| Robot Part | Cleaning Frequency Replacement Frequency | |
| Filter Once | every week Every 2 months | |
| Roller Brush | Once every week | Every 6 to 12 months |
| Side Brush | Once every month | Every 3 to 6 months, or when it is obviously damaged |
| Roller Brush Cover | Once every month | Every 3 to 6 months, or when the rubber silicon strip on the roller brush cover is damaged |
| Sensor | Once every month | |
| Charging Electrode | Once every month | |
| Omnidirectional Wheel | Once every month | |
- Press the Dust Box release button to pull the Dust Box out.
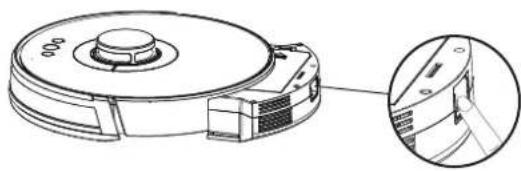
natural_image
Technical line drawing of a robotic vacuum cleaner with a close-up inset showing internal components (no text or symbols)- Open the side cover of the dust box and empty the trash.
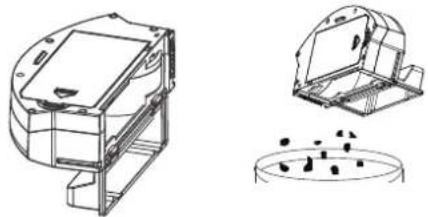
natural_image
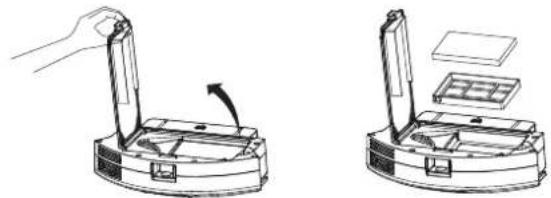
Technical line drawings of a mechanical housing and a circular component with internal components (no text or symbols)- Open the HEPA filter cover and remove the HEPA filter and prefilter. Tap on the HEPA filter to remove the dust. Water washing is not recommended for the HEPA filter.
natural_image
Two technical line drawings of a device with a handle, showing a left-hand and right-hand assembly (no text or symbols)Maintenance - Dust Box
- Use water to rinse the prefilter.
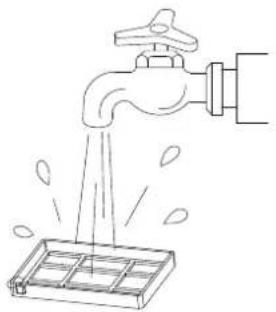
natural_image
Line drawing of a faucet pouring water into a water tank (no text or symbols)- Wipe the dust box clean with a cloth. Do NOT wash the dust box with water.
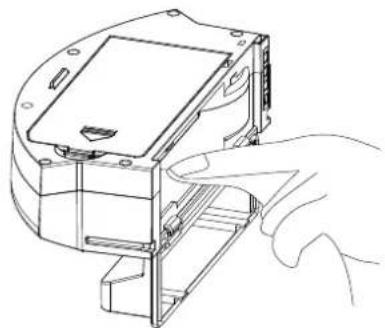
natural_image
Line drawing of a hand inserting a device into a housing (no text or symbols)- Dry the dust box and filter components, keep them dry to ensure their service life.

It is recommended that you wash the prefilter every 15-30 days. The maximum service life of the HEPA filter is 3 months.
natural_image
Technical line drawing of a mechanical device with three views: top view, side view, and bottom view (no text or symbols)
-
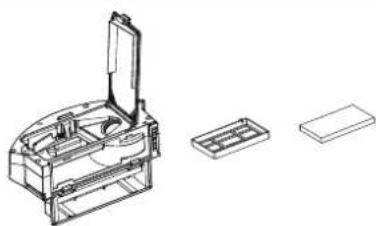
Before installing filters, ensure that the prefilter and HEPA filter are dry.
-
Do NOT expose the prefilter and HEPA filter to the sunlight
-
Install the prefilter and HEPA filter back to the dust box.

flowchart
graph LR
    A["Rectangular Block"] --> B["3D Model with Internal Structure"]
    B --> C["Final 3D Box"]
Maintenance - Water Tank & Mopping Pad
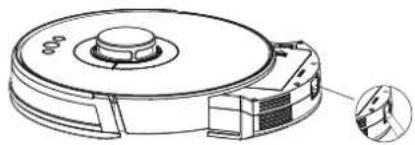
- Press the Water Tank release button to pull the Water Tank out
natural_image
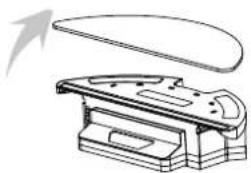
Technical line drawing of a mechanical device with a circular top and side ports, showing internal components and a close-up inset (no text or symbols)- Remove the mopping cloth from the Water Tank
natural_image
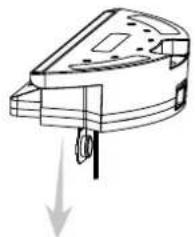
Technical line drawing of a mechanical component with a flat top and internal structure (no text or symbols)- Open the water inlet cover and empty water from Water Tank.
natural_image
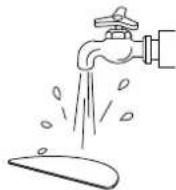
Technical line drawing of a mechanical component with a downward arrow indicating force or direction (no text or symbols)- Use water to clean the mopping cloth
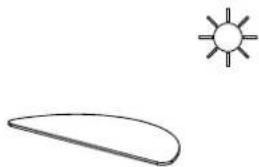
- Dry the mopping cloth with sunlight
natural_image
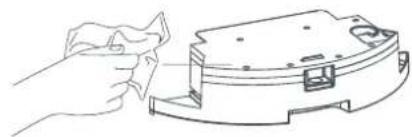
Simple line drawing of a sun and a leaf (no text or symbols)- The Water Tank can be dried with dry cloth or let it naturally dry with air.
natural_image
Line drawing of a hand holding a small object next to a mechanical component (no text or symbols)Maintenance - Rolling Brush & Side Brush
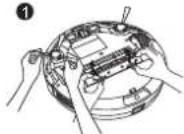
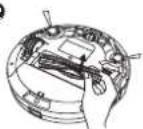
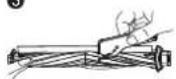
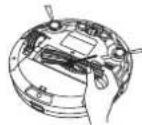
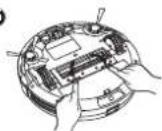
① Pull on the release tabs to unlock the brush guard as shown.
② Lift the rolling brush to remove.
③ Clean the rolling brush with the provided cleaning tool or a vacuum cleaner.
④ Reinstall the rolling brush by inserting the fixed protruding end first and then clicking into place.
⑤ Press down to snap the brush guard into place
1
②
3
4
5
Clean the Side Brushes
Foreign substances, such as hair, can easily get tangled in the side brushes, and dirt may adhere to them. Be sure to clean them regularly
① Remove the side brushes
② Carefully unwind and pull off any hair or string that is wrapped between the main unit and the side brushes
③ Use a cloth dampened with warm water to remove dust from the brushes or to gently reshape them.
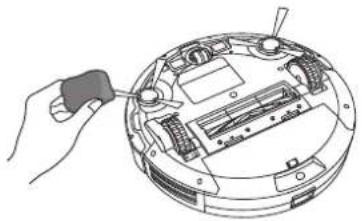
natural_image
Illustration of a hand using a tool to adjust or install electronic components on a circular device (no text or symbols visible)
Only use the side brushes when completely dried.
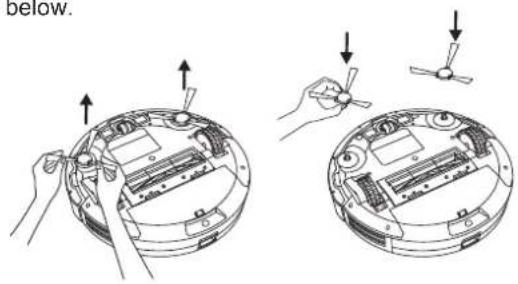
Replace the Side Brushes
The side brushes may become bent or damaged after being used for a period of time. Follow the instructions below to replace them
Remove the old side brushes and install the new ones as shown below.
Maintenance - Charging electrode and Anti-fall Sensor
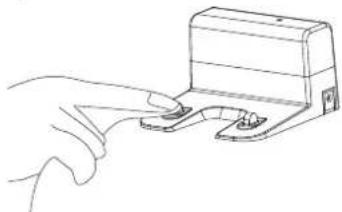
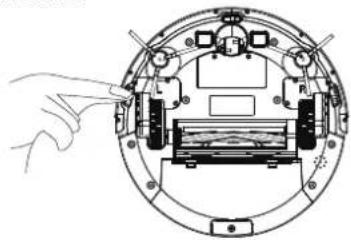
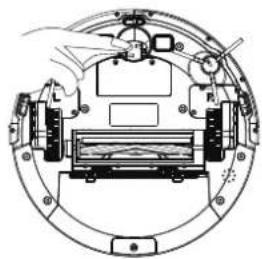
To Maintain the best performance, clean the anti-fall sensors and charging electrode regularly. Dust off the anti-fall sensors and charging electrode using a cloth or cleaning brush.

please use dry dishcloth for cleaning, and do not use wet dishcloth to prevent damage caused by water.
Clean up charging electrode
natural_image
Line drawing of a hand pressing a small electronic device (no text or symbols)Clean the anti-fall sensor
natural_image
Technical diagram of a mechanical assembly with a hand pointing to a component (no text or labels visible)Clean drive wheels and omnidirectional wheel
natural_image
Technical diagram of a mechanical assembly with no visible text or symbolsTroubleshooting
If the vacuum cleaner encounters a fault while working, the power indicator blinks quickly in red, and a voice prompt is generated. In this case, rectify the fault by referring to the table below.
| ERROR PROMPT | SOLUTION |
| Error 1: Laser head is blocked or stuck, please check. | The laser ranging sensor is blocked or jammed by a foreign object. Remove the obstruction or foreign object. If the obstruction or foreign object cannot be removed, move the main unit to a new position and then start it. |
| Error 2: Collision sensor get stuck,please check the collision sensor. | The bumper is stuck. Tap the bumper for several times to remove the foreign object. If there is no foreign object, move the main unit to a new position and then start it. |
| Error 3:Right wheel suspended, please remove the robot in a new place then start again. | The wheel is suspended. Please move the main unit to a new position and then start it. |
| Error 4: Anti-fall sensor is blocked,please check and clean anti-fall sensor. | The main unit is suspended. Please move the main unit to a new position and then start it. This fault may occur when the cliff sensor is too dirty. Please wipe the cliff sensor clean. |
| Error 5: Side brush is entangled, please clean the side brush. | The side brushes may be entangled with foreign objects. Please disassemble and clean the side brushes. |
| Error 6: Right/left wheel is entangled, please clean the right/left wheel. | The wheel may be entangled with foreign objects. Please clean the wheel and start the main unit again. |
| Error 7: The robot is trapped, please remove the robot | The main unit may be stuck. Please remove the obstacles around the main unit. |
| Error 8: Low battery, please charge. | The power is insufficient. Please charge the vacuum cleaner before using it. |
| Error 9: Charging problem, please check. | The battery temperature is too high or too low. Please wait and charge the vacuum cleaner after the battery temperature becomes normal. |
| Error 10: Wall sensor is blocked, please check | The wall sensor is covered with dust. Please wipe the wall sensor. |
| Error 11: Uneven floor, please move the robot to a new place then start again. | It is detected that the main unit is tilted upon startup. Please place the main unit on an even ground and restart it. |
| Error 12: Top cover of laser is blocked or stuck, please check. | The laser pressure sensor is pressed or stuck. Please move the vacuum cleaner to a new position and then restart it. |
Frequently Asked Questions
| FAULT | SOLUTION |
| Failed to power on the machine | The battery power is insufficient. Please use the vacuum cleaner after charging it on the docking station.The battery temperature is too high or too low. Please use the vacuum cleaner when the ambient temperature is 0°C to 40°C. |
| Failed to charge the machine | The docking station is not connected to the power supply. Please make sure that both ends of the docking station power cord are properly connected.The docking station is not in proper contact with the main unit. Please clean the docking station shrapnel and the charging contact of the main unit.Check whether the docking station indicator is on. |
| Slow charging | When used in a high or low temperature environment, the main unit will automatically decrease the charging speed to extend the battery life.The charging contact area may be dirty. Please clean the area with a dry cloth. |
| Failed to return to the docking station | There are too many obstacles around the docking station. Please place the docking station in an open area.The main unit is too far away from the docking station. Try to place the main unit near the docking station. |
| Abnormal behaviour | Power off the vacuum cleaner and start again. |
| There is abnormal noise during cleaning. | The roller brush, side brushes, or main wheel may be entangled with foreign objects. Clean them after powering off the vacuum cleaner.The omnidirectional wheel is covered by dust or is entangled during cleaning. It is recommended that you use a screwdriver to pull it out and rinse it. |
| The cleaning performance is degraded, or ash is dropped. | The dust box is full. Clean the dust box.The filter is blocked. Clean the filter.The roller brush is entangled with foreign objects. Clean the roller brush. |
| The Wi-Fi network cannot be connected. | The Wi-Fi function is not activated. Reset the Wi-Fi connection, and try again.The Wi Fi signal is not good. Ensure that the main unit is located in a place with good Wi-Fi signals.The Wi-Fi connection is abnormal. Reset the Wi-Fi settings, download the mobile app of the latest version, and try to connect to the Wi-Fi network again.The Wi-Fi network suddenly cannot be connected. The family router settings may be incorrect.In this case, contact the customer service team of the Wi-Fi operator for help. |
Frequently Asked Questions
| FAULT | SOLUTION |
| Scheduled cleaning cannot be carried out. | The power is insufficient. Scheduled cleaning will be started only when the remaining power is more than 20%. |
| Is any power consumed if the vacuum cleaner always stays at the docking station? | The power consumption is extremely low when the vacuum cleaner always stays at the docking station. This helps to keep the battery in the best performance. |
| Is it necessary to charge the battery for 16 hours when the vacuum cleaner is used for the first three times? | The lithium battery does not have a memory effect. It can be used instantly after it is fully charged. There is no need to wait 16 hours. |
| The mopping module does not release water or the water output is less . | Check whether there is enough water in the water tank. Use the mobile app to set the water output to the maximum value.Install the mopping cloth and mop stand properly according to the manual. |
| The power is insufficient during cleaning. After the vacuum cleaner returns to the docking station for charging, it does not continue cleaning. | Check whether the main unit is in DND mode. The vacuum cleaner will not continue cleaning in DND mode.The vacuum cleaner will not continue cleaning if the main unit is manually put back to the docking station. |
| The vacuum cleaner cannot return to the docking station after partial cleaning or after its position is moved. | The vacuum cleaner will re-generate a map after partial cleaning or after it is moved far away.If the main unit is far away from the docking station, the main unit may fail to return to the docking station by itself. In this case, manually put the main unit back to the docking station. |
| The vacuum cleaner misses some areas during cleaning. | The wall sensor or cliff sensor may get dirty. It is recommended that you wipe the sensors using a soft dry cloth. |
Product Parameters
| Classification | Projects Parameter | |
| Structural Class | Diameter | 330 mm / 1.08 ft |
| Height | 80mm | |
| Net weight | 2.7 kg / 5.94 lbs | |
| Battery | Voltage | 14.8 volts |
| Battery | 3000 mAh rechargeable lithium battery pack | |
| Parameter | Dust box capacity | 600 ml |
| Charging type | Automatic charging / Manual charging | |
| Cleaning mode | Auto / Single Room / Edge / Spot / Mopping | |
| Primary charging time | About 300 minutes | |
| Working time | About 150 minutes | |
| Robot | Rated power (w) | 28w |
| Operating voltage (v) | 14.8v |
IN CASE OF ANY QUERY/ISSUE WITH THE PRODUCT, PLEASE REACH OUT TO US AT: SUPPORT@V-TAC.EU FOR MORE PRODUCTS RANGE, INQUIRY PLEASE CONTACT OUR DISTRIBUTOR OR NEAREST DEALERS. V-TAC EUROPE LTD. BULGARIA, PLOVDIV 4000, BUL.L.KARAVELOW 9B
(BG) ВЪВЕДЕНИЕ
MANUEL D'INSTRUCTIONS
MANUEL D'INSTRUCTIONS
INNE FUNKCJE APLIKACJI
DALŠÍ FUNKCE APLIKACE
POKYNY K INSTALACI APLIKACE
- Important Safety Instructions
- WARNING SYMBOLS USED
- Notice
- V-TAC
- INSTRUCTION MANUAL
- ROBOT LASER VACUUM (VT-5556)
- INTRODUCTION
- MULTI-LANGUAGE MANUAL QR CODE
- Package Contents
- Product Composition / Part Name
- Product Usage - Preparation
- Charging The Product
- Using The Water Tank
- Installation
- Notes
- Usage Instruction
- START CLEANING
- NOTE:
- PAUSE CLEANING
- SLEEP MODE
- CHARGING THE VACUUM CLEANER
- Faulty state:
- RESET THE Wi-Fi SETTINGS
- PIN N GO
- SET A RESTRICTED ZONE OR VIRTUAL WALL
- ZONE CLEANING
- SCHEDULED CLEANING
- CONFIGURED ZONE CLEANING
- CLEANING MODE
- DND MODE
- Description of App Icons and Buttons
- APP INSTALLATION INSTRUCTIONS
- Step 12: Modes And Features
- Device Sharing:
- Cleaning & Maintenance
- Maintenance - Dust Box
- Maintenance - Water Tank & Mopping Pad
- Maintenance - Rolling Brush & Side Brush
- Clean the Side Brushes
- Replace the Side Brushes
- Maintenance - Charging electrode and Anti-fall Sensor
- Troubleshooting
- (BG) ВЪВЕДЕНИЕ
- MANUEL D'INSTRUCTIONS
- POKYNY K INSTALACI APLIKACE
Brand : V-TAC
Model : VT-5566
Category : Fan