
MA 900 - Receiver MAGNAT - Free user manual and instructions
Find the device manual for free MA 900 MAGNAT in PDF.
| Product type | Stereo tube receiver |
| Brand | Magnat |
| Model | MA 900 |
| Output power (nominal) | 2 x 200 W RMS (4 Ω, 20 Hz – 20 kHz, THD < 1 %) |
| Output power (peak) | 2 x 320 W (4 Ω, 1 kHz) |
| Frequency response | 6 Hz – 100 kHz (-3 dB) for CD/Streamer/Aux/Line/Tape/Tuner ; 20 Hz – 20 kHz (+/- 0.2 dB) |
| Total harmonic distortion (THD) | < 1.0 % |
| Signal-to-noise ratio | 105 dB (digital inputs), 85 dB (Phono MM), 74 dB (Phono MC) |
| Input sensitivity | 470 mV / 100 kΩ (CD/Streamer/Aux/Line/Tape/Tuner) ; 5 mV / 47 kΩ (Phono MM) ; 0.5 mV / 470 Ω (Phono MC) |
| Analog inputs | Phono MM, Phono MC, CD, Streamer/DVD, AUX, TAPE, TUNER, Line In (3.5 mm jack) |
| Digital inputs | 2 x optical (Toslink), 2 x coaxial (RCA) |
| Bluetooth | Version 5.0 with Qualcomm aptX HD, range up to 10 m |
| Outputs | 2 x speakers (4-8 Ω), 1 x headphone (6.3 mm jack), 1 x Rec Out |
| Preamplifier tubes | 2 x ECC 81 / 12AT7 |
| Power supply | 230 V / 50 Hz (115/230 V selector) |
| Power consumption | Max. 700 W ; standby < 0.5 W |
| Dimensions (W x H x D) | 433 x 161 x 316 mm (main unit) ; 433 x 161 x 362 mm (with buttons and connectors) |
| Weight | 11.7 kg |
| Included accessories | Remote control, batteries (2x AAA), power cord, instruction manual |
| Warranty | Manufacturer's warranty (excluding tubes, batteries and wear parts) |
Frequently Asked Questions - MA 900 MAGNAT
User questions about MA 900 MAGNAT
0 question about this device. Answer the ones you know or ask your own.
Ask a new question about this device
Download the instructions for your Receiver in PDF format for free! Find your manual MA 900 - MAGNAT and take your electronic device back in hand. On this page are published all the documents necessary for the use of your device. MA 900 by MAGNAT.
USER MANUAL MA 900 MAGNAT
Important notes for installation / warranty card
The Bluetooth® word mark and logos are registered trademarks owned by Bluetooth SIG, Inc. and any use of such marks by Magnat Audio-Produkte GmbH is under license. Other trademarks and trade names are those of their respective owners.
Qualcomm® aptX™ is a product of Qualcomm Technologies, Inc. and/or its subsidiaries. Qualcomm is a trademark of Qualcomm Incorporated, registered in the United States and other countries. aptX is a trademark of Qualcomm Technologies International, Ltd., registered in the United States and other countries.

At the end of the product's useful life, please dispose of it at appropriate collection points provided in your country.
20 Hz - 20 kHz, THD < 1.0%, 8 Ohm 2 x 130 W
CD/Streamer/Aux/Line/Tape/Tuner/
Digital Inputs 105 dB
Phono MM 85 dB
Phono MC 74 dB
12 Instructions for disposal
12 Declaration of conformity
12 Use as directed
13 - 15 Operational elements and connections
Front panel
Rear panel
Remote control
16 Initial Operation
16 Connecting the device to a Bluetooth audio source
16 Auto standby function
16 Tube replacement
16 Service and technical problems
17 Specifications
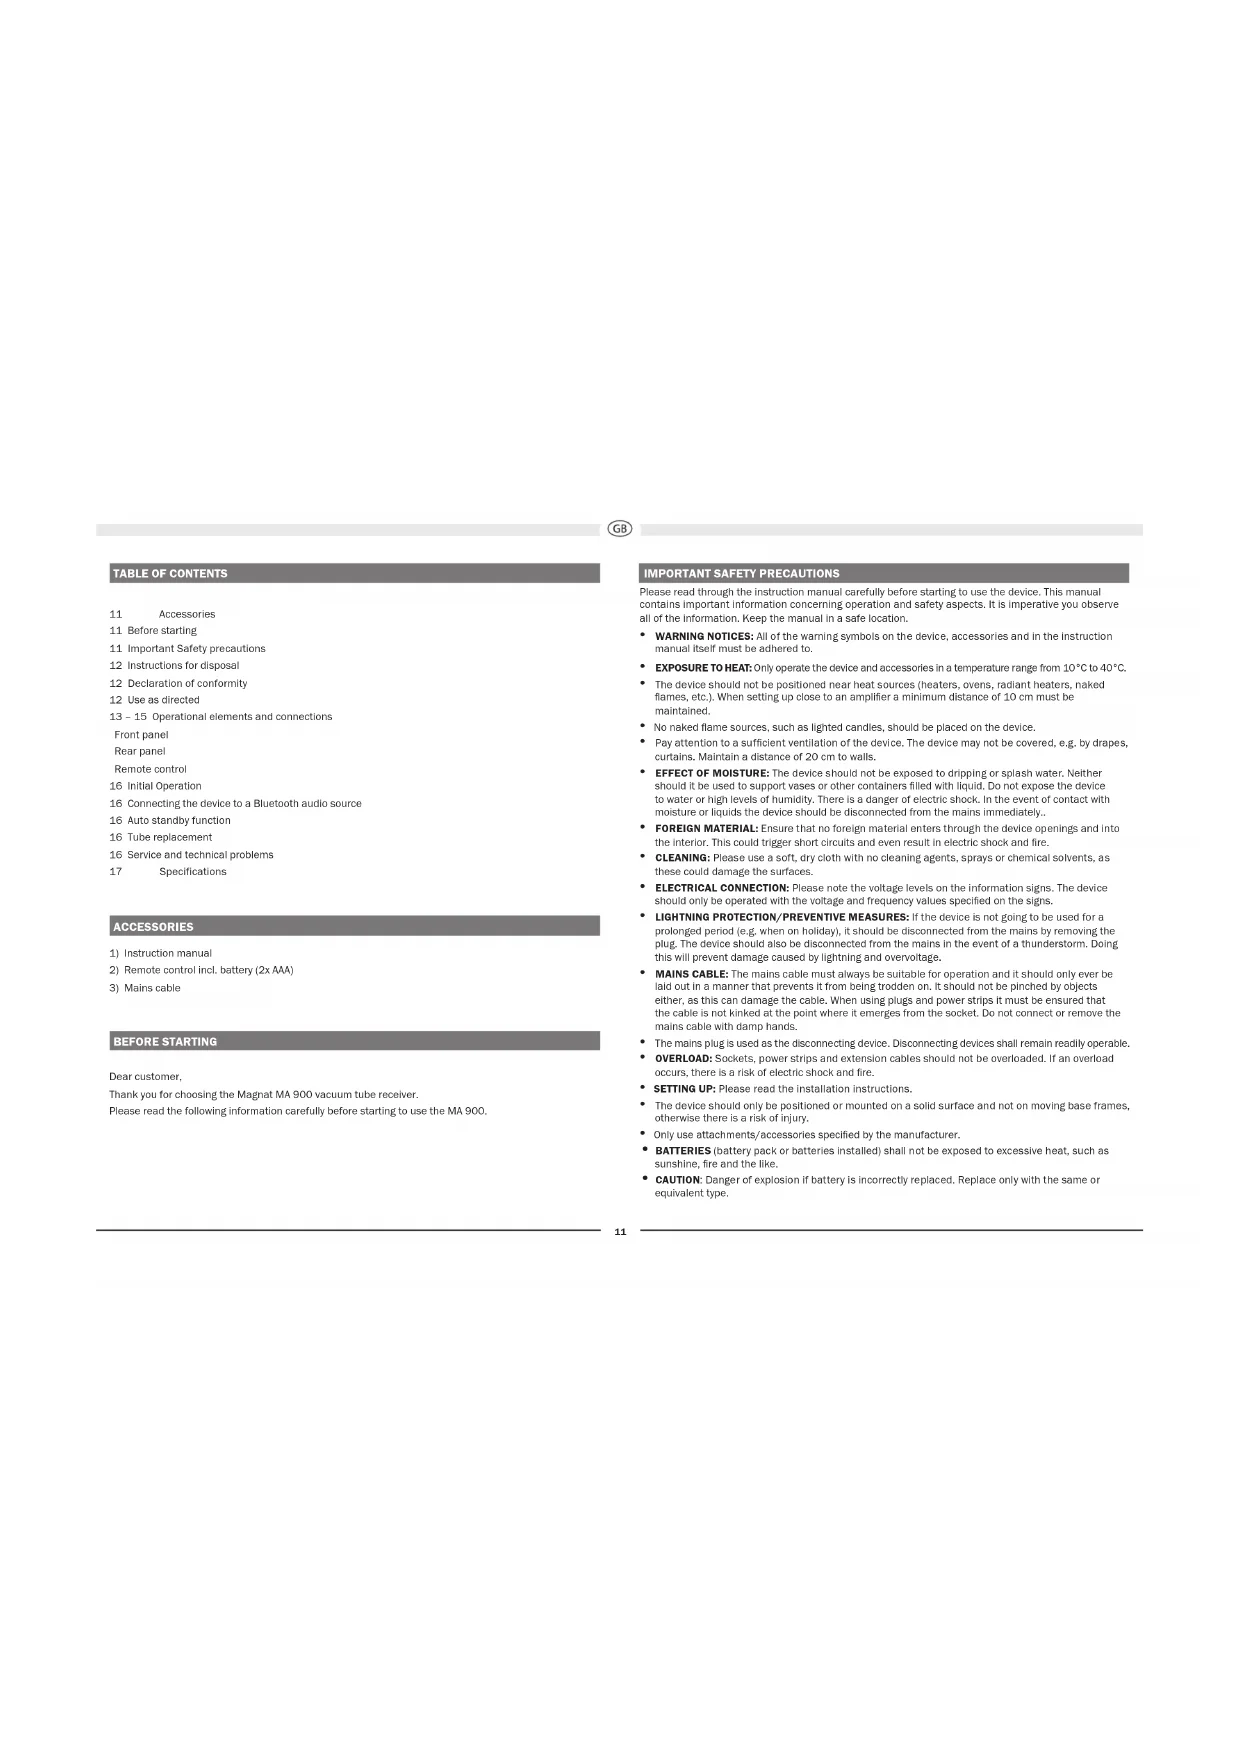
ACCESSORIES
1) Instruction manual
2) Remote control incl. battery (2x AAA)
3) Mains cable
BEFORE STARTING
Dear customer,
Thank you for choosing the Magnat MA 900 vacuum tube receiver.
Please read the following information carefully before starting to use the MA 900.
IMPORTANT SAFETY PRECAUTIONS
Please read through the instruction manual carefully before starting to use the device. This manual contains important information concerning operation and safety aspects. It is imperative you observe all of the information. Keep the manual in a safe location.
- WARNING NOTICES: All of the warning symbols on the device, accessories and in the instruction manual itself must be adhered to.
- EXPOSURE TO HEAT: Only operate the device and accessories in a temperature range from 10°C to 40°C.
- The device should not be positioned near heat sources (heaters, ovens, radiant heaters, naked flames, etc.). When setting up close to an amplifier a minimum distance of 10 cm must be maintained.
- No naked flame sources, such as lighted candles, should be placed on the device.
- Pay attention to a sufficient ventilation of the device. The device may not be covered, e.g. by drapes, curtains. Maintain a distance of 20 cm to walls.
- EFFECT OF MOISTURE: The device should not be exposed to dripping or splash water. Neither should it be used to support vases or other containers filled with liquid. Do not expose the device to water or high levels of humidity. There is a danger of electric shock. In the event of contact with moisture or liquids the device should be disconnected from the mains immediately..
- FOREIGN MATERIAL: Ensure that no foreign material enters through the device openings and into the interior. This could trigger short circuits and even result in electric shock and fire.
- CLEANING: Please use a soft, dry cloth with no cleaning agents, sprays or chemical solvents, as these could damage the surfaces.
- ELECTRICAL CONNECTION: Please note the voltage levels on the information signs. The device should only be operated with the voltage and frequency values specified on the signs.
- LIGHTNING PROTECTION/PREVENTIVE MEASURES: If the device is not going to be used for a prolonged period (e.g. when on holiday), it should be disconnected from the mains by removing the plug. The device should also be disconnected from the mains in the event of a thunderstorm. Doing this will prevent damage caused by lightning and overvoltage.
- MAINS CABLE: The mains cable must always be suitable for operation and it should only ever be laid out in a manner that prevents it from being trodden on. It should not be pinched by objects either, as this can damage the cable. When using plugs and power strips it must be ensured that the cable is not kinked at the point where it emerges from the socket. Do not connect or remove the mains cable with damp hands.
- The mains plug is used as the disconnecting device. Disconnecting devices shall remain readily operable.
• OVERLOAD: Sockets, power strips and extension cables should not be overloaded. If an overload occurs, there is a risk of electric shock and fire.
- SETTING UP: Please read the Installation Instructions.
- The device should only be positioned or mounted on a solid surface and not on moving base frames, otherwise there is a risk of injury.
• Only use attachments/accessories specified by the manufacturer.
- BATTERIES (battery pack or batteries installed) shall not be exposed to excessive heat, such as sunshine, fire and the like.
- CAUTION: Danger of explosion if battery is incorrectly replaced. Replace only with the same or equivalent type.

• RISK OF SWALLOWING BATTERIES!
- The product/remote control may contain a coin/button type battery, which can be swallowed. Keep the battery out of reach of children at all times! If swallowed, the battery can cause serious injury or death. Severe internal burns can occur within two hours of ingestion.
- If you suspect that a battery has been swallowed or placed inside any part of the body, seek immediate medical attention.
- When you change the batteries, always keep all new and used batteries out of reach of children. Ensure that the battery compartment is completely secure after you replace the battery.
- If the battery compartment cannot be completely secured, discontinue use of the product. Keep out of reach of children and contact the manufacturer.
DAMAGE THAT MUST BE RECTIFIED BY A SPECIALIST:
If any of the following damage occurs, disconnect the device from the mains immediately and contact a specialist to conduct the repair work:
- The device should not continue to be operated if there is visible damage to the mains cable. A damaged cable should not be repaired, but must be replaced.
• Damage to the mains socket at the device.
• If moisture or water has entered the device or foreign objects have fallen into the device.
• If the device has fallen and the housing is damaged. - If the device does not work properly, even though all of the information in the instruction manual has been observed.
Only those subsequent alterations approved by the manufacturer may be conducted.
Only original spare parts should be used for repair.
After conducting any repairs the safety of device should be checked to ensure it is functioning correctly and safely.
Repairs must always be conducted by qualified specialists, as you might otherwise be exposed to dangerous high voltage levels or other hazards.

This symbol warns the user that high voltage is used within the device which can result in electric shock.

This symbol makes the user aware that there are important notes in the enclosed instruction manual which must be observed.
WARNING:DO NOT OPEN! RISK OF ELECTRIC SHOCK!
To reduce the risk of fire or electric shock, do not expose this unit to rain or moisture.

This is Class II apparatus with double insulation, and no protective earth provided.
INSTRUCTIONS FOR DISPOSAL
In accordance with European Directive 2012/19/EU all electrical and electronic appliances must be disposed of separately via local collection points. Please observe the local regulations and do not dispose of your old appliances with normal household waste.
Battery disposal
Old batteries are hazardous waste and must be disposed of in accordance with current regulations.
DECLARATION OF CONFORMITY

Hereby, Magnat Audio-Produkte GmbH declares that the device Magnat MA 900 is in compliance with the essential requirements and other relevant provisions of directive 2014/53/EU. The Declaration of Conformity can be found at www.mac-audio.de in the download area of the device.
USE AS DIRECTED
This device is designed for indoor use only.
GB
OPERATIONAL ELEMENTS AND CONNECTIONS - FRONT PANEL
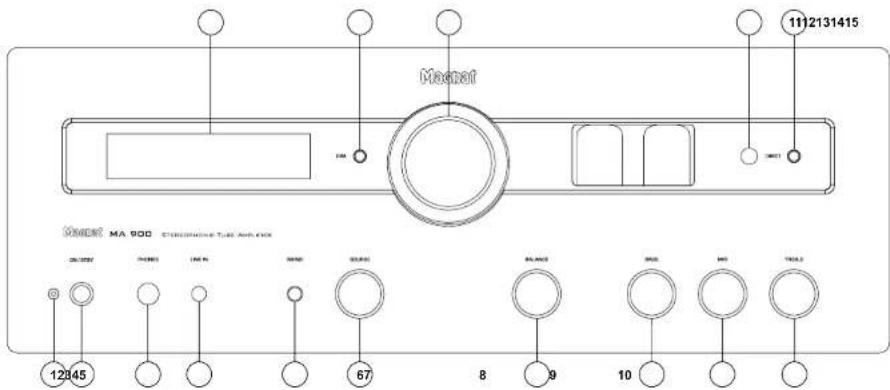
1 LED STATUS INDICATION
This illuminated display indicates the MA 900's 2 possible states:
• LED is illuminated green: The MA 900 is switched on. The device is ready for use.
- LED is illuminated red: The MA 900 is in the standby mode.
2 ON/STBY
Switches the device on when it is in the standby mode. If the LED does not illuminate, actuate the power switch located on the rear of the device. Conversely the device can be switched from power operation to the standby mode.
3 HEADPHONES
6.3 mm stereo output jack for headphones. The speakers are deactivated when this jack is used. Set the volume to a low level before connecting headphones.
3 LINE IN
3.5 mm stereo input jack for an auxiliary audio device (e.g. MP3 player, etc.).
5 MONO
Switches between Stereo and Mono. A long press opens the "SOURCE GAIN and SOURCE RENAME" menu.
6 SOURCE (INPUT SELECTOR SWITCH)
Switches between the different audio sources:
- PHONO MM: Record players with a Moving Magnet System (MM) or MC system with high output level (high output MC).
- PHONO MC: Record players with Moving Coil System (MC).
• CD: CD player.
• STREAMER or DVD
• AUX: Other audio devices.
• TAPE: Tape or cassette recorder.
• LINE IN: Front input for portable devices
• TUNER: Selection of the FM tuner
• DIGITAL OPT 1/2, DIGITAL COAX 1/2: Connecting to digital audio sources.
• BT: Connection to a Bluetooth device
7 BALANCE
For adjusting the stereo balance between the speakers to the right or to the left.
8, 9, 10 EQUALISATION: BASS / MID / TREBLE
The bass, mid-range and treble reproduction can be set individually with these controls.
11 DIRECT
The device is switched to the linear mode. The TREBLE, MID and BASS levels cannot be adjusted in this mode. DIRECT ON appears in the display.
12 SENSOR FOR THE REMOTE CONTROL
Please aim at this sensor when using the remote control.
13 VOLUME
For adjusting the overall volume of the music.
14 DIM
This button can be used to adjust the brightness of the display (3 levels).
15 DISPLAY
The following information is indicated in the display:
• Heating phase of the tube.
This lasts for around 30 seconds after the device has been switched on.
- Selected audio input
• Volume information
GB
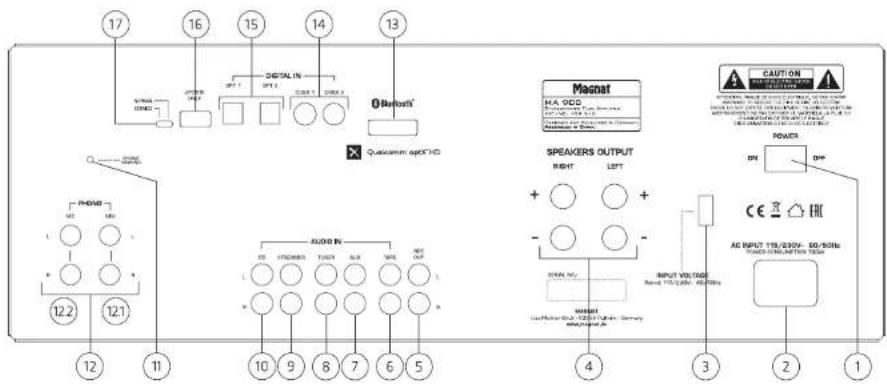
OPERATIONAL ELEMENTS AND CONNECTIONS - REAR PANEL
flowchart
graph TD
    A["Speaker Input"] --> B["Capacitor"]
    B --> C["Capacitor"]
    C --> D["Magnet"]
    D --> E["Power"]
    E --> F["AC Input"]
    F --> G["Output"]

    subgraph Audio In
        H["12.2"] --> I["12.1"]
    end

    subgraph Magnat
        J["HA 900"] --> K["Capacitor"]
        L["Capacitor"] --> M["Capacitor"]
        N["Capacitor"] --> O["Capacitor"]
    end

    subgraph Speakers OUTPUT
        P["RIGHT"] --> Q["LEFT"]
        R["+"] --> S["+"]
        T["-"] --> U["-"]
        V["+"] --> W["-"]
        X["+"] --> Y["+"]
        Z["+"] --> AA["+"]
        AB["+"] --> AC["+"]
        AD["+"] --> AE["+"]
        AF["+"] --> AG["+"]
        AH["+"] --> AI["+"]
        AJ["+"] --> AK["+"]
        AL["+"] --> AM["+"]
        AN["+"] --> AO["+"]
        AP["+"] --> AQ["+"]
        AR["+"] --> AS["+"]
        AT["+"] --> AU["+"]
        AV["+"] --> AW["+"]
        AX["+"] --> AY["+"]
        AZ["+"] --> BA["+"]
        BB["+"] --> BC["+"]
        BD["+"] --> BE["+"]
        BF["+"] --> BG["+"]
        BH["+"] --> BI["+"]
        BJ["+"] --> BK["+"]
        BL["+"] --> BM["+"]
        BN["+"] --> BO["+"]
        BP["+"] --> BQ["+"]
        BR["+"] --> BS["+"]
        BT["+"] --> BU["+"]
        BV["+"] --> BW["+"]
        BX["+"] --> BY["+"]
        BZ["+"] --> CA["+"]
        CB["+"] --> CD["+"]
        CE["CE"] --> CF["AC Input"]
    end

    style Audio In fill:#f9f,stroke:#333
    style Magnat fill:#ccf,stroke:#333
    style Speakers OUTPUT fill:#cfc,stroke:#333
    style Power Output fill:#fcc,stroke:#333
1 POWER SWITCH
Switches the device on and sets it in the standby mode. If the switch is set to the "OFF" position, the device is disconnected from the mains supply.
2 MAINS CONNECTION
For connecting the supplied mains cable. The safety fuse should only be changed by qualified service personnel.
3 115/230V (VOLTAGE SELECTOR)
The voltage selector has been set at the factory to 230 V for operation in Europe.
Warning: Connecting the device to a 230 V mains outlet while the voltage selector is set to 115 V will lead to immediate destruction of the amplifier!
4 SPEAKER TERMINALS
For the connection of stereo speakers with an impedance rating of 4-8 ohms (the correct polarity must be taken into account). (See also INITIAL OPERATION).
ANALOGUE RCA CONNECTIONS (5 - 10)
For connecting analogue audio sources. Please observe the coloured marking of the sockets and connectors. Red is always the right channel.
5 REC OUT
For connecting devices for analogue sound recording (e.g. tape recorder). The signal for the selected audio source with fixed level applies for this output, i.e. it is independent of the position of the volume knob.
6 TAPE INPUT
For the connection of a cassette deck or tape recorder.
7 AUX INPUT
Connecting other audio sources (e.g. MP3 or Minidisc player).
8 TUNER INPUT
For the connection of a tuner.
9 STREAMER INPUT
Connecting a Streamer, DVD or Bluray player.
10 CD INPUT
Connection of a CD player.
11 PHONO EARTH CONNECTION
Connection of the phono cable's earth wire in order to prevent humming.
12 PHONO INPUTS
12.1 PHONO MM-EINGANG
Connection of a record player with a Moving Magnet system (MM) or MC system with high output level (high output MC).
12.2 PHONO MC-EINGANG
Connection of a record player with Moving Coil System (MC).
13 BLUETOOTH ANTENNA
14, 15 DIGITAL IN OPT1/2, COAX 1/2
Connect the MA 900 to the digital output on your CD player/computer/games console/network player, etc. by using an optical or coaxial digital audio cable.
16 UPDATE
This connection is intended exclusively for system updates.
CAUTION: Switch (17) must always be in the NORMAL position during operation!
OPERATIONAL ELEMENTS AND CONNECTIONS - REMOTE CONTROL
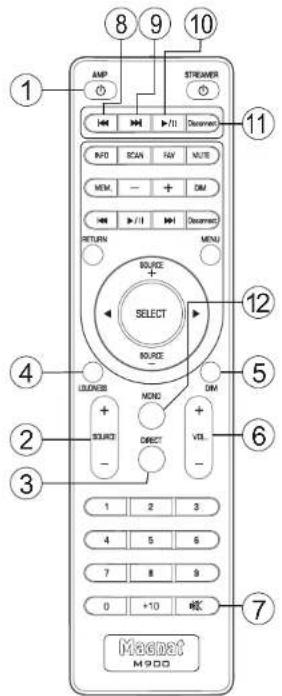
- Before using the remote control the supplied batteries must be inserted into the battery compartment located at the rear of the remote control.
- If the batteries have run out after prolonged use, please replace them (type AAA).
• To prevent causing damage to the remote control please remove the batteries if the device is not going to be used for a prolonged period.
1 AMP
Switches the device on when it is in the standby mode. If the LED does not illuminate, actuate the power switch located on the rear of the device. Conversely the device can be switched from power operation to the standby mode.
2 SOURCE (INPUT SELECTION)
Switches between the different audio sources: (see also FRONT PANEL, Pos. 6). The active input is indicated in the display..
3 DIRECT
The device is switched to the linear mode. The TREBLE, MID and BASS levels cannot be adjusted in this mode. DIRECT ON appears in the display.
4 LOUDNESS
Selection of the Loudness function (aurally compensated volume correction).
5 DIM
This button can be used to adjust the brightness of the display (3 levels).
6 VOLUME
Increases (+) or decreases (-) the volume.
7 MUTE
Switches the sound on and off.
Pressing this once starts the track currently being played on a Bluetooth source device from the beginning. Repeatedly pressing the button allows you to skip to previous tracks.
Pressing this once starts the track currently being played on a Bluetooth source device from the beginning. Repeatedly pressing the button allows you to skip to subsequent tracks.
10 PLAY/PAUSE (BLUETOOTH OPERATION)
Pauses the current track on a Bluetooth device or resumes playback.
Closes an existing Bluetooth connection and starts the pairing mode
12 MONO
A brief press switches between Stereo and Mono mode.
Note: This function is not available when using the Bluetooth input and the digital inputs.
SOURCE GAIN and SOURCE RENAME Menu A long press opens the SOURCE GAIN and the SOURCE RENAME menu.
(Note: When using the BLUETOOTH and LINE IN modes, only the GAIN menu can be selected!)
The SOURCE +/- buttons can then be used to select either SOURCE GAIN or SOURCE RENAME.
Confirm your selection by briefly pressing the MONO button. When the GAIN menu is selected, you can make the current source louder or quieter by using the SOURCE +/- buttons (+/- 6 dB).
The set value is confirmed by briefly pressing the Mono button.
When the SOURCE RENAME menu is selected, you can choose your own name for the current source (maximum of 14 digits).
Navigate through letters and numbers by using the Source +/- buttons. Confirm the individual digits by briefly pressing the Mono button.
The last digit entered can be deleted using the selection box (☑). When the desired name has been set, confirm it with (←).
The non-numbered buttons are reserved for operating the Magnat MMS 730 and have no function for the MA 900.

INITIAL OPERATION
- Place the MA 900 on an even surface. Observe the relevant clearance gaps as specified under "Important safety instructions".
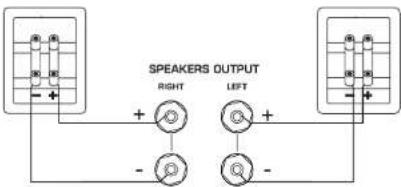
IMPORTANT: Do not place any objects on top of the device (magazines, CD/record cases, etc.). The ventilation slots located on top of the device must be unobstructed at all times! - Connect your speakers:
The stereo speakers (impedance of 4 to 8 ohms) are connected to the rear as follows:
flowchart
graph TD
    A["Speaker Output"] --> B["Left"]
    A --> C["Right"]
    B --> D["+"]
    C --> E["-"]
    D --> F["○"]
    E --> G["○"]
    F --> H["+"]
    G --> I["-"]
    H --> J["○"]
    I --> K["○"]
Only use high-quality audio speaker cables with a conductor cross section of min. 1.5 - 2.5 mm ^2 . Strip approx. 10 mm from the cables and twist the ends. Loosen the terminal screws one after the other and insert the stripped ends into the holes. Re-tighten the terminal screws. Make sure you pay attention to the correct polarity.
You can also use prefabricated cables with 4mm banana plugs or forked fittings. Also observe the operating instructions for the speakers you are using.
- Connect your audio sources.
- Connect the supplied mains cable to the rear and then insert the other end into a 230V socket.
- Actuate the on/off switch on the rear side, the device is now in the standby mode.
- Now switch on the device using the remote control or with the ON/STBY key on the front.
- When the tube has heated up the device is ready for use.
- Select your desired audio source using the input selector switch.
CONNECTING THE DEVICE TO A BLUETOOTH AUDIO SOURCE
Select Bluetooth input. If you have previously connected a Bluetooth device, the MA 900 will automatically attempt to re-establish a connection with this device. If this is the case, you may be required to manually reconfirm the connection on the source device.
If a connection has not already been made or the connection cannot be re-established, the MA 900 will automatically activate the 'pairing mode'. "BT" will flash on the display.
Now activate the Bluetooth mode on your source device. The MA 900 will appear in the list of Bluetooth devices as "MA 900". If it is not displayed in the list, set your source device to search for Bluetooth devices manually and make sure that the MA 900 has been switched to the pairing mode.
Depending on the source device, you may be asked whether the password is to be accepted during the pairing procedure. You can confirm this by simply pressing „Accept”. If you are still asked for a password, use the default passwords „0000” or „1234”. If you are asked if you want to establish a connection after pairing, please select „Yes”. When the device has been paired and connected successfully the „BT” indicator will illuminate continuously.
The MA 900 supports the „Qualcomm® aptX™ HD" high quality audio transmission standard. If your source device also supports this standard, „Qualcomm® aptX™ HD" will be selected automatically as the transfer mode when establishing a Bluetooth connection.
AUTO STANDBY FUNCTION
The unit has an auto standby function that automatically switches the device to standby mode around 3 1/2 hours after the last time it was operated (via the controls on the unit or via the remote control). This function implements an EU energy-saving regulation (1275/2008 EC), reducing power consumption if the device is accidentally left turned on after use.
This function can be deactivated as follows:
Press the DIM button on the device for around 5 seconds. APO MODE OFF appears in the display. Pressing the button again for around 5 seconds activates the function again. APO MODE ON then appears in the display.
TUBE REPLACEMENT
The device has a high-quality preamplifier stage fitted with two tubes. The tubes have a very long service life when used under normal operating conditions (min. 20,000-50,000 hours). If it is necessary to replace the tubes, please refer to a specialist dealer.
SERVICE AND TECHNICAL PROBLEMS
If you should encounter any technical problems, please contact your specialist dealer or Magnat Audio-Produkte GmbH, www.magnat.de.

SPECIFICATIONS
Power output:
Rated power 20 Hz - 20 kHz, THD < 1.0%, 4 ohm 2 x 200 W
20 Hz - 20 kHz, THD < 1.0%, 8 ohm 2 x 130 W
Peak power 1 kHz, 4 ohm 2 x 320 W
Frequency response:
CD/Streamer/Aux/Line/Tape/Tuner 6 Hz - 100 kHz (-3 dB)
20 Hz - 20 kHz (+/- 0,2 dB)
Phono 20 Hz - 20 kHz (+/- 0,3 dB)
Subsonic filter: 16 Hz, 18 dB/octave
Signal to noise ratio:
CD/Streamer/Aux/Line/Tape/Tuner/
Digital Inputs 105 dB
Phono MM 85 dB
Phono MC 74 dB
Input sensitivity:
CD/Streamer/Aux/Line/Tape/Tuner 470 mV / 100 kohm
Phono MM 5 mV / 47 kohm
Phono MC 0,5 mV / 470 ohm
Digital inputs: 2x optical (Toslink™)
2x coaxial (cinch)
Supported sampling frequencies: 44.1/48/88.2/96/176.4/192kHz
Supported bit depths: 16/24bits
Bluetooth® inputs: Bluetooth® 5.0 / Qualcomm® aptXTM HD
Operating frequency: 2404 - 2480 MHz
Maximum emitted power according
to EN 62479: -2.02 dBm
Electricity consumption: Max. 700 W
Standby < 0,5 W
Preamplifier fitted with: 2 x ECC 81 / 12AT7
Dimensions (wxhxd):
Main device: 433 x 161 x 316 mm
Main device incl. operational
elements/connecting terminals: 433 x 161 x 362 mm
Remote Control: 45 x 175 x 20 mm
Weight: 11.7 kg
Subject to technical change.
For further information please visit our website: http://www.magnat.de.

SOMMAIRE
18
Accessoires
23 Service and technical problems
INSTRUCTIONS POUR LA MISE AU REBUT
DÉCLARATION DE CONFORMITÉ

flowchart
graph TD
    A["17"] --> B["2000A"]
    B --> C["3000A"]
    C --> D["4000A"]
    D --> E["5000A"]
    E --> F["6000A"]
    F --> G["7000A"]
    G --> H["8000A"]
    H --> I["9000A"]
    I --> J["1000A"]
    J --> K["1100A"]
    K --> L["1200A"]
    L --> M["1300A"]
    M --> N["1400A"]
    N --> O["1500A"]
    O --> P["1600A"]
    P --> Q["1700A"]
    Q --> R["1800A"]
    R --> S["1900A"]
    S --> T["2000A"]
    T --> U["2100A"]
    U --> V["2200A"]
    V --> W["2300A"]
    W --> X["2400A"]
    X --> Y["2500A"]
    Y --> Z["2600A"]
    Z --> AA["2700A"]
    AA --> AB["2800A"]
    AB --> AC["2900A"]
    AC --> AD["3000A"]
    AD --> AE["3100A"]
    AE --> AF["3200A"]
    AF --> AG["3300A"]
    AG --> AH["3400A"]
    AH --> AI["3500A"]
    AI --> AJ["3600A"]
    AJ --> AK["3700A"]
    AK --> AL["3800A"]
    AL --> AM["3900A"]
    AM --> AN["4000A"]
    AN --> AO["4100A"]
    AO --> AP["4200A"]
    AP --> AQ["4300A"]
    AQ --> AR["4400A"]
    AR --> AS["4500A"]
    AS --> AT["4600A"]
    AT --> AU["4700A"]
    AU --> AV["4800A"]
    AV --> AW["4900A"]
    AW --> AX["5000A"]
1 INTERRUPTEUR D'ALIMENTATION
PRISES CINCH ANALOGIQUES (5 - 10)
8 SAUT AU TITRE PRÉCÉDENT
(MODE BLUETOOTH)
REMPLACEMENT DES TUBES
20 Hz - 20 kHz, THD < 1.0%, 8 Ohm 2 x 130 W
CD/Streamer/Aux/Line/Tape/Tuner/
ATTACCHI ANALOGICI CINCH (5 - 10)
(MODALITÀ BLUETOOTH)
(MODALITÀ BLUETOOTH)
Menu SOURCE GAIN e SOURCE RENAME:
Congratulations! You have made a wise selection in becoming the owner of a MAGNAT HiFi equipment.
The equipments are checked and tested continuously during the entire production process. In case you have problems with HiFi equipment, kindly observe the following:
-
The warranty period commences with the purchase of the component and is applicable only to the original owner.
-
During the warranty period we will rectify any defects due to faulty material or workmanship by replacing or repairing the defective part at our discretion. Further claims, and in particular those for price reduction, cancellation of sale, compensation for damages or subsequent damages, are excluded.
-
Unauthorized tampering with the equipment will invalidate this warranty.
-
Consult your authorized dealer first, if warranty service is needed. Should it prove necessary to return the component to the factory, please insure that • the component is packed in original factory packing in good condition • your enclose your receiat as proof of purchase.
-
Excluded from the warranty are: • Illumines • Valves • Batterias • Wear parts • Slipping damages, either readily apparent or concealed (claims for such damages must be Indged immediately with forwarding agent, the railway express office or past office), • Scratches in cases, metal components, front panels, etc. (You must notify your easier directly of such defects within three days of purchase.) • Defects ceased by incorrect installation or connection, by operation errors (see operating instructions), by overading or external force. • Equipments which have been repaired incorrectly or modified or where the case has been opened by persons other than any subsequent marital defects to other equipments. • Reimbursement of costs, without our prior consent, where repairing damage by third parties.

Toutes nos félicitations!
Name and address of the dealer/stamp
Käufer/Customer
Name/Name
Straße/Street
PLZ, Ort/City
Land/Country
Kaufdatum/buying date

- ACCESSORIES
- BEFORE STARTING
- IMPORTANT SAFETY PRECAUTIONS
- • RISK OF SWALLOWING BATTERIES!
- DAMAGE THAT MUST BE RECTIFIED BY A SPECIALIST:
- INSTRUCTIONS FOR DISPOSAL
- Battery disposal
- DECLARATION OF CONFORMITY
- USE AS DIRECTED
- OPERATIONAL ELEMENTS AND CONNECTIONS - FRONT PANEL
- LED STATUS INDICATION
- ON/STBY
- HEADPHONES
- LINE IN
- MONO
- SOURCE (INPUT SELECTOR SWITCH)
- BALANCE
- 8, 9, 10 EQUALISATION: BASS / MID / TREBLE
- DIRECT
- SENSOR FOR THE REMOTE CONTROL
- VOLUME
- DIM
- DISPLAY
- OPERATIONAL ELEMENTS AND CONNECTIONS - REAR PANEL
- POWER SWITCH
- MAINS CONNECTION
- 115/230V (VOLTAGE SELECTOR)
- SPEAKER TERMINALS
- ANALOGUE RCA CONNECTIONS (5 - 10)
- REC OUT
- TAPE INPUT
- AUX INPUT
- TUNER INPUT
- STREAMER INPUT
- CD INPUT
- PHONO EARTH CONNECTION
- PHONO INPUTS
- PHONO MM-EINGANG
- PHONO MC-EINGANG
- BLUETOOTH ANTENNA
- 14, 15 DIGITAL IN OPT1/2, COAX 1/2
- UPDATE
- OPERATIONAL ELEMENTS AND CONNECTIONS - REMOTE CONTROL
- AMP
- SOURCE (INPUT SELECTION)
- DIRECT
- LOUDNESS
- DIM
- VOLUME
- MUTE
- PLAY/PAUSE (BLUETOOTH OPERATION)
- MONO
- Note: This function is not available when using the Bluetooth input and the digital inputs.
- INITIAL OPERATION
- CONNECTING THE DEVICE TO A BLUETOOTH AUDIO SOURCE
- AUTO STANDBY FUNCTION
- TUBE REPLACEMENT
- SERVICE AND TECHNICAL PROBLEMS
- SPECIFICATIONS
- Power output:
- Frequency response:
- Signal to noise ratio:
- Input sensitivity:
- Dimensions (wxhxd):
- Weight: 11.7 kg
- SOMMAIRE
- 18
- Accessoires
- INSTRUCTIONS POUR LA MISE AU REBUT
- DÉCLARATION DE CONFORMITÉ
- INTERRUPTEUR D'ALIMENTATION
- PRISES CINCH ANALOGIQUES (5 - 10)
- SAUT AU TITRE PRÉCÉDENT
- (MODE BLUETOOTH)
- REMPLACEMENT DES TUBES
- ATTACCHI ANALOGICI CINCH (5 - 10)
- (MODALITÀ BLUETOOTH)
Brand : MAGNAT
Model : MA 900
Category : Receiver