
WAHTSD1 - Other camera accessories SONY - Free user manual and instructions
Find the device manual for free WAHTSD1 SONY in PDF.
| Product Type | Wi-Fi Surround Kit for Sony DVD Home Theatre System (DAV) |
| Brand | Sony |
| Model | WAHTSD1 |
| Surround Amplifier Dimensions (W/H/D) | 65 × 89 × 253 mm (without cover); 65 × 89 × 345 mm (with speaker cord cover) |
| IR Receiver Dimensions (W/H/D) | 50 × 83 × 21 mm (without stand); 50 × 92 × 42 mm (with stand) |
| IR Transmitter Dimensions (W/H/D) | 58 × 112 × 58 mm |
| Transmitter Box Dimensions (W/H/D) | 108 × 17 × 80 mm |
| Surround Amplifier Weight | 1.3 kg (without cover); 1.4 kg (with speaker cord cover) |
| IR Receiver Weight | 0.05 kg (without stand); 0.07 kg (with stand) |
| IR Transmitter Weight | 0.14 kg |
| Transmitter Box Weight | 0.07 kg |
| Power Supply (Surround Amplifier) | 120 V AC, 60 Hz (North American models); 110-240 V AC, 50/60 Hz (Latin American models); 220-240 V AC, 50/60 Hz (other models) |
| Power Consumption | 40 W (operating) |
| Transmission Type | Digital Infrared Audio Transmission (DIAT) |
| Output Power (Amplifier) | Stereo: 80 W + 80 W (3 Ω, 1 kHz, 1% THD); Surround: 100 W per channel (3 Ω, 1 kHz, 10% THD) |
| Main Features | Wireless surround speaker transmission, automatic calibration, wall-mountable |
| Care and Cleaning | Soft cloth slightly moistened with water or mild detergent. Do not use solvents. |
| Safety | Do not install in confined space, avoid liquids, unplug if not used for extended period |
| Spare Parts and Repairability | Contact a Sony dealer. Parts replaced during repair are not returned. |
| General Information | Digital Class B, complies with Canadian NMB-003. Designed to operate horizontally. |
Frequently Asked Questions - WAHTSD1 SONY
User questions about WAHTSD1 SONY
0 question about this device. Answer the ones you know or ask your own.
Ask a new question about this device
Download the instructions for your Other camera accessories in PDF format for free! Find your manual WAHTSD1 - SONY and take your electronic device back in hand. On this page are published all the documents necessary for the use of your device. WAHTSD1 by SONY.
USER MANUAL WAHTSD1 SONY
Wireless Surround Kit
Operating Instructions.
GB
Mode d'emploi.
FR
S-master
Digital Amplifier
WAHT-SD1
Table of Contents
About this manual 2
Unpacking 3
Hooking Up 4
Connecting the AC Power Cords (Mains Leads) 8
Adjusting the Wireless System 8
Installing the IR Transmitter and the IR Receiver on a Wall 11
Troubleshooting 13
Specifications 14
Index to Parts 15
WARNING
To reduce the risk of fire or electric shock, do not expose this apparatus to rain or moisture.
This Class B digital apparatus complies with Canadian ICES-003.
Do not install the appliance in a confined space, such as a bookcase or built-in cabinet.
To prevent fire or shock hazard, do not place objects filled with liquids, such as vases, on the apparatus.
The nameplate is located on the bottom exterior.
Precautions
On power sources
- Install this system so that the AC power cord (mains) can be unplugged from the wall socket immediately in the event of trouble.
On placement
- Do not place the system in locations that are hot and subject to direct sunlight, dusty, very humid, or extremely cold.
- Use caution when placing the system on a specially treated (waxed, oiled, polished, etc.) floor, as staining or discoloration may result.
- Allow adequate air circulation to prevent internal heat buildup.
- Do not place the system on surfaces (rugs, blankets, etc.) or near materials (curtains, draperies) that may block the ventilation slots.
- Do not install the system near heat sources such as radiators, or air ducts, or in a place subject to direct sunlight, excessive dust, mechanical vibration, or shock.
-
Do not install the system in an inclined position. It is designed to be operated in a horizontal position only.
-
Position the Sony DVD Home Theatre System (DAV) and surround amplifier away from each other.
- Keep the system away from equipment with strong magnets, such as microwave ovens, or large loudspeakers.
- Do not place heavy objects on the system.
- If you use more than one set of these systems (Sony DVD Home Theatre System (DAV) and WAHT-SD1), position them away from each other to avoid cross talk.
On cleaning
Clean the cabinets with a soft cloth lightly moistened with a mild detergent solution or water. Do not use any type of abrasive pad, scouring powder or solvent such as alcohol or benzene.
Safety
- If anything falls into the cabinet, unplug the unit and have it checked by qualified personnel before operating it any further.
- Unplug the unit from the wall outlet if you do not intend to use it for an extended period of time. To disconnect the cord, pull it out by the plug, never by the cord.
About this manual
The WAHT-SD1 is a Wireless Surround Kit for the Sony DVD Home Theatre System (DAV). DAV-DZ555K/DZ556KB model is used in this manual for some illustrations.
This kit is for models which have a slot cover and have "DIR-TC1" printed on the rear panel.
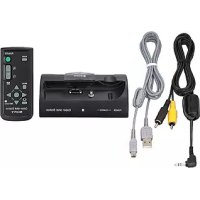
Unpacking
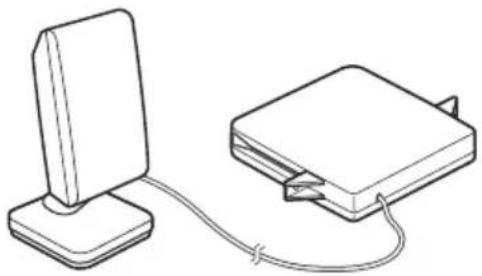
Transmitter (DIR-TC1) (IR transmitter + Transmitter box) (1)
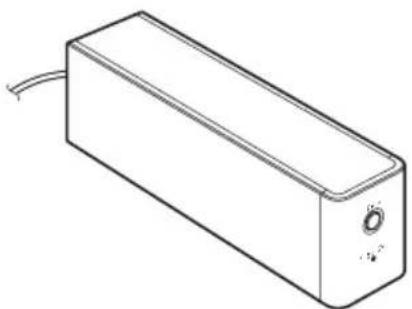
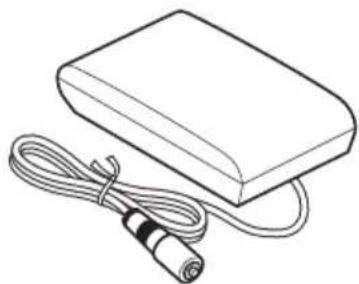
Surround amplifier (TA-SB500WR) (1)
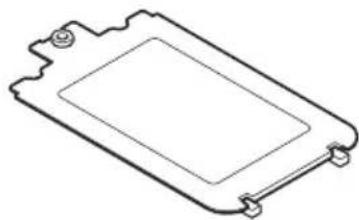
Speaker cord cover (1)
Screw (1)

Operating Instructions (1)
Note
- Speaker cords are not supplied.
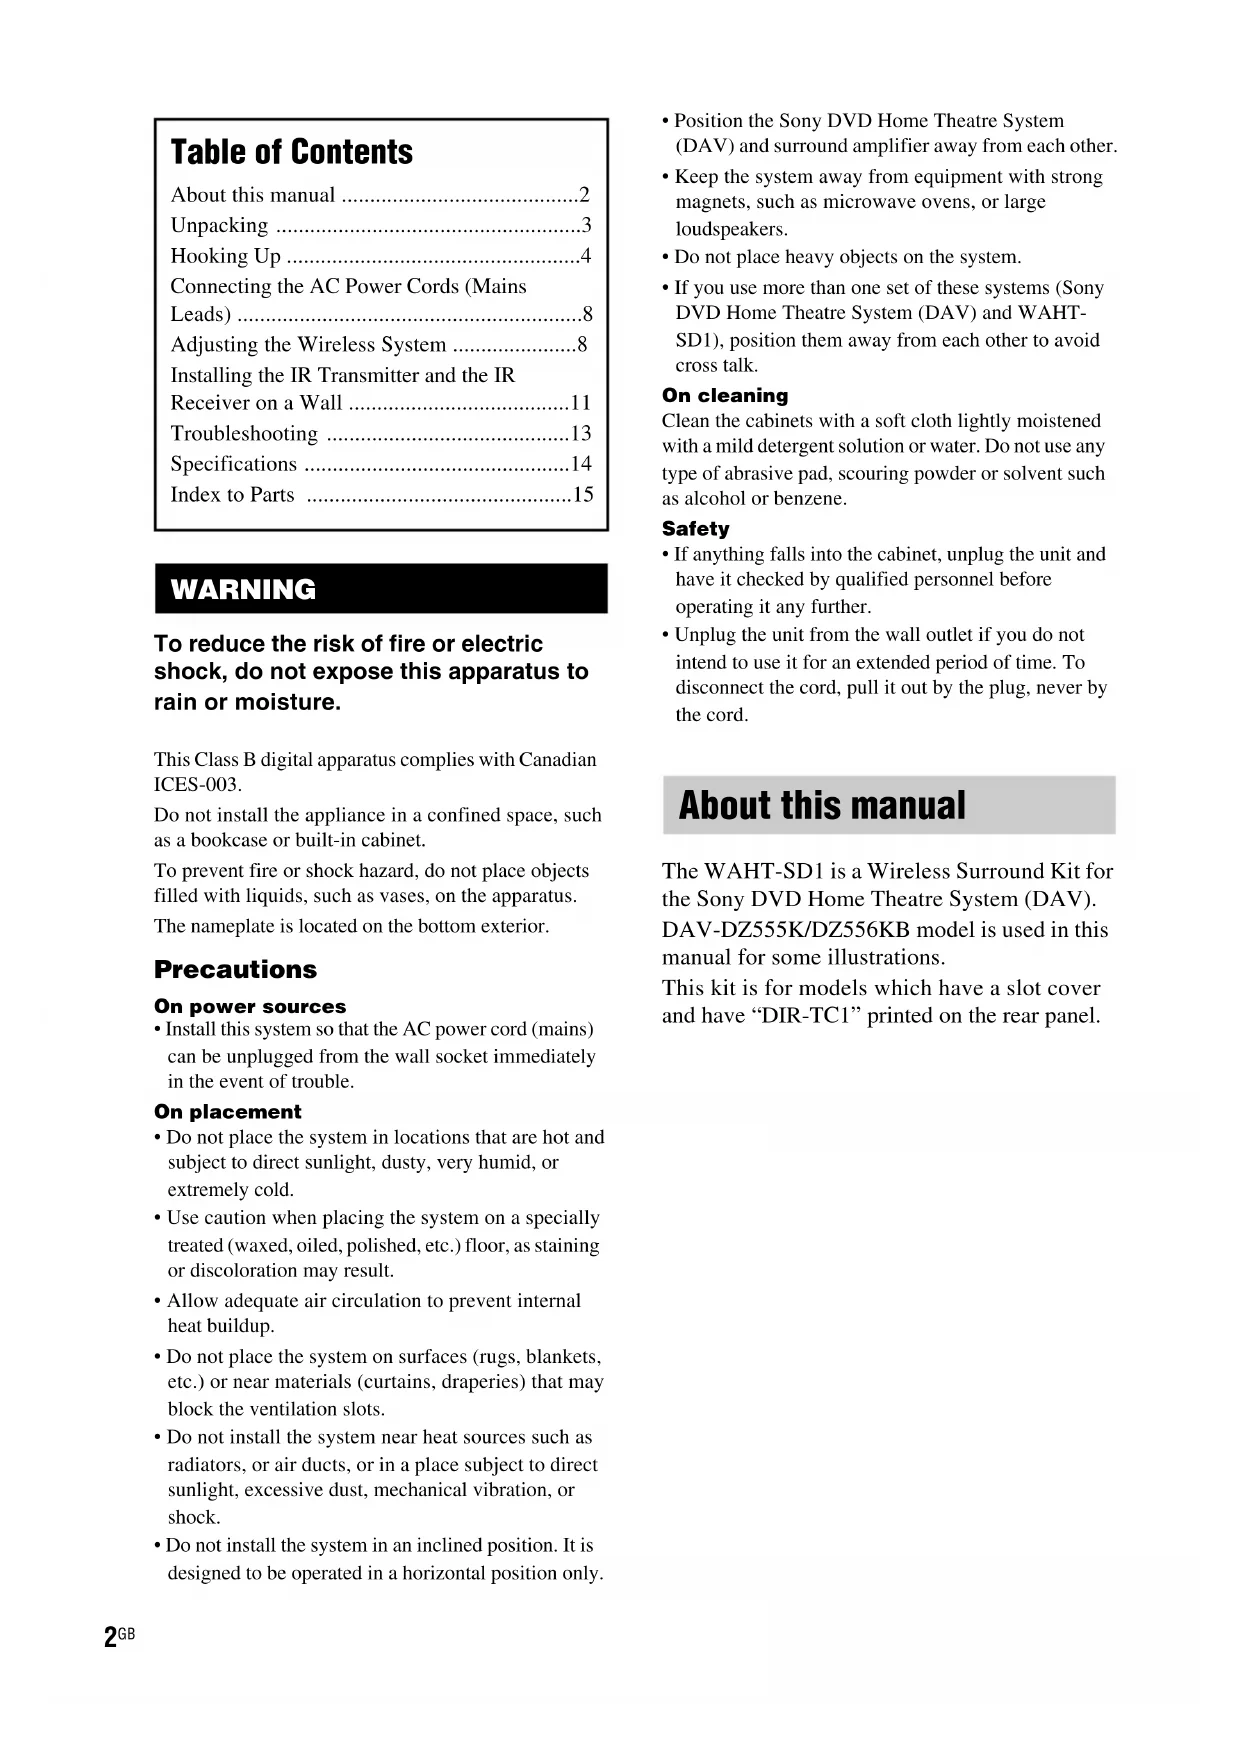
IR receiver (DIR-R1) (1)
IR receiver stand (1)
Speaker cord holder (1)
Hooking Up
Connecting the transmitter and the surround amplifier to a Sony DVD Home Theatre System (DAV).
Before installing, make sure to remove the AC power cord (mains lead) of the system from the wall outlet (mains).
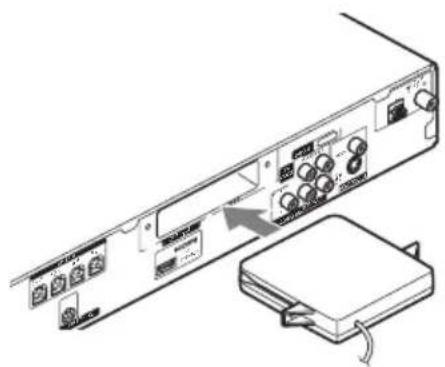
Inserting the transmitter
1 Remove the screws and detach the slot cover.
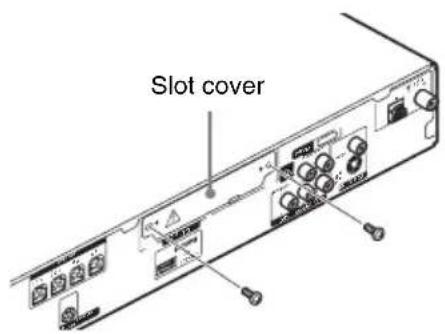
Note
- Remove the screws from the slot cover bearing the caution mark. Do not remove other screws.
- The slot cover is no longer necessary; however, keep it after detaching.
2 Insert the transmitter box.
Note
- Insert the transmitter box with the SONY logo facing up.
3 Make sure to use the same screws to secure the transmitter box.
Note
- Do not use other screws to fasten the transmitter box.
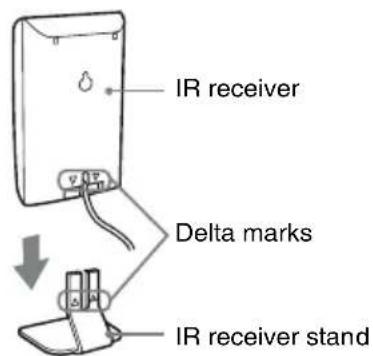
When using the IR receiver stand, attach the stand so that both delta marks on the IR receiver and stand are aligned.
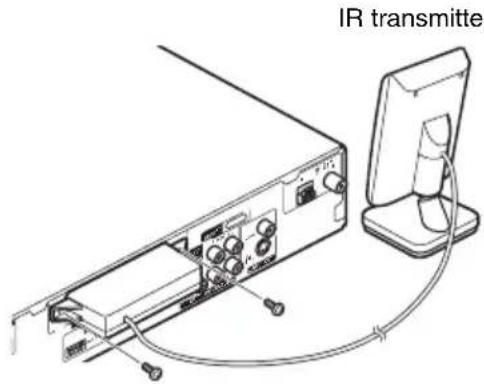
Connecting the Surround Speakers and the IR Receiver
Insert the connectors of the speaker cords in their corresponding speaker jacks. The connectors of the speaker cords are the same color as the jacks to be connected.

Note
- Use the speaker cord supplied with the Sony DVD Home Theatre System (DAV) to connect the surround speakers to the surround amplifier.
- Customers who already have the Sony DVD Home Theatre System (DAV), use the speaker cords of the system.
- When you use this Wireless Surround Kit, do not connect the speaker cord (s) to the surround speaker jack (s) on your Sony DVD Home Theatre System (DAV).
- The cord of the IR receiver is for this system only, and is not commercially available.
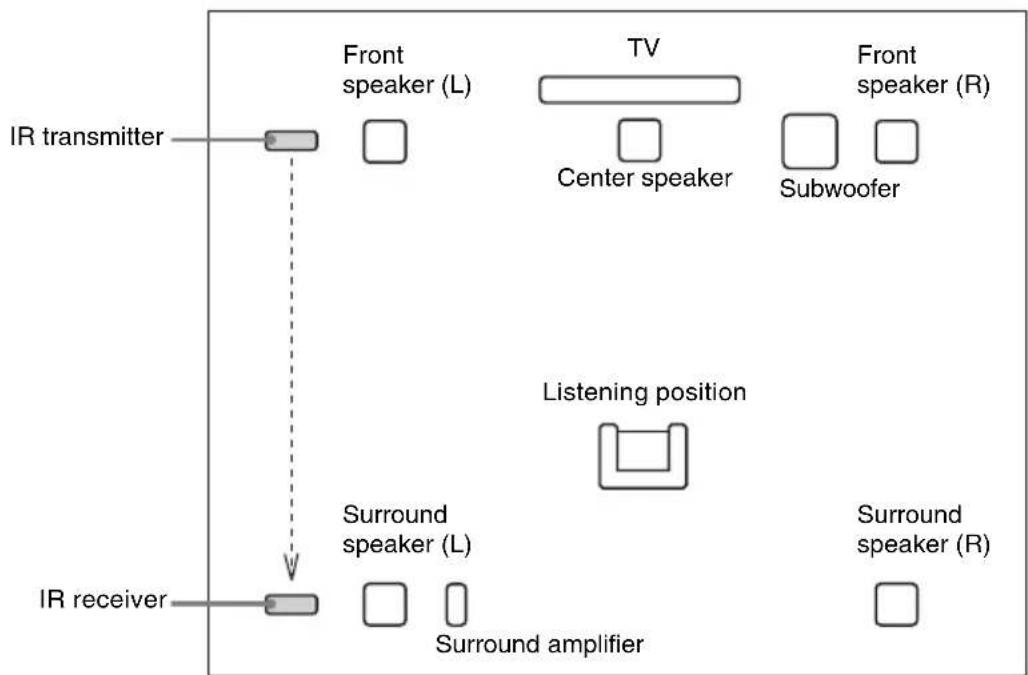
Example for installation
Position the IR transmitter and IR receiver as illustrated.
Top view
About the surround amplifier
After connecting, you can attach the cover to the surround amplifier for organizing and storing excess speaker cords.
Attaching the cover
1 Attach the speaker cord cover by sliding it down along the grooves at the edges of the surround amplifier.
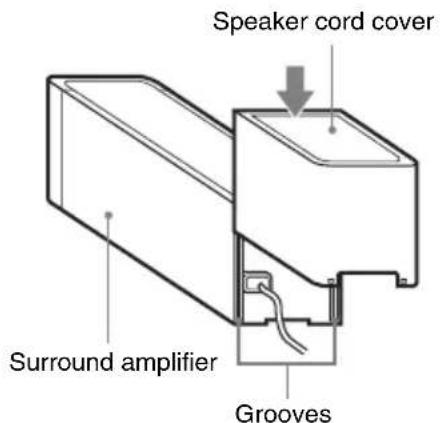
Push the speaker cord cover down until you hear a click. Turn the surround amplifier upside down, then store the cords in the speaker cord cover.
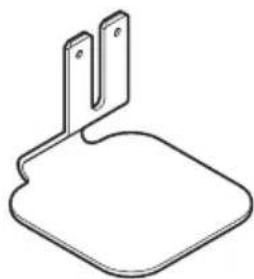
2 Insert the tabs of the speaker cord holder in the slots of the speaker cord cover, and press it into place.
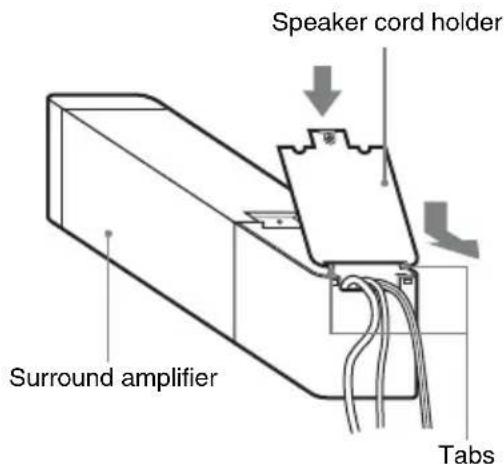
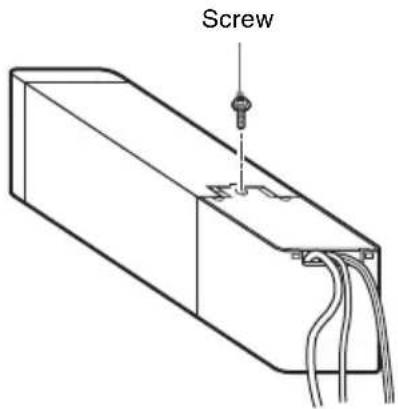
3 Secure the speaker cord holder with the supplied screw.
Note
-
Do not use the speaker cord cover and holder without the supplied screw.
-
Before detaching the speaker cord cover, first remove the screw, then the speaker cord holder. Forcing the speaker cord cover off with the screw in place may cause damage.
Gently pull apart the side of the speaker cord cover when detaching.
About the wireless system
This wireless system employs the Digital Infrared Audio Transmission (DIAT) system. The following diagram indicates the infrared transmission area (the range that infrared signals can reach).
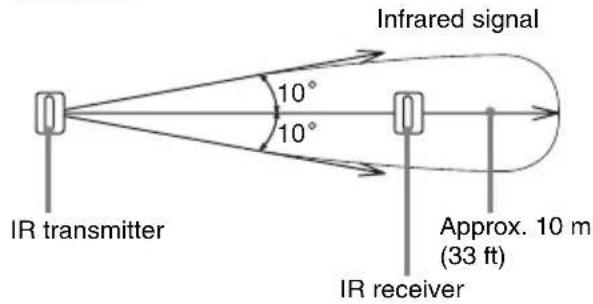
Top view
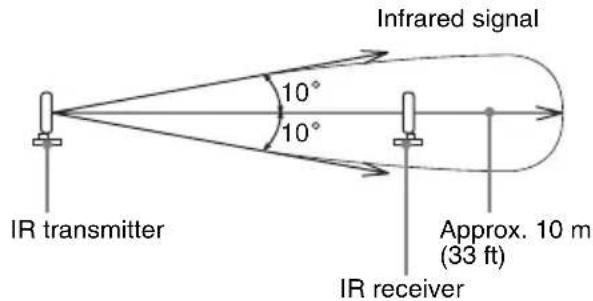
Side view
Note
- Do not install the IR receiver in a place exposed to direct sunlight, or strong light such as an incandescent lamp.
- Do not use an IR transmitter or IR receiver other than the one supplied with this system.
Connecting the AC Power Cords (Mains Leads)
Before connecting the AC power cords (mains leads) of your Sony DVD Home Theatre System (DAV) and the surround amplifier to a wall outlet (mains), connect the front and center speakers to your DAV, and surround speakers to the surround amplifier.
Adjusting the Wireless System
After connecting the speakers, surround amplifier, IR transmitter, IR receiver, and the AC power cords (mains leads), adjust the wireless system for good transmission.
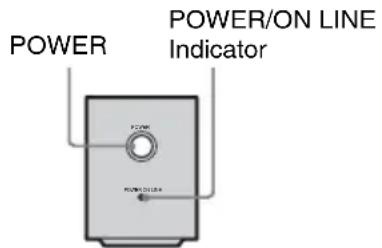
- If the POWER/ON LINE indicator flashes in red, the IR receiver is receiving an infrared signal from another Sony's wireless product. Move the IR transmitter and/or the IR receiver so that the POWER/ON LINE indicator turns green.
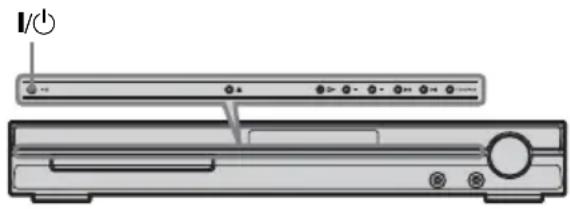
1 Press I/ on DAV and POWER on the surround amplifier.
The DAV and surround amplifier turn on and the POWER/ON LINE indicator turns red.
2 Orient the IR transmitter and IR receiver to face each other.
Adjust the position until the POWER/ON LINE indicator turns green.
Tip
- The IR transmitter is movable for easy reorientation.
Note
-
Make sure that there is no obstruction such as a person or object between the IR transmitter and the IR receiver. Otherwise, the sound from the surround speakers may be interrupted.
-
If the POWER/ON LINE indicator turns red, the transmission is incomplete. Adjust the position of the IR transmitter and IR receiver until the POWER/ON LINE indicator turns green.
Settings for the Speakers
It is necessary to set up your Sony DVD Home Theatre System (DAV) to use this Wireless Surround Kit.
1 Press FUNCTION repeatedly until "DVD" appears in the front panel display.
2 Press DISPLAY when the system is in stop mode.
The Control Menu appears.
3 Press / to select [SPEAKER FORMATION], then press
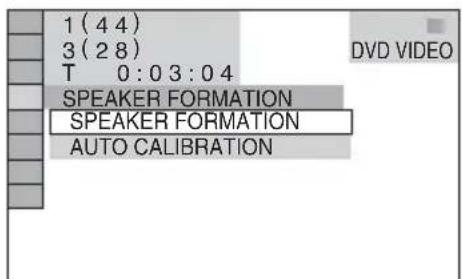
4 Press / to select [SPEAKER FORMATION], then press
The options for [SPEAKER FORMATION] appear.
Note
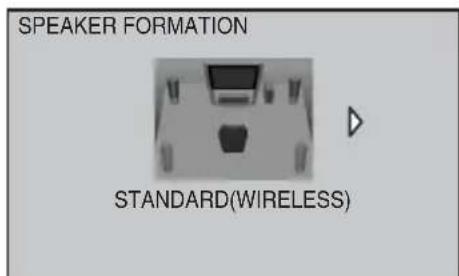
The [STANDARD (WIRELESS)] option appears after inserting transmitter box. (When you do not insert transmitter box, only [STANDARD] appears.)
5 Press to select [STANDARD (WIRELESS)], then press
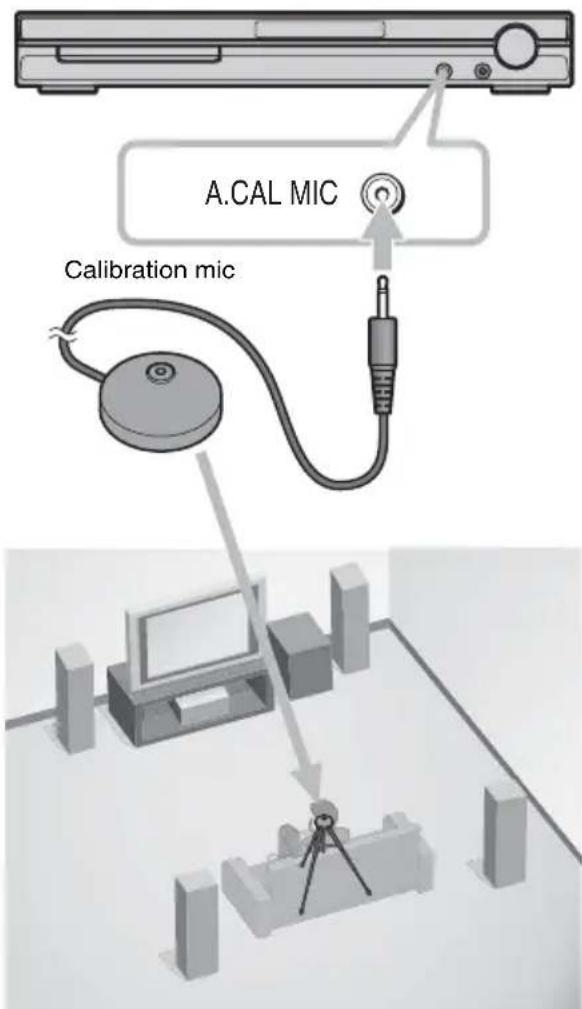
6 Connect the calibration mic to the A.CAL MIC jack on the front panel and press / to select [YES].
7 Press
Set up the calibration mic at ear level using a tripod, etc. (not supplied). The front of each speaker should face the calibration mic, and there should be no obstruction between either speaker and the calibration mic. Be quiet during the measurement.
8
Press

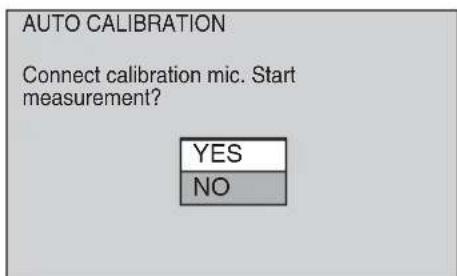
Auto Calibration starts.
Note
-
Loud test sound is output when [AUTO CALIBRATION] starts. You cannot turn the volume down. Give consideration to children and neighbors.
-
Avoid being in the measurement area and making noise during the measurement (which takes about 3 minutes), as it may interfere with measurement.
9 Unplug the calibration mic and press to select [YES].
Quick Setup is finished. All connections and setup operations are complete.
![SONY WAHTSD1 - Unplug the calibration mic and press to select [YES]. - 1](/content/2026/03/491630/images/82ee8d315b553fccc6e23c4e3aec0f48436754ba5b0b1158dd3e7212db142508.jpg)
Note
- Reflections from walls or the floor may affect measurements.
- If measurement fails, follow the message then retry [AUTO CALIBRATION].
- When you select [SECOND ROOM] for [SPEAKER FORMATION], the measurement of [SURROUND L] and [SURROUND R] are not displayed.
10Press
Installing the IR Transmitter and the IR Receiver on a Wall
You can hang the IR transmitter and IR receiver on a wall when:
- there is an obstruction between the IR transmitter and the IR receiver.
people often pass between the IR transmitter and the IR receiver.
When hanging both the IR transmitter and IR receiver, adjust the position of the IR transmitter after deciding the position of the IR receiver.
Installing the IR transmitter on a wall
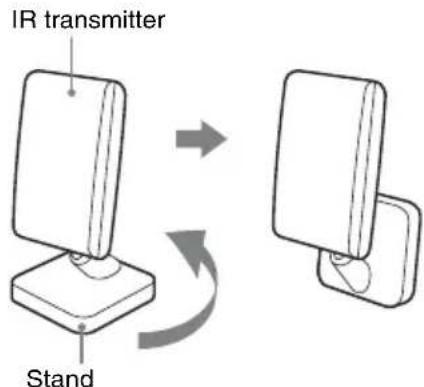
1 Rotate the stand of the IR transmitter.
2 Install 2 commercially available screws in the wall so as to protrude 4mm (^3 / _16 inch).
Install the screws 30mm (1^3 / _16 inches apart.
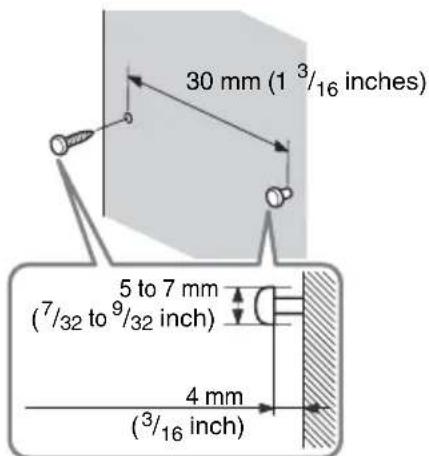
3 Hang the IR transmitter by the hole on the bottom of the stand on the screw.
Make sure that the IR transmitter does not move after installation.

Tip
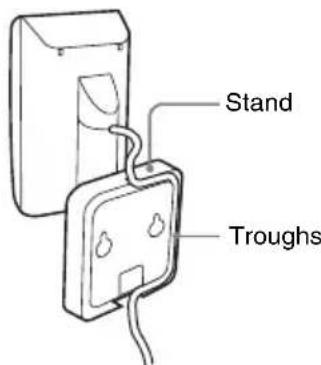
- You can store the cords in the troughs in the bottom of the stand.
Note
- Use screws suitable for the material and strength of the wall.
- Do not install the IR transmitter on a wall of low strength.
- Sony is not liable for any damage or accident incurred by incorrect installation (i.e. low strength wall, etc.), incorrect use of this product, or natural disaster.
- When connecting/disconnecting the cord, detach the IR transmitter from the wall first.
Installing the IR receiver on a wall
1 Install a commercially available screw in the wall so as to protrude 4mm (^3 / _16 inch).
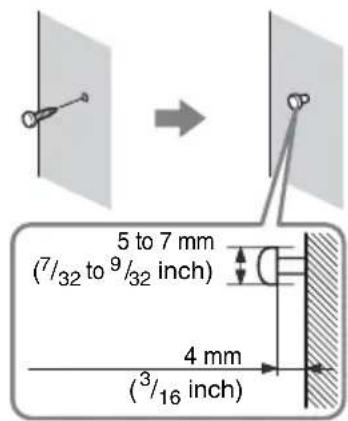
2 Detach the IR receiver stand and hang it by the hole on the rear of the IR receiver on the screw.
Make sure that the IR receiver does not move after installation.
IR receiver
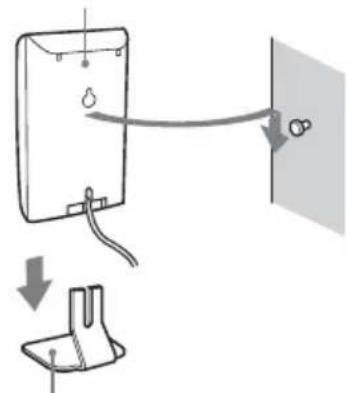
IR receiver stand
Tip
- When reattaching the IR receiver stand to the IR receiver, attach the stand so that both delta marks on the IR receiver and stand are aligned.
Troubleshooting
If you experience any of the following difficulties while using the system, use this troubleshooting guide to help remedy the problem before requesting repairs. Should any problem persist, consult your nearest Sony dealer.
Note that if service personnel changes some parts during repair, these parts may be retained. In the event of a problem with the surround amplifier, have a Sony dealer check the entire system together (system, and surround speaker).
Power
The power is not turned on.
- Check that the AC power cord (mains lead) is connected securely.
The POWER/ON LINE indicator does not turn on.
- The + and - speaker cords are short-circuited. In this case, disconnect the AC power cord (mains lead) of the surround amplifier from the wall outlet (mains), reconnect, and then turn the surround amplifier on.
Sound
There is no sound.
- The speaker cord is not connected securely.
- Check the speaker settings.
The left and right sounds are unbalanced or reversed.
- Check that the speakers and components are connected correctly and securely.
- Check the unit's SYSTEM MENU and select "REV OFF" when "SR SL REV" is set to "REV ON".
Severe hum or noise is heard.
- Check that the speakers and components are connected securely.
- Check that the connecting cords are away from a transformer or motor, and at least 3 meters (10 ft) away from your TV set or a fluorescent light.
- Move your TV away from the audio components.
- The plugs and jacks are dirty. Wipe them with a cloth slightly moistened with alcohol.
Clean the disc.
No sound or only a very low-level sound is heard from the surround speakers.
- Check the speaker connections and settings.
- Make sure the sound field function is on.
- Depending on the source, the effect of the surround speakers may be less noticeable.
- Wireless setting of the surround speaker is not correct.
- The plasma display may interfere with transmission, in which case, adjust the position of the IR transmitter and IR receiver.
- Do not install the IR transmitter, IR receiver in a place exposed to direct sunlight or strong light such as an incandescent lamp.
- Do not use the IR transmitter and the IR Receiver near a radiant heater or fireplace.
- Clean the surface of the IR transmitter and IR receiver.
A 2 channel source is being played.
Operation
The POWER/ON LINE indicator momentarily turns red.
- When changing the disc or switching the function, the POWER/ON LINE indicator may momentarily turn red. This is not a malfunction.
The POWER/ON LINE indicator flashes in red.
- The IR receiver is receiving an infrared signal from another Sony's wireless product. Move the IR transmitter and/or the IR receiver so that the POWER/ON LINE indicator turns green.
- Move the wireless system away from any other nearby wireless system(s).
- Point the IR transmitter at the IR receiver.
The system does not work normally.
- Disconnect the AC power cord (mains lead) from the wall outlet (mains), then reconnect after several minutes.
Specifications
TA-SB500WR (Surround Amplifier)
Amplifier section
Stereo mode (rated) 80W + 80W
(at 3 ohms, 1kHz 1 %
THD)
Surround mode (reference) RMS output power
SL / SR^*:100W
(per channel at 3 ohms, 1
kHz, 10% THD)
- Depending on the sound field setting and the source, there may be no sound output.
Power requirements:
North American models: 120V AC, 60Hz
Mexican models: 120V AC, 60Hz
Latin American models: 110 - 240VAC,50 / 60Hz
Taiwan models: 120VAC,50 / 60Hz
Other models: 220 - 240VAC 50 / 60Hz
Power consumption On: 40 W
Dimensions (approx.) 65 × 89 × 253 ~mm
(2^5 / 8× 3^5 / 8× 10 inches)
(w/h/d)
65× 89× 345mm
(2^5 / 8 × 3^7 / 8 × 13^5 / 8 inches)
(w/h/d) incl. speaker cord
cover
Mass (approx.) 1.3kg 2 lb 14 oz
1.4kg (3 lb 2 oz) incl.
speaker cord cover
Design and specifications are subject to change without notice.
DIR-R1 (IR receiver)
Dimensions (approx.) 50 × 83 × 21 ~mm
(2× 3^3 / 8×^27 / 32 inches)
(w/h/d)
50× 92× 42mm
(2× 3^5 / 8× 1^11 / 16 inches)
(w/h/d) with stand
Mass (approx.) 0.05kg 18 lb
0.07kg(%_32lb) with stand
DIR-TC1
IR transmitter
Dimensions (approx.) 58 × 112 × 58 ~mm
(2^3 / 8 × 4^1 / 2 × 2^3 / 8 inches)
(w/h/d)
Mass (approx.) 0.14kg 16 lb
Transmitter box
Dimensions (approx.) 108 × 17 × 80 ~mm
(4^3 / 8 × 11 / 16 × 3^1 / 4 inches)
(w/h/d)
Mass (approx.) 0.07kg (^5 / 32lb)
Surround amplifier
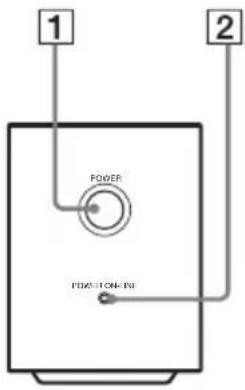
Front panel
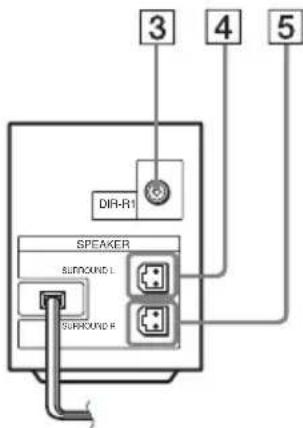
Rear panel
1 POWER (ON/OFF)
2 POWER/ON LINE indicator
DIR-R1 jack
4 SURROUND L SPEAKER jack
5 SURROUND R SPEAKER jack
Table des matieres
TA-SB500WR (Amplificateur surround)


- Wireless Surround Kit
- Table of Contents
- WARNING
- To reduce the risk of fire or electric shock, do not expose this apparatus to rain or moisture.
- Precautions
- On power sources
- On placement
- On cleaning
- Safety
- About this manual
- Unpacking
- Operating Instructions (1)
- Note
- Hooking Up
- Inserting the transmitter
- Connecting the Surround Speakers and the IR Receiver
- Example for installation
- Top view
- About the surround amplifier
- Attaching the cover
- About the wireless system
- Connecting the AC Power Cords (Mains Leads)
- Adjusting the Wireless System
- Press I/ on DAV and POWER on the surround amplifier.
- Orient the IR transmitter and IR receiver to face each other.
- Tip
- Settings for the Speakers
- Press
- 8
- Press
- Unplug the calibration mic and press ← to select [YES].
- Installing the IR Transmitter and the IR Receiver on a Wall
- Installing the IR transmitter on a wall
- Hang the IR transmitter by the hole on the bottom of the stand on the screw.
- Installing the IR receiver on a wall
- Troubleshooting
- Power
- The power is not turned on.
- The POWER/ON LINE indicator does not turn on.
- Sound
- There is no sound.
- The left and right sounds are unbalanced or reversed.
- Severe hum or noise is heard.
- No sound or only a very low-level sound is heard from the surround speakers.
- Operation
- The POWER/ON LINE indicator momentarily turns red.
- The POWER/ON LINE indicator flashes in red.
- The system does not work normally.
- Specifications
- TA-SB500WR (Surround Amplifier)
- Amplifier section
- DIR-R1 (IR receiver)
- DIR-TC1
- Surround amplifier
- Table des matieres
- TA-SB500WR (Amplificateur surround)
Brand : SONY
Model : WAHTSD1
Category : Other camera accessories