
GPSCS3KA - Other camera accessories SONY - Free user manual and instructions
Find the device manual for free GPSCS3KA SONY in PDF.
| Product Type | GPS unit kit for camera (model GPS-CS3) |
| Brand | Sony |
| Model | GPSCS3KA (kit contents) / GPS-CS3 (unit) |
| Dimensions (W × H × D) | Approx. 57 mm × 80 mm × 23 mm |
| Weight | Approx. 70 g (without battery) |
| Power | 1 LR6 (AA) alkaline battery or 1 HR6 (AA) Ni-MH battery (sold separately); also via USB port |
| Battery Life | Approx. 15 h (LR6 alkaline) / 16 h (HR6 Ni-MH) with continuous triangulation at 25 °C |
| Main Functions | GPS log recording (update every ~15 s); applying coordinates to JPEG images via Matching function; displaying images on map with included PMB software; importing log to PC; Undo function to remove last applied coordinates |
| GPS Reception Frequency | 20-channel parallel tracking, sensitivity -159 dBm max |
| Interface | USB 2.0 Hi-Speed |
| Internal Memory Capacity | Approx. 1 GB (approx. 128 MB dedicated to GPS logs) |
| Compatible Memory Cards | Memory Stick Duo (PRO, PRO-HG Duo, Micro via adapter); SD card (SD, SDHC up to 8 GB, mini/micro via adapter) |
| Included Software | PMB (image management and map display), GPS Image Tracker (import and matching), PMB Launcher |
| Display | LCD screen with GPS status, coordinates, clock, menus |
| Maintenance and Cleaning | Clean with a soft cloth slightly dampened; do not use solvents, alcohol, insecticides or repellents |
| Safety | Do not expose to rain or moisture; do not use manganese batteries; turn off before opening the battery cover; do not shake vigorously |
| Spare Parts and Repairability | For repairs, contact an authorized Sony service center; no spare parts provided; battery and memory cards sold separately |
| Operating Temperature | 0 °C to 40 °C |
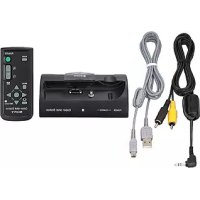
| Kit Contents | GPS unit GPS-CS3, USB cable, software CD-ROM, carrying case |
Frequently Asked Questions - GPSCS3KA SONY
User questions about GPSCS3KA SONY
0 question about this device. Answer the ones you know or ask your own.
Ask a new question about this device
Download the instructions for your Other camera accessories in PDF format for free! Find your manual GPSCS3KA - SONY and take your electronic device back in hand. On this page are published all the documents necessary for the use of your device. GPSCS3KA by SONY.
USER MANUAL GPSCS3KA SONY
Operating Instructions
Mode d'emploi
GB
FR
GPS-CS3KA
English
WARNING
To reduce fire or shock hazard, do not expose the unit to rain or moisture.
For Customers in the U.S.A.
If you have any questions about this product, you may call:
Sony Customer Information Center
1-800-222-SONY (7669)
The number below is for the FCC related matters only.
Regulatory Information
Declaration of Conformity
Trade Name: SONY
Model No.: GPS-CS3
Responsible Party: Sony Electronics Inc.
Address:16530 Via Esprillo,
San Diego, CA 92127 U.S.A.
Telephone No.: 858-942-2230
This device complies with Part 15 of the FCC Rules. Operation is subject to the following two conditions: (1) This device may not cause harmful interference, and (2) this device must accept any interference received, including interference that may cause undesired operation.
CAUTION
You are cautioned that any changes or modifications not expressly approved in this manual could void your authority to operate this equipment.
I Note:
This equipment has been tested and found to comply with the limits for a Class B digital device, pursuant to Part 15 of the FCC Rules. These limits are designed to provide reasonable protection against harmful interference in a residential installation. This equipment generates, uses, and can radiate radio frequency energy and, if not installed and used in accordance with the instructions, may cause harmful interference to radio communications. However, there is no guarantee that interference will not occur in a particular installation. If this equipment does cause harmful interference to radio or television reception, which can be determined by turning the equipment off and on, the user is encouraged to try to correct the interference by one or more of the following measures:
– Reorient or relocate the receiving antenna.
- Increase the separation between the equipment and receiver.
- Connect the equipment into an outlet on a circuit different from that to which the receiver is connected.
- Consult the dealer or an experienced radio/TV technician for help.
The supplied interface cable must be used with the equipment in order to comply with the limits for a digital device pursuant to Subpart B of Part 15 of FCC Rules.
For Customers in Canada
This Class B digital apparatus complies with Canadian ICES-003.
For Customers in Europe
CE
Hereby, Sony Corporation, declares that this GPS-CS3 GPS unit is in compliance with the essential requirements and other relevant provisions of the Directive 1999/5/EC.
For details, please access the following URL:
http://www.compliance.sony.de/
This product has been tested and found compliant with the limits set out in the EMC regulation for using connection cables shorter than 3 meters (9.8 feet).
Disposal of Old Electrical & Electronic Equipment (Applicable in the European Union and other European countries with separate collection systems)

This symbol on the product or on its packaging indicates that this product shall not be treated as household waste. Instead it shall be handed over to the applicable collection point for the recycling of electrical and electronic equipment. By ensuring this product is disposed of correctly, you will help prevent potential negative consequences for the environment and human health, which could otherwise be caused by inappropriate waste handling of this product. The recycling of materials will help to conserve natural resources. For more detailed information about recycling of this product, please contact your local Civic Office, your household waste disposal service or the shop where you purchased the product.
Table of contents
Read this first
What you can do with the GPS unit kit ....5
Displaying images where they were taken and the route you traveled on a map 6
Checking the included items 8
Identifying the parts ....9
Menu screen 11
Step 1 Recording the traveled route
Inserting a battery 14
Recording a GPS log 16
Formatting the internal memory ....19
Step 2 Applying the recording positioning information to images
Installing the supplied software 20
Applying positioning information to images with the GPS unit (Matching) 22
Applying positioning information to the images on a computer/Importing the GPS log 26
Step 3 Displaying the image on a map
Viewing the image and the location where you recorded an image on a map/Viewing the route you traveled 30
Troubleshooting
Troubleshooting 32
Error messages 34
Additional information
GPS 36
Precautions 37
Specifications 41
What you can do with the GPS unit kit
The GPS-CS3KA GPS unit kit enables you to:
- Apply positioning information to image data
- Display images on a map of the shooting locations
- Display the route you traveled on a map
- Send e-mails with images displayed on a map of the shooting locations
Components of the GPS unit kit
The GPS unit kit consists of a GPS unit, and three sets of application software: "PMB," "GPS Image Tracker," and "PMB Launcher."
GPS unit
The GPS unit records the travel route as a “GPS log,” a log of serial positioning information. The GPS unit records the current positioning information about every 15 seconds in the “GPS log.” You can also apply positioning information to image data using the GPS unit.
PMB
This software enables you to view and manage the images recorded by digital still cameras and Sony digital video camera recorders. Using the Map View feature of PMB, you can display images which have positioning information recorded by the GPS unit and incorporated in the image data by GPS Image Tracker, on a map. Thanks to this feature, you can easily determine where you took the image, and check the route you traveled while recording images.
GPS Image Tracker
This software enables you to import the “GPS log” (serial positioning information recorded) from the GPS unit to a computer, incorporate the positioning information in the image data recorded by digital still cameras and Sony digital video camera recorders, and store them together.
PMB Launcher
If you select an operation on the PMB Launcher, the software required for the operation starts automatically.
■ Matching positioning information to individual images
The GPS unit and GPS Image Tracker match date and time information recorded with the image data and that of the GPS log, and pair positioning information from the GPS log with image data that has the same date and time information as that of the GPS log (Matching).
Notes
- Since the GPS unit records positioning information about every 15 seconds, the positioning information applied to the image may not be exactly the same as that where the image was actually taken.
- The GPS unit records Greenwich Mean Time (GMT) as the time information.
Displaying images where they were taken and the route you traveled on a map
Step 1 Recording the traveled route
→ See page 14.

natural_image
Illustration of a woman holding a smartphone and a car, with a house and tree in the background (no text or symbols)1 Insert an LR6/HR6 (size AA) battery (sold separately) into the GPS unit, and turn it on.
Make sure that the triangulating symbol ( ×_i ) ×_i appears on the LCD screen. Turn on the GPS unit outdoors.
2 When you use the GPS unit for the first time, the [Time Zone] screen appears. Select the time difference using / based on GMT, then press ENTER.
See page 17 on the GMT time difference for each country/region.
3 Set the correct time on your camera.
Refer to the operating instructions of the camera.
4 Carry the GPS unit and the camera together.
Step 2 Applying the recording positioning information to images
→ See page 20.
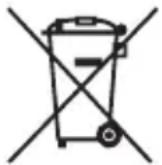
1 Insert the "Memory Stick Duo" media or the SD memory card that contains the recorded images into the GPS unit.
2 Press MENU, then select [Matching] → [Start]. When the GPS unit has applied the positioning information to the images, [Complete] appears.
3 Install the supplied software (GPS Image Tracker, PMB, and PMB Launcher) on your computer.
- You may apply positioning information to images using the supplied GPS Image Tracker (p. 26).
- If you are using media other than “Memory Stick Duo” media or SD memory cards, see page 26.
- When you want to adjust or change the location of the images on a map, refer to the GPS Image Tracker Help.
natural_image
Illustration of a laptop connected to a smartphone and a camera, both without any text or symbols.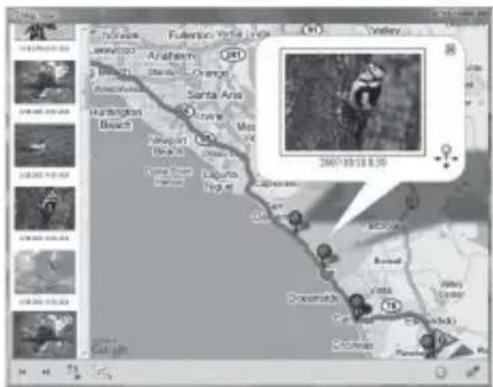
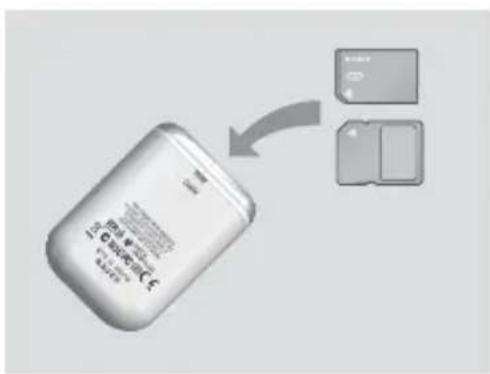
1 Insert the "Memory Stick Duo" media or the SD memory card that contains the images with positioning information into the camera, and connect the camera to the computer. PMB starts automatically.
2Import the images.
Note
If GPS Image Tracker is opened, close GPS Image Tracker after importing the images.
3Start PMB Launcher, and click "Display Images on the Map with Map View."
The images and the location where you shot them will be displayed on the map.
• To use the world map, the computer needs to be connected to the Internet. The online map and the aerial photomap are powered by Google Maps.
- You can use network services and Google Earth using the supplied PMB. See the PMB support page for more information.
- You can use the GPS unit as a GPS logger. Using GPS Image Tracker, import the GPS log that was recorded by the GPS unit while you were carrying the GPS unit that was turned on, and connected to a computer. Then, the route you traveled will be displayed on a map, using PMB.
Checking the included items
Make sure you have following items included with your GPS unit. The number in parenthesis indicates the number of that item supplied.
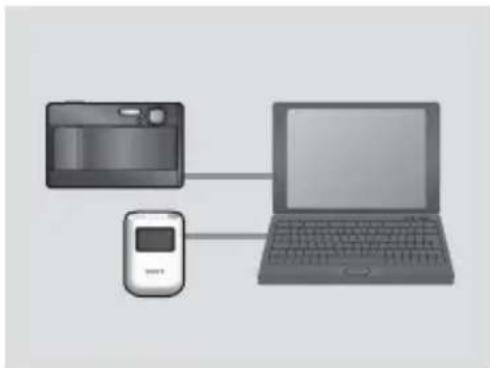
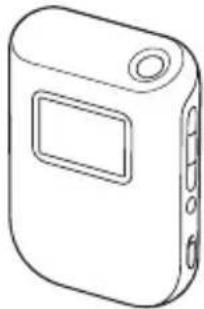
• GPS unit (GPS-CS3) (1)
natural_image
Line drawing of a rectangular electronic device with a screen and ports (no text or symbols)- USB cable (1)

- CD-ROM “GPS Unit Application Software” (1)
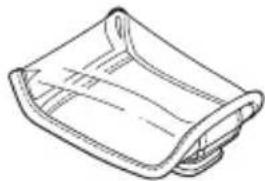
- Carrying case (1)
natural_image
Simple line drawing of a rectangular object with curved edges and a flat top (no text or symbols)- Set of printed documentation
Note
Neither LR6 (size AA) alkaline batteries nor HR6 (size AA) Nickel-Metal Hydride batteries are supplied with the GPS unit.
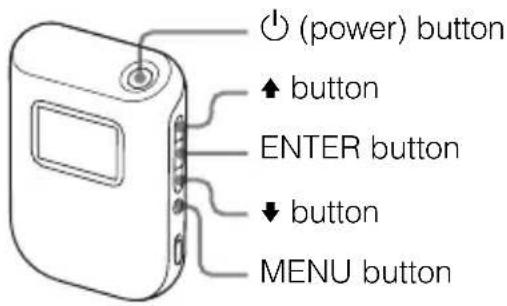
Identifying the parts
GPS unit
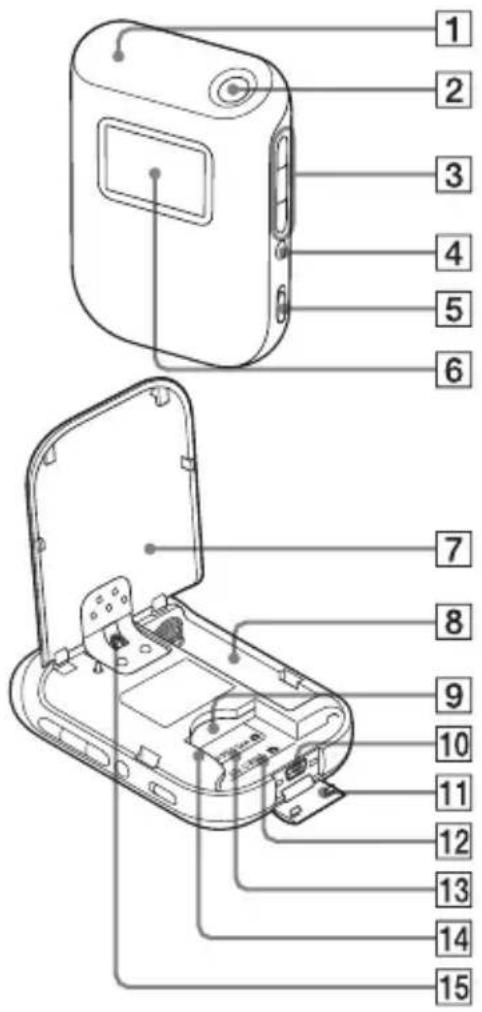
1 Antenna
2 (power) button (p. 11, 16)
3 ↑/ENTER/↓ buttons (p. 11)
4 MENU button (p. 11)
5HOLD switch (p. 13)
6 LCD screen
7 Battery cover (p. 14)
8Battery compartment (p. 14)
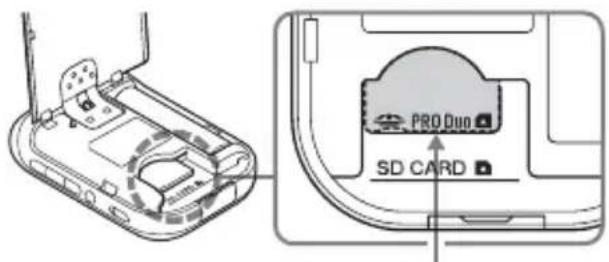
9 "Memory Stick Duo" media/SD card slot (p. 22)
10 (USB) jack (p. 28)
11USB jack cover (p. 28)
12 Position marker for SD memory card (p. 22)
13 Position marker for “Memory Stick Duo” media (p. 22)
14Card guide (p. 22)
15 Strap attaching part
• No strap is supplied.
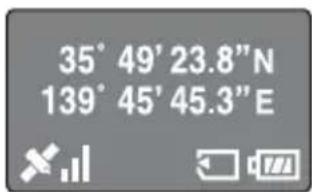
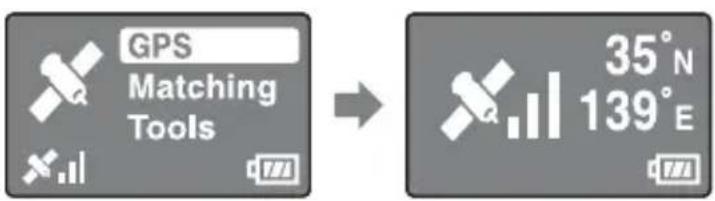
LCD screen
GPS status display
Searching for satellites

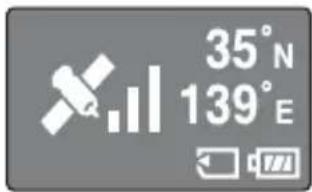
Triangulating

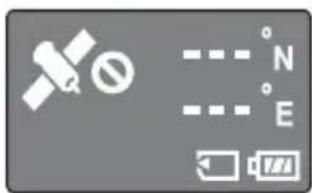
Unable to triangulate

Coordinates display
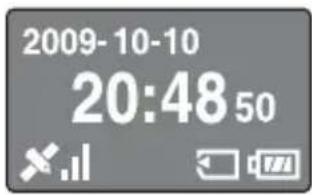
Clock display
| Icons Meanings | |
 | Searching for GPS satellites. • Looking for radio signals from GPS satellites. |
 | The GPS unit is acquiring positioning information, triangulating, and recording GPS signals. Bars on the right show the signal strength. |
 | Unable to receive GPS signals. Unable to acquire positioning information. |
 | Latitude (N/S) and longitude (E/W) |
 | One of “Memory Stick Duo” media or SD memory cards is inserted. |
 | Remaining battery power |
 | Internal memory capacity is low. |
- If you do not operate the GPS unit for about 10 seconds, the backlight of the LCD screen will go out. Press ENTER to turn it on again.
- The GPS unit does not show the date and time until it receives a GPS radio signal. There may be some discrepancies in the displayed time, depending on the condition under which you are using the GPS unit.
Menu screen
Operating the GPS unit
Operate the GPS unit using the menu displayed on the LCD screen, by pressing the buttons on the side of the GPS unit.
Example: To set [Time Zone]
1 Hold the ⏻ (power) button down.
2 Press MENU.
The top menu appears.
3 Press / to select the item, then press ENTER.
The sub menu appears.
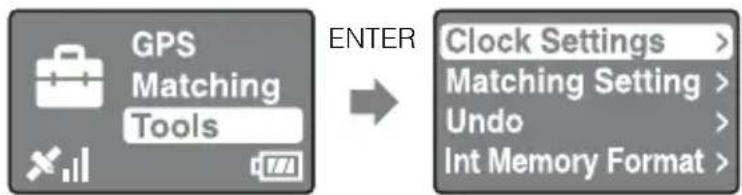
flowchart
graph LR
    A["GPS Matching Tools"] -->|ENTER| B["Clock Settings >"]
    B --> C["Matching Setting >"]
    C --> D["Undo >"]
    D --> E["Int Memory Format >"]
4 Repeat the operation in step 3 to select the desired setting.

flowchart
graph LR
    A["Clock Settings"] --> B["Date Disp Format"]
    C["Matching Setting"] --> B
    D["Undo"] --> B
    E["Int Memory Format"] --> B
    B --> F["Time Zone"]
    F --> G["GMT +09:00"]
    G --> H["2009-10-02 15:30"]
The GPS unit does not show the date and time until it receives a GPS radio signal.
5 Press MENU repeatedly to return to the top menu.
Menu list
The top menu appears when you press MENU.
The GPS unit has three types of menu mode.
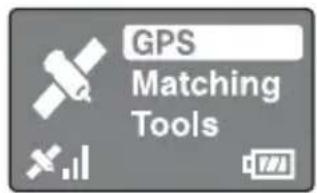
[GPS] mode screen
Triangulates and records the GPS log (p. 16).
The screen appears differently according to the status of the current triangulation.
[Matching] mode screen
Applies positioning information to images (p. 23).
![SONY GPSCS3KA - [Matching] mode screen - 1](/content/2026/03/491573/images/832f29c29a967cc4d5f9148bb41405e63d6269cd2e2987332dbb6a9cac7fadbc.jpg)
flowchart
graph LR
    A["GPS Matching Tools"] --> B["Matching"]
    B --> C["Start"]
    B --> D["Cancel"]
    C --> E["0/40"]
[Tools] mode screen
Changes the settings of the GPS unit.
![SONY GPSCS3KA - [Tools] mode screen - 1](/content/2026/03/491573/images/2717396d749bcd12b3c70693c577ec7b0deb9784090cad55e2501439e885356e.jpg)
flowchart
graph LR
    A["GPS Matching Tools"] --> B["Clock Settings > Matching Setting > Undo > Int Memory Format >"]
■ [Clock Settings]
Sets the items related to the time settings.
[Time Zone]: Sets the time difference between Greenwich Mean Time (GMT) and the time in the place you use the GPS unit.
[Date Disp Format]: Sets the order of year, month, and date to be displayed.
■ [Matching Setting]
Selects [Matching] or [Quick Matching] (p. 25).
■ [Undo]
Deletes the positioning information from the images that you applied positioning information to using the GPS unit most recently (p. 25).
■ [Int Memory Format]
Formats the internal memory of the GPS unit (p. 19).
To prevent triangulation from being interrupted
You can prevent the button of the GPS unit from being pressed accidentally in a bag, etc., during triangulation.
Slide the HOLD switch up.
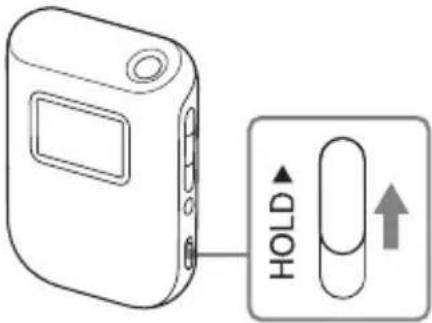
To operate the GPS unit again, slide the HOLD switch down.
Inserting a battery
You can use one of the following batteries.
• LR6 (size AA) alkaline battery
• HR6 (size AA) Nickel-Metal Hydride battery (recommended)
Note
The battery life of an LR6 (size AA) alkaline battery is shorter at temperatures lower than 25 °C (77 °F). It is recommended that you use a Nickel-Metal Hydride battery.
1 Open the battery cover.
- If the GPS unit is already turned on, make sure that you turn it off before opening the battery cover.
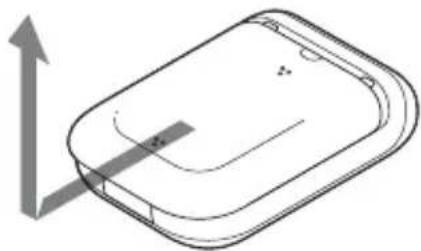
natural_image
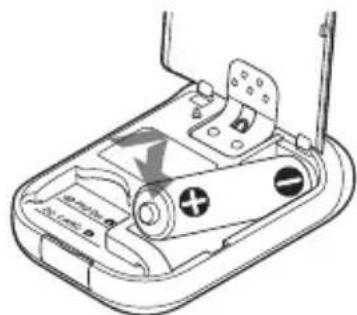
Isometric line drawing of a rectangular device with a curved internal structure and an upward arrow indicator (no text or symbols)2 Observe the ⊕/⊖ marks on the battery compartment, and insert the battery with the correct polarity.
- Insert the ⏻ side first as shown to the right.
natural_image
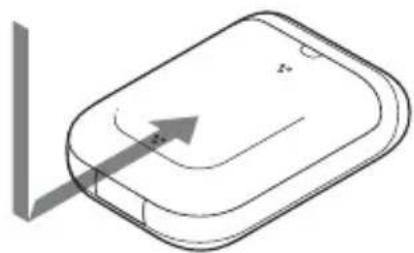
Technical line drawing of a battery pack with no visible text or symbols3 Close the battery cover.
natural_image
Simple line drawing of a rounded rectangular object with an arrow pointing to its side (no text or symbols)■Removing the battery
After making sure that the GPS unit is turned off, hold the GPS unit with the battery cover up, and then remove the battery.
Be sure not to drop the battery.
Battery life
(When triangulating at 25 ^ ( 77 ^ ) without “Memory Stick Duo” media/SD memory card inserted)
| LR6 (size AA) Sony alkaline battery (sold separately) | HR6 (size AA) Sony Nickel-Metal Hydride battery (sold separately) |
| about 15 hours about 16 hours |
- The battery life may differ from the above depending on the operation or the environmental condition. The battery life is shorter when “Memory Stick Duo” media/SD memory card is inserted.
- Sony alkaline batteries and Nickel-Metal Hydride batteries are recommended.
- The battery life will be noticeably shorter at low temperatures.
- You cannot use manganese batteries with the GPS unit.
Note
If you mishandle the battery, there is a danger of leakage or explosion. Be sure to observe the following.
- Insert the battery with the correct polarity / .
- Do not charge a dry battery.
- Remove the battery when you do not intend to use the GPS unit for a long time. Otherwise, it may result in leakage from the battery.
Recording a GPS log
The GPS log data from when the GPS unit is turned on to when the GPS unit is turned off, or to when the mode is switched from [GPS] to another mode ([Matching] or [Tools]), are recorded as one log file. When the GPS unit is turned on again, or the mode is switched to [GPS], the GPS log data is recorded as a new log file.
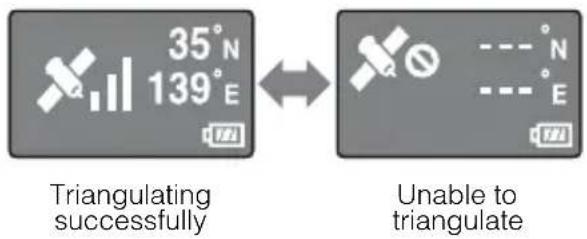
1 In an open sky environment, direct the antenna upward, and hold the ⏻ (power) button down.
The GPS unit turns on, and the GPS triangulation status appears on the LCD screen.
Wait for about several minutes at the same location, until the GPS unit starts triangulating.
If the GPS unit cannot triangulate after five minutes, you may be in a location where the radio signals from GPS satellites cannot reach.
The GPS unit records the location about every 15 seconds automatically during triangulation.
2 Set the time difference from GMT with [Time Zone].
When you use the GPS unit for the first time, the [Time Zone] screen appears. If the [Time Zone] screen does not appear, press MENU, then select [Tools] → [Clock Settings] → [Time Zone].
When you use the GPS unit in other countries/regions, set the time difference to the appropriate country/region.
- Adjust the time difference based on Greenwich Mean Time (GMT). See “World time difference” (p. 17) for more information on the time difference.
- After the GPS unit starts triangulating, the clock is displayed on the [Time Zone] screen (p. 11).
- When you do not know the time difference for where you are, press / on the [Time Zone] screen until the clock display at the bottom of the screen shows the time of the region/country.
3 Check the date and time setting on your camera.
The positioning information and the image data are matched to each other based on their time information (p. 5). Therefore, if the date and time setting of the camera is incorrect, the recorded image and the recorded location will not match correctly. Refer to the operating instructions of your camera for setting the clock of your camera.
- You can refer to the clock display of the GPS unit when setting the clock of the camera.
4 Check the triangulation status, and carry the GPS unit.
- Press ENTER to display the triangulation status.
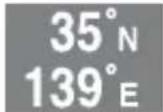
Checking the current location and current time
Press ENTER repeatedly while triangulation is successful.
The screen display will change as follows.
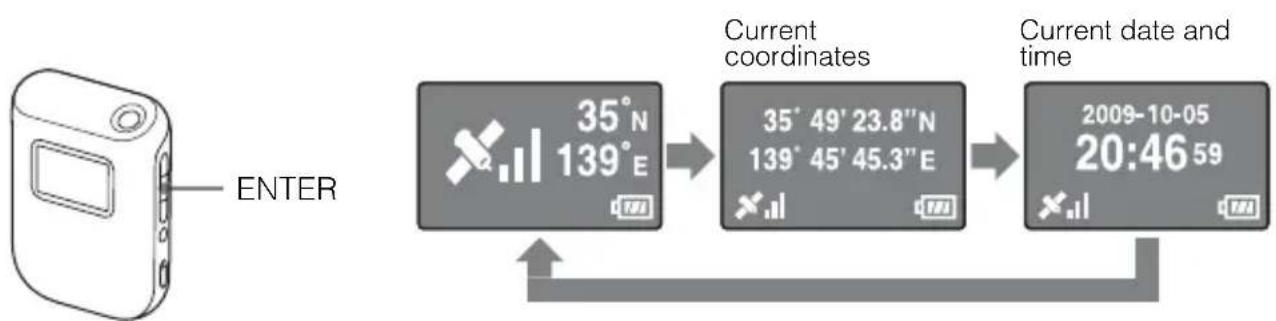
flowchart
graph LR
    A["ENTER"] --> B["Current coordinates 35°N 139°E"]
    B --> C["Current coordinate 35°49'23.8"N 139°45'45.3"E"]
    C --> D["Current date and time 20:46 59"]
    D --> E["Arrow indicating direction"]
Notes
- Even if you press ENTER when the GPS unit is unable to triangulate, the GPS unit will not display the coordinates of the current location.
- The GPS unit does not show the date and time until it receives a GPS signal. There may be some discrepancies in the displayed time, depending on the condition under which you are using the GPS unit.
■World time difference
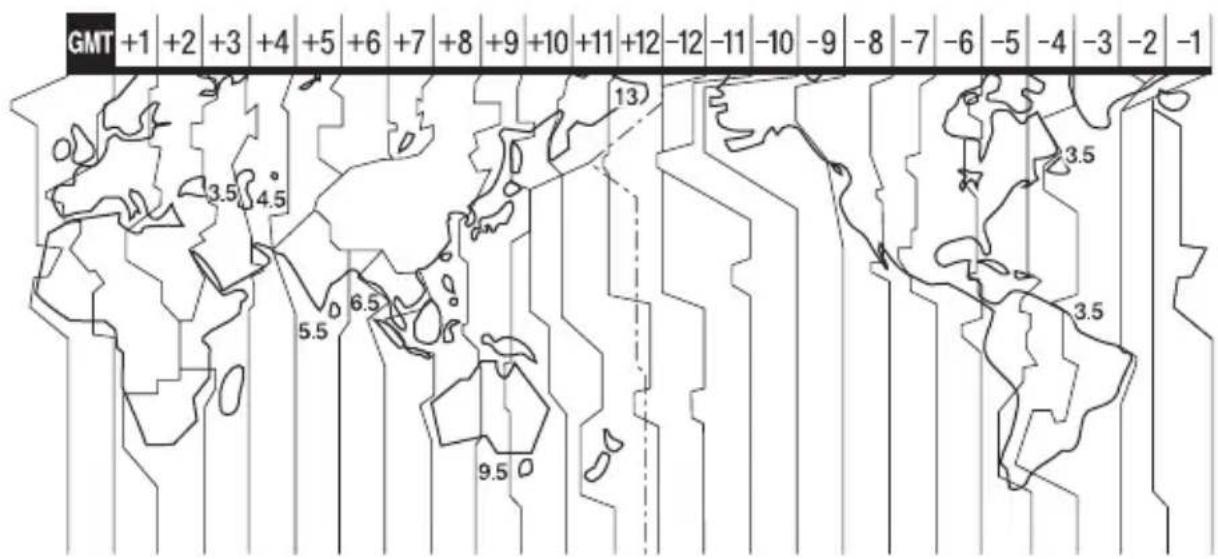
geo
| Region | Value | |--------|-------| | North America | 13 | | Europe | 3.5 | | Asia | 6.5 | | Africa | 5.5 | | South America | 9.5 | | Australia | 0 | | Middle East | 3.5 | | Central Asia | -12 | | North Africa | -11 | | South Africa | -10 | | Southeast Asia | -9 | | Eastern Europe | -8 | | Southern Europe | -7 | | Central America | -6 | | North America | -5 | | South America | -4 | | Europe | -3 | | North America | -2 | | South America | -1 |Inappropriate locations for acquiring GPS data
You may not record a GPS log at locations or in situations where the radio signals from GPS satellites do not reach the GPS unit. For example,
- In tunnels, indoors, or under the shade of buildings.
- Between tall buildings or at narrow streets surrounded by buildings.
- In underground locations, locations surrounded by dense trees, or under an elevated bridge.
- In locations where magnetic fields are generated, such as near high voltage cables.
- Near devices that generate radio signals of the same frequency band as those of the GPS unit, near 1.5 GHz band mobile telephones, etc.
Notes
- You are not supposed to turn the GPS unit on and off when you are about to press the shutter on your camera. On the contrary, keep the power of the GPS unit turned on while you carry the GPS unit together with the camera, and while you record images. Unless the GPS unit is triangulating when you record images, the GPS unit does not record GPS logs to be matched with the images.
- When the GPS unit is left with the power on, the GPS unit enters [GPS] mode and starts triangulating automatically. This may result in creation of an unexpected GPS log.
- You can delete unnecessary GPS logs, using GPS Image Tracker, after importing them to the computer. Refer to the GPS Image Tracker Help for information on deleting a GPS log.
- If several GPS logs are created due to turning the GPS unit on/off, etc., you can merge them using GPS Image Tracker, after importing them to the computer. Note that you cannot divide merged GPS logs. Refer to the GPS Image Tracker Help for information on merging GPS logs.
■ Turning off the GPS unit
Hold the ⏻ (power) button down.
■ Resetting the settings
If the GPS unit starts unsteady operation, reset the settings of the GPS unit.
While holding the MENU button down, hold the ⏻ (power) button down.
The settings of the GPS unit are reset.
Formatting the internal memory
The GPS unit can record multiple GPS logs totaling up to about 3 months. (Recording duration differs depending on the condition under which you are using the GPS unit.) When the internal memory is full, the following message appears.

You can format the internal memory using the menu. When formatted, all data in the internal memory is cleared, and cannot be recovered. It takes about 15 seconds for formatting.
1 Press MENU during triangulation.
2 Press / to select [Tools], and press ENTER.
3 Press / to select [Int Memory Format], and press ENTER.
4 Press / to select [Start], and press ENTER.
5 When [Complete] appears, press ENTER.
Installing the supplied software
By installing the supplied software on your computer, you can import images to your computer, apply positioning information to images, and display them on a map.
This section describes the operation with the English version of screen contents.
■ Recommended computer environment
The following environment is recommended for using the supplied software.
GPS Image Tracker and PMB
OS (pre-installed): Microsoft Windows XP SP3/Windows Vista* SP1
* 64-bit editions is also supported.
CPU/Memory: Intel Pentium III 500 MHz or faster/256 MB or more (Intel Pentium III 800 MHz or faster/512 MB or more is recommended)
Hard Disk: Disk space required for installation – approximately 500 MB
Display: 1024 × 768 dots or more
- To operate movies, you need a computer system environment that supports PMB supplied with Sony digital still cameras or Sony digital video camera recorders.
Notes on connecting the GPS unit to a computer
- Operations are not guaranteed for all the recommended computer environments mentioned above.
- If you connect two or more USB devices to a single computer at the same time, some devices, including your camera, may not operate, depending on the types of USB devices you are using.
- Operations are not guaranteed when using a USB hub.
- When your computer resumes from suspended or sleep mode, communication between the GPS unit and your computer may not recover at the same time.
- Log on to a computer as Administrator.
Notes on PMB
Check the following before installing the supplied software.
- When handling the movies recorded with Sony digital still cameras or some of Sony digital video camera recorders, you need to install PMB supplied with the respective model additionally.
- Be aware of the following when installing PMB supplied with Sony digital still cameras or Sony digital video camera recorders (hereinafter collectively called “cameras”).
- When the version of PMB supplied with the cameras is older than that of supplied with this kit, first install PMB supplied with the cameras, and then install PMB using the CD-ROM supplied with this kit.
- When the version of PMB supplied with the cameras is equivalent to that of supplied with this kit or later, first install PMB using the CD-ROM supplied with this kit, and then install PMB supplied with the cameras. By doing this, extra functions will be added.
■ Installing GPS Image Tracker and PMB
1 Turn on your computer, and insert the supplied CD-ROM into the CD-ROM drive.
The screen to select the Setup Language appears.
- For Windows Vista, the AutoPlay screen appears. Select “Run Setup.exe.” and follow the instruction that appears on the screen to proceed with the installation.
- If the installation does not start, click [Start] [My Computer], then double-click the (SONYPICTUTIL) icon.
2 Select the desired language, then click [Next].
The “License Agreement” screen appears.
3 Read the agreement carefully. If you accept the terms of this agreement, click the radio button next to [I accept the terms of the license agreement] and then click [Next].
The screen that shows the completion of the installation preparation appears.
4 Confirm the installation setting and click [Install].
5 Follow the instructions on the screen to complete the installation.
- When the restarting confirmation message appears, restart the computer by following the instructions on the screen.
- The installation screen of the software may appear depending on the system environment of your computer. Follow the instruction to proceed with the installation.
6 Remove the CD-ROM after the installation is complete.
Applying positioning information to images with the GPS unit (Matching)
Using the GPS unit, you can apply the positioning information to JPEG format (.jpg of extension) still images recorded on “Memory Stick Duo” media or SD memory cards. You can display the images that have positioning information applied with the GPS unit at the recording points on a map. If you import GPS logs from the GPS unit, you can also display the route you traveled on a map.
See ““Memory Stick Duo” media/SD memory cards” (p. 38) on the type of “Memory Stick Duo” media/SD memory cards you can use with the GPS unit.
Notes
- When you use the GPS unit, you can apply positioning information only to JPEG format images. However, you cannot apply positioning information to the following types of image, even if they are of JPEG format. Also, you cannot apply positioning information to movies.
- Images that do not conform to DCF
- Images that were recorded while the GPS unit was not recording a GPS log
– JPEG files in a format earlier than Exif 2.1 - Use a new or fully charged battery for matching operations. (A Nickel-Metal Hydride battery is recommended.) Do not use a battery with a low capacity remaining. If the battery capacity becomes low during matching, the GPS unit may not apply positioning information to all images.
- The battery duration will be shorter in low temperatures.
- Images that have already been applied the positioning information, irrespective of on this GPS unit or on other devices, will be excluded automatically.
- You may not be able to apply positioning information to images processed on a computer.
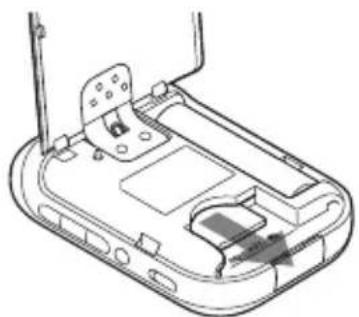
Inserting the “Memory Stick Duo” media/SD memory card with images stored into the GPS unit
Insert the “Memory Stick Duo” media/SD memory card along the card guide fully into the end until it aligns with the position marker.
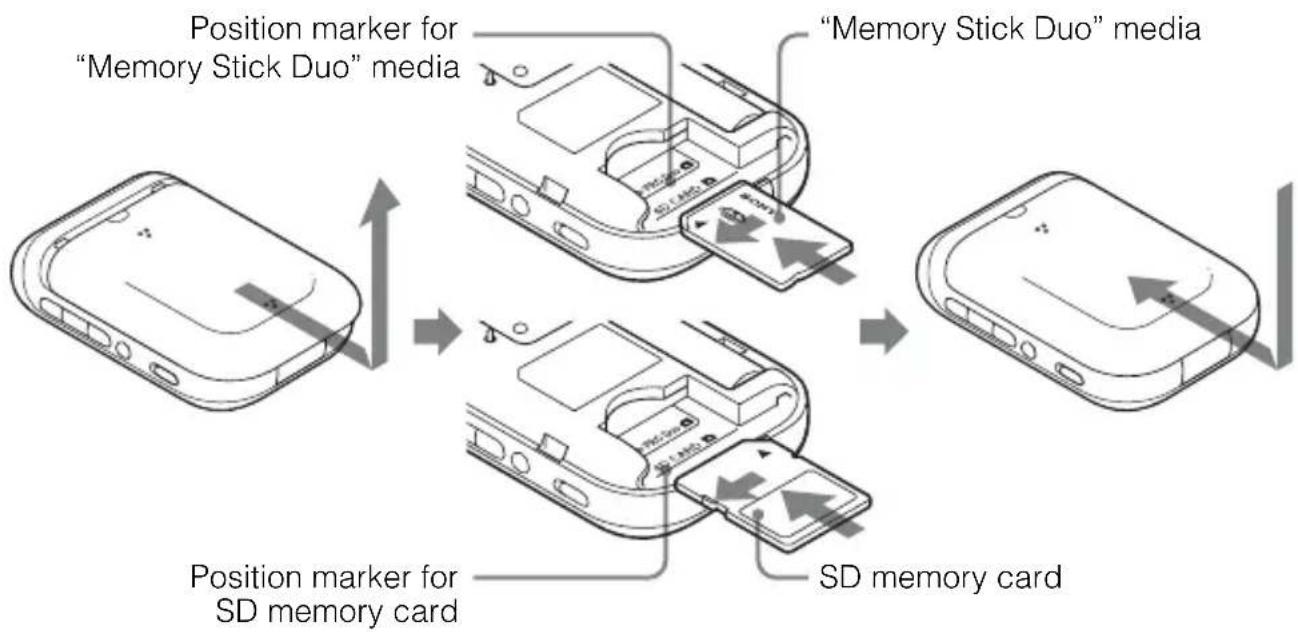
flowchart
graph TD
    A[""Memory Stick Duo" media"] --> B["SD memory card"]
    B --> C["SD memory card"]
    C --> D["Position marker for "Memory Stick Duo" media"]
    D --> E["Position marker for SD memory card"]
Correct position of "Memory Stick Duo" media
Insert the "Memory Stick Duo" media until it aligns with the position marker.
Position marker for "Memory Stick Duo" media
Notes
- Be sure to close the battery cover. If the battery cover is open, you cannot operate the GPS unit.
- Do not open the battery cover during Matching/Undo operation.
To remove the “Memory Stick Duo” media/SD memory card
While holding the “Memory Stick Duo” media/SD memory card down with your thumb or finger, slide it out.
natural_image
Technical line drawing of a device casing with internal components and connectors (no text or symbols)■ Applying the positioning information to images
You can match a maximum of 60 images in one session. If the size of an image is more than 13 MB, the number of images you can match in one session will be fewer.
1 Turn on the GPS unit, and insert the "Memory Stick Duo" media/SD memory card (p. 22).
2 Close the battery cover. You can operate the GPS unit.
3 Press MENU, select [Matching], and press ENTER.
The GPS unit starts scanning the images that can be matched with positioning information. When there are many images, it will take longer time for scanning.

• To stop scanning, press ENTER.
4 Select [Start] and press ENTER.
The GPS unit starts the matching operation. When completed, [Complete] appears.
![SONY GPSCS3KA - Select [Start] and press ENTER. - 1](/content/2026/03/491573/images/f3856ee699c1b07fee9e0de2c8fc33f75b50c2eea978276942d36ff308dd825e.jpg)
flowchart
graph LR
    A["Matching"] --> B["10/40 images"]
    B --> C["Number of images being matched"]
    D["Matching"] --> E["Complete"]
    style A fill:#99ccff,stroke:#333
    style B fill:#e6f2ff,stroke:#333
    style C fill:#ffffff,stroke:#333
    style D fill:#ffffff,stroke:#333
    style E fill:#ffffff,stroke:#333
* You can match a maximum of 60 images in one session. When there are more than 60 images that can be matched on the GPS unit, 60 is displayed.
Note
Be sure that you do not perform the following during a matching operation. The image data may be damaged. If you want to do one of the following operations, stop the current matching operation.
- open the battery cover
- turn off the GPS unit
- disconnect the USB cable
5 Remove the "Memory Stick Duo" media/SD memory card.
Tip
The more images there are, the more time it takes for matching. It is recommended that you match images and data frequently.
To match more than 60 images
Before step 5, repeat steps 3 and 4.
To stop matching
Press MENU during matching. On the [STOP] screen displayed, select [OK], and press ENTER. The GPS unit returns to the menu screen.
- The GPS unit may display [cancelling] and continue matching even if you press MENU. If this happens, wait for a while until the GPS unit stops matching.
- If you want to continue matching, select [Cancel] on the [STOP] screen and press ENTER.
To delete the positioning information from matched images (Undo)
1 Insert the "Memory Stick Duo" media/SD memory card with the previously matched images into the GPS unit.
2 Press MENU.
3 Select [Tools] → [Undo] → [Start].
- To cancel the operation, select [Cancel].
4 Press ENTER.
Notes
- Using the Undo function, you can delete the positioning information only once from the images that were matched most recently.
- If you process the matched images on a computer or camera, you may not be able to delete the positioning information from the images using the Undo function.
Tips
- If you set [Matching Setting] to [Quick Matching], you can match faster than when using [Matching]. However, you cannot use the Undo function with the images.
- [Matching] is selected as the default setting. To change the matching method, press MENU, select [Tools] [Matching Setting] [Matching] or [Quick Matching].
Applying positioning information to the images on a computer/Importing the GPS log
You can apply positioning information to the images imported to a computer using GPS Image Tracker.
Notes
- You do not need to apply positioning information to images that have already been matched with the GPS unit.
- GPS Image Tracker is compatible with files in the following file formats.
– JPEG files (compatible with Exif 2.1 or later)
– Movie files taken with a Sony digital still camera or Sony digital video camera recorder
– Sony RAW files (Program compatible with RAW files from the following camera models.) - SRF: DSC-F828/V3
- SR2: DSC-R1
- ARW: DSLR-A100
- ARW2.0: DSLR-A200/A300/A350/A700
- ARW2.1: DSLR-A900
Tip
You can confirm whether the movie file format is compatible with GPS Image Tracker by clicking [Help] → [About PMB] and click [Supported Formats] in the About PMB window of PMB.
■ Importing images to your computer
Using PMB, import the images to which you want to apply positioning information.
1 Connect the camera and your computer.
PMB starts, and the window used to import images appears.
If the window does not appear, double-click (PMB) on the computer screen.
- You may start PMB by clicking [Start] [All Programs] [Sony Picture Utility] [PMB].
- For details, refer to the operating instructions of the camera.
2 Click [OK].
Images are imported automatically from the camera to the computer.
3 Double-click 📞 (GPS Image Tracker) on the computer screen to start GPS Image Tracker.
- You may start GPS Image Tracker by clicking [Start] [All Programs] [Sony Picture Utility] [GPS Image Tracker].
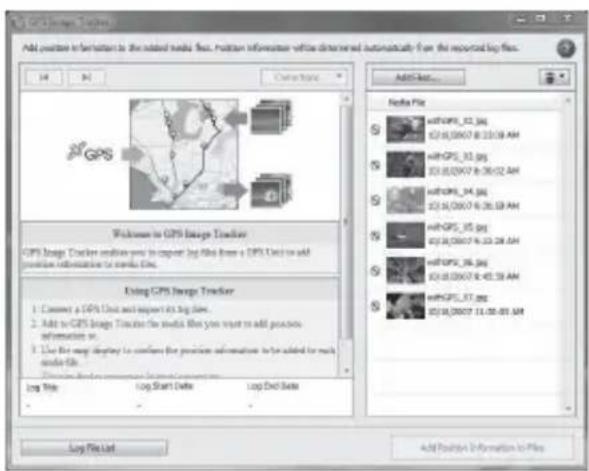
4 Select images to which you want to apply positioning information using PMB.
- For details, refer to the PMB Guide.
5 Drag-and-drop the selected images to the image file list on the right side of the main window of GPS Image Tracker.
The images are imported to GPS Image Tracker.
- For details, refer to the GPS Image Tracker Help.
1 Open the USB jack cover, and connect the GPS unit and your computer with the supplied USB cable.
The Log File Import window appears (USB communication mode).
If the window does not appear, double-click (GPS Image Tracker) on the computer screen. (You may start GPS Image Tracker by clicking [Start] → [All Programs] → [Sony Picture Utility] → [GPS Image Tracker].)
- For details, refer to the GPS Image Tracker Help.

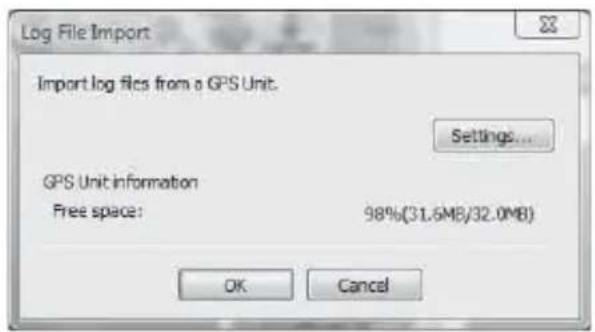
2 Click [OK].
All available GPS logs are imported to your computer.
3 When the GPS logs have been imported, disconnect the GPS unit from the computer.
①Double-click on the task-tray.
②Click (USB Mass Storage Device) → [Stop].
③Confirm the device on the confirmation window, then click [OK].
④Click [Close].
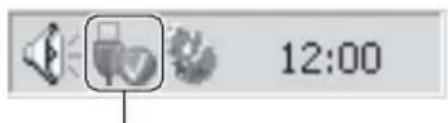
Double-click here.
Notes
- Be sure that you turn off the GPS unit before connecting it with the computer. Otherwise, the files may be broken.
- The Windows Explorer screen shot of the contents of the removable disk may appear when the GPS unit is connected to your computer, be sure not to touch the data in the GPS folder.
- Before displaying GPS logs that you have newly imported from the GPS unit to GPS Image Tracker using Map View, be sure that you close GPS Image Tracker before starting Map View.
- The GPS unit becomes the USB communication mode even if the HOLD switch is activated.
- The ⏻ (power) button does not work in the USB communication mode. When the GPS unit is disconnected from the computer, the GPS unit is turned off automatically.
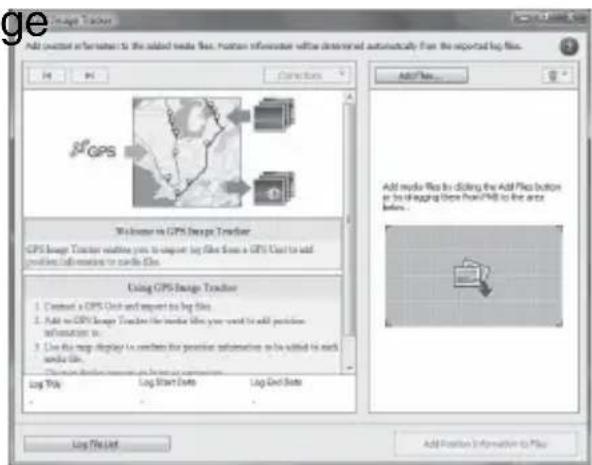
■ Applying positioning information to images
1 Click [Add Position Information to Files] at the lower right of the GPS Image Tracker screen.
The [Add Position Information] dialog box appears.
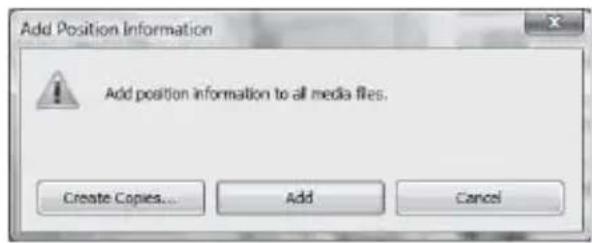
2 Click [Add] or [Create Copies...].
The positioning information is applied to all the image files in the list, and then the image files are saved and removed from the list.
To apply positioning information to a specific image
1 Double-click the image to which you want to apply positioning information on the list on the right of the GPS Image Tracker screen.
2 Click [Add].
Positioning information is applied to the selected image, and then the image is saved and removed from the list.
Notes
- You cannot save images set to read-only. Reset the read-only attribute of the files, and then import them to GPS Image Tracker again.
- Even if you click [Create Copies...] to save images, you cannot duplicate and save movie files.
Tip
When the computer is connected to the Internet, the tracks recorded by the GPS logs will appear on the map of the main window. (Even if the computer is not connected to the Internet, the GPS logs are imported correctly.)
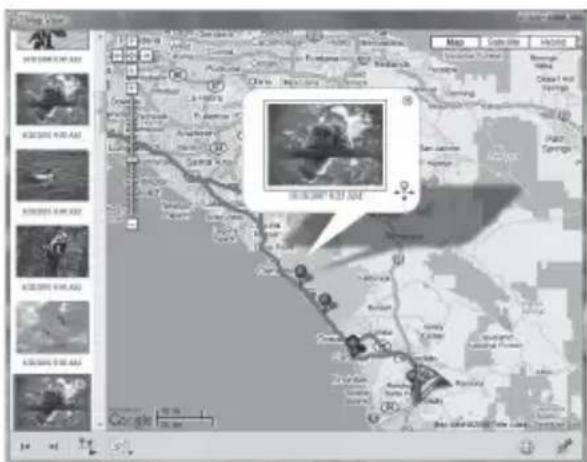
Viewing the image and the location where you recorded an image on a map/Viewing the route you traveled
Using the “Map View” function of PMB, you can display the location where you recorded the image that has positioning information on a map. In addition, using the GPS unit as a GPS logger, you can display the route you traveled on a map.
1 Close GPS Image Tracker, if it is open.
2 Connect your computer to the Internet.
3 Start PMB.
■ When images have been imported to the computer
Double-click (PMB) on the computer screen.
■ When importing images to the computer
Connect the camera and the computer using a USB cable. (If the computer has a memory card slot, you may insert the “Memory Stick Duo” media/SD memory card directly into the computer.)
PMB starts, and the window used to import images appears. If the window does not appear, double-click (PMB) on the computer screen.
- You may start PMB by clicking [Start] [All Programs] [Sony Picture Utility] [PMB].
4 Select the image you want to display on the map.
appears at the upper right of the thumbnail of images having positioning information.
5 Click of the image operation buttons of PMB.
“Map View” appears. You can check the location where images were taken, and the path of GPS logs imported to GPS Image Tracker on the map. In addition, you can create your own map and send the map with the relevant images by e-mail.
- For details, refer to the PMB Guide.
Notes
- When you have matched the images and positioning information using the GPS unit, import the GPS logs to the computer (p. 28).
- If you have not imported the log file of the same date as the images selected on GPS Image Tracker, the tracks will not be displayed.
- Be sure that you close GPS Image Tracker before starting PMB. Otherwise, any editing, etc., you did on GPS Image Tracker will not be attributed to the images.
Troubleshooting
If you run into any problem using the GPS unit, use the following table to troubleshoot the problem. If the problem persists, contact your Sony dealer or local authorized Sony service facility.
You press the ⏻ (power) button, but the GPS unit does not turn on.
- This may be caused by a bad battery contact.
→ Open the battery cover and re-insert the battery. - You may be using a battery with low remaining power.
→ Replace the battery with a new one. - The battery may not be inserted correctly.
→ Insert the battery correctly referring to “Inserting a battery” (p. 14).
Unable to operate the buttons on the GPS unit.
- Slide down the HOLD switch (p. 13).
- There may be something wrong with the GPS unit.
→ While holding the MENU button down, hold the ⏻ (power) button down. The screen indicators go out, and the GPS unit is reset. (Note that all setting information recorded will be deleted when the GPS unit is reset.) If the problem persists, remove the battery, and insert it again.
No GPS logs are recorded.
- You may have been using the GPS unit in locations where the GPS unit could not triangulate.
→ Use the GPS unit in an open-air location, avoiding locations such as in tunnels, underground, indoors, locations surrounded by tall buildings, under trees, etc. - You cannot record a GPS log while the GPS unit is connected to a computer.
- You imported the GPS logs to the computer.
→ In the default setting, the GPS logs in the GPS unit are deleted after they are imported to the computer by GPS Image Tracker. (You can change the setting on GPS Image Tracker.)
The GPS unit cannot receive radio signals from GPS satellites.
- You may be in a location where the radio signals from GPS satellites cannot reach.
→ Use the GPS unit in an open-air location, avoiding locations such as in tunnels, underground, indoors, locations surrounded by tall buildings, under trees, etc.
It takes an excessively long time to receive radio signals from GPS satellites.
- It may take a long time to triangulate the location, depending on the positions of the closest GPS satellites.
→ For details, read “GPS” on page 36. - It takes a long time to triangulate the location because the current location cannot be determined if you are moving around.
→ Stay still until the GPS unit can triangulate the location.
The GPS unit is not recognized by the computer.
- If you connected the GPS unit and your computer with the USB cable before you started the computer, the computer may not recognize the GPS unit.
→ Disconnect the USB cable from the GPS unit and the computer, and restart your computer, then connect the GPS unit again.
Unable to apply the positioning information to images using the GPS unit.
- The battery power may not be sufficient.
→ Replace the battery with a new one. Or, use a fully charged battery. - You may not be able to apply positioning information in low temperatures, because the battery is consumed more quickly at low temperatures.
- Make sure that the “Memory Stick Duo” media/SD memory card is inserted correctly (p. 22).
- The free capacity of the “Memory Stick Duo” media/SD memory card may not be sufficient.
→ Delete unnecessary data from the “Memory Stick Duo” media/SD memory card using a camera. Or, apply positioning information to images using the computer. - Make sure that the battery cover is closed.
The images are not displayed at the correct location.
- The GMT time difference set on the GPS unit and that on the camera were not the same at the time the images were recorded.
→ Correct the location using GPS Image Tracker. - The GPS unit records the positioning information once about every 15 seconds. As the locations between the recorded positioning information are obtained through calculation, the images recorded while moving at high speed may not be displayed at the correct location.
The GPS unit does not recognize the “Memory Stick Duo” media/SD memory card.
- Make sure that the “Memory Stick Duo” media/SD memory card is inserted correctly (p. 22).
- The “Memory Stick Duo” media/SD memory card may not be compatible with the GPS unit. Use compatible “Memory Stick Duo” media/SD memory cards with the GPS unit (p. 38).
The GPS unit performance is unstable.
- Use a new or fully charged battery.
- Format the internal memory (p. 19).
- While holding the MENU button down, hold the ⏻ (power) button down. The screen indicators go out, and the GPS unit is reset. (Note that all setting information recorded will be deleted when the GPS unit is reset.) If the problem persists, remove the battery, and insert it again.
Some JPEG files in the “Memory Stick Duo” media/SD memory card cannot be opened.
- If the power is turned off or the battery cover is opened and closed during Matching/Undo operation, files named *****.JPG (* represents a number) or DUMMY.JPG are left in the “Memory Stick Duo” media/SD memory card. These files do not affect the recorded image files, however, you can delete these files on a computer, if you prefer.
Error messages
The following messages appear on the LCD screen.
| Error message Meaning Countermeasure | ||
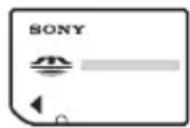
| Low Battery | The battery capacity is insufficient. • Replace the alkaline battery with a new one.• Charge the Nickel-Metal Hydride battery. | |
| Int Memory Error | There is something wrong with the internal memory. | Format the internal memory (p. 19). All content will be lost. If the error message does not disappear, consult your Sony dealer. |
| Int Memory Full | The internal memory is full, so the GPS unit cannot record GPS logs. | Format the internal memory (p. 19). All content will be lost. |
| Memory Card Error | • Writing may be prohibited on the “Memory Stick Duo” media/SD memory card.• The GPS unit may not be compatible with the “Memory Stick Duo” media/SD memory card you are using. | Check the “Memory Stick Duo” media/SD memory card. |
| There is something wrong with the “Memory Stick Duo” media/SD memory card. | Eject the “Memory Stick Duo” media/SD memory card from the GPS unit, and insert it again. If the error message does not disappear, consult your Sony dealer. | |
| The “Memory Stick Duo” media/SD memory card is not inserted correctly. | Insert it correctly (p. 22). | |
| Memory Card Full | The “Memory Stick Duo” media/SD memory card is full, so matching cannot be carried out. | Delete unnecessary data from the “Memory Stick Duo” media/SD memory card. Or, apply the positioning information to the images using your computer. |
| Matching Error | The battery cover is open. Close the battery cover. | |
| There are no images to be matched. Insert the “Memory Stick Duo” media/SD memory card that contains the images to be matched. | ||
| There are no GPS logs to use to match the images. | Check the time difference setting. | |
| Undo Error | The battery cover is open. Close the battery cover. | |
| [Quick Matching] was selected. You cannot undo images that were matched with [Quick Matching]. | ||
| The “Memory Stick Duo” media/SD memory card you inserted is not the one that you used for matching the last time. | “Undo” is possible only with the “Memory Stick Duo” media/SD memory card that was used to match most recently. | |
| Hold The HOLD function is activated. Cancel the HOLD function (p. 13). | ||
| Insert Card You tried to | undo matching without inserting the “Memory Stick Duo” media/SD memory card. | Insert the “Memory Stick Duo” media/SD memory card, and press ENTER. |
| Cover Open The battery | cover is open. Close the battery cover. | |
| !Error | An error other than one of those above has occurred. | Turn on the GPS unit again. If the error message does not disappear, consult your Sony dealer. |
GPS
The GPS (Global Positioning System) is a system that calculates geographical location from highly accurate US space satellites. This system allows you to pinpoint your exact location on the earth.
On error
Error caused by the position of GPS satellites
The GPS unit automatically triangulates your current location when the GPS unit receives radio signals from 3 or more GPS satellites.
The triangulating error allowed by the GPS satellites is about 10 m (30 feet). Depending on the environment of the location you are in, the triangulation error may be greater. In this case, your actual location may not match the location on the map based on the GPS information.
Error during the triangulation process
The GPS unit acquires positioning information about every 15 seconds during triangulation. There can be a slight time difference between when the positioning information is acquired and when images are taken. The supplied software (GPS Image Tracker) calculates the position where such images were taken based on the path between the two positions from which it acquires the positioning information, therefore, the actual recording location may not match exactly the location on the map based on the GPS information.
Precautions
When using the GPS unit, please keep the following in mind.
Battery
No batteries are supplied.
- An LR6 (size AA) alkaline battery or an HR6 (size AA) Nickel-Metal Hydride battery is necessary for recording log data with the GPS unit. Purchase a battery before using the GPS unit.
- You cannot use manganese batteries.
Notes on a Nickel-Metal Hydride battery
- Charge the Nickel-Metal Hydride battery before using the GPS unit for the first time. Refer to the instructions supplied with the battery on charging.
- The battery can be charged even if it is not completely discharged. Also, even if the battery is not fully charged, you can use the partially charged capacity of the battery as is.
- If you do not intend to use the battery for a long time, use up the existing charge and remove it from the GPS unit, then store it in a cool, dry place. This is to maintain the battery's functions.
Recorded data on the GPS unit
If you remove the battery while using the GPS unit, the log data may be damaged. Be sure to replace the battery with a new one after you turn the power off.
Compensation for damaged log data will not be made
If positioning information (GPS log) is not recorded properly due to malfunction of the recording memory or the system, compensation for damaged log data or images with positioning information will not be made.
Use and storage
- Before you use the GPS unit, make sure that the GPS unit works properly by checking its operation.
- Do not shake or strike the GPS unit hard. In addition to malfunctions and an inability to record the log, this may cause recorded data breakdown.
- The GPS unit is neither dust-proof, nor splash-proof, nor water-proof.
- Neither use nor store the GPS unit in the following places.
- In an extremely hot, cold or humid place In places such as in a car parked in the sun, the GPS unit body may become deformed and this may cause a malfunction.
- In places near a heater The GPS unit may become discolored or deformed, and this may cause a malfunction.
- Near strong magnetic place
- In sandy or dusty places Be careful not to let sand or dust get into the GPS unit. This may cause the GPS unit to malfunction, and in some cases this malfunction cannot be repaired.
Carrying the GPS unit
Do not sit on a chair etc., with the GPS unit in the back pocket of your pants or skirt, as this may cause a malfunction or damage of the GPS unit.
Cleaning the GPS unit
Cleaning the GPS unit surface
Clean the GPS unit surface with a soft cloth slightly moistened with water, then wipe the surface with a dry cloth. Do not use the following as they may damage the finish or the casing.
- Chemical products such as thinner, benzine, alcohol, disposable cloths, insect repellent, sunscreen or insecticide, etc.
- Do not touch the GPS unit with the above on your hand.
- Do not leave the GPS unit in contact with rubber or vinyl for a long time.
Sony shall assume no responsibility for any accidental or consequential damages or loss of the recorded contents which may be caused by use or malfunction of the GPS unit.
Backup recommendations
To avoid potential risk of data loss caused by accidental operation or malfunction of the GPS unit, we recommend that you save a backup copy of your data.
“Memory Stick Duo” media/SD memory cards
Types of “Memory Stick Duo” media (sold separately) you can use with the GPS unit

"Memory Stick Duo" media: This size can be used with the GPS unit.
"Memory Stick" media: You cannot use it in the GPS unit.
Using “Memory Stick PRO Duo” media with “Memory Stick” media compatible equipment
Be sure to insert “Memory Stick PRO Duo” media into a “Memory Stick Duo” media adaptor (sold separately).
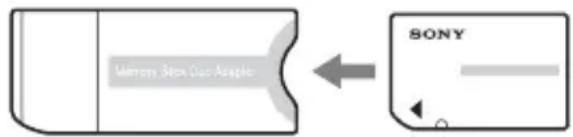
"Memory Stick Duo" media adaptor
Types of SD memory card you can use with the GPS unit
You can use the following types of SD memory card with the GPS unit (as of October, 2008).
- SD memory card *1
- miniSD card, microSD card (An adaptor is necessary.) ^*2
- SDHC memory card
We do not guarantee proper operations for all types of SD memory cards.
Especially, there are some cards that consumes power a lot. If you use these cards for Matching/Undo operation, the power may be turned off on the way, or the number of images available may be less than expected. It is recommended to use other types of cards.
*1 The GPS unit has been demonstrated as operable with an SD memory card with a capacity of 2 GB or smaller.
*2 Some commercially available card adaptors have projected terminals on the rear. This type of adaptor may not work properly with the GPS unit.
*3 The GPS unit has been demonstrated as operable with an SDHC memory card with a capacity of 8 GB or less.
Data reading/recording that requires copyright protection cannot be performed.
"Memory Stick Duo" media
“Memory Stick Duo” media are compact, portable IC recording media with a large data capacity. You can use only “Memory Stick Duo” media shown below with the GPS unit.
However, we do not guarantee the operation of all types of “Memory Stick Duo” media on the GPS unit.
| Types of “Memory Stick Duo” media | Compatibility |
| “Memory Stick Duo” media (without “MagicGate”) | ○ |
| “Memory Stick Duo” media (with “MagicGate”) | ^*1 |
| “MagicGate Memory Stick Duo” media | ^*1 |
| “Memory Stick PRO Duo” media | ^*1 |
| “Memory Stick PRO-HG Duo” media | ^*1*2 |
*1 The GPS unit does not support "MagicGate" technology.
*2 The GPS unit does not support 8-bit parallel data transfer but it supports 4-bit parallel data transfer the same as with “Memory Stick PRO Duo” media.
- “Memory Stick PRO Duo” media formatted by a computer (Windows OS/Mac OS) does not have guaranteed compatibility with the GPS unit.
- Data read/write speed may vary depending on the combination of the “Memory Stick PRO Duo” media and the “Memory Stick PRO Duo” media compliant product you use.
- Be careful not to apply excessive force when writing on a memo area on “Memory Stick PRO Duo” media.
- Do not attach a label or the like on “Memory Stick PRO Duo” media or a “Memory Stick Duo” media adaptor.
Notes on using a “Memory Stick Duo” media adaptor (sold separately)
- When using “Memory Stick Duo” media with a “Memory Stick” media compliant device, be sure to insert “Memory Stick Duo” media into a “Memory Stick Duo” media adaptor. Otherwise, “Memory Stick Duo” media may not be removed from the “Memory Stick” media compliant device.
- When inserting “Memory Stick Duo” media into a “Memory Stick Duo” media adaptor, make sure that you insert “Memory Stick Duo” media facing in the correct direction, then insert it all the way in. If “Memory Stick Duo” media is not inserted properly, it may not work correctly. Also, if you force “Memory Stick Duo” media into the “Memory Stick Duo” media adaptor in the wrong direction, it may be damaged.
- When inserting “Memory Stick Duo” media attached to a “Memory Stick Duo” media adaptor into a “Memory Stick” media compliant device, make sure that you insert “Memory Stick Duo” media facing in the correct direction. Note that improper use may cause a malfunction.
- Do not insert a “Memory Stick Duo” media adaptor without “Memory Stick Duo” media attached into a “Memory Stick” media compliant device. Doing so may result in malfunctions of the unit.
Notes on using "Memory Stick PRO Duo" media (sold separately)
The maximum memory capacity of “Memory Stick PRO Duo” media that can be used with the GPS unit is 16 GB.
Notes on using "Memory Stick Micro" media (sold separately)
- The GPS unit is compatible with “Memory Stick Micro” media (M2). M2 is the abbreviation for the “Memory Stick Micro” media.
- To use “Memory Stick Micro” media with the GPS unit, you need a Duo-sized M2 Adaptor. Insert “Memory Stick Micro” media into the Duo-sized M2 Adaptor, and then insert the adaptor into the “Memory Stick Duo” media slot. If you insert “Memory Stick Micro” media into the GPS unit without using a Duo-sized M2 Adaptor, you might not be able to remove it from the GPS unit.
Notes on using "Memory Stick Duo" media/SD memory cards
- Make sure that you insert “Memory Stick Duo” media/SD memory cards into the “Memory Stick Duo” media/SD memory card slot in the correct direction. Wrong insertion will cause a malfunction of the GPS unit.
- When inserting “Memory Stick Duo” media/SD memory cards, do not try to insert them forcibly as this could damage “Memory Stick Duo” media/SD memory cards and/or the GPS unit.
- Do not insert any objects other than “Memory Stick Duo” media/SD memory cards into the “Memory Stick Duo” media/SD memory card slot. Doing so will cause a malfunction of the GPS unit.
- Do not remove “Memory Stick Duo” media/SD memory cards or turn off the GPS unit while the GPS unit is reading, writing, or accessing data. Otherwise, that data may be rendered unreadable or be erased.
-
We recommend that you save a backup of important data.
-
When you carry or store “Memory Stick Duo” media/SD memory cards, put them in the case supplied.
- Do not touch the terminals of “Memory Stick Duo” media/SD memory cards with your hand or a metal object.
- Do not strike, bend, or drop “Memory Stick Duo” media/SD memory cards.
- Do not disassemble or modify “Memory Stick Duo” media/SD memory cards.
- Do not expose “Memory Stick Duo” media/SD memory cards to water.
- Do not use or store “Memory Stick Duo” media/SD memory cards under the following conditions:
- Locations beyond the required operational limits, including such as the hot interior of a car parked in the sun in the summer, the outdoors exposed to direct sunlight, or a place near a heater
– Humid locations with corrosive substances present
- Locations subject to static electricity or electrical noise
- Keep “Memory Stick Duo” media/SD memory cards out of the reach of small children. There is danger that a child might swallow them.
- Not every “Memory Stick Duo” media/SD memory cards are guaranteed.
Specifications
Power
LR6 (size AA) alkaline battery or HR6 (size AA) Nickel-Metal Hydride battery × 1 (Power is supplied from the USB bus power while in the USB connection.)
Power consumption
Approx. 0.15 W (during continuous triangulating when operating on a battery)
Operating time on a battery (When used at 25 °C (77 °F))
Approx. 15 hours (during continuous triangulating when using an LR6 (size AA) Sony alkaline battery),
Approx. 16 hours (during continuous triangulating when using an HR6 (size AA) Sony Nickel-Metal Hydride battery)
Operating time may differ depending on the situation or the environmental condition.
Receiving frequency
1575.42 MHz (L1 band, C/A code)
Receiving method
20-channel parallel tracking
Receiving sensitivity
-159 dBm or less (while tracking)
Interface
USB 2.0 Hi-Speed
Memory capacity
Approx. 1 GB (GPS logs recording area: about 128 MB. The rest is used by the system.)
Logging interval
Approx. 15 seconds
Operating temperatures
Approx. 0 to 40 °C (32 to 104 °F)
Storage temperature
Approx. -20 to +60^ (-4 to +140^)
Dimensions
Approx. 57 mm × 80 mm × 23 mm (2 1/4 × 3 1/4 × 29/32 inches) (w/h/d, excluding the projecting parts)
Mass
Approx. 70 g (2.5 oz) (excluding a battery)
Supported image format
GPS unit
- JPEG (compatible with Exif 2.1 or later, MPF Baseline)
GPS Image Tracker/PMB
- JPEG (compatible with Exif 2.1 or later, MPF Baseline)
- Movie file taken with Sony digital still camera or Sony digital video camera recorder (PMB supplied with your Sony digital still camera or Sony digital video camera recorder should be installed to your computer.)
- Sony RAW files (Program compatible with RAW files from the following models.)
- SRF: DSC-F828/V3
- SR2: DSC-R1
- ARW: DSLR-A100
- ARW2.0: DSLR-A200/A300/A350/A700
- ARW2.1: DSLR-A900
This unit or software may not operate properly with some images that have the file format listed above.
Included items
GPS unit (GPS-CS3) (1)
USB cable (1)
CD-ROM "GPS Unit Application Software" (1)
Carrying case (1)
Set of printed documentation
Design and specifications are subject to change without notice.
License
TNKernel real time kernel
Copyright. 2004, 2006 Yuri Tiomkin
All rights reserved.
Permission to use, copy, modify, and distribute this software in source and binary forms and its documentation for any purpose and without fee is hereby granted, provided that the above copyright notice appear in all copies and that both that copyright notice and this permission notice appear in supporting documentation.
Trademarks
- Google and Google Earth are registered trademarks of Google Inc.
- Microsoft, Windows are either registered trademarks or trademarks of Microsoft Corporation in the United States and/or other countries.
- "Memory Stick", MEMORY STICK "Memory Stick Duo", MEMORY STICK DUO "MagicGate", MAGICGATE,
"Memory Stick PRO", MEMORY STICK PRO "Memory Stick PRO Duo",
MEMORY STICK PRO DUO, "Memory Stick PRO-HG Duo", MEMORY STICK PRO-HG Duo "Memory Stick PRO-HG Duo (Mark2)",
MARK2, "Memory Stick Micro", and MEMORY STICK MICRO are trademarks or registered trademarks of Sony Corporation.
- Pentium is a trademark or registered trademark of Intel Corporation.
- In addition, system and product names used in this manual are, in general, trademarks or registered trademarks of their respective developers or manufacturers. However, the ^TM or ^® marks are not used in all cases in this manual.
- The online maps and the aerial photomaps are powered by Google Maps.
Français
AVERTISSEMENT
Responsible : Sony Electronics Inc.
Adresse : 16530 Via Esprillo,
San Diego, CA 92127 É.-U.
natural_image
Illustration of a woman holding a shopping bag and a mobile phone, with a house and trees in the background (no text or symbols)natural_image
Diagram showing a laptop connected to a smartphone and a camera, both connected via a line (no text or symbols present)natural_image
Line drawing of a compact electronic device with a screen and ports (no text or symbols)- C â b l e U S B (1)
natural_image
Line drawing of a rectangular object with curved edges and a flat top (no text or symbols)Triangulation
Triangulation impossible
natural_image
Isometric line drawing of a rectangular device with a curved internal structure and an upward arrow indicator (no text or symbols)natural_image
Line drawing of a vehicle battery pack with no text or symbolsnatural_image
Simple line drawing of a rounded rectangular object with an arrow pointing to its side (no text or symbols)geo
| Region | Value | |---|---| | North America | 13 | | Europe | 3.5 | | Asia | 9.5 | | Africa | 6.5 | | South America | 5.5 | | Australia | 4.5 | | Oceania | 3.5 | | Middle East | -12 | | Central Asia | -11 | | Southern Europe | -10 | | Eastern Europe | -9 | | Western Europe | -8 | | North America | -7 | | South America | -6 | | Southern Europe | -5 | | Eastern Europe | -4 | | Western Europe | -3 | | North America | -2 | | South America | -1 |natural_image
Technical line drawing of a device casing with internal components and wiring (no text or symbols)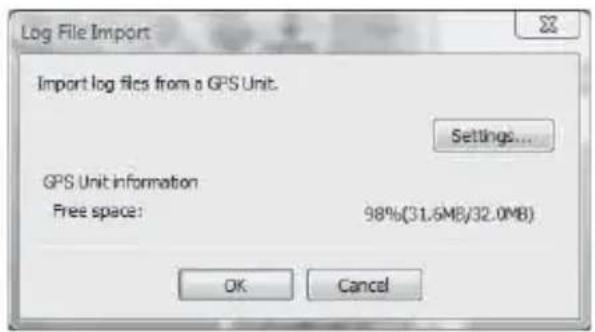
2 Cliquez sur [OK].
Remarques
1575,42 MHz (bande L1, code C/A)
Copyright. 2004, 2006 Yuri Tiomkin
All rights reserved.
Permission to use, copy, modify, and distribute this software in source and binary forms and its documentation for any purpose and without fee is hereby granted, provided that the above copyright notice appear in all copies and that both that copyright notice and this permission notice appear in supporting documentation.
Marques commerciales
Printed on 70% or more recycled paper using VOC (Volatile Organic Compound)-free vegetable oil based ink.
- English
- WARNING
- For Customers in the U.S.A.
- Regulatory Information
- Declaration of Conformity
- CAUTION
- I Note:
- For Customers in Canada
- For Customers in Europe
- CE
- Disposal of Old Electrical & Electronic Equipment (Applicable in the European Union and other European countries with separate collection systems)
- Table of contents
- Read this first
- Step 1 Recording the traveled route
- Step 2 Applying the recording positioning information to images
- Step 3 Displaying the image on a map
- Troubleshooting
- Additional information
- What you can do with the GPS unit kit
- Components of the GPS unit kit
- GPS unit
- PMB
- GPS Image Tracker
- PMB Launcher
- ■ Matching positioning information to individual images
- Notes
- Displaying images where they were taken and the route you traveled on a map
- Note
- Checking the included items
- Identifying the parts
- LCD screen
- GPS status display
- Menu screen
- Operating the GPS unit
- Press MENU repeatedly to return to the top menu.
- Menu list
- [GPS] mode screen
- [Matching] mode screen
- [Tools] mode screen
- ■ [Clock Settings]
- ■ [Matching Setting]
- ■ [Undo]
- ■ [Int Memory Format]
- To prevent triangulation from being interrupted
- Inserting a battery
- Open the battery cover.
- Observe the ⊕/⊖ marks on the battery compartment, and insert the battery with the correct polarity.
- Close the battery cover.
- ■Removing the battery
- Battery life
- Recording a GPS log
- In an open sky environment, direct the antenna upward, and hold the ⏻ (power) button down.
- Set the time difference from GMT with [Time Zone].
- Check the date and time setting on your camera.
- Check the triangulation status, and carry the GPS unit.
- Checking the current location and current time
- ■World time difference
- Inappropriate locations for acquiring GPS data
- ■ Turning off the GPS unit
- ■ Resetting the settings
- Formatting the internal memory
- Installing the supplied software
- ■ Recommended computer environment
- GPS Image Tracker and PMB
- Notes on connecting the GPS unit to a computer
- Notes on PMB
- ■ Installing GPS Image Tracker and PMB
- Applying positioning information to images with the GPS unit (Matching)
- Inserting the “Memory Stick Duo” media/SD memory card with images stored into the GPS unit
- Correct position of "Memory Stick Duo" media
- To remove the “Memory Stick Duo” media/SD memory card
- ■ Applying the positioning information to images
- Press MENU, select [Matching], and press ENTER.
- Select [Start] and press ENTER.
- Remove the "Memory Stick Duo" media/SD memory card.
- Tip
- To match more than 60 images
- To stop matching
- To delete the positioning information from matched images (Undo)
- Tips
- Applying positioning information to the images on a computer/Importing the GPS log
- ■ Importing images to your computer
- Connect the camera and your computer.
- Click [OK].
- Double-click 📞 (GPS Image Tracker) on the computer screen to start GPS Image Tracker.
- Select images to which you want to apply positioning information using PMB.
- Drag-and-drop the selected images to the image file list on the right side of the main window of GPS Image Tracker.
- ■ Applying positioning information to images
- To apply positioning information to a specific image
- Viewing the image and the location where you recorded an image on a map/Viewing the route you traveled
- You press the ⏻ (power) button, but the GPS unit does not turn on.
- Unable to operate the buttons on the GPS unit.
- No GPS logs are recorded.
- The GPS unit cannot receive radio signals from GPS satellites.
- It takes an excessively long time to receive radio signals from GPS satellites.
- The GPS unit is not recognized by the computer.
- Unable to apply the positioning information to images using the GPS unit.
- The images are not displayed at the correct location.
- The GPS unit does not recognize the “Memory Stick Duo” media/SD memory card.
- The GPS unit performance is unstable.
- Some JPEG files in the “Memory Stick Duo” media/SD memory card cannot be opened.
- Error messages
- GPS
- On error
- Error caused by the position of GPS satellites
- Error during the triangulation process
- Precautions
- Battery
- No batteries are supplied.
- Notes on a Nickel-Metal Hydride battery
- Recorded data on the GPS unit
- Compensation for damaged log data will not be made
- Use and storage
- Carrying the GPS unit
- Cleaning the GPS unit
- Cleaning the GPS unit surface
- Backup recommendations
- “Memory Stick Duo” media/SD memory cards
- Types of “Memory Stick Duo” media (sold separately) you can use with the GPS unit
- Using “Memory Stick PRO Duo” media with “Memory Stick” media compatible equipment
- Types of SD memory card you can use with the GPS unit
- "Memory Stick Duo" media
- Notes on using a “Memory Stick Duo” media adaptor (sold separately)
- Notes on using "Memory Stick PRO Duo" media (sold separately)
- Notes on using "Memory Stick Micro" media (sold separately)
- Notes on using "Memory Stick Duo" media/SD memory cards
- Specifications
- Power
- Power consumption
- Operating time on a battery (When used at 25 °C (77 °F))
- Receiving frequency
- Receiving method
- Receiving sensitivity
- Interface
- Memory capacity
- Logging interval
- Operating temperatures
- Storage temperature
- Dimensions
- Mass
- Supported image format
- Included items
- License
- Trademarks
- Français
- AVERTISSEMENT
- Remarques
- Marques commerciales
Brand : SONY
Model : GPSCS3KA
Category : Other camera accessories