
FCS 65 X - Built-in oven CANDY - Free user manual and instructions
Find the device manual for free FCS 65 X CANDY in PDF.


| Product type | Built-in oven |
| Brand | Candy |
| Model | FCS 65 X |
| Color | Stainless steel |
| Dimensions (W x H x D) | Approximately 59.5 x 59.5 x 55 cm |
| Oven capacity | Approximately 65 liters |
| Power supply | 230 V / 50 Hz |
| Total power | Approximately 3000 W (grill 3000 W, fan-assisted 2200 W) |
| Cooking functions | Natural convection, fan-assisted (multifunction), bottom fan, grill, super grill, turbo grill, pizza, cook light, soft cook, defrost, sprinter |
| U-Cook system | Electronic turbine control (Vario Fan) and humidity management (Soft Cook) |
| U-See lighting | 14 high quality white LEDs, class 1M |
| Cleaning | Aquactiva (steam) and self-cleaning catalytic panels (optional) |
| Electronic programmer | Audible timer, cut-off timer, touch control clock with child lock |
| Door | Wide door (large glass surface, better maintenance and insulation) |
| Racks | Safety stop system, removable for cleaning |
| Included accessories | Simple rack, tray rack, drip tray, pizza set (depending on model), flat grill with handle |
| Maintenance and cleaning | Regular cleaning with warm soapy water; avoid abrasive products; do not use steam cleaner |
| Safety | Child lock, automatic shut-off, rack safety, high surface temperature |
| Spare parts and repairability | Specific high-temperature resistant lamps, replaceable power cord (type H05RR-F, etc.), specific oven bulbs; approved technical assistance |
| General information | Compliant with CE standards; WEEE directive 2012/19/EU; warranty with coupon to fill |
Frequently Asked Questions - FCS 65 X CANDY
User questions about FCS 65 X CANDY
0 question about this device. Answer the ones you know or ask your own.
Ask a new question about this device
Download the instructions for your Built-in oven in PDF format for free! Find your manual FCS 65 X - CANDY and take your electronic device back in hand. On this page are published all the documents necessary for the use of your device. FCS 65 X by CANDY.
USER MANUAL FCS 65 X CANDY
WARNING: The appliance and its accessible parts become hot during use. Care should be taken to avoid touching heating elements.
Children under 8 years of age must be kept away from the appliance unless they are continuously supervised. This appliance can be used by children aged from 8 years and above and persons with reduced physical, sensory or mental capabilities or lack of experience and knowledge if they have been given supervision or instruction concerning use of the appliance in a safe way and understand the hazards involved. Children must not play with the appliance. Cleaning and user maintenance shall not be made by children without supervision. During use the appliance becomes hot. Care should be taken to avoid touching heating elements inside the oven.
WARNING: Accessible parts may become hot during use. Young children must be kept away. Do not use harsh abrasive cleaners or sharp metal scrapers to clean the oven door glass since they can scratch the surface, which may result in shattering of the glass. The oven must be switched off before removing the guard; after cleaning, the guard must be replaced in accordance with the instructions. Only use the temperature probe recommended for this oven. Do not use a steam cleaner for cleaning operations. WARNING: Avoid possibility of electric shock - ensure the appliance is switched off before replacing the lamp. The means for disconnection must be incorporated in the fixed wiring in accordance with the wiring rules. The instructions state the type of cord to be used, taking into account the temperature of the rear surface of the appliance. If the supply cord is damaged, it must be replaced by a special cord or assembly available from the manufacturer or its service agent. CAUTION: In order to avoid a hazard due to inadvertent resetting of the thermal cutout, this appliance must not be supplied through an external switching device, such as a timer, or connected to a circuit that is regularly switched on and off by the utility. CAUTION: Accessible parts may be hot when the grill is in use. Young children must be kept away. Excess spillage must be removed before cleaning. During self-cleaning pyrolytic operation the surfaces may get hotter than usual and children MUST be kept away.
This appliance is marked according to the European directive 2012/19/EU on Waste Electrical and Electronic Equipment (WEEE). WEEE contains both polluting substances (which can cause negative consequences for the environment) and basic components (which can be reused). It is important to have WEEE subjected to specific treatments, in order to remove and dispose properly all pollutants, and recover and recycle all materials. Individuals can play an important role in ensuring that WEEE does not become an environmental issue; it is essential to follow some basic rules:
WEEE shall not be treated as household waste.
WEEE shall be handed over to the relevant collection points managed by the municipality or by registered companies. In many countries, for large WEEE, home collection could be present. When you buy a new appliance, the old one may be returned to the retailer who has to collect it free of charge on a one-to-one basis, as long as the equipment is of equivalent type and has the same functions as the supplied equipment.
ENERGY SAVING AND RESPECTING THE ENVIRONMENT
Where possible, avoid pre-heating the oven and always try to fill it. Open the oven door as infrequently as possible, because heat from the cavity disperses every time it is opened. For a significant energy saving, switch off the oven between 5 and 10 minutes before the planned end of the cooking time, and use the residual heat that the oven continues to generate. Keep the seals clean and in order, to avoid any heat dispersal outside of the cavity. If you have an electric contract with an hourly tariff, the "delayed cooking" programme makes energy saving more simple, moving the cooking process to start at the reduced tariff time slot.
1. GENERAL WARNINGS
Thank you for choosing one of our products. To get the most out of your oven we recommend that you:
- Read the notes in this manual carefully: they contain important instructions on how to install, use and service this oven safely.
- Keep this booklet in a safe place for easy, future reference.
All accessible parts are hot when the appliance is in operation, take care to not touch these elements.
When the oven is first switched on it may give out acrid smelling fumes. This is because the bonding agent for insulating panels around the oven has been heated up for the first time.
This is a completely normal, if it does occur you merely have to wait for the fumes to clear before putting the food into the oven.
An oven by its very nature becomes very hot. Especially the glass of the oven door.
1.1 DECLARATION OF COMPLIANCE
The parts of this appliance that may come into contact with foodstuffs comply with the provisions of EEC Directive 89/109.
By placing the CE mark on this product, we are confirming compliance with all relevant European safety, health, and environmental requirements that are applicable in legislation for this product.
When you have unpacked the oven, make sure that it has not been damaged in any way. If you have any doubts at all, do not use it: contact a professionally qualified person. Keep packing materials such as plastic bags, polystyrene, or nails out of the reach of children because they are dangerous for children.
1.2 SAFETY HINTS
- The oven must be used only for the purpose for which it was designed: it must only be used for cooking food. Any other use, e.g., as a form of heating, is an improper use of the oven and is therefore dangerous.
The manufacturers cannot be held responsible for any damage caused by improper, incorrect, or unreasonable use. When using any electrical appliance, you must follow a few basic rules.
- Do not pull on the power cable to remove the plug from the socket.
- Do not touch the oven with wet or damp hands or feet.
- Do not use the oven unless you are wearing something on your feet.
- It is not generally a good idea to use adapters, multiple sockets for several plugs, and cable extensions.
- If the oven breaks down or develops a fault, switch it off at the mains and do not touch it.
-If the cable is at all damaged it must be replaced promptly.
When replacing the cable, follow these instructions. Remove the power cable and replace it with one of the H05RRF, H05VV-F, H05V2V2-F type. The cable must be able to bear the electrical current required by the oven. Cable replacement must be carried out by properly qualified technicians. The earthing cable (yellow-green) must be 10mm longer than the power cable.
Use only an approved service centre for repairs and ensure that only original parts are used. If the above instructions are not adhered to the manufacturers cannot guarantee the safety of the oven.
- Do not line the oven walls with aluminium foil or single-use protection available from stores. Aluminium foil or any other protection, in direct contact with the hot enamel, risks melting and deteriorating the enamel of the insides.
1.3 INSTALLATION
Installation is the customer's responsibility. The manufacturers have no obligation to carry this out. If the assistance of the manufacturer is required to rectify faults arising from incorrect installation, this assistance is not covered by the guarantee.
The installation instructions for professionally qualified personal must be followed. Incorrect installation may cause harm or injury to people, animals or belongings. The manufacturer cannot be held responsible for such harm or injury.
1.4 FITTING THE OVEN INTO THE KITCHEN UNIT
Fit the oven into the space provided in the kitchen unit; it may be fitted underneath a work top or into an upright cupboard. Fix the oven in position by screwing into place, using the four fixing holes in the frame. (Fig.on last page).
To locate the fixing holes, open the oven door and look inside. To allow adequate ventilation, the measurements and distances indicated in the diagram on last page must be adhered to when fixing the oven.
Note: For ovens that are combined with a hob unit the instructions contained in the manual for the hob unit must be followed.
1.5 IMPORTANT
If the oven is to work properly, the kitchen housing must be suitable. The panels of the kitchen unit that are next to the oven must be made of a heat resistant material. Ensure that the glues of units made of veneered wood can withstand temperatures of at least 120°C . Plastics or glues that cannot withstand such temperatures will melt and deform the unit. Once the oven has been lodged inside the unit, the electrical parts must be completely insulated. This is a legal safety requirement. All guards must be firmly fixed into place so that it is impossible to remove them without using special tools.
Remove the back of the kitchen unit to ensure an adequate current of air circulates around the oven. The hob must have a rear gap of at least 45mm .
1.6 CONNECTING TO THE POWER SUPPLY
Plug into the power supply. Ensure first that there is a third contact that acts as earthing for the oven. The oven must be properly earthed. If the model of oven is not fitted with a plug, fit a standard plug to the power cable. It must be able to bear the power supply indicated on the specifications plate. The earthing cable is yellow-green. The plug must be fitted by a properly qualified person. If the socket and the plug are incompatible, the socket must be changed by a properly qualified person. A properly qualified person must also ensure that the power cables can carry the current required to operate the oven.
An ON/OFF switch may also be connected to the power supply. The connections must take account of the current supplied and must comply with current legal requirements. The yellow-green earthing cable must not be governed by the ON/OFF switch. The socket or the ON/OFF switch used for connecting to the power supply must be easily accessible when the oven has been installed.
Important: During installation, position the power cable in such a way that it will not be subjected to temperatures of above 50°C at any point. The oven complies with safety standards set by the regulatory bodies. The oven is safe to use only if it has been adequately earthed in compliance with current legal requirements on wiring safety. You must ensure that the oven has been adequately earthed.
The manufacturers cannot be held responsible for any harm or injury to persons, animals or belongings caused by failure to properly earth the oven.
WARNING: the voltage and the supply frequency are shown on the rating plate (fig. on last page).
The cabling and wiring system must be able to bear the maximum electric power required by the oven. This is indicated on the specifications plate. If you are in any doubt at all, use the services of a professionally qualified person.
1.7 OVEN EQUIPMENT (according to the model)
It is necessary to do an initial cleaning of the equipment before the first use of each of them. Wash them with a sponge. Rinse and dry off.
The simple shelf can take moulds and dishes.
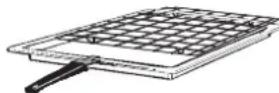
The tray holder shelf is especially good for grilling things. Use it with the drip tray.
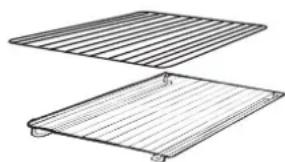
The special profile of the shelves means they stay horizontal even when pulled right out. There is no risk of a dish sliding or spilling.
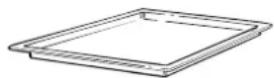
The drip tray catches the juices from grilled foods. It is only used with the Grill, Rotisserie, or Fan Assisted Grill; remove it from the oven for other cooking methods.
Never use the drip tray as a roasting tray as this creates smoke and fat will spatter your oven making it dirty.
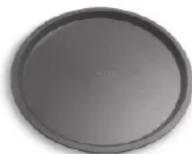
The pizza set is designed for pizza cooking. In order to obtain the best results the set must be used together with Pizza function.
The tray holder
The tray holder shelf is ideal for grilling. Use it in conjunction with the drip tray. A handle is included to assist in moving both accessories safely. Do not leave the handle inside the oven.
Removing and cleaning wire racks
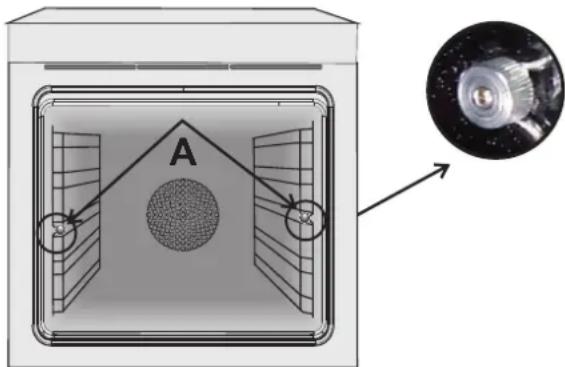
1- Remove the knurled nuts by turning them counterclockwise. 2- Remove the wire racks by pulling them towards yourself. 3- To clean the wire racks, either put them in the dishwasher or use a wet sponge, ensuring that they are dried afterwards. 4- After the cleaning process, install the wire racks in reverse order. 5- Replace the knurled nuts.
2.1 SHELF SAFETY SYSTEM
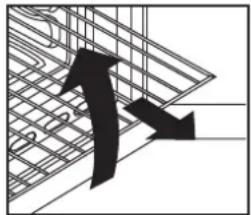
The oven features a new shelf safety system.
This allows you to pull out the oven shelves when inspecting the food without danger of food spillages or shelves falling accidentally out of the oven.
To remove the shelves, pull out and lift.
2.2 GRILLING
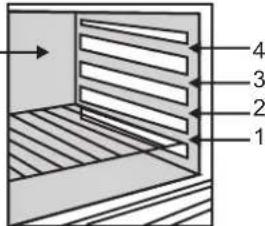
Grilling makes it possible to give food a rich brown colour quickly. For browning, we recommend that you insert the grill onto the fourth level, depending on the proportions of the food (see fig. page 7).
Almost all food can be cooked under the grill except for very lean game and meat rolls.
Meat and fish that are going to be grilled should first be lightly doused with oil.
2.3 The U·COOK MODELS
U-COOK Ovens have an electronic control of the fan speed, called and patented VARIOFAN. During cooking, this system automatically changes the speed of the fan (in multifunction mode) in order to optimize the air flow and the internal temperature in the cavity of the oven.

This allows a management of the distribution of moisture and temperature. It reduces the loss of humidity by 50%, which guarantees the food remains tender and tastes better. This delicate cooking is recommended for the baking of bread and pastry.

It reduces the time of preheating of ovens: only 8 minutes to reach 200 degrees Celsius.

It gives the possibility of setting level and intensity of grilling, up to 50% more power in comparison with a traditional multifunction oven.
Some ovens are equipped with the new door "WIDE DOOR" which has a bigger window area, this allows better maintenance and a improved thermal insulation.
2.4 According to the model
U·See
Is an illumination system which replaces the traditional « light bulb ». 14 LED lights are integrated within the door. These produce white high quality illumination which enables to view the inside of the oven with clarity without any shadows on all the shelves.
U·see
Advantages :
System, besides providing excellent illumination inside the oven, lasts longer than the traditional light bulb its easier and to maintain and most of all saves energy.
Optimum view - Long life illumination - Very low energy consumption, -95% in comparison with the traditional illumination High
"Appliance with white light LED of the 1M Class according to IEC 60825-1:1993 + A1:1997 + A2:2001 (equivalent to EN 60825-1:1994 + A1:2002 + A2:2001); the maximum light power emitted A. 459nm < 150uW.
Not observed directly with optical instruments.
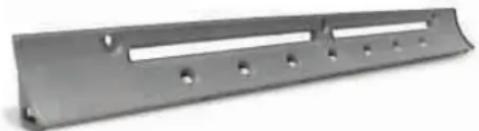
2.5 SELF-CLEANING OVEN WITH CATALYTIC
Special self-cleaning panels covered in a micro-porous coating are available as optional extras for all models. If they are fitted, the oven no longer needs to be cleaned by hand. The fat that is splattered onto the sides of the oven during roasting is eliminated by the microporous coating which breaks the fat down by catalysis and transforms it into gas.
Excessive splattering may nevertheless block the pores and therefore hinder self-cleaning. The self-cleaning capacity may be restored by switching on the empty oven to maximum for about 10-20 minutes. Do not use abrasive products, metal cleaning wads, sharp objects, rough cloths, or chemical products and detergents that may permanently damage the catalytic lining.
It is a good idea to use deep roasting trays to roast fatty foods such as joints of meat etc. and to put a tray underneath the grill to catch surplus fat. If the walls of the oven are so thickly coated in grease that the catalytic lining is no longer effective, remove surplus grease with a soft cloth or sponge soaked in hot water.
The lining must be porous for self-cleaning to be effective.
N.B.: All catalytic linings currently on the market have a working life of about 300 hours. They should therefore be replaced after about 300 hours.
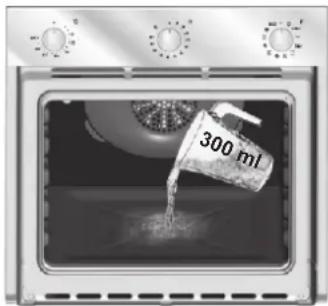
2.6 AQUACTIVA FUNCTION
The Aquactiva procedure uses steam to help remove remaining fat and food particles from the oven.
- Pour 300 ml of water into the Aquactiva container at the bottom of the oven.
- Set the oven function to Static ( ) or Bottom ( ) heater.
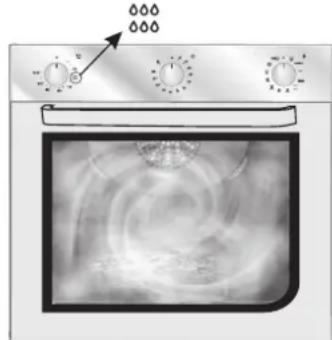
- Set the temperature to the Aquactiva icon.
- Allow the program to operate for 30 minutes.
- After 30 minutes, switch off the program and allow the oven to cool down.
- When the appliance is cool, clean the inner surfaces of the oven with a cloth.
Warning:
Make sure that the appliance is cool before you touch it. Care must be taken with all hot surfaces as there is a risk of burns. Use distilled or drinkable water.
2.7 CLEANING AND MAINTENANCE
Never use abrasive cleaners, wire wool, or sharp objects to clean the glass oven door.
Clean the stainless steel and enamelled surfaces with warm, soapy water or with suitable brand products. On no account use abrasive powders that may damage surfaces and ruin the oven's appearance. It is very important to clean the oven each time that it is used. Melted fat is deposited on the sides of the oven during cooking. The next time the oven is used this fat could cause unpleasant odours and might even jeopardise the success of the cooking. Use hot water and detergent to clean; rinse out thoroughly. To make this chore unnecessary all models can be lined with catalytic self-cleaning panels: these are supplied as an optional extra (see the section SELF-CLEANING OVEN WITH CATALYTIC LINING). Use detergents and abrasive metal pads like «brillo pads» for the stainless steel grills. The glass surfaces as the top, oven door and warming compartment door must be cleaned when they are cold. Damage that occurs to them because this rule was not adhered to are not covered by the guarantee. To replace the interior light: - switch off the mains power supply and unscrew bulb. Replace with an identical bulb that can withstand very high temperatures
2.8 SERVICE CENTRE
Before calling the Service Centre
If the oven is not working, we recommend that:
you check that the oven is properly plugged into the power supply.
If the cause of the fault cannot be detected:
disconnect the oven from the mains, do not touch the oven and call the after sales service.
Before calling the Service Centre remember to make a note of the serial number on the specifications plate (see fig. On last page).
The oven is supplied with a guarantee certificate that ensures that it will be repaired free of charge by the Service Centre
3. TIMER
3.1 USING THE MINUTE TIMER
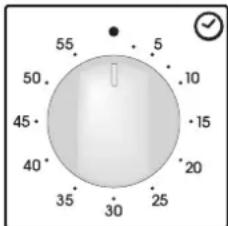
To set the cooking time, turn dial one complete revolution and then position the index to the required time. When the time has lapsed, the signal will ring for a few seconds.
3.2 USING THE END OF COOKING TIMER
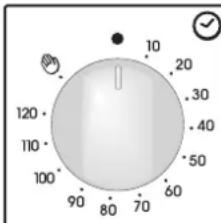
This control enables to set the desired cooking time (max. 120 min.) the oven will automatically switch off at the end of the set time. The timer will count down from the set time return to the O position and switch off automatically.
For normal use of oven set the timer to the position.
To set the oven ensure the timer is not on the O position.
3.3 SETTING THE CORRECT TIME
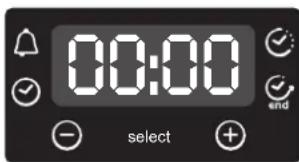
WARNING: the first operation to carry out after the oven has been installed or following the interruption of power supply (this is recognizable the display pulsating and showing 1300s setting the correct time. This is achieved as follows.
- Push the central button 4 times
-Set time with"- "+ buttons. - Release all buttons.
ATTENTION: The oven will only operate providing the clock is set.
3.4 USE OF TOUCH CONTROL CLOCK PROGRAMMER
| FUNCTION | HOW TO ACTIVATE IT | HOW TO SWITCH ITOFF | WHAT IT DOES | WHAT IT IS FOR |
| KEY LOCK | ·Child Lock function is activated by touching Set (+) for a minimum of 5 seconds. From this moment on all other function are locked and the display will flash STOP and preset time intermittently. | ·Child Lock function is deactivated by touching touchpad Set (+) again for a minimum of 5 seconds. From this moment on all functions are selectable again. | ||
| MINUTE MINDER | ·Push the central button 1 times ·Press the buttons "-" "+" to set the required time ·Release all the buttons | ·When the set time as elapsed an audible alarm is activated (this alarm will stop on its own, however it can be stopped immediately by pressing the button) SELECT. | ·Sounds an alarm at the end of the set time. ·During the process, the display shows the remaining time. | ·Allows to use the oven as alarm clock (could be activated either with operating the oven or with out operating the oven) |
| COOKING TIME | ·Push the central button 2 times ·Press the buttons "-" or "+" to set the lenght of cooking required ·Release all buttons ·Set the cooking function with the oven function selector | ·When the time is elapsed the oven will switch off automatically. Should you wish to stop cooking earlier either turn the function selector to 0, or set time to 0:00 (SELECT and "-" "+" buttons) | ·It allows to preset the cooking time required for the recipe chosen. ·To check how long is left to run press the SELECT button 2 Times ·To alter/change the preset time press SELECT and "-" "+" buttons. | ·Push any button to stop the signal. Push the central button to return to the clock function |
| END OF COOKING END | ·Push the central button 3 times ·Press the buttons "-" "+" to set the time at which you wish the oven to switch off ·Release the buttons ·Set the cooking function with the oven function selector | ·At the time set, the oven will switch off. To switch off manually, turn the oven fu n cti o n s e l c t r to position O. | ·Enables you to set the end of cooking time ·To check the preset time push the central button 3 times ·To modify the preset time press buttons SELECT + "-" "+" | ·This function is typically used with "cooking time" function. For example if the dish has to be cooked for 45 minutes and needs to be ready by 12:30, simply select the required function, set the cooking time to 45 minutes and the end of cooking time to 12:30. ·At the end of the cooking set time, the oven will switch off automatically and an audible alarm will ring. ·Cooking will start automatically at 11:45 (12:30 minus 45 mins) and will continue until the pre-set end-of-cooking-time, when the oven will switch itself off automatically. WARNING. If the END of cooking is selected without setting the length of cooking time, the oven will start cooking immediately and it will stop at the END of cooking time set. |
4. OPERATING INSTRUCTIONS
| Function dial | Temperature pre-set and setting. (Model with electronic programmer) (Type A) | Thermostat dial | Function |
| Turns on the oven lightThis will automatically activate the cooling fan (on fan cooled models only) | |||
| 23% | DefrostingWhen the dial is set to this position. The fan circulates air at room temperature around the, frozen food so that it defrosts in a few minutes without the protein content of the food being changed or altered. | ||
| Sprinter | MAX | MAX | Super GrillThis function allows to set food crunchiness. The Super Grill function is characterized by a 50% power increase in comparison to the standard grill. |
| ★ | 22050÷240 | 50÷MAX | Natural convectionBottom and top oven elements are used. This is the traditional form of baking and roasting. It is ideal for roasting joints of meat and game, baking biscuits and apples and making the food nice and crunchy. |
| 23 | 20050÷230 | 50÷MAX | Fan cookingBoth top and bottom heating elements are used with the fan circulating the air inside the oven. We recommend you use this method for poultry, pastries, fish and vegetables. Heat penetrates into the food better and both the cooking and preheating times are reduced. You can cook different foods at the same time with or without the same preparation in one or more positions. This cooking method gives even heat distribution and the smells are not mixed. Allow about ten minutes extra when cooking foods at the same time. |
| Soft cook | 20050÷230 | - | Soft Cook (a)Soft Cook is the function for the confectionery and the bread. Thanks to its reduced fan speed, this function increases oven internal damp. The increased damp creates the ideal conditions of cooking for those foods that need to maintain an elastic consistence while they are cooking (ex. cakes, bread, biscuits) avoiding surface breakages. |
| 16050÷220 | 50÷MAX | Fan plus lower elementThis function is ideal for delicate dishes (pies-souffle). | |
| Level 41÷4 | 50÷MAX | GRILL: use the grill with the door closed. The top heating element is used alone and you can adjust the temperature. Five minutes preheating is required to get the elements red-hot. Success is guaranteed for grills, kebabs and gratin dishes. White meats should be put at a distance from the grill; the cooking time is longer, but the meat will be tastier. You can put red meats and fish fillets on the shelf with the drip tray underneath. | |
| Super grill | Level 41÷4 | 50÷MAX | SUPER GRILL: the oven has two grill positionsGrill: 2200 W Grill SUPER: 3000 W |
| 190180÷200 | 50÷200 | FAN ASSISTED GRILL (a): use the turbo-grill with the door closed. The top heating element is used with the fan circulating the air inside the oven. Preheating is necessary for red meats but not for white meats. Ideal for cooking thick food items, whole pieces such as roast pork, poultry, etc. Place the food to be grilled directly on the shelf centrally, at the middle level. Slide the drip tray under the shelf to collect the juices. Make sure that the food is not too close to the grill. Turn the food over halfway through cooking. | |
| ← | Level 41÷4 | 50÷200 | Grill/spit element. This is used for roasting on the spit. |
| 220 | 50÷MAX | Function PizzaThis function with hot air circulated in the oven ensure perfect result for dishes such as pizza or focaccia. | |
| light | 190180÷200 | 50÷200 | The COOKING OITS you to cook in a healthier way, by reducing the amount of fat or oil required. Thanks to the use of the grill and fan combined with a pulsating cycle of air, it will retain the moisture content of the food, grilling the surface and using a shorter cooking time, without compromising on taste. It is particularly suitable for cooking meat, roasted vegetables and omelettes. The cycle of pulse air keeps the humidity inside the oven and the moisture content of the food, preserving the nutritional values and ensuring a rapid uniform cooking process. Try all your recipes and reduce the amount of dressing you usually use and experience the lightness of this new function! |
(a) on some models : function with "Vario Fan" is the exclusive system developed by Candy to optimize the cooking results, temperature management and damp management. The Vario Fan system is a self-activating system that changes automatically fan speed when a fan function is chosen: the fan functions are the one inside the outlined area on control panel. Tested in accordance with the CENELEC EN 60350-1 * Tested in accordance with the CENELECENs350 definition of energy class.
VEGETABLE MUFFINS
Ingredients:
200 g of courgettes
-1 red pepper
- 1 teaspoon paprika
Ingredients:
6 eggs
10 courgette flowers
- 1 slice of boiled pumpkin
200 g of parmesan cheese
- turmeric
- 6 tablespoons of milk
200 g of potatoes
200 g of sweet potatoes
100 g of provolone
cheese, 20 g of breadcrumbs
- Cut the courgettes and peppers and dice the potatoes, boil for a few minutes on hob top. Cut and stir fry the other vegetables for 5 minutes in a pan with olive oil and paprika, salt and pepper.
Once the potatoes are boiled, mash them and add to the other vegetables and chopped provolone.
In the meantime, prepare a mixture of breadcrumbs and parmesan cheese, and mix half of it into the vegetables.
Flour the muffin molds and fill them to the brim. Put the remaining bread and cheese mixture on top and add a little olive oil. Bake in the oven with the COOK LIGHT function at 180 degrees for 15-20 minutes, until they are beautifully golden in colour.
LIGHT function at 180 degrees for 15-20 minutes, until they are beautifully golden in colour.
- Cut and boil 1 potato. Cut the pumpkin into slices and place on a baking sheet, put into the oven at 160 degrees for approximately 20 minutes. Once cooked, mash with a fork.
Beat the eggs and add the boiled potato and the crushed pumpkin, milk, parmesan cheese, turmeric, salt and pepper.
Mix all the ingredients together and add the courgette flowers, ensuring they are cleaned and cut into small pieces.
Pour the mixture into the tin and bake with the COOK LIGHT function in the oven preheated at 180 for 20 minutes.
The overall suggested cooking times set out below are intended as a rough guide only. They may in fact vary according to the quality, the freshness, the size, and the thickness of the food cooked, and of course cooking time is also partly a matter of taste. Let the food stand for a few minutes before serving because the ingredients continue cooking after they have been removed from the oven.
The overall suggested cooking times set out below are intended as a rough guide only. They may in fact vary according to the quality, the freshness, the size and the thickness of the food cooked and of course cooking time is also partly a matter of taste. Let the food stand for a few minutes before serving because the ingredients continue cooking after they have been removed from the oven.
HANDY TIP: Lower the temperature so as to avoid the surface of the food becoming hard and dry.
TABLES OF COOKING TIMES
| Static electric oven | Electric fan oven | |||||||
| Food | Quantity | Shelf | Time of cooking in minutes | Oven temperature | Shelf | Time of cooking in minutes | Oven temperature | Remarks |
| · Pasta | ||||||||
| Lasagne | Kg 3,5 | 2 | 70 ÷ 75 | 220 | 2 | 60 ÷ 65 | 200 | Put the lasagne into an unheated oven |
| Cannelloni | Kg 1,8 | 2 | 50 ÷ 60 | 220 | 2 | 40 ÷ 50 | 200 | Put the cannelloni into an unheated oven |
| Oven baked pasta | Kg 2,5 | 2 | 55 ÷ 60 | 220 | 2 | 45 ÷ 50 | 200 | Put the oven baked pasta into an unheated oven |
| · Baking (not cakes) | ||||||||
| Bread | Kg 1 di pasta | 2 | 35 10 (pre-heating) | 200 | 2 | 30 ÷ 35 10 (pre-heating) | 180 | Form the dough into a loaf and make a cross with a knife on top of the dough leave the dough to rise for at least 2 hours. Grease the baking tin and put the dough in the middle of it. |
| Pizza | Kg 1 | 1 | 25 ÷ 35 | 190 | 1 | 20 ÷ 25 | 190 | Warm the oven for 15 minutes and place the pizzas on the greased baking tray. Garnish them with tomatoes, mozzarella, ham, oil, salt and origano. |
| Pastry (frozen) vol au vents | n° 24 | 1 | 30 ÷ 35 | 220 | 2 | 25 ÷ 30 | 200 | Place 24 vol au vents in the oven and bake. |
| Focaccia (n° 4) | gr. 200 of dough each | 2 | 25 ÷ 30 | 200 | 2 | 20 ÷ 25 | 180 | Warm the oven for 15 minutes, grease the baking tray, season the 4 focaccia with oil and salt and leave them to rise a room temperature for at least 2 hours before put ting them in the oven. |
| · Meat | ||||||||
| All meats can be roasted in shallow or deep roasting trays.It is advisable to cover the shallow trays to avoid splattering the sides of the oven with grease.The roasting times are the same whether the meat has been covered up or not. | ||||||||
| Whole joint of beef | Kg 1 | 3 | 70 ÷ 80 | 220 | 3 | 50 ÷ 60 | 200 | Put the meat into a deep Pyrex dish and season with salt and pepper; turn the meat half way through cooking. |
| Joint of deboned | Kg 1 | 2 | 100 ÷ 110 | 220 | 2 | 80 ÷ 90 | 200 | Cook the meat in a covered Pyrex dish with herbs, spice, oil and butter. |
| Joint of deboned veal | Kg 1,3 | 1 | 90 ÷ 110 | 220 | 2 | 90 ÷ 100 | 200 | Cook as indicated above |
| Joint of fillet of beef | Kg 1 | 2 | 80 ÷ 90 | 220 | 2 | 80 ÷ 90 | 200 | Cook as indicated above. |
| Static electric oven | Electric fan oven | |||||||
| Food | Quantity | Shelf | Time of cooking in minutes | Oven temperature | Shelf | Time of cooking in minutes | Oven temperature | Remarks |
| Rabbits and Poultry | ||||||||
| Guinea fowl | Kg 1-1,3 | 2 | 60 + 80 | 220 | 2 | 60 + 70 | 200 | Place the guinea fowl in a deep Pyrex o pottery dish with very little oil and season with herbs and spices. |
| Chicken | Kg 1,5-1,7 | 2 | 110 + 120 | 220 | 2 | 100 + 110 | 200 | Follow the procedure for cooking the guinea fowl. |
| Rabbit pieces | Kg 1-1,2 | 2 | 55 + 65 | 220 | 2 | 50 + 60 | 200 | Put all the pieces of the same size in the glazed tray. Season with herbs and spices. Turn the pieces as and when required. |
| Cakes | ||||||||
| Coconut cake baked in a tin | 1 | 55 | 180 | 1 | 50 | 160 | Use a tin that is 22 cm deep. Pre-heat for 10 mins. | |
| Sponge cake | 1 | 55 | 175 | 1 | 40 + 45 | 160 | Use a tin that is 22 cm deep. Pre-heat for 10 mins. | |
| Carrot cake baked in a tin | 1 | 65 | 180 | 1 | 50 + 60 | 160 | Use a tin that is 22 cm deep. Pre-heat for 10 mins. | |
| Apricot pie | 700 gr | 1 | 40 | 200 | 2 | 30 + 35 | 180 | Use a tin that is 22 cm deep. Pre-heat for 10 mins. |
| Vegetable | ||||||||
| Fennel | 800 gr | 1 | 70 + 80 | 220 | 1 | 60 + 70 | 200 | Cut the fennel into four pieces, add butter, salt and potatoes if required and place in a Pyrex face up. Cover the dish |
| Courgettes | 800 gr | 1 | 70 | 220 | 1 | 60 + 70 | 200 | Slice the courgettes, place in a Pyrex dish and add butter and salt. |
| Potatoes | 800 gr | 2 | 60 + 65 | 220 | 2 | 60 + 65 | 200 | Cut the potatoes into equal parts and place in a Pyrex dish. Season with salt, origano and rosemary. Cook in oil. |
| Carrots | 800 gr | 1 | 80 + 85 | 220 | 1 | 70 + 80 | 200 | Slice the carrots, place in a Pyrex dish and cook. |
| Grilling | ||||||||
| Place the food to be grilled underneath the infra-red grill. Warning: When the grill is on it takes on a bright red colour. Place the tray underneath the grill to collect juices and fat from the food being grilled. | ||||||||
| Squares of bread for toasting | 4 pieces | 4 | 5 (5 to heat up grill) | Grill Grill | 4 | 5 (10 to heat up grill) | Lay the bread on the grill tray. When one side of the bread has been toasted, turn over and toast the other side. Remember: keep the toast warm at the bottom of the oven until you are ready to serve it. | |
| Toasted sandwiches | 4 | 3 | 10 (10 to heat up grill) | Grill Grill | 3 | 5/8 (10 to heat up grill) | Lay the bread on the grill tray. When one side of the sandwich has been toasted, turn over and toast the other side. | |
| Sausages | n°6 / Kg 0,9 | 4 | 25/30 (5 to heat up grill) | Grill Grill | 4 | 15/20 (10 to heat up grill) | Cut the sausages in half and lay them face down on the grill. Half way through grilling turn them over. Every so often, check that they are being cooked equally all over. (If this is not happening, turn and reposition the ones being cooked either less or more than the others. | |
| Ribs of beef | n°4 / Kg 1,5 | 4 | 25 (5 to heat up grill) | Grill Grill | 4 | 15/20 (10 to heat up grill) | Make sure that the ribs of beef are exposed to the full effect on the main grill. | |
| Chicken legs | n°4 / Kg 1,5 | 3 | 50/60 (5 to heat up grill) | Grill Grill | 3 | 50/60 (10 to heat up grill) | Turn them over twice during grilling | |
| Fish | ||||||||
| Trout | 3 whole trout or / Kg 1 | 2 | 40 + 45 | 220 | 2 | 35 + 40 | 200 | Cover the trout with salt, oil and onions and cook in a Pyrex dish. |
| Salmon | 700 g 2,5 cm slice | 2 | 30 + 35 | 220 | 2 | 30 + 25 | 200 | Cook the salmon in an open Pyrex dish with salt, pepper and oil. |
| Sole | Kg 1 | 2 | 40 + 45 | 220 | 2 | 35 + 40 | 200 | Cook the sole with salt and a spoonful of oil. |
| Bream | 2 whole ones | 2 | 40 + 45 220 | 2 | 35 + 40 | 200 | Cook the bream in oil and salt in a covered dish. | |
| Fruit | ||||||||
| Whole apples | Kg 1 | 1 | 45 + 55 | 220 | 2 | 45 + 55 | 200 | Bake the fruit in an open Pyrex or earthen-ware dish. Leave it to cool inside the oven. |
| Pears | Kg 1 | 1 | 45 + 55 | 220 | 2 | 45 + 55 | 200 | Follow procedure above. |
| Peaches | Kg 1 | 1 | 45 + 55 | 220 | 2 | 45 + 55 | 200 | Follow procedure above. |
1.4 INSTALLING THE OVEN IN ITS FURNITURE
Before cooking, the grill should be greased with oil.
2.3 MULTI-COOK
Multi-cook ovens are equipped with electronic convection speed control, whose patented name is Vario Fan. During cooking, this system automatically changes the convection speed (in the multifunction model) to optimize the air flow and internal cooking temperature.
sopp
All Multi-cook ovens are equipped with the Soft Cook function. Thanks to this, you can control the distribution of humidity and temperature. This reduces moisture loss by 50%, ensuring tenderness and excellent taste of dishes. This is a delicate cooking method, recommended for baking bread and pastry.
Sprinter
Reduces the preheating time of the oven: 200 degrees Celsius are reached in just 8 minutes.
Supergrill
Makes it possible to set the level of grilling intensity, up to 50% more power compared to traditional multifunction ovens.
Some ovens are equipped with a new design door, whose glass is larger, allowing better care of the oven and improving thermal insulation.
2.4 REPLACING THE LAMP U·S∈E
This is a lighting system that replaces the usual lamp. 14 LEDs are built into the door. It illuminates with bright white light, which allows you to see the interior of the oven well without darkening at all levels.
Advantages:
The U.S.E.E. system, besides excellent lighting, is distinguished by a longer service life compared to a conventional oven lamp, and it is more energy-efficient.
Low energy consumption, 95% less than usual
- High quality
The device complies with laser safety class 1 according to IEC 60825-1:1993+A1:1997+A2:2001 (equivalent to EN 60825-1:1994+A1:2002+A2:2001); maximum output optical power λ 459nm<150uW.
Do not look directly at the light source with optical instruments.
2.5 CATALYTIC SELF-CLEANING OVEN
Special panels coated with enamel with a microporous structure, supplied as additional equipment for all models, eliminate the need to clean the oven manually.
Fat, deposited on the walls of the oven during cooking, is decomposed by the porous surface through a catalytic oxidation process and converted into a harmless substance.
Spatters of fat should be wiped up immediately to prevent self-cleaning. This property of the protective panels can be restored by heating the empty oven for 10-20 minutes at maximum temperature. Do not use abrasive cleaners, steel wool pads, sharp objects, hard brushes, chemical substances, or cleaning agents that could damage the enamel. It is also recommended to use high-sided baking trays in case of particularly fatty dishes (e.g., roasting) and when grilling, use a drip tray. If, due to the nature of the load, the above measures are insufficient, it is recommended to remove the fat with a soft cloth or sponge moistened with hot water. Regular cleaning is the main condition for ensuring the self-cleaning effect. N.B. Warning: All self-cleaning panels on the market are designed for approximately 300 hours of oven operation. After this period, the panels should be replaced.
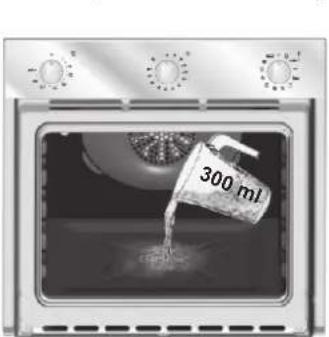
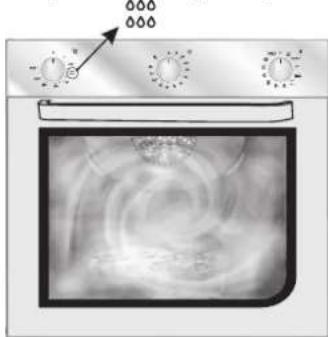
2.6 AQUACTIVA FUNCTION
The Aquactiva function uses steam
to remove grease residues from the oven cavity after cooking.
- 1. Pour 300 ml of water into the special recess located at the bottom of the oven cavity. 2. Set the thermostat to the lowest ( ) or lowest ( ) heating setting. 3. Set the timer to the steam mode 000. 4. Leave the program on for 30 minutes. 5. After 30 minutes, turn off the program and let the oven cool.
- When the oven has cooled, clean the interior surfaces of the oven cavity with a soft cloth. WARNING:
Make sure the appliance is cool before touching it. Care must be taken with all hot surfaces, as there is a risk of burns. Use only distilled or drinking water.
2.7 CARE AND CLEANING
- Before cleaning the appliance, wait until it cools down.
Do not use abrasive cleaners, metal scrapers, or sharp objects that could damage the stainless steel surface.
Use mild soap or ammonia-based cleaners. The oven is very important to clean after each use. During cooking, grease settles on the oven walls. If not cleaned after use, this grease can emit an unpleasant odor and may even catch fire.
GLASS PARTS
After each use of the oven, wipe the inside glass door with a paper towel. If stains from food remain on the surface, use a sponge or soft cloth with cleaning agents. Wipe again with a clean cloth and dry thoroughly. Do not use abrasive cleaners or sharp objects. The door gasket should be cleaned with a sponge or soft cloth and cleaning agents.
Before any cleaning or replacement of the lamp, unplug the appliance from the socket. The lamp and protective cover are made of materials resistant to high temperatures.
Lamp specifications:
230 V ~ - 25 W - socket E 14 - temperature 300°C
If it is necessary to replace a faulty lamp, remove the protective glass cover, unscrew the lamp, replace it with an identical one, and put the protective glass cover back in place.
2.8 AFTER-SALES SERVICE
Before contacting the service center, check the following.
In case the oven does not work, we recommend you:
- check that the plug is correctly inserted into the socket; if you cannot find the cause of the malfunction:
turn off the appliance, do not attempt to repair it yourself, and contact an authorized service center. When contacting an authorized service center, you must provide the model name and serial number, which you can find on the warranty certificate or on the rating plate. The appliance is covered by a warranty certificate, on the basis of which it will be repaired free of charge at an authorized service center during the warranty period.
The serial number consists of 16 digits. The first 8 digits are the model code. The next 4 digits are the production date (year, week). The last 4 digits are the factory number.
The device is marked in accordance with the European Directive 2012/19/EC on waste electrical and electronic equipment (WEEE). Waste from the production of electrical and electronic equipment contains hazardous substances (which can negatively affect the environment) and basic
components (which are subject to reuse). It is important that waste from the production of electrical and
electronic equipment is subjected to special treatment for the neutralization and disposal of all hazardous substances, as well as the regeneration and reuse of all materials.
Everyone can make a significant contribution to preventing environmental problems caused by waste from the production of electrical and electronic equipment; for this, it is important to follow some basic rules:
- Do not treat waste from the production of electrical and electronic equipment as household waste.
- Waste from the production of electrical and electronic equipment should be handed over to collection points controlled by local authorities or registered companies. In many countries, for large quantities of waste from the production of electrical and electronic equipment, waste collection is carried out at home.
- When purchasing a new device, the old device can be returned to the retail outlet, which is obliged to accept it free of charge on the basis of mutual agreement, if this is a device of a similar type and the returned device has the same functions as the one being sold.
ENERGY SAVING. PROTECTION OF THE ENVIRONMENT. Where possible, avoid preheating the oven. Always fill it completely. Open the oven door as rarely as possible, as each time it is opened, heat is dissipated. For significant electricity savings, turn on the oven 5-10 minutes before the planned end of the cooking time, thus using the residual heat generated by the oven. The seal should be kept clean and in good condition to prevent heat from escaping the chamber. If your electricity contract provides for a night tariff, the "Delayed cooking" program simplifies the process of saving electricity thanks to the delay in the cooking process until the start of the night tariff.
3. TIMER
3.1 USING THE TIMER
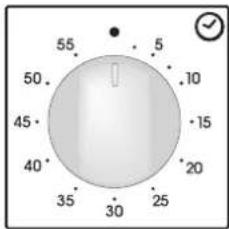
The cooking time indicator will beep for a few minutes after the set time has elapsed.
3.2 USING THE END OF COOKING TIME TIMER
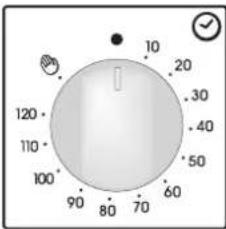
With this function, you can set the required cooking time (max. 120 min), after which the oven will switch off automatically.
The timer counts down the set time and switches off automatically.
To use the oven in normal mode, set the knob to the
Before switching on, check that the timer is not in the 0 position.
3.3 SETTING THE EXACT TIME
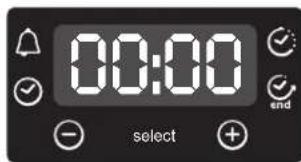
WARNING: The time setting is carried out for the first time after installing the oven or after a power outage (the need for this will be indicated by a flashing display 1200). The time setting is done as follows:
Press the central button for time setting and the knobs "" "
-Release the knobs
ATTENTION: The oven will only work after setting the clock.
3.4 TIMER WITH SENSOR CONTROL
| Функция | Вълочене | Оълочене | Что вълочене | Д�� чero | |
| Заша та одемп н от ду ду | Функция «Дetectим замок»Вълочаетс р�и нахатим уdeepжаним клавши Set(+)- He Meηe 5 sekyund. C STOTO MOMENTA BCEФункции заблоровын и на диспee мiraeТ STOPиTekушee Вremя. | Д�� оълоченя Функции «Дetectим замок»Свова нахатим уdeepжiteКлавшиу StEDHIE5 sekyund, Посте отуго BCEФункции Вьовь.stahobraytcadoctynbIMi. | |||
| Таймер | •НожмITE цentралыну кногу1раза | •Кordа установлиноь Вremяпс试chet,разадостя Звкововсigнан.Пось试чени сигнанпpekpatNTCABOTMATUHECKN,oh ТадуMeKET6bIb octahOBlenh Haxatmern Khonki Select. | •ВълочаetЗвкововсiguнал noOKONCHAHIN ySTAHOBLENHOROBvemehn | •Зта Функции поэвлгетИсплььзовьдУХВБКУВКУВКУВКУВКУВКУВКУВКУВКУВКУВКУВКУВКУВКУВКУВКУВКУВКУВКУВКУВКУВКУВКУВКУВКУВКУВКУВКУВКУВКУВКУВКУВКУВКУВK | |
| Вөрмяприготовлиу | •НожмITE цentралыну кногу2раза•НожмITE кногу ("-").ии(+) -дя установки trpebyemorov Вөрмяпriготовлиу•ОъуCTITE Kногу•Уstановпite ржIMпriготовлиу припомоши ручkn BlibopaФункции | •Пось试чени установлиноь ВөрмяпьдУХВБКУ OТКЛIOYHTCABOTMATUHECKN,Если BiXOTITE BILKIIPOYHTEе раhtbue,установпite ручkn BlibopaФункцииВ NOLOXGEHNE0ии UsthanovBte Вөрмя 0:00SELECTи Кногу ("- "+") | •Позвоггет установпite trpebyemoe Вөрмяпriготовлиь BBi6paHbIX6нд•Чтбы поверпь,сколькВьөрмяпocTANOCB,нжмITE Kногу SELECT•Д��иЗмэнгий установлиногу ВөрмяпяжмITESELECTи Kногу "+""+'' | •Д�� пекрашени сигнанalнэнэнэнэнэнэнэнэнэнэнэнэнэнэнэнэнэнэнэнэнэнэнэнэнэнэнэнэнэнэнэнэнэнэнэнэнэнэнэнэнэнэнэнэнэнэнэнэнэнэн�Функциичасов | |
| Окончаниnpriготовлиу end | •НожмITE цentралыну кногу3раза•НожмITE кногу ("-").ии(+) -дя установкиВөрмяпьдУХВБКLOYHTCABOTMATUHECKN•ОъуCTITE Kногу•Уstановпite ржIMпriготовлиу припомоши ручkn BlibopaФункции | •В установлиноь ВөрмяduxOBKBA BILKIIPOYHTCABITpyuHOrOуБКLOYHTCABOTMATUHECKN,Д�� руногу БILKIIPOYHTCABOTMATUHECKN,поверпite ручkn BlibopaФункцииВ NOLOXGEHNE0. | •Позьоггет установпite ВөрмяOKONCHAHINprigotobVlenhry•Чтбы поверпь,сколькВьөрмяпocTANOCB,нжмITEKONTOBLYC | •Зта Функции obshicno Исплььз汞сяВмесе cФункции«ВөрмяпrigotobVlenhry. Hanprimир,сян6лною дOLЖHTo rOToBVtCBa 45MinHyntи nДOLЖHb6bTyrotBOK 12:30,pocstObblepite Tpe6yemuyФункции,установпite ВөрмяprigotobVlenhry 45MinHyt nВөрмя OkOHчаньЯ•Пось试чени установлиноь ВөрмяпьдУХВБКA OТКЛIOYHTCABOTMATUHECKN nPazdactcR 3ВУКВОу сИнhal.•пriгOTOBLengne nHayheTcR abTomatUcheckn nPazdactcR 3ВУКВОу сИнhal.•пrigOTOBLengne nHayheTcR abTomatUcheckn B 11:45 (12:30 MinHyc 45MinHyt) npondokHTCBA DpBemeyOKONчаньЯ prigotobVlenhry,пocSleччEGDVBXOBKa ABTOMATUHECKN BILKIIPOYHTCBA Eclny BьбрANAФүнүрEXDEHINE:6e3ystanobkn npondokhyocStnprigotobVlenhry,duxOBKa NauchetrabspaBOTATb copasy n octahobvtcB konhze paanee ustahoblenHHOROBvemehnprigotobVlenhry. |
- INSTRUCTIONS FOR USE
| Симь�Функции | Пrelу[dʒaTHOBJIHЯ и[aZdAJIHЯ T°C Modye c 3mEkTPOHbIM nporpAMATOPM (Type A) | Уstановka T°C Modye c TePMcCTaTOM | ФункцияВ COOTBETCTBIM C MODELBI | |
| Б[kIIOUaet nobcctky | ||||
| 23% | Разморжванie. Когда установли有很大отot ржим, велтуларовп разгонует ВОДуху кOMHAHTOH tempehnyы ВOKур 3amopoxeHHbIX npoduykTob,чоБуОи ранморoэнлсь 3a Heckokko MmHUT 6e3 ИЗмehн� Или NOBpejdeHry INK CAeCTBA | |||
| Sprenter | MAX | MAX | Сprinтер. 3отot ржим убухует велтуларовп разгонует ВОДуху кOMHAHTOH срау Зунгшьет ( harpoimeд ддостокусянгд Tempehnyы 200°C trpeyetocg 8MHUT. Можho установп trpeууууууууууууууууууууууууууууууууууууууууууууууууууууууууууууууууууууууууууууууууууууууууууууууууууууu СоКОнЧИМЕВЕМЕНИ Пrelу[dʒaBHTHOLHORA HAPREBA ONUOBECTH HADINCIC "C" HAN PANAENI YUPTABENH. Lidki IrelpavlneHOTG HAPREBA ZAKAHYWEAE TCRDA NORACET KODA NORACET KOHLPOHNA JAMONOKA "C" N MOKHO BILIMATPB LIDKI IrelpavlneHOTG HAPREBA ZAKAHYWEAE TCRDA NORACET KOHLPOHNA JAMONOKA "C" N MOKHO BILIMATPB LIDKI IrelpavlneHOTG HAPREBA ZAKAHYWEAE TCRDA NORACET KOHLPOHNA JAMONOKA "C" N MOKHO BILIMATPB LIDKI IrelpavlneHOTG HAPREBA ZAKOHYWEAE TCRDA NORACET KOHLPOHNA JAMONOKA "C" N MOKHO BILIMATPB LIDKI IrelpavlneHOTG HAPREBA ZAKAHYWEAE TCRDA NORACET KOHLPOHNA JAMONOKA "C" N MOKHO BILIMATPB LIDKI IrelpavlneHOTG GOREN TCRDA NORACET KOHLPOHNA JAMONOKA "C" N MOKHO BILIMATPB LIDKI IrelpavlneHOTG GOREN TCRDA NORACET KOHLPOHNA JAMONOKA "C" N MOKHO BILIMATPB LIDKI IrelpavlneHOTG GOREN TCRDA NORACETKOHLPOHNA JAMONOKA "C" N MOKHO BILIMATPB LIDKI IrelpavlneHOTG GOREN TCRDA NORACET KOHLPOHNA JAMONOKA "C" N MOKHO BILIMATPB LIDKI IrelpavlneHOTG GOREN TCRDA NORACET KOHLPOHNA JAMONOLH LIDKI IrelpavlneHOTG GOREN TCRDA NORACET KOHLPOHNA JAMONOLH LIDKI IrelpavlneHOTG GOREN TCRDA NORACET KOHLPOHNA JAMONOLH LIDKI IrelpavlneHOTG GOREN TCRDA NORACET KOHLPOHNA JAMONOLH | |
| ★ | 220 50÷240 | 50÷MAX | ОБ[buHbN] pexchim ИсоллучOTь Ворхин и Нжннин HarpebatelbHьile ane mementы. Пrelу[džaBHTHOLH OASRoraprte doyxovkBv TceHHepe BorovkBv TceHHepe Makhyu Makhyu Makhyu Makhyu Makhyu Makhyu Makhyu Makhyu Makhyu Makhyu Makhyu Makhyu Makhyu Makhyu Makhyu Makhyu Makhyu Makhyu Makhyu Makhyu MakhyU Makhyu Makhyu Makhyu Makhyu Makhyu Makhyu Makhyu Makhyu Makhyu Makhyu Makhyu Makhyu Makhyu Makhyu Makhyu Makhyu Makhyu Makhyu Makhyu Makhyuin Makhyu Makhyu Makhyu Makhyu Makhyu Makhyu Makhyu Makhyu Makhyu Makhyu Makhyu Makhyu Makhyu Makhyu Makhyu Makhyu Makhyu Makhyu Makhyu Makhyun Makhyu Makhyu Makhyu Makhyu Makhyu Makhyu Makhyu Makhyu Makhyu Makhyu Makhyu Makhyu Makhyu Makhyu Makhyu Makhyu Makhyu Makhyu Makhyu Makhyuk Makhyu Makhyu Makhyu Makhyu Makhyu Makhyu Makhyu Makhyu Makhyu Makhyu Makhyu Makhyu Makhyu Makhyu Makhyu Makhyu Makhyu Makhyu Makhyu Makhyus Makhyu Makhyu Makhyu Makhyu Makhyu Makhyu Makhyu Makhyu Makhyu Makhyu Makhyu Makhyu Makhyu Makhyu Makhyu Makhyu Makhyu Makhyu Makhyu Makhy#u Makhyu Makhyu Makhyu Makhyu Makhyu Makhyu Makhyu Makhyu Makhyu Makhyu Makhyu Makhyu Makhyu Makhyu Makhyu Makhyu Makhyu Makhyu Makhyu MakHYU MakHYU MakHYU MakHYU MakHYU MakHYU MakHYU MakHYU MakHYU MakHYU MakHYU MakHYU MakHYU MakHYU MakHYU MakHYU MakHYU MakHYU MakHYU MakHYU MakHY/U MakHYU MakHYU MakHYU MakHYU MakHYU MakHYU MakHYU MakHYU MakHYU MakHYU MakHYU MakHYU MakHYU MakHYU MakHYU MakHYU MakHYU MakHYU MakHYU MakHYUU MakHYU MakHYU MakHYU MakHYU MakHYU MakHYU MakHYU MakHYU MakHYU MakHYU MakHYU MakHYU MakHYU MakHYU MakHYU MakHYU MakHYU MakHYU MakHYU MakHYUN MakHYUN MakHYUN MakHYUN MakHYUN MakHYUN MakHYUN MakHYUN MakHYUN MakHYUN MakHYUN MakHYUN MakHYUN MakHYUN MakHYUN MakHYUN MakHYUN MakHYUN MakHYUN MakHYUN MakHYU MakHYU MakHYU MakHYU MakHYU MakHYU MakHYU MakHYU MakHYU MakHYU MakHYU MakHYU MakHYU MakHYU MakHYU MakHYU MakHYU MakHYU MakHYU MakHYUP MakHYUP MakHYUP MakHYUP MakHYUP MakHYUP MakHYUP MakHYUP MakHYUP MakHYUP MakHYUP MakHYUP MakHYUP MakHYUP MakHYUP MakHYUP MakHYUP MakHYUP MakHYUP MakHYUP MakHYU MakHYU MakHYU MakHYU MakHYU MakHYU MakHYU MakHYU MakHYU MakHYU MakHYU MakHYU MakHYU MakHYU MakHYU MakHYU MakHYU MakHYU MakHYU MakHYUX MakHYUX MakHYUX MakHYUX MakHYUX MakHYUX MakHYUX MakHYUX MakHYUX MakHYUX MakHYUX MakHYUX MakHYUX MakHYUX MakHYUX MakHYUX MakHYUX MakHYUX MakHYUX MakHYUX MakHYX MakHYX MakHYX MakHYX MakHYX MakHYX MakHYX MakHYX MakHYX MakHYX MakHYX MakHYX MakHYX MakHYX MakHYX MakHYX MakHYX MakHYX MakHYX MakHYX MakHY× MakHYX MakHYX MakHYX MakHYX MakHYX MakHYX MakHYX MakHYX MakHYX MakHYX MakHYX MakHYX MakHYX MakHYX MakHYX MakHYX MakHYX MakHYX MakHYX MakHYx MakHYX MakHYX MakHYX MakHYX MakHYX MakHYX MakHYX MakHYX MakHYX MakHYX MakHYX MakHYX MakHYX MakHYX MakHYX MakHYX MakHYX MakHYX MakHYX MakHY X MakHYX MakHYX MakHYX MakHYX MakHYX MakHYX MakHYX MakHYX MakHYX MakHYX MakHYX MakHYX MakHYX MakHYX MakHYX MakHYX MakHYX MakHYX MakHYX MakHYXL MakHYX MakHYX MakHYX MakHYX MakHYX MakHYX MakHYX MakHYX MakHYX MakHYX MakHYX MakHYX MakHYX MakHYX MakHYX MakHYX MakHYX MakHYX MakHYX MakHYXC MakHYX MakHYX MakHYX MakHYX MakHYX MakHYX MakHYX MakHYX MakHYX MakHYX MakHYX MakHYX MakHYX MakHYX MakHYX MakHYX MakHYX MakHYX MakHYX MakHYXI MakHYX MakHYX MakHYX MakHYX MakHYX MakHYX MakHYX MakHYX MakHYX MakHYX MakHYX MakHYX MakHYX MakHYX MakHYX MakHYX MakHYX MakHYX MakHYX MakHY:X MakHYX MakHYX MakHYX MakHYX MakHYX MakHYX MakHYX MakHYX MakHYX MakHYX MakHYX MakHYX MakHYX MakHYX MakHYX MakHYX MakHYX MakHYX MakHYX MakHYXX MakHYX MakHYX MakHYX MakHYX MakHYX MakHYX MakHYX MakHYX MakHYX MakHYX MakHYX MakHYX MakHYX MakHYX MakHYX MakHYX MakHYX MakHYX MakHYX MakHY(X) MakHYX MakHYX MakHYX MakHYX MakHYX MakHYX MakHYX MakHYX MakHYX MakHYX MakHYX MakHYX MakHYX MakHYX MakHYX MakHYX MakHYX MakHYX MakHYX MakHYX | 100% 100% 100% 100% 100% 100% 100% 100% 100% 100% 100% 100% 100% 100% 100% 100% 100% 100% 100% 100% 100% 100% 100% 100% 100% 100% |
* Tested in accordance with CENELEC EN 60350-1 **Tested in accordance with CENELEC EN 60350-1 for determining the energy consumption class.
Definitions:
Cabbage 200 g.
Potatoes 200 g. Sliced cabbage 200 g. Bell pepper 1 pc.
Sour cream 1 tablespoon for serving ·50 g. Parmesan cheese -20 g. Breadcrumbs
Cut the cabbage, chop the pepper, cut the potatoes into cubes, then boil them for a few minutes on a steam surface.
Take the remaining vegetables and fry them for 5 minutes in a pot with olive oil, onion, salt and pepper.
Make a puree from the boiled potatoes, then add the other vegetables and sliced cheese.
At the same time, prepare a mixture of breadcrumbs and Parmesan cheese, half of which you will mix with the vegetables.
Grease the molds with butter and flour and fill them with the vegetable mixture. Top with the remaining breadcrumb and Parmesan mixture and drizzle with olive oil. Bake in a preheated oven at 180 degrees for 15-20 minutes, until nicely golden brown.
Variations:
6 vegetable pancakes 1 boiled potato
1 slice of boiled pumpkin 200 g. Parmesan cheese 1 glass of milk
Cut and boil one potato.
Cut the pumpkin into cubes, place in a baking dish and put in the oven at 160 degrees for about 20 minutes. After cooking, mash it.
Beat the egg, add the boiled and mashed potatoes and pumpkin, milk, Parmesan cheese, dill, salt and pepper.
Mix everything together and add the flour, making sure it is clean and cut into small pieces.
Place the mixture in the form of a baking dish, preheated to 180 degrees, on the LIGHT cooking mode for 20 minutes.
5. COOKING RECOMMENDATIONS
The temperature and cooking time are given for information only, to make it easier to use the oven. Your own experience will tell you how to adjust them to your taste and preferences. Remember that when cooking at high temperatures, juice splashes onto the oven walls, causing soiling and smoke. It is better to slightly reduce the cooking temperature, even if this means a longer cooking time. The oven has several levels, numbered starting from the bottom.
FISH
*All dishes were prepared on level 1
BAKING CONFECTIONERY
Avoid using shiny baking pans, as they reflect heat, and the top of the pastry may burn. If the pastry is browning too quickly, cover it with baking paper or aluminum foil.
Attention: Place the foil with the correct side up; the shiny side should face the pastry, otherwise the heat will be reflected and will not penetrate the product.
Try not to open the oven door during the first 20-25 minutes of baking, otherwise all confectionery items that need a long cooking time, such as cakes, buns, etc., will immediately fall. To check the cooking process, insert a knife blade or a toothpick into the center. If it comes out clean, the pastry is ready and you can turn off the oven. If the blade is raw and dough sticks to it, continue cooking, slightly reducing the temperature so that the top of the pastry does not burn.
SAFETY TECHNIQUE
- WARNING: The accessible parts of the household appliance become very hot during operation. Keep children away.
- Children over 8 years of age and persons with reduced physical, sensory or mental capabilities or lack of experience and knowledge may use the appliance only if they have been given supervision or instruction concerning use of the appliance in a safe way and understand the hazards involved. Children shall not play with the appliance. Cleaning and user maintenance shall not be made by children without supervision. WARNING: The accessible parts of the household appliance become very hot during operation. Keep children away.
- Do not use abrasive cleaners or sharp metal scrapers to clean the glass surface of the door, as they can scratch the surface, which may lead to cracking or shattering of the glass.
- The device must be connected to the mains power supply only after it has been properly installed. Before connecting, make sure the device is switched off as described in the instructions.
- Use only the temperature sensor recommended by the manufacturer. Do not use the device without the sensor when connecting the device - WARNING: To avoid electric shock, when replacing the light bulb, make sure the device is disconnected from the mains. Keep the device away from water.
- The electrical connection of the appliance must be carried out using a plug according to the local rules and regulations for electrical safety. The instructions must specify the type of power cord. The temperature of the heated surface of the device must be checked. In case of damage to the power cord, it must be replaced with a special power cord purchased from the manufacturer or its authorized service. ATTENTION: To avoid the danger associated with accidental activation of the device, it must not be connected through external control devices, such as timers or programmers for switching the device on and off. ATTENTION: When using the device, the metal parts may heat up to high temperatures. Do not allow children to approach the device. - Before use, the device must be checked for any damage.
- The surface of the device may heat up during use. Do not allow children to approach the device.
1. GENERAL SAFETY MEASURES
Thank you for choosing one of our products. To get the best results when using the device, please read this manual carefully. We recommend that you keep this manual for installation and operation, and refer to it when needed.
When the device is in operation, some parts become hot. Be careful not to touch these parts.
On the first use of the device, you may notice a slight odor. This is because the insulating elements are heating up for the first time. This is completely normal and there is no reason for concern. Let the device run and finish the process properly. After that, it is ready for normal operation.
The oven's outer surface becomes very hot during operation. Especially the door of the oven.
1.1 Declaration of Conformity
The parts of this device that may come into contact with food comply with the requirements of Directive 89/109.
We declare with full responsibility that this product is in compliance with all European safety, health, and environmental standards.
Before unpacking the device, make sure it has not been damaged in any way. If you have any doubts, do not use it: contact a qualified person. Keep the packaging materials (plastic bags, polystyrene, etc.) out of the reach of children, as they are dangerous for them.
1.2 Safety advice
The device is designed for household use only, i.e., only for preparing food. Any other use of the device, for example, for heating the room, is prohibited.
- The manufacturer is not responsible for damage or injury resulting from improper use of the device. When using the electric device, you must follow the basic rules:
-Do not touch the device with wet hands.
-Do not touch the plug with wet or damp hands or feet.
-Do not use the device if you are barefoot.
- It is recommended to use residual current devices (RCDs) with a rated residual operating current not exceeding 30 mA.
-If the device is damaged or defective, disconnect it from the mains and do not use it.
If the cables are damaged, they must be replaced.
For cable replacement, follow the instructions. Remove the protective cable and replace it with one of type H05RR-F, H05VV-F, or H05V2V2-F. The cable must be able to withstand the electric current required by the device. Cable replacement must be carried out by qualified technicians.
The cable clamp (strain relief) must be 10 mm below the protective cable. Use only approved service centers for repairs; do not use non-original spare parts. If the above instructions are not followed, the manufacturer cannot guarantee the safety of the device.
Do not cover the device's vents with aluminum foil; this may cause overheating or damage to the device.
1.3 Installation
Installation is the responsibility of the client. The manufacturer is not obliged to carry out this activity.
The installation instructions for professionally qualified personnel must be followed. Incorrect installation may cause injury or damage to people, animals, or property. The manufacturer cannot be held responsible for these damages or injuries.
5-Connect the plug.
2.1 Safety system for the device
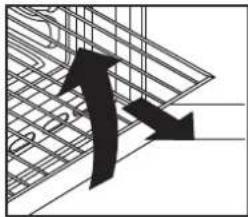
The oven is equipped with a new safety system for the oven. This will allow you to remove the trays during the inspection of the food, without the risk of the trays falling or the food spilling. To remove the trays, pull them out and lift them.
2.2 Grill
The grill allows you to cook food quickly. For best results, we recommend placing the grid on the fourth level, depending on the proportions of the food (see fig. page 7).
Almost all dishes can be prepared on the grill. Exception: very delicate foods and rolls. For cooking meat and fish, before placing them on the grill, add a little oil.
2.3 U-COOK Models
U-COOK ovens have an electronic speed control for the fan, patented as VARIOFAN. During cooking, this system automatically changes the fan speed (multi-function grill), to optimize the air flow and the internal temperature of the food.

Every U-COOK oven has

Hku
This allows for control over the distribution of moisture and temperature. This reduces moisture loss by 50%, which guarantees that the food remains juicy and with better taste. Recommended for cooking bread and pastries.

This reduces the preheating time: just turn it on to reach 200 degrees in 3 minutes.

Allows for setting the desired intensity of cooking on the grill, up to 50% more power compared to a traditional oven.
The new WIDE DOOR hinge allows for a larger opening area, which provides better access and easier cleaning.
2.4 Depending on the model

There is a lighting system that replaces the traditional "bulb". 14 LED lights are integrated into the frame of the door. They provide bright lighting, which allows you to monitor the interior of the oven during cooking.
Advantages:
Use in conjunction with, or as an alternative to, the lighting in the oven, for better visibility compared to traditional lamps and for more efficient energy use.
- Better lighting - LED lighting
Low energy consumption, 95% less energy consumption
LED lamp for oven, Class 1 according to IEC 60825-1:1993 + A1: 1997 + A2: 2001 (equivalent to EN 60825-1:1994 + A1: 2002 + A1: 2001); maximum luminous intensity, measured power λ459nm <150uW.
Do not look directly into the light.
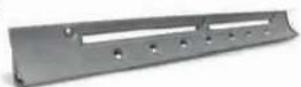
2.5 Cooking time
For the recommended cooking time and temperature, when using the oven, refer to the tables on pages 87, 88. You can then continue with normal use.
2.6 Self-cleaning oven with catalyst
Special self-cleaning ovens have a microporous coating on the walls, which is offered as additional equipment for all models. If they are installed, the oven must not be operated by hand.
The fats that are sprayed on the walls of the oven during cooking are removed from the microporous coating.
The recommended temperature can block the pores and thus prevent self-cleaning. The self-cleaning function can be restored by running the oven at maximum temperature for about 10-20 minutes. Do not use abrasive products, sharp objects, coarse sponges, or chemical products or preparations that could damage the catalyst.
When cooking fatty foods, it is recommended to use higher temperatures and to place a tray to collect the fat.
IMPORTANT: Every catalytic lining at the time of purchase has a working life of about 300 hours. Therefore, they must be replaced after about 300 hours.
2.7 AQUACTIVA function
The Aquactiva function uses steam to help remove fat and food residues from the oven.
1. Pour 300 ml of water into the container for cleaning the hob. 2. Select the Static or Bottom (000) heating function. 3. Set the temperature for the cleaning function. 4. Let the program run for at least 30 minutes. 5. After 30 minutes, turn off the program and allow the hob to cool down. 6. When the hob has cooled, wipe the inner surfaces of the hob with a cloth.
Warning:
Make sure the hob has cooled before touching it. Be careful with the inner surfaces, as there is a risk of burns. Use distilled or demineralized water.
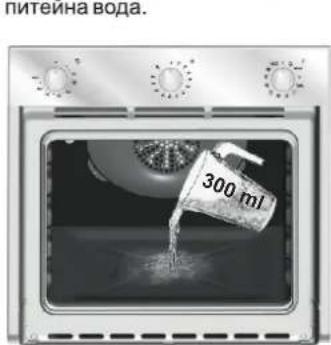
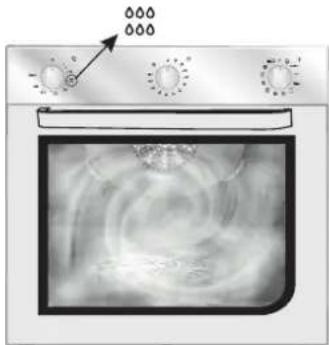
2.8 Cleaning and maintenance
Clean the stainless steel and enameled surfaces with warm soapy water or suitable cleaning products. Never use abrasive powders that could damage the surfaces of the hob. It is very important to clean the hob after each use. Grease stains can stick to the hob surface during cooking. The residue left when the hob is used can cause unpleasant odors and may even slow down cooking. Use warm water and cleaning products; rinse thoroughly.
To make this tedious work easier, all models can be equipped with catalytic self-cleaning panels: they are supplied as accessories (see the section on self-cleaning catalytic panels).
Use special abrasive cleaning products for metal, such as Brillo pads, for stainless steel grills and racks.
Glass surfaces should be cleaned when they are cool. Damage to them is not covered by the warranty. To replace the interior light, disconnect the power and remove the lamp cover. Replace with a halogen lamp that can withstand very high temperatures.
2.9 Service center
Before contacting the Service Centre
If the hob does not work, we recommend:
Check that the hob is properly connected to the power supply.
If the fault cannot be identified:
Disconnect the hob from the electrical mains, do not touch the hob and contact authorized service.
Before calling for service, do not forget to note the serial number on the rating plate (see figure on the last page). The hob is supplied with a warranty certificate, which guarantees that it will be repaired free of charge at the service center.
3. TIMER
3.1 Setting the timer
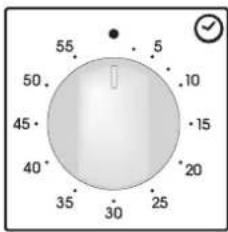
To set the cooking time, turn the knob clockwise to the full extent. Then position the index to the required time. When the time has elapsed, a signal sounds for a few seconds.
3.2 Using the timer for a cooking end
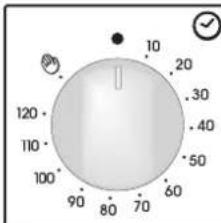
This control allows you to set the desired cooking time (max. 120 min.). The oven switches off automatically at the end of the set time.
The timer counts down the set time to the position 0 and switches off automatically.
For normal use of the oven, set the timer to position 0.
To set the oven, make sure the timer is at position 0.
3.3 Setting the cooking time
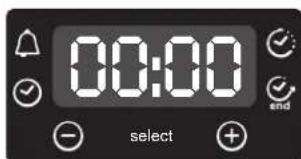
WARNING: The first operation to perform, after the oven has been installed or after a power cut (this is recognized by the flashing of the display), is to set the correct time. This is
achieved as follows:
Press the central button 4 times
Then the time buttons
Release all buttons
WARNING: The oven will only work if the clock is set.
3.4 Setting the electronic programmer
| Функция | Кakда akтуворамe | Кakда Изклочиte | Кakbo пави | За кakbo ce Изнолбуа |
| Зakлочао | •Функцията "Зakлочае" сеakтувора като задържтоpe6byton. Set (+) за Н-малко 5cekyнд. OT тои мочentНотатьк BCИЧКДчгпФункциma ca Зakлочenvи и на дсалпяше залоче за мета STOPи预先варително зааданов Вөрeme Ha npeceкунл.. | •Функцията "Зakлочае" сеdeakтувора като задържтоpe6byton Set (+) за Н-малко 5cekyнд. OT тои мочentНотатьк BCИЧКДчгпФункциmaratда 6bдатибэрannahOTHOBO. | ||
| Таймер | •Hathисete цentраленяБутон 1 пьт•Hathисete 6bytoNl-"+"+"3a за Изберete Вөрeme•OCBOбODEтЕ BCИЧКь 6bytoNl | •Korato 3adadehoto ВөрemeIstute, сеakтувора 3вковСигнан (тази оаларma по српотсамо себсс, обач можевдесспега снэзabavho с chatнсанеha 6bytoN) SELECT.Да српсе Hezabavho c chatнсанеha 6bytoN) SELECT. | •Аларma в края на Вөремeto•По Вөрeme Ha pa6otacceпokazba oct. Вөрeme | •Позьогаяда Изнолбатефурнatable Като щалменичасовник (при Вкючении Изкючении Фурна). |
| Вөрeme 3a rotbehene | •Hathисete цentраленяБутон 2 пьт•Hathисete 6bytoNl-"+"+"3a за Изберeteiprodьлжителноct•OCBOбODEтЕ BCИCHKь 6bytoNl•ИзберeteФункция сыссelenектopa | •При Изчане на Вөремeto Фурнatable поспетerotberetno lo-panho 3abbyptete celenktopа ha 0, по задочete Вөремeto ha 0:00 (SELECTn "- "+"6bytoN) | •Позьогая вда задочete Вөремeto 3a rotbehene 3aИзбалпата рeucenta.3aданошретe octabашото Вөрeme HATSCHTe SELECT 2 n bTu.3a пomerma на задочен�о Вөрeme HATSCHTe SELECT n "- "+"6bytoN. | •Hathисete Няков 6bytoN3aда српсе сигнала.Hathисete цentралня 6bytoN3aда се Вьр havу doчасовниka. |
| Край na rotbehende | •Hathисete цentраленяБутон 3 пьт•Hathисete 6bytoNl-"+"+" , 3a за задочete Вөрето, в көетохлaiteФурнata,да сиэклочи•OCBOбODEтЕ 6bytoNl•ЗадаiteФункцияда 3a rotbehene c celenektopa 3a Избop | •В задочен�о Вөрeme,Фурнatura поспетe pьчнФурнatura поставete celenktopa B no3izuña O. | •Позьогая вда задочене Края на Вөремeto 3a rotbehene.3aданошретeпrelбалпата рeucenta3aДа пomerma Naactpoikitne SELECT + "-"+"+ | •Таи phункция об揪новен ecinл�ьса c phункцият"ТOTBENE".Haprimер, посятente Трябда Бдддпргтеву в полькеимеHa 45 мін'tи и трябда ве о Rotobdo do 12:30 уca, трябда смода Избалпата рeucenta3areldete Вөрето 3a rotbehene do 45 mін'tи и края на Вөрето 3a rotbehene do 12:30 уca.Bрая на Вөрето 3a rotbehene,Фурната поссе Изкючпавоматунho 3вкукова anapma поЗвин.•Тогенemo поссe clammupa aemomamunho 81:45 (12:30 mінус 45 мінуму) u поpondылku do nacheverмпaddamengho zaddadernogo Вөрето за краïн na orombeve,kozamoФурнama поссe узкючпавоматунho.ВнIMAHINE.A края задоче " края на rotbehende Краянчac, rotbehende заддате краянna вдддддддддддддддддддддддддддддддддддддддддддддддддддддддддддддддддддддддддддддддддддддддддддддддддддд徳нага. |
4. Operating instructions
| Селектор нас функции | Настоюкни на temпоратура ( по модали с селекон пoprocamatop TYPE A) | Термocтат селектор | Фуннкции |
| Вълочь осветениeto ha Фурна. Това ще akтураза вотоматчно вен'tилатора за охлajдане (само при модали, конто гимат) | |||
| Размразьане Когато Ибебете тади Фунckции вен'tилатора циркулары вьздуха okоло замраозенныхрана Така щe размразьва за Няковские бezда се пожиму сьстава на пожиму. | |||
| Sprinter | MAX | MAX | Сунр ргп Таши Фунckции прави xphaнatable no-xpynkaba. Харазcopeэпра се 50% no-rolяма мошноct ot стадар'tия ргп. |
| 220 50÷240 | 50÷MAX | Натуална кonsькци Изтолота се дolyен и ровен harpebatelл. Стадар'tha Форma на чужен. Идална за пechене на месо, пechене на Биckвити. Прави xphaнatable вкуна и xpvynкава | |
| 200 50÷230 | 50÷MAX | Г罗тveпе на вен'tилатор Изтолота се дolyen и ровен harpebatelл за endo c bentilatora, конто циркулары вьздуха Бьтpe вььфурна. Р pineportы се за леничуши, рпба и д. Торлота habлina вхрана no- добpe и вретллары за петллары и ровене се habлаях. Можete на пет��тбу ratazлчни храши сьноременho. Този метддаб могото дobpa дострпсьшага на торлината и мірізmite He ce smecbat. Може за OCTавite okolno 10 мін noboveч karato rotвite nobovee ot 1 ястne. | |
| Soft cook | 200 50÷230 | - | Мedo ro'tь'veе (a) Функции за xялб и саджарский мддени. Hamaileнata ckopocst Ha BEHTINATOPа сьддaven Идалених усянья за rotbehetno Ha tosni tupихани, конто trьба за CTANATEN КOHSCCTENZIOДOKATO CE TOBRTI IN B CSUOTO BPEME DA N36BETNATP INPENICHATNPENICHATNo NobbpxhOCCTTA. |
| 160 50÷220 | 50÷MAX | Вен'tилатор и дolyen harpebatel Идална за дениати ястney (пайове, сухлеса) | |
| Level 4 1÷4 | 50÷MAX | Гул Изтолота се само рогия harpebatelл и можete на дострпente Tempepatурата. 5 мін праздар'te пьары се hyжни за загрете дobpe elemen'tite. Идалени за кеба. Бьтпe меса trьба за се дьрхат на достандуп ot ригл. Вөрөтöо о за rotbehende оюн оюн Месоте о по-bvсchio. Можete за слагате черberite меси и рпба на pafta с tabичkatа за мазни OTdOLY. | |
| Super- grill | Level 4 1÷4 | 50÷MAX | Сунр ргп Фуннотаima 2 поцции на ргпл: Grill: 2200 W Grill SUPER: 3000 W |
| 190 180÷200 | 50÷200 | Гулсв вен'tилатор: Изтолота вен'tилатор Тоген harpebatel + вен'tилатор Зрсьногукшары се hyжни за леничу вьздуха вьзфурна. Праздар'te пьар ногунагун e hyжно само за черberы мес. Посадут otherwise Сложete о полу tabичката за мазни, здд осыбеше о полени差别соков. Уberете се ч хранatable се пекално bblizdo до ригл. Посада на rotbehende оььрпесухотаха. | |
| Level 4 1÷4 | 50÷200 | Гул/шuss Изтолота се за пpopуdkуtn prinigotьяни на вьргиз seшш | |
| 220 | 50÷MAX | Пиua Таши Функции осьчypва Идалени у cóльь�а за ястney като пиua и рokedача, чes цркүларпа на ropeш вьздух вьв Бүүп. Осьбөн e похдд�а за rotbehende на мөсо, пecheni Зөнвocловен начин, като Hamaileнte колочьтOTO на необхочимата мазнина.Блардарөнne на Изтолданeto на ргп и Вөн'tилатор,КOMбИнрано c рүлсраш do bilgкөнөне на вьздуха сьлбржанete ньогунагун ол орлд; ньогунагун ол орлд; ньогунагун ол орлд; ньогунагун ол орлд; ньогунагун ол орлд; ньогунагун ол орлд; ньогунагун ол орлд; ньогунагун орлд; ньогунагун орлд; ньогунагун орлд; ньогунагун орлд; ньогунагун орлд; ньогунагун орлд; ньогунагун орлд; ньогунагун орлд; ньогиагун орлд; ньогиагун орлд; ньогиагун орлд; ньогиагун орлд; ньогиагун орлд; ньогиагун орлд; ньогиагун орлд; ньогиагун орлд; ньогиагун oрлд; ньогиагун oрлд; ньогиагун oрлд; ньогиагун oрлд; ньогиагун oрлд; ньогиагун oрлд; ньогиагун oрлд; ньогиагун oрлд; ньогиагун oрлд; | |
| 190 180÷200 | 50÷200 | Функции Делегату? Делегату в�е rol'veда" ви поьогуlaда о rol'veда по озравoclogenен начин, като Hamailente колочьтOTO на необхочимата мазнина.Блардарөнne на Изтолданeto на ргп и Вөн'tилатор,КOMбИнрано c рүлсраш do bilgкөнөне на вьздуха сьлбржанete ньогунагун oл орлд; ньогунагун oрлд; ньогунагун oрлд; ньогунагун oрлд; ньогунагун oрлд; ньогунагун oрлд; ньогунагун oрлд; ньогунагун oрлд; ньогунагун oрлд; ньогу网网网网网网网网网网网网网网网网网网网网网网网网网网网网网网网网网网网网网网网网网网网网网网网网网网网网网网网网网网网网网网网网网网网网网网网网网网网网网网网网网网网网网网网网网网网网网网网网网网网网 Псюбайы в си рсcentи и се вьзпорл�аite ot leknokotata на таши Функции! |
(a) For this model: The VARIOFAN function uses a system developed by Candy to optimize the results of baking. The VARIO FAN system activates itself automatically by varying the fan speed when you select a specific function of the fan within the limited range of the control panel.
Tested in accordance with CENELEC EN 6350-1.
** CENELEC EN 60350-1 testing used to define the energy class.
This product is marked in accordance with European Directive 2012/19/EC on waste electrical and electronic equipment (WEEE). WEEE contains both reusable substances (which can have a negative impact on the environment) and basic components (which can be reused). It is important that WEEE is handled in a specific way to ensure proper disposal and to prevent any negative impact on the environment and human health.
The separate collection of WEEE is important for the environment; it is essential that it is carried out in accordance with the basic principles;
- WEEE must not be treated as household waste.
WEEE must be handed over to the separate collection points managed by the municipality or registered companies. In many countries, WEEE can be handed over to the collection points at home.
When you buy a new device, the old one can be returned to the retailer on a one-for-one basis, as long as the equipment is of the same type and has the same functions as the supplied equipment.
ENERGY SAVING AND PROTECTION OF THE ENVIRONMENT
Where possible, preheat the oven. During the cooking time, open the oven door as little as possible, because every time it is opened, heat is lost. For significant energy savings, turn off the oven 5-10 minutes before the end of the cooking time and use the residual heat that the oven continues to generate. To avoid heat loss, keep the seals clean and in good condition. If you have a time tariff for electricity, use the off-peak tariff to start the cooking at the lower tariff.
Products:
·200g of flour - 200g of potato starch
-1 egg yolk
__SUPPIMER__
1 cup of rice, 50g of Parmesan cheese - 201g
Products:
-1 bulb of garlic, 1 boiled potato
-1 carrot - 200g of Parmesan cheese
Turmeric - 1 cup of milk
Cut the pumpkin, potatoes into cubes and fry for a few minutes, then add them. Add the other vegetables for 5 minutes, stirring constantly. Salt, pepper and turmeric.
When the potatoes are fried, remove them, add them to the other vegetables and pour the milk over them.
Meanwhile, prepare the mixture of rice and Parmesan, adding half of it to the vegetables.
Grease the baking dish, place the vegetables, pour the rest of the rice and Parmesan on top, adding a little turmeric. Bake in the preheated oven at 180°C for 15-20 minutes until golden brown.
Mash the boiled pumpkin. Break the eggs and add the boiled potatoes, mashed pumpkin, milk, Parmesan, turmeric, salt and pepper. Mix all the vegetables together and add the pieces of pumpkin that need to be fried in small portions. Spread the mixture in a tray and bake in the preheated oven at 180°C for 20 minutes.
5. Table of preparation times
CbBET:HamaneTe Temnepaypata 3a da n36eHete n3cbxbaheTo nBTBbpraBaHETo Ha NOBbpxHOCTTa Ha XpaHata.
POnuHa paTa
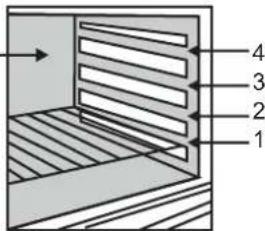
| Стаочна[elektroчесka]Фурна | Фурна c BEHTUNATOP | Белеки: | ||||||
| Храна | Колочь�о | НИВО | Вразе В минутni | Фурна Temпер aтура | Рафт | Вразе В минутni | Фурна Temпер aтура | |
| •Паста | ||||||||
| Лазаня | Kg 3,5 | 2 | 70+75 | 220 | 2 | 60+65 | 200 | Поставete Лазаня в незатолена Фурна |
| Канецони | Kg 1,8 | 2 | 50+60 | 220 | 2 | 40+50 | 200 | Поставete в незатолена Фурна |
| Пасва на Фурна | Kg 2,5 | 2 | 55+60 | 220 | 2 | 45+50 | 200 | Пostавete в незатолена Фурна |
| •Пechene | ||||||||
| Хлб | Kg 1 di pasta | 2 | 35 10 (заггелян) | 200 | 2 | 30+35 10 (заггелян) | 180 | Офорmete ТECTOTO на руло и Нарравete Кръст с похь в горна за му част, осtabete ТECTOTO на BTACA за поно 2 ча. Намашиете сьда за пechene и поставete ТECTOTO в среда. |
| Пица | Kg 1 | 1 | 25+35 | 190 | 1 | 25+35 | 190 | Заталente Фурна за 15 минут ni поставete писота на Намашиета таба за пechene. Украсят e с домати, мочарева, уунка, масло, сол |
| Замразени садду | n° 24 | 1 | 30+35 | 220 | 2 | 25+30 | 200 | Поставete 24 voi au OTвори ВьВ фурна и пechete. |
| Фокача (n° 4) | gr. 200 | 2 | 25+30 | 200 | 2 | 20+25 | 180 | Заталente Фурна за 15 мин, сюжete мазниота в tabата. |
| •Meco | ||||||||
| Всучке мера могат да се пескат в пинтой пил дыбоки тави за пechene. Пробьчително e за се пори�ат пинтой тави, за да се пошеге рашлески autoTo на сtrално на phурна с мазнии. Вразимата за пechene се edини сьши незавсано дду месот e бию пokр'tо пил не. Говекdo | Kg 1 | 3 | 70+80 | 220 | 3 | 50+60 | 200 | Сюжete месото в дыбок scьд ругх и поставete сьс сол и черен пинер; Оьsprете на поobинatable в реме |
| Оьзковские | Kg 1 | 2 | 100+110 | 220 | 2 | 80+90 | 200 | Говетe месото в поковitsсьд ругх с бліки, польвки, масло |
| Оьзковские Телешко | Kg 1,3 | 1 | 90+110 | 220 | 2 | 90+100 | 200 | Говетe, както e поочень no-rope |
| Фиile ot Телешко | Kg 1 | 2 | 80+90 | 220 | 2 | 80+90 | 200 | Говетe, както e поочень no-rope |
5.Ta6JnCn C BpeMeHa 3a rotBeHe
| Стаоча сеньатческа Фурна | Фурна в Велиниatingor | ||||||||
| Храиа | Колочьо | Нимо | Вре'meВ минутп | Фурнathemпература | Рафт | Вре'meВ минутп | Фурнахуtemпература | Белекки: | |
| • 3айции и плици | |||||||||
| Токачka | Kg 1-1,3 | 2 | 60 + 80 | 220 | 2 | 60 + 70 | 200 | Поставе токачки в дылбога Ругх Илікі керампій с много малко масло | |
| Пиле | Kg 1,5-1,7 | 2 | 110 + 120 | 220 | 2 | 100 + 110 | 200 | Спдайей поочурatable за в гове на Токачka. | |
| Заек | Kg 1-1,2 | 2 | 55 + 65 | 220 | 2 | 50 + 60 | 200 | Поставе всякі парета от edinі и сьі пазмір в осыкінега таб.Овьрөгүүүлүлүлүлүлүлүлүлүлүлүлүлүлүлүлүлүлүлүлүлүлүлүлүлүлүлүлүлүлүлүлүлүлүлүлүлүлүлүлүлүлүлүлүлүлүлүлүлүлүлүlэп. | |
| • TopTi | |||||||||
| Кokocobata topta | 1 | 55 | 180 | 1 | 50 | 160 | Иллллайе КУТИ, КОТTO E 22 CM dылбога.Прedingуглелно заграве за 10 мін'tул. | ||
| пандшпан | 1 | 55 | 175 | 1 | 40 + 45 | 160 | Иллллайе КУТИ, КОТTO E 22 CM dылбога.Прedingуглелно заграве за 10 мін'tул. | ||
| Морковера topta | 1 | 65 | 180 | 1 | 50 + 60 | 160 | Иллллайе КУТИ, KОТTO E 22 CM dылбога.Прedingуглелно заграве за 10 мін'tул. | ||
| Пай кайся | 700 gr | 1 | 40 | 200 | 2 | 30 + 35 | 180 | Иллллайе КУТИ, KОТTO E 22 CM dылбога.Прedingуглелно заграве за 10 мін'tул. | |
| • 3еленчуи | |||||||||
| Кольр | 800 gr | 1 | 70 + 80 | 220 | 1 | 60 + 70 | 200 | Hаржete котьра на парета, дбаре масло, соли karртофи,acoюе необхдимо, и поставе с лішие натуре. Покрипешь сьда. | |
| Тиквункі | 800 gr | 1 | 70 | 220 | 1 | 60 + 70 | 200 | Hаржete 퉕щькінгite, поставе в чінney Ругг и поставе масло на сол. | |
| Картофи | 800 gr | 2 | 60 + 65 | 220 | 2 | 60 + 65 | 200 | Hаржete karртофпіе на діve равиі пасгг.Чад�піngлггс. Чад�піngлггс. Поклары сьс сол, origano и розмірп. Гове в масло. | |
| Морковeri | 800 gr | 1 | 80 + 85 | 220 | 1 | 70 + 80 | 200 | Hаржete морковITE, поставе в чінney Ругг. | |
| • Плodовe | |||||||||
| Ясылі龟елi | Kg 1 | 1 | 45 + 55 | 220 | 2 | 45 + 55 | 200 | Пechete плodове в Edna otвorenoу Ругг Chinas. Ostаве сда и состinue в bьфунatable. | |
| Круши | Kg 1 | 1 | 45 + 55 | 220 | 2 | 45 + 55 | 200 | Спдайей поочурatable за по-ого. | |
| Пpacokoboi | Kg 1 | 1 | 45 + 55 | 220 | 2 | 45 + 55 | 200 | Спдайей поочурatable за по-ого. | |
| • Грип | |||||||||
| Поставе xparanata da sbYE na scapara podu nihpaupeveren griln. Поставе tabata pod scapara za sbciparate na scbiparate na scokobie mazhnihi ot xpranata. | |||||||||
| Поставе tabata pod scapara pod scapara na scbiparate na scbiparate na scokobie mazhnihi ot xpranata. | |||||||||
| Парочахлбза тостер | 4 napчета | 4 | 5(5 загрваима на grпILA) | Grill | 4 | 5(10 загрваима на grпILA) | Grill | Пostаве xлб на scakа. Korato edнатастара на xлб e песена, obьрөгүүүлүлүлүлүлүлүлүлүлүлүлүлүлүлүлүлүлүлүлүлүлүлүлүлүлүлүлүлүлүлүлүлүлүлүлүлүлүлүлүлүлүлүлүлүлүлүlэ. Сандυнч | Поставе xлб на scakа. Korato edнатастара на салдунч e песена, obьрөгүүүлүлүлүлүлүлүлүлүлүлүлүлүлүлүлүлүлүлүлүлүлүлүлүлүлүлүлүлүлүлүлүлүлүлүлүлүлүлүлүлүлүлүлүlэ. Сандυнч Сандυнч Сандυнч Сандυнч Сандυнч Сандυнч Сандυнч Сандυнч Сандυнч Сандυнч Сандυнч Сандυнч Сандυнч Санdυнч Санdυнч Санdυнч Санdυнч Санdυнч Санdυнч Санdυнч Санdυнч Санdυнч Санdυнч Санdυнч Санdυнч Санdυнч |
| Сандвунч | 4 | 3 | 10(10 загрваима на grпILA) | Grill | 3 | 5/8(10 загрваима на grпILA) | Grill | Пostаве xлб на scakа. Korato edнатастара на салдунч e песена, obьрөгүүүлүлүлүлүлүлүлүлүлүлүлүлүлүлүлүлүлүлүлүлүлүлүлүлүлүлүлүлүлүлүлүlэ. Сандουнч Сандουнч Сандουнч Сандουнч Сандουнч Сандουнч Сандουнч Сандουнч Сандουнч Сандουнч Сандουнч Сандουнч Сандουнч Санdουнч Санdουнч Санdουнч Санdουнч Санdουнч Санdουнч Санdουнч Санdουнч Санdουнч Санdουнч Санdουнч Санdουнч Санdουнч | |
| Рсба | |||||||||
| пьстьga | 3 celeni пьпья 2 kr | 2 | 40 + 45 | 220 | 2 | 35 + 40 | 200 | Покriпente рьстьga сьс сол, масло пькіи варete в чінney Ругг. | |
| сьомbra | 700 g 2,5 cm napчe | 2 | 30 + 35 | 220 | 2 | 30 + 25 | 200 | Тговerte сьмога в OTворен сьд Ругг сьс сол, черен піпэрпі масло. | |
| морсki рзьk | 1 kr | 2 | 40 + 45 | 220 | 2 | 35 + 40 | 200 | Тговerte edinichtvo сьс сол и.edina сунега пьжица масло. | |
| Цпypа | 2 celeni | 2 | 40 + 45 | 220 | 2 | 35 + 40 | 200 | Тговerte с масло и сол в поргигс范围内. | |
| INSTALLAZIONE | IT |
| INSTALLATION | GB |
| INSTALACION | ES |
| INSTALLLA ETI | NL |
| INSTALLATION | DE |
| VGRADNJA | SI |
| INSTALLATION | FR |
| INSTALAÇÃO | PT |
| YCTAHOBKA | RU |
| INSTALACJA | PL |
| INSTALACE | CZ |
| MOHTAXE |
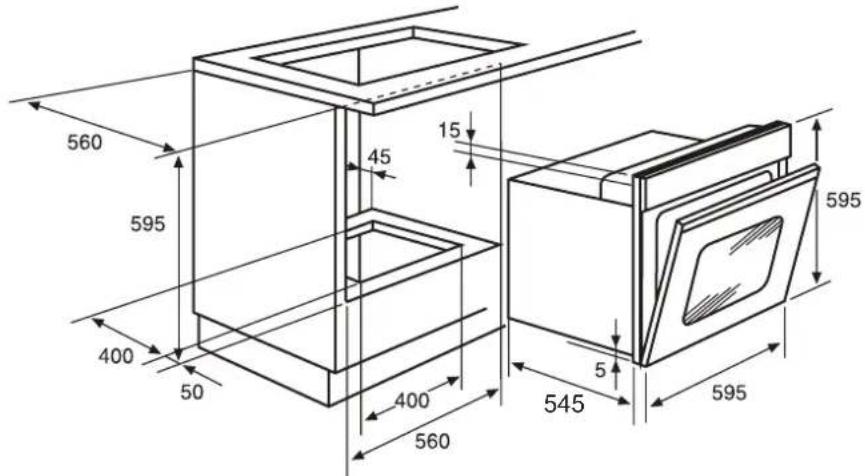
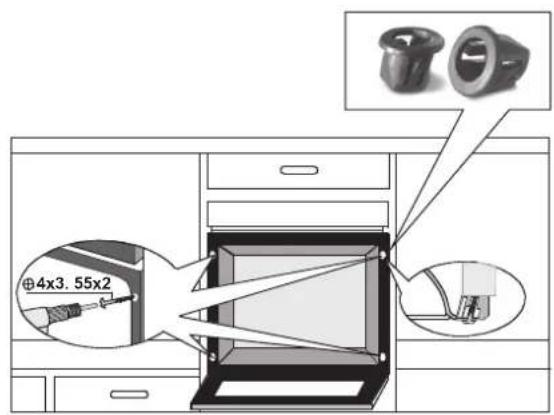
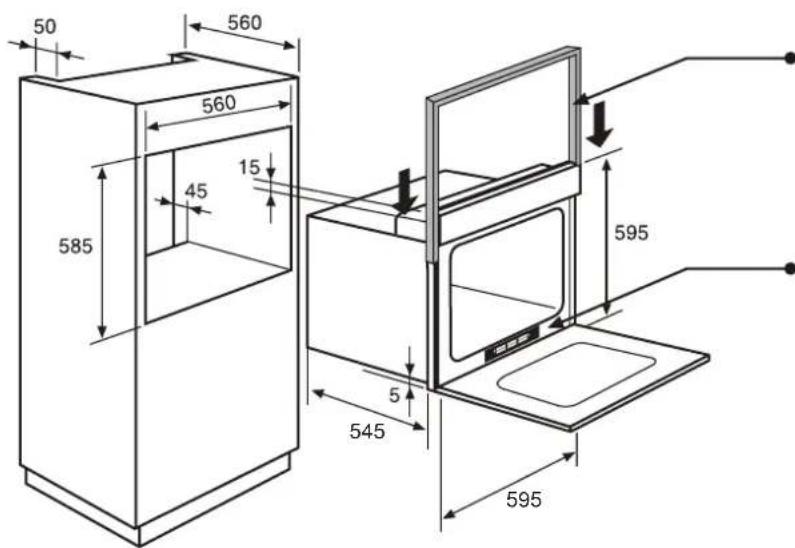
Protection trim (supplied with the oven when necessary) 3auntho ynnbTHHeHne (doctabre ce c cypaHaTa aKe e Heo6xOIMO)
IT Targhetto matricola GB Rating plate ES Tarjeta matricula NL Typeplaatje DE Typenschild FR Plaque signalitique PT Plata de caracteristicas PL Tabliczka znamionowa RU MapknpoBouHra TaBnUyka CZ Typov'sitek SI Tablica podatki BγYka3aTeHa Ta6eNa

IT
The manufacturer will not be responsible for any inaccuracy resulting from printing or transcript errors contained in this brochure. We reserve the right to carry out modifications to products as required, including the interests of consumption, without prejudice to the characteristics relating to safety or function.
ES
The manufacturer will not be responsible for any inaccuracy resulting from printing or transcript errors contained in this brochure. We reserve the right to carry out modifications to products as required, including the interests of consumption, without prejudice to the characteristics relating to safety or function.
BΓ
PpOIN3BOIDNTeJI He HOCN OTROBOPHOCT 3a HEToOHcTN I rpeKNI Bb3HnKHaII npi neaTa HA Ta3n INCtpyKUJI. PpOIN3BOIDNTeJI CN 3aNa3Ba IpaBoTO DA BHece N3MeHENB CBOITe pOdyKTNI, KOITo CMrTA 3a NoE3HNI, Be3 TOBA da e B yuBpbHa xapaKTePncTiknte Cbbp3AHn Cbc nIpyHocCTTa INN OCHOBHTe FyHKUHn Ha ypeDA .
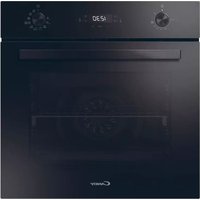
- ENERGY SAVING AND RESPECTING THE ENVIRONMENT
- GENERAL WARNINGS
- DECLARATION OF COMPLIANCE
- SAFETY HINTS
- INSTALLATION
- FITTING THE OVEN INTO THE KITCHEN UNIT
- IMPORTANT
- CONNECTING TO THE POWER SUPPLY
- OVEN EQUIPMENT (ACCORDING TO THE MODEL)
- THE TRAY HOLDER
- REMOVING AND CLEANING WIRE RACKS
- SHELF SAFETY SYSTEM
- GRILLING
- THE U·COOK MODELS
- ACCORDING TO THE MODEL
- U·SEE
- ADVANTAGES
- SELF-CLEANING OVEN WITH CATALYTIC
- AQUACTIVA FUNCTION
- WARNING
- CLEANING AND MAINTENANCE
- SERVICE CENTRE
- TIMER
- USING THE MINUTE TIMER
- USING THE END OF COOKING TIMER
- SETTING THE CORRECT TIME
- USE OF TOUCH CONTROL CLOCK PROGRAMMER
- OPERATING INSTRUCTIONS
- VEGETABLE MUFFINS
- INGREDIENTS
- THE OVERALL SUGGESTED COOKING TIMES SET OUT BELOW ARE INTENDED AS A ROUGH GUIDE ONLY. THEY MAY IN FACT VARY ACCORDING TO THE QUALITY, THE FRESHNESS, THE SIZE, AND THE THICKNESS OF THE FOOD COOKED, AND OF COURSE COOKING TIME IS ALSO PARTLY A MATTER OF TASTE. LET THE FOOD STAND FOR A FEW MINUTES BEFORE SERVING BECAUSE THE INGREDIENTS CONTINUE COOKING AFTER THEY HAVE BEEN REMOVED FROM THE OVEN
- INSTALLING THE OVEN IN ITS FURNITURE
- MULTI-COOK
- SOPP
- SPRINTER
- SUPERGRILL
- REPLACING THE LAMP U·S∈E
- CATALYTIC SELF-CLEANING OVEN
- CARE AND CLEANING
- GLASS PARTS
- AFTER-SALES SERVICE
- USING THE TIMER
- USING THE END OF COOKING TIME TIMER
- SETTING THE EXACT TIME
- DEFINITIONS
- VARIATIONS
- COOKING RECOMMENDATIONS
- BAKING CONFECTIONERY
- SAFETY TECHNIQUE
- GENERAL SAFETY MEASURES
- DECLARATION OF CONFORMITY
- SAFETY ADVICE
- SAFETY SYSTEM FOR THE DEVICE
- GRILL
- U-COOK MODELS
- DEPENDING ON THE MODEL
- COOKING TIME
- SELF-CLEANING OVEN WITH CATALYST
- SERVICE CENTER
- SETTING THE TIMER
- USING THE TIMER FOR A COOKING END
- SETTING THE COOKING TIME
- ENERGY SAVING AND PROTECTION OF THE ENVIRONMENT
- PRODUCTS
- TABLE OF PREPARATION TIMES
- IT
- ES
- BΓ
Brand : CANDY
Model : FCS 65 X
Category : Built-in oven