
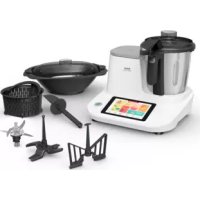
Fast & Delicious CY505 - Kitchen appliance TEFAL - Free user manual and instructions
Find the device manual for free Fast & Delicious CY505 TEFAL in PDF.
| Product type | Electric pressure cooker |
| Brand / Model | Tefal Fast & Delicious CY505 |
| Total capacity | 5.8 L |
| Useful capacity | 3.8 L |
| Power supply | Mains (230 V ~ 50 Hz) |
| Power | Approximately 1100 W (estimated) |
| Operating pressure | Low 20 kPa (104.5°C), Medium 38 kPa (108.5°C), High 60 kPa (112.5°C) |
| Maximum safety pressure | 130 kPa |
| Cooking programs | 25 types including Rice, Porridge, Stew/Soup, Steam, Browning, Braising, Slow cooking, Reheating, Pressure cooking (3 levels), Baby food, Baking, Custom |
| Special functions | Automatic keep warm, Delayed start (2-24 h) |
| Lid type | Metal lid with removable sealing ring, safety lock |
| Safety | Safety valve, pressure relief valve, anti-open under pressure lock, overpressure safety |
| Cooking bowl | Removable with non-stick coating (do not cut inside) |
| Included accessories | Steamer basket, tripod, spatula, measuring cup, condensation collector accessory |
| Cleaning | Bowl and accessories dishwasher safe (bowl except?). Do not immerse the appliance. Clean seal and valves regularly |
| Spare parts | Sealing ring (ref. 22CM CYSB50YC8), valves, cooking bowl, lid |
| Seal lifespan | Recommended replacement every 2 years |
| Usage | Household use only, not for sterilization or frying |
| Dimensions (approx.) | Height ~30 cm, diameter ~30 cm (estimated) |
| Weight (approx.) | Approximately 5 kg (estimated) |
| Warranty | Manufacturer standard (not specified) |
Frequently Asked Questions - Fast & Delicious CY505 TEFAL
User questions about Fast & Delicious CY505 TEFAL
0 question about this device. Answer the ones you know or ask your own.
Ask a new question about this device
Download the instructions for your Kitchen appliance in PDF format for free! Find your manual Fast & Delicious CY505 - TEFAL and take your electronic device back in hand. On this page are published all the documents necessary for the use of your device. Fast & Delicious CY505 by TEFAL.
USER MANUAL Fast & Delicious CY505 TEFAL
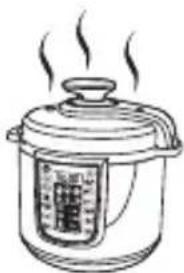
Fast & Delicious Multicooker
www.tefal.com
1
natural_image
Simple line drawing of an open box, a rice cooker with a lid, and a cord with plug (no text or symbols)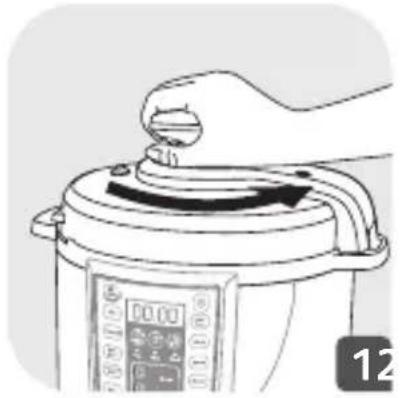
natural_image
Illustration of a hand pressing down on a rice cooker with a control panel (no text or symbols visible)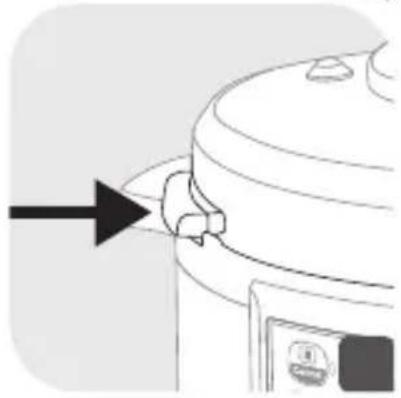
natural_image
Diagram of a container with a directional arrow pointing to its side (no text or symbols present)
natural_image
Diagram of a kitchen appliance with a lid and arrow indicating rotation (no text or symbols)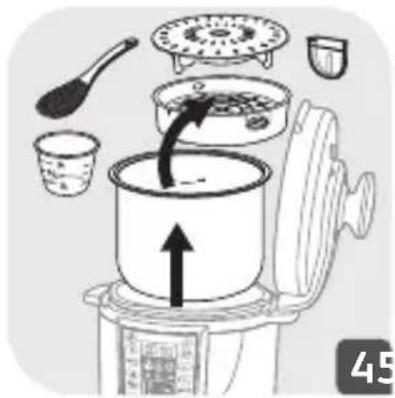
natural_image
Diagram of cooking process with a pot, stove, and cup, showing a crossed-out baking pan (no text or symbols)2
natural_image
Line drawing of a steaming rice cooker with lid and side panel (no text or symbols)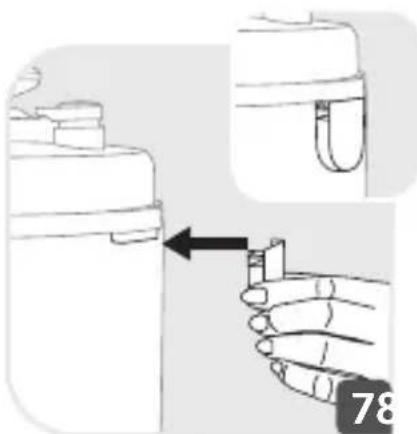
natural_image
Illustration of a hand inserting a small object into a container, with an arrow indicating the process (no text or symbols present)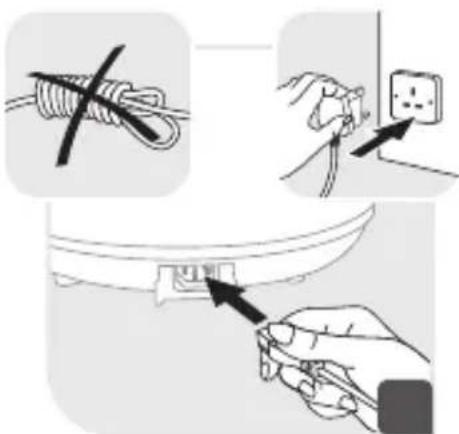

natural_image
Illustration of a cooking step with a bowl, egg drop, and eye symbol (no text or labels)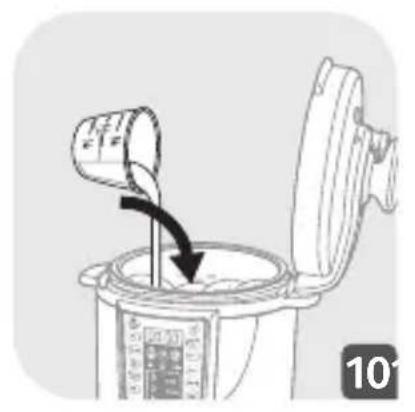
natural_image
Illustration of a cooking step showing pouring liquid from a container into a pot (no text or symbols)
natural_image
Simple line drawing of a container with an X-shaped mark and internal oval shapes, no text or symbols present.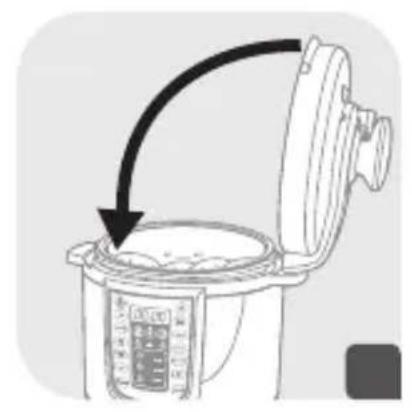
natural_image
Diagram of a food reactor with an arrow indicating a process or transformation (no text or symbols present)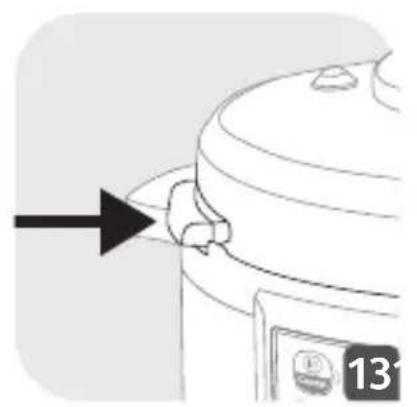
natural_image
Diagram of a mechanical component with an arrow pointing to a cylindrical feature (no text or symbols)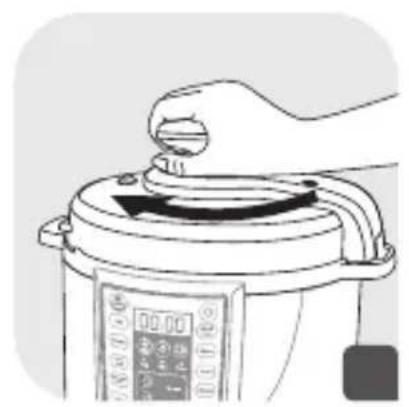
natural_image
Illustration of a hand pressing down on a digital kitchen appliance with a rotary knob (no text or symbols visible)


natural_image
Line drawing of a cooking pot with a hand holding a tool above it, showing steam rising from a bowl (no text or symbols)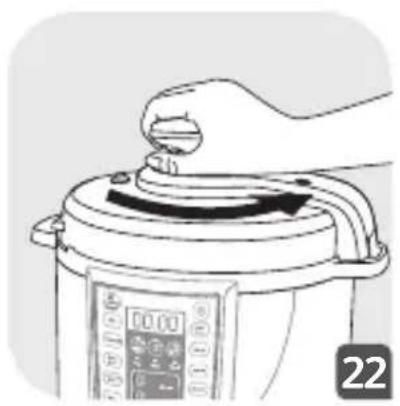
natural_image
Illustration of a hand pressing down on a rice cooker with a digital display (no text or symbols)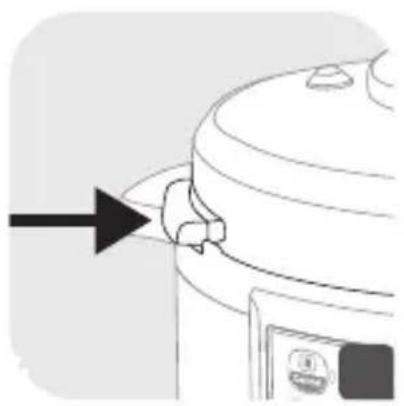
natural_image
Diagram of a kitchen appliance with a handle and arrow pointing to the interior (no text or symbols)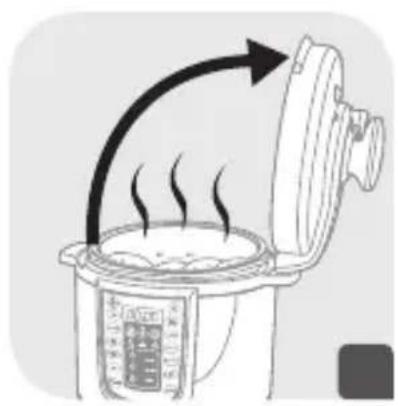
natural_image
Illustration of a cooking pot with steam rising from the lid, showing heat transfer (no text or symbols)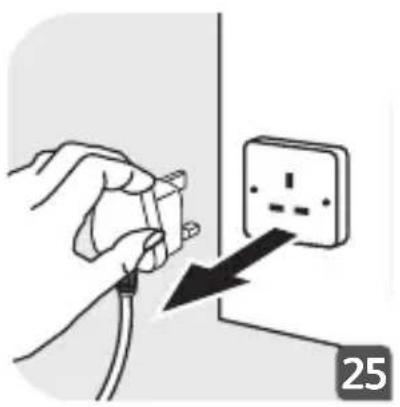
natural_image
Illustration of a hand inserting a plug into an electrical outlet with a black arrow indicating the process (no text or symbols)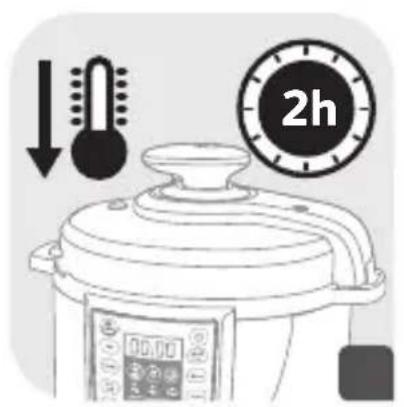
natural_image
Illustration of a mechanical device with a black X mark on its side, placed on a grid-patterned surface (no text or symbols)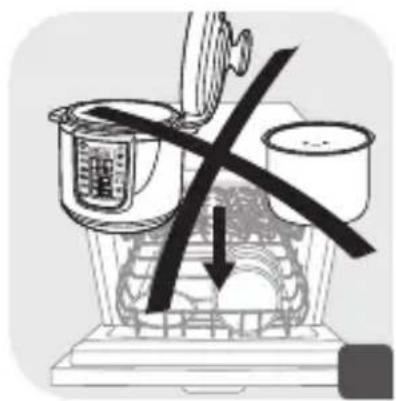
natural_image
Diagram of a cooking setup with a pot, stove, and stand (no text or symbols)
natural_image
Line drawing of a faucet inside a tiled room with a bucket (no text or symbols)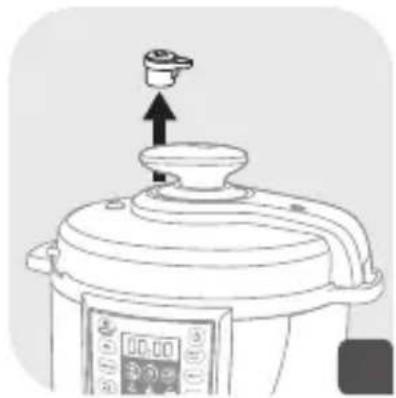
natural_image
Line drawing of a cooking pot with a digital display showing temperature reading (no text or symbols)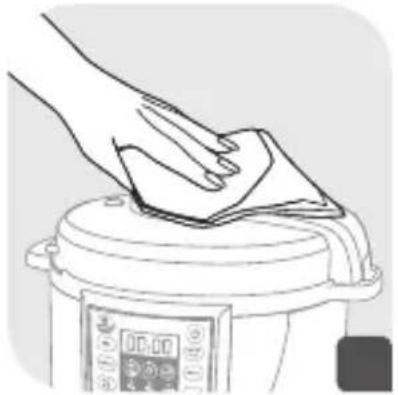
natural_image
Line drawing of a hand cleaning a rice cooker with a cloth (no text or symbols)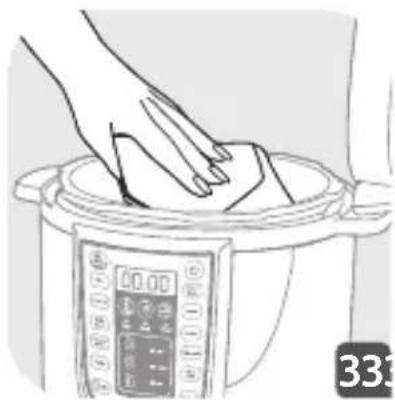
natural_image
Illustration of a hand cleaning a rice cooker with a digital kitchen control (no text or symbols)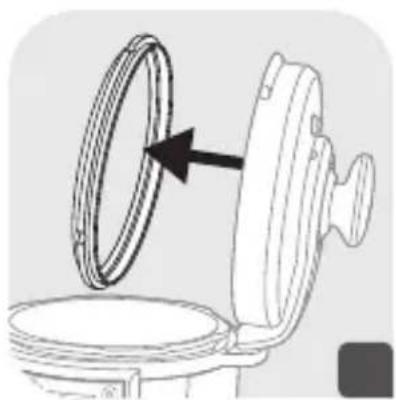
natural_image
Diagram of a mechanical device with a circular component and an arrow indicating rotation (no text or symbols)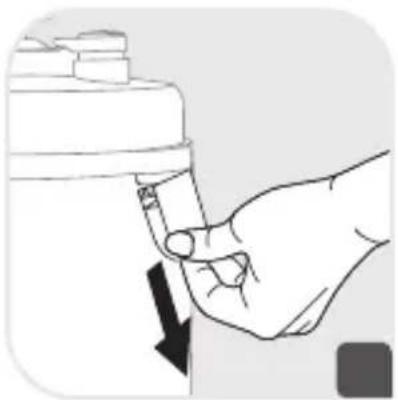
natural_image
Hand holding a small object with a black arrow pointing downward (no text or symbols visible)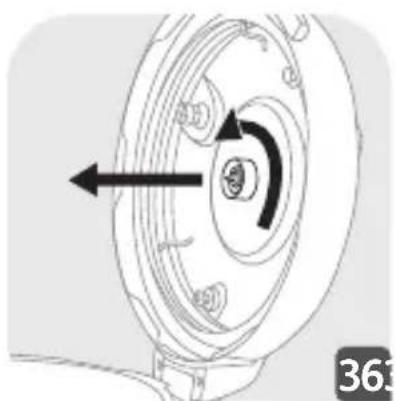
natural_image
Technical line drawing of a mechanical component with directional arrows indicating motion (no text or symbols)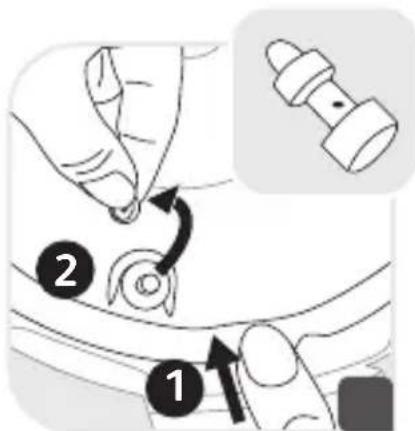
natural_image
Simple line drawing of a ring and a pencil icon (no text or symbols)INSTRUCTIONS DE SÉCURITÉ
FR
Sypet of venoshindled control lampjes
Verhogen toets
Redlagekeyoets
Temperature key
22:05


Timer toets
Menu toets
Drukniveau-controlelampjes
Take the time to read all the following instructions carefully.
- Indoor use only.
- For cleaning your appliance, please refer instructions for use. Clean the body of the appliance using a damp cloth.
- Do not immerse the appliance in water.
- Improper use of the appliance and its accessories may damage the appliance and cause injury.
- Do not touch hot parts of the appliance. After use, heating element surface is subject to residual heat after use.
- For your safety, this product conforms to all applicable standards and regulations (Low Voltage Directive, Electromagnetic Compatibility, Food Compliant Materials, Environment, ...).
- This appliance is not intended for use by persons (including children) with reduced physical, sensory or mental capabilities, or lack of experience and knowledge, unless they have been given supervision or instruction concerning use of the appliance by a person responsible for their safety.
Children should be supervised to ensure that they do not play with the appliance. - If the supply cord is damaged, it must be replaced by the manufacturer, its service agent or similar qualified persons in order to avoid a hazard. Do not replace the power cord supplied with other cords.
- This appliance is intended for domestic household use only.
It is not intended to be used in the following applications, and the guarantee will not apply for:
- staff kitchen areas in shops, offices and other working environments;
- farm houses;
- by clients in hotels, motels and other residential type environments;
- bed and breakfast type environments.
- This appliance shall not be used by children. Keep the appliance and its cord out of reach of children.
- Appliances can be used by persons with reduced physical, sensory or mental capabilities or lack of experience and knowledge if they have been given supervision or instruction concerning use of the appliance in a safe way and if they understand the hazards involved.
• Children shall not play with the appliance.
- Do not fill your appliance more than the MAX mark on the pot. Do not fill it more than half full for food that expands during cooking, such as rice, dehydrated vegetables.
Reduce the volume of water to avoid the risk of boiling over.
- Please follow the recommendations on the volume of food and water to avoid the risk of boiling over which can damage your appliance and cause injury.
- Before using your appliance, check that the safety valve and the pressure limit valve are clean (see section Cleaning and maintenance).
- Do not place any foreign objects in the pressure relief system. Do not replace the valve.
- When you open the lid, always hold it by the lid handle. Position your arms in alignment with the side carrying handles. Boiling water could remain trapped between the gasket support and the lid and could cause burns.
- Be careful also about the risk of burning from the steam coming out of the appliance when you open the lid. First open the lid very slightly to allow the steam to escape gently.
-
Never force the appliance open. Make sure that the inside pressure has returned to normal. Do not open the lid when the product is under pressure. To do so, see the Instructions for use.
-
Use only the appropriate spare parts for your model. This is particularly important for the sealing gasket, the cooking pot and the metal lid.
- Do not damage the sealing gasket. If it is damaged, have it replaced in an Approved Service Centre.
- The heat source necessary for cooking is included in the appliance.
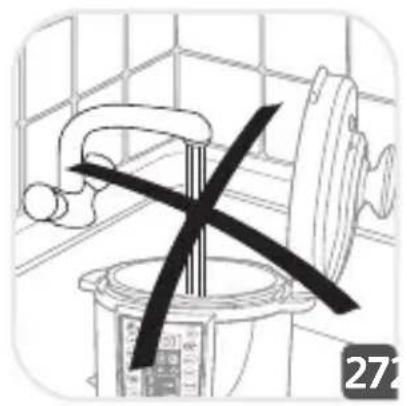
- Do not place the appliance in a heated oven or on a hot hob. Do not place the appliance close to an open flame or a flammable object.
- Do not heat the cooking pot with any other heat source than the heating plate of the appliance and do not use any other pot. Do not use the cooking pot with other appliances.
- Do not move the appliance when it is under pressure. Do not touch the hot surfaces. Use the carrying handles when moving it and wear oven gloves, if necessary. Do not use the lid handle to lift the appliance.
- Do not use appliance for other than the intended purpose.
- This appliance is not a steriliser. Do not use it to sterilise jars.
- The appliance cooks food under pressure. Incorrect use may cause risks of burns due to steam.
- Make sure that the appliance is properly closed before bringing it up to pressure (see Instructions for use).
- Do not use the appliance empty, without its pot or without liquid inside the pot. This could cause serious damage to the appliance.
-
After cooking meat which has an outer layer of skin (such as ox tongue), which could swell due to the effects of pressure, do not pierce the skin after cooking if it appears swollen: you could get burnt. Pierce it before cooking.
-
When cooking food with a thick texture (chick peas, rhubarb, compotes, etc.), shake the appliance slightly before opening it to ensure that the food or cooking juices do not spurt out.
- Do not use the appliance to deep-fry food in oil. Only browning is allowed.
- In browning mode, be careful of risks of burns caused by spattering when you add food or ingredients into the hot pot.
- During cooking and steam release at the end of cooking, the appliance releases heat and steam. Keep your face and hands away from the appliance to avoid scalding. Do not touch the lid during cooking.
- Do not use a cloth or anything else between the lid and the housing to leave the lid ajar. This can permanently damage the gasket.
- Do not touch the safety devices, except while cleaning and maintaining the appliance in accordance with the instructions given.
- Make sure that the bottom of the cooking pot and the heating element are always clean. Make sure that the central part of the heating plate is mobile.
- Do not fill up your appliance without its cooking pot.
- Use a plastic or wooden spoon to prevent any damage to the non-stick coating of the pot. Do not cut food directly in the cooking pot.
- If a great deal of steam is released from the rim of the lid, unplug the power cord at once and check whether the appliance is clean. If necessary, send the appliance to an Approved Service Centre for repair.
- Always use the two side handles on the housing of the appliance. Wear oven gloves if the appliance is hot. For more safety, make sure that the lid is locked before transporting the appliance.
- If pressure is released continuously through the valve of the appliance (for more than 1 minute) while pressure cooking, send the appliance to an approved service center for repair.
- Do not use a damaged appliance. Take it to your approved service centre.
SAVE THESE INSTRUCTIONS CAREFULLY.
- Use only spare parts sold in an approved service centre.
- The warranty does not cover the abnormal wear and tear of the cooking pot.
- Read these instructions for use carefully before using your appliance for the first time. Any use which does not conform to these instructions will absolve the manufacturer from any liability and void the warranty.
- In accordance with current regulations, before disposing of an appliance no longer needed, the appliance must be rendered inoperative (by unplugging it and cutting off the supply cord).

Environment protection first!
① Your appliance contains valuable materials which can be recovered or recycled.
Leave it at a local civic waste collection point.


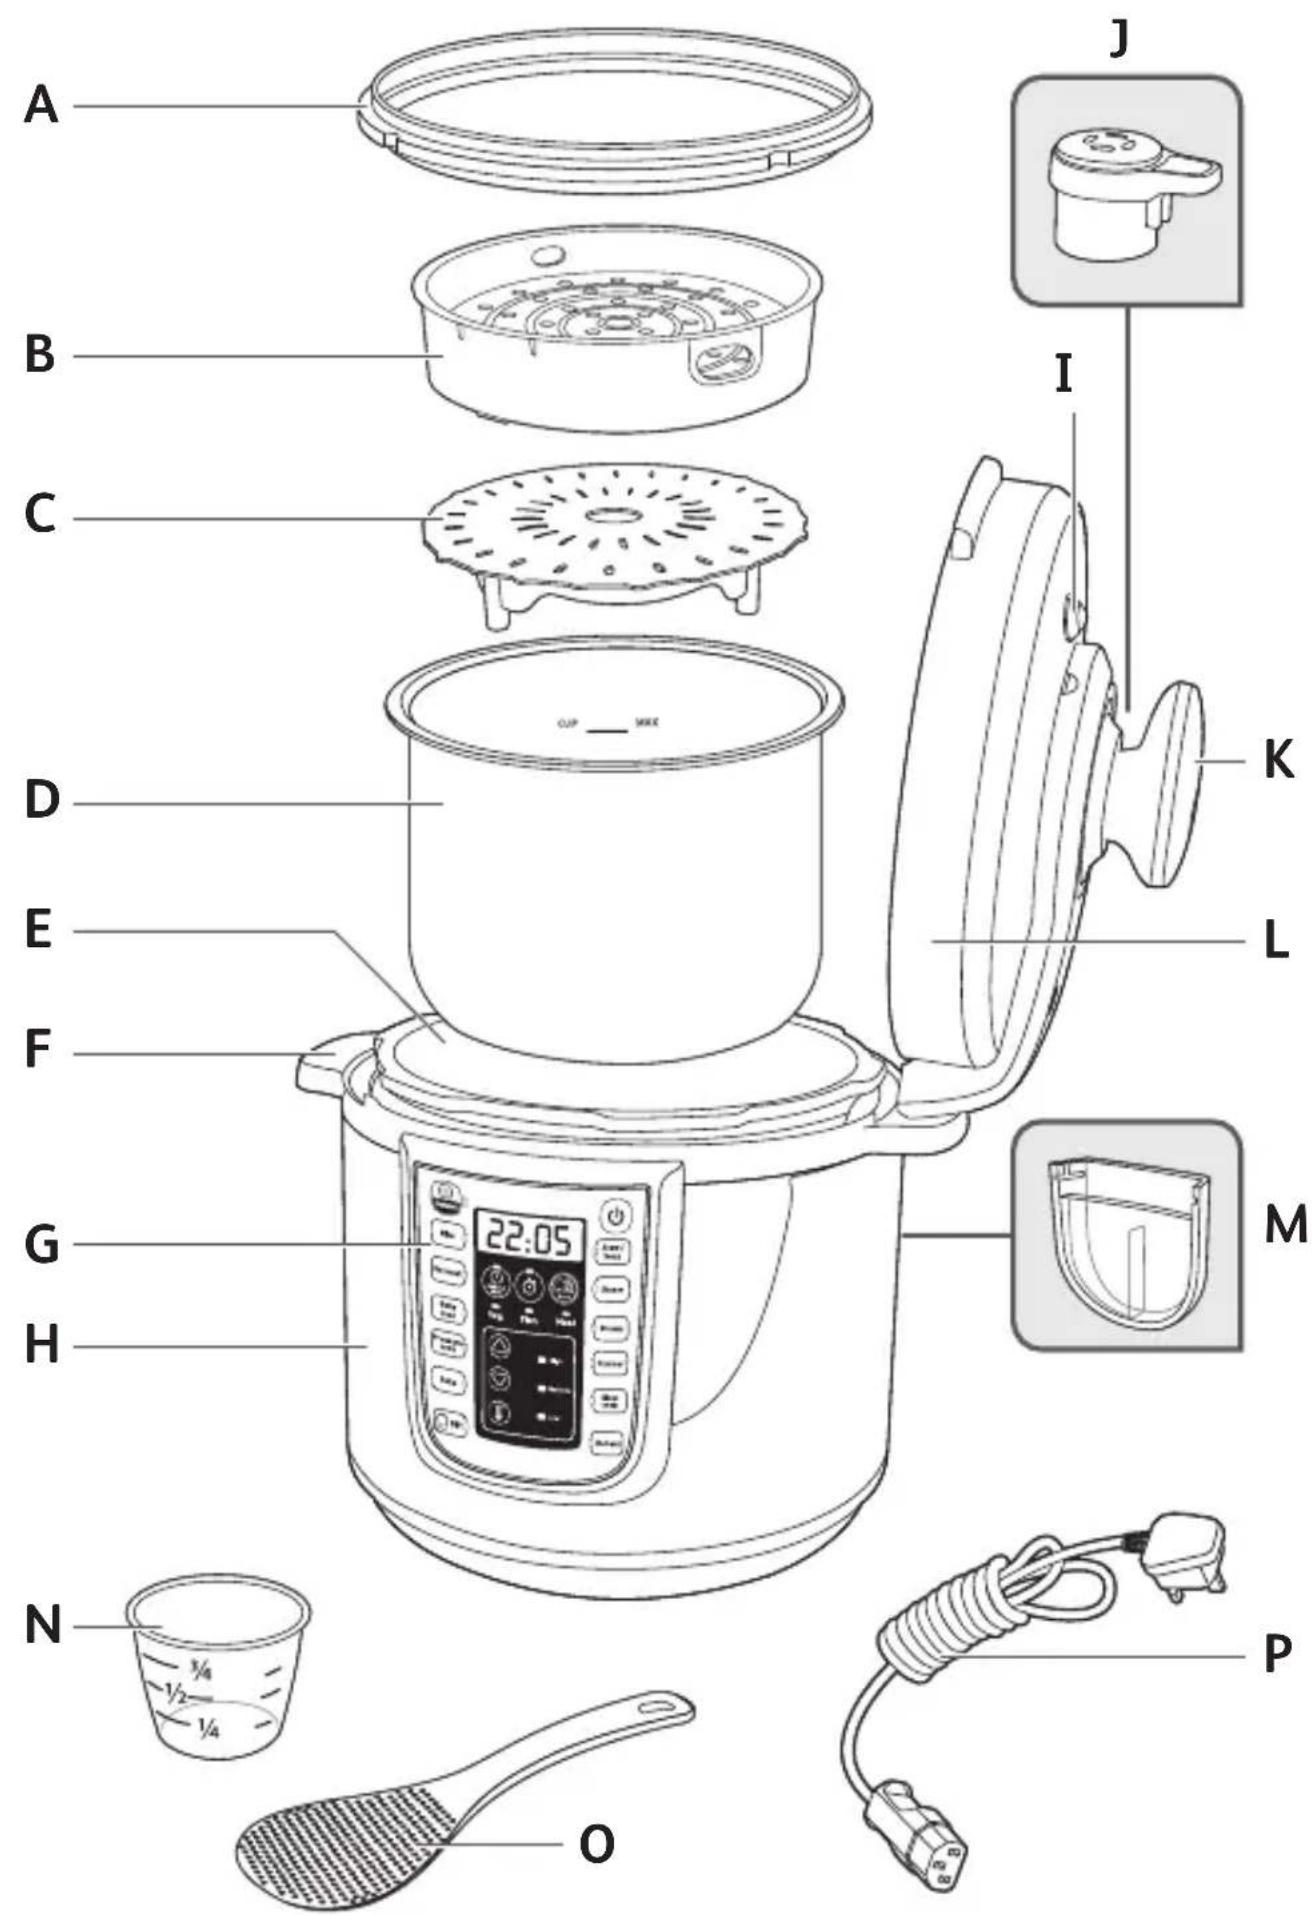
DESCRIPTION
A Sealing gasket
B Steam basket
C Trivet
D Cooking pot (removable)
E Heating element
F Carrying handle
G Control panel
H Base
I Safety valve
J Pressure limit valve
K Lid handle
L Lid
M Condensation collector
N Measuring cup
O Rice ladle
P Power cord
CONTROL PANEL
Keep warm
Cancel function key
Rice function key
Oatmeal (Porridge)
function key
Baby food function key
Pressure cook function key
Bake function key
DIY function key

Rice

Baby food

Bake


Stew /

Brown

Slow

Start / Stop function key
Stew / Soup function key
Steam function key
Browning function key
Simmer function key
Slow cook function key
Reheat function key
Digital display
Delayed start key
Type of food indicators
Increase key
Reduce key
Temperature key
22:05
Timer key
Menu key

High
Medium
Low
Pressure level indicators
25 types of cooking are proposed, please see Table 1 for more information.
For «Steam», «Stew/Soup» and «Simmer», you can choose the type of food: «vegetables», «fish», «meat/bean».
BEFORE FIRST USE
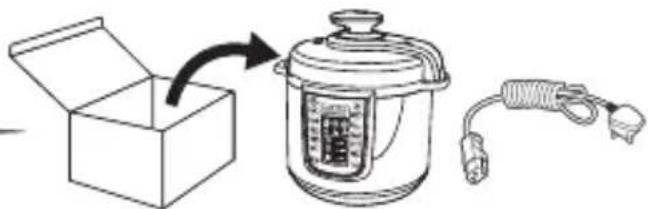
Remove packaging
- Take your appliance out of its packaging. Please keep your warranty card and remember to read the operating instructions before using the appliance for the first time.
- Place your appliance on a flat surface. Remove all packaging materials from the inside of the appliance: plastic bags, accessories (trivet, rice ladle, measuring cup & condensation collector) as well as the plug - fig. 4.
- Remove the promotional sticker on the appliance before using your appliance for the first time.
Opening the lid
- To open the lid, take hold of the handle, turn anti-clockwise, lift and pull the lid to the right - fig. 1-2-3.
EN
Cleaning
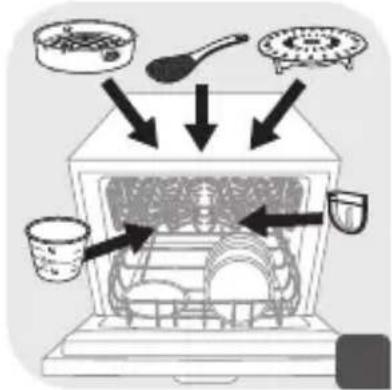
- Be aware: only the accessories are dishwasher safe.
- Rinse the cooking pot, the condensation collector, the accessories and the sealing gasket before the first use.
Using your appliance for the first time
- Fully unwind the power cord; connect it to the appliance and then plug it into the mains - fig. 8.
INSTRUCTIONS FOR USE
Put the condensation collector into place. - fig. 7.
Take the cooking pot out and add the ingredients
- Remove the cooking pot.
- Put ingredients in the cooking pot.
- Please note that the level of foods and liquids should never exceed the max level marking on the cooking pot - fig. 9.
Place the cooking pot in the appliance
- Ensure the bottom of the cooking pot is clean and dry, and remove any food residue from the heating plate. Then place the cooking pot into the appliance - fig. 10-11.
- Do not use your appliance without the cooking pot.
Close and lock the lid
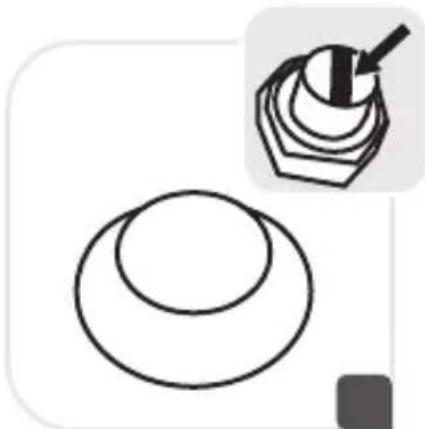
- Check that the sealing gasket is securely placed on the sealing gasket supporting cover.
- Close the lid on the appliance and turn it fully clockwise - fig. 12-13-14.
Fit the pressure limit valve
- Position the pressure limit valve and ensure that it is on. Please note that the valve does not click into place and that it will remain somewhat loose. Check that the pressure limit valve is down before you start pressure cooking (please see appliance description).
FUNCTIONS ILLUSTRATION
1. Switching on the appliance (standby mode)
Connect to the power supply, the system starts to self check, a buzzer makes a «BEEP» sound. The digital screen and all the indicator lights come on. After 1 second, the screen displays «----», the appliance is in the standby mode.
2. Working mode
- Each function has a default time and temperature and requires a specific lid position as shown below:
| PROGRAMS MENU | TIME SET (min) | TEMPERATURE (°C) LID POSITION | cooking with pressure | ||||||
| Default | Range | Default | Range | Lid closed + locked | Lid closed + not locked | Lid raised | |||
| Rice 9 1-50 108 not applicable | ● | ● | |||||||
| Oatmeal (Porridge) | 3 1-20 90 not applicable | ● | |||||||
| Stew / Soup | veg 10 1-70 108 not applicable | ● | ● | ||||||
| fish | 20 1-70 104 not applicable | ● | |||||||
| meat/ bean | 40 1-70 112 not applicable | ● | |||||||
| Steam | veg | 3 1-40 108 not applicable | ● | ● | |||||
| fish | 3 1-15 104 not applicable | ● | |||||||
| meat/ bean | 10 5-40 112 not applicable | ● | |||||||
| PROGRAMS | MENU | TIME SET (min) | TEMPERATURE (°C) | LID POSITION | cooking with pressure | ||||
| Default | Range | Default | Range | Lid closed + locked | Lid closed + not locked | Lid raised | |||
| Browning 10 | 1-60 160 | 100-1 | 60 | ● | |||||
| Reheat 4 1-60 | 104 not | applicable | ● | ● | |||||
| Simmer | veg 15 | 1-35 | 108 not applicable | ● | ● | ||||
| fish 15 | 1-35 | 104 not applicable | ● | ||||||
| meat/bean | 15 5-35 112 | not applicable | ● | ||||||
| Pressure cooking | high | 30 5-40 112 | not applicable | ● | ● | ||||
| medium | 30 5-40 108 | not applicable | ● | ||||||
| low 30 | 5-40 | 104 not applicable | ● | ||||||
| Baby food | 30 5-70 112 not applicable | ● | ● | ||||||
| Baking | 40 5-60 150 not applicable | ● | |||||||
| Slow cooking | 2h | 2h-9h | 85 | not applicable | ● | ||||
| PROGRAMS | MENU | TIME SET (min) | LID POSITION | ||
| Default | Range | closed + locked | not locked / raised | ||
| DIY Chef | 1 | 10 1-60 | 70°C | 70°C | |
| 2 | 80°C | 80°C | |||
| 3 | 90°C | 90°C | |||
| 4 | LOW*(104°C) | 100°C | |||
| 5 | MEDIUM*(108°C) | 110°C | |||
| 6 | HIGH*(112°C) | 120°C | |||
*Cooking with pressure
COOKING PROGRAM INSTRUCTIONS
Rice, Oatmeal (Porridge), Baby Food, Baking, Slow cooking, Reheat functions
- Press the corresponding key of the desired function, the screen displays the default cooking time.
- Then press and set the desired time by pressing or keys.
- Then press ⓋThe appliance enters into cooking preheat and the screen displays a rotating red circle « [»:
- When the temperature for cooking is reached, the appliance switches automatically to counting down signifying the cooking phase has started.
- At the end of the count down the appliance will beep to announce the end of cooking.
Note : Refer to the table on pages 76 and 77 for the lid position for each function.
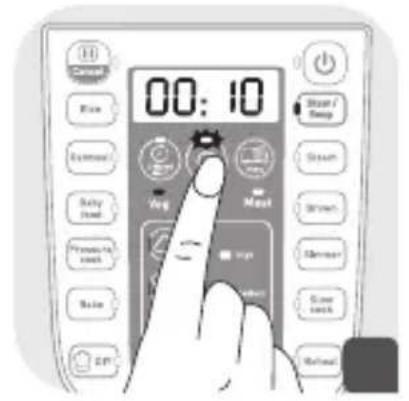
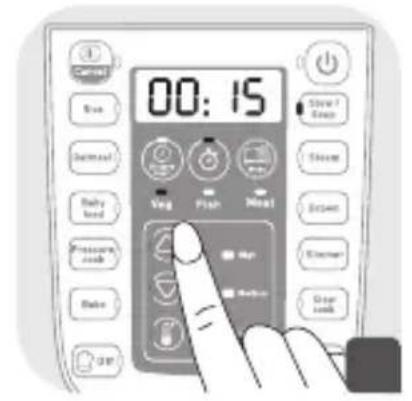
Stew/Soup, Steam, Simmer functions
- Press the corresponding key of the desired function, the screen displays the default cooking time, the indicator for the type of food lights up was the default and the corresponding pressure level indicator lights comes on too.
- If needed you can change the time and type of food.
- To change cooking time, press and set the desired time by pressing or keys.
- To change the type of food, press Menu key several times until the indicator of the desired type of food lights up. The specified food will have a red light indicator light underneath.
- Then press ⏻. The appliance enters into cooking preheat and the screen displays « [—]».
- When the temperature for cooking is reached, the appliance switches automatically to cooking phase, and the time previously set starts counting down.
- At the end of the count down the appliance will beep to announce the end of cooking.
- The appliance enters into keep warm mode (see Keep Warm chapter).
Note : refer to the table on pages 76 and 77 for the lid position for each function.
Browning function
- You can add oil first and then the ingredients, or add oil and ingredients at the same time.
- Press the Browning key, the screen displays the default temperature.
- If needed you can change the temperature by pressing or keys.
- Then if you want to change the browning time press and set the desired time by pressing or keys.
- You are able to change the temperature by pressing the temperature key (I and or key.
- Then press ⏻. The appliance enters into cooking preheat and the screen displays « [—]».
- When the temperature for cooking is reached, the appliance switches automatically to cooking phase, and the time previously set starts counting down.
- At the end of the count down the appliance will beep to announce the end of cooking.
Note :
* The lid must remain open during browning.
* To avoid the oil overheating do not use the browning function for more than 30 minutes.
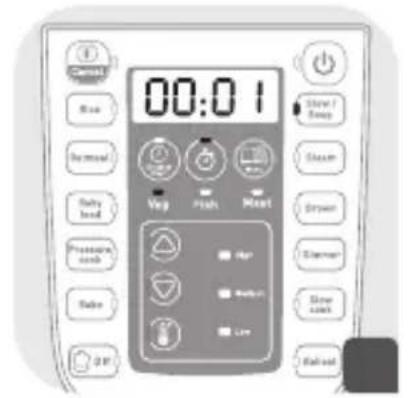
Pressure cooking function
- Press the Pressure cook key, the pressure level is indicated by a light on the control panel (High, Medium or Low) and on the display by «HI-P», «P», or «LO-P».
- You can change the pressure level by pressing or keys.
- If needed you can also change the cooking time, by pressing and set the desired time by pressing or keys.
- Then press ⏻. The appliance enters into cooking preheat and the screen displays « [☐☐]».
- The appliance switches auto matically to cooking phase (indicated by a single beep sound), and the time previously set starts counting down. Another beep sound during cooking (double beep sound) informs that the operational pressure is achieved.
- At the end of the count down the appliance will beep to announce the end of cooking.
- The electric pressure cooker enters into keep warm mode (see Keep Warm chapter).
Note : The lid must remain closed and locked during pressure cooking.
DIY Chef function
Thanks to this function, you are free to choose the cooking time and temperature/pressure.
- Set your DIY cooking level from 1 to 6 depending on the cooking you want to do (see the table page 77), by pressing or keys. If you want to cook with pressure in DIY mode: the lid must be locked, there must be enough liquid in the cooking pot, and you have to choose between the three levels: 4 (LOW pressure 20kPa), 5 (MEDIUM pressure 38kPa) or 6 (HIGH pressure 60kPa).
- If needed you can also change the cooking time, by pressing and set the desired time by pressing or keys.
- Then press ⏻. The appliance enters into cooking preheat and the screen displays « [—] ».
- When the temperature for cooking is reached, the appliance switches automatically to cooking phase, and the time previously set starts counting down.
- At the end of the count down the appliance will beep to announce the end of cooking.
Keep Warm
- In keep warm mode, when the cooking countdown reaches 0, the appliance “will beep”, then it automatically goes into the keep warm setting, (except for DIY functions), the digital screen indicates «00:00».
- If pressing during standby mode, it goes to keeping warm function, the digital screen indicates «00:00» and counts up.
- After 24 consecutive hours, this function will be cancelled automatically and it returns to the standby state.
- During Keep Warm, take care that the lid is closed.
Delayed start setting
- When choosing a function, before the appliance has started cooking, you can press to set a delayed time. By pressing and keys, you can adjust the time, in intervals of 10 minutes.
- The delayed time setting range (2-24 hours) contains the cooking time; when you press the Delayed start/timer function key, it indicates «02:00», press the key to increase and the key to decrease.
- After setting the delayed start the corresponding function indicator will light up.
Note : «Delayed start» is not available for the «Browning» and «DIY» functions.

Cancel/Stop setting
In the following setting: preset, cooking, pressure cooking, keeping warm, only «keep warm/cancel» key is available. Press the «keep warm/cancel» key for one second to cancel and return to the standby mode.
You have the possibility to switch off the product by pressing the key more than 2 seconds.
Opening the lid after pressure cooking
After cooking under pressure is completed, steam will be released by pressing on the button on the handle “one-touch steam release”- fig. 21, it will take only a few seconds to 10 minutes depending depending on the quantity of liquid inside.
- To open the lid, take hold of the handle, turn it clockwise, lift and pull the lid to the right - fig. 22-23-24.
- Unplug the power cord - fig. 25.
Note : Be careful of the hot steam coming out from the bowl. Keep your face and hands away from the steam flow.
GENERAL INFORMATION FOR COOKING UNDER PRESSURE
- Once pressure has built up in the appliance:
- The pressure limit valve will rise. The safety lock in the lid is then activated and the lid will not be able to be opened during cooking. Never attempt to open the lid during pressure cooking.
- The LED Low, Medium, or High will light on to indicate that there is pressure in the appliance.
- When using the pressure cooker for the first few times, you may notice slight leaking from the pressure limit valve and the sealing gasket. This is normal and will occur when pressure builds up.
- Your favourite traditional recipes can be easily adapted to PRESSURE COOK setting.
- Low (Low Pressure): to cook delicate food such as fish, shellfish and some delicate vegetables.
- Medium (Moderate Pressure): to cook vegetables
- High (High Pressure): to cook meat and frozen food
- It is normal for a small amount of steam to escape during cooking (as the valve is a safety valve).
- Don't use the pressure cooking without a minimum amount of water of 10cl.
- For cooking with pressure, the starting of the cooking is indicated by a single beep sound. The operational pressure is achieved after a double beep sound.
SAFETY FEATURES
Your pressure cooker contains several safety features:
Safety When Opening:
- If your pressure cooker is under pressure, the manometric rod is in the upper locking position, which prevents the cover from opening. Never try to force open your pressure cooker.
- It is especially important not to apply pressure to the manometric rod.
- Ensure that the internal pressure has fallen prior to trying to open the cover.
Two Overpressure Safety Features:
- First device: the safety valve releases the pressure – see chapter on Cleaning and Maintenance, page 81.
- Second device : the joint let off steam on the back of the cover.
If one of the overpressure safety features is triggered:
- Turn off your appliance.
- Allow your appliance to completely cool down.
- Open it.
- Check and clean the safety valve, decompression ball and gasket. See chapter on Cleaning and Maintenance.
- If your appliance leaks or is no longer operational after having performed these checks and cleaning, take it to an approved Service Centre.
Regulating your appliance:
The pressure can be regulated by switching the heating element on or off.
SERIE EPC06
Low pressure 20kPa (104,5°C) / Medium Pressure 38kPa (108,5°C) / High pressure 60kPa (112,5°C) / PS: 130 kPa
Product capacity: 5.8L / Useful capacity: =3.8L
Built-in heating (overmolded heating resistance)
CLEANING AND MAINTENANCE
- Once your food is cooked, unplug the appliance and let it cool for at least 2 hours before cleaning - fig. 25-26. Clean your appliance after each use.
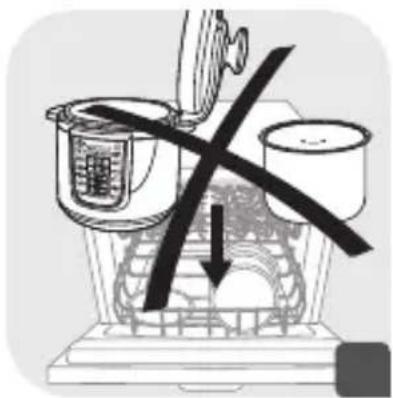
- Clean the housing and the inside of the lid with a damp cloth - fig. 32-33. Do not immerse the appliance in water or pour water into it without the inner bowl - fig. 27.
-
Remove the condensation collector and clean it thoroughly under water. Place it back in its original position - fig. 35.
-
Rinse the sealing gasket. Dry it off thoroughly before placing it back.
- To clean the safety valve, remove the lid - fig. 36 then remove the valve gently from the lid - fig. 37 and rinse it under water. Dry it off thoroughly. Take care that the duct is properly cleaned before placing the safety valve back in its original position.
- Press on the internal part of the safety valve spring to check that it is not clogged - fig. 37,38.
- Clean the cooking pot and the accessories. Only the accessories are dishwasher safe - fig. 29. Do not use a scourer or abrasive cleaners to clean the pot as this can damage the non stick coating in the pot.
- Remove the pressure limit valve from the pipe and clean both valve and pipe with water. Once dry, take care that duct of the pipe is properly cleaned before to plug the valve back on it - fig. 31.
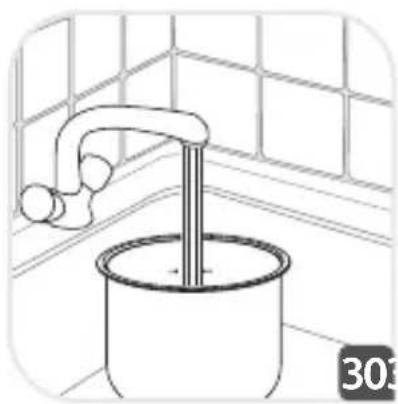
- Do not immerse the appliance. Always use the cooking pot provided. Do not pour water or food directly into the appliance - fig. 27.
- If you inadvertently immerse your appliance in water or spill water directly on the heating element (when the pot is not in place), do not use the appliance and take it to your approved service center centre for repair.
- Clean your appliance after each use.
- Change the sealing gasket every 2 years. Use only the gasket reference 22CM CYSB50YC8.
TROUBLESHOOTING
| Problem Possible reasons Solutions | ||
| Unable to open lid. | Unable to open because of pressure in the inner pot. | a.Wait for the pressure in the pot to release completely.b. Press and hold the pressure release button. |
| Pressure in the pot is fully released but the safety valve is stuck because it is too dirty, and therefore unable to move down. | a. Be sure the pressure is totally released by leaving to completely cool down for 2 hours minimum (not under water).b. Please use a skewer to poke the safety valve, to make it fall down. Be careful, keep your face away from the lid and the handle as hot steam/ food may be released.c. Before next use, please clean and wipe the safety valve. | |
| Unable to close lid. | Sealing gasket is not properly installed. | Install the sealing gasket properly. |
| The safety valve is stuck because it is too dirty, and therefore unable to move down. | a. Please use a skewer to poke the safety valve, to make it fall down.b. Before next use, please clean and wipe the safety valve (see page 81, cleaning steps of the safety valve). | |
| Direction which lid was closed is incorrect. | Close the lid in the correct direction according to the instruction manual. | |
| Intense release of pressure from pressure limit valve. | Faulty pressure control resulted in release of pressure. | Send it to an approved service center for repair. |
| Pressure limit valve is in an incorrect in position. | Gentling press the pressure limit valve to make it fall into place. | |
| Food is uncooked | Food/water ratio is incorrect. | Use the required food/water ratioBe sure the releasing valve is not dirty and creating leakage during cooking. |
| No electricity from the power supply. | Check the home electric circuit. | |
| E0 displayed on digital screen. | Lid temperature sensor is faulty. | Send it to an approved service center for repair. |
| E1 displayed on digital screen. | The bottom sensor open circuit or short circuit. | Send it to an approved service center for repair. |
| E2 displayed on digital screen. | lid is not locked | Check if the program selected requires the lid totally closed.If yes, completely lock the lid.If no, send it to an approved service center for repair. |
| E5 displayed on digital screen. | Abnormal low pressure. | Check that gasket is properly installed and cleaned. Check that pressure limit valve falls down into place and is cleaned. Check that lid fixing nut is well tightened. |
| Steam leaking from lid. | The sealing gasket was not properly installed. | Remove the gasket, clean it and reinstall the sealing gasket properly, in correct position (see page 81, cleaning steps of the lid gasket). |
CONSIGNAS DE SEGURIDAD


- INSTRUCTIONS DE SÉCURITÉ
- Take the time to read all the following instructions carefully.
- SAVE THESE INSTRUCTIONS CAREFULLY.
- DESCRIPTION
- CONTROL PANEL
- BEFORE FIRST USE
- Remove packaging
- Opening the lid
- Cleaning
- Using your appliance for the first time
- INSTRUCTIONS FOR USE
- Take the cooking pot out and add the ingredients
- Place the cooking pot in the appliance
- Close and lock the lid
- Fit the pressure limit valve
- FUNCTIONS ILLUSTRATION
- Switching on the appliance (standby mode)
- Working mode
- COOKING PROGRAM INSTRUCTIONS
- Rice, Oatmeal (Porridge), Baby Food, Baking, Slow cooking, Reheat functions
- Stew/Soup, Steam, Simmer functions
- Browning function
- Note :
- Pressure cooking function
- DIY Chef function
- Keep Warm
- Delayed start setting
- Cancel/Stop setting
- Opening the lid after pressure cooking
- GENERAL INFORMATION FOR COOKING UNDER PRESSURE
- SAFETY FEATURES
- Safety When Opening:
- Two Overpressure Safety Features:
- If one of the overpressure safety features is triggered:
- Regulating your appliance:
- SERIE EPC06
- CLEANING AND MAINTENANCE
- CONSIGNAS DE SEGURIDAD
Brand : TEFAL
Model : Fast & Delicious CY505
Category : Kitchen appliance