USER MANUAL RDF327B JVC
natural_image
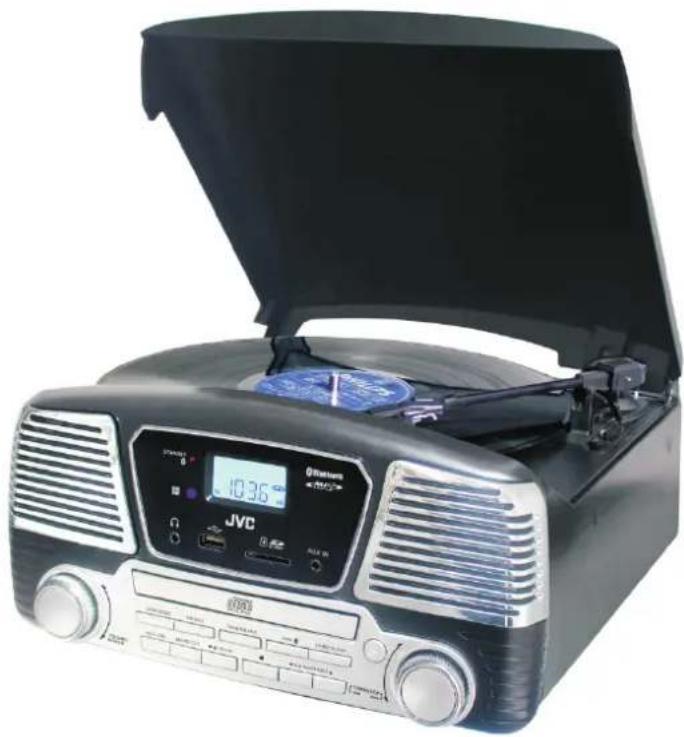
Black portable electronic device with open lid and digital display, no visible text or symbols on main body
Table des matières
AVERTISSEMENTS....FR-2
DESCRIPTION....FR-3
TÉLÉCOMMANDE....FR-4
PRÉCAUTIONS D'UTILISATION....FR-4
BRANCHEMENT....FR-4
RÉGLER L'HORLOGE....FR-5
RÉGLER L'ALARME ....FR-5
RAPPEL D'ALARME....FR-5
FONCTION MINUTEUR....FR-5
ÉCOUTER LA RADIO....FR-6
SYNTONISATION....FR-6
STATIONS DE RADIO PRÉRÉGLÉES ....FR-6
PRÉRÉGLAGE AUTOMATIQUE DES STATIONS DE RADIO ....FR-6
RÉCEPTION FM STÉRÉO ET MONO....FR.-6
CONSEILS POUR OPTIMISER LA RÉCEPTION ....FR-6
DISQUES VINYLES et ENCODAGE ....FR-6
ENTRÉE AUX IN et ENCODAGE....FR-7
LIRE DES FICHIERS MP3 D'UNE CARTE MÉMOIRE OU D'UN SUPPORT USB....FR-8
SUPPRIMER DES FICHIERS D'UNE CARTE SD OU D'UN SUPPORT USB....FR-9
LECTURE ET ENCODAGE DES CD....FR-9
SÉPARER LES MORCEAUX LORS DE L'ENREGISTREMENT USB/SD DE LA PLATINE OU DE
L'ENTRÉE AUX ....FR-11
CONNEXION BLUETOOTH....FR-11
PRISE CASQUE ET PRISES LINE-OUT....FR-11
FONCTION D'ÉCONOMIE D'ÉNERGIE FR-11
SPÉCIFICATIONS ....FR.12
MISE AU REBUT ....ER-12
[Union Européenne]
Cher client,
Darty Holdings SAS © 14 route d'Aulnay 93140 Bondy, France
AVERTISSEMENTS:
• To protect the environment, use local recycling facilities for battery disposal.
Downloaded from www.vandenborre.be
Hotline Darty France
natural_image
Black JVC portable electronic device with open lid and digital display (no visible text or symbols)
Inhoudsopgave
WAARSCHUWING......Nen 2
BESCHRIJVING VAN DE ONDERDELEN....NL-3
AFSTANDSBEDIENING....NL-4
Darty Holdings SAS © 14 route d'Aulnay 93140 Bondy, France
WAARSCHUWING:
AFSPELEN / PAUZE KNOP ▶II
VOORUIT GAAN 🚗 ACHTERUIT GAAN KNOF
AFSPELEN / PAUZE KNOP ▶II
OMHOOG ▶| OMLAAG |KNOP
ALLE TRACKS KOPIËREN
natural_image
Black JVC portable electronic device with open lid and digital display (no visible text or symbols)
Índice de materias
Darty Holdings SAS © 14 route d'Aulnay 93140 Bondy, France
ADVERTENCIAS:
Downloaded from www.vandenborre.be

MANUAL DE INSTRUÇÕES
RD-F327B
natural_image
Black portable electronic guitar with open lid and digital display, no visible text or symbols on the device itself.
Índice
AVISOS....LPT-.2
OUVIR RÁDIO....P.T.-6
Darty Holdings SAS © 14 route d'Aulnay 93140 Bondy, France
AVISOS:
Turntable with CD Player
natural_image
Black JVC portable electronic device with open lid and digital display, no visible text or symbols on main body
Table of Contents
WARNINGS....EN.2
SETTING THE CLOCK....EN.5
SETTING ALARM....EN.5
SNOOZE FUNCTION....EN.5
TIMER FUNCTION ....EN-5
LISTENING TO RADIO ....EN.5
RADIO TUNING....EN-5
PRESETTING RADIO STATIONS....EN.6
AUTO PRESETTING RADIO STATIONS....EN.6
FM & FM-STEREO RECEPTION....EN.6
FM & FM-STEREO RADIO ENCODING....EN.6
PHONO & ENCODING....EN-6
AUX IN JACK & ENCODING....EN-7
PLAYBACK OF MP3 SONG VIA USB STORAGE MEDIA OR MEMORY CARD ....E.N.8
FILE DELETE FROM USB / SD CARD....EN.9
COMPACT DISC (CD) PLAYBACK & ENCODING......EN.9
SPLIT TRACK FUNCTION FOR USB/SD RECORDING FOR TURNTABLE/AUX IN....EN.-11
BLUETOOTOOTH CONNECTION ....EN.11
EARPHONE JACK & LINE OUT JACKS....EN-11
POWER SAVING FEATURE....EN.11
SPECIFICATIONS: EN-11
DISPOSAL......EN-12
[European Union]
Dear Customer,
This apparatus is in conformance with the valid European directives and standards regarding electromagnetic compatibility and electrical safety.
European representative of the manufacturer is:
Darty Holdings SAS © 14 route d'Aulnay 93140 Bondy, France
WARNINGS:
- This appliance is intended for domestic household use only and should not be used for any other purpose or in any other application, such as for non domestic use or in a commercial environment.
- Ventilation
Allow at least a 10 cm gap all around the product.
- The ventilation should not be impeded by covering the ventilation openings with items, such as newspapers, table-cloths, curtains, etc.
- No naked flame sources, such as lighted candles, should be placed on the apparatus.
- Attention should be drawn to the environmental aspects of battery disposal. Don't throw used batteries in dustbin. Please contact your retailer in order to protect the environment.
- This apparatus is not suitable for use in a tropical climate.
- The apparatus shall not be exposed to dripping or splashing and that no objects filled with liquids, such as vases, shall be placed on the apparatus.
• To protect the environment, use local recycling facilities for battery disposal.
- Batteries (battery pack or batteries installed) shall not be exposed to excessive heat such as sunshine, fire or the like.
- Where the MAINS plug or an appliance coupler is used as the disconnect device, the disconnect device shall remain readily operable.
- CAUTION
Danger of explosion if battery is incorrectly replaced. Replace only with the same or equivalent type.
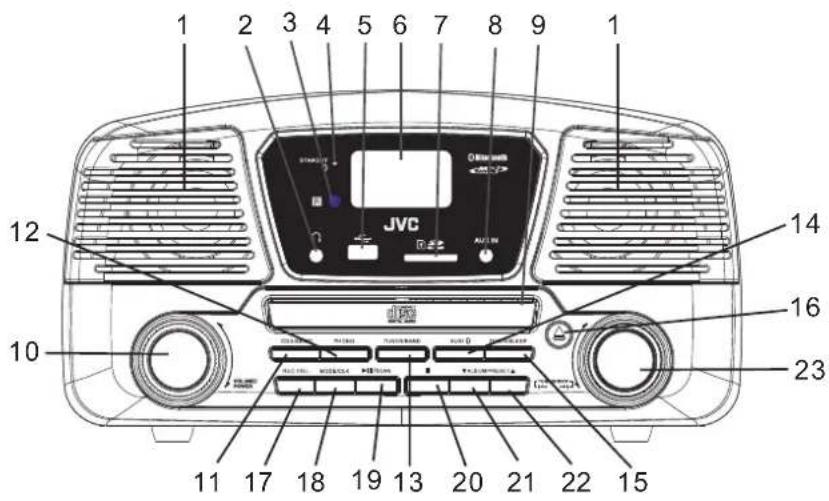
LOCATION OF CONTROL
Downloaded from www.vandenborre.be 4


- Speaker
- Earphone/Headphone jack
- Remote control sensor
- Standby/Bluetooth indicator light

- Display
- card slot
- j a AUX IN
- CD door
- Power/Volume knob
- button
- button
- button
- AUX button
- TIMER/SLEEP button
- CD door open/close button
- REC./DEL. button
- MODE/CLK
-
▶/SCAN button
-
Button
- ▼ALBUM/PRESET
- ALBUM/PRESET ▲
- TUNING/SKIP/◄◄/►►I knob
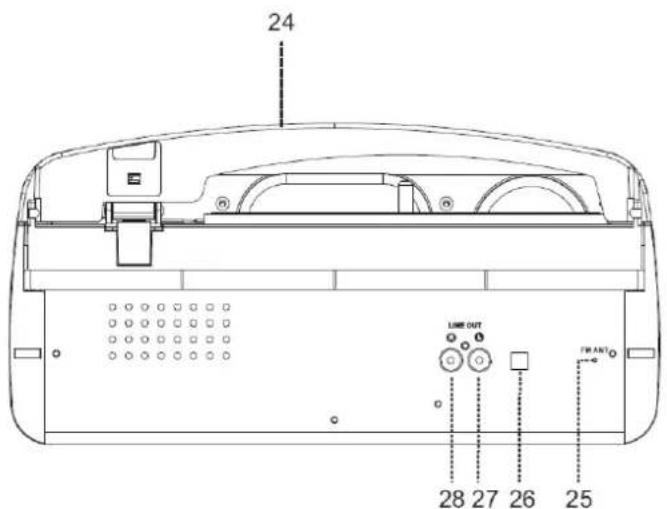
- Dust cover
- FM wire antenna
- External power adapter jack
- LINE-OUT jack (Left)
- LINE-OUT jack (Right)
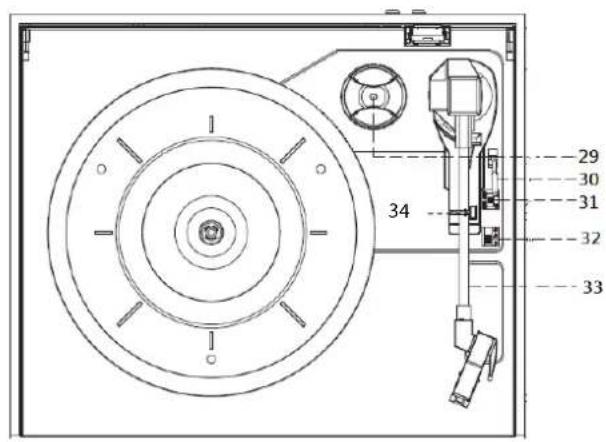
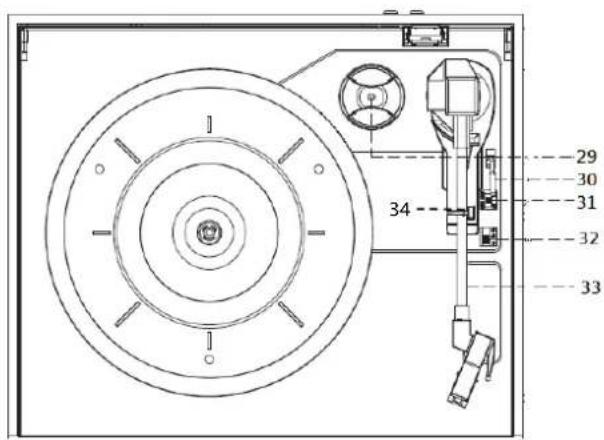
- 45 RPM(Remixes Per Minute) adapter
- Lift lever
- Auto stop on/off button
- 33/45/78 RPM speed selector
- Tone arm
- Arm lock
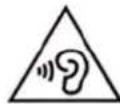
To prevent possible hearing damage, do not listen at high volume levels for long periods.
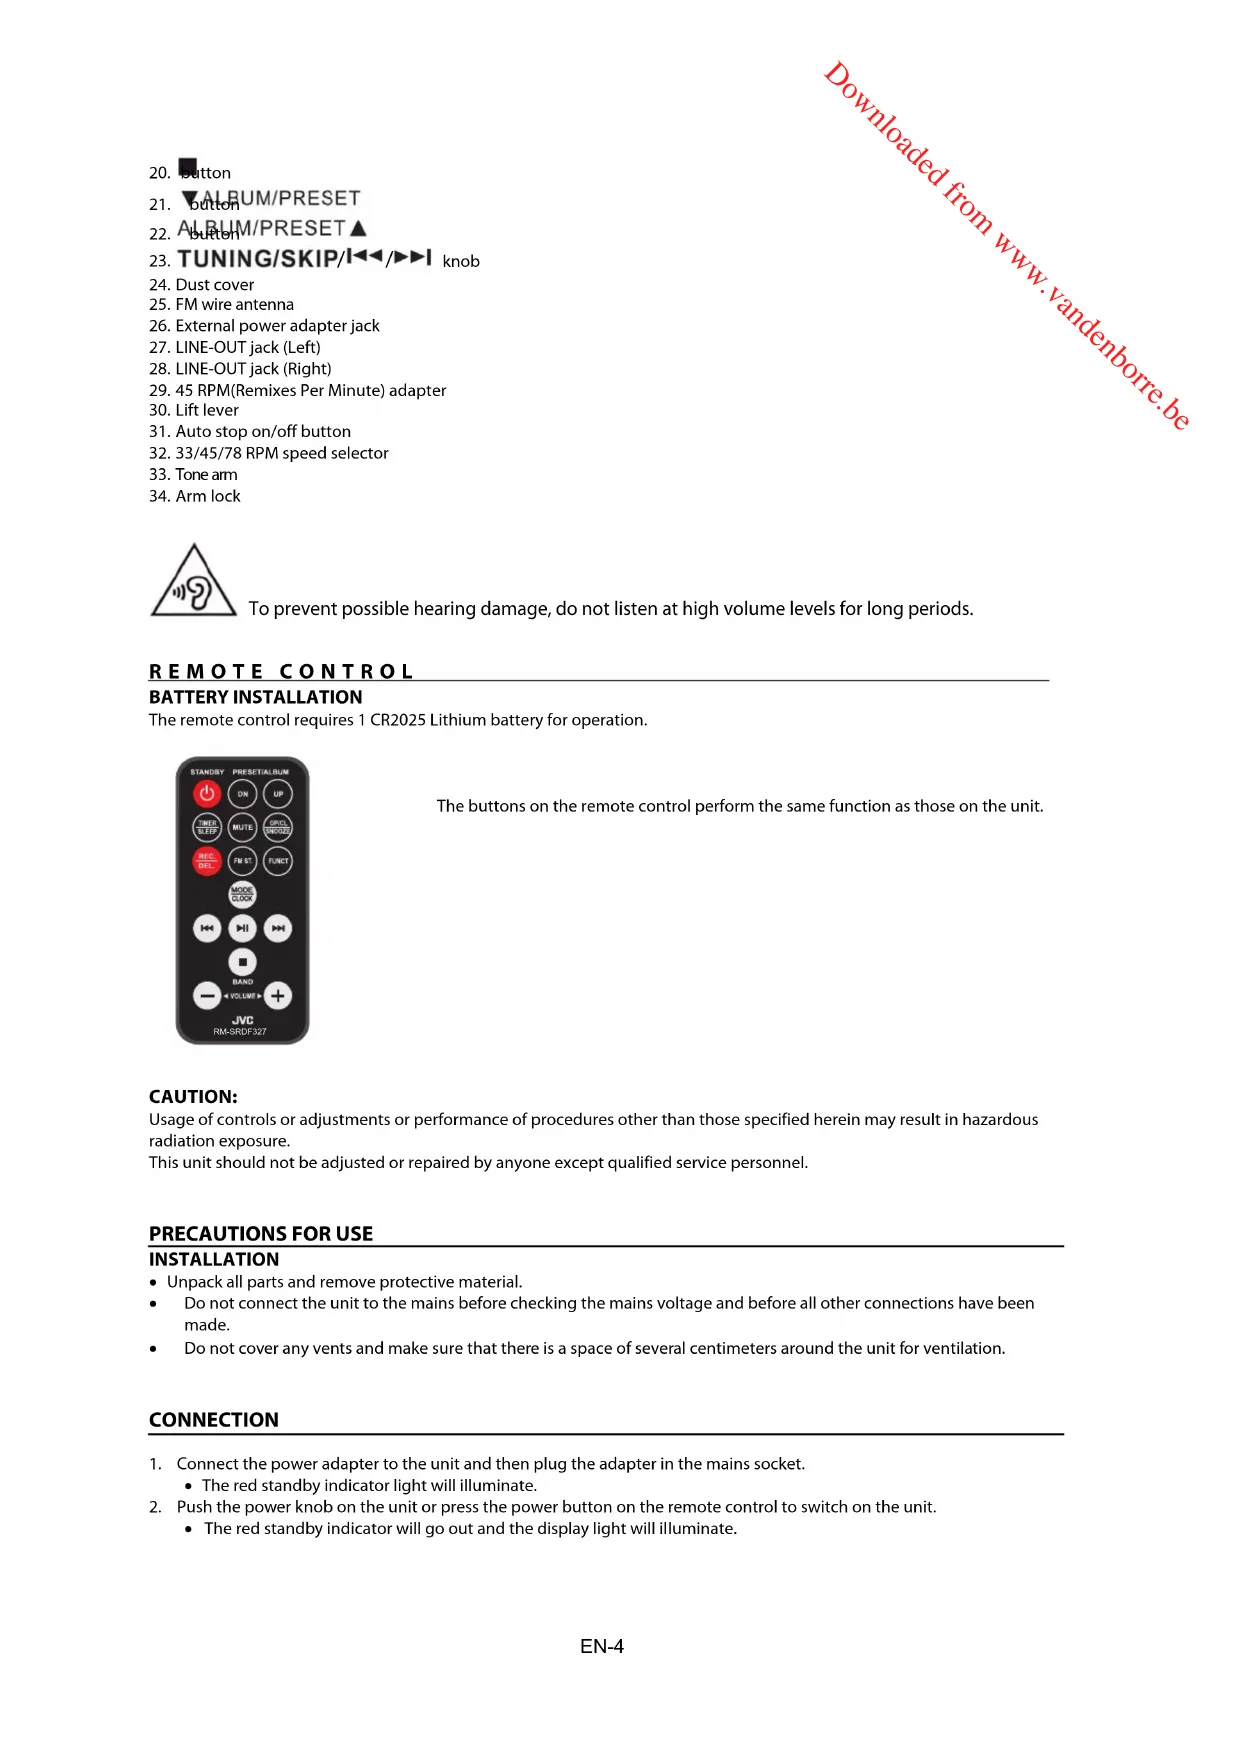
REMOTE CONTROL
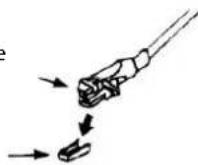
BATTERY INSTALLATION
The remote control requires 1 CR2025 Lithium battery for operation.

The buttons on the remote control perform the same function as those on the unit.
CAUTION:
Usage of controls or adjustments or performance of procedures other than those specified herein may result in hazardous radiation exposure.
This unit should not be adjusted or repaired by anyone except qualified service personnel.
PRECAUTIONS FOR USE
INSTALLATION
- Unpack all parts and remove protective material.
- Do not connect the unit to the mains before checking the mains voltage and before all other connections have been made.
- Do not cover any vents and make sure that there is a space of several centimeters around the unit for ventilation.
CONNECTION
- Connect the power adapter to the unit and then plug the adapter in the mains socket.
• The red standby indicator light will illuminate.
- Push the power knob on the unit or press the power button on the remote control to switch on the unit.
- The red standby indicator will go out and the display light will illuminate.
SETTING THE CLOCK
1 In standby state, press and hold for about 3 seconds.
• 12h / 24h will flash on the display.
2 While the time format is flashing, turn the TUNING/SKIP knob to select 12h or 24h format.
3 Press MODE/CLK to confirm.
• The hour digits will flash on the display.
4 While the hour digits are flashing, turn the TUNING/SKIP knob to select the correct hours.
5 Press MODE/CLK to confirm.
- The minute digits will flash on the display.
6 While the minute digits are flashing, turn the TUNING/SKIP knob to select the correct minutes.
7 Press MODE/CLK to confirm.
SETTING ALARM
-
In standby state, press and hold TIMER/SLEEP for about 3 seconds. The alarm sequence is "alarm on time > alarm off time > alarm mode > alarm volume".
-
Setting alarm on time: "ON" will flash on the display.
a) To set the hours, turn TUNING/SKIP knob to select the correct hours, then press TIMER/SLEEP to confirm.
b) To set the minutes, turn TUNING/SKIP knob to select the correct minutes, then press TIMER/SLEEP to confirm.
- Setting alarm off time: "OFF" will flash on the display.
a) To set the hours, turn TUNING/SKIP knob to select the correct hours, then press TIMER/SLEEP to confirm.
b) To set the minutes, turn TUNING/SKIP knob to select the correct minutes, then press TIMER/SLEEP to confirm.
- Setting alarm mode: "TUNE" will flash on the display.
Turn knob to select the alarm mode.
The sequence is TUNE > CD > USB > CARD, press TIMER/SLEEP to confirm.
- Setting alarm volume: "V-[volume level]" will flash on the display.
Turn TUNING/SKIP knob to select the alarm volume, press TIMER/SLEEP to confirm.
-
When the alarm is set, the clock icon will be display.
-
To cancel alarm: in standby state, press TIMER/SLEEP and the clock icon will disappear from the display.
SNOOZE FUNCTION
Press 📄 on the remote control when the alarm sounds. The alarm will be turned off for about 10 minutes and then the alarm will sound again. This function can be used for repeatedly within the 1-hour alarm active interval.
TIMER FUNCTION
- Push the power knob to power on the unit.
• The red standby indicator light will go out.
-
Repeatedly press TIMER/SLEEP to choose the sleep time minutes from 90>80>70.....>10 off.
-
The sleep time setting will be stored when the sleep icon SLEEP is displayed.
-
When the set sleep time has elapsed, the unit will be switched to the standby state.
LISTENING TO RADIO
RADIO TUNING
-
Press TUNER/BAND to activate the radio mode.
-
Press TUNER/BAND to select the desired band (AM or FM).
-
Tune in to the desired station by turning and holding TUNING/SKIP knob for about 2 seconds and then release
the knob.
• The unit will start auto scanning and stop when a radio station is found.
PRESETTING RADIO STATIONS
Up to 30 FM and 20 AM radio stations can be preset.
- When the desired radio station is found, press. MODE/CLK
The program number will flash.
-
Press ▼ALBUM/PRESET/ ALBUM/PRESET▲ to choose the program number for storing the desired radio station.
-
Press to confirm.
The program number will stop flashing.
-
Repeat steps 2 & 3 until all desired radio stations are stored.
-
Press / ▼ALBUM/PRESET ALBUM/PRESET ▲ to choose the preset radio stations.
AUTO PRESETTING RADIO STATIONS
Press ▶II/SCAN, the unit will automatically scan the radio frequency. When the clear signal is found, the unit will automatically store the radio station, starting from program number 1.
FM & FM-STEREO RECEPTION

Press the remote control to select FM mono or FM stereo mode. When stereo signals are weak, the unit will receive the radio stations in mono mode.
"ST" icon will be displayed when the station is broadcasting in stereo.
HINTS FOR BETTER RECEPTION
AM: There is a built-in am bar antenna. If the reception is weak, slightly rotate or re-position the unit.
FM: Fully extend the FM wire antenna for best reception and tape its tip to a wall or other surface.
FM & FM-STEREO RADIO ENCODING
-
Press TUNER/BAND to activate the radio mode and then press TUNER/BAND again to select the desired band (AM or FM).
-
Insert a memory device.
-
Press REC./DEL. and the unit will take 3-5 seconds to read memory device.
-
Turn TUNING/SKIP knob to select desired mode (USB or SD) for encoding. Then press REC./DEL. to confirm.
• The system will start the encoding process after a few seconds.
- To finish encoding, press ■ and the unit will return to the radio mode and the track is recorded in the "LINE-IN" folder.
- The recording speed is 1:1 and based on the actual playing time of FM or FM-stereo radio.
- The recording format is preset at 128 kbps.
- During FM & FM-stereo radio encoding, radio frequency will be fixed and cannot be tuned.
PHONO & ENCODING
NOTES:
- Remove the stylus protector.
- Be sure that the tone arm is detached from the tone arm rest before operating and re-secured again afterwards.
Cartridge
Stylus assembly

-
Repeatedly press on the remote until the display shows "PHON".
-
Set the speed selector to the proper position depending on the record to be played.
-
Place the record on the platter and do not let the record touch the lid.
- Use the 45 rpm adaptor if you are playing 45 rpm records.
- Unlock the tone arm from the rest, and then slowly move it to the record side. The platter will start to rotate.
Arm lock

Tone arm locked

Tone arm unlocked
- Put down the lift lever to drop the tone arm and touch the record gently. The phono will start playing the record.
- Push the lift lever upward to raise the tone arm from the arm park, now platter will still be rotating but phono playing will stop. To continue the playing, you need to put down the lift lever.
- Adjust the volume to the desired level.
- At the end of record, the platter will automatically stop rotating. Push the lift lever upward to raise the tone arm and lock it on the rest, and then put down the lift lever.
- To stop manually, lift the tone arm from the record and return it to the arm park.
REMARK: As some kind of record the auto-stop area was out of the unit setting, so it will stop before the last track finishes. In this case, select the auto-stop switch to "off" position, then it will run to the end of the record but will not stop automatically (turn off the unit by power button or switch back the auto-stop switch to "on" position to stop the platter rotating). Then put back the tone arm to the arm park.
PHONO ENCODING
- Press PHONO to enter the phono mode and then insert a memory device.
- Press REC./DEL.
- It will take 3-5 seconds to read the memory device.
- Turn TUNING/SKIP knob to select desired mode (USB or SD) for encoding. Then press REC./DEL. to confirm.
- The system will start encoding after a few seconds.
- To finish encoding, press ■ and the unit will return to the phono mode and the track is recorded in the "LINE_IN" folder.
- The recording speed is 1:1 according to the actual playing time of the phono.
- the recording format is preset at - mp3 bit rate: 128 kbps.
AUX IN JACK & ENCODING
Press AUX/ to enter the AUX mode, then connect the external audio device (such as a CD player) through the AUX IN jack. Audio signal from the external audio device can be played through the system.
AUX IN ENCODING

-
Repeatedly press 📄 on the remote until the display shows "AUX", then insert a memory device.
-
Press REC./DEL.
- It will take 3-5 seconds to read the memory device.
- Turn TUNING/SKIPknob to select desired mode (USB or SD) for encoding. Then press REC./DEL. to confirm.
- The system will start encoding after a few seconds.
- To finish encoding, press and the unit will return to the AUX mod and the track is recorded in the "LINE_IN" folder.
- The recording speed is 1:1 according to the actual playing time of the external audio device.
- The recording format is preset at - mp3 bit rate: 128 kbps.
CONNECTING
Repeatedly press until the display shows "USB" or "CARD", then insert a memory device.
- The system will start reading the memory device automatically and the display will show the total number of m33 files (e.g. 016).
• The system will start play.
Press ▶|| once to pause and press ▶||again to resume.
Press ■b stop playback.
During playback, turn TUNING/SKIPknob to play the previous or next file.
FOLDER SEARCHING
Press ▼ ALBUM/PRESET ALBUM/PRESET ▲ to search folder backward or forward.
REPEAT FUNCTION
During playback, press MODE/CLK once, single track will be played repeatedly. Press MODE/CLK again, it will repeatedly play all tracks in the memory device.
TRACKS PROGRAMMING
Up to 99 tracks can be programmed for mp3 file and play in any order. Ensure the system is in stop state before programming:
- Select "USB" or "CARD" function and then press ■.
- Press MODE/CLK
- "MEM" and "P01" will flash on the display.
- Select a desired track by turning TUNING/SKIPknob.
- If folder selection is required, press ▼ALBUM/PRESET / ALBUM/PRESET▲ to search folder backward or forward.
- Press MODE/CLK to confirm and store the track into memory.
- Repeat steps 3 and 4 to store additional tracks into the memory if necessary.
- When all the desired tracks have been programmed, press ▶II to play the tracks in the assigned order.
- Press ■ to stop playing of programmed tracks and press ■ again to cancel programming.
COPYING OF MP3 FILES
The system allows you to copy files from USB to SD or SD to USB.
Copy 1 track
- Insert a USB device or SD card and select the USB or CARD function.
- Press REC./DEL. during the playback.
- "one" will flash on the display.
- Press REC./DEL. to confirm.
• The USB or SD icon will flash on the display. Copying is performing now.
- After copying is finished, the unit will stop playback automatically.
- The unit will return to USB or CARD mode.
Copy 1 folder
- Insert a USB device or SD card and select the USB or CARD function. Ensure the unit is in stop mode.
- Press ▼ALBUM/PRESET / ALBUM/PRESET ▲ to search desired folder for copying.
- Press REC./DEL..
- "one" will flash on the display.
-
Turn TUNING/SKIP knob until "dir" is displayed.
-
Press REC./DEI to confirm.
• The USB or SD icon will flash on the display. Copying is performing now.
- When the USB or SD icon stops flashing, it means that the folder copying is completed.
Copy all tracks
-
Insert a USB device or SD card and select the USB or CARD function. Ensure the unit is in stop mode.
-
Press REC./DEL.
- "one" will flash on the display.
-
Turn TUNING/SKIP knob until "all" is displayed.
-
Press REC./DEI to confirm.
• The USB or SD icon will flash on the display. Copying is performing now.
- When the USB or SD icon stops flashing, it means that all track copying is completed.
FILE DELETE FROM USB / SD CARD
The system is able to erase the file stored in a memory device.
Delete 1 track
- Press and hold REC./DEL. for about 3 seconds during playback.
- "one" will flash on the display.
- Press REC./DEL to confirm.
Delete 1 folder
-
Insert a USB device or SD card and select the USB or CARD function. Ensure the unit is in stop mode.
-
Press / to search desired folder for deleting.
-
Press and hold REC./DEL. for about 3 seconds.
- "del" will be displayed.
-
Turn TUNING/SKIP knob until "dir" is displayed.
-
Press REC./DEL to confirm.
Delete all tracks
-
Insert a USB device or SD card and select the USB or CARD function. Ensure the unit is in stop mode.
-
Press and hold for about 3 seconds.
- "one" will flash on the display.
-
Turn TUNING/SKIP knob until "ALL" is displayed.
-
Press REC./DEL.to confirm.
- The USB or SD icon will flash on the display. Deleting is performing now.
- When the USB or SD icon stops flashing, it means that all track deleting is completed.
COMPACT DISC (CD) PLAYBACK & ENCODING
-
Repeatedly press CD/USB/SD until "CD" is displayed.
-
Press to open the CD door.
-
Place a CD disc in the tray and press again to close the CD door.
- The system will start reading the CD disc.
NOTE: The CD door cannot be opened in standby state. When the turntable is turned off, the CD door will automatically be closed. If you open the CD door and then switch to another mode, the CD door will automatically be closed.
PLAY / PAUSE BUTTON ▶II
Press ▶|| once to pause and press ▶|| again to resume.
STOP BUTTON
Press ■ stop playback.
SKIP UP ▶ | / SKIP DOWN ◀◀ BUTTON
During playback, turn TUNING/SKIPknob to play the previous or next file.
FOLDER SEARCHING
Press / to search folder backward or forward.
REPEAT FUNCTION
During playback, press MODE/CLK once, single track will be played repeatedly. Press again, it will repeatedly play all tracks in the whole CD disc.
TRACKS PROGRAMMING
Up to 99 mp3 tracks and 20 audio tracks can be programmed and played in any order. Ensure the unit is in stop mode.

-
Repeatedly press 📋 on the remote until "CD" is displayed.
-
Press MODE/CLK
- "MEM" and "P01" will flash on the display.
- Select a desired track by turning TUNING/SKIPknob.
- If folder selection is required, press ▼ALBUM/PRESET / ALBUM/PRESET▲ to search folder backward or forward.
- Press MODE/CLK to confirm and store the track into memory.
- Repeat steps 3 and 4 to store additional tracks into the memory if necessary.
- When all the desired tracks have been programmed, press ▶ to play the tracks in the assigned order.
- Press ■ to stop playing of programmed tracks and press ■ again to cancel programming.
COPYING OF CD
The system allows you to copy the track from CD to USB or SD.
COPY 1 TRACK
- Insert a USB device or SD card and then repeatedly press CD/USB/SD until "CD" is displayed.
- Press REC./DEL.during playback.
- "one" will flash on the display.
- Press REC./DEL.to confirm.
- The USB or SD icon will flash on the display. Copying is performing now.
-
After copying is finished, the unit will stop playback automatically.
-
The unit will return to CD mode;
- CDDA format files recorded in "CDIN" folder;
- MP3 format files recorded in "COPY" folder.
COPY 1 FOLDER (FOR MP3 DISC ONLY)
- Insert a USB device or SD card and select the CD function. Ensure the unit is in stop mode.
- Press / to search desired folder for copying.
- Press REC./DEL.
- "one" will flash on the display.
-
Turn TUNING/SKIP knob until "dir" is displayed.
-
Press REC./DEL.to confirm.
- The USB or SD icon will flash on the display. Copying is performing now.
- When the USB or SD icon stops flashing, it means that the folder copying is completed.
COPY ALL TRACKS
- Insert a USB device or SD card and select the CD function. Ensure the unit is in stop mode.
- Press REC./DEL.
- "one" will flash on the display.
-
Turn TUNING/SKIP knob until "ALL" is displayed.
-
Press REC./DEL.to confirm.
- The USB or SD icon will flash on the display. Copying is performing now.
- When the USB or SD icon stops flashing, it means that all track copying is completed.
SPLIT TRACK FUNCTION FOR USB/SD RECORDING FOR TURNTABLE/AUX IN
1) Manual Split Operation Procedure: During recording, the USB/SD icon will flash on the display. If a new track is required, press and the display will show "ts", then the unit will stop recording temporarily and resume again. A new file representing a new track will be created on the USD device or SD card.
2) Auto Split Operation Procedure:
- Before recording, select audio source, then press MODE/CLK and the display will show "t-on", which means the auto split function has been activated. Then start USB/SD recording, the unit can automatically detect the silent part between each track, and create a new file to move on to start recording the next track.
- To deactivate auto split operation, press MODE/CLK before recording and the display will show "t-of".
NOTES:
- Several seconds of the beginning of the next track may not be recorded, as the unit may take a few seconds to create a new file on the USB device or SD card.
- During recording from turntable to the USB device or SD card, when the unit has detected any particular silent part, the turntable will stop temporarily. The turntable will resume operation once the USB device or SD card has begun creating a new file to be recorded.
BLUETOOTOOTH CONNECTION
- Repeatedly press 📋 on the remote until the display shows "bt" or repeatedly press AUX/ * to select the Bluetooth mode.
- The blue indicator will flash, indicating that the unit is ready for connecting with your Bluetooth-enabled device.
- Switch on the Bluetooth function of your Bluetooth device, and search "RD-F327B" for connection.
- After connection is successful, the blue indicator light will stop flashing, then start to playback your device.
EARPHONE JACK & LINE OUT JACKS
This system can be connected with headphone or external amplifier / speaker by 3.5mm earphone jack. This system can be connected with external device (e.g. amplifier and speaker) by LINE-OUT jacks at the rear of the unit.
POWER SAVING FEATURE
To save energy, if there is no audio signal from CD / Turntable / AUX IN / USB / SD for a period of over 10 minutes, the unit will automatically switch to the standby state.
SPECIFICATIONS:
Input: AC 100-240V\~50Hz
Output: DC 12V 1A
Frequency range for AM: 522kHz-1620kHz
Frequency range for FM: 87.5MHZ-108MHZ
Frequency range: 2.402GHz - 2.480GHz
Transmitting power: 4dBm

Bluetooth®
The Bluetooth word mark and logos are registered trademarks owned by Bluetooth SIG, Inc. and any use of such marks by Trinovae Development (HK) Co., Ltd. is under license.

As a responsible company, we care about the environment.
As such we urge you to follow the correct disposal procedure for the product, packaging materials and if applicable, accessories and batteries. This will help conserve natural resources and ensure that the materials are recycled in a manner that protects health and the environment.
You must follow laws and regulations about disposal. Waste electrical products and batteries must be disposed of separately from household waste when the product reaches the end of its life.
Contact the store where you bought the product and your local authority to learn about disposal and recycling. The batteries must be disposed of at your local recycling point.
We apologize for any inconvenience caused by minor inconsistencies in these instructions, which may occur as a result of product improvement and development.
Darty Holdings SAS © 14 route d'Aulnay 93140 Bondy, France 06 / 09 / 2017
This product is manufactured, distributed, serviced and warranted exclusively DARTY et Fils.
"JVC" is the trademark of JVC KENWOOD Corporation, used by Etablissement DARTY et Fils under license.
Product Description –
Bluetooth® turntable
Platine vinyle Bluetooth ^®
Bluetooth ^® -platenspeler
We declare that the above product has been evaluated and deemed to comply with the requirements of the listed European Directives and standards:
RoHS 2 Directive (2011/65/EU) - Directive RoHS 2 (2011/65/UE)
RoHS-2 richtlijn (2011/65/EU) Directiva RoHS 2 (2011/65/UE)
ETSI EN 301 489-1 V2.2.0
ETSI EN 301 489-17 V3.2.0
EN 61000-3-2:2014
EN 61000-3-3:2013
EN 55032:2015
EN 55020:2010+AC:2011
EN 62479:2010
ETSI EN 300 328 V2.1.1 (2016-11)
ETSI EN 303 345 V1.1.7 (2017-03)
ETSI EN 303 345 V1.1.7 (2017-03)
EN 60065:2014
Notified Body: DEKRA
Organisme Notifié
The person responsible for this declaration is:
Position - Poste: General Manager Direct Sourcing
Signature - Signature:
Date : 7 ^th September, 2017