836000HB - Humidifier AirCare - Free user manual and instructions
Find the device manual for free 836000HB AirCare in PDF.

User questions about 836000HB AirCare
0 question about this device. Answer the ones you know or ask your own.
Ask a new question about this device
Download the instructions for your Humidifier in PDF format for free! Find your manual 836000HB - AirCare and take your electronic device back in hand. On this page are published all the documents necessary for the use of your device. 836000HB by AirCare.
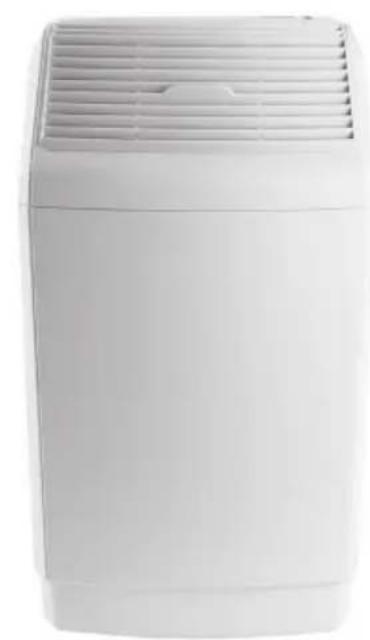
USER MANUAL 836000HB AirCare
set up guide and owner's manual
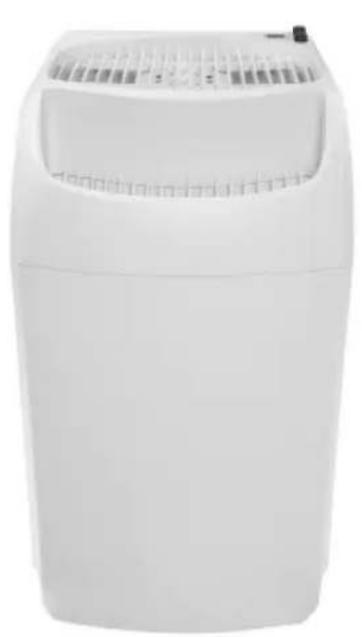
- Pour-in fill design
- 6-gallon reservoir
- Three speed control
- Auto shutoff

Intertek
Your Serial Number:
table of contents
Humidifier Quick Set Up. 2&3
Read Before Using 4
General Information:
How Evaporative Humidifiers Work 5
Get the Most from your Humidifier 5
Wick Performance. 5
Cautions Regarding Water Additives 5
Detailed set up:
Unpack and Assemble the Unit. 6
Install Components 7
Assemble Chassis and Base 7
Fill Reservoir. 7
Locate Place for Humidifier 7
Operation: 8
Model 836000HB .8
Model 831000. 8
Common to all models. 8
Maintenance 9
How to Care for Your Humidifier. 9
General Cleaning 9
Disinfecting Unit 10
Replacement parts and Accessories. 11
Troubleshooting 12
Warranty. 13
Use these basic instructions for setting up your unit.
Use the "Detailed Set Up" on page 6 for additional set up and operational information.
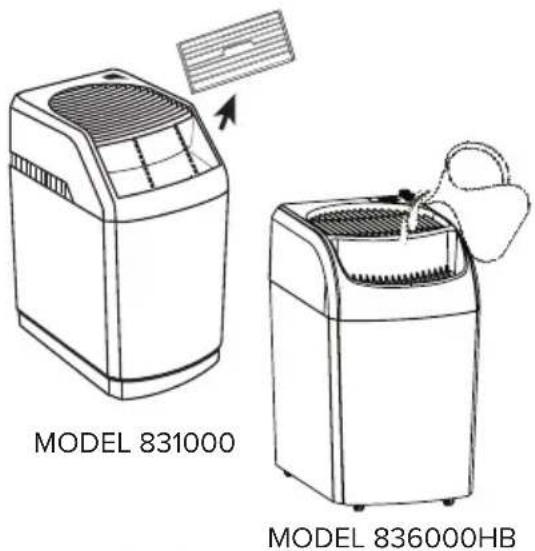
NOTE: To simplify instructions, model 836000HB is featured in most illustrations.
Images of the 831000 unit are included where needed.
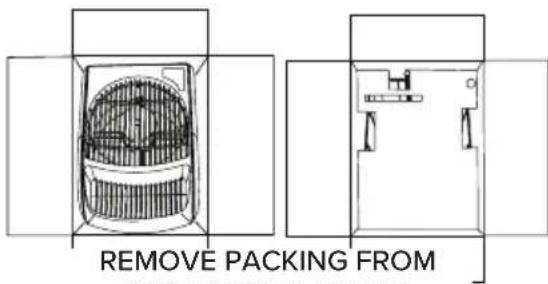
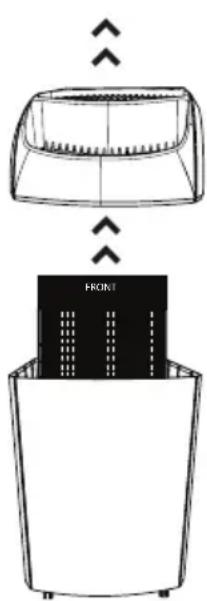
UNPACK HUMIDIFIER
a. OPEN THE CARTON AND LIFT OUT OF THE CHASSIS (TOP SECTION)
b. NOTE THE FLOAT ROD STICKING UP THROUGH THE INNER PACKING.
c. CAREFULLY FREE THE FLOAT ROD FROM THE CARDBOARD PACKING.
d. REMOVE THE CARDBOARD INNER PACKING.
e. DO NOT THE DISCARD THE SMALL STYROFOAM CUBE. IT IS NOT PACKING.
UNPACK UNIT
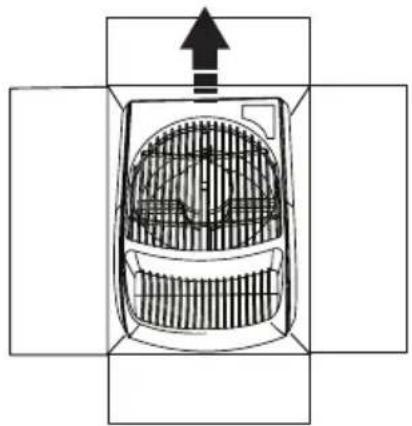
LIFT OUT THE CHASSIS
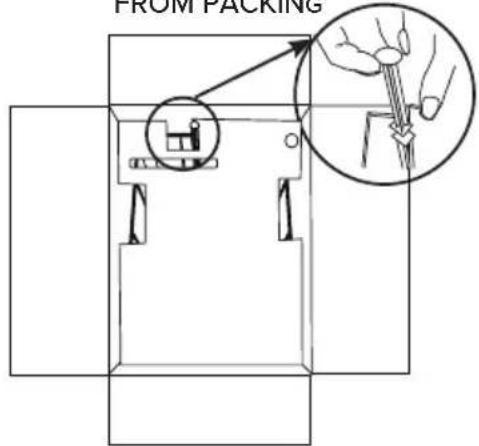
REMOVE THE FLOAT ROD FROM PACKING
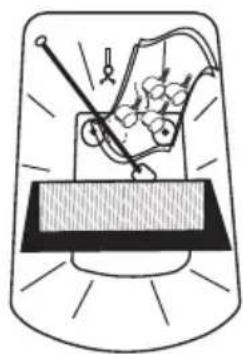
REMOVE THE PARTS BAG
AND OTHER CONTENTS FROM BASE
ASSEMBLE CONTENTS OF BASE
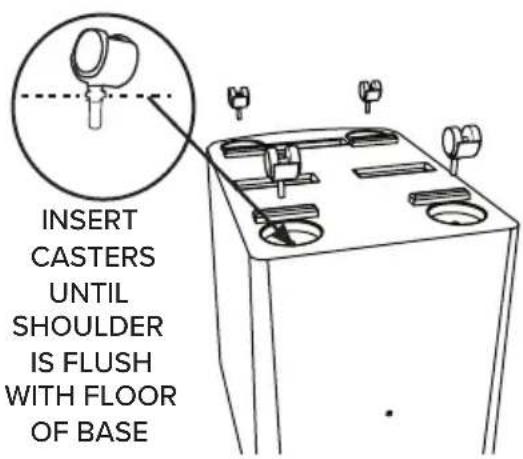
INVERT THE BASE AND INSTALL THE CASTERS
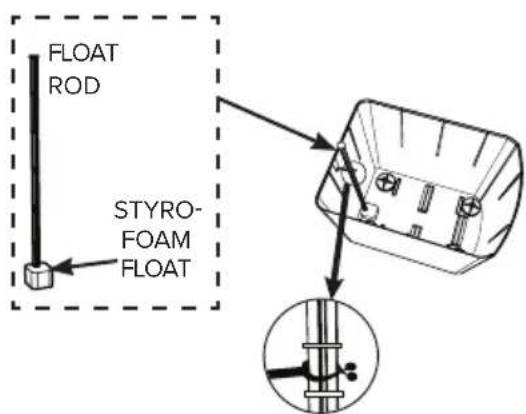
ENSURE THE STYROFOAM FLOAT IS ATTACHED TO FLOAT ROD
INSTALL THE FLOAT ROD IN THE BASE

INSTALL WICK IN BASE
COMPLETED INSTALLATION
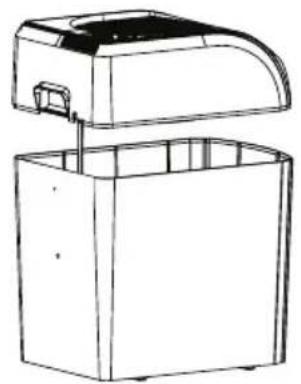
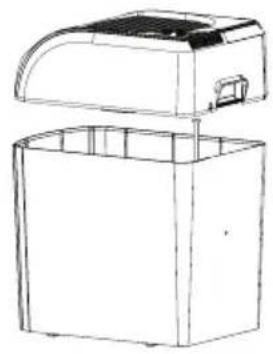
ASSEMBLE CHASSIS AND BASE
PLACE CHASSIS ON BASE
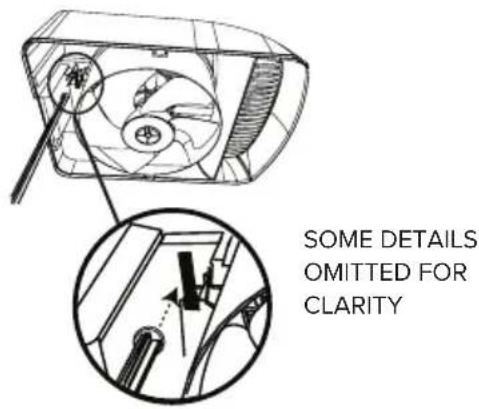
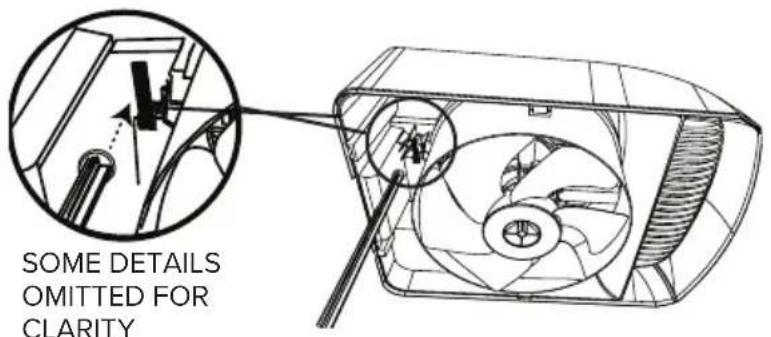
FLOAT ROD MUST MAKE CONTACT WITH METAL SWITCH
LEVEL

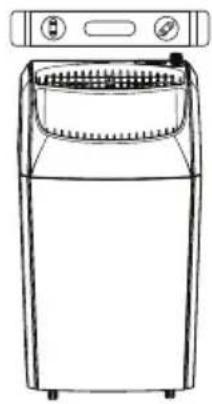
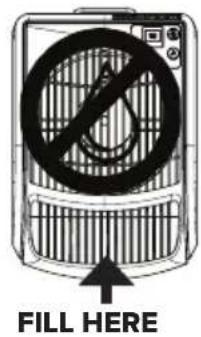
FILLING UNIT
REMOVE FRONT LOUVERS (Model 831000 only)
FILL ONLY TO THE "MAX FILL LINE" INSIDE
POSITION
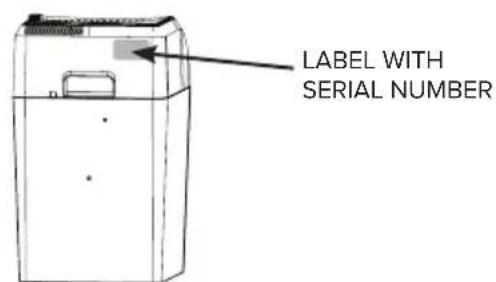
LOCATE THE SERIAL NUMBER
LABEL ON UPPER BACK OF
THE CHASSIS, AND WRITE IT
ON THIS MANUAL COVER FOR
QUICK REFERENCE
SEE FOLLOWING MANUAL FOR DETAILED SET UP AND OPERATING INSTRUCTIONS FOR SPECIFIC MODELS
FOR HELP, CALL 1.800.547.3888 OR VISIT AIRCAREPRODUCTS.COM
READ BEFORE USING YOUR HUMIDIFIER
WARNING: means if the safety information is not followed someone could be seriously injured or killed.
CAUTION: means if the safety information is not followed someone may be injured.
READ AND SAVE THESE INSTRUCTIONS
- To reduce the risk of fire or shock hazard, this humidifier has a polarized plug (one blade is wider than the other). Plug humidifier directly into a 120V, A.C. electrical outlet. Do not use extension cords. If the plug does not fully fit into the outlet, reverse plug. If it still does not fit, contact a qualified electrician to install the proper outlet. Do not change the plug in any way.
- Keep the electric cord out of traffic areas. To reduce the risk of fire hazard, never put the electric cord under rugs, near heat registers, radiators, stoves or heaters.
- Always unplug the unit before moving, cleaning or removing the fan assembly section from the humidifier, or whenever it is not in service.
- Keep the humidifier clean. To reduce the risk of injury, fire or damage to humidifier, use only cleaners specifically recommended for humidifiers. Never use flammable, combustible or poisonous materials to clean your humidifier
- Do not put foreign objects inside the humidifier.
- Do not allow unit to be used as a toy. Close attention is necessary when used by or near children.
- To reduce the risk of electrical hazard or damage to humidifier, do not tilt, jolt, or tip humidifier while unit is running.
- To reduce the risk of accidental electrical shock, do not touch the cord or controls with wet hands.
- To reduce the risk of fire, do not use near an open flame, such as a candle or other flame source.
WARNING:
For your own safety, do not use humidifier if any parts are damaged or missing.
To reduce risk of fire, electric shock, or injury always unplug before servicing or cleaning.
To reduce the risk of fire or shock hazard, do not pour or spill water into control or motor area. If controls get wet, let them dry completely and have unit checked by authorized service personnel before plugging in.
GENERAL INFORMATION
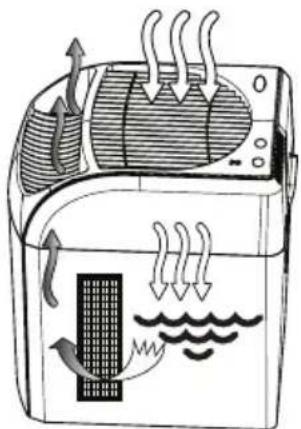
How Evaporative Humidifiers Work
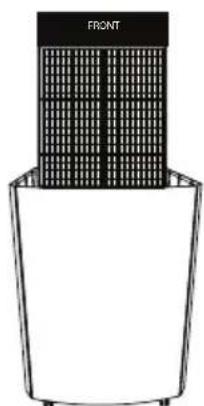
Your new humidifier adds humidity to your home by drawing dry air into the humidifier though the large top grille, then moisturizing it as it passes through the saturated wick. The air becomes humidified, while any dust and hard water minerals remain in the wick. Because the water is evaporated, there is just clean, moist air.
Get the Most from Your Humidifier
When first setting up your humidifier, place it in a central area where the air can flow evenly throughout the home. Initially, it may take up to 48 hours of operation for humidity levels to rise, depending on outdoor air temperatures and the tightness of your home's construction. To raise the humidity quickly, run the humidifier on high during the day (lower the fan speed at night, if needed, for sleeping.) More helpful notes on location follow in the "Detailed Set-Up" portion of this manual.
Wick Performance
As the evaporative wick traps accumulated minerals from the water, its ability to absorb and evaporate water decreases. We recommend changing the wick at the beginning of every season and after every 30 to 60 days of operation to maintain optimum performance. In hard water areas, more frequent replacement may be necessary to maintain your humidifier's efficiency.
CAUTIONS Regarding Water Additives
Only use cool, clean water to fill your humidifier.
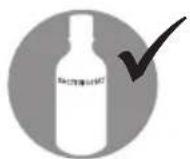
- To maintain the wick's integrity and performance, never add anything to the water except Essick Air brand Bacteriostat for evaporative humidifiers.
- For best results do not use softened water. If you only have softened water available, you can use it, but mineral buildup will occur more quickly. Use distilled or purified water to extend the life of the wick.
- Never add essential oils to the water. It can damage the plastic seals and cause leaks.
- Never add water treatment intended for ultrasonic or rotobelt humidifiers.

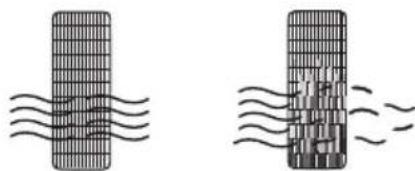
Replace wick every 30 to 60 days for best performance.


DETAILED SET UP
Unpack and Assemble the Unit
- Open the box, revealing the chassis.
- Remove any packaged literature on top.
- Lift the chassis up and out of the carton.
- Carefully pull the cardboard packing away from around the float rod.
- Remove cardboard and pull the base from the carton.
NOTE Do not dispose of the small Styrofoam block. This is not packing material, it is the float.
- Remove contents of the base including parts bag.
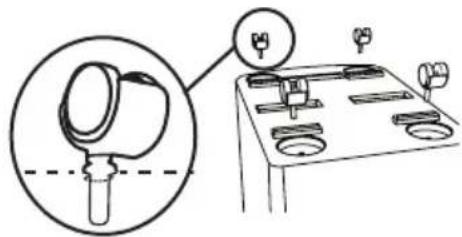
- Turn the cabinet upside down. Remove the casters from the parts bag and install them in the base.
- Casters should be fully inserted and fit snug - gly with stem shoulder reaching the cabinet surface.
- Set the base right-side up to install contents.
Install Components
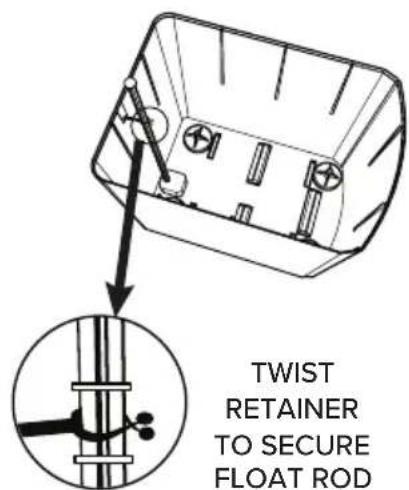
- Install the small Styrofoam float onto the float rod. Insert the float into the correlating shape on the base. Note the float rod retainer in the back of the base.
- Secure the float rod in position by twisting the flexible float rod retainer around the upright rod.
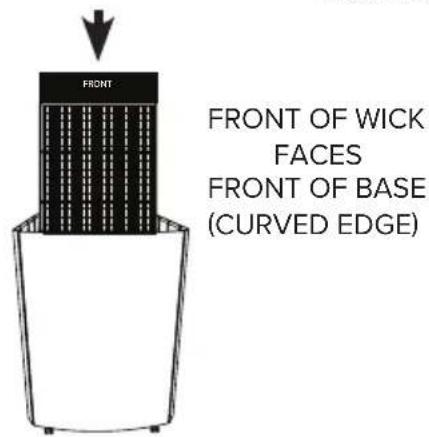
- Install the wick retainer (with the wick inside) in the front of the base. Observe the word "front" on the wick retainer and place it facing the front (curved edge) of the humidifier base.
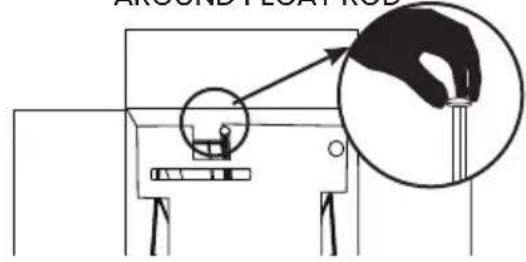
AROUND FLOAT ROD
LOCATOR VIEW
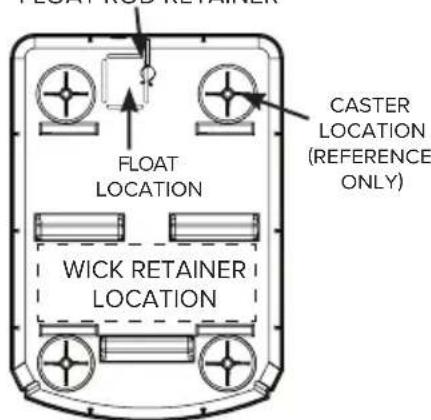
FLOAT ROD RETAINER
FRONT
TWIST RETAINER
TO SECURE ROD
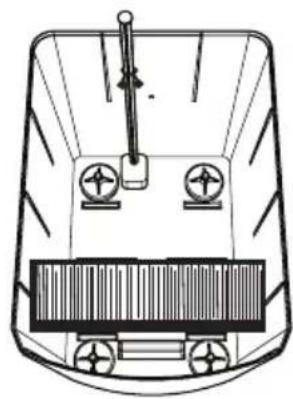
Assemble Chassis and Base
- Align the chassis to the base. Starting at the back, bring the two sections together.
IMPORTANT NOTE: The float rod must make contact with the metal switch in order for the unit to operate.
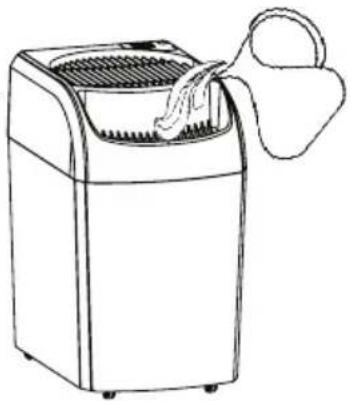
Fill Reservoir
CAUTION Turn unit off before filling.
NOTE Follow Cautions on page 5 regarding additives to water.
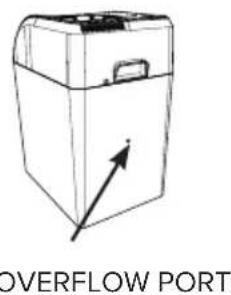
- If desired, lift out the louvers at the front of the 831000 unit. Otherwise, pour cool water into the reservoir through the louvers or grid (depending on the model). Total capacity is six gallons. Do not overfill as water will leak out the overflow port.
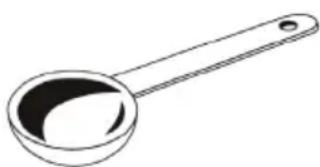
- Add bacteriostat per the instructions on the bottle.
CAUTION Do not allow water to spill onto the motor or control panel. If the motor or controls get wet turn unit off and allow them to dry completely before turning unit on again.
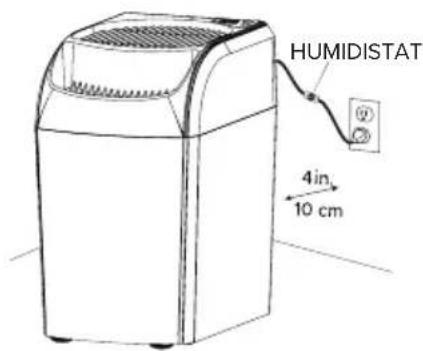
Locate Place for Humidifier
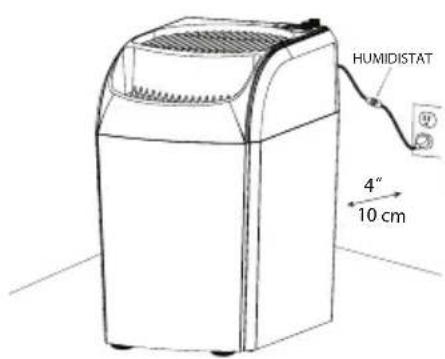
- Once unit is assembled and filled up, centrally position the humidifier so the humidified air flows throughout the house. Consider the following points when identifying where to locate the humidifier:
Tips for Positioning
- On level surface near an inside wall.
- Located for best flow through your home.
- At least 4 inches from wall.
Not next to thermostat or hot air vent. - Not by window (to avoid condensation).
OPERATION:
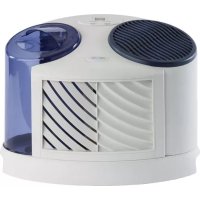
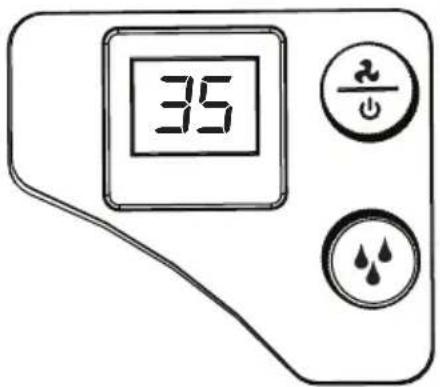
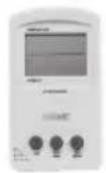
Model 836000HB (analog controls with digital display screen)
Turn On and Set Controls.
-
Press the fan/power knob once to turn the unit on. Two dashes (-) will appear on the display.
-
Rotate the fan knob clockwise to set the fan level. The fan speed proceeds from low (F1) to high (F3). NOTE: The knob will rotate freely clockwise. To decrease the fan speed, turn the knob counterclockwise.
-
Rotate the humidity knob clockwise to set the percentage of desired humidity. The range for setting the humidity is from 25% to 65% , and goes up in 5% increments. Lower the level by rotating the humidity knob counterclockwise.
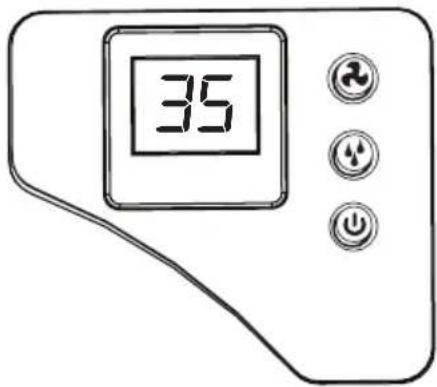
Model 831000 (full digital controls)
Turn On and Set Controls
- Press the power button once to turn unit on. Two dashes (-) will appear on the display.
- Adjust the fan speed by pressing the fan button The display will show the fan speed as it proceeds from low (F1) to high (F3).
- Press the humidity button to set the percentage of desired humidity. The range for setting the humidity is from 25% to 65% and goes up in 5% increments as the button is pressed. Once 65% is reached, the cycle starts over again at 25% .
Common to All Models
Humidifier Status Indications


seconds.
Refill Indication: When the reservoir is empty, an F displays on the LCD screen.
Check Filter: After every 720 hours of operation a reminder to check the filter/wick condition is programmed to show CF on the display. Check the condition of the filter/wick, and change it if necessary. Clear the CF display by unplugging the humidifier, waiting 60 seconds, and plugging it back in.
Control Lock: You can lock the controls to avoid unwanted changes to your settings by pressing and holding the power button down for five seconds. CL will display for a few seconds, then resume displaying room humidity. Turn off this feature by holding down the power button for five
FOR HELP, CALL 1.800.547.3888 OR VISIT AIRCAREPRODUCTS.COM
MAINTENANCE
How to Care for Your Humidifier
CAUTION Turn the unit off and disconnect the power before attempting any maintenance.
Wick Replacement (Uses 1043 Superwick)
- When it's time to replace the wick, allow the unit to run dry so the wick will be drier and easier to remove.
- With the unit turned off and unplugged, lift the chassis (top part) off and set aside in a safe place.
- Lift out the wick in the black wick retainer.
- Unlatch the clips on the side of the retainer, open and discard the used wick. DO NOT DISCARD THE BLACK WICK RETAINER.
- Insert a new 1043 wick and close wick retainer using the small clips on the edge of the retainer.
General Cleaning
We recommend cleaning the unit regularly to keep it free of scale and smelling fresh.
Recommended cleaning fluids:
- White vinegar to remove scale
Household bleach for general disinfecting (use for cleaning only).
NOTE Regular use of an EPA approved bacteriostat, such as part # 1970, added to the water reservoir helps keep the interior of the unit from growing mildew or mold.
NOTE When cleaning, we recommend moving the humidifier to an area where water will not cause damage, such as the kitchen or bathroom.
Cleaning the Unit
- Before cleaning, we recommend allowing the unit to run out of water to make cleaning easier. Turn off and unplug the unit. Lift off the chassis and empty the cabinet by removing the wick, wick retainer, float rod, and Styrofoam float.
- Place the wick retainer in the sink to drain. Open the retainer and dispose of the used wick.
- Pour out any water remaining in the base. Clean the reservoir in the base by filling about half full with clean water and adding about 1 cup of white vinegar. Let it sit for 20 minutes, then pour the water out. Rinse out reservoir completely.
- Take a soft cloth dampened with white vinegar and water solution and wipe down the interior and exterior of base.
Performance Tips
Wicks should be replaced at least once each season, and after every 30 to 60 days of use.
In areas with hard water, replace wick more often.
- Use Essick Air Bacteriostat (part # 1970) to reduce bacteria and mineral buildup. Follow directions on the bottle.
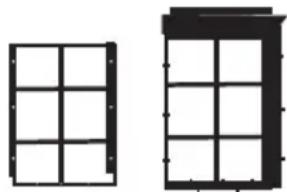
OPEN THE RETAINER
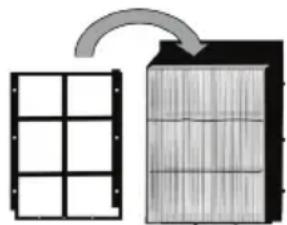
REPLACE WICK & CLOSE RETAINER
Wick Care:
- Wicks should not be washed or rinsed.
-
If cleaning the base between wick changes, run the fan until the wick is dry. Then lift the wicks out, supporting them with your hands, and set them aside to be reinstalled after the cleaning is complete.
-
Rinse the base thoroughly with fresh water to remove scale and cleaning solution before disinfection.
- Prepare unit for use by filling the base with cool, clean water.
CAUTION DO NOT OVERFILL, AS LEAKING MAY OCCUR.
- Install a new wick into the wick retainer. See "Wick Replacement" on page 9.
- Position the wick retainer in the base as described on page 6, step 12.
- Replace the Styrofoam float and float rod and secure by twisting the retainer around the float rod.
- Place the chassis back onto the base ensuring the float rod meets the small metal switch. (See page 7.)
NOTE Ensure all assembly directions are followed carefully.
Disinfecting Unit
Disinfect the humidifier at the end of the season, (or more often if needed).
- Clean as described above.
- Fill reservoir half full of water and add 1 teaspoon of household bleach. Use same bleach and water solution to clean reservoir in base. Let sit for 20 minutes.
- Rinse base thoroughly until no smell of bleach remains.
- Wipe down exterior with soft cloth dampened with clean water, then dry unit with soft, clean cloth.
- If you plan to continue using the humidifier, refill and install a new wick as described in this manual.
- If storing the humidifier for the season, place it in the original carton, if available. Do not store in attic or other high temperature location, as damage will occur.
Tips for Humidity Setting
To start, set the humidity level between 45 - 50% . Adjust to desired level after getting a baseline reading.
It may take up to 48 hours of operation to see overall humidity levels change.
CDC tests show that humidity levels of 43% greatly reduce the ability of the flu virus to spread.
We recommend using high speeds during the day to spread humidified air rapidly, and using low speed at night.
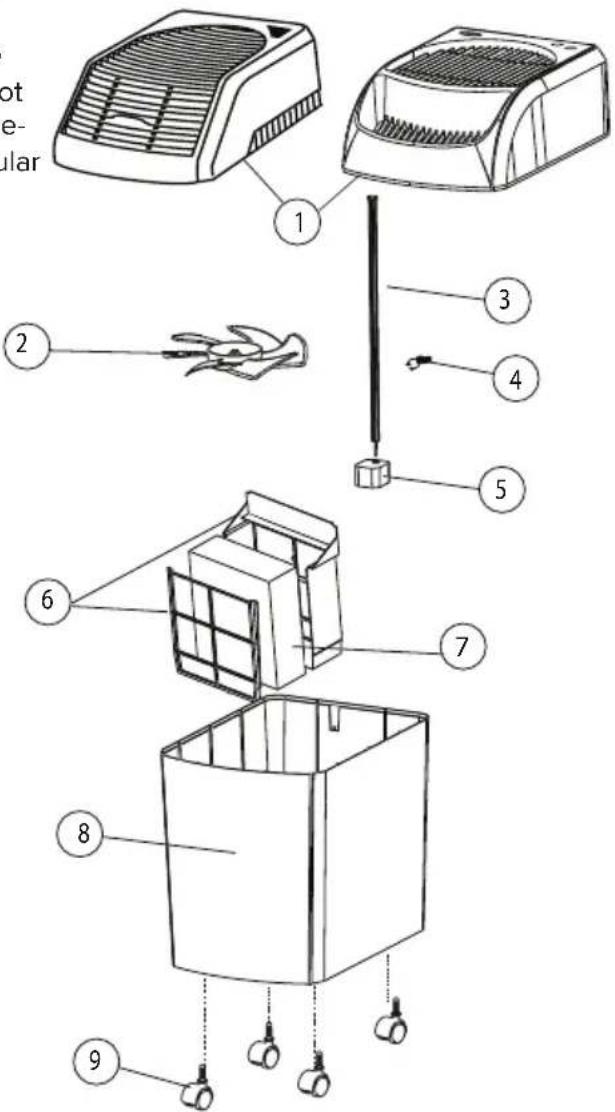
REPLACEMENT PARTS AND ACCESSORIES
Note Chassis illustration is for reference only and is not intended to reflect a particular model.
You may also be interested in:
BACTERIOSTAT PART # 1970
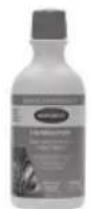
Reduces bacterial growth in humidifier. Extends life of wick. 32 oz
HYGROMETER PART # 1990
Reads and displays room humidity and temperature (C^ and F^)
REPLACEMENT PARTS FOR SALE
| # | PART NAME | PART NUMBER BY MODEL | |
| 831000(CN) | 836000HB(CN) | ||
| 1 a | Chassis 1B72810 1B7 | 73184 | |
| 2 | Fan Blade 1B50604 | 70 | |
| 3 | Float Rod 1B72125 | ||
| 4 | Float Retainer 1B546 | 60590 | |
| 5 | Float 1B5060400 | ||
| 6 | Wick Retainer 4V33 | 98020GRYP | |
| 7 | Wick 1043 | ||
| 8 | Base 4V3395020VWH | ||
| 9 | Casters 1B5460070 | (Qty 4) | |
| - | Manual 1B73178 | ||
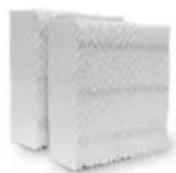
WICK MULTI-PACKS
1043-2
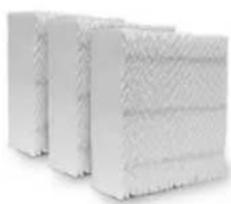
1043-3
| PROBLEM PROB | ABLE CAUSE SOLUTION | |
| Unit does not operate on any speed setting | • No power to unit. • Unit has run out of water and turned off automatically. • Refill switch operation/im-proper positioning of float Assy. | • Ensure polarized plug is fully inserted in wall outlet. • Refill reservoir. • Ensure float assembly is correctly positioned as described in "Water Fill" |
| Motor does not turn on • Check | motor/fan operation. UNDERSIDE OF CHASSIS PRESSURE SWITCH • Wick may be incorrectly installed. | • CAUTION: Do not touch the fan when accom- plishing this test, as the motor may turn on. • To test the motor, turn unit ON and turn all knobs fully ON. • Turn the chassis over and insert finger into tab where float rod is supposed to go. If fan turns on, the fan and motor are working correctly. • Remove and reinstall wick correctly. |
| Display shows "00" • Unit just | turned on. • Unit is initiating. | • Fan speed is in standby |
| Not enough humidity • Wick is | old and ineffective. • Humidistat is not set high enough | • Replace wick when clogged or hardened with minerals. • Increase humidity setting on control panel |
| Too much humidity. ( condensation becomes heavy on cold surfaces in room) | • Wick is old and ineffective. • Humidistat is not set high enough • Humidistat is set too high. | • Reduce humidistat setting or increase room temperature |
| Water leak • Cabinet may have | been overfilled. There is a safety overflow hole in rear of cabinet. | • DO NOT OVERFILL cabinet. Correct water level is indicated inside of cabinet side wall. |
| Odor • Clean and disinfect cabinet following Care | and Maintenance instructions. • Add EPA registered Bacteria Treatment according to instructions on the bottle. • It may be necessary to replace the wick if odor persists. | |
| Control panel does not respond to input. Display shows CL | • Control lock feature has been turned on to prevent changes in settings. | • Press Humidity and Speed buttons at same time for 5 seconds to deactivate feature. |
| Display flashes "20" • ROOM | Humidity is lower than 20%. | • Will read actual humidity when level comes up to 25%. |
| Display flashes"-"level comes up to 25%. • Will remain until humidity drops below 90%. | ||
| HUMIDIFIER TWO YEAR LIMITED WARRANTY POLICY SALES RECEIPT REQUIRED AS PROOF OF PURCHASE FOR ALL WARRANTY CLAIMS. This warranty is extended only to the original purchaser of this humidifier when the unit is installed and used under normal conditions against defects in workmanship and materials as follows: · Two (2) years from date of sale on the unit, and · Thirty (30) days on wicks and filters, which are considered disposable components and should be replaced periodically. The manufacturer will replace the defective part/product, at its discretion, with return freight paid by the manufacturer. It is agreed that such replacement is the exclusive remedy available from the manufacturer and that TO THE MAXIMUM EXTENT PERMITTED BY LAW, THE MANU- FACTURER IS NOT RESPONSIBLE FOR DAMAGES OF ANY KIND, INCLUDING INCIDENTAL AND CONSEQUENTIAL DAMAGE OR LOSS OF PROFITS OR REVENUES. Some states do not allow limitations on how long an implied warranty lasts, so the above limita- tions may not apply to you. Exclusions from this warranty We are not responsible for replacement of wicks and filters. We are not responsible for any incidental or consequential damage from any malfunction, accident, misuse, alterations, unauthorized repairs, abuse, including failure to perform reason- able maintenance, normal wear and tear, nor where the connected voltage is more than 5% above the nameplate voltage. We are not responsible for any damage from the use of water softeners or treatments, chemi- cals or descaling materials. We are not responsible for the cost of service calls to diagnose the cause of trouble, or labor charge to repair and/or replace parts. No employee, agent, dealer or other person is authorized to give any warranties or conditions on behalf of the manufacturer. The customer shall be responsible for all labor costs incurred. Some states do not allow the exclusion or limitation of incidental or consequential damages, so the above limitations or exclusions may not apply to you. How to obtain service under this warranty Within the limitations of this warranty, purchaser with inoperative units should contact customer service at 800-547-3888 for instructions on how to obtain service within warranty as listed above. This warranty gives the customer specific legal rights, and you may also have other rights which vary from province to province, or state to state. Register your product at www.aircareproducts.com |
If you have questions or issues with your unit, please contact us right away. We can be reached Monday through Friday, 7:30 am - 5:30 pm CST. You can also email us at info@essickair.com
THIS PAGE INTENTIONALLY LEFT BLANK
AIRCARE
For English, see page 1
PROBLEM CAUSE SOLUTION
For English, see page 1