— Hi-fi system — Mode d'emploi PDF")
LIFE P64074 (MD 43198) - Hi-fi system MEDION - Free user manual and instructions
Find the device manual for free LIFE P64074 (MD 43198) MEDION in PDF.
| Product type | Micro hi-fi system |
| Brand | Medion |
| Model | LIFE P64074 (MD 43198) |
| Output power | 2 x 2.5 watts RMS |
| Power consumption | Approximately 20 watts |
| Power supply | Mains adapter 100-240 V ~ 50/60 Hz, output 5 V / 2300 mA |
| Radio bands | FM 87.5-108 MHz / AM 522-1620 kHz |
| CD player | CD, CD-R, CD-RW, Class 1 laser |
| Speakers | 2 speakers, 4 ohm impedance |
| Headphone jack | 3.5 mm jack |
| Auxiliary inputs | 2 x RCA (AUX IN) and 3.5 mm jack (LINE IN) |
| Remote control battery | 1 x CR2025, 3 V |
| Audio functions | Equalizer (Classic, Rock, Pop, Jazz), Mute |
| Alarm and timer | Alarm (buzzer/CD/radio), sleep timer (up to 90 min) |
| Display | Numeric display |
| Antenna | Built-in FM wire antenna |
| Station presets | Yes, manual |
| Cleaning | Soft dry cloth, unplug before |
| Operating temperature | 0 to +35 °C |
Frequently Asked Questions - LIFE P64074 (MD 43198) MEDION
User questions about LIFE P64074 (MD 43198) MEDION
0 question about this device. Answer the ones you know or ask your own.
Ask a new question about this device
Download the instructions for your Hi-fi system in PDF format for free! Find your manual LIFE P64074 (MD 43198) - MEDION and take your electronic device back in hand. On this page are published all the documents necessary for the use of your device. LIFE P64074 (MD 43198) by MEDION.
USER MANUAL LIFE P64074 (MD 43198) MEDION
natural_image
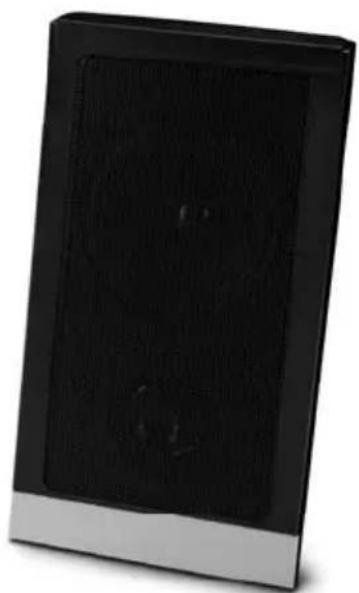
Black rectangular electronic device with a metallic frame and two small black components on its surface (no visible text or symbols)
natural_image
Front view of a black MEDION digital kitchen appliance with control panel and display (no visible text or symbols on device body)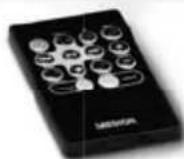
natural_image
Black rectangular electronic device with a metallic base and visible internal components (no text or symbols)Hifi-keten
Chaîne hi-fi
Hi-Fi Anlage
Micro Audio System
MEDION® LIFE® E64074 (MD 43198)
Inhaltsverzeichnis
DE
text_image
DC R "EADP" OUT SF AK ROUT R L AU R L LH R FHAIT. 111 1314 6text_image
QR code image containing encoded data, no visible human-readable text1. About these instructions.... 25
1.1. Warning symbols and key words used in these instructions .....25
EN
2. Proper use
3. Declaration of conformity....26
4. Safety information ....NL
4.1. Operating safety....27
4.2. Installation location ....27
4.3. Repairs 27
4.4. Environmental temperature
4.5. Power supply 29
4.6. Mains adapter ....30
4.7. CD player....30
4.8. Batteries 30
5. Package contents
6. Overview of the device.... 33
6.1. Front 33
6.2. Rear....34
6.3. Remote control....35
7. Getting started
7.1. Inserting/replacing batteries in the remote control 36
7.2. Connecting the mains adapter ....36
7.3. Aerial reception....36
7.4. Setting up the device 36
7.5. Connecting the loudspeakers ....37
8. Connecting the headphones 37
9. Connecting an external playback device 37
10. Operation using the controls on the player or remote control...... 38
11. Switching on the device/switching to standby 38
12. Audio functions.... 38
12.1. Volume/mute 38
12.2. Equalizer....38
13. Setting clock time 38
14. Using the alarm.... 39
14.1. Setting the alarm 39
14.2. Activating/deactivating the alarm 39
14.3. Stopping the alarm/activating the snooze function ....39
15. Radio....40
15.1. Selecting the frequency range ....40
15.2. Tuning the stations 40
15.3. Saving and selecting stations ....40
16. Playing back CDs 41
16.1. Inserting a disc....41
16.2. Start/pause/stop playback 41
16.3. Track selection, fast rewind/forward....41
16.4. Program the playing order of tracks 42
17. Cleaning 42
18. Disposal 42
19. Technical data 43
20. Legal notice 44
1. About these instructions

Read the safety instructions carefully before using the device for the first time. Note the warnings on the device and in the operating instructions. Always keep the operating instructions close to hand. If you sell the device or give it away, please ensure that you also pass on these instructions.
1.1. Warning symbols and key words used in these instructions
 | DANGER!Warning of immediate mortal danger! |
 | WARNING!Warning of possible risk of fatal injury and/or serious irreversible injuries! |
 | CAUTION!Danger of possible minor or moderate injuries! |
 | NOTICE!Please follow the guidelines to avoid property damage!Additional information on using the device! |
 | NOTICE!Please follow the instructions in the operating instructions! |
2. Proper use
The device is used for playing sound media on CD, as well as for receiving radio transmissions.
The device is intended for private use only and not for industrial/commercial use.
Please note that we shall not be liable in cases of improper use:
- Do not modify the device without our consent and do not use any auxiliary equipment that we have not approved or supplied.
- Use only spare parts and accessories that we have supplied or approved.
- Heed all the information in these operating instructions, especially the safety information. Any other use is deemed improper and can cause personal injury or property damage.
- Do not use the device in extreme environmental conditions.
This device is not intended for use by people (including children) with reduced physical, sensory or mental abilities or by those without experience and/or knowledge, unless they are supervised by a person responsible for their safety or they have been instructed in its use by that person. Children should be supervised to ensure they do not play with this device.
3. Declaration of conformity
Medion AG hereby declares that the product conforms to the following European requirements:
• EMC Directive 2014/30/EC
• Low Voltage Directive 2014/35/EC
• Ecodesign Directive 2009/125/EC
• RoHS Directive 2011/65/EU
4. Safety information
4.1. Operating safety
- Never allow children to use electrical devices unattended.

DANGER!
Risk of suffocation!
Packaging film can be swallowed or used improperly. Therefore, there is a risk of suffocation!
- Keep packaging material such as plastic film or plastic bags away from children.
4.2.Installationlocation
The device is not designed for use in rooms with high humidity levels (e.g. bathrooms). Make sure that:
- Do not cover the vents so as to ensure adequate ventilation; the ventilation openings must not be covered by objects like newspapers, tablecloths, curtains, etc. which obstruct the air flow;
- Allow at least 10 cm clearance at the sides and top of the device if it is placed in a rack or a similar enclosed space;
- Do not expose the device to extreme temperatures;
- Do not expose the device to direct sources of heat (e.g. heaters, sunlight);
- Do not place naked flames (for example, lit candles) near or on the device;
- Avoid contact with moisture, water and splashes; Do not therefore place any objects filled with liquid, for example vases, on the device;
- Do not place the device close to magnetic fields (for example, televisions or other loudspeakers).
4.3. Repairs
- Contact customer services if: - the power cable is burnt or damaged
–liquid has penetrated the device
—the device is not operating correctly
–the device has fallen or the housing is damaged.
- Repairs to your device should only be carried out by qualified specialists.
4.4. Environmental temperature
- The device can be operated at an ambient temperature of 0^ to +35^ and at a relative humidity of < 80% (non-condensing).
- When switched off, the device may be stored at temperatures between -20^ and +60^ .

DANGER!
Risk of electric shock!
Major changes in temperature or fluctuations in humidity can cause moisture to build up within the product due to condensation – this can cause an electrical short circuit.
▶ After transporting the device, wait until it has reached ambient temperature before switching it on.
4.5. Power supply
- Operate the device only on a 100–240 V\~ 50/60 Hz earthed safety contact socket that is close by and easy to access.

DANGER!
Risk of electric shock!
Even when the device is switched off, some components are live.
In order to disconnect the power to your device or to completely isolate the device from voltage sources, disconnect the mains plug from the mains socket and remove the batteries from the device.
- Make sure that the mains cable does not present a trip hazard. The connecting cable must not be trapped or squashed.
- Before cleaning, pull the plug out of the mains socket.

DANGER!
Risk of electric shock!
The device contains live parts. They pose a risk of electric shock or fire if an unintentional short circuit occurs.
▶ Never open the housing and never insert any objects through the slots and openings into the device!
- Do not place any objects on the cables as they may be damaged.
- Keep the device at a distance of at least one metre from sources of high-frequency or magnetic interference (televisions, loudspeakers, mobile telephones, etc.) to avoid malfunctions and data loss.
4.6. Mains adapter
- Use only the mains adapter supplied:
BSY Switching Power Supply, Model BSYB050230V W (for UK: BSYB050230B W). - If the housing of the mains adapter or the power cable is damaged, the mains adapter must be disposed of and replaced with a new mains adapter of the same type.
- The mains adapter may only be used in dry rooms.
4.7. CD player

text_image
LASER KLASSE 1 CLASS 1 LASER PRODUCT APPAREIL LASER DE CATEGORIE 1The CD player is a class 1 laser product. The device has a safety system that prevents dangerous laser rays from escaping during normal use. To avoid eye injuries, never tamper with or damage the safety system of the device.
4.8. Batteries
The remote control is battery-operated. Please note the following:
- Keep new and used batteries out of the reach of children. Risk of chemical burns if batteries are swallowed.

WARNING!
Risk of chemical burns!
The remote control supplied with the product contains a button cell battery. If this battery is swallowed, it can cause serious internal chemical burns within two hours which may prove fatal.
▶ Seek medical help immediately if you think that batteries may have been swallowed or secreted in any part of the body.
- Before inserting the batteries, check that the contacts in the device and on the batteries are clean and, if necessary, clean them.
- Always use new batteries of the same type. Never use old and new batteries together.
- Pay attention to the polarity (+/−) when inserting the batteries.
- There is a risk of explosion if batteries are replaced incorrectly! Replace the batteries only with the same or equivalent type.
- Never try to recharge non-rechargeable batteries. There is a risk of explosion!
- Never expose the batteries to excessive heat (such as direct sunlight, fire or similar).
- Store batteries in a cool, dry place. Strong direct heat can damage batteries. Therefore, keep the product away from strong heat sources.
- Never short-circuit batteries.
- Never throw batteries into a fire.
- Remove leaking batteries from the device immediately. Clean the contacts before inserting a new battery. There is a risk of skin irritations from battery acid!
• Always remove flat batteries from the device.
- If the device is not going to be used for long periods, remove the batteries.
5. Package contents
Please check your purchase to ensure that all items are included. If anything is missing, please contact us within 14 days of purchase. The following items are supplied with your monitor:
- Micro Audio System
• 2 loudspeakers
• 1 remote control incl. button cell 3V CR 2025 battery - Mains adapter [BSY Switching Power Supply, Model BSYB050230V W (for UK: BSYB050230B W)]
- Documentation

DANGER!
Risk of suffocation!
Packaging film can be swallowed or used improperly. Therefore, there is a risk of suffocation!
- Keep packaging material such as plastic film or plastic bags away from children.
6. Overview of the device
6.1. Front
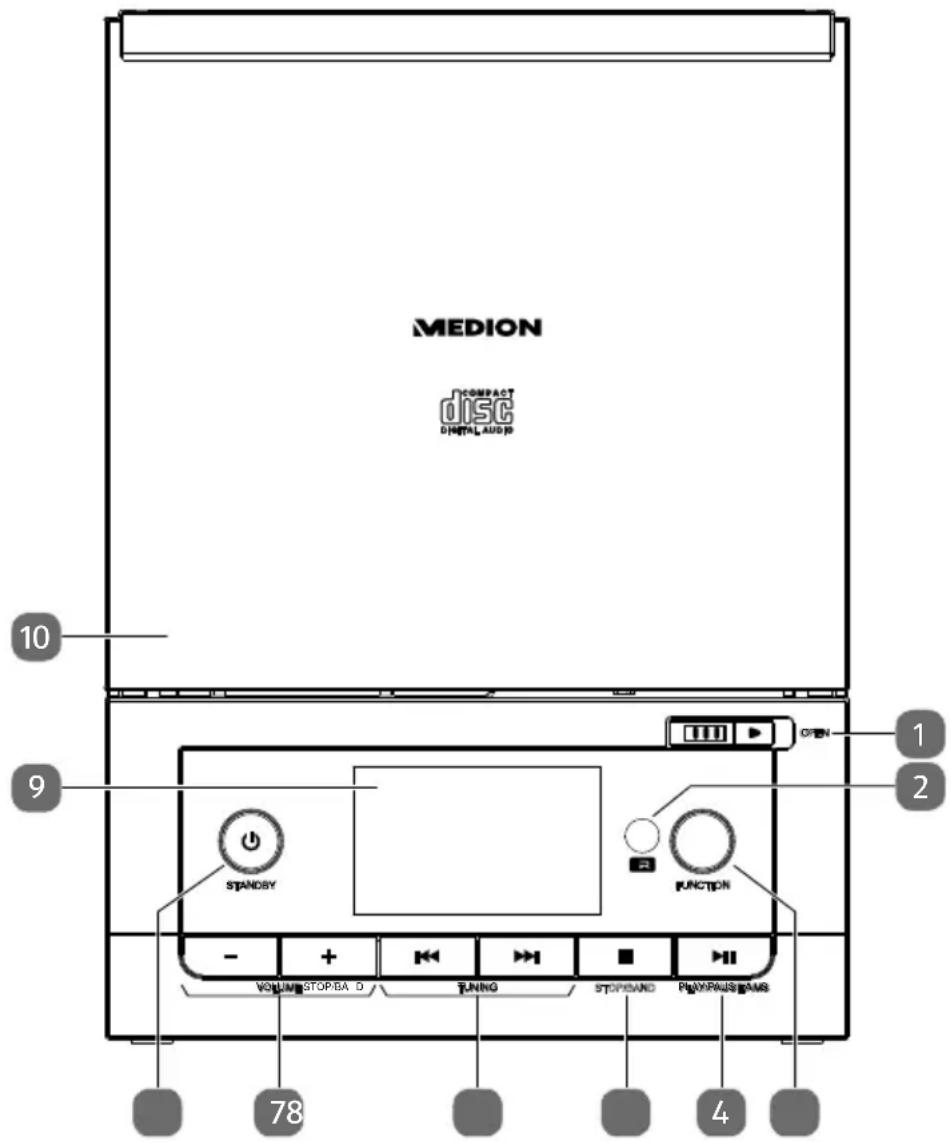
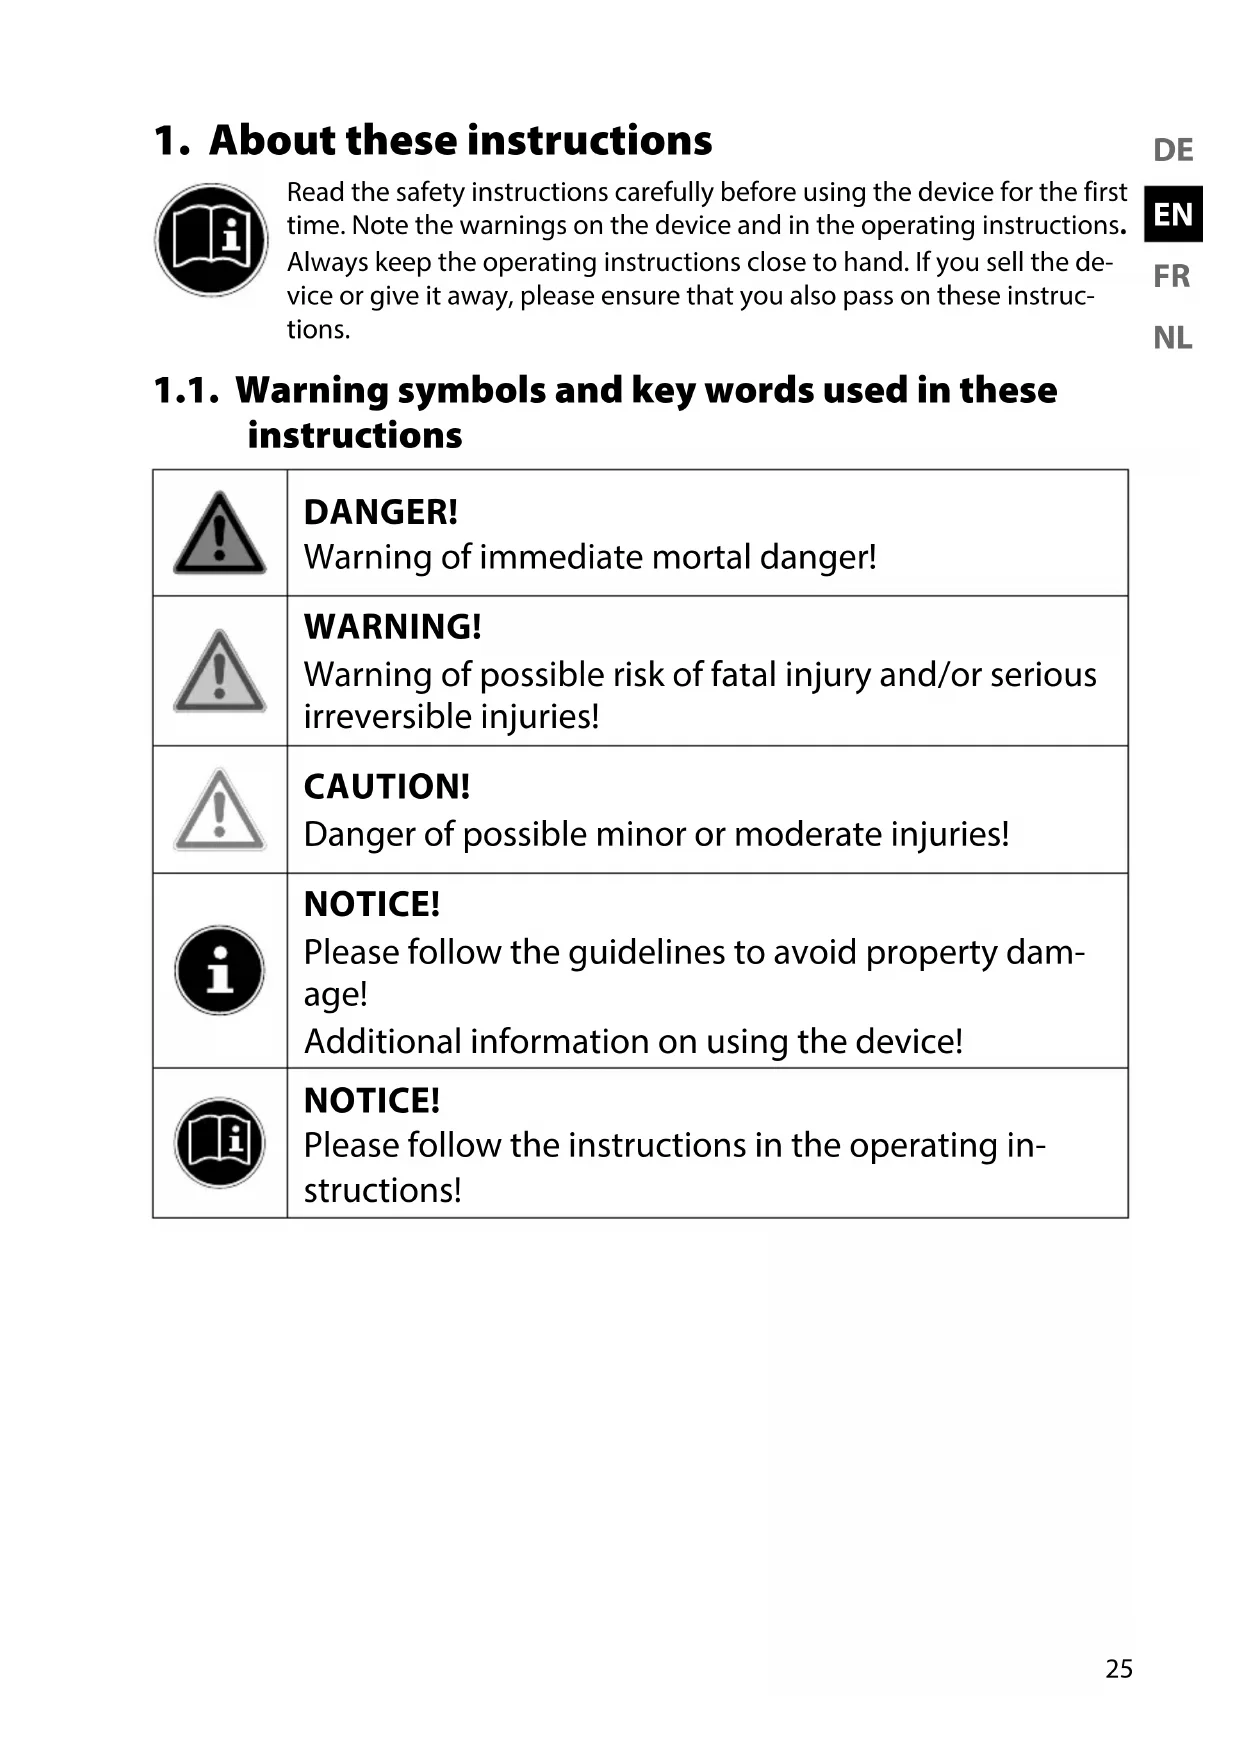
text_image
MEDION COMPACT DISC DIGITAL AUDI 10 9 STANDSY FUNCTION OPEN 1 2 - + VOLUME STOP/BA D TUNING STOP/SAND PLAYERS/PAMS 78 41) OPEN – Open CD compartment
2) Infrared sensor for remote control
3) FUNCTION – Select playback mode
4) PLAY/PAUSE/AMS ▶ II – Start/pause playback/scan radio stations
5) STOP/BAND ■ – Stop playback / change frequency band
6) TUNING – Radio frequency/station search backwards/forwards
|◄/►► – Fast rewind/forward / previous/next track
7) VOLUME -/+ - Volume control
8) STANDBY – Turn the device on / switch to standby mode
9) Display
10) CD compartment
6.2. Rear

text_image
DC R "EADP" OUT SF AK ROUT R L AU R L LH R FHAIT. 111 1314 611) DC IN – Connection socket for mains adapter
12) HEADPHONE – Connection socket for headphones
13) SPEAKER OUT L/R – Connection sockets for loudspeakers
14) AUX IN L/R - Connection sockets for an external audio device (Cinch)
15) LINE IN - Connection socket for an external audio device (3.5 mm jack)
16) FM ANT. - FM aerial
6.3. Remote control
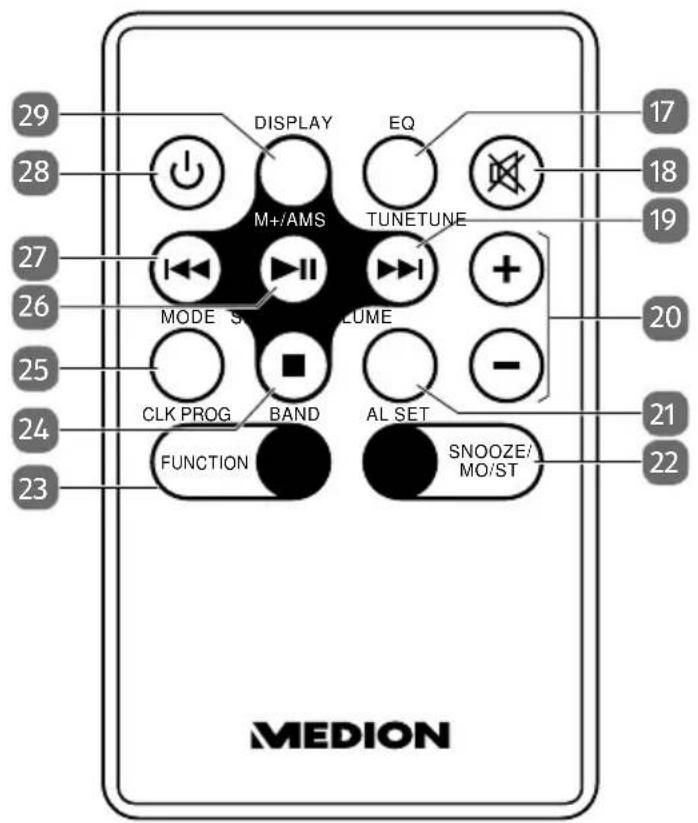
text_image
29 28 DISPLAY EQ 17 M+/AMS TUNETUNE 18 MODE S VOLUME 20 CLK PROG BAND AL SET 21 FUNCTION SNOOZE/ MO/ST 22 MEDION17) EQ – Select equaliser mode
18) - Switch sound off
19) ▶ – Fast forward / next track
TUNE– Radio frequency/station search forwards
20) VOLUME -/+ - Decrease/increase volume
21) SLEEP/AL SET – Select sleep mode/setting the alarm
22) SNOOZE/MO/ST – Snooze function/switch between stereo and mono playback
23) FUNCTION- Select playback mode
24) ■ – Stop playback
BAND – Switch between FM/AM
25) MODE / CLK PROG – Programme mode / set clock
26) ▶ II – Start/pause playback
M+/AMS– Select radio memory spaces/scan radio stations
27) ← Fast rewind / previous track
TUNE – Radio frequency/station search backwards
28) - Turn device on / switch to standby mode
29) DISPLAY -Show time
7. Getting started
7.1. Inserting/replacing batteries in the remote control
Insert the supplied 3V CR 2025 battery into the remote control.
▶ Open the battery compartment cover as illustrated on the back of the remote control.

WARNING!
Risk of explosion if batteries are replaced incorrectly.
- Replace batteries only with the same or equivalent type.
7.2. Connecting the mains adapter
Connect the supplied mains adapter to the DC IN socket on the device.
▶ Plug the mains adapter into an easily accessible 100-240V \~ 50/60Hz mains socket.

NOTICE!
To avoid damaging the device, use only the mains adapter supplied: BSY Switching Power Supply, Model BSYB050230V W (for UK: BSYB050230B W).
7.3. Aerial reception
A wire aerial is already connected to the device for radio reception. Fully unwind the aerial cable and arrange it for optimum reception.
7.4. Setting up the device
- Place the device on a sturdy, level surface. Some aggressive varnishes can corrode the rubber feet on the device. If necessary, place the device on a suitable underlay.

NOTICE!
Before making a connection to an external device, unplug the mains adapter from the device!
7.5. Connecting the loudspeakers
Connect the coloured cinch plugs on the loudspeaker cable to the corresponding colour-coded sockets. R (red) is for the cable pair for the right loudspeaker. L (white) is for the cable pair for the left loudspeaker.
8. Connecting the headphones
On the front of the device you will find a 3.5mm headphone socket HEADPHONE.
Insert headphones with a 3.5mm jack plug into the headphones connection.
When headphones are connected the speakers are disabled. Volume adjustment is still possible to alter the headphone volume.

WARNING!
Risk of hearing damage!
Using headphones/earphones to listen to a device at high volumes for an extended period can damage your hearing.
Before pressing play, set the volume to the lowest setting.
▶ Start playback and increase the volume to a comfortable level.
9. Connecting an external playback device
You can use the AUX IN or LINE IN sockets to connect an external playback device (e.g. CD player or MP3 player).
▶ Switch the device to standby mode.
▶ Switch off your external device.
Insert one end of a L/R cinch cable (not supplied) into the AUX IN connection or use a cable with a 3.5mm jack with the LINE IN socket on the rear of the device.
Connect the other end of the cable with your external device.
▶ Switch your external unit on.
▶ Press the button on the device.
▶ Press the FUNCTION button until AUX is shown on the display. The audio signal from your external device will now be played back.
10. Operation using the controls on the player or remote control
You can activate the main play functions of your player using the buttons on the device. In addition to the basic controls, the remote control also provides numerous additional options for using all functions of your device.
In these instructions, we refer to the remote control buttons. If reference is made to the controls on the device itself, this will be clearly indicated.
11. Switching on the device/switching to standby
▶ Press the ⏻ button to switch on the device. The display lights up.
▶ Press the ⏻ button again to switch the device back into standby mode. The display will go out.
12. Audio functions
12.1. Volume/mute
▶ Control the volume with the VOLUME -/+ buttons.
▶ Press MUTE to switch off the sound. Press the button again to cancel the mute setting.
12.2. Equalizer
Press the EQ button once or multiple times to call up the various sound presets: CLASSIC, ROCK, POP, JAZZ.
13. Setting clock time
▶ Press the MODE/CLK PROG button when the device is switched off. The time flashes on the display.
▶ Set the time by selecting the hour with the ◀ button and the minutes with the ▶ button.
▶ Confirm by pressing MODE/CLK PROG.
The time is now set.
14. Using the alarm
The device has an alarm function using either an alarm tone, CD or the radio.
14.1. Setting the alarm
If you want to be woken by the radio, firstly select the radio frequency (as described in "15.2. Tuning the stations" on page 40) and then switch off the radio with ⏻
▶ Press the AL SET button when the device is switched off. The time flashes on the display.
▶ Set the time by selecting the hour with the ◀ button and the minutes with the ▶ button.
▶ Use the FUNCTION button to select whether the alarm should use an alarm tone or a radio station. Press the button once or multiple times. If you have selected the alarm tone, only the alarm symbol is displayed. If you have selected CD or RADIO for the alarm function, the corresponding text will appear on the display.
▶ Press the AL SET button again to complete the setting.
The alarm symbol will be shown on the display if the alarm has been activated.
14.2. Activating/deactivating the alarm
▶ Press the AL SET button. The alarm time flashes.
▶ Press the button again to switch the alarm on or off.
The alarm symbol will appear or disappear from the display.
14.3. Stopping the alarm/activating the snooze function
When the alarm sounds, you can stop it by pressing or activate the snooze function by pressing SNOOZE on the remote control. The alarm will sound again after approx. 9 minutes.
Using the sleep timer
With the sleep timer, the device turns off automatically after a defined period of time.
With the sleep timer, the device turns off automatically after a defined period of time of up to 90 minutes.
▶ Press the SLEEP button once or multiple times and select the length of the sleep timer in increments of 10 minutes.
To switch off the sleep timer, press SLEEP until SLEEP appears on the display.
15. Radio
In order to switch to radio mode, press the FUNCTION button once or multiple times until RADIO appears on the display.
15.1. Selecting the frequency range
▶ Press the ■/BAND button to switch between the frequency ranges for FM and AM.
15.2. Tuning the stations
▶ Press the TUNING ◀ or ▶ buttons briefly to set a particular frequency. Hold down one of the buttons to automatically search for the next station.
15.3. Saving and selecting stations
15.3.1. Storing stations manually
▶ Tune in a station that you would like to save.
▶ Press the MODE/CLK PROG button. The information for the memory position appears on the display (e.g. MEM PO1).
▶ While the display is flashing, use the ▶ II /M+/AMS button to select the memory position for this station.
▶ Press the MODE/CLK PROG button again to save the station.
15.3.2. Calling up stations
▶ Press the ▶ II /M+/AMS button once or multiple times to switch between the memory positions (e.g. MEM PO1, MEM PO2 etc.).
16. Playing back CDs
▶ Press the FUNCTION button once or multiple times until the operating mode CD appears on the display.
16.1. Inserting a disc
Make sure that there is about 15 cm of space above the device so that the lid of the CD compartment can open without hindrance.
▶ Slide the switch for the CD compartment towards OPEN to open it.
The CD compartment lid opens upwards. OPEN will appear in the display.
Place a CD with the label side facing upwards onto the support and make sure it is seated firmly.
▶ Close the CD compartment by gently pressing down the compartment lid. The CD starts to rotate and ---- appears on the display.
The first track will start to play immediately.
If there is no disc inserted or if the disc cannot be read, the display reads DISC or ERR.

Notice!
Do not open the CD compartment while the disc is still playing or rotating. Press ■ first.
16.2. Start/pause/stop playback
▶ You can start playback of the tracks with the ▶ II button. To pause playback, press the button again. Pressing the button once more resumes playback.
▶ Use the ■ button to stop playback completely and the CD will no longer rotate.
16.3. Track selection, fast rewind/forward
▶ Press the ◀ button to go back to the start of the track currently being played. Press the button again to skip to the previous track. Use the ▶ button to skip to the next track.
▶ Hold down the ◀ button to fast rewind within a track or the ▶ button to fast forward.
16.4. Program the playing order of tracks
The programme function allows you to compile your own playlist by only selecting specific tracks for playback. You can specify the order in which the list is played yourself. Proceed as follows:
▶ Stop playback with ■.
▶ Press the MODE/CLK PROG button. The memory position PO1 is displayed
Now use ◀◀ or ▶▶ to select a track (e.g. 03).
▶ Press the MODE/CLK PROG button and save further tracks in the same way.
▶ Start playback of the programmed playlist with ▶ II.
17. Cleaning
Always disconnect the device from the mains plug before cleaning it.
Only use a dry, soft cloth to clean the device. Do not use chemical solutions or cleaning products because these may damage the device's surface and/or inscriptions.
18. Disposal

Packaging
Your device has been packaged to protect it from damage in transit. Packaging materials are raw materials and can therefore be reused or recycled.
Device
Do not dispose of the device in the household rubbish at the end of its service life. Ask your local authority about suitable environmentally friendly disposal facilities.
Batteries
Do not dispose of used batteries in the household rubbish. Take the batteries to a collection point for used batteries.
19. Technical data
Product
Power consumption Approx. 20 watts
Output power 2 x 2.5 watts RMS
Radio
FM waveband 87.5 - 108 MHz
AM waveband 522 - 1620 kHz
PLL tuning 30 station memory (20 FM, 10 AM)
Mains adapter
Manufacturer BSY Switching Power Supply
Model BSYB050230V W (for UK: BSYB050230B W)
Input voltage AC 100-240 V \~ 50/60 Hz, 0.4 A
Output voltage DC 5 V
2300 mA


Remote control
Batteries for remote control 1 x 3 V CR 2025
Connections for external functions
FM aerial Permanently installed wire aerial
Line In 3.5 mm jack socket
AUX In 2 x cinch sockets
Headphone output voltage <150 mV
Speaker Impedance 4 ohms
CD player
Laser output Class 1 laser product
Supported formats CD-R, CD-RW, audio CD
Please note: These days, there are many non-standard ways of recording CDs, copy protection methods, and also a wide variety of blank CD-R and CD-RW discs. Therefore, there may occasionally be read errors or delays. This does not mean that the device is faulty.
Subject to technical modifications!

20. Legal notice
Copyright © 2016
Status: 2016-06-24
All rights reserved.
This operating manual is protected by copyright.
Mechanical, electronic and any other form of reproduction is prohibited without the written permission of the manufacturer
Copyright is owned by the company:
Medion AG
Am Zehnthof 77
45307 Essen
Germany

text_image
QR code image containing encoded data, no visible human-readable textThe operating manual can be reordered via the service hotline and is available for download via the service portal at www.medion.com/gb/service/start/.
You can also scan the QR code above and download the operating manual onto your mobile device via the service portal.
Sommaire
text_image
DC R "EADP" OUT SF AK ROUT R L AU R L LH R FHAIT. 111 1314 6PLL Tuning 30 stations programmables (20 FM, 10 AM)
Adaptateur secteur
Fabricant BSY Switching Power Supply
AUX IN 2 prises Cinch