RMP1700 RX - DJ Equipment Reloop - Free user manual and instructions
Find the device manual for free RMP1700 RX Reloop in PDF.
| Product Type | Professional CD player with USB player |
| Brand | Reloop |
| Model | RMP1700 RX |
| Dimensions (approx.) | 482 x 85 x 330 mm (19 inches, 2U) |
| Weight (approx.) | 5.5 kg |
| Power Supply | 100-240 V AC, 50/60 Hz |
| Power Consumption | 30 W |
| Supported Audio Formats | Audio CD, MP3 CD, MP3 files via USB |
| Audio Inputs | 1 x RCA (unbalanced) |
| Audio Outputs | 1 x XLR (balanced), 1 x RCA (unbalanced) |
| USB Ports | 2 x USB (front and rear) |
| Pitch | Ranges: ±4%, ±8%, ±16%, ±100% (Audio CD only) |
| Main Functions | Play, pause, cue, loop, reloop, keylock, automatic and manual BPM (Tap), jog wheel, fast forward/backward, folder selection, USB recording |
| Remote Control | Included, with basic functions |
| Display | Backlit LCD with indicators for play, pitch, BPM, loop, single/continuous, time, ID3 Tag |
| Laser System | Class 1 Laser Diode |
| Maintenance | Clean with a soft, dry cloth; do not use solvents or aerosol products |
| Safety | Do not open the casing; keep away from liquids and moisture; disconnect before cleaning; follow voltage instructions |
| Spare Parts and Repairability | Repair by qualified personnel only; no user-serviceable parts; contact your dealer |
| Operating Temperature | 5°C to 35°C |
| Included Accessories | Power cable, remote control, user manual |
Frequently Asked Questions - RMP1700 RX Reloop
User questions about RMP1700 RX Reloop
0 question about this device. Answer the ones you know or ask your own.
Ask a new question about this device
Download the instructions for your DJ Equipment in PDF format for free! Find your manual RMP1700 RX - Reloop and take your electronic device back in hand. On this page are published all the documents necessary for the use of your device. RMP1700 RX by Reloop.
USER MANUAL RMP1700 RX Reloop
Deutsch 02-11
English 12-21
Espanol. 22-31
Francais 32-41
Technical Data 42-43
RMP1700RX
PROFESSIONAL DJ USB / MP3 / CD MEDIA PLAYER & REORDER

Bedienungsanleitung
ACHTUNG!
For your own safety, please read this operation manual carefully before initial operation! All persons involved in the installation, setting-up, operation, maintenance and service of this device must be appropriately qualified and observe this operation manual in detail. This product complies with the requirements of the applicable European and national regulations. Conformity has been proven. The respective statements and documents are deposited at the manufacturer.
Mode d'emploi
ATTENTION!
To prevent fire or avoid an electric shock do not expose the device to water or fluids!
Never open the housing!
ATTENTION!
Keep information for further reference!
48153 Muenster / Germany © 2017
INHALT
Reloop - Solutions for DJs
48153 Muenster, Germany, Fax +49.251.6099368
www.reloop.de
INDEX
Safety instructions 13
Application in accordance with regulations 13
Maintenance. 13
1....Layout 14
1.1 Control Elements and Connections (Player) 14
1.2 Remote Control 14
1.3 Display 15
-
Device Setup 16
-
Operation 16
3.1 Basic Functions 16
3.2 ......Media Select (CD/USB). 16
3.3 Track Select, Fast Forward & Rewind 16
3.4.......Playback 16
3.5 ...Jog Wheel Mode 16
3.6 ....Pitch Fine Adjustment 17
3.7 Cueing 17
3.8 .........Looping 17
3.9 .BPM Function 17
3.10 ....Keylock 17
3.11 ...End of Operation 17
3.12..Recording 17 -
Device Settings (Submenu) 18
- Appendix 19
5.1 Database Builder Software 19
5.2 ...Trouble Shooting 21
5.3 .Technical Specifications 42
CAUTION! For your own safety, please read this operation manual carefully before Initial operation! All persons involved in the Installation, setting-up, operation, maintenance and service of this device must be appropriately qualified and observe this operation manual in detail. This product complies with the requirements of the applicable European and national regulations. Conformity has been proven. The respective statements and documents are deposited at the manufacturer.
Cngtions on puching your Rop 1700x CD/MP3/USB player. Thank you for plcing your trust in our disc jockey technology. Before operating this equipment we ask you to carefully study and observe all instructions.
Please remove the Reloop RMP-1700RX from its packaging. Check before initial operation to make sure that the device has not been visibly damaged during transport. If you detect any damage to the power cable or the casing, do not operate the device. Contact your specialised dealer.
SAFETY INSTRUCTIONS
CAUTION!
Please exercise particular caution when handling the power voltage. This voltage rating may lead to a critical electrical shock! Any damage caused by the non-observance of this operation manual excludes any warranty claims. The manufacturer is not liable for any damage to property or for personal injury caused by improper handling or non-observance of the safety instructions.
This device left the works in perfect condition. To maintain this condition and to ensure a risk-free operation the user must observe the safety instructions and warnings contained in this operation manual.
- For reasons of safety and certification (CE) the unauthorised conversion and/or modification of the device is prohibited. Please note that in the event of damage caused by the manual modification to this device any warranty claims are excluded.
- The inside of the device does not contain any parts which require maintenance, with the exception of wear parts that can be exchanged from the outside. Qualified staff must carry out maintenance, otherwise the warranty does not apply!
- Ensure that the power will only be supplied after the device has been fully set up. Always plug in the mains plug last. Ensure that the mains switch is in the „OFF“ position when connecting the device to power.
- Only use cables that comply with regulations. Observe that all jacks and bushes are tightened and correctly hooked up. Refer to your dealer if you have any questions.
- Ensure that when setting up the product the mains cable is not squashed or damaged by sharp edges.
- Prevent the mains cable from coming into contact with other cables! Exercise great care when handling mains cables and connections. Never touch these parts with wet hands!
- Ensure that the voltage selector is set to the correct national voltage level (240 V, 50 Hz or 110 V, 60 Hz, in FRG: 240 V, 50 Hz). The manufacturer is not liable for damage resulting from an incorrect setting of the voltage selector. In such a case any warranty claims are excluded.
- Connect the power cable exclusively to appropriate shock-proof outlets. The only supply point to be used is a supply outlet in accordance with specifications of the public supply network.
- Disconnect the device from the supply outlet when not in use and before cleaning! Be sure to hold the mains plug by the body. Never pull the mains cord!
- Position the device on a horizontal and stable low-flame base.
- Avoid any concussions or violent impact when installing or operating the device.
- When selecting the location of installation make sure that the device is not exposed to excessive heat, humidity, and dust. Be sure that no cables lie around openly. You will endanger your own safety and that of others!
- Do not rest any containers filled with liquid that could easily spill onto the device or in its immediate vicinity. If, however, fluids should access the inside of the device, immediately disconnect the mains plug. Have the device checked by a qualified service technician before re-use. Damage caused by fluids inside the device is excluded from the warranty.
- Do not operate the device under extremely hot (in excess of 35^ ) or extremely cold (below 5^ ) conditions. Keep the device away from direct exposure to the sun and heat sources such as radiators, ovens, etc. (even during transport in a closed vehicle). Never cover the cooling fan or vents. Always ensure a sufficient ventilation.
- The device must not be operated after being taken from a cold environment into a warm environment. The condensation caused hereby may destroy your device. Do not switch on or operate the device until it has reached ambient temperature!
- Controls and switches should never be treated with spray-on cleaning agents and lubricants. This device should only be cleaned with a damp cloth. Never use solvents or cleaning fluids with a petroleum base for cleaning.
- When relocating, the device should be transported in its original packaging.
- When starting operation, the cross-faders and volume controls of your amplifier have to be set to minimum level. Bring the loudspeaker switches into the „OFF“ position. Wait between 8 to 10 seconds before increasing the volume to avoid shot noise created by transient effect, which could cause damage to loudspeakers and the diplexer.
- Always ensure that you insert scratch-free, clean CDs into the player. When placing the CD into the tray, your hands should also be clean.
- To keep the laser head clean always close the CD tray.
Devices supplied by voltage should not be left in the hands of children. Please exercise particular care when in the presence of children.
At commercial facilities the regulations for the prevention of accidents as stipulated by the association of professional associations must be observed.
- At schools, training facilities, hobby and self-help workshops the operation of the device must be monitored with responsibility by trained staff.
- Keep this operation manual in a safe place for later reference in the event of questions or problems.
APPLICATION IN ACCORDANCE WITH REGULATIONS
- This device is a professional CD player for playback of conventional MP3/Audio CDs and USB devices. To do so connect this equipment to a mixing console.
- This product is authorised for connection to switching power AC 100-240 V, 60/50 Hz and is designed exclusively for Indoor application.
If the device is used for any other purposes than those described in the operation manual, damage can be caused to the product, leading to exclusion of warranty rights. Moreover, any other application that does not comply with the specified purpose harbours risks such as short circuit, fire, electric shock, etc. - The serial number determined by the manufacturer must never be removed to uphold the warranty rights.
MAINTENANCE
- Check the technical safety of the device regularly for damage to the mains line or the casing, as well as for wear of wear parts such as rotary and sliding switches.
- If it is to be assumed that the safe operation is no longer feasible then the device must be disconnected and secured against accidental use. Always disconnect mains plug from the outlet!
- It must be assumed that a safe operation is no longer feasible if the device bears visible defects, if the device no longer functions, following longer storage under unfavourable conditions or after major transport stress.

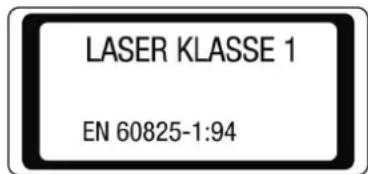
CAUTION LASER RADIATION!
This device is equipped with two Class 1 laser diodes. To ensure a safe operation do not remove any covers or try to access the inside of the equipment. The inside of the device does not contain any parts which are subject to maintenance. Maintenance must only be carried out by qualified staff.
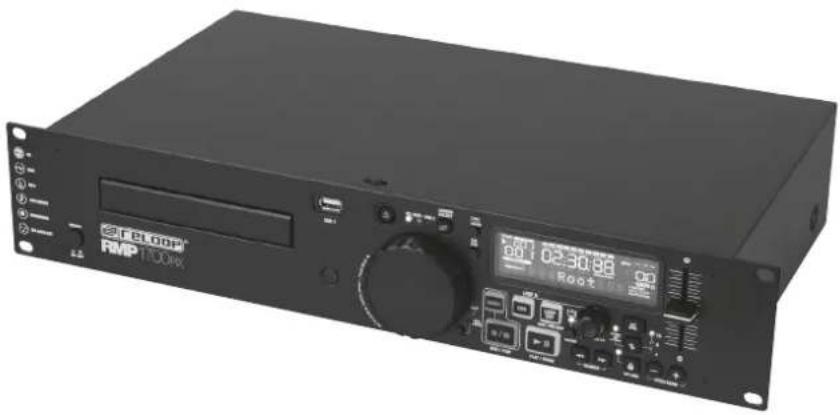
1. LAYOUT
1.1 CONTROL ELEMENTS AND CONNECTIONS (PLAYER)
FRONT PANEL
- ON/OFF Button
- CD Tray
3....USB1Port
4....Open/Close Button - ...... Media Select Button
- ......Remote Control Sensor
7....Jog Wheel
8....Time Button - .... Single/Continue Button
10....Display - ....Rec Button/Rec Stop Button
12....Mark Button
13....Cue Button/Loop-In Button
14....Loop Out/Exit/Reloop Button
15. ....Play/Pause Button
16....Track Select Encoder
17. ......TAP/BPM Button
18....Folder Button
19....Pitch Range Button
20....Search Buttons
21....Keylock Button
22....Pitch Bend Buttons
23....Pitch Fader
24....Rec Mode Button
25.....CLip LED

REAR PANEL
26....Mains Connection
27....USB2Port
28. .... XLR Audio Output (symmetrical)
29....RCA Audio Output (asymmetrical)
30. ....RCA Audio Input (asymmetrical)

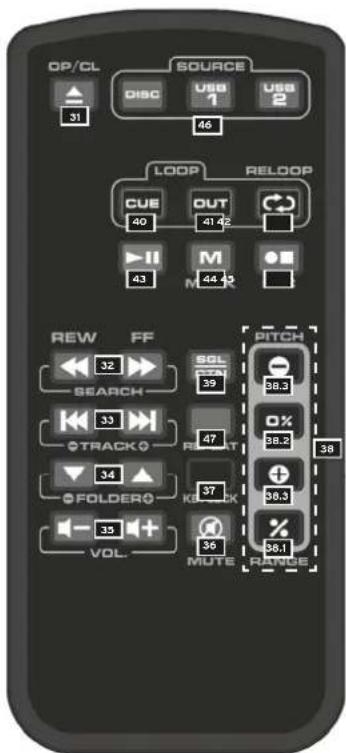
1.2 REMOTE CONTROL
DESIGNATION
31....Open/Close Button
32....Search Buttons
33....Track Select Buttons
34....Folder Select Buttons
35....Volume Control
36....Mute Button
37....KeylockButton
38....Pitch Buttons
39....Single/Continue Button
40. ... Cue Button/Loop In Button
41....Loop Out Button
42....Reloop Button
43. ....Play/Pause Button
44....Mark Button
45. Rec Button/Rec Stop Button
46....Media Select Buttons
47....Repeat Function
1.3 DISPLAY
When the device is turned on and there is no CD in the tray, "NO DISC" will appear on the Display -10-. If a CD has been inserted correctly, the total playing time and number of tracks will be shown shortly on the Display.
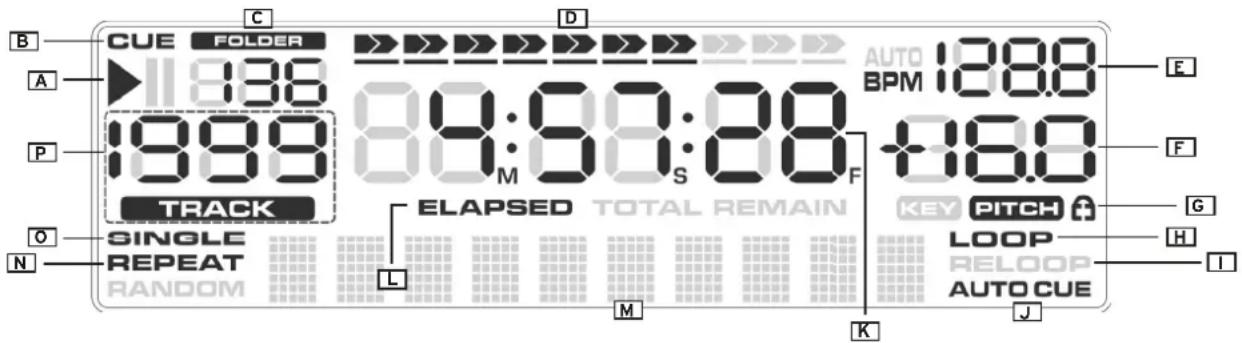
The single Display -10- elements are described in the following.
A) Play/Pause Display
The play symbol is shown during playback of a track. If the player is in pause mode, the pause symbol appears.
B) Cue Display
This symbol will appear when a loaded track is stopped and the player is in cue mode. When a new cue point is set, the corresponding symbol fl ashes up once.
C) Folder Display
This display element represents your currently selected MP3 CD's or USB device's folder.
D) Progress Display
Besides the time display, the 10 digit Progress Display represents the playback time graphically.
E) BPM Display
Shows the current BPM value. When the TAP/BPM Button -17- is being pressed for a longer period, the automatic BPM counter can be turned on and off respectively. If the counter is active, "AUTO BPM" appears on the display.
F) Pitch Display
Shows the adjusted pitch value of the current track expressed in percentage.
G) Keylock Symbol
The Keylock Symbol (padlock) lights up as soon as the Keylock Button -21- is pressed. This way the keylock function is active. When active, the track's key is kept when changing its pitch.
H) Loop Display
If a loop has been set and stored it will be shown as "Loop" on the display.
1) Reloop Display
The last stored loop can be called up and activated via the Reloop Button -14-. This will be confirmed via the blinking Reloop symbol.
J) Auto Cue Display
By pressing and holding the Single/Continue Button -9- for one second, the auto cue mode can be de-/activated. When this mode is active, the auto cue symbol on the display is lit.
K)Playback Time
This section of the display shows the playback time in m(inutes), s(seconds), and f(frames).
L) Time-Mode
Via the Time Button -8- several time modes can be selected.
Remain
"Remain" appears on the display. The remaining time of the current track is shown. The Progress Display -D- decreases from left to right. When the track is approaching its ending, the complete bar will flash warningly.
Total Remain
"Total Remain" appears on the display. The total remaining time of the CD or selected media folder is shown. The Progress Display -D decreases from left to right. When the medium is approaching its ending, the complete bar will fl ash warningly.
Elapsed
"Elapsed" appears on the display. The elapsed time of the current track is displayed. The Progress Display -D- Increases from left to right. When the current track is approaching its ending, the complete bar will flash warningly.
M) ID3 Tag Display
This display section shows artist, title, bit rate, and folder (only available for MP3 titles).
N) Repeat
If the Folder Button -18- is pressed for a longer period, "Repeat" appears on the display. The current track is played and after it has ended it will be repeated directly.
O) Single Display
By shortly pressing the Single/Continue Button -9- and -39- respectively, „Single" will appear/disappear from the display. When this is acit vated, the player will turn to pause mode after the track has been played. If „Single" is not displayed the player is in Continue mode. The current medium is played completely and afterwards it will be repeated.
P) Track Display
The 3 digit, numerical display represents the track's number.
2. SETUP
- Connect the Outputs (RCA) -29- to the line input of your mixing console or connect the XLR Output -28- to your PA.
- Connect the mains cable -26- to your power outlet
- Connect any rec source to the RCA Input -30- to be able to record the signal.
3. OPERATION
3.1 Basic Steps
Power On
After having finished all connections turn on the device via the ON/OFF Button -1-. The LED will be lit.
Loading a medium
CD
Press the Open/Close Button -4- or -31- on the supplied remote control in order to open the CD tray -2-. Insert the CD. Press the Open/Closed Button once again in order to close the CD tray.
ATTENTION!
Never try to close the CD tray manually as this could damage the mechanism.
USB
Connect a standard external USB device, such as an USB stick or USB hard disk with power supply of its own, to one of the USB ports -3- or -27-. Please make sure that the used data carrier and its stored media files are supported. Further information regarding this issue can be found at the end of this instruction manual.
3.2 Media Select (CD/USB)
If a compatible CD has been inserted or a suitable USB device is connected to one of the USB ports -3- or -27- it is possible to select the source by pressing the Media Select Button -5- repeatedly. Alternatively it is also possible to select the device by using the Media Select Buttons -46- on the remote control. The active device is displayed via the 3 LEDs next to the corresponding Select Button -5- on the front panel.
3.3 Track Select, Fast Forward and Rewind
Via the Track Select Encoder -16- it is possible to select tracks. By turning the Track Select Encoder clockwise the following tracks can be selected. By turning the Encoder counterclockwise it is possible to return to previous tracks. By pressing and holding while also turning the Encoder 9 tracks at once will be skipped. Alternatively it is also possible to use the Track Select Buttons -33- on the remote control. By pressing the Search Buttons -20- or -32- you can fastforward (right button) or rewind (left button) a track.
If you would like to play an MP3 CD or a USB device that comprises various folders it is possible to navigate as follows: By briefly pressing the Folder Button -18- the Track Select Encoder -16- will be put in browse mode. The folder LED is lit. By turning the encoder you can now navigate through the folder structure. By pressing the Folder Button -18- again the Encoder will be put in track select mode once again. Alternatively it is possible to select the folder via the Folder Buttons -34- on the remote control.
By briefly pressing the Track Select Encoder -16- while playing an MP3 title it is possible to show certain information on the display. Depending on how the MP3's Tag has been organized, it is possible to select the following values:
- File Name:
Actual file name with file extension
- Title:
The title's name is displayed.
- Artist:
The artist's name is displayed.
- Album:
The album's assigned name is displayed.
Genre:
The genre that has been assigned to the track is displayed.
In the default settings the MP3's bitrate is additionally displayed. If you prefer to deactivate this additional information you can do so in the device settings. Please see the chapter "Device Settings" for further explanations.
3.4 Playback
Press the Play/Pause Button -15- or -43- in order to start playback. By pressing the button again pause mode will be entered. The current medium can be set into two different playback modes via the Single/Continue Button -9- or -39-.
a) Single
"Single" appears on the display. The current track is played, afterwards the player enters pause mode. If the repeat function (see next paragraph) has been activated additionally, the current track will be repeated in an endless loop until this mode is turned off.
b) Continue
"Single" will disappear from the display. The whole CD or complete USB device is played. When reaching the end of a CD or a USB device's folder, playback will restart from the beginning if the repeat function is active (see next paragraph).
Apart from these two modes it is also possible to activate the repeat mode. This can be de/activated by pressing the Folder Button -18- for a longer period. The current status can be read via the "REPEAT" symbol on the display -N-. The effects of the repeat mode depend on active "Single" or "Continue" mode. For further information please read the items "Single" and "Continue" in this chapter.
3.5 Jog Wheel Mode
Depending on the playback mode, the Jog Wheel -7- disposes of two different modes:
a) If the selected track is in pause or cue mode it is possible to search by frame (1/75 sec) via the Jog Wheel. In order to set a new cue point, for example, turn the Jog Wheel until you reach the desired point and press the Play -15/43- or Loop-In Button -13/40-.
b) During playback of a track it is possible to temporarily increase (clockwise) or decrease (counterclockwise) a track's pitch. The longer the Jog Wheel is turned in any of the two directions, the more the track's pitch will increase/decrease. Let go the Jog Wheel in order to exit pitch bend mode.
3.6 Pitch Fine Adjustment
Via the Pitch Range Button -19/-38.2 It Is possible to select a pitch range of +/-4% , +/-8% , +/-16% or +/-100% (a pitch range of +/-100% is only available for audio CDs). Via the Pitch Fader -23/38.3- you can now stepplessly adjust the CD's or USB device's pitch in the selected range. The difference in pitch compared to the original pitch is shown on the display -F. By using the Pitch Bend Buttons -22- it is possible to change the track's pitch by the percentage within the selected pitch range. When releasing the button the player returns to the pitch that has been previously adjusted via the Pitch Fader -23-. By pressing the Pitch Reset Button, the pitch value will be set back to 0%.
NOTE!
By turning the Jog Wheel -7- in playback mode the pitch can be increased by +100% (clockwise) or decreased by -100% (counterclockwise) as well.
For further information please see chapter "Jog Wheel Mode".
3.7 Cueing
When pressing the Cue Button/Loop In Button -13/40- during playback mode the player will return to the track's beginning and will enter pause mode if no cue point has been set. If a cue point has been set the player will return to the cue point and enter pause mode. You can set a cue point by pressing the Play/Pause Button -14/41-, thus entering pause mode. Now via the Jog Wheel -7- it is possible to search for the desired cue point by frame. Afterwards press the Cue Button -13/40- in order to save the cue point. By holding the Cue Button you will constantly return to playback mode until you release the button; afterwards the player returns to the cue point and will be in pause mode. By pressing the Play/Pause Button you will return to playback mode.
3.8 Looping
A loop is the permanent repetition of a sequence between a determined loop starting and ending point. Select a loop starting point by pressing the Cue Button/Loop-In Button -13/40- once. The LED flashes. Select the loop ending point by pressing the Loop-Out Button -14/41- once. The Player will switch to seamless-loop mode. The selected sequence will be repeated until the Loop-Out Button -14/41- will be pressed again; the player then returns seamlessly to playback mode.
By means of the Reloop Button -14/42- you can activate the stored loop or jump to the loop respectively. In order to stop the seamless loop press the Loop-Out Button -14/41.
By shortly pressing the Reloop Button -14/42- the last set loop will return to the loop in point and then played again. By pressing the Reloop Button -14- for a longer period you will enter your loop's fine adjustment. You will start with the loop-out point that can be adjusted by frame by turning the Jog Wheel -7-. In order to exit the fine adjustment at this point, press the Loop-Out Button -14/41.
After having determined the loop-out point you can enter the loop's edit mode by pressing the Reloop Button -13-. The loop can in turn be adjusted by frame via the Jog Wheel. In order to exit the fine adjustment at this point, press the Loop-Out Button -14/41-.
3.9 BPM Function
The media player disposes of an automatic BPM counter. Additionally it is possible to manually count the BPM value via the TAP/BPM Button -17- To do so the TAP/BPM Button -17- has to be pressed to the beat of the music. In order to return to the automatic BPM- counter mode the TAP/BPM Button -17- has to be pressed and held for one second. Now you will enter the automatic counter again.
3.10 Keylock
When activating the keylock function via the button -21- the original track's key will be kept, independently from the adjusted pitch. Press the button again in order to deactivate the keylock function.
3.11 End of Operation
Before turning the device off via the ON/OFF Button -1- make sure that no CD is inserted in the CD player. Also make sure that the CD Tray -2- is closed. Should this not be the case after turning off the device, turn it on again and close the open CD tray via the Open/Close Button -4/31-.
3.12 Recording
It is possible to record any desired input source (CD/USB/RCA) to a USB storage device. In order to select a recording source or to carry out further adjustments, please refer to chapter 4, paragraphs 5-9.
Start to record by pressing the Rec Button -45- during playback. The recording process starts onto the previously selected storage device. In order to stop your recording, press the Rec Button -45- once again. Your recording will now be written onto the storage device. By pressing the Mark Button -44-, your recording will be turned seamlessly into a file. This way you can divide your recording into several segments.
By using the Rec Mode Button -24-, it is possible to switch the displayed information between playback mode and rec mode. If the Rec Mode LED is lit, the display information is divided as follows:
- Elapsed Time: Shows the elapsed time of a recording.
- Remain Time: Shows the remaining time of a recording.
- Total Remain: Shows the available space on your storage device. Please note that the length depends from the storage capabilities of the recording media.
If the Clip LED -25- lights up, the recording volume is too high. Adjust this as described under 4.7.
4. DEVICE SETTINGS (SUBMENU)
By pressing the Time Button -8- for a longer period you will enter the device settings. The navigation can be carried out via the Track Select Encoder -16-. By pressing the Track Select Encoder you will enter the respective submenu.
1. Playlist
Info
Provided the Database Builder has been carried out for the used USB device (see chapter "Database Builder" in the appendix), several criteria can be adjusted for filtering of the stored title.
Normal
This is the default setting. The titles will be navigated according to the determined data structure.
Title
If this criteria has been selected, it is possible to continuously and alphabetically navigate through the title structure by turning the Track Select Encoder -16-. The Folder Buttons -34- on the remote control behave analogically to this.
Artist
If this criteria has been selected, it is possible to continuously and alphabetically navigate through the artist structure by turning the Track Select Encoder -16-. The Folder Buttons -34- on the remote control behave analogically to this.
Album
If this criteria has been selected, it is possible to continuously and alphabetically navigate through the album structure by turning the Track Select Encoder -16-. The Folder Buttons -34- on the remote control behave analogically to this.
Genre
If this criteria has been selected, it is possible to continuously and alphabetically navigate through the genre structure by turning the Track Select Encoder -16-. The Folder Buttons -34- on the remote control behave analogically to this.
Example
On your USB device you are looking for an artist whose name starts with a "G". Under 1. Playlist you select the item "Artist". Now navigate via the Track Select Encoder -16- (folder mode has to be active: see chapter Track Select) to the letter "G". All artists with the initial letter "G" are now displayed in sequence. Via the Track Select Encoder -16- you can select the corresponding track as soon as you have returned to track select mode by pressing the Folder Button -18-.
2. Sleep Time
Adjustable stand-by time from "No Sleep" up to 120 minutes.
3. Line Mode
a) M
Selected ID3 TAG information runs through the display once and then stops. This procedure will then be repeated.
b) Mode 2
ID3 TAG information runs through the display once and then stops.
c) Mode 3
ID3 TAG information runs through the display in a repeating loop.
4. Bitrate
Here you can determine whether the bit rate should be displayed or not.
5. REC.USB
It is possible to select which USB port to use for recordings, namely USB1-3- or USB2-27-.
6. REC. Bitrate
Select the quality of your recording. You can select between WAV / 64kbit / 128kbit / 192kbit / 256kbit / 320kbit.
7. REC. Input
Adjusts the input volume of the respective recording source. If turned to "MANUAL", it is possible to adjust the volume via the Jog Wheel -7-
8. OUT Mode
Selects which sound source should be played back. In order to listen to internal playback (USB/CD), select "Playback". Switch to "REC MON" in order to hear the RCA Input's -30- signal.
9. REC. Select
In order to record an external source via the RCA Audio Input -30-, select "External". If you wish to start recording via USB or CD, please select "Internal".
A. Version
Here the player's current firmware is displayed. Due to the modular way of programming there are two values that can be displayed.
B. Load Defaults
With the "Load Default" adjustment it is possible to return the player to the default settings. All player adjustments are thereby set back to their original status. Confirm the setting back via the Track Select Encoder -16-.
C.Exit&Save
In order to save the individually adjusted settings and exit the menu confirm the item "Exit & Save" via the track Select Encoder -16.
5. APPENDIX
5.1 Database Builder Software
In the Reloop support forum (www.reloop.com/forum) you can download the Reloop Database Builder from the Download Center in the category "Software Updates". This software is capable of analyzing USB data carriers, creating special index files, allowing fast and easy access to music files. Moreover it is possible to search interactively for certain criteria such as title or artist (also see chapter "Device Settings", item 2 " Playlist").
Minimum system requirements:
Operating system: Microsoft Windows XP (SP3), Vista (SP2), Windows 7
CPU: Intel Pentium 4,1 GHz processor or better,Intel Centrino Mobile Technology 1.6 GHz,512 MB RAM
Hard disk: at least 100 MB free storage space required
Proceed as follows:
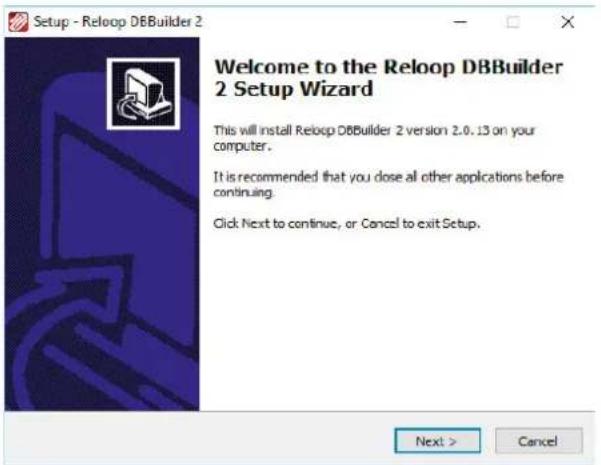
1. Reloop Database Builder Software-Installation
Carry out the Database Builder's installation program. As first step click the "Next" button.
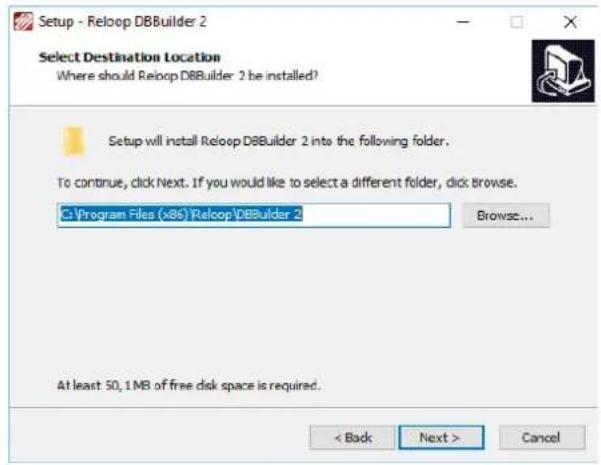
Here you can select the folder that you would like to use in order to store the Database Builder and confirm via "Next".
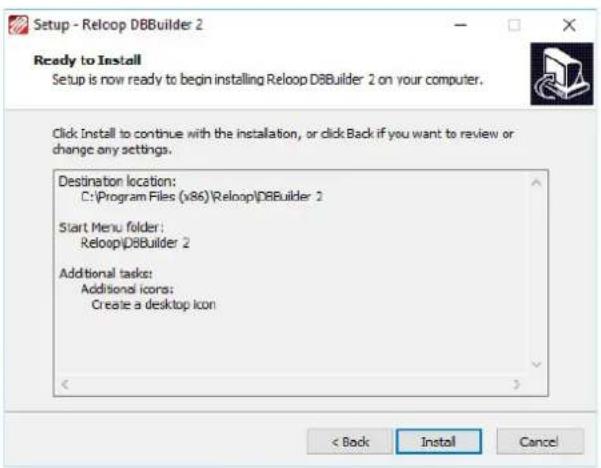
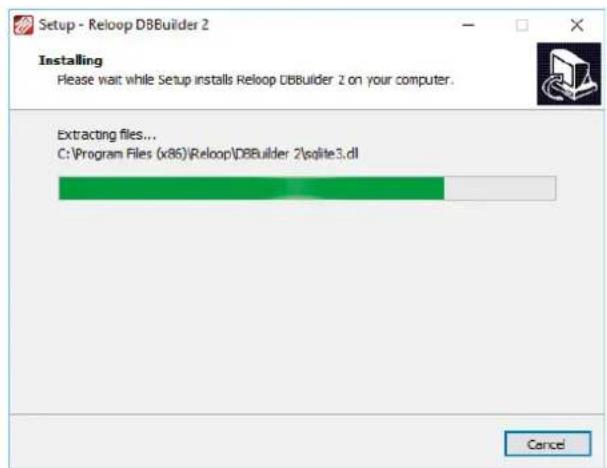
The program can now be installed. Click the "Install" button. The program will now be installed.
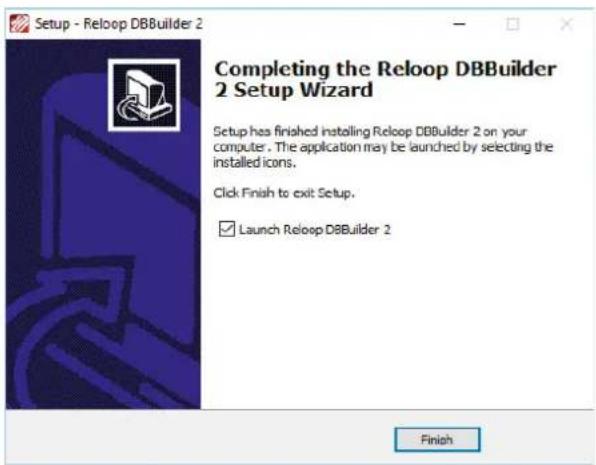
In order to successfully finalize the installation click on the "Finish" button as last step.
2. Using the Reloop Database Builder
In order to use the Reloop Database Builder and analyze your USB storage device proceed as follows:
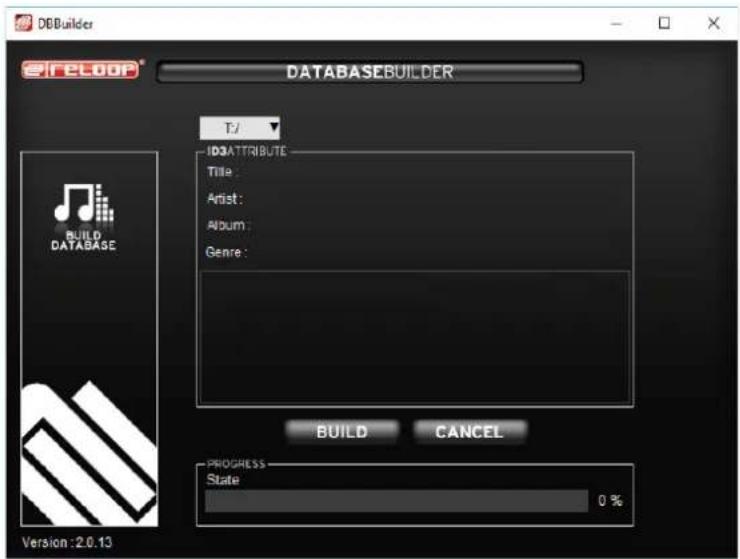
Start the installed program. As first step select the desired USB storage device and then click the "Build" button.
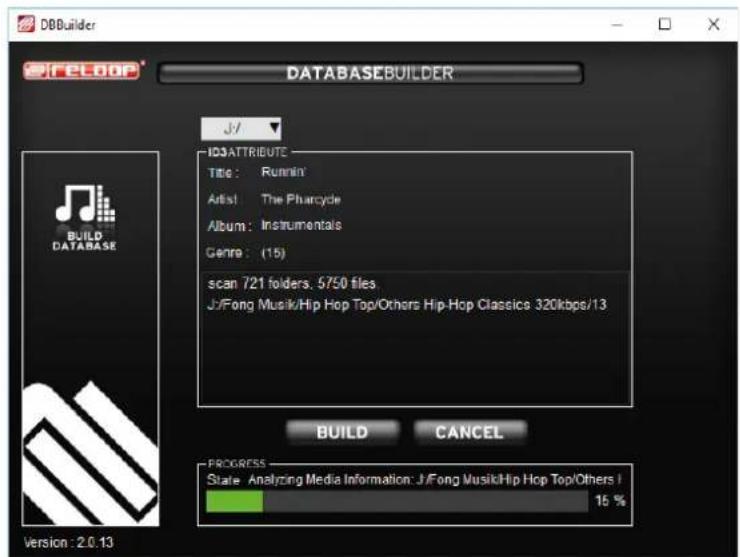
Your USB device will now be analyzed.
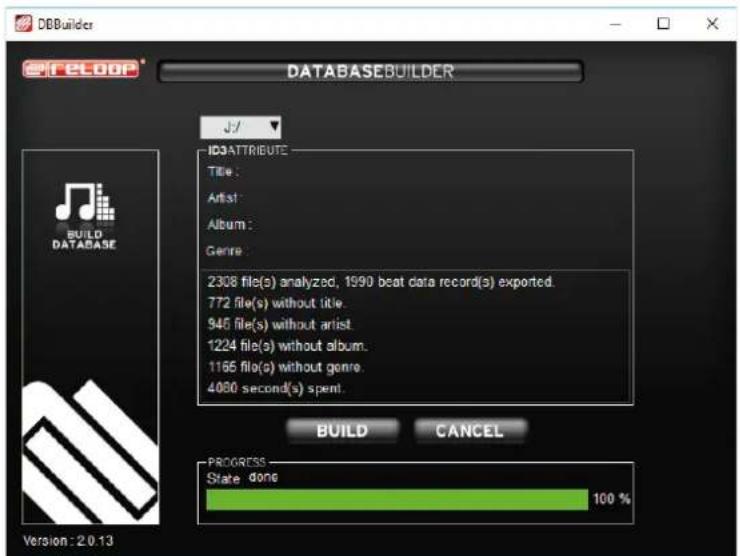
After a successful analysis you can exit the program. Your USB device has now been analyzed and is ready to be used with the media player.
NOTE!
While using the Database Builder some problems may occur under Windows Vista and Windows 7. Please observe the following trouble shooting:
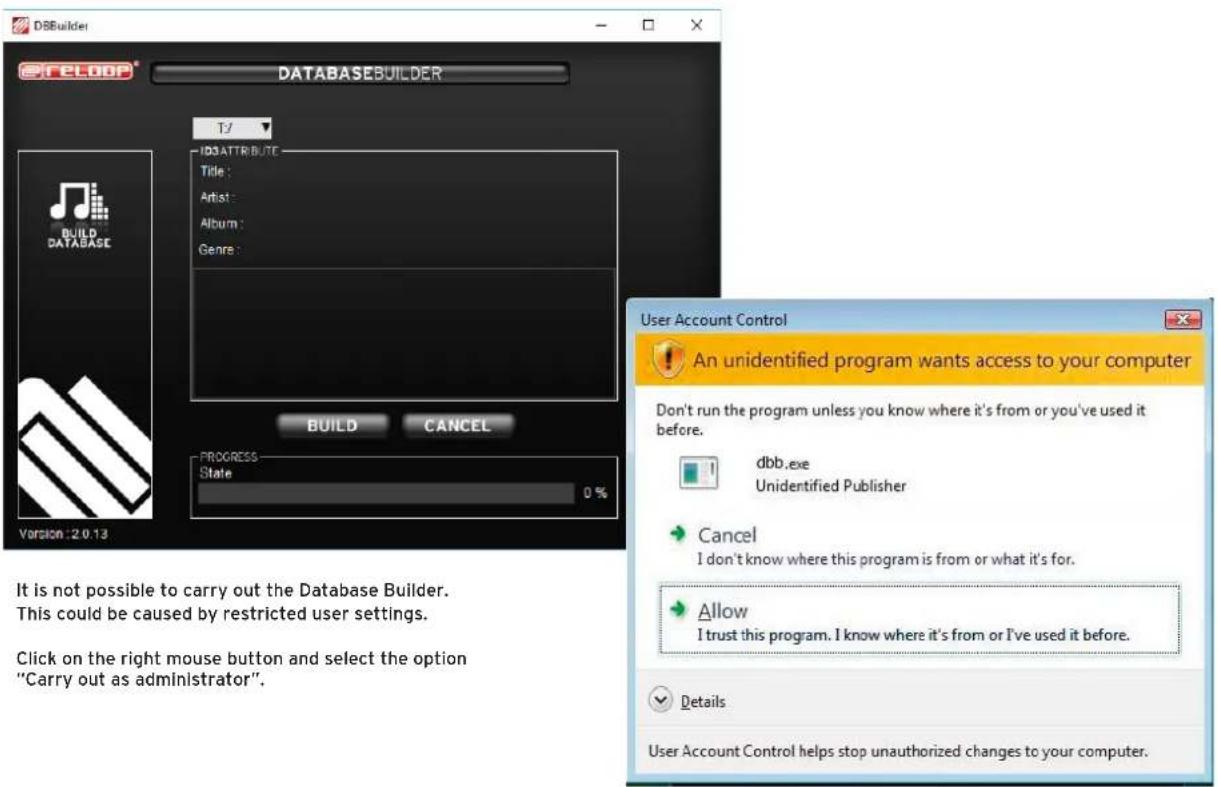
As next step click on "Allow" in order
to carry out the Database Builder.
5.2 Trouble Shooting
| Symptoms Possible Cause Corrective | Measures | |
| The device does not receive any power when turning it on via the ON/OFF Button -1-. | Mains adapter has not been connected correctly. | Check the mains adapter connection. |
| The CD's playback does not begin. The CD has been inserted upside down or it is dirty. | Insert the CD with the label showing up; clean the CD. | |
| CD is skipping. The CD player is permanently subject to strong vibrations or impact for more than 10 seconds. | Set up the sound system in a different place. | |
| The USB device cannot be recognized. | Use the Media Select Button -5/46- in order to select the correct USB port.Please format the device correspondingly. The supported file systems can be found in the chapter „Technical specifications". If you are not sure use the Database Builder (chapter „Database Builder Software“) in order to correctly format the device.Please use a suitable mains adapter for your hard disk.Please copy compatible MP3 files (see chapter „Technical Specifications“) to your USB device. | |
| No sound. The output cord is not connected at all or correctly; faulty amplifier or mixer usage. | Check the output cords' connections and the amplifier and mixer settings. | |
| Humming noise. Loose cable connections. Check all audio connections. |
Have fun with your Reloop!
Reloop - Solutions for DJs
48153 Muenster, Germany, Fax +49.251.6099368
www.reloop.de
INDICE DE CONTENIDO
Configuration minimum
Reloop - Solution for DJs
48153 Muenster, Germany, Fax +49.251.6099368
www.reloop.de
5.3 TECHNICAL SPECIFICATION
1. GENERAL SECTION
| PRODUCT | DIGITAL MEDIA PLAYER |
| POWER SOURCE | AC100 - 240V, 50/60Hz |
| POWER CONSUMPTION | 13 WATTS |
| DIMENSIONS | 482mm (W) X 270.5mm (D) X 88.8 mm (H) |
| WEIGHT | 4.3kg |
2.AUDIO CHARACTERISTICS
(CD TEST DISC: TCD-782 & TCD-781; USB TEST FORMAT: MP3, 128KBPS; LOAD=100KOHM)
| ITEM | TYPICAL | LIMIT | CONDITION | |
| OUTPUT LEVEL | CD | 2V +/-0.5dB | 2V +/-1dB | 1KHz, 0dB (TCD782,TRK2) |
| USB | 2V +/-0.5dB | 2V +/-1dB | 1KHz, 0dB (TCD782,TRK2) | |
| CHANNEL BALANCE | WITHIN 0.2dB | WITHIN 1dB | 1KHz, 0dB (TCD782,TRK2) | |
| FREQUENCY RESPONSE | CD | 17-20KHz +/-0.4dB | 17-20KHz +/-1dB | 0dB OUTPUT (TCD782,TRK2/3/7) |
| USB | 17-16KHz +/-0.2dB | 17-16KHz +/-1dB | 0dB OUTPUT(TCD781,TRK1/4/16) | |
| DE-EMPHASIS | CD | -20dB +/-0.2dB | -20dB +/-1dB | 16KHz,-20dB(TCD782,TRK2/14) |
| CHANNEL SEPARATION (*2) | CD/USB | 93dB | 85dB | 1KHz,0dB(TCD782,TRK2/9/11) |
| THD+N (*1) | CD | 0.008% | 0.015% | 1KHz, 0dB (TCD782,TRK2) |
| USB | 0.007% | 0.015% | 1KHz, 0dB (TCD782,TRK2) | |
| S/N (*2) | CD | 126dB | 90dB | 1KHZ, 0dB (TCD782,TRK2/8) |
| USB | 85dB | 80dB | 1KHZ, 0dB (TCD782,TRK2/8) | |
| DYNAMIC RANGE (*2) | CD | 92dB | 88dB | 1KHz, -60dB (TCD782,TRK18) |
| XLR OUTPUT LEVEL | 8.22dBm (2V) +/-0.5dB | 8.22dBm(2V)+/-1dB | 1KHz, 0dB (TCD782,TRK2) | |
NOTE: 1: WITH 20KHz LOW PASS FILTER.
2: WITH 20KHz LOW PASS FILTER, "IHF-A" WEIGHTED.
3. CD SEARCHING TIME: (TEST DISC: TCD-792)
| ITEM | TYPICAL | LIMIT | CONDITION |
| (1) SHORT ACCESS TIME | 2Sec | 4Sec | PLAY NEXT TRACK |
| (2) LONG ACCESS TIME | 4Sec | 6Sec | TRACK 1 TO 20,20 TO 1 |
- CD PLAYABILITY:
- SOUND RECORDING
| ITEM | TYPICAL | LIMIT | CONDITION |
| (1) INTERRUPTION | 1mm | 0.7mm | TCD-725 |
| (2) BLACK DOT | 1mm | 0.6mm | TCD-725 |
| (3) FINGER PRINTS | 75um | 65um | TCD-725 |
| (4) ECCENTRICITY | 140um | 140um | TCD-712 W/O TRACK JUMP |
| (5) VERTICAL DEVIATION | 1mm | 0.5mm | TCD-731R |
| (6) SCRATCH | 2mm | 1.2mm | TCD-721 W/O TRACK JUMP |
(1) MENU REC INPUT: AUTO / REC BIT RATE: WAV.(REC INPUT: 1KHZ / +10dBV)
PLAY AUDIO FILES LEVEL: 1KHZ / 4dBV +/-2dBV
THD+N: LESS THAN 0.015% (W/20KHz LPF, A-WEIGHTED)
(2) MENU REC INPUT: MANUAL / REC BIT RATE: WAV.(REC INPUT: 1KHZ / -4dBV) / GAIN 0dBV
PLAY AUDIO FILES LEVEL: 1KHZ / 0dBV +/-2dBV
THD+N: LESS THAN 0.03% (W/20KHz LPF, A-WEIGHTED)
- MP3 FORMAT
| Disc Format | Applicable file extensions | mp3. MP3. mP3. Mp3 |
| ISO9660 | Max. 63 characters | |
| Joliet | Max. 63 characters | |
| CD-ROM sector format | mode-1 only | |
| Max. number of Folders | 255 | |
| Max. number of files | Max. 999 files (* note #1) | |
| USB Format | File System | FAT 12/16/32 |
| Applicable file extensions | mp3. MP3. mP3. Mp3 | |
| Max. number of Folders | 999 | |
| Max. number of files | Max. 999 files | |
| MP3 Format | MPEG 1 Layer 3 standard (ISO/IEC 11172-3), which provides for single channel ('mono') and two-channel ('stereo') coding at sampling rates of 32, 44.1 and 48kHz. | 32/40/48/56/80/96/112/128/160/192/224/256/320 kbps Xing/VBRI VBR |
| MPEG 2 Layer 3 standard (ISO/IEC 13818-3), which provides for similar coding at sampling rates of 16, 22.05 and 24 kHz. | 32/40/48/56/64/80/96/112/144/160 Kbps Xing/VBRI VBR | |
| MPEG 2.5 Layer 3 standard, which provides for similar coding at sampling rates of 8, 11.025 and 12 kHz. | 32/40/48/56/64/80/96/112/144/160 Kbps Xing/VBRI VBR | |
| Disc Writing Method | Disc at Once and Track at Once | |
| Multi Session | If the 1stsession is CDDA, you can playback Only CDDA track, If the 1stsession is MP3, you can playback only MP3 file. |
Note #1: max.255 files each folder
6. NOTES
(1) The specifications are subject to change to any improvement by negotiations in advance.
(2) The parts are subject to change to any improvement within the range of the specifications.

www.reloop.com
Reloop Distribution
Global Distribution GmbH
Schuckertstr. 28
48153 Munster / Germany
Fax ++49/251/6099368
Subject to alterations.
Illustrations similar to original product.
Misprints excepted.