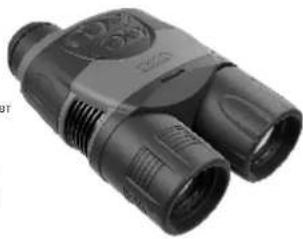
Ranger RT 6.5x42 - Binoculars Yukon - Free user manual and instructions
Find the device manual for free Ranger RT 6.5x42 Yukon in PDF.
User questions about Ranger RT 6.5x42 Yukon
0 question about this device. Answer the ones you know or ask your own.
Ask a new question about this device
Download the instructions for your Binoculars in PDF format for free! Find your manual Ranger RT 6.5x42 - Yukon and take your electronic device back in hand. On this page are published all the documents necessary for the use of your device. Ranger RT 6.5x42 by Yukon.
USER MANUAL Ranger RT 6.5x42 Yukon
| MODEL / SKU# | RANGER RT 6.5X42 / 20047 | RANGER RT 6.5X42S / 20048 |
| Optical characteristics | ||
| Magnification | 6.5x / 13x | 6.5x / 13x |
| Digital zoom | 2x | 2x |
| Objective lens | 1:1.2 | 1:1.2 |
| Max. observation range of an animal 1.7 m long (built-in IR on). m | 350 | 450 |
| Focal of view (at 6.5x), magnification at 100 m | 4.6/7.8 | 4.6/7.8 |
| Close-up ratio, in | 5 | 5 |
| Eyesopic diopter adjustment, D | 15 | 15 |
| Eye roll, mm | 14 | 14 |
| Electronic characteristics | ||
| Display type / Resolution, pixel | LCD / 640x480 | LCD / 640x480 |
| Sensor type / Size | CMOS/1/3" | CMOS/1/3" |
| Camera resolution, pixel | 940x480 | 640x480 |
| Sensitivity of the device's max. mW | ||
| - wavelength 780 nm, resolution 25 lines/mm | 8.5x10⁻³ | 8.5x10⁻³ |
| - wavelength 615 nm, resolution 25 lines/mm | 2.8x10⁻¹ | 2.8x10⁻¹ |
| Operational characteristics | ||
| Operating voltage, V Battery | 6-9 (6AA) | 6-9 (6AA) |
| External power supply | 5V power bank / USB() | 5V power bank / USB() |
| Max. operating time on a set of batteries (at +22°C) | 10/14 | 10/14 |
| (unit only on IR on +W-F), hours | ||
| Tripod mount thickness | 1/2 | 1/2 |
| Operating temperature | -25 °C, -50 °C, -15 °F, -122 °C | -215 °C, -65 °C, -15 °F, -122 °C |
| Dimensions (L×W×H), mm / inch | 170x116x76/6.763363 | 170x116x76/6.763363 |
| Weight (wa batteries), kg / oz | 0.65 / 22.9 | 0.65 / 22.9 |
| Video recorder | ||
| Video resolution, pixels | 320x240; 640x480 | 320x240; 640x480 |
| Photo resolution, pixels | 320x240; 640x480; 1280x960 | 320x240; 640x480; 1280x960 |
| Video / Photo format | aw / pg | aw / pg |
| Built-in memory | 8GB (7.4GB available) | 8GB (7.4GB available) |
| Memory capacity | 10GB as preax. 40mm3 | 10GB as preax. 40mm3 |
| Built-in IR LED illuminator (long-range / short-range) | ||
| Wavelength, nm | 940 / 940 | 850 / 940 |
| Wi-Fi channel | ||
| Frequency | 2.4GHz | 2.4GHz |
| Standard | 802.11 bighm | 802.11 bighm |
| Line-of-sight reception range, m | 15 | 15 |
ENGLISH
PACKAGE CONTENTS
Ranger RT 6.5x42 / 6.5x42S Digital Night Vision Monocular
Micro USB cable
Carrying case
Lens cloth
Neck strap
Warranty card
Extra battery container
The design of this product is subject to change for development purposes
The device's software is subject to change without notice.
Please viat www. ykcoonlalnai to downoed the latest version of the user manual

FEATURES
Enhanced night sensitivity
High magnification 6.5x / 13x
2xdigital zoom
Viewing range up to 450 m
Long range invisible IR Illuminator (#28047)
Wi-Fi remote review and operation using
smartphone
Youtube. Recording and live YouTube streaming
Onboard video/sound recording
Charging with Power Bank
Updatable software
Stream Vision compatible
Self-contained operating time up to 10 hours
Resistant to bright light
Tripod mount for installation of accessories
Achospacitymayoffer

INSTALLATION OF BATTERIES
Slide and remove the battery cover (2).
Pullout the battery container (1) using the attached strap.
- Slide batteries (or rechargeable batteries) into the battery container. Pay attention to «艹» (positive) and «艹» (negative) symbols marked on the walls of the container.
- Insert the battery container back into the battery compartment. Make sure the battery container is re-inserted properly, particularly watching for the orientation of the battery container contacts.
- Slide back the battery cover to its original position
Attention! Do not use batteries of different types or batteries with various charge level because this may significantly decrease operating time.

EXTERNAL POWER SUPPLY
The unit can operate on an external battery such as Power Bank (5V) or a computer (laptop).
Connect the plug of the USB cable (5) to the unit's USB port (4).
- Connect the other plug of the USB cable to a Power bank or a computer.
Upon connection of an external power supply the unit stops operating on batteries.
Operation on external power supply is shown with an icon
More about powering from Power Bank and computer in section 14.

EXTERNAL VIEW AND CONTROLS
Battery container
② Battery container cover
③ Short range IR Illuminator
④ Micro USB port
Micro USB cable
Eyepiece diopter adjustment ring
Display brightness adjustment wheel
Objective lens
③ Radiator
Long range IR Illuminator
Objective lens and IR covers
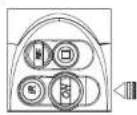
Button REO
Button IR
Button ZOOM
Button ON
LED Indicator

DESCRIPTION OF CONTROLS
| Button | Operating mode | 1" short press | 2" short press | Long press |
| ON | The unit is off | Turns the unit on | Turns the WU-Off | Turns this display off (hold longer than 1 sec) |
| The unit is in main window. Photo | Turns the WU-Off | Turns the WU-Off | ||
| The unit is in Review mode | File deletion prompt See description of Review Mode | Turns this unit off (hold longer than 3 sec) | ||
| ZOOM | Video | Digital zoom activation | Enter the menu | |
| Photo | ||||
| Review | Switch between files - leftwards navigation Return to the beginning of file under review | — | ||
| REC | Video | Start video recording | Stop video recording | Switch to Photo Mode |
| Photo | Image capture | Image capture | Switch to Review Mode | |
| Review | Recorded video review | Base video review | Switch to Video Mode | |
| IR | Video | Switch between IR Illuminator modes | Turns the IR Illuminator off | |
| Photo | ||||
| Review | Switch between files - rightwards navigation | — | ||

BASIC MENU ICONS
| 13x | Full magnification (optical+digital) |
| IR, IR: IR: | IR Illuminator power level |
| Battery charge indicator | |
| Operation on external power supply | |
| Built-in microphone | |
| Wi-Fi | |
| Operating modes: video recording / Image capture | |
| Video review / Image review |

OPERATION
Remove the lens cap from the objective lens (8).
- Turn the unit on by briefly pressing the ON (15) button - the green LED (16) will light up. The display shows the battery charge icon . . . The short range IR Illuminator switches on automatically.
To turn the display off during operation, press and hold down the ON button for more than one second.
The display will show a DISPLAY OFF message.
To turn the display on, press briefly the ON button
To turn the unit off, press and hold down the ON button for more than three second. The display shows message "Switch off", countdown will start from 3 to 1 seconds, and the unit turns off.
Achieve a crisp image of the icons on the display by rotating the eyepiece diopter adjustment ring (6).
Locate an object within 20 to 30 metres.
- Achieve a crisp image of the object by rotating the objective lens (8).
Adjust the image brightness by turning the adjustment wheel (7). The brightness level and brightness icon are shown in the right top corner of the display. The adjustment range is 0 to 20.
When changing the viewing distance, obtain a sharp and high-quality image by rotating the objective lens (8) and the wheel (7). There is no need to rotate the eyepiece - you have already made the necessary individual adjustment.
To increase the range of detection and identification in low light conditions or in complete darkness, you may switch on the built-in LED IR Illuminator (10). Remove the cap and press the IR (13) button. The IR illuminator allows you to increase the observation distance and recognise the object.
Press the IR button successively to change power level (from 1 to 3). The corresponding icon IR, IR2, IR3 will appear in the upper part of the display.
To turn the IR Illuminator off, press and hold down the IR button for two seconds. The IR icon will disappear.
- You can find a detailed description of IR Illuminator operation in section 12 "BUILT-IN IR ILLUMINATOR".
To activate the digital zoom, briefly press the ZOOM (14) button.
To start video recording, press briefly the REC (12) button. The LED indicator (16) blinks while recording is on.

OPERATING MODES
The operating modes are as follows:
Video (video recording)
Photo (image capture) eviewR (video and image review)
When first switched on, the unit is in Video mode. Switch between operating modes by a long press of the REC
(12) button. This enables you to cycle between modes (Video->Photo->Review->Video...).
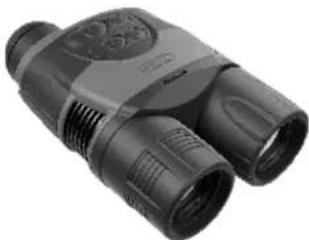
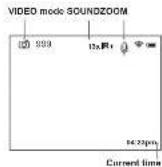
VIDEO MODE
Video recording mode is the default mode.
Video recording mode is shown by the icon on the display.
Sound recording is shown by the icon on the display.
Full magnification is shown with by special icon (i.e. 13x) on the display
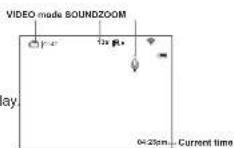
To start or stop video recording, briefly press the REC (12) button.
The LED indicator (16) blinks while recording is on.
Video clips are saved in the internal Flash memory when videorecording is stopped or the unit is turned off.
Video recording indication on the display:
The REC (12) icon appears in place of the "VIDEO" icon.
Display icons are not recorded.
You can enter and navigate the menu tuning video recording.
Note! You can stop recording video only after exiting the menu.
Note: maximum duration of a recorded file is seven minutes. After this time expires a video is recorded into a new file. The number of recorded files is limited by the capacity of unit's internal memory.
IRllluminator and brightness. InVIDEO mode the display shows the following information:
IR Illuminator power level - shown by the corresponding icon -
IR, IR: IR. If the IR llluminator is off, the icon is not displayed.
Brightness level.
Brightness level (from 0 to 20) is displayed only during brightness
adjustment.
Wi-F
Wi-Fi connection is shown in the top right corner of the display.
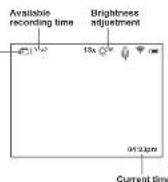
PHOTO MODE
Photo Mode is shown by icon on the display.
The counter of available photos is displayed when the number of photos is 99 or less.
Photos are saved into the internal Flash memory
The following functions are displayed in PHOTO Mode:
IR Illuminator
Brightness
Full magnification
Note: sound is not recorded in Photo Mode.
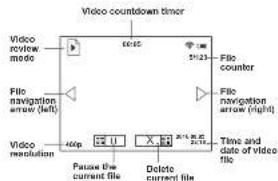
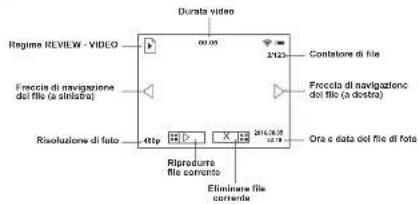
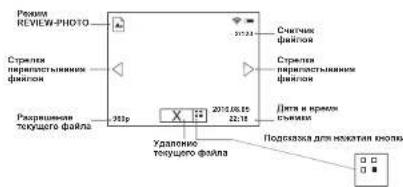
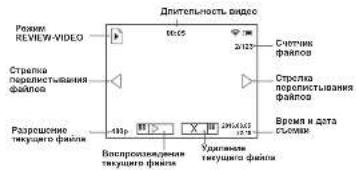
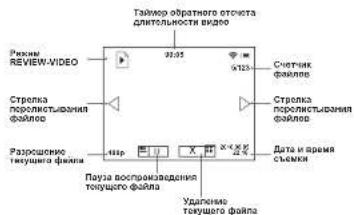
REVIEWMODE is designed to review photo and video files (saved in the internal Flash memory) on the display.
File display order. Upon activation of Review Mode, the display always shows the last recorded file.
Mode indication on the display. Along with the image itself the display shows the following information:
File type icon: photo or video
Video clip length - shown as mm:ss. File counter - shown as x/y
(common for photo and video files)
x-number of running file
y=totalnumberof files
- Resolution of current (displayed) file
"PLAY" and "PAUSE" Indicators for video clip
File deletion indicator
Date and time of file recording
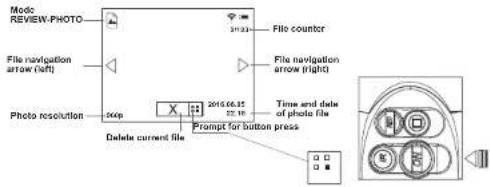
REVIEW Mode - Photo
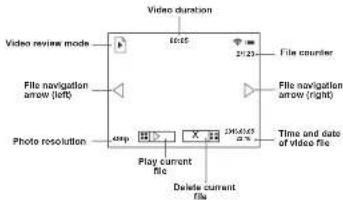
REVIEW Mode - Video
File navigation:
Leftwards - brief press of the ZOOM (14) button.
Rightwards - brief press of the IR (13) button.
Briefly press the REC (12) button to start reviewing a video.
Video review indication:
The video length countdown timer starts.
The PAUSE Indicator appears in place of PLAY.
To pause the video-briefly press the REC (12) button.
Video pause indication:
The video length countdown timer stops.
The PLAY indicator appears in place of PAUSE.
- With another short press of the REC button you can resume reviewing a file from the place where the video review was stopped.
Return to start of current file - briefly press the ZOOM (14) button.
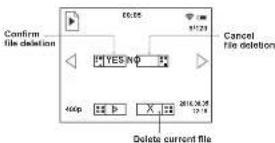
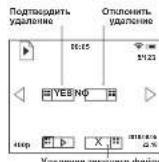
Review next file -briefly press the IR (13) button. File deletion with confirmation.A brief press of the ON (15) button shows the file deletion prompt on the display.
To select "YES" briefly press the ZOOM bu
To select "NO" briefly press the ON button.
Unavailable functions. During file review some control functions are not available:
Enter menu
ZOOM control
IR Illuminator control
If the IR Illuminator was on, it turns off when entering the REVIEW mode. The IR Illuminator power level is saved. On exiting REVIEW mode, the IR Illuminator will be switched on with the previously saved power level.

MENU
Menu navigation:
ZOOM (14) button:
Long press - enter the main menu;
- Brief press - enter the submenu:
Brief press - confirmation of selection in submenu, with simultaneous exit to the main menu;
- Long press - exit submenu without confirmation of selection (in some cases with confirmation, specified separately in the description of menu sub-items);
Long press - exit main menu.
IR button - menu navigation - downwards or leftwards;
REC button - menu navigation - upwards or right
Automatic exit - after 10 seconds of inactivity In the menu (or submenu) exit to the main screen takes place automatically. In some submenus automatic exit is not possible.
Menu contents
Wi-Fi setup
Recording resolution 51
Date and time setup
Sound record activation
About device (D)
Wi-Fi Setup
This menu item allows you to set a password for the access point. This password is used to connect an external device (such as a smartphone, for example) to your unit.
with a short press of the ZOOM (14) button.
A password appears on the display - by default "12345".
Use the navigation buttons to set your desired password (REC (12) button to increase the value; IR (13) button to decrease the value). To switch between digits, briefly press the ZOOM (14) button.
To save the password and exit the submenu hold down the ZOOM (14) button for longer than one second.
Setting Wi-Fi access levels
This option allows you to set required access level of the Stream Vision application to your device.
Stream Vision user has the complete access to all device's functions.
- Access level Guest. Stream Vision user has the access only to the video stream from the device.
Wi-Fi operation is shown by an icon on the display:
Wi-Fi icon glows - Wi-Fi is on?
Wi-Fi icon blinks - connection is established.
Stream Vision Technology
With the help of Stream Vision technology you can stream images from the display of your Ranger 6.5x42 RT unit via Wi-Fi to a smartphone or PC tablet. You can find further guidelines on Stream Vision in an individual booklet or on our web site www.yukonopicalsglobal.com
Selection of recording resolution
This menu item allows you to select the resolution of a video recording or pho shot, depending on the active mode.
Video Mode. Available resolution options for video recording (pixels):
:320x240
:640x480
Photo Mode. Available resolution options for photo capture (pixels):
- 320x240
640x480
1200x500
To enter the submenu, press briefly the ZOOM (14) button.
To select resolution, use the IR (13) and REC (12) navigation buttons.
Confirm your choice with a brief press of the ZOOM (14) button.
The selected resolution is shown on the display as follows:
240p (for 320x240); 480p (for 640x480); 960p (for 1280x960)
Resolution is displayed only in the REVIEW mode.
The selected value is saved.
- When the unit is next switched on, the display will show the last saved value.
Date and time setup
This menu option allows you to set the current date and time, and time format.
Date setup
Enter the submenu with a brief press of the ZOOM (14) button.
- Date format is displayed as: yyyyMMdd (2016/07/12)
Use the navigation buttons to select desired value (REC (12) button to increase value; IR (13) button to
decrease value). To move from one digit to another briefly press the ZOOM (14) button.
To save the date and go to time setup, press and hold down the ZOOM button for more than one second.
Time setup
Enter the submenu with a brief press of the ZOOM (14) button.
Time format is displayed as: "format mm/HH" (24 06:51)
- Use the navigation buttons IR (13)/REC (12) to select the required time format - 24/AM/PM. To set the hour value, briefly press the ZOOM button.
- Use the navigation buttons to select the hour value (REC button to increase the value; IR button to decrease the value).
To set the minute value, briefly press the ZOOM button.
- Use the navigation buttons to select the minute value (REC button to increase the value; IR button to decrease the value).
To save the time settings and to exit the submenu, press and hold down the ZOOM button for more than one second.
Current time in the format selected is shown on the display.
The set value is saved.
- When the unit is next switched on, the display shows the last saved value.
Sound recording
This menu option allows you to activate/deactivate sound recording only during video recording. Enter the submenu with a short press of the ZOOM (14) button.
Use the navigation buttons to select one of the options:
Yes to activate sound recording.
No - to deactivate sound recording.
Confirm your selection with a short press of the ZOOM button.
When actuating sound recording the 4-iron appears on the dislou loen. In shown when
When activating sound recording, the icon appears on the display. Icon is shown when
sound is deactivated.
The sound record icon is shown on the display in theVIDEO and PHOTO modes.
The set value is saved. When the unit is put
About device
This menu option shows the following service information about your device:
Name: Ranger 6.5x42 RT (name of the unit)
SKU:28047 (model number)
Serial: 70119307 (serial number)
FW:12.34.567 (software version)
HW: MNV001 (hardware version)

DIGITAL ZOOM FUNCTION
This function allows you to control the unit's ZOOM mode. The display shows the full magnification value, which is the sum of the optical and digital magnification.
- You can use the ZOOM function only in VIDEO and PHOTO modes.
- To activate the zoom, briefly press the ZOOM (14) button.
Cycle through the available full magnification options by briefly pressing the ZOOM button: 6.5x>13x>6.5x.
Setting retention. The digital zoom value is retained only during the current session.
BUILT-IN IR ILLUMINATOR
The unit is equipped with two IR Illuminators: the short-range IR Illuminator turns on automatically upon start of the unit. The long range IR Illuminator (10) is activated manually, and the short-range IR Illuminator turns off. In model #28047 both Illuminators operate at a wavelength of 940nm which ensures covert observation; the long-range IR Illuminator in model #28048 operates at a wavelength of 850nm.
You can control the IR Illuminator in the VIDEO and PHOTO modes.
To activate the Illuminator, briefly press the IR (13) button.
- IR Illuminator power level indication. When the IR Illuminator is set to position IR1; IR2; IR3 the display shows the corresponding icons IR, IR, IR1
To switch between IR power levels, successively press the IR button to cycle through the available options: IR1 > IR2 > IR3 > IR1
To switch off the IR Illuminator, hold down the IR button. The icon is not displayed.
The IR Illuminator power level is not saved.
You cannot control the IR Illuminator when operating the unit in REVIEW mode.
Upon activation of REVIEW moda, the IR Illuminator switches off, the power level is saved, and the icon is not shown on the display.
Upon exiting REVIEW mode, the IR Illuminator reverts to the power level selected before deactivation, with the corresponding icon shown on the display.

DISPLAY OFF FUNCTION
This function deactivates the display, which allows you to eliminate light exposure caused by the glowing display.
You can operate the DISPLAY OFF function in two modes:VIDEO and PHOTO.
To turn the display off, press and hold down the ON (15) button for more than a second.
The message DISPLAY OFF appears on the black display.
When the DISPLAY OFF function is activated:
All controls are inactive (except for the ON b
Video recording continues (if video was recording before activating the DISPLAY OFF function).
The Wi-Fi function keeps running.
The DISPLAY OFF function deactivates when:
The ON (15) button is briefly pressed.
- The unit is connected to a PC via the USB port or to an external portable power supply (in this case the display should activate and the unit switches to operating mode).

USB CONNECTION
The unit can be connected to a PC via the USB port (4). The PC will detect the unit automatically, no driver installation is necessary.
Connection options.
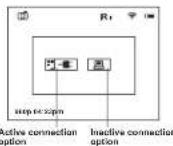
When the activated unit is connected to a PC via the USB port, one of the following connection options is selected:
USB Mass storage device
- If this option is selected, the unit is detected by the PC as a flash card. The unit switches to USB power.
- This option is designed for use when working with files saved in the unit's memory. In this mode the unit's functions are not available and the unit is "off".
Power
When this option is selected, the PC is used by the unit as an external power supply. The external power icon appears on the display in place of the battery charge icon.
The unit continues to operate, all functions are available.
Press the navigation buttons to cycle between connection options (USB->Power->USB...).
To confirm the selection, briefly press the ZOOM (14) button.
Connection in various operating modes
| Connection option | Operating mode | Status of the unit |
| USB | Video/Photo | The unit is "off". If video recording is on when the connection is made, the recording is stopped and saved automatically. |
| Review | The unit is "off". If a video is being reviewed when the connection is made, the review stops. | |
| Power Video/ | Photo/Review | The unit continues to function. |
USB disconnection.
In USB Mass storage device connection mode,
On disconnection the unit remains "off". The unit must be switched on to continue operation.
In Power connection mode
Once disconnected from PC, the unit switches off. Once the unit is disconnected from a power bank or AC power adapter, the unit will automatically switch to internal batteries, provided the batteries are fitted and have sufficient charge.
- If the unit is switched off on connection to a PC, the display does not show anything. The unit will not be detected by the PC until it is switched on (brief press of the ON button).

TRIPODMOUNT
The standard 12 tripod mount in the lower part of the monocular is designed to install the unit on a tripod.

OPERATING HINTS
The unit can be used during the daytime; this is a standard feature and will not harm your unit.
- When the unit is brought into a warm place after use in cold conditions, leave it in the carry case for 2-3 hours - this will help prevent condensation on the optics.
Do not leave the unit in direct sunlight. - Avoid exposing the unit to severe impact, thermal shock, aggressive liquids or other effects that are liable to cause damage.
The unit is not water-resistant.

MAINTENANCE AND STORAGE
The optics should only be cleaned when it is necessary to do so. Use a soft cotton cloth and special multi-coated lens cleaners.
- Wipe plastic and metal surfaces with a soft cloth molstened with a synthetic cleaning agent.
- Store the unit in its carrying case in a dry well-ventilated area. Remove the batteries when storing the unit for an extended period.

TROUBLESHOOTING
The table below lists some potential problems that may occur when using the scope. If the problem experienced with the scope is not listed, or if the suggested action does not resolve the problem, the unit should be returned for repair.
| Problem | Check | Corrective action |
| The unit will not turn on. | Check that the batteries are correctly fitted in the battery compartmentCheck battery operation. | Replace the batteries or fill the batteries correctly. |
| Oxidized contacts in the battery compartment due to 'leaky' batteries or contacts have been exposed to a chemically active liquid. | Clean the battery compartment, clean the contacts. | |
| The unit does not operate on external power supply. | Make sure your power supply is providing output voltage. | Charge the external power supply (if required).Check that the USB cable is intact. |
| Poor image quality. Check that the eyepieces and lens are adjusted in accordance with the user manual. | Adjust the unit according in accordance with the user manual. | |
| Clean the lenses with a cloth moistened with alcohol. | ||
| Problem | Check | Corrective action |
| No Wi-Fi signal or erratic signal. | The unit is beyond reliable Wi-Fi range.There are obstacles between the unit and the signal receiver (concrete walls for example). | Place the unit in line of sight of the Wi-Fi signal. |
| The unit is not operating properly due to software update. | Please restore the original software version. | 1) Hold down simultaneously the REC and ZOOM buttons.2) Hold down the ON button (while holding REC and ZOOM).3) The green LED will blink twice, then will start blink constantly,the original software is being installed.4) Release REC and ZOOM.5) Once software installation is over, the LED is blinking with a 1 sec interval.6) Disconnect the unit from the power supply (remove the batteries or disconnect an external power supply). |
CHARACTERISTIQUES TECHNIQUES
USB Mass storage device
Power (Alimentation)
USB Mass storage device
USB Mass storage device
Regime REVIEW - file video
IR ILLUMINATORE INCORPORATO
USB Mass storage device
LHpOBO MoHOynp Ranger RT 6.5x42/6.5x42S
hexon
WeinbpeMeHb
DOnonHmTeBbKoHTeHep6Tape
Ka6enb micro USB
VHctpyku no 3Kcnnyatau
TapaHTNnHbI TaHO
CanpeKa dna YnCTKn HnH
yachnncnncnnnccnne nnnnne nnnnne nnnnne nnnnne nnnnne nnnnne nnnnne nnnnne nnnnne nnnnne nnnnne nnnnne nnnnne nnnnne nnnnne nnnnne nnnnne nnnnne nnnnne nnnnne nnnnne nnnnne nnnnne nnnnne nnnnne nannnee
Poeepnnepee eaeenee aeennnnn ennnnne nnnnne aen nee

OTNNUHTENbHbIE YEPTbI
BbICOKaHOHARyBCHTBnBHCCTb
Bongbwoe ybennueHne 6,5x/13x
UHPOBOy3mX2
Houhoe Habnokene He 450M
JaHbHObOHbHnHeBnHmblNk-ocBteTne (28047)
Wi-Fi, DuctahuOHHOy ynpapnHHe HabnOneHne CO
CMAOTHOHa
Youtube.1pmaH BnBbotpaHcHm H 3aINBC b VHTepHer
BcTpoeHHbM Bvdeo- m ayDnOpekopep
PnDnepkna nntAHn oT PcwERBank
O6hcanreMoe NO
CoBMeCTnCnnatFopMoI Stream Vision (TpaHcraua
306paXHHHa CTOpOHnB
ycrpoictba uepea Wi-Fi B peKmpepebHoro spemeHn
BpeMaABROHOHHOpaObToIOTBaTape-010yacOB
3anvcb 38yka
HeYyBCTBNTENbHOCTeKCHNbHbHM3aCBeTKAM
WATAHHOETHe3oDnYCTAHOBHAKCECCYAPON
LHpOBO MoHOKynp Ranger RTnDaealbno noDxOoT nra TAKHX cΦop npMHeHHa KaK
HaBnHOeHNO BectCTBOHHo 06TaHOEko
HCKCNACAH
Oxotn Hypn3M
ChopnneMIE mPcOcmHOBaHOBmE Habnoe 3a paoTb TckHOONHCKo obopyoBaHO
3 YCTAHOBKA BATAPEI
CnBnHbTe nCHmHTe KpbuKky BatapeHoroOTcKa (2).
NotAHKe 3a HHy np HnBneKe TKeHep 6Tapei (1)
Co6nogaa nonapnoctb cactabte b KOHTREHep (1) wectb 8atape Tuna AA (nu6o nepe3aepkaembx
akymythopcHAA)
BCTABTE KORTHEP BATAPENHOTCK TAKK OOPASOM,FOOB HApYKHAIE ANKTPKNEE KORTBKTEK
3aBHHTe KpBky OTEKa BATpe DaYnpA
BHHMaHue!
NcnoB3yTe TOnbKO ODNHTnHbI 3nEMeHTb NHTAHN C paBBHbIM yPOBHEM 3apra, B
npTHBOM cnyae Bpempa60bI npmbopa MoKet 3aunTeNbHO cokpaHTbcra.
BHEWHEE NITAHNE
BHeHHe HHTAHHE OcyIeCTIeHTERcT O BHeHHeO AXXyMnITOpa TnA Power Bank (5V) N6o or KOMTEPepa.
PnDnHnHTeWTeKepKa6BnHmicroUSB(5)Kpa3aBmyUSB(4)npi6opa.
PnokmntBtroponwTeepKa5enrUSBKPowerBanknfoKkOMTbOtepy
PnipnoknHBNBnHrnoTnTnAHHnnpoepaetpaoatb0tbaopnHnnaeHpaoatb
Pa60a np60pa ot BHeHero nHTAHH 6o3HaueTc Hnncnne NkTOrpMaM
Ioppo6heo nrrnHnr OPerer Bank Xomnbtopepa pa3pe 14.
5 3NEMENTbI N OPTAHbI YNPABNEHIN
①KoTeHep bataep
KpHUKKA KOHTBHeBa 6aTaep
③ MK-ocaeTntEnb6nKHeRrJeCTBnR
④ Psaem micro USB
KaGenb micro USB
KoJIeCo dHONITPMHON HACTPOKN OKYINPA
⑦ KonecopoerynpoBKn Apkocn Dncnn
⑨ ObekTnB
Pagetop
10HK-OCBHTNTIELdJIbHIODBCTBMR
KpsnokofbekrHBAHK-ocetnten
12 Khonka REO
(3) Khonka IR
4 Khonka ZOOM
19 Khonka ON
15 CBeToaHnHnHnKaTOp
6 ΦYHKUHOH OPGAHOB UYPABNEHNA
BHHMaHHe:peXMePHoT O3aunncb3ayKa He npOn3oDnTcR.
PEKHM REVIEW - PEKM nPOMCMTPO OCHTRATX (XpAHHxCX BO 8HHTpeHHN NAMTINnp603) faipno HA dHcTnEe.
PnrooKtoT6paExhena faHIO. PnB KIOIOeHH NPOKIMRAve HAr DmNcNEe BCERda OTObpaKaTe TNCOeDHHOTCHrTHaIeIN
HnDnkaunpeXnMaHa dnCnnee.KPOMe nOcbpaXeHHn HnDCnIeBbBOuTcHnFOpMaun
NtKTOrpaMaTHaFaHn:AtoHnBHeo
HNTeBHOCTb BnDEO -OTOBpaKaETcBΦOPMaTe:MM:CC
Cuetukfaino-botobpaKaetBvne:xy,(0bunnDnAfo-tuBnueofoaHOB)
X-HOMepTeKyuerofoaHna.
y-o0uee konwctBo dainob
CtpennnepeennctbhaHnBnEBO-Bnpabo
Paepewenme tekyuero (otobpaKaemoro) paia.
HnDnKaToPbI"PLAY"u"PAUSE"-nnaBnDeoepaJna.
HdNkatop ydaenna paHa.
- Dataa BpemcBemKn faHna
PexnM REVIEW - FOToCHMOK
PexMM REVIEW-BuDeofoaH
Habraqmaexdyaainamn:
BneBO-XoPOTKoe HAXaTme KONKZOOM(14).
Bnpabo-KopotKoe HaxkTne KhoNkIR(13)
Dn npocmptpa Bndbofoaaima Kpatko HAKMITE KHONKY REC (12).
Hnkaun npocmotpa Bndeo:
3YNAcKTeCR TARMEb OP5aTHoO OCTeHTA DNTHnEHOCTN BIAHO
PONJARETC KHONKA PAUSE BMECTO KHONKA PLAY
JINOCTAOHOBI KUYEYOB HIEO HNA NAYA KPATKO HAKMTTE KHONKY REC (12) INHKAIAK NAYBA IPOCMOTRA BIEO:
OCTAHABINBAETC TAI MOp 06pHOrO OCHETA HNTENBHOHTNBD
PONBNAETCAHHNKATOP PLAYBMECTOHHNKATOPA PAUSE.
IaBIO 60306BHEHNIPOC MTOCTMFA HcMA TOTKOPM P BIBEO 6blOCTAHOBINH, NOPTBOHP XKTAPK HAKMITE KHONKY REC (1)
Дагьбраза К санулу рссмгета TeKуцero BIDeo - крато Нимпerte KhoNYZOOM.
Дунгдздддддддддддддддддддддддддддддддддддддддддддддддддддддддддддддддддддддддддддддддддддддддддддддддддддд徴псу
KONIKI IR.
YdaneHne caiNOB C noTBePckDeHHEM.
ПИОКОНТМЕKHAKATIM KHOHONI ON HAJCNPEI ROHANETC 3ANPOC O NOITBREKHEMUN YUANENJI.
ДявбopaКOMAHнБу“Yes”-KopoTкоЕHAKATme KONKN ZOOM
DnBbOpaKoMaHdb"No"KopoTKoe HxKaTMe KONKN ON.
HedocytynHbE yHnKu.Bo aepma npocmoTpa faiao HEDOCYTHIy Ia ynpaaenHHeXOTOphe yHKnI pIe6ba;
BxOaB MeHIO.
YnpaBneHne Zoom.
-ynpaBneHnK-ocBETeJeM.
EcnM IV-KOcEBTETBbI bbl BkIOHcE,To pRb IVKOeB aEKHM "REVIEW", Obl BkIOHcAeTc. Prr OTOM npomCXoDMt coXpAHHeH eHHa HyeOBHa MOUHOCTN IV-KOcEBTETAe. Prr BkIOHcE o pEXIMAA "REVIEW" IV-KOcEBTETBaIKIOHcAeC03aHbEMeYPOOBHa MOUHOCTN, KOTOPoe Bbl COxPAMHO.

MEHIO
HabiracnB MeHO:
KHONKA ZOOM (1)
A DNTNtBHeH HAXKATHE BDOAD B OCHOBHOE MCHO,
KOPOTKOHAKATHE NOITBEPXDEHNE BILOBOPA NIOHMHO, C ONDOBPEMeHHM BIXXODMO B OCHOBNO MEHO,
MnHbIeBHO HAXATHE -BHXO HIO MNEHO 6E NOJtAePckHEHbIbO6Ba (B HEKOTOPIX CNYAHX CNOITBREKdHBMIE, OGRBOEHO OTENHIO B CINCAHIN NIOYHTKOH BOH)
DNTENbHOe HaxkTne -BbIXOIN3 OCHOBHOro MeHIO.
KHONKAIR(13)-HABIRARUN NO MEHO-BHN3NINBnpaBO;
KHONKA REC (12)-HABINARUN NO MEHO-BBEPX INN BNEBO;
ABMATHueckn BbIXoD - NocB 10 C6KyJb 6eBpIaRtBBA MHeH (TOpMHeO) BbXoD HA rbbHH b3KpAH OcUeTBeTACr ABMATHueckn B HeKToTOpBx NOpMHO ABOTMAtHEckn BbIXoD HbEo3MOKeH.
CoCTAB MEO
HactponKaWI-FI
Bb6oppa3peWENHsANHC
HactpoKa DaTbN BpeMeHN
BkhHnHae 3annc 38yaq
VHOpMaNnOgnpoep 1
Даньн pyнгт NOBONJIET HACHTOBI NAPOBI K TOUK OSTOYNA. NAPOBI HCNOLBYETCNY pNNOHIOBENH BHEWHERO YCTOPAHTBA (CMPTDFOHA) NkPb6Oy.
BoHnTe BnoDMHeIO KpaTKM HAKaTMeKHOIKN ZOOM(14).
Ha dncnnee noBHTc npoB-noymohann "12345"
KhoNkAMn HABMaIaun yCtAHOBIne XeHaembIy napBoI (KhoNkA REc (12)-YBeHmUHeMe 3HaHeHMy; KhoNkAR 13-ymEnbSeHnra 3HaHeHnry).JrnapeMeMeJeHnM Eekdy pa3paDAMK pKaTko HAKMMAte KhoNkY ZOOM
Ia 10000000000000000000000000000000000000000000000000
HactpoKa ypOBHeNo DocTyna Wi-Fi
DAnHHNoDnYHKI NOBONAEHACPTbN Heo6xOaMbI ypoBeHIOCTyNA K CBOEmy np60py,
KOTOpBn nonyHaET npInnoKeHne Stream Vision.
YpOeBb Owner (xo3aHH) . NOnb3oBATEb n3 Stream Vision IMeet nonHb doctyn Ko BcEM
Функлuarнпрсдра
UpyoBENs Guest (OCTh) .IIOJIbIOBATEH NStream Vision IMBBT IOCTY TIOJIbKO KIBJADOTOTORY AIOPI60Ba.
Pa6oTaWi-Fi 0to6paKaTeTcHKOHKOnHa dncnnee np6opa.
-IKTOrpMMW-FiCBETTCB-Wi-FiKIOHcH;
IITKtorpmaWi-Fimuraet-ImeetcnoiknueHne K np6opy.
Texhonoru Stream Vision
IocpeCTBOMTexHONORnStreamVisionWi-Fi BbMOKeTe TpaHCnnpoBaTbN306paKHeHcC np6opa
Ranger RT 6,5x42 uepea Wi-Fi ha cmaptoon nioo nnanwet.
Падобдьные Н�стурикима по раб trade Stream Vision Bby мохete наи в огдунов SFKETE n60 ha caire www.yukonopticsglobal.com
Bb6op pa3peWenHn 3annCn
AnHHyI NHTK MENK NO30ANRET Bb5p9a, PapeWEn HnDEO INH FOOTaONHCN, 3aBnCHMOCTN OT BkOeHNHO RPEMMA pRn6PBA.
Pekn Bneo. DocTyHbE BapHaHTb pa3peWeHnA n3nnCH BnDeo (B NkceIax).
Pexmm foto. DocTyNHbIe BapMaHTb paapeWeHnA n3nnC hfo
320x240 360
(BNUKOENAX)
320x240
640x480
1280x960
- DnBxOaB MeHIO KopoTKo HAKMTe KHONKY ZOOM (14)
KHOIKAHABIRALIN-IR(13)IREC(12)Bb6epNTBaPnAHTpa3peHn.
NoTBePAnTe KOpOTKMM HaxKaTHEM KHONKN ZOOM.
3HaueHHe ycTaHOBHeHHoro paapeeHnro oTo6paXaetcHa dncnnee cneyuoumO6pa3oM
240p(nn320x240):480p(nn640x480):960p(nn1280x960)
YCTAHOBNEHHOE 3HaehnE COxpaHReTcB nAMrtn npbopa.
Pa3peHHe OTo6paKaTaTcA ToIbKo B pexnme npocmToPa (REVIEW).
PnOepeHDM AekHcEHnn Pnp6oRa oTo6paXaeTcnoCedHee CoOpAeHNHOe 3aHcHMe FyHKn.
- YpapJIeHHe PHyIeHn DISPLAY OFF BO3MOxHO B pekIMax pa50Tu npH6opa:VIDEO n PHOTO.
DnKIOHINHNIHNNHNNNNNNNNNNNNNNNNNNNNNNNNNNNNNNNNNNNNNNNNNNNNNNNNNNNNNNNNNNNNNNNNNNNNNNNNNNNNNNNNNNNNNNNNNNNNNNNNNNNNNNNNNNNNNNNNNNNNNNNNNNNNNNNNNNNNNNNNN
DnBKNIOHHeMIMCNNNEKMMTEKONKYON.KpATKOHa
PnBkHIOeHHmFyHKmDisPLAY OFF:
Bce opraHb ynpabneHHa (KpOMe KhONKn ON) He aKTMBHbI.
- 3aInbC bVde npOdoNkAeTc8 (ecn 3aInbC pnpOBAoDnIaBc DO BxNIOHENH yHkLIM DISPLAY OFF).
-ФyнкURA Wi-Fi npodonkae rpaobotb.
BbKIOHHe HcYHKcIMn DISPLAY OFF npocXoAHT:
PpKpaTkom HaxaTHN KHONK ON
PnnpNQkHNOCHNn pRbopa K KOmbltopey Hepe3 nopt USB HIN BHEUHMY noptATBHMOMHYHOHNKny nIHTAHMn (power bank) (pnp 1cTm dmIOeBdoJIKB KKnHtBcB, npRbop npBepxOqmtBpa0oH peKm).

NODIKHOYEHNE USB
PpeyCMTOpeHa BO3MOKHOCTb NOIKIOHHeHHr pnp6opKa KOMMbTepy ueepa3bEm USB (4).
PimATOMpIb6OpONpEeDfHETCRKOMBIOTepOMB8OTOMAtWQCKN,yCTAHOBKpIpaRepoRHO TpeSycbers.
BapnAHTbI NODKNIOHNEHNA
Pnio knoHIOENI KMOBIOETPO BNOHO pnoBOPa c noMoo USB-nopra pnpdaeraTc OHN H3 CNEUVOBAPBAHOBTOB NOKIOHIOENI
USB Mass storage device
PnBb6ope daHoro BapnHaTApn6op pacnsHaTeC KOMnbOpem, KaK Pneu-KapTa.
Pnp60 npepexoHT Ha nTahne ot USB.
JaHnnB aapnAHT npDHaaHbHnIaPabOcM tBApNAMi, KOTpHE XpaHrTcB NAmSTnPi6bopa, pN 3OMfYhKuNpi6bopa He DOctOyHbN, Pnp60e BkInoVaeCTa.
Power (PntaHne)
PnBbIbOpaDHHaBOrBaHARo CMKbIbOpTe NcIbIyEeTaeNpOBoMg BAnCHeTbe IocTHIOHAr BHeuHero nHTAHnA. HdIcmnnBe MECTO KINKPTAMMOBly OyooRzapdae BaaepTe NOBITKTBBKOTKPMMABHEUHO
NHTAHNA
Pnp6op npoonkaet pa6otatb, BCEyHKmNdoctynb.
- 1nR uKINHOro nepeXoDa Mekdy BapHaHTaMn NodKnIOeHnA
(USB->Power->USB...) HaxkmaTe KhoNk Habraun
-Днг noTBePxDHeN BbOpa KpaTko HaxMite Khonky Zoom.
BEPHANT BEPHANT (BEPHANT) (BEPHANT) (BEPHANT) (BEPHANT)
IpaKIOHHe B pa3HbIX pEXmMax pa60Tb np6opa
PPIKTKKHOHHPNBOOPCTAOTCBG B8bIKHOHHEHMOCCOHTOB.IIINDAIaJIHeHUIPA60BBAHO6XDMK8KNHHTPBNPDC
Bpekme nocknuee Hn Power.
PnO tOKHIOEHNOTIKNPb6OpBbIKHOaTcN.PnO tOKHIOEHNOT power bank kIN CTeBOI O anaTrep a np6oppeKIOHHTcNa HbYtpHee NHTAHMe npE rO KaHmN IN DocTaTOHOM 3aepde.
PnnpoNkIOHcHmHE BKnIOeHHOrO npIbOp K KomBItePOy HdJncnne PnIbOp HcHcE He OToBpaAaTcR. PnIbOp HE bOApHyKbAeTc KAOMTIbTePOm. noka He 6yDenBkIOeH (KopoTKeO HAKATINA KOHNI ON).

WITATNBHOE THe3DO
CTaHdAHTHO THe3o 12IOJIIMBA HINKHeJ CHACTN MOHKYNPRApeDHa3AHeHO IINy yCTaHOBIMI pnpO6Ba HnTtB.

OCOBEHHOCTN3KCNYYATAUIN
Bb MoKETe 63 onaee 3kncnyatno8pabn np6op n B dHeBHe oepm; taKo pexkm paobtbpnpdycaTOpHn b HneHecetN kndJeNoRbpa
Ecnn npnpoc kcnnnnytphopancn HxnoJe Hbuee Hte Teneoe nmeuHne, He bunHmuatre erho hexpa Bteue Hne MeHee 2-3acos -30 noaBomnt ppeoTbaPMTbnoBHe KOHcHcata HaaneKPOHOONTHNecHcx anemEHTax.
He octaenei npnoop do connehymni ynaHMM.
He onycknaiie cnihhns ydaepnhx. tennohns n hInx bsOeCTBN, nopekdoanpnpno.
PpH6Op He ABnraTcBnaro3aunueHHbIM.

06CJyKBAHNE XPAHEHNE
YCHTKOTNHCKHISTADIKI PNOAHOHTE TIOBHKO B CNYAHO HOHOOJOIMOCN. HIOJIYBETACM KNIHO XNTOHOMOXYAMOHCENKFOHNCUHUMCPECDTAMN FOR NINH C MHROCNHOHN IOKIOTHEM
TINACTMCCOBIE M ENATANNECKIE NOEPEXHOCTN POTOPHAE MRKIO TXAHIO, HEMHOPO IPOPNTAHIOI CHHTETENCKHM CTEUSTRAMC PCECTDBOM.
XpaHnTne pRb60B 8xKHe, B CYOMX, XOPOIOB BeHTNIIHPYEMOM NOMEHHIN. PnD nIITeJIbHOM XaHEHNM IANKeHNTBe 8aAEO.

BbIeHHeHEHCnPABHOCTE
B TaBnIePnpBHeDnCNOxO3MOKHXNpO6Nm.KOTOpBeMOryO3HNIHyTb pNn KcNpyatauIN npBOpA. nHnHmHnDeFKeTb, He NpeHnCNEHbTB aTbnIe, mnn PnN HEBo3MOKHOCTn CAMOCToTeHbNoYcTpAnHbDeFekT, NpBOp CneJeTp BepHyTb Ipn PEMOHa.
| Победа | Поберka | Ирравлика |
| Побору не висьдемп. | Поберда реловл致电г установ各项工作等工作的工作 | ЗаменITE Альперл патима ратима ратима ратима ратима ратима ратима ратима ратима ратима ратима ратима ратима ратима ратима ратима ратима ратима ратима ратима ратима ратима ратима ратима ратима ратима pатима pатима pатима pатима pатима pатима pатима pатима pатима pатима pатима pатима pатима pатима pатима pатима pатима patamia patamia patamia patamia patamia patamia patamia patamia patamia patamia patamia patamia patamia patamia patamia patamia patamia patamia patamia patamia patamia patamia patamia patamia patamia patamIA patamIA patamIA patamIA patamIA patamIA patamIA patamIA patamIA patamIA patamIA patamIA patamIA patamIA patamIA patamIA patamIA patamIA patamIA patamIA patamIA patamIA patamIA patamIA patamIA patamIB patamIB patamIB patamIB patamIB patamIB patamIB patamIB patamIB patamIB patamIB patamIB patamIB patamIB patamIB patamIB patamIB patamIB patamIB patamIB patamIB patamIB patamIB patamIB patamIB patam IB patamIB patamIB patamIB patamIB patamIB patamIB patamIB patamIB patamIB patamIB patamIB patamIB patamIB patamIB patamIB patamIB patamIB patamIB patamIB patamIB patamIB patamIB patamIB patamIB patamIE patamIB patamIB patamIB patamIB patamIB patamIB patamIB patamIB patamIB patamIB patamIB patamIB patamIB patamIB patamIB patamIB patamIB patamIB patamIB patamIB patamIB patamIB patamIB patamIB patamIK patamIK patamIK patamIK patamIK patamIK patamIK patamIK patamIK patamIK patamIK patamIK patamIK patamIK patamIK patamIK patamIK patamIK patamIK patamIK patamIK patamIK patamIK patamIK patamIK patamIB patamIK patamIK patamIK patamIK patamIK patamIK patamIK patamIK patamIK patamIK patamIK patamIK patamIK patamIK patamIK patamIK patamIK patamIK patamIK patamIK patamIK patamIK patamIK patamIB patamIB patamIB patamIB patamIB patamIB patamIB patamIB patamIB patamIB patamIB patamIB patamIB patamIB patamIB patamIB patamIB patamIB patamIB patamIB patamIB patamIB patamIB patamIB patamIC patamIK patamIK patamIK patamIK patamIK patamIK patamIK patamIK patamIK patamIK patamIK patamIK patamIK patamIK patamIK patamIK patamIK patamIK patamIK patamIK patamIK patamIK patamIK patamIK patamIC patamIK patamIK patamIK patamIK patamIK patamIK patamIK patamIK patamIK patamIK patamIK patamIK patamIK patamIK patamIK patamIK patamIK patamIK patamIK patamIK patamIK patamIK patamIK patamIB patamIC patamIK patamIK patamIK patamIK patamIK patamIK patamIK patamIK patamIK patamIK patamIK patamIK patamIK patamIK patamIK patamIK patamIK patamIK patamIK patamIK patamIK patamIK patamIB patamIK patamIB patamIK patamIK patamIK patamIK patamIK patamIK patamIK patamIK patamIK patamIK patamIK patamIK patamIK patamIK patamIK patamIK patamIK patamIK patamIK patamIK patamIK patamIK patamIB patamIK patamIC patamIK patamIK patamIK patamIK patamIK patamIK patamIK patamIK patamIK patamIK patamIK patamIK patamIK patamIK patamIK patamIK patamIK patamIK patamIK patamIK patamIK patamIK patamIB patamIC patamIB patamIK patamIK patamIK patamIK patamIK patamIK patamIK patamIK patamIK patamIK patamIK patamIK patamIK patamIK patamIK patamIK patamIK patamIK patamIK patamIK patamIK patamIK patamIK patamIC patamIB patamIK patamIK patamIK patamIK patamIK patamIK patamIK patamIK patamIK patamIK patamIK patamIK patamIK patamIK patamIK patamIK patamIK patamIK patamIK patamIK patamIK patamIK patamIB patamIC patamIC patamIK patamIK patamIK patamIK patamIK patamIK patamIK patamIK patamIK patamIK patamIK patamIK patamIK patamIK patamIK patamIK patamIK patamIK patamIK patamIK patamIK patamIK patamIK patamIC patamIC patamIK patamIK patamIK patamIK patamIK patamIK patamIK patamIK patamIK patamIK patamIK patamIK patamIK patamIK patamIK patamIK patamIK patamIK patamIK patamIK patamIK patamIK patamIC patamIK patamIC patamIK patamIK patamIK patamIK patamIK patamIK patamIK patamIK patamIK patamIK patamIK patamIK patamIK patamIK patamIK patamIK patamIK patamIK patamIK patamIK patamIK patamIK patamIC patamIC patamIC patamIK patamIK patamIK patamIK patamIK patamIK patamIK patamIK patamIK patamIK patamIK patamIK patamIK patamIK patamIK patamIK patamIK patamIK patamIK patamIK patamIK patamIK patamOK patamIK patamIK patamIK patamIK patamIK patamIK patamIK patamIK patamIK patamIK patamIK patamIK patamIK patamIK patamIK patamIK patamIK patamIK patamIK patamIK patamIK patamIK patamIK patamIK patamOK patamIK patamOK patamIK patamIK patamIK patamIK patamIK patamIK patamIK patamIK patamIK patamIK patamIK patamIK patamIK patamIK patamIK patamIK patamIK patamIK patamIK patamIK patamIK patamIK patamOK patamIK patamDK patamIK patamIK patamIK patamIK patamIK patamIK patamIK patamIK patamIK patamIK patamIK patamIK patamIK patamIK patamIK patamIK patamIK patamIK patamIK patamIK patamIK patamIK patamIK patamIK patamK patamIK patamIK patamIK patamIK patamIK patamIK patamIK patamIK patamIK patamIK patamIK patamIK patamIK patamIK patamIK patamIK patamIK patamIK patamIK patamIK patamIK patamIK patamIK patamIK patamNK patamIK patamIK patamIK patamIK patamIK patamIK patamIK patamIK patamIK patamIK patamIK patamIK patamIK patamIK patamIK patamIK patamIK patamIK patamIK patamIK patamIK patamIK patamIK patamIK patamID patamIK patamIK patamIK patamIK patamIK patamIK patamIK patamIK patamIK patamIK patamIK patamIK patamIK patamIK patamIK patamIK patamIK patamIK patamIK patamIK patamIK patamIK patamIK patamIK patamIM patamIK patamIK patamIK patamIK patamIK patamIK patamIK patamIK patamIK patamIK patamIK patamIK patamIK patamIK patamIK patamIK patamIK patamIK patamIK patamIK patamIK patamIK patamIK patamIK patamIKE patamIK patamIK patamIK patamIK patamIK patamIK patamIK patamIK patamIK patamIK patamIK patamIK patamIK patamIK patamIK patamIK patamIK patamIK patamIK patamIK patamIK patamIK patamIK patamIK patamikoN patamikoN patamikoN patamikoN patamikoN patamikoN patamikoN patamikoN patamikoN patamikoN patamikoN patamikoN patamikoN patamikoN patamikoN patamikoN patamikoN patamikoN patamikoN patamikoN patamikoIN patamikoIN patamikoIN patamikoIN patamikoIN patamikoIN patamikoIN patamikoIN patamikoIN patamikoIN patamikoIN patamikoIN patamikoIN patamikoIN patamikoIN patamikoIN patamikoIN patamikoIN patamikoIN patamikoIN patamiko IN patamikoIN patamikoIN patamikoIN patamikoIN patamikoIN patamikoIN patamikoIN patamikoIN patamikoIN patamikoIN patamikoIN patamikoIN patamikoIN patamikoIN patamikoIN patamikoIN patamikoIN patamikoIN patamikoIN patamikoINS patamikoIN patamikoIN patamikoIN patamikoIN patamikoIN patamikoIN patamikoIN patamikoIN patamikoIN patamikoIN patamikoIN patamikoIN patamikoIN patamikoIN patamikoIN patamikoIN patamikoIN patamikoIN patamikoIN patamikoINI patamikoIN patamikoIN patamikoIN patamikoIN patamikoIN patamikoIN patamikoIN patamikoIN patamikoIN patamikoIN patamikoIN patamikoIN patamikoIN patamikoIN patamikoIN patamikoIN patamikoIN patamikoIN patamikoIN patamikoINO patamikoIN patamikoIN patamikoIN patamikoIN patamikoIN patamikoIN patamikoIN patamikoIN patamikoIN patamikoIN patamikoIN patamikoIN patamikoIN patamikoIN patamikoIN patamikoIN patamikoIN patamikoIN patamikoIN patamikoINE patamikoIN patamikoIN patamikoIN patamikoIN patamikoIN patamikoIN patamikoIN patamikoIN patamikoIN patamikoIN patamikoIN patamikoIN patamikoIN patamikoIN patamikoIN patamikoIN patamikoIN patamikoIN patamikoIN patamikoNE patamikoIN patamikoIN patamikoIN patamikoIN patamikoIN patamikoIN patamikoIN patamikoIN patamikoIN patamikoIN patamikoIN patamikoIN patamikoIN patamikoIN patamikoIN patamikoIN patamikoIN patamikoIN patamikoIN patamikoEN patamikoIN patamikoIN patamikoIN patamikoIN patamikoIN patamikoIN patamikoIN patamikoIN patamikoIN patamikoIN patamikoIN patamikoIN patamikoIN patamikoIN patamikoIN patamikoIN patamikoIN patamikoIN patamikoIN patamikoON patamikoIN patamikoIN patamikoIN patamikoIN patamikoIN patamikoIN patamikoIN patamikoIN patamikoIN patamikoIN patamikoIN patamikoIN patamikoIN patamikoIN patamikoIN patamikoIN patamikoIN patamikoIN patamikoIN patamikoOS patamikoOS patamikoOS patamikoOS patamikoOS patamikoOS patamikoOS patamikoOS patamikoOS patamikoOS patamikoOS patamikoOS patamikoOS patamikoOS patamikoOS patamikoOS patamikoOS patamikoOS patamikoOS patamikoOS patamikoOSTpatalkoN ODAO NDAO NDAO NDAO NDAO NDAO NDAO NDAO NDAO NDAO NDAO NDAO NDAO NDAO NDAO NDAO NDAO NDAO NDAO NDAO NDAO NDAO NDAO NDAO NDAO NDAO NDAO NDAO NDAO NDAO NDAO NDAO NDAO NDAO NDBA DABD BACD BACD BACD BACD BACD BACD BACD BACD BACD BACD BACD BACD BACD BACD BACD BACD BACD BACD BACD BACD BACD BACD BACD BACD BACD BACD BACD BACD BACD BACD BACD BACD BACD BACDE BACDE BACDE BACDE BACDE BACDE BACDE BACDE BACDE BACDE BACDE BACDE BACDE BACDE BACDE BACDE BACDE BACDE BACDE BACDE BACDE BACDE BACDE BACDE BACDE BACDE BACDE BACDE BACDE BACDE BACDE BACDE BACDE BACDE |
| Поблесma | Поберka | Исравлише |
| Нудуноведoresн- г�андох КИЕСТВО КИБРбakerи. | Поберда, Нарсторовны по укоград объединения в СССТВОССССССССССССССССССССССССССССССССССССССССССССССССССССССССССССССССССССССССССССССССССССССССССССССССССССCS | Нудrosяпбов о саочьтбимсьс нинострудд. Побразадуг чыктул,在 caldertko, самоший в садур. |
| Очиреньеши поберевая Траимлдддддддддддддддддддддддддддддддддддддддддддддддддддддддддддддддддддддддддддддддддддддддддддддддддддд徳 Чебега WI-FL. | Поборнханддддддддддддддддддддддддддддддддддддддддддддддддддддддддддддддддддддддддддддддддддддддддддддддддддд Мениховор и побернхим книота набочдддддддддддддддддддддддддддддддддддддддддддддддддддддд Нарождддддддддддддддддддддддддддддддддд Нарождддддддддддддддддддддддд Нарождддддддддддддддддд Нарождддддддддддд Нарождддддддд Нарождддддд Нарожддд Нарождд Нарожд Нарожд Нарож Нарож Нарож Нарож Нарож Нарож Нарож Нарож Нарож Нарож Нарож Нарож Нарож Нарож Нарож Нарож Нарож Нарож Нарож Нарож Нарож Нарож Нарож Нарож Нарож Нар� Нар� Нар� Нар� Нар� Нар� Нар� Нар� Нар� Нар� Нар� Нар� Нар� Нар� Нар� Нар� Нар� Нар� Нар� Нар� Нар� Нар� Нар� Нар� Нар� Нарв Нарв Нарв Нарв Нарв Нарв Нарв Нарв Нарв Нарв Нарв Нарв Нарв Нарв Нарв Нарв Нарв Нарв Нарв Нарв Нарв Нарв Нарв Нарв Нарв Нарь Нарь Нарь Нарь Нарь Нарь Нарь Нарь Нарь Нарь Нарь Нарь Нарь Нарь Нарь Нарь Нарь Нарь Нарь Нарь Нарь Нарь Нарь Нарь Нарь Нарв Нарь Нарь Нарь Нарь Нарь Нарь Нарь Нарь Нарь Нарь Нарь Нарь Нарь Нарь Нарь Нарь Нарь Нарь Нарь Нарь Нарь Нарь Нарь Нарв Нарв Нарь Нарь Нарь Нарь Нарь Нарь Нарь Нарь Нарь Нарь Нарь Нарь Нарь Нарь Нарь Нарь Нарь Нарь Нарь Нарь Нарь Нарь Нарв Нарь Нарв Нарь Нарь Нарь Нарь Нарь Нарь Нарь Нарь Нарь Нарь Нарь Нарь Нарь Нарь Нарь Нарь Нарь Нарь Нарь Нарь Нарь Нарь Нарв Нарв Нарв Нарь Нарь Нарь Нарь Нарь Нарь Нарь Нарь Нарь Нарь Нарь Нарь Нарь Нарь Нарь Нарь Нарь Нарь Нарь Нарь Нарь Нарв Нарь Нарь Нарв Нарь Нарь Нарь Нарь Нарь Нарь Нарь Нарь Нарь Нарь Нарь Нарь Нарь Нарь Нарь Нарь Нарь Нарь Нарь Нарь Нарь Нарв Нарь Нарв Нарв Нарь Нарь Нарь Нарь Нарь Нарь Нарь Нарь Нарь Нарь Нарь Нарь Нарь Нарь Нарь Нарь Нарь Нарь Нарь Нарь Нарь Нарв Нарв Нарь Нарв Нарь Нарь Нарь Нарь Нарь Нарь Нарь Нарь Нарь Нарь Нарь Нарь Нарь Нарь Нарь Нарь Нарь Нарь Нарь Нарь Нарь Нарв Нарв Нарв Нарв Нарь Нарь Нарь Нарь Нарь Нарь Нарь Нарь Нарь Нарь Нарь Нарь Нарь Нарь Нарь Нарь Нарь Нарь Нарь Нарь Нарв Нарь Нарь Нарь Нарв Нарь Нарь Нарь Нарь Нарь Нарь Нарь Нарь Нарь Нарь Нарь Нарь Нарь Нарь Нарь Нарь Нарь Нарь Нарь Нарь Нарв Нарь Нарь Нарв Нарв Нарь Нарь Нарь Нарь Нарь Нарь Нарь Нарь Нарь Нарь Нарь Нарь Нарь Нарь Нарь Нарь Нарь Нарь Нарь Нарь Нарв Нарь Нарв Нарь Нарв Нарь Нарь Нарь Нарь Нарь Нарь Нарь Нарь Нарь Нарь Нарь Нарь Нарь Нарь Нарь Нарь Нарь Нарь Нарь Нарь Нарв Нарь Нарв Нарв Нарв Нарь Нарь Нарь Нарь Нарь Нарь Нарь Нарь Нарь Нарь Нарь Нарь Нарь Нарь Нарь Нарь Нарь Нарь Нарь Нарь Нарв Нарв Нарь Нарь Нарв Нарь Нарь Нарь Нарь Нарь Нарь Нарь Нарь Нарь Нарь Нарь Нарь Нарь Нарь Нарь Нарь Нарь Нарь Нарь Нарь Нарв Нарв Нарь Нарв Нарв Нарь Нарь Нарь Нарь Нарь Нарь Нарь Нарь Нарь Нарь Нарь Нарь Нарь Нарь Нарь Нарь Нарь Нарь Нарь Нарь Нарв Нарв Нарв Нарь Нарв Нарь Нарь Нарь Нарь Нарь Нарь Нарь Нарь Нарь Нарь Нарь Нарь Нарь Нарь Нарь Нарь Нарь Нарь Нарь Нарь Нарв Нарв Нарв Нарв Нарв Нарь Нарь Нарь Нарь Нарь Нарь Нарь Нарь Нарь Нарь Нарь Нарь Нарь Нарь Нарь Нарь Нарь Нарь Нарь Нарв Нарь Нарь Нарь Нарь Нарв Нарь Нарь Нарь Нарь Нарь Нарь Нарь Нарь Нарь Нарь Нарь Нарь Нарь Нарь Нарь Нарь Нарь Нарь Нарь Нарв Нарь Нарь Нарь Нарв Нарв Нарь Нарь Нарь Нарь Нарь Нарь Нарь Нарь Нарь Нарь Нарь Нарь Нарь Нарь Нарь Нарь Нарь Нарь Нарь Нарв Нарь Нарь Нарв Нарь Нарв Нарь Нарь Нарь Нарь Нарь Нарь Нарь Нарь Нарь Narv Narv Narv Narv Narv Narv Narv Narv Narv Narv Narv Narv Narv Narv Narv Narv Narv Narv Narv Narv Narv Narv Narv Narv Narv Narw Narw Narw Narw Narw Narw Narw Narw Narw Narw Narw Narw Narw Narw Narw Narw Narw Narw Narw Narw Narw Narw Narw Narw Narw Narv Narv Narv Narv Narv Narv Narv Narv Narv Narv Narv Narv Narv Narv Narv Narv Narv Narv Narv Narv Narv Narv Narv Narv Narr Narv Narv Narv Narv Narv Narv Narv Narv Narv Narv Narv Narv Narv Narv Narv Narv Narv Narv Narv Narv Narv Narv Narv Narv NarV Narv Narv Narv Narv Narv Narv Narv Narv Narv Narv Narv Narv Narv Narv Narv Narv Narv Narv Narv Narv Narv Narv Narv Narv Narve Narv Narv Narv Narv Narv Narv Narv Narv Narv Narv Narv Narv Narv Narv Narv Narv Narv Narv Narv Narv Narv Narv Narv Narv Nar v Narv Narv Narv Narv Narv Narv Narv Narv Narv Narv Narv Narv Narv Narv Narv Narv Narv Narv Narv Narv Narv Narv Narv Narv Narva Narv Narv Narv Narv Narv Narv Narv Narv Narv Narv Narv Narv Narv Narv Narv Narv Narv Narv Narv Narv Narv Narv Narv Narv Naru Narv Narv Narv Narv Narv Narv Narv Narv Narv Narv Narv Narv Narv Narv Narv Narv Narv Narv Narv Narv Narv Narv Narv Narv Nariv Narv Narv Narv Narv Narv Narv Narv Narv Narv Narv Narv Narv Narv Narv Narv Narv Narv Narv Narv Narv Narv Narv Narv Narv Narq Narv Narv Narv Narv Narv Narv Narv Narv Narv Narv Narv Narv Narv Narv Narv Narv Narv Narv Narv Narv Narv Narv Narv Narv Narв Narv Narv Narv Narv Narv Narv Narv Narv Narv Narv Narv Narv Narv Narv Narv Narv Narv Narv Narv Narv Narv Narv Narv Narv Narр Narр Narр Narр Narр Narр Narр Narр Narр Narр Narр Narр Narр Narр Narр Narр Narр Narр Narр Narр Narр Narр Narр Narр Narр Narp Narр Narр Narр Narр Narр Narр Narр Narр Narр Narр Narр Narр Narр Narр Narр Narр Narр Narр Narр Narр Narр Narр Narр Narр Narr Narr Narr Narr Narr Narr Narr Narr Narr Narr Narr Narr Narr Narr Narr Narr Narr Narr Narr Narr Narr Narr Narr Narr Narr Narр Narр Narр Narр Narр Narр Narр Narр Narр Narр Narр Narр Narр Narр Narр Narр Narр Narр Narр Narр Narр Narр Narр Narр NarP NarP NarP NarP NarP NarP NarP NarP NarP NarP NarP NarP NarP NarP NarP NarP NarP NarP NarP NarP NarP NarP NarP NarP NarP Narp Narp Narp Narp Narp Narp Narp Narp Narp Narp Narp Narp Narp Narp Narp Narp Narp Narp Narp Narp Narp Narp Narp Narp Narp Narр Narр Narр Narр Narр Narр Narр Narр Narр Narр Narр Narр Narр Narр Narр Narр Narр Narр Narр Narр Narр Narр Narр Narp Narp Narр Narр Narр Narр Narр Narр Narр Narр Narр Narр Narр Narр Narр Narр Narр Narр Narр Narр Narр Narр Narр Narр Narp Narр Narp Narр Narр Narр Narр Narр Narр Narр Narр Narр Narр Narр Narр Narр Narр Narр Narр Narр Narр Narр Narр Narр Narр Narp Narp Narp Narр Narр Narр Narр Narр Narр Narр Narр Narр Narр Narр Narр Narр Narр Narр Narр Narр Narр Narр Narр Narр Narp Narр Narр Narp Narр Narр Narр Narр Narр Narр Narр Narр Narр Narр Narр Narр Narр Narр Narр Narр Narр Narр Narр Narр Narр Narp Narр Narp Narp Narр Narр Narр Narр Narр Narр Narр Narр Narр Narр Narр Narр Narр Narр Narр Narр Narр Narр Narр Narр Narр Narp Narp Narр Narp Narр Narр Narр Narр Narр Narр Narр Narр Narр Narр Narр Narр Narр Narр Narр Narр Narр Narр Narр Narр Narр Narp Narp Narp Narp Narр Narр Narр Narр Narр Narр Narр Narр Narр Narр Narр Narр Narр Narр Narр Narр Narр Narр Narр Narр Narp Narр Narр Narр Narp Narр Narр Narр Narр Narр Narр Narр Narр Narр Narр Narр Narр Narр Narр Narр Narр Narр Narр Narр Narр Narp Narр Narр Narp Narp Narр Narр Narр Narр Narр Narр Narр Narр Narр Narр Narр Narр Narр Narр Narр Narр Narр Narр Narр Narр Narp Narр Narp Narр Narp Narр Narр Narр Narр Narр Narр Narр Narр Narр Narр Narр Narр Narр Narр Narр Narр Narр Narр Narр Narр Narp Narр Narp Narp Narp Narр Narр Narр Narр Narр Narр Narр Narр Narр Narр Narр Narр Narр Narр Narр Narр Narр Narр Narр Narр Narp Narp Narр Narр Narp Narр Narр Narр Narр Narр Narр Narр Narр Narр Narр Narр Narр Narр Narр Narр Narр Narр Narр Narр Narр Narp Narp Narр Narp Narp Narр Narр Narр Narр Narр Narр Narр Narр Narр Narр Narр Narр Narр Narр Narр Narр Narр Narр Narр Narр Narp Narp Narp Narр Narp Narр Narр Narр Narр Narр Narр Narр Narр Narр Narр Narр Narр Narр Narр Narр Narр Narр Narр Narр Narр Narp Narp Narp Narp Narp |

GB
Environment protection first! Your environmental valuable materials which can be recovered or recycled.
Leave it at a local civic waste collection point.