DO9135G - Grill plate DOMO - Free user manual and instructions
Find the device manual for free DO9135G DOMO in PDF.
User questions about DO9135G DOMO
0 question about this device. Answer the ones you know or ask your own.
Ask a new question about this device
Download the instructions for your Grill plate in PDF format for free! Find your manual DO9135G - DOMO and take your electronic device back in hand. On this page are published all the documents necessary for the use of your device. DO9135G by DOMO.
USER MANUAL DO9135G DOMO
Downloaded from www.vandenborre.beDO9135G RECYCLING INFORMATION This symbol on the product or on its packaging indicates that this product may not be treated as household waste. Instead it must be brought to the applicable collection point for recycling of electrical and electronic equipment. By ensuring this product is disposed of correctly, you will help prevent potential negative consequences for the environment and human health, which could otherwise be caused by inappropriate waste handling of this product. For more detailed information about recycling of this product, please contact your local city ofce, your household waste disposal service or the shop where you purchased the product. The packaging is recyclable. Please treat package ecologically.
- Only in Belgium, the Netherlands, Luxemburg, France and Germany.
Downloaded from www.vandenborre.beDO9135G SAFETY INSTRUCTIONS This appliance may be used by children from the age of 16 and up, and also by persons with a physical or sensorly limitation, as well as mentally limited persons or persons with a lack of experience and knowledge. But only on the condition that these persons have received the necessary instructions on how to use this appliance in a safe way and know the dangers that can occur by using this appliance. Children cannot be allowed to play with the appliance. Maintenance and cleaning of the appliance may not be done by children, unless they are older than 16 years old and are under supervision. Keep the appliance out of reach of children younger than 16 years old. This appliance is suitable to be used in a household environment and in similar surroundings such as:
- Kitchen for personnel of shops, ofces or other similar professional surroundings
- Hotel or motel rooms and other surroundings with a residential character
- Guest rooms or similar Attention: This appliance cannot be used with an external timer or a separate remote control.
Downloaded from www.vandenborre.beDO9135G The appliance can become hot during use. Keep the power cord away from hot parts and don’t cover the appliance.
- Read all instructions before use.
- Before use, check if the voltage stated on the appliance corresponds with the voltage of the power net at your home.
- Do not let the cord hang on a hot surface or on the edge of a table or counter top.
- Never use the appliance when the cord or plug is damaged, after malfunction or when the appliance itself is damaged. In that case, take the appliance to the nearest qualied service center for check-up and repair.
- Close supervision is necessary when the appliance is used near or by children.
- The use of accessories that are not recommended or sold by the manufacturer can cause re, electrical shock or injuries.
- Unplug the appliance when it is not in use, before assembling or disassembling any parts and before cleaning the appliance. Put all buttons and knobs into the ‘off’ position and unplug the appliance by grasping the plug. Never unplug by pulling the cord.
- Do not leave a working appliance unattended.
- Never place this appliance near a gas stove or Downloaded from www.vandenborre.beDO9135G electrical stove or in a place where it may come into contact with a warm appliance.
- Do not use the appliance outdoors.
- Only use the appliance for its intended use.
- Always use the appliance on a steady, dry and level surface.
- Only use the appliance for domestic use. The manufacturer can not be held responsible for accidents that result from improper use of the appliance or not following the instructions described in this manual.
- All repairs should be carried out by the manufacturer or its aftersales service.
- Never immerse the appliance, the cord or the plug in water or any other liquid.
- Make sure that children do not touch the cord or appliance.
- Keep the cord away from sharp edges and hot parts or other heat sources.
- Before use, remove all packaging materials and any promotional stickers. POWER CORD A short power-supply cord is provided to reduce the hazards resulting from entanglement or tripping over a long cord. An extension cord may be used with care; however, be sure the marked electrical rating is equal to or greater than the rating of this appliance. The extension cord should be positioned such that it does not drape over the counter or tabletop where it can be pulled on by children or tripped over. Use only 3-wire extension cord with 3-blade grounding plug. The electrical rating of this appliance is listed on the bottom panel of the unit. Downloaded from www.vandenborre.beDO9135G
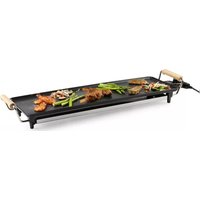
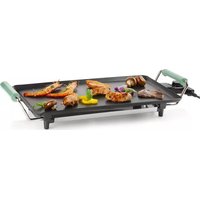
BEFORE USING YOUR PANINI GRILL
Unpack your new panini grill and remove all of the packaging materials. Wipe the exterior and the grill plates with a clean, damp cloth. Wipe dry before use. Never use harsh or abrasive cleaners.
2. Latch for Upright Storage
5. Power Indicator Light (Red)
6. Ready Indicator Light (Green)
1. Place your panini grill on a dry, at surface. Ensure that the sides, back and top
are at least 4 inches (10 cm) away from walls, cabinets, and other objects. turn the temperature dial to the off position, situated below the green temperature light. Plug the panini grill into a 230V, 50Hz AC-only outlet. Once plugged in, the red “POWER” indicator light and the green “READY” indicator light will come on.
2. Turn the temperature control knob to the required setting. The green “READY”
light will turn off. Allow the panini grill to preheat in the closed position. When the correct temperature has been reached, the green “READY” light will turn on. Note: During cooking, the green “READY” light will turn on and off. This is the panini grill automatically adjusting the temperature to maintain the desired cooking temperature.
3. Place sandwiches, seasoned meat or sliced vegetables onto the bottom grill plate
and close the lid. It is not necessary to press down on the handle as the hinge will allow the grill plate to press down evenly on your sandwich and the weight of it will cause the plate to press down during cooking as necessary. Do not use the latch to lock down the top plate. It is a safety feature for storage purposes only.
4. Please refer to the chart provided at the end of this manual for cooking time
suggestions. Check on the panini grill’s progress often to ensure that your food is being toasted or grilled to your preference.
5. When your food is ready, remove it from the panini grill with a plastic or wooden
spatula. Do not use metal utensils as this will damage the nonstick coating on the grill plates.
6. When you have nished cooking, turn the temperature control to the “OFF”
position and unplug your panini grill.
1. The panini grill is designed to toast sandwiches and grill meats and vegetables.
Use the variable temperature control to choose the right temperature and prepare your favourite meal.
2. The oating back hinge on your panini grill can accommodate all kinds of breads,
thick and thin. Try making your favourite sandwich on focaccia, pita breads, sourdough or mini-baguettes. Sweet breads, like raisin bread, have a higher sugar content and will brown faster than regular breads.
3. Allow your sandwich or meat to cool for a few minutes before eating.
4. Season your meat before cooking for tastier results.
5. Grease the grill plates when cooking sh to prevent sticking.
6. Adjustable hinge level allows any thickness of food to toast or melt perfectly.
Simply lift and adjust the hinge to the desired level for precise cooking. COOKING CHART FOOD TEMP. SELECTION COOKING TIME (MIN.) REMARKS Chicken (1 kg) medium 75 – 80 Cut in half. Doesn’t need to be turned over. Sausages 2 pcs High 4 – 6 Cut in half Hamburger 2 pcs High 3 – 5 Wait 2-3 min. before opening the top plate. Kebabs 3 pcs HIgh 8 – 10 turn kebabs after 4-5 min. Liver 2 pcs Medium 2 – 3 Clean liver thoroughly. Pork chops High 6 – 8 Pork chops should be of even thickness. Salmon Medium 16 – 20 Grease the plate and turn halfway through cooking sole 1 pc Medium 18 – 22 Grease te plate and turn halfway through cooking. Downloaded from www.vandenborre.beDO9135G Spare ribs 3 pcs High 15 – 18 Turn ribs after 10 min. Steak 1 pc Medium 2 – 3 Meat cooked rare in time indicated, time will vary with thickness of steak. Eggplant 6 slices Medium 6 - 8 slice evenly Onions sliced Medium 6 - 8 Slice evenly Yellow/green/red pepper 1 pc Medium 6 - 8 Close the grill plates and press down. Filled bread rolls Medium 3 - 9 Use soft rolls Toasted sandwich/ panini Medium 2 - 3 Place only half a slice of cheese in each sandwich. - Pease note these are recommended cook times only. - Please adjust the cook times for personal preference and taste. - Different cuts of meat will require different cook times. Please ensure your meat is cooked at a safe internal temperature for consumption.
CLEANING & CARING FOR YOUR PANINI GRILL
1. Unplug your panini grill and allow it to cool slightly before cleaning. We
recommend to clean the grill plates while they are still slightly warm.
2. Wipe the grill plates with a clean, damp cloth. Never use abrasive cleaners or
scouring pads, as they will scratch the nonstick coating on the grill plates.
3. If there is food remnants cooked onto the grill plates, reheat the unit and
brush on a little vegetable oil. Let this stand for a few minutes then use the plate cleaner and a damp cloth to clean the plates again.
4. Never immerse any part of your panini grill in water or any other liquid.
5. Be sure to clean your panini grill every time you use it.
6. For safe and convenient storage, allow the panini grill to cool completely, close
the unit and press the locking latch on the side handle into place. Once locked closed, your panini grill can be stored in an upright position. Downloaded from www.vandenborre.beDO9135G