
PRO4850G - Refrigerator Sub-Zero - Free user manual and instructions
Find the device manual for free PRO4850G Sub-Zero in PDF.
| Type of product | Built-in refrigerator with glass door |
| Brand | Sub-Zero |
| Model | PRO4850G |
| Dimensions (H x W x D) | 2134 x 1219 x 610 mm (84 x 48 x 24 inches) |
| Weight | Approximately 136 kg (300 lb) |
| Power supply | 115 V, 60 Hz, 15 A |
| Refrigeration type | Dual Refrigeration (independent dual system) |
| Touch screens | External touch screens for refrigerator and freezer |
| Ice making | Integrated ice maker with Ice Max function (+30%) |
| Air purification | Air purification system with replaceable cartridge (lifespan ~1 year) |
| Water filtration | Water filtration system (behind the grille) |
| Capacity | Approximately 650 liters (refrigerator + freezer) |
| Shelves | Glass shelves (refrigerator), stainless steel shelves (freezer) |
| Drawers | Removable storage drawers, vegetable bin with cover |
| Sabbath Mode | Star-K certified, meets religious requirements |
| Condenser cleaning | Every 3 to 6 months; access via lower grille |
| Warranty | 2 years parts and labor, 5 years sealed system |
| Maintenance | Interior cleaning with mild soap and baking soda; stainless steel with non-abrasive cleaner |
| Country of manufacture | United States (Sub-Zero International) |
Frequently Asked Questions - PRO4850G Sub-Zero
User questions about PRO4850G Sub-Zero
0 question about this device. Answer the ones you know or ask your own.
Ask a new question about this device
Download the instructions for your Refrigerator in PDF format for free! Find your manual PRO4850G - Sub-Zero and take your electronic device back in hand. On this page are published all the documents necessary for the use of your device. PRO4850G by Sub-Zero.
USER MANUAL PRO4850G Sub-Zero
GUIDA ALL'USO E ALLA MANUTENZIONE
The model and serial number are listed on the product rating plate. Refer to page 4 for rating plate location. For warranty purposes, you will also need the date of installation and name of your authorized Sub-Zero dealer. Record this information below for future reference.
SERVICE INFORMATION
Model Number
Serial Number
Date of Installation
Certified Service Name
Certified Service Number
Authorized Dealer
Dealer Number
Important Note
To ensure this product is installed and operated as safely and efficiently as possible, take note of the following types of highlighted information throughout this guide:
IMPORTANT NOTE highlights information that is especially important.
CAUTION indicates a situation where minor injury or product damage may occur if instructions are not followed.
WARNING states a hazard that may cause serious injury or death if precautions are not followed.
SAFETY PRECAUTIONS
IMPORTANT SAFEGUARDS
WARNING
Do not store explosive substances such as aerosol cans with a flammable propellant in this appliance.
WARNING
Keep ventilation openings, in the appliance enclosure or in the built-in structure, clear of obstruction.
WARNING
Do not use mechanical devices or other means to accelerate the defrosting process, other than those recommended by the manufacturer.
WARNING
Do not damage the refrigerant circuit.
WARNING

This symbol indicates risk of fire/flammable materials.
WARNING

This symbol indicates pressure.
CAUTION
Incorporated ice makers must be installed by the manufacturer or its service agent.
WARNING
Do not use electrical appliances inside the food storage compartments of the appliance, unless they are of the type recommended by the manufacturer.
WARNING
This appliance is not intended for use by persons (including children) with reduced physical, sensory or mental capabilities, or lack of experience and knowledge, unless they have been given supervision or instruction concerning use of the appliance by a person responsible for their safety.
Children should be supervised to ensure they do not play with the appliance.
SAFETY PRECAUTIONS
PRO FEATURES
IMPORTANT SAFEGUARDS
- This appliance is intended to be used in household and similar applications such as:
- staff kitchen areas in shops, offices and other working environments
- farm houses and by clients in hotels, motels and other residential type environments
- bed and breakfast type environments
- catering and similar non-retail applications
PRO Features
FEATURES
Product Rating Plate (inside drawer)
Freezer External Touch Display
Helicopter External Touch Display
4 Air Purification System
Glass Shelves
6 Slide-Out Bins
7 Pull-Out Shet
8 Side Roll Supports
9 Refrigerator Crisper Drawers
10 Removable Crapier Ltd.
11 Refrigerator Storage Drawn
12 Freezer Storage Dwyer
13. Automark Ice Maker
14 Ice Container
15. Water Filtration System (behind grille)
16 Condenser (behind grille)
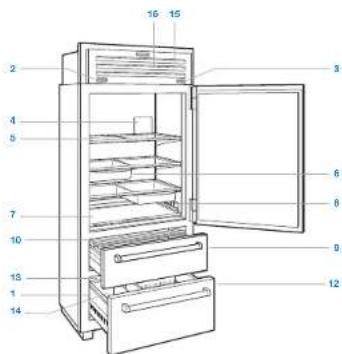
ICBPRO3650 (solid door model)
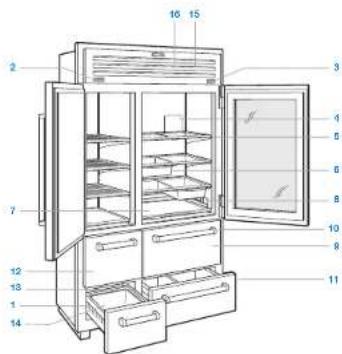
ICBPRO4850G (glass door model)
STORAGEINTERACTIVECONTROLS
Interactive Touch Controls
For initial start up, touch and hold PDWER on either external touch display, located on the grille.
Temperature can be adjusted in one-degree increments.
The left and right external displays control different temperature zones in the unit, but can both access the settings menu.
EXTERNAL TOUCH DISPLAY
To unlock the display, touch and hold for three seconds. The display will automatically after 30 seconds of inactivity. Refer to the illustrations below.
To adjust the temperature, touch the temperature displayed next to the corresponding zone icon.
To turn the ice maker on or off or to active max ice, touch
Freezer display (914 mm model shown)
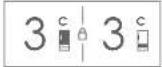
Refrigerator display (914 mm model shown)
SETTING
To access the settings menu, touch an either external touch display.
SETTING
Activate or desactivate power to the unit
A Enable or disable automatic display lock
Activatie, deactivatie, or refresh purifier life reminder
Enable or disable door/answer alarm and duration
Enable or disable connect
Enable, disable reminder, or refresh filter life reminder
Enable or disable Sabbath mode
Adjust soft on lighting and accent lighting (1 applicable)
Adjust temperature units
Adjust alarm volume and tone
Select Language
View troubleshooting and service information
Keeping Food At Its Best
DUAL REFRIGERATION
This Sub-Zero features a unique Dual Refrigeration® system to keep food fresher longer. Three separate controls allow the refrigerator, refrigerator drawer(s), and freezer to be set at different temperatures.
With the Sub-Zero Dual Refrigeration system, individual refrigerator and freezer systems have been designed to maintain accurate, consistent temperatures and proper humidity levels for longer food life expectancy. Dual Refrigeration eliminates transfer of fresh food odors to frozen food and ice and does not freeze the moisture out of the air in the fresh food section.
For handy tips and information on how to maximize food freshness, refer to the freshness cards stored in the refrigerator.
Refrigerator Storage
GLASS SHELVES
To remove or adjust a glass shelf, tilt up, then lift up and out. To reposition, insert the shelf in the tracks along the back wall, then lower the front until it locks into position. Refer to the illustration below.
IMPORTANT NOTE: Use care when handling glass shelves to prevent breakage or scratching of the interior.
CAUTION
Warm glass shelves to room temperature before immersing in warm water.
SLIDE-OUT BINS
Integrated rails mounted below the glass shelves allow slide-out bins to be positioned in a variety of locations. To remove or adjust a slide-out bin, pull the handle of the bin forward until it stops, and lift up and out of the rails. Refer to the illustration below.
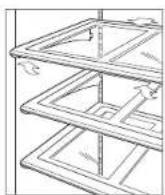
Glass shelf removal
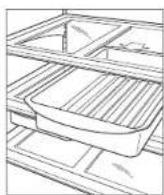
Slide-out bin removal
STORAGE OPERATION
Refrigerator Storage
PULL-OUT SHELF
The bottom shelf pulls out for easy access to condiments and other items commonly stored on door shelves. Adjustable rails keep items snugly in place. To adjust, pull the rail up and rotate. Refer to the illustration below.
CRISPERLID
To remove the risper lid assembly, pull the upper refrigerator drawer all the way out, raise the front edge of the risper lid up, and pull out from the back. Refer to the illustration below.
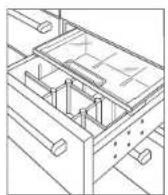
DRAWER DIVIDERS
Long dividers run the full depth of the drawer, with shorter dividers that connect to the long dividers to compartmentalize the drawer.
To remove the short dividers, lift up and out. The long dividers cannot be removed.
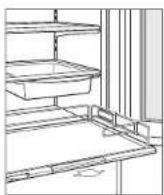
Pull-out shelf
Crisper lid (1219 mm model shown)
Freezer Storage
STAINLESS STEEL SHELVES
For 1219 mm models, to remove or adjust a shelf, tilt up, then lift up and out. To install, insert the shelf in the tracks along the back wall, then lower the front until it looks into position:
ICE CONTAINER
To remove the ice container, pull the drawer out to full-extension, then lift the container up and out.
Storage Drawers
Refrigerator and freezer storage drawers are removable for cleaning. An automatic stop is built in to prevent the drawers from coming all the way out unintentionally.
To remove, pull the drawer out to full-extension, lift up evenly on both sides of the drawer front, and pull out. Refer to the illustration below.
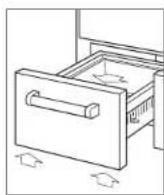
Storage drawer removal
Air Purification System
The advanced air purification system reduces bacteria, odors, and ethylene gas, which causes premature ripening in fruits and vegetables. The air purification cartridge has been factory installed and is located inside the refrigerator on the back wall.
To initiate air purification, touch , then touch
The cartridge will last approximately one year. "Change Air Purifier" will appear on the display when the cartridge needs to be replaced. Touch "Snoze" to delay the reminder for 24 hours or until cartridge can be replaced. Touch "Fresh" to reset the life indicator to 100% once the cartridge is replaced.
AIR PURIFICATION CARTRIDGE REPLACEMENT
To access the air purification cartridge, grasp the outside cover from the bottom and rotate upward. Refer to the illustration below.
2 Grasp the black cover from the top and rotate downward. The cartridge will pop out and can be removed.
3 Remove the new cartridge from packaging and insert with the connector pointing downward.
Once in position, close the black cover. Then rotate the outside cover downward until it closes against the back wall.
Once the cartridge has been replaced, follow the instructions on the display. The cartridge life cycle will reset for approximately one year.
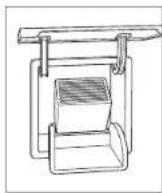
Air purification cartridge
OPERATION CARE RECOMMENDATIONS
Ice Maker Operation
To initiate ice production, touch the freezer external touch display will be visible in the display. After initial start-up, discard the first few batches of ice. The ice may contain impurities from new plumbing connections.
Max ice increases ice production up to 30% for a 24-hour period. Touch to activate max ice. will be visible in the display.
If ice is not used regularly, it may fuse together. To avoid, discard the ice and allow the ice maker to replenish.
Sabbath
This appliance is certified by Star-K to meet strict religious regulations in conjunction with specific instructions found on www.star-k.org.
Cleaning
INTERIOR CLEANING
To clean interior surfaces and all removable parts, wash with a mild solution of soap, water, and baking soda. Rinse and dry thoroughly. Avoid getting water on the lights.
CAUTION
Do not use vinegar, rubbing alcohol, or other alcohol-based cleaners on any interior surface.
STAINLESS STEEL EXTERIOR
Use a nonabsorptive stainless steel cleaner and apply with a soft lint-free cloth. To bring out the natural fuzz, lightly wipe the surface with a water-dampened microfiber cloth followed by a dry polishing chamoe. Always follow the grain of stainless steel.
CONDenser CLEANING
CAUTION
Before cleaning the condenser, turn power off to the unit. Wear gloves to avoid injury from sharp condenser fins.
The condenser is located behind the grille. To access, rotate the bottom of the grille upward. Use a soft bristle brush and vacuum to remove dust and lint from the condenser. Clean the condenser every three to six months. Refer to the illustration below.
IMPORTANT NOTE: To avoid damaging the condenser fins, vacuum in the direction of the fins.
CAUTION
Failure to clean the condenser could result in temperature loss, mechanical failure, or damage.
VACATIONS
For extended vacations, turn the unit off. Empty the unit and black doors open to let fresh air in and keep the interior dry. The water filter should be replaced before start up.
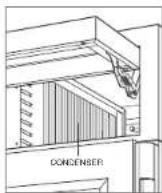
Gendenser location
TROUBLESHOOTING
Troubleshooting
UNIT OPERATION
No lights or cooling.
- Verify power is on.
- Verify electrical power to the unit and home circuit breaker is on.
No lights in the refrigerator or freezer.
- The door/drawer may have been left ajar which has disabled lights to eliminate excess heat. If the lights are out, close the door/drawer for one hour. If the lights are still out, contact Sub-Zero Factory Certified Service.
LED Interior lighting must be replaced by Sub-Zero Factory Certified Service.
Frost, condensation, or ice build up inside the unit.
- Verify the condenser is clean.
- Verify the door/drawer is closing properly.
- Verify the door/drawer has not been left ajar.
- Verify the door/drawer gasket does not have rips or tears. If it does, contact Sub-Zero Factory Certified Service.
If licking is heavy, turn the unit off and use a handheld steamer to melt the ice. Do not use a hair dryer. Once the ice has melted, wipe up any water with a cloth or paper towel.
High temperatures, the unit runs excessively, or is giving off too much heat.
- Verify the condenser is clean.
- Verify the door/drawer is closing properly.
- Verify the door/drawer has not been left ajar.
- Increased ambient temperatures may cause the compressors to run longer.
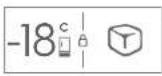
- If temperature display shows 3^ and -18^ , but is not cooling, contact Sub-Zero Factory Certified Service.
ODOR
- The unit should be cleaned before using for the first time. This will clear any odors that may have been trapped during shipping.
- Replace the air purification cartridge.
Clean the unit and shelving thoroughly. - Uncovered food could create an odor which may require cleaning.
- Remove and clean the drain pan located behind the kickplate, and reinstall.
ICE PRODUCTION
No ice.
or appears in the freezer external display.
- Verify the ice maker has been on for at least 24 hours.
- Verify the freezer temperature is near -18°C.
- Verify the ice container is properly installed.
- Verify the ice maker arm in the down position.
- Verify water is being supplied to the unit.
Blue or green ice.
Possible copper supply line corrosion. Contact a plumber to clean or replace.
Black flecks in the cubes.
- Stop use and contact Sub-Zero Factory Certified Service.
Bad taste.
Defrost the freezer and clean with soap and water.
- Place coffee grounds or charcoal briquettes in the freezer to absorb odor.
Hollow cubes.
Clean the condenser, Contact Sub-Zero Factory Certified Service if unresolved.
Sub-Zero International Limited Warranty
FOR RESIDENTIAL USE
FULL TWO YEAR WARRANTY
For two years from the date of original installation, this Sub-Zero product warranty covers all parts and labor to repair or replace, under normal residential use, any part of the product that proves to be defective in materials or workmanship. All service provided by Sub-Zero under the above warranty must be performed by Sub-Zero factory certified service, unless otherwise specified by Sub-Zero, Inc. Service will be provided during normal business hours.
FULL FIVE YEAR SEALED SYSTEM WARRANTY
For five years from the date of original installation, this Sub-Zero product warranty covers all parts and labor to repair or replace, under normal residential use, these parts that prove to be defective in materials or workmanship: compressor, condenser, evaporator, drier and all connecting tubing. All service provided by Sub-Zero under the above warranty must be performed by Sub-Zero factory certified service, unless otherwise specified by Sub-Zero, Inc. Service will be provided during normal business hours.
For more information regarding your Sub-Zero product warranty, contact your authorized Sub-Zero dealer.
Warranties must comply to all country, state, city, local and or ordinance.
Stainless steel doors, panels, handles, product frames and interior surfaces) are covered by a limited 60-day parts and labor warranty for cosmetic defects.
*Replacement water filters and air purification cartridges are not covered by the product warranty.
SUBZERO
Sub-Zero, Sub-Zero & Design, Sub-Zero & Santoroeche Design, Dual-Perfektionen. The Living Kitchen, German American Kitchener 'Tiefen', at Kitchener Design, Walr & Design, Schwer, Schwer & Design, Schwer, Schwer & Design, Schwer, Schwer & Design, Schwer, Schwer & Design, Schwer, Schwer & Design, Schwer, Schwer & Design, Schwer, Schwer & Design, Schwer, Schwer & Design, Schwer, Schwer & Design, Schwer, Schwer & Design, Schwer, Schwer & Design, Schwer, Schwer & Design, Schwer, Schwer & Design, SCHWER
REFRIGERACION PRO
Indice
Commandes tactiles interactives
Sub-total: Zie-BioDesign, S. 3.0.0: BioScienceDesign, D. 1.0.0: Biomedical Design, C. 1.0.0: Computer Science, F. 1.0.0: Programming, C. 1.0.0: American Society of Computer Science, T. 1.0.0: The Art of Computer Design, V. 1.0.0: Visual Design, W. 1.0.0: Visualization, U.S. 1.0.0: User Experience Design, A. 1.0.0: Information Management, B. 1.0.0: Business Planning, H. 1.0.0: Human Resources Management, L. 1.0.0: Legal and Administrative Management, M. 1.0.0: Management Systems, J. 1.0.0: Journal of Industrial Design, K. 1.0.0: Knowledge Management, L. 1.0.0: Learning Management, P. 1.0.0: Professional Development, R. 1.0.0: Research in Human Resource Management, S. 1.0.0: Social Sciences, T. 1.0.0: Technology Management, T. 1.0.0: Technology Management, T. 1.0.0: Technology Management, T. 1.0.0: Technology Management, T. 1.0.0: Technology Management, T. 1.0.0: Technology Management, T. 1.0.0: Technology Management, T. 1.0.0: Technology Management, T. 1.0.0: Technology Management, T.
FRIGORIFERI PRO
Sommario
Gean lampjes of koeling.
- Controller of de stroom is ingeschakeld.
- Controller de电解triche stroom hier cet apparatae en de strooonderbraker inageschakidal.
Geen lampjes in de Ijskast of die depvriezer.
Sien-Zhen, Sich-Zhou & Design, Design & Sub-Design & Accessories Design, Design Hongweiwei, The Liang Kistouc, Great American Kistouc, The Art of Kitchen Design, What! Well & Good Design, How to Use Design Tools, Showroom & Design as Usual, Showroom & Design as Usual, 2016 and 2017 China's Food Industry, 2018 and 2019 China's Food Industry, 2018 and 2019 China's Food Industry, 2018 and 2019 China's Food Industry, 2018 and 2019 China's Food Industry, 2018 and 2019 China's Food Industry, 2018 and 2019 China's Food Industry, 2018 and 2019 China's Food industry,
#
SUB*ZERO
SUB-ZERO, INC. P.O. BOX 44848 MADISON, WI 53744 SUBZERO.COM 800.222.7820
9014952 REV-A
11/2018

- SERVICE INFORMATION
- Important Note
- IMPORTANT SAFEGUARDS
- WARNING
- CAUTION
- PRO Features
- Interactive Touch Controls
- EXTERNAL TOUCH DISPLAY
- SETTING
- Keeping Food At Its Best
- DUAL REFRIGERATION
- Refrigerator Storage
- GLASS SHELVES
- SLIDE-OUT BINS
- STORAGE OPERATION
- PULL-OUT SHELF
- CRISPERLID
- DRAWER DIVIDERS
- Freezer Storage
- STAINLESS STEEL SHELVES
- ICE CONTAINER
- Storage Drawers
- Air Purification System
- AIR PURIFICATION CARTRIDGE REPLACEMENT
- Ice Maker Operation
- Sabbath
- Cleaning
- INTERIOR CLEANING
- STAINLESS STEEL EXTERIOR
- CONDenser CLEANING
- VACATIONS
- TROUBLESHOOTING
- UNIT OPERATION
- No lights in the refrigerator or freezer.
- Frost, condensation, or ice build up inside the unit.
- ODOR
- ICE PRODUCTION
- Blue or green ice.
- Black flecks in the cubes.
- Bad taste.
- Hollow cubes.
- Sub-Zero International Limited Warranty
- FULL TWO YEAR WARRANTY
- FULL FIVE YEAR SEALED SYSTEM WARRANTY
- REFRIGERACION PRO
- Indice
- Commandes tactiles interactives
- FRIGORIFERI PRO
- Sommario
- #
Brand : Sub-Zero
Model : PRO4850G
Category : Refrigerator