SnapShot Mini Black 12MP HD - Camera Dörr - Free user manual and instructions
Find the device manual for free SnapShot Mini Black 12MP HD Dörr in PDF.
User questions about SnapShot Mini Black 12MP HD Dörr
0 question about this device. Answer the ones you know or ask your own.
Ask a new question about this device
Download the instructions for your Camera in PDF format for free! Find your manual SnapShot Mini Black 12MP HD - Dörr and take your electronic device back in hand. On this page are published all the documents necessary for the use of your device. SnapShot Mini Black 12MP HD by Dörr.
USER MANUAL SnapShot Mini Black 12MP HD Dörr
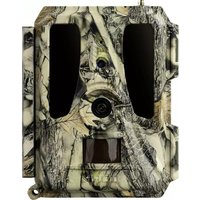
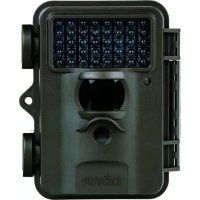
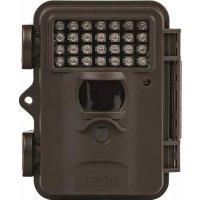
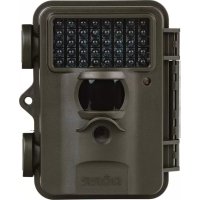
SnapShot Mini 12 MP HD & SnapShot Mini Black 12 MP HD
natural_image
Line drawing of a Dörr camera with no text or symbols on the device itselfTHANK YOU for choosing this DÖRR quality product.
Please read the instruction manual and safety hints carefully before first use. Keep this instruction manual together with the device for future use. If other people use this device, make this instruction manual available. This instruction manual is part of the device and must be supplied with the device in case of sale.
DÖRR is not liable for damages caused by improper use or the failure to observe the instruction manual and safety hints.
INDEX
CAPTURE PAGE
| 01 | Safety Hints | 15 |
| 02 | Safety Hints for Batteries | 15 |
| 03 | Product Description | 16 |
| 04 | Features | 16 |
| 05 | Nomenclature | 16 |
| 06 | First Use | 17 |
| 07 | Camera Settings | 17 |
| 08 | Settings & Functions | 18 |
| 09 | Test Recordings | 20 |
| 10 | Mounting the Camera | 21 |
| 11 | Orientation of the Camera | 21 |
| 12 | Start Surveillance | 21 |
| 13 | Camera Inspection | 22 |
| 14 | Tips & Hints | 22 |
| 15 | Technical Specifications | 23 |
| 16 | Content | 23 |
| 17 | WEEE, RoHS, CE Marking | 24 |
- Your camera is fitted with a weatherproof housing according to protection class IP54 (dust and splash waterproof). So the camera can be used outdoors. Nevertheless protect the camera from extreme weather conditions and direct sunlight.
- Make sure to use fresh batteries of the same type and brand only. When inserting the batteries please respect the correct polarity (+/-). Please remove batteries when device is not in use for a longer period. Also note capture "Safety Hints for Batteries".
- Do not use re-chargeable batteries. They may lead to malfunction.
- Do not drop the camera onto a hard surface. Do not use the camera if it has been dropped. In this case a qualified electrician should inspect the camera before you use it again.
- Do not attempt to repair the device by yourself. Risk of electrical shock! When service or repair is required, contact qualified service personnel.
- Do not open the camera housing (except the protective cover and the battery cover) – the warranty will become void. The camera may only be opened by qualified staff of the company DÖRR GmbH.
- LED bulbs cannot be replaced.
- People with cardiac pacemakers, defibrillators or any other electrical implants should maintain a minimum distance of 30~cm , as the device generates magnetic fields.
- Do not use the camera nearby mobile phones and devices that generate strong electromagnetic fields (e.g. electric engines).
• People with physical or cognitive disabilities should use the camera with supervision. - Avoid touching the camera lens with your fingers.
- Protect the device against dirt. Never use aggressive cleansing agents or benzine to clean the device. We recommend a soft, slightly damp microfiber cloth to clean the outer parts of the camera and the camera lens. Make sure to remove batteries before cleaning.
- Store the camera in a dust-free, dry and cool place.
• The camera is not a toy - keep it out of reach of children. - Keep away from pets.
- If the camera is defective or without any further use, dispose of the camera according to the Waste Electrical and Electronic Equipment Directive WEEE. For further information, please contact your local authorities.
⚠ SAFETY HINTS FOR BATTERIES
Only use high-quality batteries of popular brands. When inserting the batteries, please respect the correct polarity (+/-). Do not insert batteries of different types and always replace all batteries at the same time. Do not combine used batteries with fresh batteries. Please remove batteries when device is not in use for a longer period. Do not throw the batteries into fire, do not short-circuit and do not disassemble them! Never charge non-rechargeable batteries – risk of explosion! Remove empty batteries immediately from the device to avoid the leaking of battery acid. Remove leaking batteries from the device immediately. Clean the contacts before inserting fresh batteries. Risk of battery acid burn! In case of contact with battery acid, rinse the affected area immediately with water and contact a doctor. Batteries can be dangerous to life if swallowed. Keep batteries away from small children and pets. Do not dispose of batteries in household waste (see also capture "Disposal of Batteries/Accumulators").
03 | PRODUCT DESCRIPTION
Powerful and compact game and surveillance camera for brilliant recordings at daylight and high-contrast black and white images in the darkness.
04 | FEATURES
- Outstanding image quality – picture resolution up to 12MP
• HD 720P videos with audio recording
• Combined picture & video recording: takes 1 image and a 10 second video sequence per release - 1-9 images per release, videos from 10 to 60 seconds selectable
- Trigger time 0.9 seconds
- 2 time frames per day programmable
- Flash range up to 15 m
- Clearly arranged colour LCD 3,7cm/1,5 inch for menu settings and image viewing
• Displays date, time, temperature, battery status and moon phase on every image - Robust and weatherproof housing according to IP54
- SnapShot Mini: Almost invisible infrared flash with 28 LEDs
- SnapShot Mini Black: Invisible infrared flash with 40 BLACK VISION LEDs
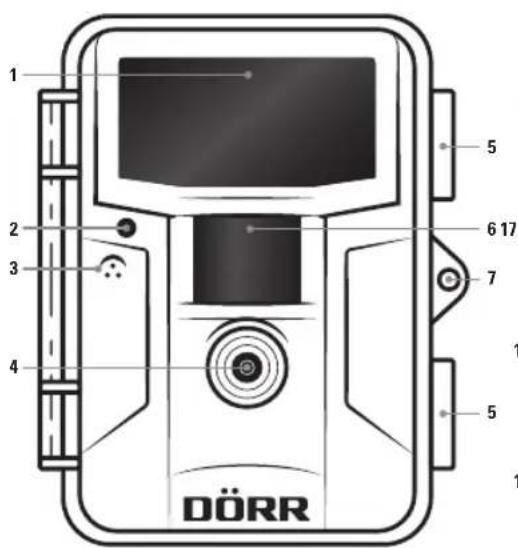
05 | NOMENCLATURE
text_image
1 2 3 4 5 6 17 7 5 DÖRR 1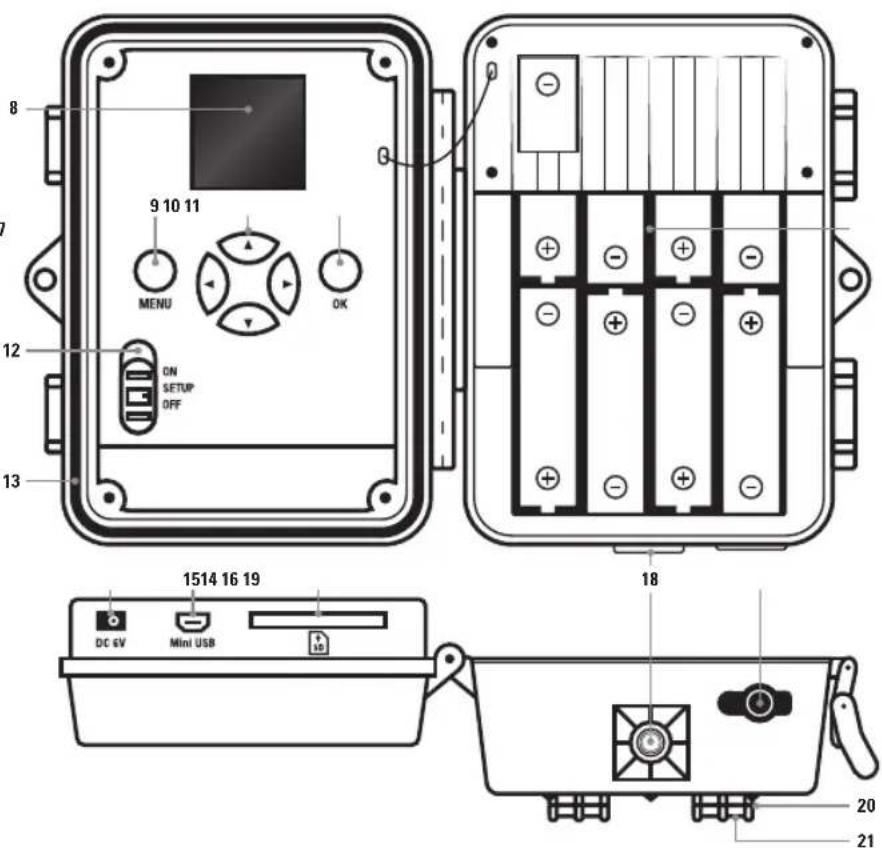
text_image
8 9 10 11 MENU OK 12 ON SETUP OFF 13 1514 16 19 DC EV Mini USB 18 20 211 Infrared flash
2 LED indicator
3 Microphone
4 Camera lens
5 Tension locks
6 PIR motion sensor
7 Eyelet for U-Lock (lock optional)
8 LCD display
9 Menu button
10 Arrow buttons
11 OK button
12 Slide control ON/SETUP/OFF
13 Rubber seal
14 External DC 6V connection
15 Mini USB port
16 SD card slot
17 Battery compartment
18 14 thread mount
19 Rubber cover of DC 6V connection
20 Eyelet for cable lock (lock optional)
21 Eyelet for mounting strap
06 | FIRST USE
- Open the camera releasing the lateral tension locks (5).
- Make sure that the slide control (12) is on OFF position.
CAUTION: To avoid camera damages always make sure that camera is switched off (12=OFF) when inserting batteries or changing SD card.
- Insert 8 x AA/1,5V batteries (optional) into the battery compartment (17). Respect correct polarity (+/-).
CAUTION: Do not use re-chargeable batteries. They may lead to malfunction.
- Insert a SD card (optional) with the label facing upwards into the SD card slot (16).
Make sure that the SD card is unlocked.
IMPORTANT Please make sure to format the SD card before use!
To format the SD card with the camera, please proceed as follows:
- Move the slide control (12) to SETUP position
- Press the MENU button (9)
- Press the arrow button (10) ▼ until the display shows FORMAT
- Confi rm with the OK button (11)
- With the arrow button (10) ▼ select YES
- Confirm with the OK button (11) = formatting is in progress
-
Press the MENU button (9) to get back to the start screen
-
Move the slide control (12) to SETUP position.
The LCD display (8) shows the basic settings:


Camera symbol
5M
Battery symbol
00000/00000m
Single picture mode
Resolution 5 Mega Pixels
Battery status
Stored pictures/free capacity
07 | CAMERA SETTINGS
Your camera is pre-set as follows:
| MODE | Photo |
| PHOTO SIZE | 5 MP |
| PHOTO NO (NUMBER OF PHOTOS) | 1 photo |
| PIR INTERVAL | 10 seconds |
After having inserted the batteries and the memory card and after the date and time setting (refer to capture 08), the camera is ready for instant use with the pre-settings. Simply move the slide control (12) to position ON.
In case you wish to change the pre-settings, move the slide control (12) to position SETUP and press the MENU button (9). The LCD display (8) shows a list with the various menu settings.
- Press the arrow buttons (10) or to select the menu item. The selected menu item is marked with a yellow background.
- Press the OK button (11) to edit the menu item.
- Select the desired setting using the arrow buttons (10) ▼/▲/◄/►.
• To save your settings press the OK button (11). You will automatically get back to main menu. - Press the MENU button (9) to get back to the start screen.
| MODE Press the arrow buttons (10) | ▼ or ▲ to select between PHOTO (image),VIDEO (video recording) or P+V (combined photo video function). Using the combined photo video function, your camera will take a photo and directly afterwards a 10 second video sequence.To save your settings press the OK button (11). |
| PHOTO SIZE Press the arrow buttons (10) | ▼ or ▲ to select between 4 picture resolutions:2MP,5MP,8MP,12MP.To save your settings press the OK button (11).The highest resolution will not always provide the best result. Picture noise can increase under bad light conditions. |
| VIDEO SIZE Press the arrow buttons (10) | ▼ or ▲ to select between 2 video resolutions:720x480 (VGA) or 1280x720 (HD).To save your settings press the OK button (11). |
| PHOTO NO Press the arrow buttons (10) | ▼ or ▲ to select number of photos per release. The camera can take 1 to 9 pictures in series. To save your settings press the OK button (11). |
| VIDEO LENGTH Press the arrow buttons (10) | ▼ or ▲ to select length of video recording. Video length can be set from 10 to 60 seconds.To save your settings press the OK button (11). |
| PIR INTERVAL | Pause of motions sensor - determines the duration during which the motion sensor will not be active after having taken a record. Can be set from 10 seconds to 60 minutes.Press the arrow buttons (10)▼ or ▲ to select the minutes.Press the arrow button (10)▶ to switch to seconds. Press the arrow buttons (10)▼ or ▲ to select the seconds.To save your settings press the OK button (11). |
| TIMING SHOT | Setting the interval for sequential shots. The interval for sequential shots can be set independently from the motion detector. Press the arrow button (10)▶ to select "On". In the next step, the interval can be determined:Timing Delay Set the time gap between sequential shots in hours, minutes, seconds (e.g. 01:00:00 means one picture every hour).Press the arrow buttons (10)▼ or ▲ to select the hours.Press the arrow button (10)▶ to switch to minutes. Press the arrow buttons (10)▼ or ▲ to select the minutes.Press the arrow button (10)▶ to switch to seconds. Press the arrow buttons (10)▼ or ▲ to select the seconds.To save your settings press the OK button (11).When timing shot function is activated the LCD Display (8) shows the symbol . |
| TIMER | Offers the possibility to program the camera in a way to be active within a defined period only. Outside of the time frame, there will no motion detection and no pictures will be taken.Select "Off" for this menu item, the camera will be active for 24 hours.To activate the function press the arrow button (10)▼ to select "On". The next step is to define up to 2 time frames (timer):Timer 1 Start Determine start of activity for 1st time frame.Press the arrow buttons (10)▼ or ▲ to select the hours.Press the arrow button (10)▶ to switch to minutes. Press the arrow buttons (10)▼ or ▲ to select the minutes.e.g. 14:30 Timer starts at 14:30 o'clock.To save your settings press the OK button (11). |
Timer 1 Stop Determine stop of activity for 1st time frame.
Press the arrow buttons (10) ▼ or ▲ to select the hours.
Press the arrow button (10) ▶ to switch to minutes. Press the arrow buttons (10) ▶ or ▶ to select the minutes.
e.g. 23.10 Timer stops at 23:10 o'clock.
To save your settings press the OK button (11).
Timer 2 Start Determine start of activity for 2nd time frame (proceed as described above Timer 1 Start).
Timer 2 Stop Determine stop of activity for 2nd time frame (proceed as described above Timer 1 Stop).
Now the camera only works in the selected time frames.
TEMPERATURE Determine the indication of temperature on the image.
Press the arrow buttons (10)▼ or ▲ to select between Celsius or Fahrenheit.
To save your settings press the OK button (11).
The temperature shown on the image may vary from the real outdoor temperature, since the temperature sensor is located inside the camera housing. Especially when taking test pictures, the body temperature may affect the indication of the correct temperature.
Press the arrow buttons (10) ▼ or ▲ to select the day.
Press the arrow button (10) ▶ to switch to month. Press the arrow buttons (10) on to ▶ elect the month.
Press the arrow button (10) ▶ to switch to year. Press the arrow buttons (10) of to select the year.
To save your settings press the OK button (11).
Press the arrow buttons (10)▼ or ▲ to select the hour.
Press the arrow button (10)▶ to switch to minutes. Press the arrow buttons (10)▼ or ▲ to select the minutes.
To save your settings press the OK button (11).
TIME FORMAT Select the desired time format.
Press the arrow buttons (10) ▼ or ▲ to select between 24h (Europe) or 12h (USA).
To save your settings press the OK button (11).
CAM NAME
Give a name to the camera, it will be displayed on the pictures. Useful feature, when you use various cameras at various locations.
Press the arrow buttons (10)▼ or ▲ to select letters and numbers.
Press the arrow button (10)▶ to switch to next edit fi eld.
To save your settings press the OK button (11).
PASSWORD
Secure the camera with password, to avoid misuse. The password is needed every time the camera is switched on. Default password is 0000. With the arrow buttons (10) ▶ and ▶elect "On" or „Off". Press the "OK" button (11) to display the default password. The individual numbers can be changed with the arrow keys (10). To save your new password press the "OK" button (11). The next time the camera will be switched on, the password will be requested. Note your password carefully, without the password the camera cannot be operated.
TV OUT
Determine the TV output format. This setting is required if you wish to connect the camera to a USB compatible TV set. In this case, connect the supplied USB cable with the Mini USB port of the camera (15) and the TV set.
Press the arrow buttons (10) ▼ or ▲ to select between PAL or NTSC.
To save your settings press the OK button (11).
To know the signal your TV supports (PAL or NTSC) please refer to the instruction manual of your TV set.
LANGUAGE Select the menu language.
Press the arrow buttons (10)▼ or ▲ to select between English, German, French.
To save your settings press the OK button (11).
FORMAT This function deletes all files from the SD card and re-formats the memory card.
CAUTION: Make sure that you do not need the files on the SD card anymore, before you start formatting!
Press the arrow button (10)▼ to select "Yes". To start formatting press the OK button (11).
While formatting LCD display (8) shows "Please wait".
RESET Restoring of Factory Settings. This function restores all settings to initial settings (factory settings, except date and time). Press the arrow button (10)▼ to select "Yes". To confirm press the OK button (11).
PLAYBACK Opens the photo/video gallery to watch your photos and videos. For videos the video preview image will be displayed only – the video cannot be played.
Press the arrow buttons (10)▼ or ▲ to browse through your photos and video recordings ( )
Press the OK button (11) to get back to start screen.
Delete Photo or Videos:
Press the MENU button (9) while in PLAYBACK mode to delete files.
Press the arrow button (10)▼ to select "Delete" and confirm with the OK button (11).
If you just want to delete selected file, confi rm "Single" with OK button (11).
If you want to delete all fi les, confi rm "All" with OK button (11).
⚠️ CAUTION: Deleted images cannot be restored!
File Numbering:
Images and videos are numbered in sequence in a folder on the SD card, starting with IMG0001.jpg or IMAG0001.avi. The suffix .JPG stands for photos, .AVI stands for videos.
BEEP Here you select, whether the camera should confirm your key pressings with a beep tone or not.
Press the arrow buttons (10)▼ or ▲ to select "On" or "Off".
To save your settings press the OK button (11).
OVERWRITE When the SD card is full camera may overwrite oldest files or alternatively quit function.
Press the arrow button (10)▼ to select "On" to overwrite the oldest images and video sequences or "Off" to turn off camera. To save your settings press the OK button (11).
SYSTEM Indicates the software version.
In SETUP mode (slide control (12) on position SETUP), a test photo or video can be released and directly viewed.
To release a test photo press the arrow button (10). To view the test photo press the OK button (11).
To release a test video press the arrow button (10) ▲ to enter the video mode ( ▶ press the arrow button (10) to start the recording.
By pressing arrow button (10) ▶ again the recording stops. To view the video preview image press the OK button (11). The video cannot be played.
10 | MOUNTING THE CAMERA
Pull the supplied mounting strap through the eyelet (21) on camera rear side and mount the camera to a tree, pole or any suitable object. Do not fix the belt finally at this stage. The optimum distance to the object is between 3 to 10 meters. Larger distances are also possible, however with less reliability of motion sensor. We recommend to direct the camera first (refer to capture 11) and to take a few test shots before fixing the camera finally.
Our optional accessories such as the patented DÖRR holding fixture in combination with the DÖRR universal adapter are designed for fast and easy mounting of the camera at a tree, wall or other object. The camera clicks into the holding fixture and is firmly held in place. The camera can be removed easily for a quick change of place of action. The ball head with fixing screw ensure a flexible direction of the camera. The fixture is rotatable by 360° and swivels up to 30° in all directions.
Ask your specialised dealer for:
DÖRR Holding Fixture for SnapShopt Multi Item no. 204490
DÖRR UNI-1 Universal Adapter for Holding Fixture Item no. 204495
With an additional cable lock (optional) pulled through the specific eyelets (20) on camera rear side, your camera will be secured safely against theft.
11 | ORIENTATION OF THE CAMERA
To achieve perfect pictures, the camera must be oriented properly:
- Fix the camera at a height of 0,75m to 1,00m and slightly tilt it forward. The camera lens (4) should now point to the position, where the object of photography or fliming is expected.
- Move the slide control (12) to the position SETUP and close the camera housing. When you move in front of camera the LED indicator (2) is flashing red and the motion detector is active. The red LED (2) will flash as long as you are moving within the motion detectors range.
- We suggest that you now take a test picture. Move the slide control (12) to position ON and close the camera housing. After approx. 5s is the camera ready to detect (while camera is preparing the red LED (2) is flashing).
- Move with normal speed through detection area. The camera releases and you can view the image on the monitor as described in capture 08 | PLAYBACK. The camera should be oriented in a way that the object will appear in the centre of the picture. You may have to re-adjust the camera and take another test shot.
i TIP: To change the camera angle you may use e.g. a small wooden wedge and clamp it between camera and trunk.
- Once the camera position is correct, the mounting belt can be tightened to hold the camera firmly.
12 | START SURVEILLANCE
In order to get the camera ready to work, move the slide control (12) to the position ON. Then close the camera housing. After approx. 5 seconds, the camera will be active. In case of movements detected, it takes pictures according to your settings.
13 | CAMERA INSPECTION
There are various possibilities to check if images have been taken.
- Open the camera and switch it off. After 1 to 2 seconds switch the slide control (12) to SETUP mode. On the LCD display you can see the starting image. The bottom line shows how many pictures have been taken and how many more will fit on the SD card (e.g. 000034/001846m). Press the OK button (11) to view the images on the LCD display (8).
- Alternatively, you can view the images comfortably on your home PC using an image viewer.
CAUTION: To avoid camera damages always make sure that camera is switched off (12=OFF) before removing SD card!
- When checking the camera function, also check battery status. If the batteries are no longer providing sufficient power, there may be deficiencies with the quality of the pictures, especially with nightly shots since the flash requires more energy than available. In case of doubt, exchange the batteries.
14 | TIPS AND HINTS
SD MEMORY CARD
The camera only works with an SD memory card. There are SD cards which may not work with the DÖRR SnapShot and may affect the function of the camera. Usually it helps to use another SD card of other brand or different capacity. We recommend using a SD card with a capacity of 8GB up to max. 32GB (e.g. LEXAR cards, optionally available from DÖRR).
LENS RATTLES
The camera lens is covered with a filter which allows coloured pictures at daylight and black & white shots at night. When camera is turned off the filter is not fixed which can cause the rattle noise. However, this is no defect.
WEATHER PROTECTION
Although the camera is weatherproof and well-suited for outdoor use, we recommend to mount it at a secured place, so not on the weather side or in the direct sunshine. After long periods of humidity, caused by rain or fog, the camera should be stored in a dry area for a few days. Dust and splash waterproof according to protection class IP54.
MOTION SENSOR
The motion sensor will react under certain circumstances and within a certain range. In general the range of recognition is slightly larger than the range covered by the image. The recognition of the objects depends on temperature, vegetal cover, reflecting surfaces and more circumstances. Under optimum conditions, a perfectly oriented camera and high sensitivity level adjustment, the recognition range can be up to 12-15m. Usually, you may expect a range of 10 m. It can take a few attempts to find the proper position for your camera. When you test the motion sensor reaction, be aware of the facts that animals are usually remarkably smaller than human beings. So they may not be recognized.
LIGHT CONDITIONS
Avoid direct back light, as you do in normal photography. When you choose the camera position, make sure that there will be no direct back light and also that the camera will not be placed in the shadow.
MODEL SNAPSHOT MINI SNAPSHOT MINI BLACK
Item Number 204504 204505
| LED 28 High Performance LEDs 850nm 40 High Performance Black Vision LEDs 940nm | ||
| Flash Range approx. 15 meters (automatic adaptation) approx. 15 meters (automatic adaptation) | ||
| Image Sensor State of art 2 MP sensor State of art 2 MP sensor | ||
| Picture Resolution up to 12 MP up to 12 MP | ||
| Aperture F / 2,8 ISO 100 | F / 2,8 ISO 100 | |
| Image Format JPEG / 16:9 | JPEG / 16:9 | |
| No. of Photos | 1-9 images per release | 1-9 images per release |
| Angle of View | 52° | 52° |
| Video Resolution | Video HD 1280 x 720 / 720 x 480 VGA | Video HD 1280 x 720 / 720 x 480 VGA |
| Video Format AVI H.264 30 fps | AVI H.264 30 fps | |
| Video Length | 10 to 60 s | 10 to 60 s |
| Video with Audio | Yes | Yes |
| Photo Video Combination | Yes / 1 picture – 10 seconds video | Yes / 1 picture – 10 seconds video |
| Sensor Trigger Time | approx. 0,9 s | approx. 0,9 s |
| Sensor Range | 15 meters / 52° (automatic adaptation) | 15 meters / 52° (automatic adaptation) |
| Time Stamp | Date, time temperature, moon phase, battery status | Date, time temperature, moon phase, battery status |
| Camera Name | individually selectable, shown on all images | individually selectable, shown on all images |
| Interval Pictures | Yes | Yes |
| LCD Size | 3,7cm / 1,5" | 3,7cm / 1,5" |
| Housing Protection Class | IP 54 | IP 54 |
| Power Source | 8 x AA batteries/ 6 V external battery/ AC Adapter (not included) | 8 x AA batteries/ 6 V external battery/ AC Adapter (not included) |
| Memory Card | SD/SDHC card 2 GB to 32 GB (not included) | SD/SDHC card 2 GB to 32 GB (not included) |
| Measurements | 128 x 98 x 75 mm | 128 x 98 x 75 mm |
| Weight | 260 g w/o batteries | 260 g w/o batteries |
| 1⁄4" Thread Socket | Yes | Yes |
| Voltage | 6V | 6V |
| Standby Consumption | <300μA | <300μA |
| Battery Consumption | 150mA - 600mA (with 28 LEDs active) | 150mA - 800mA (with 40 LEDs active) |
| Working Temperature | -20°C to +60°C | -20°C to +60°C |
| Storage Temperature | -30°C to +70°C | -30°C to +70°C |
| Working Relative Humidity | 5% to 95% | 5% to 95% |
CONTENT
- Camera
- Mounting strap
- USB cable
- Instruction Manual

DISPOSAL OF BATTERIES/ACCUMULATORS
Batteries are marked with the symbol of a crossed out bin. This symbol indicates that empty batteries or accumulators which can no longer be charged, should not be disposed of with household waste. Waste batteries may contain harmful substances that can cause damage to health and to the environment. Please use the return and collection systems available in your country for the disposal of the waste batteries.

WEEE INFORMATION
The Waste Electrical and Electronic Equipment Directive (WEEE Directive) is the European community directive on waste electrical and electronic equipment, which became European law in February 2003. The main purpose of this directive is to prevent electronic waste. Recycling and other forms of waste recovery should be encouraged to reduce waste. The symbol (trash can) on the product and on the packing means that used electrical and electronic products should not be disposed of with general household waste. It is your responsibility to dispose of all your electronic or electrical waste at designated collection points. Disposing of this product correctly will help to save valuable resources and it is a significant contribution to protect our environment as well as human health. For more information about the correct disposal of electrical and electronic equipment, recycling and collection points please contact your local authorities, waste management companies, your retailer or the manufacturer of this device.
ROHS CONFORMITY
This product is compliant with the European RoHS directive for the restriction of use of certain hazardous substances in electrical and electronic equipment and its amendments.

CE MARKING
The CE marking complies with the European standards and indicates that the product meets the requirements of the applicable EU directives.
TECHNICAL CHANGES
Specifications and design are subject to change without notice.