HIM 20 K.A IX - Oven INDESIT - Free user manual and instructions
Find the device manual for free HIM 20 K.A IX INDESIT in PDF.

User questions about HIM 20 K.A IX INDESIT
0 question about this device. Answer the ones you know or ask your own.
Ask a new question about this device
Download the instructions for your Oven in PDF format for free! Find your manual HIM 20 K.A IX - INDESIT and take your electronic device back in hand. On this page are published all the documents necessary for the use of your device. HIM 20 K.A IX by INDESIT.
USER MANUAL HIM 20 K.A IX INDESIT
Electrical connections
Français, 12
Nederlands, 23 English;
Data plate
GB
DE GR

Deutsch, 34 EAnvika, 45
RS
Pycckn,56
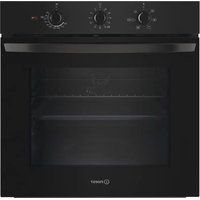
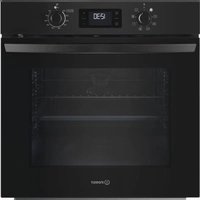
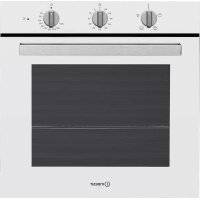
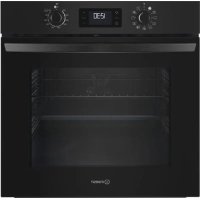
Description of the appliance, 5
Overall view
Control panel
Start-up and use, 6
Starting the oven
Cooking modes, 7-8
Cooking modes
Practical cooking advice
Cooking advice table
HIM 20 K.A
HIM 20 K.A IX
Hob, 9
Type of hob
Switching on the glass ceramic hob
Practical advice on using the glass ceramic hob
Precautions and tips, 10
General safety
Disposal
Respecting and conserving the environment
Maintenance and care, 11
Switching the appliance off
Cleaning the appliance
Cleaning the oven door
Replacing the light bulb
Assistance
GB
Before placing your new appliance into operation please read these operating instructions carefully. They contain important information for safe use, for installation and for care of the appliance.
Please keep these operating instructions for future reference. Pass them on to possible new owners of the appliance.
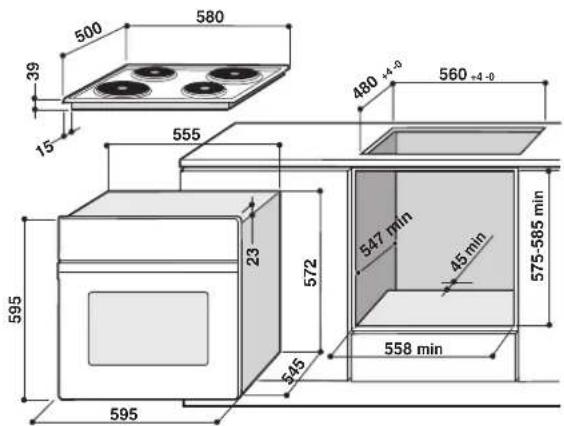
Positioning
! Keep packaging material out of the reach of children. It can become a choking or suffocation hazard (see Precautions and tips).
The appliance must be installed by a qualified person in compliance with the instructions provided. Incorrect installation may cause harm to persons, animals or may damage property.
Fitting the appliance
Use the appropriate cabinet to ensure that the appliance functions properly.
The panels adjacent to the oven must be made of heat-resistant material.
Cabinets with a veneer exterior must be assembled with glues which can withstand temperatures of up to 100^
- To install the oven under the counter (see diagram) and in a kitchen unit, the cabinet must have the following dimensions:
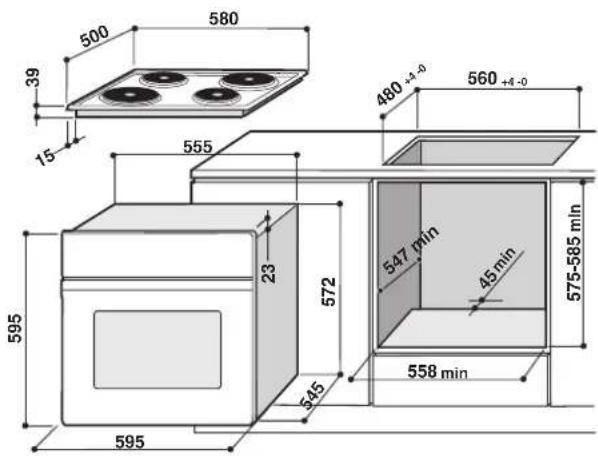
The appliance must not come into contact with electrical parts once it has been installed. The consumption indications on the data plate have been calculated for this type of installation.
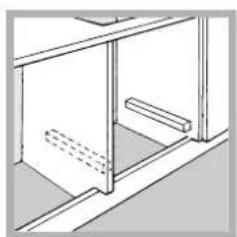
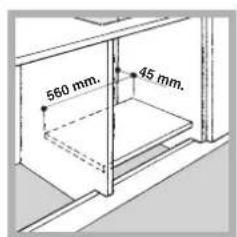
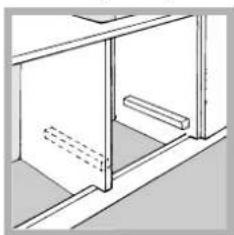
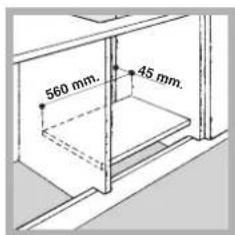
Ventilation
To ensure good ventilation, the back panel of the cabinet must be removed. It is advisable to install the oven so that it rests on two strips of wood, or on a completely flat surface with an opening of at least 45 × 560 mm (see diagrams).
Centring and fastening
Secure the appliance to the cabinet by opening the oven door and putting 4 screws into the 4 holes of the outer frame.
! All parts which ensure the safe operation of the appliance must not be removable without the aid of a tool.
Electrical connections
The cooker must be connected to the mains electricity supply. It is designed to operate with alternating current at the voltage and frequency indicated on the data plate (see the following page).
The hob is connected to the cooker using a special connector.
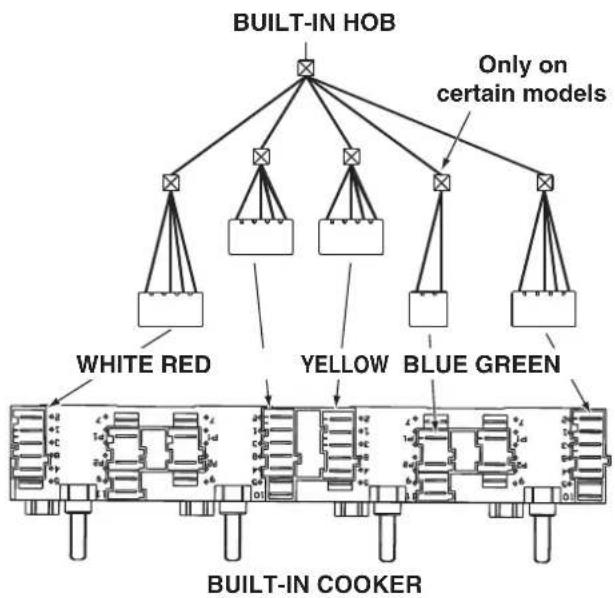
Replace the metal protection after performing all the necessary hob connections. If the hob is removed from its position, the red cap which was originally protecting the red connector must be replaced.
Fitting the power supply cable

-
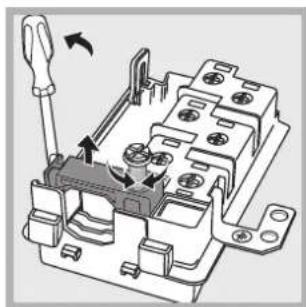
Open the terminal board by inserting a screwdriver into the side tabs of the cover. Use the screwdriver as a lever by pushing it down to open the cover (see diagram).
-
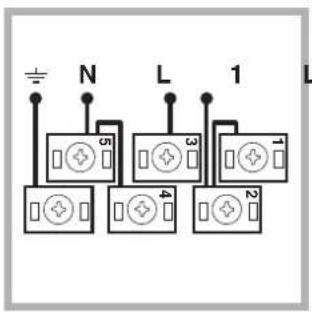
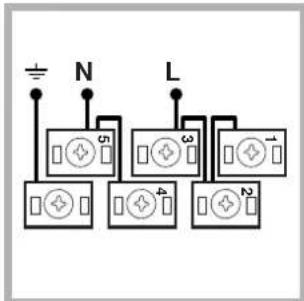
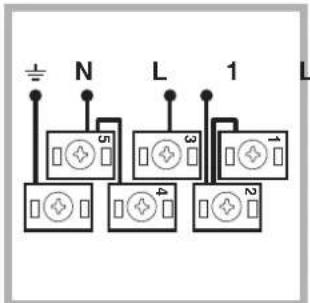
Install the power supply cable by loosening the cable clamp screw and the wire contact screws L-N- Connect the wires to the corresponding terminals: the Blue wire to the terminal marked (N), the Brown wire to the terminal marked (L) and the Yellow Green wire to the terminal marked
The terminal board is designed for a 400V three-phase connection (see diagrams below).
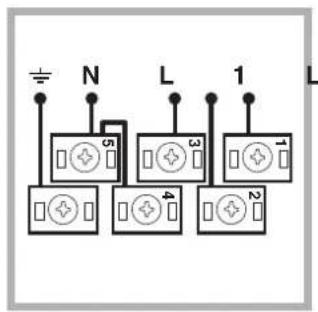
400V 3N~H05RR-F
5x2.5 CEI-UNEL 35363
3 L 2
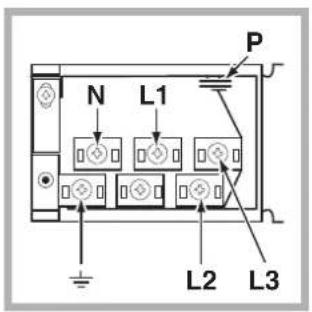
If the electrical system has other characteristics (see diagrams below), carry out the electrical connection using the connection supports provided in the box P.

230V ~H05RR-F 3x4 CEI-UNEL 35363
400V 2N~H05RR-F 4x4 CEI-UNEL 35363 2
- Secure the power supply cable by fastening the clamp screw.
- Close the cover of the terminal board.
Connecting the supply cable to the mains
Install a standardised plug corresponding to the load indicated on the data plate (see side).
The appliance must be directly connected to the mains using an omnipolar circuit-breaker with a minimum contact opening of 3mm installed between the appliance and the mains, suitable for the load indicated and complying with current electrical regulations (the earthing wire must not be interrupted by the circuit-breaker). The supply cable must not come into contact with surfaces with temperatures higher than 50^ .
The installer must ensure that the correct electrical connection has been made and that it is compliant with safety regulations.
Before connecting to the power supply, make sure that:
The appliance is earthed and the plug is compliant with the law.
The socket can withstand the maximum power of the appliance, which is indicated on the data plate (see below).
The voltage must be in the range between the values indicated on the data plate (see below).
- The socket is compatible with the plug of the appliance. If the socket is incompatible with the plug, ask an authorised technician to replace it. Do not use extension cords or multiple sockets.
! Once the appliance has been installed, the power supply cable and the electrical socket must be easily accessible.
! The cable must not be bent or compressed.
The cable must be checked regularly and replaced by authorised technicians only (see Assistance).
! The manufacturer declines any liability should these safety measures not be observed.
| DATA PLATE | |
| Dimensions | width 43.5 cm height 32 cm depth 43,5 cm |
| Volume lt. 60 | |
| Electrical connections | voltage: 230V/400V~ 3N 50/60Hz maximum power absorbed 8400W |
| ENERGY LABEL | Directive 2002/40/EC on the label of electric ovens. Standard EN 50304 Energy consumption Class certification Natural convection heating mode: TRADITIONAL |
| CE | This appliance conforms to the following European Economic Community directives: - 2006/95/EEC of 12/12/06 (Low Voltage) and subsequent amendments; - 2004/108/EEC of 15/12/04 (Electromagnetic Compatibility) and subsequent amendments; - 93/68/EEC of 22/07/93 and subsequent amendments. - 2002/96/EC and subsequent amendments. |
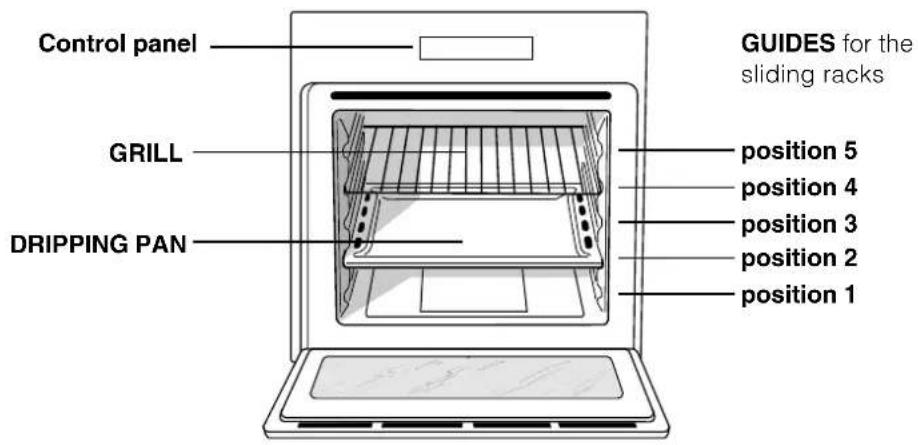
Overall view

Control panel
GB
! The first time you use your appliance, heat the empty oven with its door closed at its maximum temperature for at least half an hour. Ensure that the room is well ventilated before switching the oven off and opening the oven door. The appliance may produce a slightly unpleasant odour caused by the burning away of protective substances used during the manufacturing process.
Starting the oven
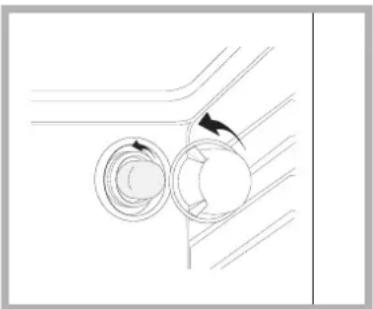
- Select the desired cooking mode by turning the SELECTOR knob.
- Select the desired temperature with the THERMOSTAT knob. See the Cooking advice table for cooking modes and the suggested cooking temperatures (see Cooking Modes).
- When preheating is finished, the THERMOSTAT indicator light will stay on: place the food in the oven.
- You may do the following during cooking:
- change the cooking mode by turning the SELECTOR knob.
- change the temperature by turning the THERMOSTAT knob.
- stop cooking by turning the SELECTOR knob to the "0" position.
! Never put objects directly on the oven bottom to avoid damaging the enamel coating.
! Always place cookware on the rack(s) provided.
Cooling ventilation
In order to cool down the external temperature of the oven, some models are fitted with a cooling fan that blows out air between the control panel and the oven door.
Once the cooking has been completed, the cooling fan remains on until the oven has cooled down sufficiently.
Oven light
It goes on when selecting with the SELECTOR knob. It stays on when a cooking mode is selected.
Cooking modes
TRADITIONAL OVEN mode
Both the top and bottom heating elements will come on. With this traditional cooking mode, it is best to use one cooking rack only; if more than one rack is used, the heat will be distributed unevenly. The oven will automatically reach the temperature set, and the thermostat, which is controlled by the SELECTOR knob, will keep it constant.

TOP OVEN nTOP OVEN
The top heating element comes on. This mode can be used to brown food at the end of cooking. Always cook in this mode with the oven door closed.
Practical cooking advice
! In the GRILL cooking mode, place the dripping pan in position 1 to collect cooking residues (fat and/or grease).
GRILL
- Insert the rack in position 3 or 4. Place the food in the centre of the rack.
- The top heating element is regulated by a thermostat and may not always be on.
PIZZA
- Use a light aluminium pizza pan. Place it on the rack provided. For a crispy crust, do not use the dripping pan (prevents crust from forming by extending cooking time).
- If the pizza has a lot of toppings, we recommend adding the mozzarella cheese on top of the pizza halfway through the cooking process.
Cooking advice table
| Foods | Weight (in kg) | Rack position | Pre-heating time (min) | Recommended temperature | Cooking time (minutes) |
| Pasta | |||||
| Lasagne | 2.5 | 3 | - | 210 | 75-80 |
| Cannelloni | 2.5 | 3 | - | 210 | 75-80 |
| Tagliatelle | 2.5 | 3 | - | 210 | 75-80 |
| Meat | |||||
| Veal | 1.7 | 3 | - | 220 | 85-90 |
| Chicken | 1.5 | 3 | - | 220 | 110-115 |
| Turkey | 3.0 | 3 | - | 220-Max | 95-100 |
| Duck | 1.8 | 3 | - | 220 | 120-125 |
| Rabbit | 2.0 | 3 | - | 220 | 105-110 |
| Pork | 2.1 | 3 | - | 220 | 100-110 |
| Lamb | 1.8 | 3 | - | 220 | 90-95 |
| Fish | |||||
| Mackerels | 1.1 | 3 | - | 210-230 | 55-60 |
| Dentex | 1.5 | 3 | - | 210-230 | 60-65 |
| Trout baked in foil | 1.0 | 3 | - | 210-230 | 40-45 |
| Pizza | |||||
| Napolitan | 1.0 3 15 Max 30-35 | ||||
| Pies | |||||
| Biscuits | 0.5 | 3 | 15 | 180 | 30-35 |
| Tart | 1.1 | 3 | 15 | 180 | 30-35 |
| Chocolate cake | 1.0 | 3 | 15 | 200 | 45-50 |
| Leavened cake | 1.0 | 3 | 15 | 200 | 50-55 |
! Cooking times are approximate and may vary according to personal taste. When cooking using the grill, the dripping pan must always be placed on the 1st oven rack from the bottom.
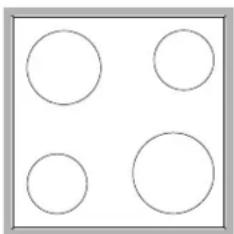
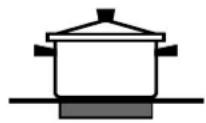
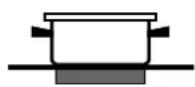
Type of hob
The oven is combined with a hob that can be made up of two types of heating elements: cast-iron electric plates (see diagram 1) or glass ceramic hobs (see diagram 2).
Switching on the glass ceramic hob
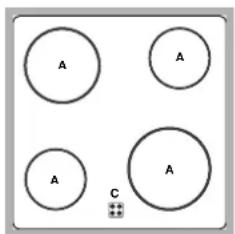
Traditional cooking zones
Traditional cooking zones are made up of circular heating elements. They turn red approximately ten seconds after they have been turned on. Each cooking zone is fitted with a control knob allowing you to select from 6 different temperature settings from a minimum of 1 to a maximum of 6.
Residual heat indicator lights*
The indicator lights (C) indicate that the temperature of the corresponding cooking zones have exceeded 60^ , even after the heating element has been switched off.
Recommended power levels for various types of cooking:
| Setting | Setting |
| 0 | Off |
| 1 | Cooking vegetables, fish |
| 2 | Cooking potatoes (using steam) soups, chickpeas, beans. |
| 3 | Continuing the cooking of large quantities of food, minestrone. |
| 4 | For roasting (average) |
| 5 | For roasting (above average) |
| 6 | For browning and reaching a boil in a short time |
Practical advice on using the glass ceramic hob
! The glue that is applied on the gaskets leaves some traces of grease on the glass. Before using the appliance, we recommend you eliminate these with a special non-abrasive cleaning product. During the first few hours of use there may be a smell of rubber which will disappear very quickly.
To obtain the best results with your hob:
- Use flat-bottomed pans to ensure that they adhere to the cooking zone perfectly.
Always use pans with a diameter that is large enough to cover the hotplate fully, in order to use all the available heat.
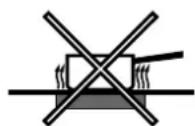
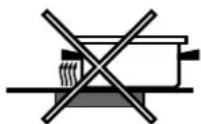
- Make sure that the bottom of the cookware is always dry and clean to guarantee correct adherence and long life, not only for the cooking zones but also for the cookware itself.
- Avoid using the same cookware that is used on gas burners: the heat concentration on gas burners may deform the base of the pan, causing it not to adhere correctly.
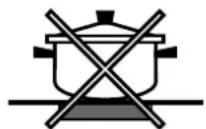
- Never leave a cooking zone on without cookware on it because as it heats up and rapidly reaches the maximum level, it could damage the heating elements.
GB
The appliance was designed and manufactured in compliance with international safety standards. The following warnings are provided for safety reasons and must be read carefully.
General safety
- The appliance was designed for domestic use inside the home and is not intended for commercial or industrial use.
- The appliance must not be installed outdoors, even in covered areas. It is extremely dangerous to leave the appliance exposed to rain and storms.
- When handling the appliance, always use the handles provided on the sides of the oven.
- Do not touch the appliance with bare feet or with wet or moist hands and feet.
- The appliance must be used by adults only for the preparation of food, in accordance with the instructions outlined in this booklet. Any other use of the appliance (e.g. for heating the room) constitutes improper use and is dangerous. The manufacturer may not be held liable for any damage resulting from improper, incorrect and unreasonable use of the appliance.
- When the appliance is in use, the heating elements and some parts of the oven door become extremely hot. Make sure you don't touch them and keep children well away.
- Ensure that the power supply cable of other electrical appliances does not come into contact with the hot parts of the oven.
- The openings used for ventilation and dispersion of heat must never be covered.
Always grip the oven door handle in the centre: the ends may be hot.
Always use oven gloves to place cookware in the oven or when removing it. - Do not use aluminium foil to line the bottom of the oven.
- Do not place flammable materials in the oven: if the appliance is switched on by mistake, it could catch fire.
Always make sure the knobs are in the "●"/"○" position when the appliance is not in use. - When unplugging the appliance always pull the plug from the mains socket, do not pull on the cable.
- Never carry out any cleaning or maintenance work without having unplugged the plug from the mains.
- In the case of a malfunction, under no circumstances should you attempt to repair the appliance yourself. Repairs carried out by inexperienced persons may cause injury or further malfunctioning of the appliance. Contact a Service Centre (see Assistance).
-
Do not rest heavy objects on the open oven door.
-
The glass ceramic hob is resistant to mechanical shocks, but it may crack (or even break) if hit with a sharp object such as a tool. If this happens, disconnect the appliance from the electricity mains immediately and contact a Service Centre.
- Remember that the temperature of the cooking zones remains relatively high for at least thirty minutes after they have been switched off.
- Keep any object that could melt away from the hob, for example plastic and aluminium objects, or products with a high sugar content. Keep plastic or aluminium objects away from the hob: if you forget them on surfaces that are still hot, they may cause serious damage to the hob.
- The appliance should not be operated by people (including children) with reduced physical, sensory or mental capacities, by inexperienced individuals or by anyone who is not familiar with the product. These individuals should, at the very least, be supervised by someone who assumes responsibility for their safety or receive preliminary instructions relating to the operation of the appliance.
- Do not let children play with the appliance.
Disposal
- Observe local environmental standards when disposing packaging material for recycling purposes. Observe existing legislation when disposing of the old appliance.
- The European Directive 2002/96/EC on Waste Electrical and Electronic Equipment (WEEE), requires that old household electrical appliances must not be disposed of in the normal unsorted municipal waste stream. Old appliances must be collected separately in order to optimise the recovery and recycling of the materials they contain and reduce the impact on human health and the environment. The crossed out "wheeled bin" symbol on the product reminds you of your obligation, that when you dispose of the appliance it must be separately collected.
Consumers should contact their local authority or retailer for information concerning the correct disposal of their old appliance.
Respecting and conserving the environment
- By using the appliance in the hours between late afternoon and early morning, you can help reduce the work load placed on electrical companies.
Always keep the oven door closed when using the GRILL mode to attain best results and to save energy (approximately 10% ). - Regularly check the door seals and wipe clean to ensure they are free of debris so that they stick properly to the door and do not allow heat to disperse.
Switching the appliance off
Disconnect your appliance from the electricity supply before carrying out any work on it.
Cleaning the appliance
- The stainless-steel or enamel-coated external parts as well as the rubber seals may be cleaned using a sponge that has been soaked in lukewarm water and neutral soap. If these stains are difficult to remove, use only specialised products. After cleaning, rinse and dry thoroughly. Do not use abrasive powders or corrosive substances.
- Ideally, the inside of the oven should be cleaned after each use, when it is still lukewarm. Use hot water and detergent, rinse and dry with a soft cloth. Do not use abrasive products.
- The accessories can be washed like everyday crockery (even in your dishwasher).
! Never use steam cleaners or pressure cleaners on the appliance.
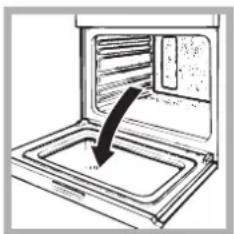
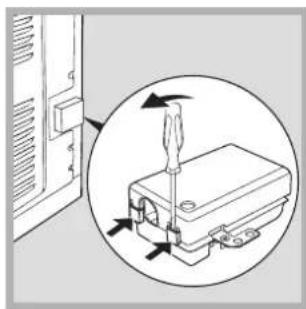
Cleaning the oven door
Clean the glass part of the oven door using a sponge and a non-abrasive cleaning product, then dry thoroughly with a soft cloth. Do not use rough abrasive material or sharp metal scrapers as these could scratch the surface and cause the glass to crack. To clean more thoroughly, you can remove the oven door.
- Open the oven door fully (see diagram).
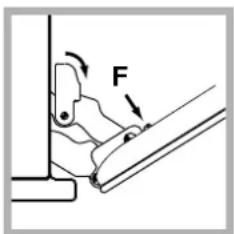
- lift up and turn the small levers situated on the two hinges; (see diagram).
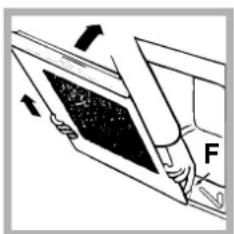
- Grip the door on the two external sides and close it approximately half way. Unlock the door by pressing on the clamps F, then pull the door towards you lifting it out of its seat (see diagram).
To replace the door, reverse this sequence.
Inspecting the seals
Check the door seals around the oven periodically. If the seals are damaged, please contact your nearest After-sales Service Centre (see Assistance). We recommend not using the oven until the seals have been replaced.
Replacing the light bulb
To replace the oven light bulb:
- Remove the glass cover of the lamp-holder.
- Remove the light bulb and replace it with a similar one: Wattage 25 W, cap E 14.
- Replace the glass cover (see diagram).
Assistance
Communicating:
- appliance model (Mod.)
- serial number (S/N)
This information is found on the data plate located on the appliance and/or on the packaging.

Sommaire
Installation, 13-15
Positionnement
PoypaMaTa mayeipepaToC
PoypaMaTAPAAOIAKOY FOYPNOY
Evpyoiouvtai ta duo eepmuavikc otoixia, to
kataw kai to tnaivw. Me auto to npapaoiako
muayipepa eivai kalutepa va xpnoiotooite povo
eva eti:pepiotepa eitieaa utapxekakn
katavoun ts cepokpaaic.
H teioa eepokpiaea etinuyxavetai autopata kai
diatnpeiitai otaepn anto to eepootattnou
dieuohvctai an tov enloyea NPOPAMMATON.

3NeKtpnueckoe noDcoeHHeHne
PacnopTnA Ta6JnUka
DEGR

RS
Deutsch, 34
EAAnvika,45
Pycckn, 56
Onncahne n3denny,60
O6uN BnD
PanaJIb ynpabJIeHnIa
BkIIOueHne n 3KcIIyatau,61
BkIIOUeHne DyXOBoro IkaΦa
PporpaMMbl, 62-63
PporpaMMbl npnroTOBneHna
PpakTnueckne COBtI No npuroToBneHIO
TbIa npiroToBnHn
HIM 20 K.A
HIM 20 K.A IX
Bapouhna naneIb, 64
MoJeIbBapOuHn paHeJI
BkIoueHne cTeKIOKepaMuecko BapOuHo nHaHei
IpaKaTnueckne peKOMeHdaCmN No IcNoJIb3OBAHIO
CTeKJIOKepaMueeCKoB BapOuHoi NaHeJI
IpeoctopoxKHOCTn pekomehdaun, 65
Obne Tpe6oBaHnK 6e3oNaChOCTn
YTNIM3aUN
3koHOMn 3neKtpo3Heprn n oxpHa oKpyKaIOuei
cpebl
Texnueckoe 6cnyxnbAHne uyo, 66
OTKJIIOUeHHe 3NeKTPoPNTaHn
UncTka n3dennr
UcTka DBepu
3aMeHa nAmnoUkn
CepBnCHe o6cnyKuBaHne

INDESIT
!BaxHo coxpaHnTb DaHHoe pykoBOcTBo dna ero nocJeDyOuXKohCynbTaun. B cnyae npodaxn, nepeDaun 3dennn nn npn nepee3de Ha HOBOe MeTo XHTBeCTBa Heo6xoDmOp npOBepntb, yTO6bl pyKOBOcTBO OCTaBAIOCB MecTe C n3dennm, DnToro YTO6bl erO HObBI BnaDeNeuC MOR O3HaKOMtbcr C npabINAMN EKCNpyataun N C COOTBETCTBYUUMN npedynpekXdEHNMA.
!BHHMaTeIbHo IpoUHTaTe HNCTpyKmH: B HIX coepkataBaxhIe CBeDeHnO6 yCtAHOBKe, 3KcIIyatauN n6e3oNaCHOCTn N3deJInr.
PacnoJoxeHne
!He pa3peWaiTe DeTmIrpaTb CynakOBouHbIMMaTePnAaAM. YnaKOBOuHbIe MaTePnAbldoNkHb6bItbYnHToKeHbBCoTBcTcBnC npaBnAmPa3deJIbHorO c6opa Mycopa (cm. PpedocmopoxHoocmu peKomeHdaauu).
!YcTaHOBKa n3dJIy npOu3BODITcB COOTBeTCTBnC DaHHbIMN HcHTpyKUmaN KBAJINΦUncPObaHHbIMNCeUaJIncTaMn. HenpaBUNbHaY cTaHOBKa n3dJIy MoKeT CtaTb npuHNoI NOBpeKDeHn NMyueCTBa nPpUHNtBu yuepe6 IIOJAM N DOMaWHm XKNBOTbIM.
BCTpoeHHbIMoHTaX
IIO6eCneHnIcnpaBHOrOyHKUHOHPOBAHnI3JeJINKyXOHbI 3JIeMeHT DOJIKeH IMeTbCOOTBeTCTByIOUHe xapakTePncTNI:
- NaHEJN KkyoONHbIX 3JIeMeHTOB, INpIeRAIOUxN K DyXOBOMy Wkafty, DOJKNbI 6bITb BbINOJIHeHbI N3 TepMOCTOIKORo MaTePnAna.
KNe KyXOHbIX 3JeMeHToB 3JeMeHToB N3 ΦaHepoBaHHoro DepeBa DOJKeH 6bITb yCTOuHBbIM K TeMnepaType 100^
-ДЯ BCtpaBANBAHЯ DyXOBORO WkaΦanOD KkyoHHbIM TOnOM (CM. pUCyHOK) UNN B KOLOHHy HmHa KkyoHHoro 3JIeMeHTa DoJxKHa NMeTb CNeDyUOuNE pa3Mepbl:
!Iocne BCtpaBHaHn 13JeHn B KxyoHHbI 3JeMeHTdoJkHa 6bItb NCKJIOHeHa BO3MOXHOCTb KacaHnK 3NeKTPuYeCKHMn YacTAmN.PacxOd 3eKTPo3Heprnn, yKa3aHHb Ha nacnpTOH Ta6JIyKe I3JeHn, 6bl 3aMepeH dJaDaHHOrTo Tnna MoHTaxa.
BeHTnJIaIcna
IIO o6eueHn HaJIeKaUe BeHTNIAuHn HeoXoIMO CHrTb 3aHIOU NaHeJb HmN KxOHHO 3JeMeHtA. PekomeHdyTeY cTaHOBtB dYXOBou IkaΦ Ha DBA DepeBAAh6pycKa Nn Ha CnloWHOe OCHOBaHne c OTBepCTNeM dNaMeTpOM He MeHee 45 x 560 MM (cm YepMeKu).
UeHTpoBka KppeHneHne
IgKperrnHnN3JEnnK KyxOHHomy 3JemeHTy: OTKpoTe DBypuy DxyOBoro ukaFa n3aBHTnre 4 Wypyna IJIpeBraHHbix NaHeiB B 4 OTBepCTnB pame.
!Bce3aunthbte 3JeMeHTbdoJNkhb6bTb3akpenneHb TaKIMO6pa3OM,TO6bIXMOKHO6bINOCHrTbToIbKO npn NOMOuCNeuaJIbHOHO HcTpMeHTa.
3JIeKtpnueckoe noCoeHHeHne
3NeKtpueckoe NoodcoeHHeHne N3dJIbBAIINHReTBCrC KxOHHo PnITOn, paCHTaHHo HaNepemHHbTOK, C HAprrKeHNEM N AcToTOy, YkazAHbIMHa NaCnOpTHo TaBnUcke (CM. cNoDyHOcmpaHcy). BapouHra naHeIb coeHNReTcRc KxOHHO pNn NOMOu CneuaJbHoro pa3bema.

BCTPOEHHbI DXYOBOI WKAΦ
YcTaHOBtE Ha MeCTo 3aUHTHy MoTaJIINueCKyO
3aRnyuKy NocNe 3neKtpnueckoro NoDKNIOueHna
BapOHeH NaHeH. B cIyuae DeMOHTaKa BapOHeH
NaHeH Heo6XoDmO yCTaHOBtHa CBoE MeCTo
KpachyO 3arNyuKy Ha KpacHbI pa3beM.
IopcoeMHHeHne ceTeBOro Hypa
- OTkpoIte 3axmHyo Kopo6ky, Haxab Pnp NOMOuN OTBepTKn Ha BbICTynl C 60KOB KpbIuKN: NOTAHNTe N OTkpoIte KpbIuKy (CM. pucyHOK).
2.OTBnHTnte BnHT KaebHOro caJIbHnka N BbIHbTe erO, NOdEe OTBeptKo (CM. cxemy).
3.OTBnHTNe BnHTbI KOHTaKToB L-N- H 3aTeM npHKpeNtepoBOda nOfOBKaMn BnHTOB, co6JIIOJa yBeTOByHO MapKpOBky CnHn (N) KopuHeBbI (L) XeJTo-3eJeHbI (1一)
3aKHMH a Kopo6ka pacuHTaHa Ha Tpexpa3Hoe 3JekTpOnTuHahe 400 B (cm. pucyHKu Hxke).
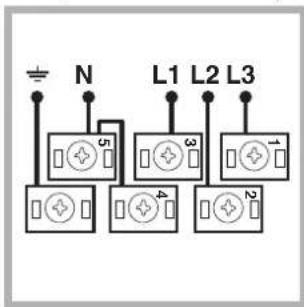
400B 3N~H05RR-F
5x2.5 CEI-UNEL 35363
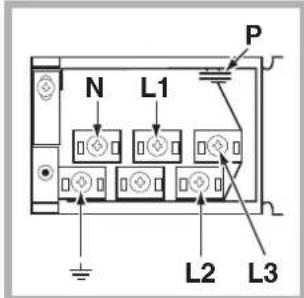
Ecnn 3neKtpoPobOka nMeet dpyrne
XapakTepnCTNK (cm. pucyHKu HxKe), dJa
3neKtpnueCKOro noCoeHHeHn uCNoJb3yIte
coeHNHTeJIbHbIe nepembyKn, paCnoJIOKeHHbIe
BHyTpN Kopo6Kn P.
230B 1N-H07RN-F 3x4 CEI-UNEL 35364
400B 2N~H05RR-F
4x2.5 CEI-UNEL 35363
- 3aKePnTe ceTeBoi uHyp B cneuHaNbHOM Ka6eJbHOM caJbHKe.
4.3akpoTe KpbIuKy 3axmHOn Kopo6Kn.
IopcoeHHeHne ceTeBOrO uHypa K cetn 3JeKtpoNTaHH
YcTaHOBtHe Ha CeTeBOI UHyp HopMaJIIN3OBAHHyIO
UTeNceIbHyIO BUNKy, paCHTaHHyIO Ha HArpy3KY,
yKa3aHHyIO Ha NacnOpTHo Ta6nUcKe (CM. c60ky).
B CInyJae IprrMO IOKIIIOueHEnr K CETn 3eNEKTPoNTAHm
MeKdy KxOHHO INITOnI INeTbIO HeO6XODIMO YCTaHOBtB
MylTBIOJIAPHbIM BbIKIOHaTeJB CMMHMAJIbHbIM
pacCToRHaEM MeKdy KOHTAKTam3 MM, paCHTaHHbI HA
DaHHyIO HArpy3KY IN COOTBETCTBYOUsI M DeIcTByOUsIM
HOPMATiBAM (BbIKIOHaTEJB He DOJKeH pa3MbkA Tb IpOBoD
3a3EmHeHry). CeTeBOI UHyp DoJKeH 6bItb paCNOIOKeH TAKMM
O6pa3OM, YTObI HN B ODN HO Toke erO TempePAtya He
IpeBBIaJa TMpePAtpy NOMeUeHn6Boe Yem Ha 50^
13neKtpoMoHTep Hecet OTBeTCTBeeHHocTb 3a npabnIbHoe NOkHoueHne N3deJnK 3JeKtpuuecko ceTu n 3a co6JIIOHeHne npabUN 6e3OnacHocTn.
PpeD noDCoeHNHeHem cTeBOrO uHypa npOBepbTe CneDuouee:
p03eTka DOnJXHa 6bItb CoeINHeHa C 3a3eMJIeHNEm COOTBeTCTBOBaTb HOpMaTnBaM;
- cTeBa p03eTka DOnJkHa 6bItb paccuTaHa Ha MaKcImaJIbHyIO Ntpe6nReMyIO MoUHocTb H3dEInna, Yka3aHHyIO Ha nacnopTHoI TaBnUKe (CM. HuXe);
HapxKeHne cTeu 3NeKtpOnnTaHn DOJXHO HaxoNtbcra B PpeJeIax 3HaueHn, yKa3aHHbIX Ha nacnopTHo Ta6JIuYke (CM. HuXe);
- ceTeBa p03eTKa DOJXHa 6bIb cOBMeCTMa co
UTeNcEhBn BUNKo N3dEINr. B npOTNBHOM
Clyuae 3aMeHnte p03eTKy INN BUNKy; He
NCNoJIb3yIte yDNIHNTeINu INN TpoHNkN.
!N3dJIeNe DOJXHO 6bITb yCTaHOBHeHO TaKMM o6pa3OM, UTO6bl 3NEKTPuYeCKn IPOBOI n CTeBa r po3etKa 6blIN JERKO DocTyNHbl.
!3nektpuecknn npoBn n3dennr He doJKeH 6bItb coHryT nn Cxat.
!Perynnpno npOBepnTe coCToHne ceTeBOrO uHypa n B Cnyae Heo6xOdMocTn NOpyHTe ero 3aMeHy TOJbKO yNoJIHOMOueHHbIM TexHnKam (CM. TexHuyeckoe o6cnykuaHue).
!Pon3BOUnteJIb He Hecet OTBETCTBeHHOCTn 3a nocIeJCTBnHeco6JIIODeHnIpeueNCJIeHHbIX Tpe6OBaHn.
PpOrpaMbl npnroTOBJIeHnA
Поррамma TPAДИЦИОНHAДУХOBKA
Bknioyotc DaHaHarpBaTeJbHbIX 3IeMeHTa: HxHmN BepxHn. B pexKIme TpaDnUHOHHoro npiroTOBHeHn peKOMeHdyetc NcNoJb3OBA Tb ToJbKO OIN yPoBeH: PnN cNOJb3OBAHN HeCKoJIbKnx ypoBHe paCnpdeJeHne TempeaTpyb6yDet HeONTMaJIbHbIM.
DyXOBKa ABToMaTnueeCKn HArpeBaeTcR Do 3aDaHHoH TeMnepaTpybl, KOtopa NODepKnBaETc Cta6nIbHOH NOpcECTBOM TepMoCTata, ynpabJIeMOro pyKoTko IPOrPAMMbI.

PporpaMa BEPXHn HAPEBATEJb
BkHouaetc BepxHn HArpeBaTeNbHbI 3neMeHT.3Ta ΦyHKUma MoKet 6bITb NcNOJb3ObaHa dna DOBOdkn roTOBbIX 6NIOd. IOTOBbTe 6NIOda c 3akpbITOn DBepuei duXOBOro WkaΦa.
PpakTnueckne COBeMbI NO nprirotOBHeHIO
!Pn nCnoJIb3OBAHmpeXmAmrPNJb nomecnte npoTneHa ypoBeHb 1dna c6opa KnKocTei, BbIeJeMOro npn Jkapke (cok nnJn Xnp).
TPIb
- YcTaHOBnTe peWteKHy Ha ypoBeHb 3 nnn 4, NOMecTnTe npOdyKTbI B ueHTppeWetKn.
He 6ecnokoTecb, ecn BepxHn 3neMeHT He octaetcnoTOrHHO BKJIOeHHbIM: eO pa6ota ynpabJIraTeC TepMOCTaOM.
NLIUCA
- NcnoJb3yIte npoTnBeHb n3 JERKOrO aJIOMmHn, yctaHaBnBaereroHa npunaraIoUyocpeWetky. PprncnoJb30BaHnnpoTnBeHb BpemBblneKu ydInnHerTc, YTO 3aTpYdHReT NOlyeHHe xpyCTauei nnzbl.
Bcnyae BbineKn NIIcIb c 6bnbHoi HauHHKO peKoMeHdyTeTc noIOXHTb Ha NlUcY cbIp MOzapeJIbA CpeEInHe BbineKn.
Ta6nua npuroToBJeHna
PekomeHdyembIe ypOBn MOUHocTn IJIpa3NHybIX TINOB pnproToBHeHH: