
10010175 - Beer dispenser Klarstein - Free user manual and instructions
Find the device manual for free 10010175 Klarstein in PDF.

| Product Type | Beer Dispenser |
| Brand | Klarstein |
| Model | 10010175 |
| Dimensions (W x H x D) | 565 x 290 x 440 mm |
| Power Supply | 230 V AC, 50 Hz |
| Compatible Keg Type | Standard 5 liters (with specific cap) |
| Optimal Serving Temperature | 6 - 8 °C |
| Recommended Ambient Temperature | 12 - 28 °C |
| Cooling Capacity | Approximately 16 hours to cool a keg from 23 °C to serving temperature |
| Display | Temperature LED |
| Compressor Power | Not specified |
| Exterior Material | Not specified |
| Included Accessories | Drip tray, silicone seal, cap tool, Heineken keg adapter |
| Main Functions | Cooling and dispensing draft beer |
| Maintenance and Cleaning | Clean after each use with warm water and dish soap; do not immerse in water; do not use abrasive cleaners |
| Safety | Unplug before cleaning; do not use if cable is damaged; do not repair yourself; keep away from children and heat sources |
| Spare Parts and Repairability | Repairs only by manufacturer, customer service, or qualified personnel |
| Warranty | 2 years for proper use |
| Recycling | Do not dispose with household waste; follow local guidelines (Directive 2012/19/EU) |
Frequently Asked Questions - 10010175 Klarstein
User questions about 10010175 Klarstein
0 question about this device. Answer the ones you know or ask your own.
Ask a new question about this device
Download the instructions for your Beer dispenser in PDF format for free! Find your manual 10010175 - Klarstein and take your electronic device back in hand. On this page are published all the documents necessary for the use of your device. 10010175 by Klarstein.
USER MANUAL 10010175 Klarstein
There are numerous beers to choose from available in 5 liter party kegs. Before using the dispenser, please read the instruction for use and safety information. You will now be able to enjoy cool, draught beer in the comfort of your own home.
Attention: The optimum ambient temperature for ice making is within 20 - 25^ . If you give the device to other people, please pass on the operating instructions. If the accident happens because of haven't informed the operating instructions, the manufacturer and importer take no responsibility.
Safety instructions
Note: Read the below safety instructions carefully and put the device in safe place.
- When the device is not in use, switch off the dispenser and always disconnect the plug from the main socket!
- Before using the dispenser, read the operating instructions carefully. Keep the device away from sources of heat, direct sunlight.
- Only use original accessories. When transporting the beer dispenser, always carry it holding the bottom edge and not by the beer tap, lid or power cord.
- Only use the dispenser with the correct beer keg. Do not attempt to change or repair the dispenser, if you have any problems or difficulties, to protect yourself safety, please contact to our customer service. It may lead electric shock if it is or repair by yourself. Please refer to our official service department, otherwise we take no responsibility.
- Unofficial or non-regular repair will lead dangerous.
- This dispenser must only be used for the intended purpose and only for private use.
- Keep packaging out of the reach of children (danger of suffocation). Keep the dispenser out of the reach of children, as they can't recognize the danger of electrical appliance.
Regularly check the dispenser and cable for damage. Do not use the appliance if it is damaged. - Ensure your standard power supply comply with the technical data.
- Only use the parts match with the device or recommend by the local dealer.
- Do not squeeze or bend the cable; do not connect with any heating.
- Ensure do not trip the cable.
- Do not put the dispenser on the gas container or near electric cooking appliance. Keep away from inflammables.
- Never immerse the dispenser and plug on water or other liquid, it may lead short circuit, fire etc.
- If the dispenser can't work or damaged, unplug it immediately.
- When remove the plug from the socket, do not pull the plug out by the cable.
- Before cleaning the dispenser, pull the plug out of the mains socket
- The dispenser is not suitable for outdoor use.
- Do not sit or stand on the dispenser.
- Do not place glasswork on the lid.
- Do not touch working parts with hair, clothes, fingers or other parts of body.
- Do not place any objects in the air vents.
Before fitting or removing any parts, always disconnect the plug from the mains socket. - Do not cover the air vents. Overheating can occur.
- Only use this dispenser when the temperature is 12 - 28^
- No legal right or entitlements may be obtained from the description made in this manual, it also apply to the wear of component.
- Do not use leaked or damaged keg.
- To avoid danger, faulty power cords must only be replaced by the manufacturer, customer service or a similarly qualified person.
Technical data
Power: 230V AC/50Hz
Dimension (L/W/H mm): 565×290×440
Beer keg: Standard 5 liter party keg
Contents, accessories and technical data subject to changes without prior notice!
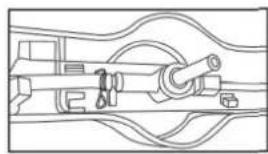
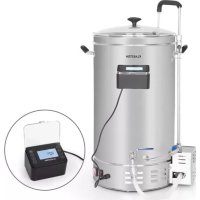
List of parts
- lid
- dispensing unit handle
- gas outlet valve
- tap handle
- Pump regulator
- main switch
- LED
temperature indicator
- drip tray cover
- drip tray
- front tube cover
- coolingchamber
- lid opener
- keg tap
- power cord
- switch
- beer keg stoppers
- connecting tube
- tools for removing keg stopper
- adapter

Warning: Before fitting or removing related parts, please cut off the mains socket, remove the plug from the socket.
Operating instructions
- Remove the beer dispenser from the packaging.
- Place the beer dispenser on a stable, horizontal, level and non-slip surface. Ensure that there is at least 10cm of space around the dispenser for optimal operating.
- Fit the collecting tray/drip tray does not protrude beyond the surface.
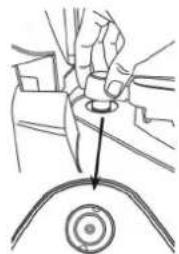
- Fit the silicon ring in the threaded part of the tap. Screw the tap tool below the dispensing unit.
- Clean the dispensing unit as described in the instructions in Chapter "Dismantling and cleaning the beer dispenser".
- Check that the main switch at the back of the dispenser is set to "0" and plug the plug into the main socket.
- Set the main switch to "I".
- Check the LED indicator to ensure that the dispenser is on.
Preparation
- Buy one standard 5 liter party keg.
Attention: only use 5L beer keg stoppers in below:

Note: If the keg has been shaken (transport, etc.), the beer must be allowed to stand for a sufficient time prior to use.
- Cool the 5 liter party keg prior to use. The optimal drinking temperature is about 6 - 8^ . The beer from a warmer keg is less refreshing. Heavy foaming can also result. To cool the keg in the beer dispenser, it is recommended to place it in the connected dispenser the day before. At a keg temperature of about 23^ , it is recommended to wait 16 hours before pulling the first glasses of beer.
Note: The cooling time in the refrigerator is between 6 and 12 hours depending on the brand and capacity due to the sophisticated cooling technology. This allows the cooling to process to be accelerated. Storing the 5 liter party keg in a refrigerator offers the advantage of always having a secondary keg ready to use.
Attention: Never cool the party keg in a freezer as it can burst. Shock cooling can impair the quality of beer.
- No matter what stopper you choose for 5 liter keg, it is necessary to use the supplied tools for removing the stopper.
-
Note: Before removing the stopper, always first vent the keg as stated on the keg and allow standing for a sufficient period so that the foam does not escape from the vent opening.
-
Once the stopper has been removed, the supplied universal beer keg stoppers can be inserted into the bunghole in the keg.
Note:
Do not dispose of the universal beer keg stoppers after emptying the keg, but remove and clean with warm water and a small amount of mild washing up liquid and retain for reuse. Remove the beer keg stoppers by gripping the edge of the rubber ring and pulling firmly with the other hand to ensure that it does not tip over.
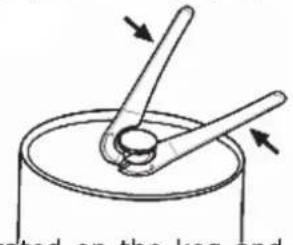
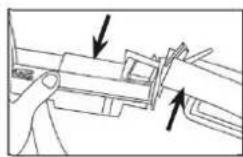
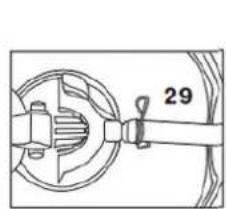
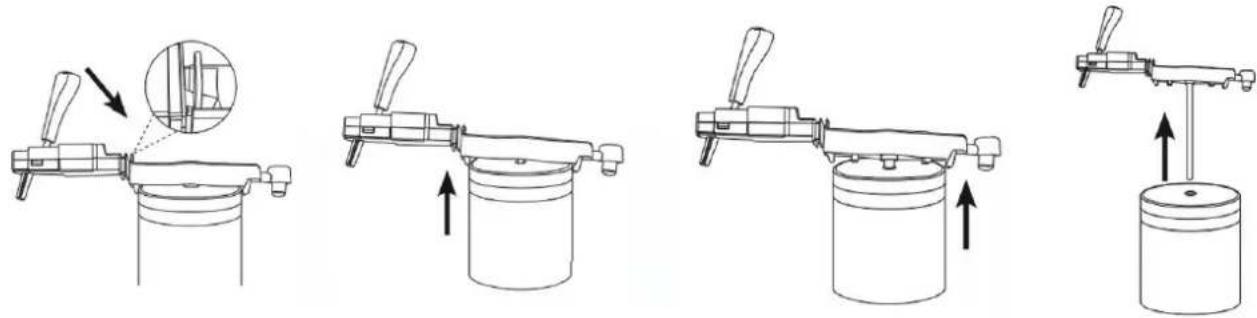
- Subsequently place it vertically on the tap opening of the stopper and push it downwards firmly and evenly into the keg. First attach the dispensing unit to the back of the keg. Push down on the front of the unit until it clicks in place. The dispensing unit is now ready to use.
Attention: Before using the 5 liter party keg, always check the best before date!
Attention: Ensure that the keg lid is not dented so that the clamps of the dispensing unit can grip under the edge of the lid.
-
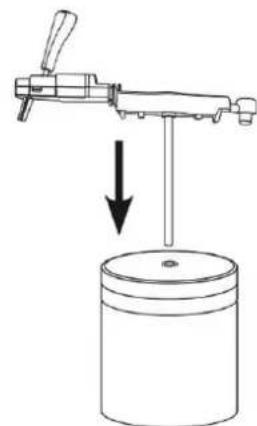
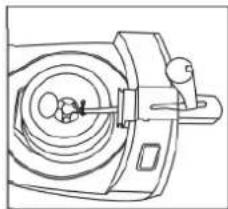
Open the dispenser lid by pressing the lid open button.
-
Lift the dispenser unit (including keg) into the cooling chamber of the dispenser.
- Attach the end of the dispensing unit to the gas outlet valve.
Attention: Never fi II liquid into the gas outlet valve.
-
Close the dispenser lid so that it locks with a click.
-
Turn pump regulator to "ON" position, you will hear the voice of working pump, and the pump will automatically shut down when the bebarrel pressure is enough.

- Pull the tap towards you standing, than you can taste fresh beer.

Warning: If there is enough pressure in the keg or pressure regulator is closed, the air pump cannot work, if there is no enough pressure in the beer keg, open the pressure regulator, the air pump will work automatically.
If you choose the Heineken keg, as it has pressure, must do as follows:
- Attach the photo, install the supplied adapter on the keg;
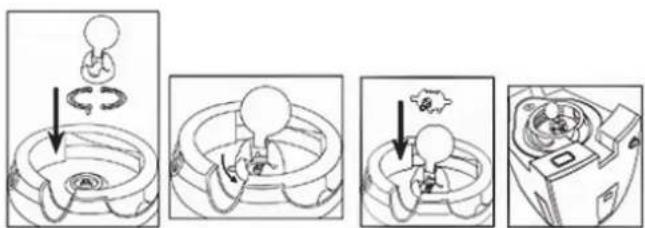
- Attach the photo, disassemble the tap;

- Attach the photo, connect the tap with beer keg
- Attach the photo, press the beer outlet valve, cover the lid

- Pull the tap towards you standing, than you can taste fresh beer.
Service
Attention: Before switching of the beer dispenser, always ensure that no 5 liter party keg is present in the dispenser as the beer in the keg becomes warm and is no longer fresh
1.Preparing glasses:
2. Wash the glasses in hot water with a small amount of washing / up liquid. Rinse the gl thoroughly each time before dispensing with cold, clear water. Ensure that all grease and residues are removed completely to avoid impairing foam formation.
Dispensing beer
Hold the glass under the beer tap at an angle. The tip of the outlet tube should not come into contact with the glass as this can impair the foam formation.
Note: The foam produced when dispensing beer can be influenced by changing the angle of the glass. Note: If the tap is only partly open, the beer may foam excessively as it is not able to flow out freely. Note: The tap locks in position when the tap is fully open. This enables several glasses of beer to be dispensed simultaneously.
Allow the beer to run down the inside of the glass and slowly straighten the glass while dispensing until it is upright towards the end. Place the glass on the drip plate and wait about 1 minute until the foam has settled. Ensure that the glass is not located directly under the beer tap so that no drops fall into the bear foam.
Repeat the dispensing process until the beer and foam are in the correct proportion. This is the case when the head is about two fi nger's breadth high and slightly over the rim of the glass.
Cleaning
To clean the beer dispenser and/or to replace the keg, the procedure for this is as follows:
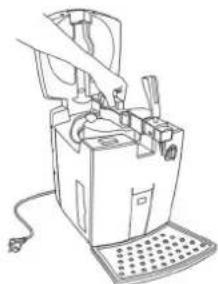
- Press the lid opener.
- Take out the tap and the keg
Note: The silicon sealing ring is a wearing part. If excessive carbon losses are noticed during use, replace the silicon sealing ring with the supplied spare seal
- Remove the clamps from the rim of the keg and pull the dispensing unit out of the keg quickly and evenly. As the beer tap may not be moist during extraction, removal may take some eff ort.
Attention: Never remove the dispensing unit from the keg when pressurized. To change the keg before it is empty, remove the keg together with the dispensing unit from the dispenser. Position it in such a way that the beer is able to flow out into a suitable container and pull the tap handle until no more beer is dispensed.
Cleaning
In order to keep the quality of the dispensed beer at a consistently high level, it is important to clean the dispenser thoroughly.
The cleaning intervals are specified in the following
Attention: Never use scouring pads, aggressive scouring agents, acetone, benzene, acids, thinner, vinegar or similar for cleaning purposes.
Cleaning after each use:
Both the collecting tray and drip tray should be cleaned after each use of the dispenser to ensure perfect hygiene. For this purpose, remove both the collecting tray and drip tray from the dispenser and pour the collected beer into the drain, subsequently clean both parts with hot water (using a small amount of washing/up liquid if necessary). Attention, to avoid scald when washing, water cannot be very hot. Drip tray can wash with washer, but painted collecting tray is not dishwasher proof.
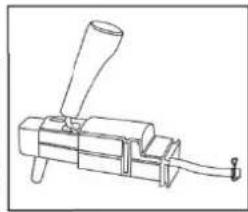
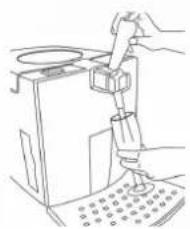
It is recommended to also clean the tube at the front of the beer tap after each use.
As illustrated in the below photo, please connect cleaning tube with connecting tube and water faucet, open the Dispensing tap handle fi rst, then open the water faucet, let the water go through the connecting tube and outflow of the Spout.
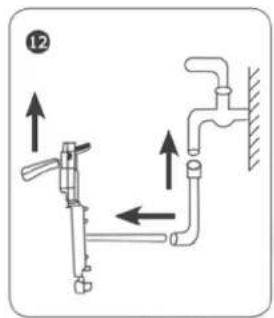
By washing a period of time, the rest beer in pipelines can be cleaned; if need to more cleaning, please add a little washing up liquid into the Connecting tube.
It is recommended to pour little beer into glass after clean the tube each time, then pour the beer and clean the glass. Next, you can enjoy the high quality beer as you expected,
Note: It is recommended to use hot water and a small amount of washing-up liquid. In this case, the tube should be rinsed again with clear, warm water in order not to prevent impairment of the taste and foam formation.
Note: Disinfectant cleaners in powder form for beer and drinks systems are available from off licenses, which are ideal for cleaning the beer dispenser.
Attention: The dispensing unit is not dishwasher proof.
Attention: If the dispenser is not used for an extended period, it should be thoroughly cleaned beforehand.
Regular cleaning:
Regularly clean the cooling chamber and all surfaces of the dispenser with a moist cloth and small amount of mild washing-up liquid.
Attention: Before cleaning the dispenser, always disconnect the plug from the mains socket and never immerse the dispenser in water.
Attention: The cooling chamber must not be filled with liquid as this can cause permanent damage.
Troubleshooting
| Problem Possible cause Remedy | ||
| The beer is too warm | The keg was not chilled long enough | Chill the keg longer |
| The vents are covered. Insufficient space next to and behind the dispenser | Uncover the vents. Position the dispenser so that there is minimum 10cm space on all sides | |
| The beer tastes flat | The best before date has expired | Use a new keg |
| The keg has been tapped too long | Use a new keg | |
| The beer runs too slowly out of the beer tap | The pressure in the keg is too low | Turn the pressure regulator slightly clockwise |
| The beer does not flow freely out of the tube | Open the beer tap fully | |
| The outlet tube touches the glass when dispensing | Hold the glass slightly further away from the outlet tube | |
| The glass is held upright when dispensing | Tilt the glass when dispensing so that the beer is able to run down the side of the glass | |
| The cooling chamber is covered with frost (slight frost is normal) | The dispenser is standing in a moist environment | Place the dispenser in a dry environment |
| The ambient temperature is too low | Place the dispenser in a warm environment | |
| Problem Cause Solution | ||
| The dispenser does not close | The dispensing unit is not correctly installed and pro-trudes from the dispenser | Install the dispensing unit correctly |
| It is difficult to install the dispensing unit on the keg | The keg tap was not moistened prior to tapping | Wet the keg tap with cold water |
| Not enough foam is produced while dispensing | The beer is too cold | Allow the keg to stand in the dispenser For while. The temperature is then Corrected by the unit |
| There are grease, washing-up Liquid or residues in the glass | Wash the glass thoroughly and subsequently rinse with cold | |
| The glass is too warm Rinse the g | glass with cold water | |
| The glass is dry Rinse the glass | with cold water | |
| The beer turns cloudy | The beer is too cold | Allow the keg to stand in the dispenser For while. The temperature is then Corrected by the unit |
| The beer tube is not clean Clean | the dispensing unit | |
| The beer was incorrectly shock-chilled prior to using the beer dispenser | Use a correctly chilled keg | |
| The unit does not switch on | The plug is not plugged into the mains socket The main switch is set to "0" | Plug the plug into the mains socket Set the main switch to "I" |
| No beer is dispensed | The 5 liter party keg is empty | Place a new 5 liter party keg in the dispenser |
| Pump regulator is closed Open the pump regulator | ||
| The keg tap is not fitted. The keg is not correctly tapped. | Screw the keg tap to the dis-pensing unit. Tap the keg cor-rectly | |
| The tap handle is not correctly installed | Install the tap handle correctly | |
| Too much foam is produced when dispensing | The 5 liter party keg is not cold enough | The beer does not flow freely out of the tube |
| The 5 liter party keg was shaken | Allow the 5 liter party keg to stand in the beer dispenser for a while | |
| The beer does not flow freely out of the tube | Open the beer tap fully | |
Error Messages
Error messages are only displayed when the keg is too cold to cool it.
| Message Meaning | |
| E1 -0 °C | |
| E2 -2 °C | |
| E3 -3 °C | |
Hints on Disposal
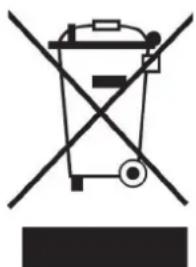
According to the European waste regulation 2012/19/EU this symbol on the product or on its packaging indicates that this product may not be treated as household waste. Instead it should be taken to the appropriate collection point for the recycling of electrical and electronic equipment. By ensuring this product is disposed of correctly, you will help prevent potential negative consequences for the environment and human health, which could otherwise be caused by inappropriate waste handling of this product. For more detailed information about recycling of this product, please contact your local council or your household waste disposal service.
Declaration of Conformity
Producer: Chal-Tec GmbH, Wallstraße 16, 10179 Berlin, Germany.

This product is conform to the following European Directives:
2014/30/EU (EMC)
2014/35/EU (LVD)
2011/65/EU (RoHS)
Trèschers clients,

Brand : Klarstein
Model : 10010175
Category : Beer dispenser