
Harmony Director HD200A - Musical instrument YAMAHA - Free user manual and instructions
Find the device manual for free Harmony Director HD200A YAMAHA in PDF.
User questions about Harmony Director HD200A YAMAHA
0 question about this device. Answer the ones you know or ask your own.
Ask a new question about this device
Download the instructions for your Musical instrument in PDF format for free! Find your manual Harmony Director HD200A - YAMAHA and take your electronic device back in hand. On this page are published all the documents necessary for the use of your device. Harmony Director HD200A by YAMAHA.
USER MANUAL Harmony Director HD200A YAMAHA
PykoBODCTBO NOIb3OBaTeJRA
사용 썸명서
SPECIALMESSAGESECTION
This product utilizes batteries or an external power supply (adapter). DO NOT connect this product to any power supply or adapter other than one described in the manual, on the name plate, or specifically recommended by Yamaha.
This product should be used only with the components supplied or; a cart, rack, or stand that is recommended by Yamaha. If a cart, etc., is used, please observe all safety markings and instructions that accompany the accessory product.
SPECIFICATIONS SUBJECT TO CHANGE:
The information contained in this manual is believed to be correct at the time of printing. However, Yamaha reserves the right to change or modify any of the specifications without notice or obligation to update existing units.
This product, either alone or in combination with an amplifier and headphones or speaker/s, may be capable of producing sound levels that could cause permanent hearing loss. DO NOT operate for long periods of time at a high volume level or at a level that is uncomfortable. If you experience any hearing loss or ringing in the ears, you should consult an audiologist.
IMPORTANT: The louder the sound, the shorter the time period before damage occurs.
NOTICE:
Service charges incurred due to a lack of knowledge relating to how a function or effect works (when the unit is operating as designed) are not covered by the manufacturer's warranty, and are therefore the owner's responsibility. Please study this manual carefully and consult your dealer before requesting service.
ENVIRONMENTAL ISSUES:
Yamaha strives to produce products that are both user safe and environmentally friendly. We sincerely believe that our products and the production methods used to produce them, meet these goals. In keeping with both the letter and the spirit of the law, we want you to be aware of the following:
Battery Notice:
This product MAY contain a small non-rechargeable battery which (if applicable) is soldered in place. The average life span of this type of battery is approximately five years. When replacement becomes necessary, contact a qualified service representative to perform the replacement.
This product may also use "household" type batteries. Some of these may be rechargeable. Make sure that the battery being charged is a rechargeable type and that the charger is intended for the battery being charged.
When installing batteries, do not mix batteries with new, or with batteries of a different type. Batteries MUST be installed correctly. Mismatches or incorrect installation may result in overheating and battery case rupture.
Warning:
Do not attempt to disassemble, or incinerate any battery. Keep all batteries away from children. Dispose of used batteries promptly and as regulated by the laws in your area. Note: Check with any retailer of household type batteries in your area for battery disposal information.
Disposal Notice:
Should this product become damaged beyond repair, or for some reason its useful life is considered to be at an end, please observe all local, state, and federal regulations that relate to the disposal of products that contain lead, batteries, plastics, etc. If your dealer is unable to assist you, please contact Yamaha directly.
NAME PLATE LOCATION:
The name plate is located on the bottom of the product. The model number, serial number, power requirements, etc., are located on this plate. You should record the model number, serial number, and the date of purchase in the spaces provided below and retain this manual as a permanent record of your purchase.
Model
Serial No.
Purchase Date
PLEASE KEEP THIS MANUAL
92-BP (bottom)
产品中有害物质的名称及含量
This product, when installed as indicated in the instructions contained in this manual, meets FCC requirements. Modifications not expressly approved by Yamaha may void your authority, granted by the FCC, to use the product.
- IMPORTANT: When connecting this product to accessories and/or another product use only high quality shielded cables. Cable/s supplied with this product MUST be used. Follow all installation instructions. Failure to follow instructions could void your FCC authorization to use this product in the USA.
- NOTE: This product has been tested and found to comply with the requirements listed in FCC Regulations, Part 15 for Class "B" digital devices. Compliance with these requirements provides a reasonable level of assurance that your use of this product in a residential environment will not result in harmful interference with other electronic devices. This equipment generates/uses radio frequencies and, if not installed and used according to the instructions found in the users manual, may cause interference harmful to the operation of other electronic devices. Compliance with FCC regulations does not guarantee that interference will
not occur in all installations. If this product is found to be the source of interference, which can be determined by turning the unit "OFF" and "ON", please try to eliminate the problem by using one of the following measures:
Relocate either this product or the device that is being affected by the interference.
Utilize power outlets that are on different branch (circuit breaker or fuse) circuits or install AC line filter/s.
In the case of radio or TV interference, relocate/reorient the antenna. If the antenna lead-in is 300 ohm ribbon lead, change the lead-in to co-axial type cable.
If these corrective measures do not produce satisfactory results, please contact the local retailer authorized to distribute this type of product. If you cannot locate the appropriate retailer, please contact Yamaha Corporation of America, Electronic Service Division, 6600 Orangethorpe Ave, Buena Park, CA90620
The above statements apply ONLY to those products distributed by Yamaha Corporation of America or its subsidiaries.
- This applies only to products distributed by YAMAHA CORPORATION OF AMERICA. (class B)
iGJi#iB(Bl)TjAip#HgIroT Jto gEepfT 100
(class b korea)
OBSERVERA!
This product contains a battery that contains perchlorate material.
Perchlorate Material—special handling may apply,
See www.dtcsc.ca.gov/hazardouswaste/perchlorate.
- This applies only to products distributed by YAMAHA CORPORATION OF AMERICA (Perchlorate)
(standby)
Information for Users on Collection and Disposal of Old Equipment and used Batteries

These symbols on the products, packaging, and/or accompanying documents mean that used electrical and electronic products and batteries should not be mixed with general household waste.
For proper treatment, recovery and recycling of old products and?used batteries, please take them to applicable collection points, in accordance with your national legislation and the Directives 2002/96/EC and 2006/66/EC.
By disposing of these products and batteries correctly, you will help to save valuable resources and prevent any potential negative effects on human health and the environment which could otherwise arise from inappropriate waste handling.

For more information about collection and recycling of old products and batteries, please contact your local municipality, your waste disposal service or the point of sale where you purchased the items.
[For business users in the European Union]
If you wish to discard electrical and electronic equipment, please contact your dealer or supplier for further information.
![YAMAHA Harmony Director HD200A - [For business users in the European Union] - 1](/content/2026/03/479334/images/cd6489d405acc04244a3fa3652528ab822ebf451054ecb573320e3cad97308c7.jpg)
[Information on Disposal in other Countries outside the European Union]
These symbols are only valid in the European Union. If you wish to discard these items, please contact your local authorities or dealer and ask for the correct method of disposal.
Note for the battery symbol (bottom two symbol examples):
This symbol might be used in combination with a chemical symbol. In this case it complies with the requirement set by the Directive for the chemical involved.
- Please keep this manual in a safe place for future reference.

WARNING
Always follow the basic precautions listed below to avoid the possibility of serious injury or even death from electrical shock, short-circuiting, damages, fire or other hazards. These precautions include, but are not limited to, the following:
Power supply/AC power adaptor
- Only use the voltage specified as correct for the instrument. The required voltage is printed on the name plate of the instrument.
- Use the specified adaptor (page 3) only. Using the wrong adaptor can result in damage to the instrument or overheating.
- Check the electric plug periodically and remove any dirt or dust which may have accumulated on it.
- Do not place the AC adaptor cord near heat sources such as heaters or radiators, and do not excessively bend or otherwise damage the cord, place heavy objects on it, or place it in a position where anyone could walk on, trip over, or roll anything over it.
Do not open
- Do not open the instrument or attempt to disassemble the internal parts or modify them in any way. The instrument contains no user-serviceable parts. If it should appear to be malfunctioning, discontinue use immediately and have it inspected by qualified Yamaha service personnel.
Water warning
- Do not expose the instrument to rain, use it near water or in damp or wet conditions, or place containers on it containing liquids which might spill into any openings. If any liquid such as water seeps into the instrument, turn off the power immediately and unplug the power cord from the AC outlet. Then have the instrument inspected by qualified Yamaha service personnel.
- Never insert or remove an electric plug with wet hands.
Fire warning
- Do not put burning items, such as candles, on the unit.
A burning item may fall over and cause a fire.
If you notice any abnormality
- If the AC adaptor cord or plug becomes frayed or damaged, or if there is a sudden loss of sound during use of the instrument, or if any unusual smells or smoke should appear to be caused by it, immediately turn off the power switch, disconnect the adaptor plug from the outlet, and have the instrument inspected by qualified Yamaha service personnel.

CAUTION
Always follow the basic precautions listed below to avoid the possibility of physical injury to you or others, or damage to the instrument or other property. These precautions include, but are not limited to, the following:
Power supply/AC power adaptor
- When removing the electric plug from the instrument or an outlet, always hold the plug itself and not the cord.
- Unplug the AC power adaptor when not using the instrument, or during electrical storms.
- Do not connect the instrument to an electrical outlet using a multiple-connector. Doing so can result in lower sound quality, or possibly cause overheating in the outlet.
Battery
- Always make sure all batteries are inserted in conformity with the +/- polarity markings. Failure to do so might result in overheating, fire, or battery fluid leakage.
- Always replace all batteries at the same time. Do not use new batteries together with old ones. Also, do not mix battery types, such as alkaline batteries with manganese batteries, or batteries from different makers, or different types of batteries from the same maker, since this can cause overheating, fire, or battery fluid leakage.
-
Do not dispose of batteries in fire.
-
Do not attempt to recharge batteries that are not intended to be charged.
- When the batteries run out, or if the instrument is not to be used for a long time, remove the batteries from the instrument to prevent possible leakage of the battery fluid.
- Keep batteries away from children.
- If the batteries do leak, avoid contact with the leaked fluid. If the battery fluid should come in contact with your eyes, mouth, or skin, wash immediately with water and consult a doctor. Battery fluid is corrosive and may possibly cause loss of sight or chemical burns.
Location
- Do not expose the instrument to excessive dust or vibrations, or extreme cold or heat (such as in direct sunlight, near a heater, or in a car during the day) to prevent the possibility of panel disfiguration or damage to the internal components.
- Do not use the instrument in the vicinity of a TV, radio, stereo equipment, mobile phone, or other electric devices. Otherwise, the instrument, TV, or radio may generate noise.
-
Do not place the instrument in an unstable position where it might accidentally fall over.
-
Before moving the instrument, remove all connected adaptor and other cables.
- When setting up the product, make sure that the AC outlet you are using is easily accessible. If some trouble or malfunction occurs, immediately turn off the power switch and disconnect the plug from the outlet. Even when the power switch is turned off, electricity is still flowing to the product at the minimum level. When you are not using the product for a long time, make sure to unplug the power cord from the wall AC outlet.
Connections
- Before connecting the instrument to other electronic components, turn off the power for all components. Before turning the power on or off for all components, set all volume levels to minimum. Also, be sure to set the volumes of all components at their minimum levels and gradually raise the volume controls while playing the instrument to set the desired listening level.
Maintenance
- When cleaning the instrument, use a soft, dry cloth. Do not use paint thinkers, solvents, cleaning fluids, or chemical-impregnated wiping cloths.
Handling caution
- Do not insert a finger or hand in any gaps on the instrument.
- Never insert or drop paper, metallic, or other objects into the gaps on the panel or keyboard. If this happens, turn off the power immediately and unplug the power cord from the AC outlet. Then have the instrument inspected by qualified Yamaha service personnel.
- Do not place vinyl, plastic or rubber objects on the instrument, since this might discolor the panel or keyboard.
- Do not rest your weight on, or place heavy objects on the instrument, and do not use excessive force on the buttons, switches or connectors.
- Do not use the instrument/device or headphones for a long period of time at a high or uncomfortable volume level, since this can cause permanent hearing loss. If you experience any hearing loss or ringing in the ears, consult a physician.
Backup battery
- This instrument has a built-in lithium backup battery. When you unplug the power cord from the AC outlet, the internal data is retained. However, if the backup battery fully discharges, this data will be lost. When the backup battery is running low, the display indicates "Backup Battery Low." In this case, have qualified Yamaha service personnel replace the backup battery.
Yamaha cannot be held responsible for damage caused by improper use or modifications to the instrument, or data that is lost or destroyed.
Always turn the power off when the instrument is not in use.
When using a power adaptor, even when the power switch is in the "STANDBY" position, electricity is still flowing to the instrument at the minimum level. When you are not using the instrument for a long time, make sure you unplug the AC power adaptor from the wall AC outlet.
Make sure to discard used batteries according to local regulations.
The ilustrations and LCD display as shown in this owner's manual are for instructional purposes only, and may appear somewhat different from those on your instrument.
Tone Generator FM Tone Generator: 8 Notes
and Polyphony AWM Tone Generator: 32 Notes
(Piano, Metronome)
Keyboard 49 Keys C scale
(4 Octaves with touch response)
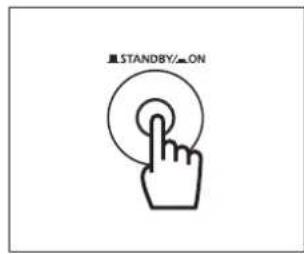
Basic Controls STANDBY/ON switch
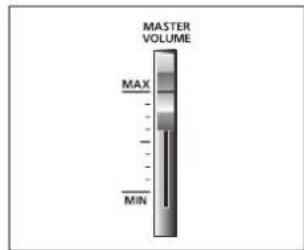
MASTER VOLUME slider
Voices 10 Voices
Flute, Oboe, Clarinet, Saxophone,
Organ, Trumpet, Horn, Brass,
String, Piano
HOLD button
Figure FIGURE button
FIGURE sliders
ATTACK, RELEASE, BRILLIANCE
Transposition TRANSPOSE button
C button
B button
E button
F button
OCTAVE switch (LOW1, LOW2, MID,
HIGH)
Temperaments EQUAL TEMPERED button
PURE TEMPERED MAJOR button
PURE TEMPERED MINOR button
MEMORY button
STANDARD PITCH buttons
Hz button
CENT button
KEY SELECT buttons
MANUAL button
AUTO button
Note Select buttons
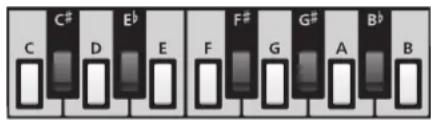
C, C†, D, E, E, F, F, G, G†, A, B, B
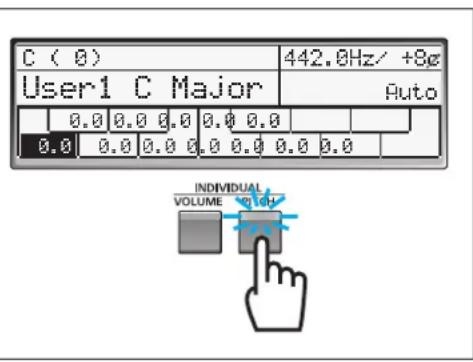
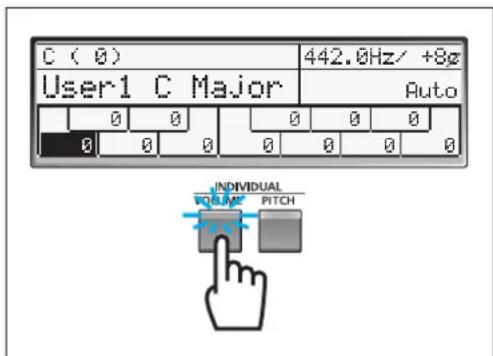
INDIVIDUAL PITCH button
INDIVIDUAL VOLUME button
Setting SETTING button
Metronome MEMORY button
TEMPO button
BEAT button
CURSOR buttons
QUARTERTRIPLETbutton
TAP TEMPO button
START/STOP button
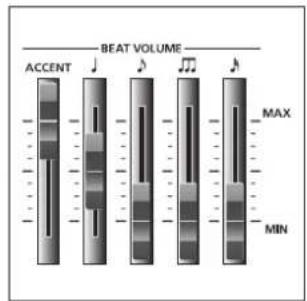
BEAT VOLUME sliders
ACCENT slider
slider
▶ slider
slider
slider
Data Entry DATA ENTRY dial
DATA ENTRY [+] /[-] buttons
Display LCD Display
HARMONY display
METRONOME display
CONTRAST dial
HARMONY CONTRAST dial
METRONOME CONTRAST dial
External Input/
DC 12V IN jack
Output Jacks
Foot Pedal jack
(Standard Stereo Phone jack)
Output jack
(Standard Monaural Phone jack)
Phones jack
(Standard Stereo Phone jack)
Power Amplifier Max. 7.5 W Output
Speaker
12 cm (4 Ω)
Power Supply AC Power Adaptor* (DC 12V 700mA)
D Cell Batteries ("AA" size, LR6 or equiv.) x 6
Power
With AC Power Adaptor: 5 W
Consumption
(operating at max. vol.)
Battery Powered: 2.5 W (operating at max. vol.)
Dimensions
Width: 855 mm (33 11/16")
Depth: 262 mm (10 5/16")
Height: 93.9mm (3 11/16")
Weight: 4.35kg (9 lbs. 9 Oz.) (without
batteries)
Battery Life
Until Low Power Warning
Approx. 3 hrs
Until Power Depleted
Approx. 4 hrs
(When using alkaline batteries)
Accessories
AC Power Adaptor PA-3C or PA-130*
(Supplied in the USA only)
Owner's Manual
-
The power adaptor supplied with HD-200 is intended for use in the USA. When using the HD-200 in any other region, please purchase and use an AC power adaptor specified or recommended by Yamaha.
-
Specifications and descriptions in this owner's manual are for information purposes only.
Yamaha Corp. reserves the right to change or modify products or specifications at any time without prior notice. Since specifications, equipment or options may not be the same in every locale, please check with your Yamaha dealer.
PRECAUTIONS 1
Specifications 3
Panel Controls and Jacks 5
Setting Up and Voice Settings 7
Turning the Power On/Off. 7
Master Volume Control 7
Selecting a Voice for Tuning. 7
Setting Figure 8
Turning Hold On/Off 8
Selecting Octave. 8
Temperaments 9
Selecting a Temperament. 9
Note Select Buttons 10
Adjusting the Pitch for Each Note 10
Adjusting the Volume for Each Note. 10
Creating a User Temperament 10
Copying a Temperament 10
Setting the Root Key 11
Standard Pitch Setting 12
Transpose Settings 12
Metronome Settings 13
START/STOP 13
BEAT VOLUME. 13
Tempo Setting 14
Beat Setting 14
Quarter Triplet 14
Tap 15
Memory 15
Other Settings 16
Foot Pedal Function. 16
Harmony Volume. 16
Metronome Sound 16
Metronome Pattern. 17
Volume Balance 17
Jacks and Dials 18
DC 12V IN Jack. 18
FOOT PEDAL Jack 18
OUTPUT Jack 18
PHONES Jack 18
CONTRAST Dials 18
Initializing 19
Error Messages
About the Preset Temperaments
Blank Chart
Troubleshooting
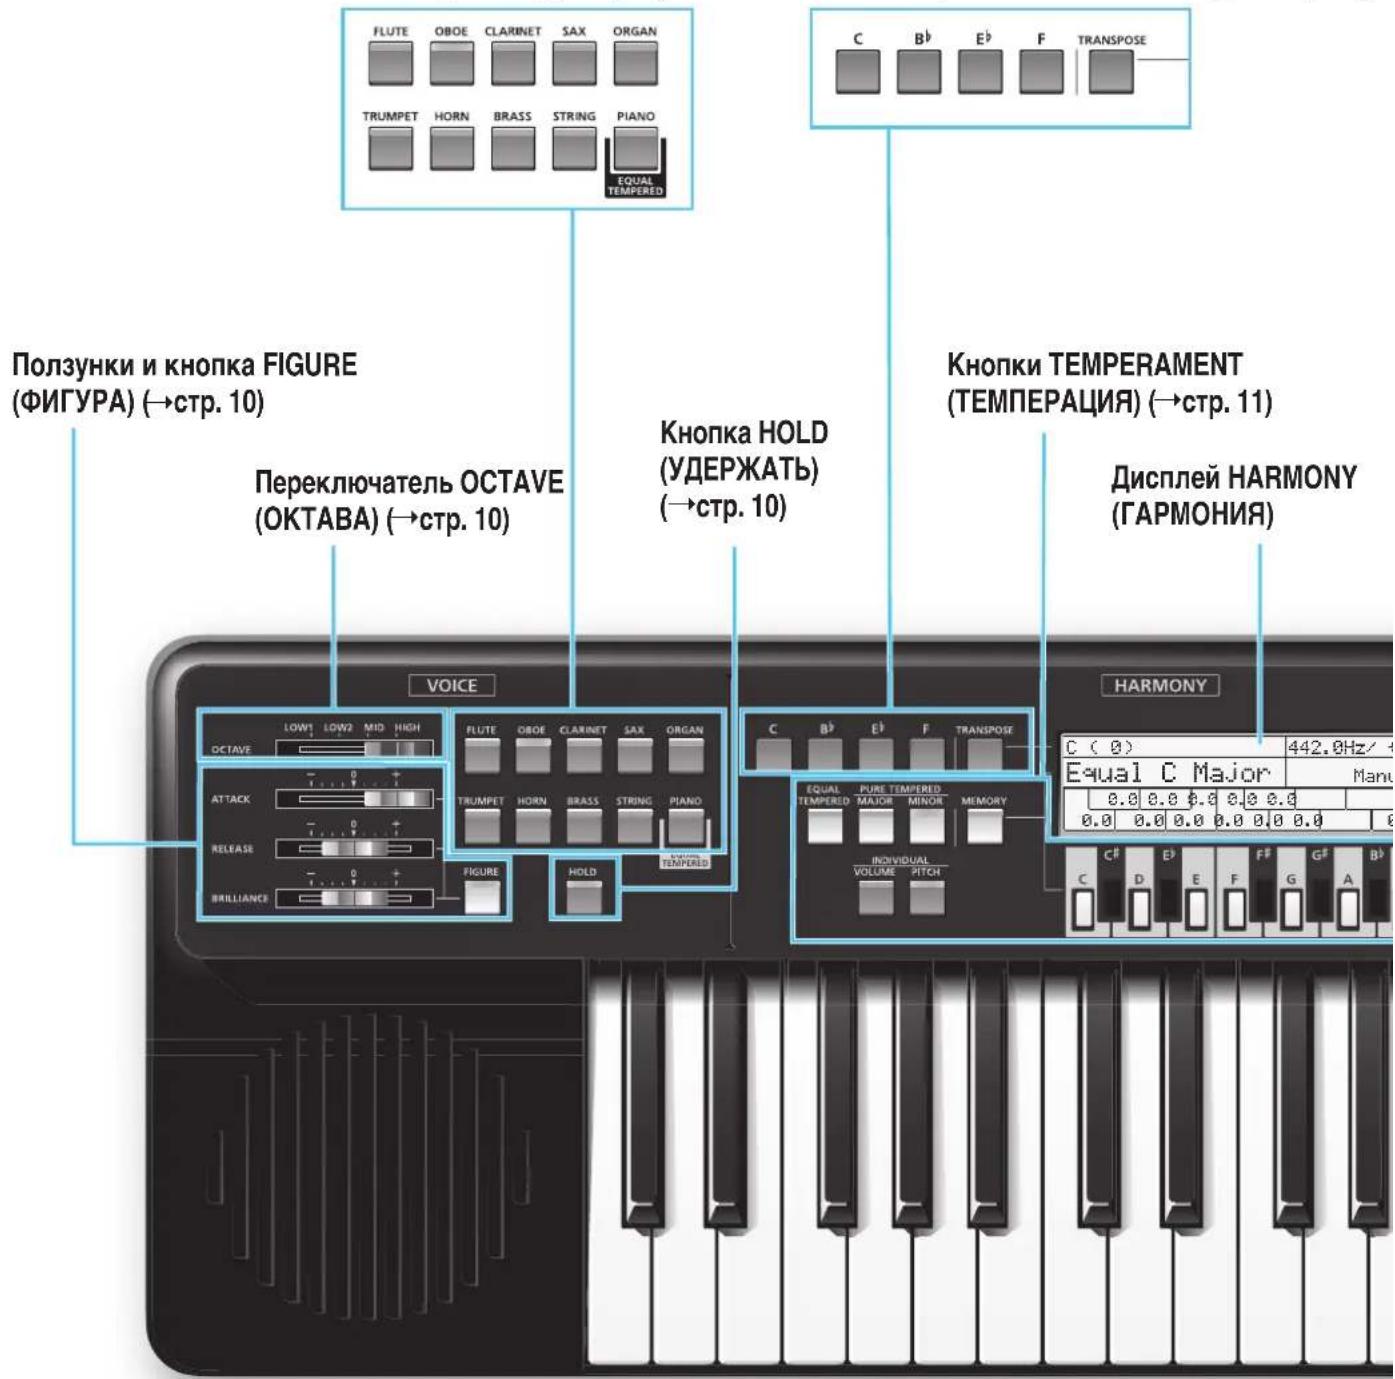
Panel Controls and Jacks
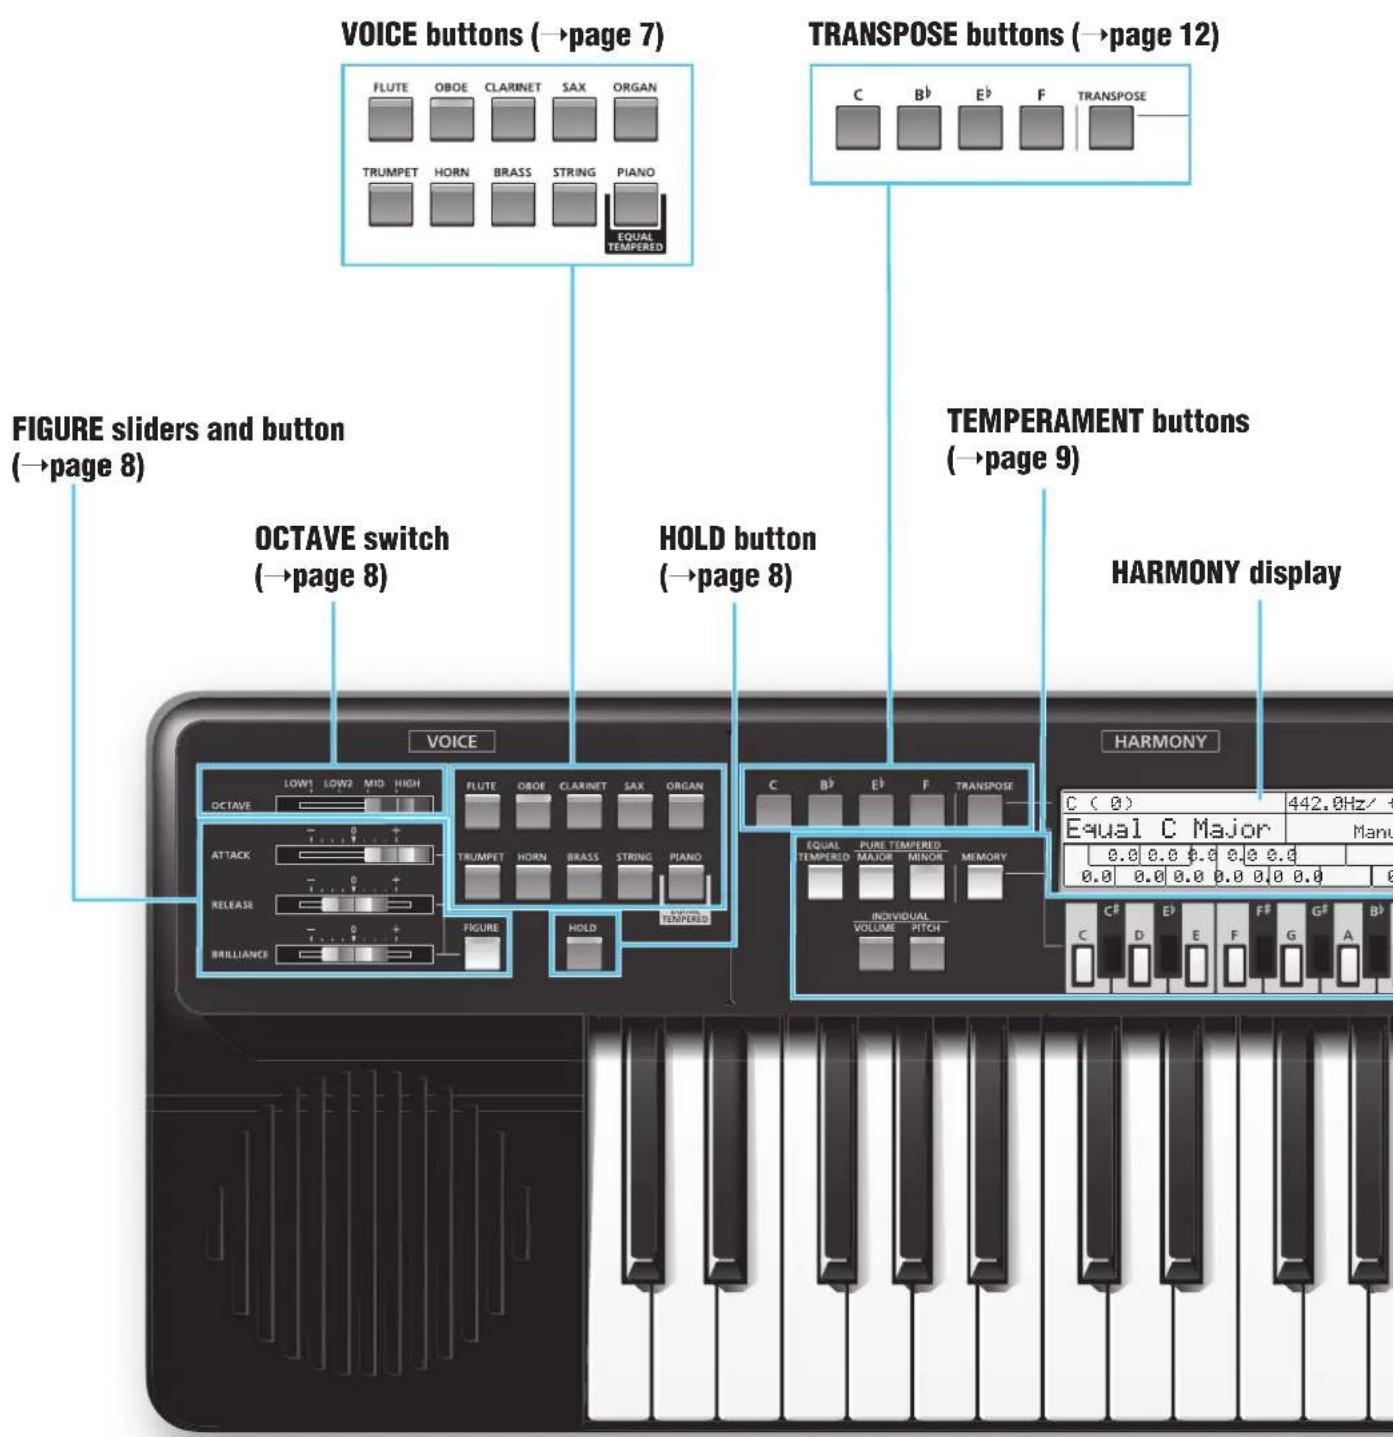
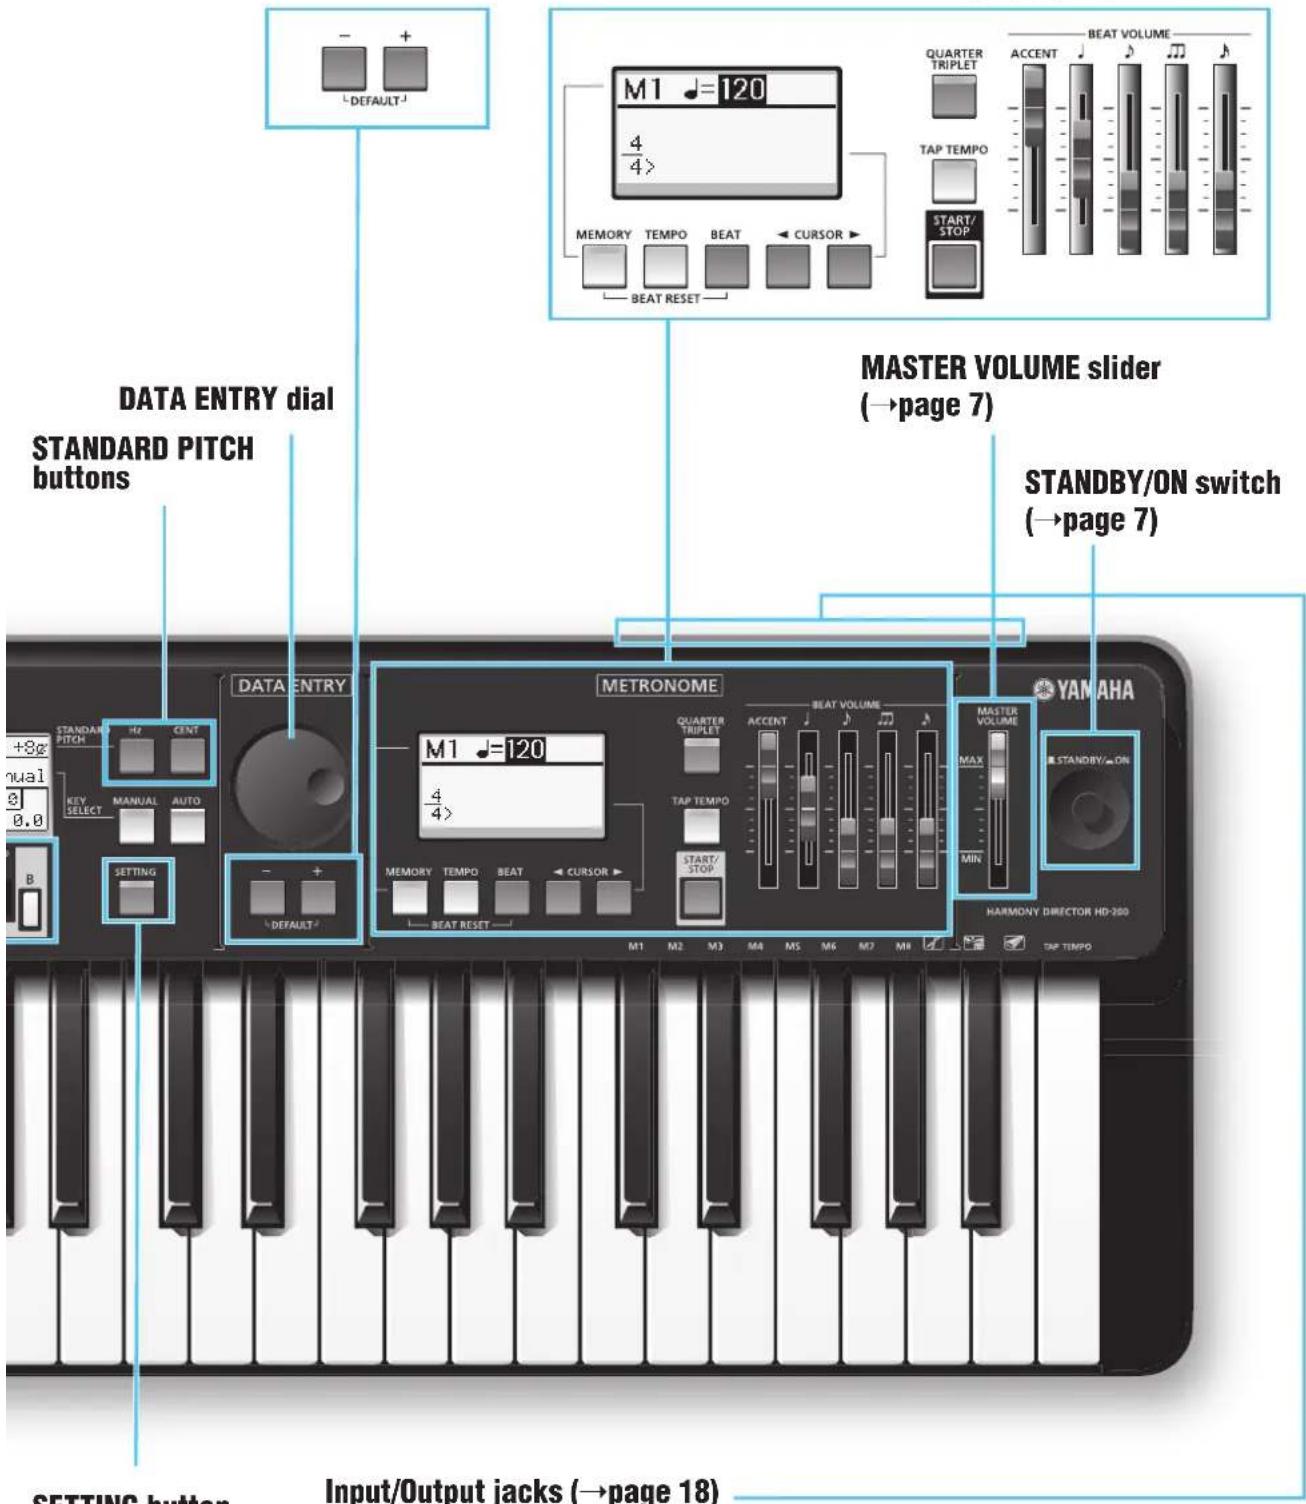
DATA ENTRY buttons METRONOME buttons and sliders (→page 13)
SETTING button
Setting Up and Voice Settings
Turning the Power On/Off
This instrument will run either from an optional AC power adaptor or batteries.
Make sure that the instrument's [STANDBY/ON] switch is set to STANDBY (off), then execute the following steps.
When using the AC power adaptor, connect the adaptor's DC plug to the instrument's DC 12V IN jack on the rear panel, then connect the other end (standard AC plug) to the nearest electrical outlet.
When using batteries, open the battery compartment cover located on the bottom panel, insert six new alkaline batteries, then replace the compartment cover, making sure that it locks firmly in place.
After setting up, press the [STANDBY/ON] switch to turn on the power.
The HARMONY display and METRONOME display show the same information as the last time the power was turned off.
Because this instrument is equipped with a backup battery, the settings made on this instrument will be maintained even if the power is turned off.
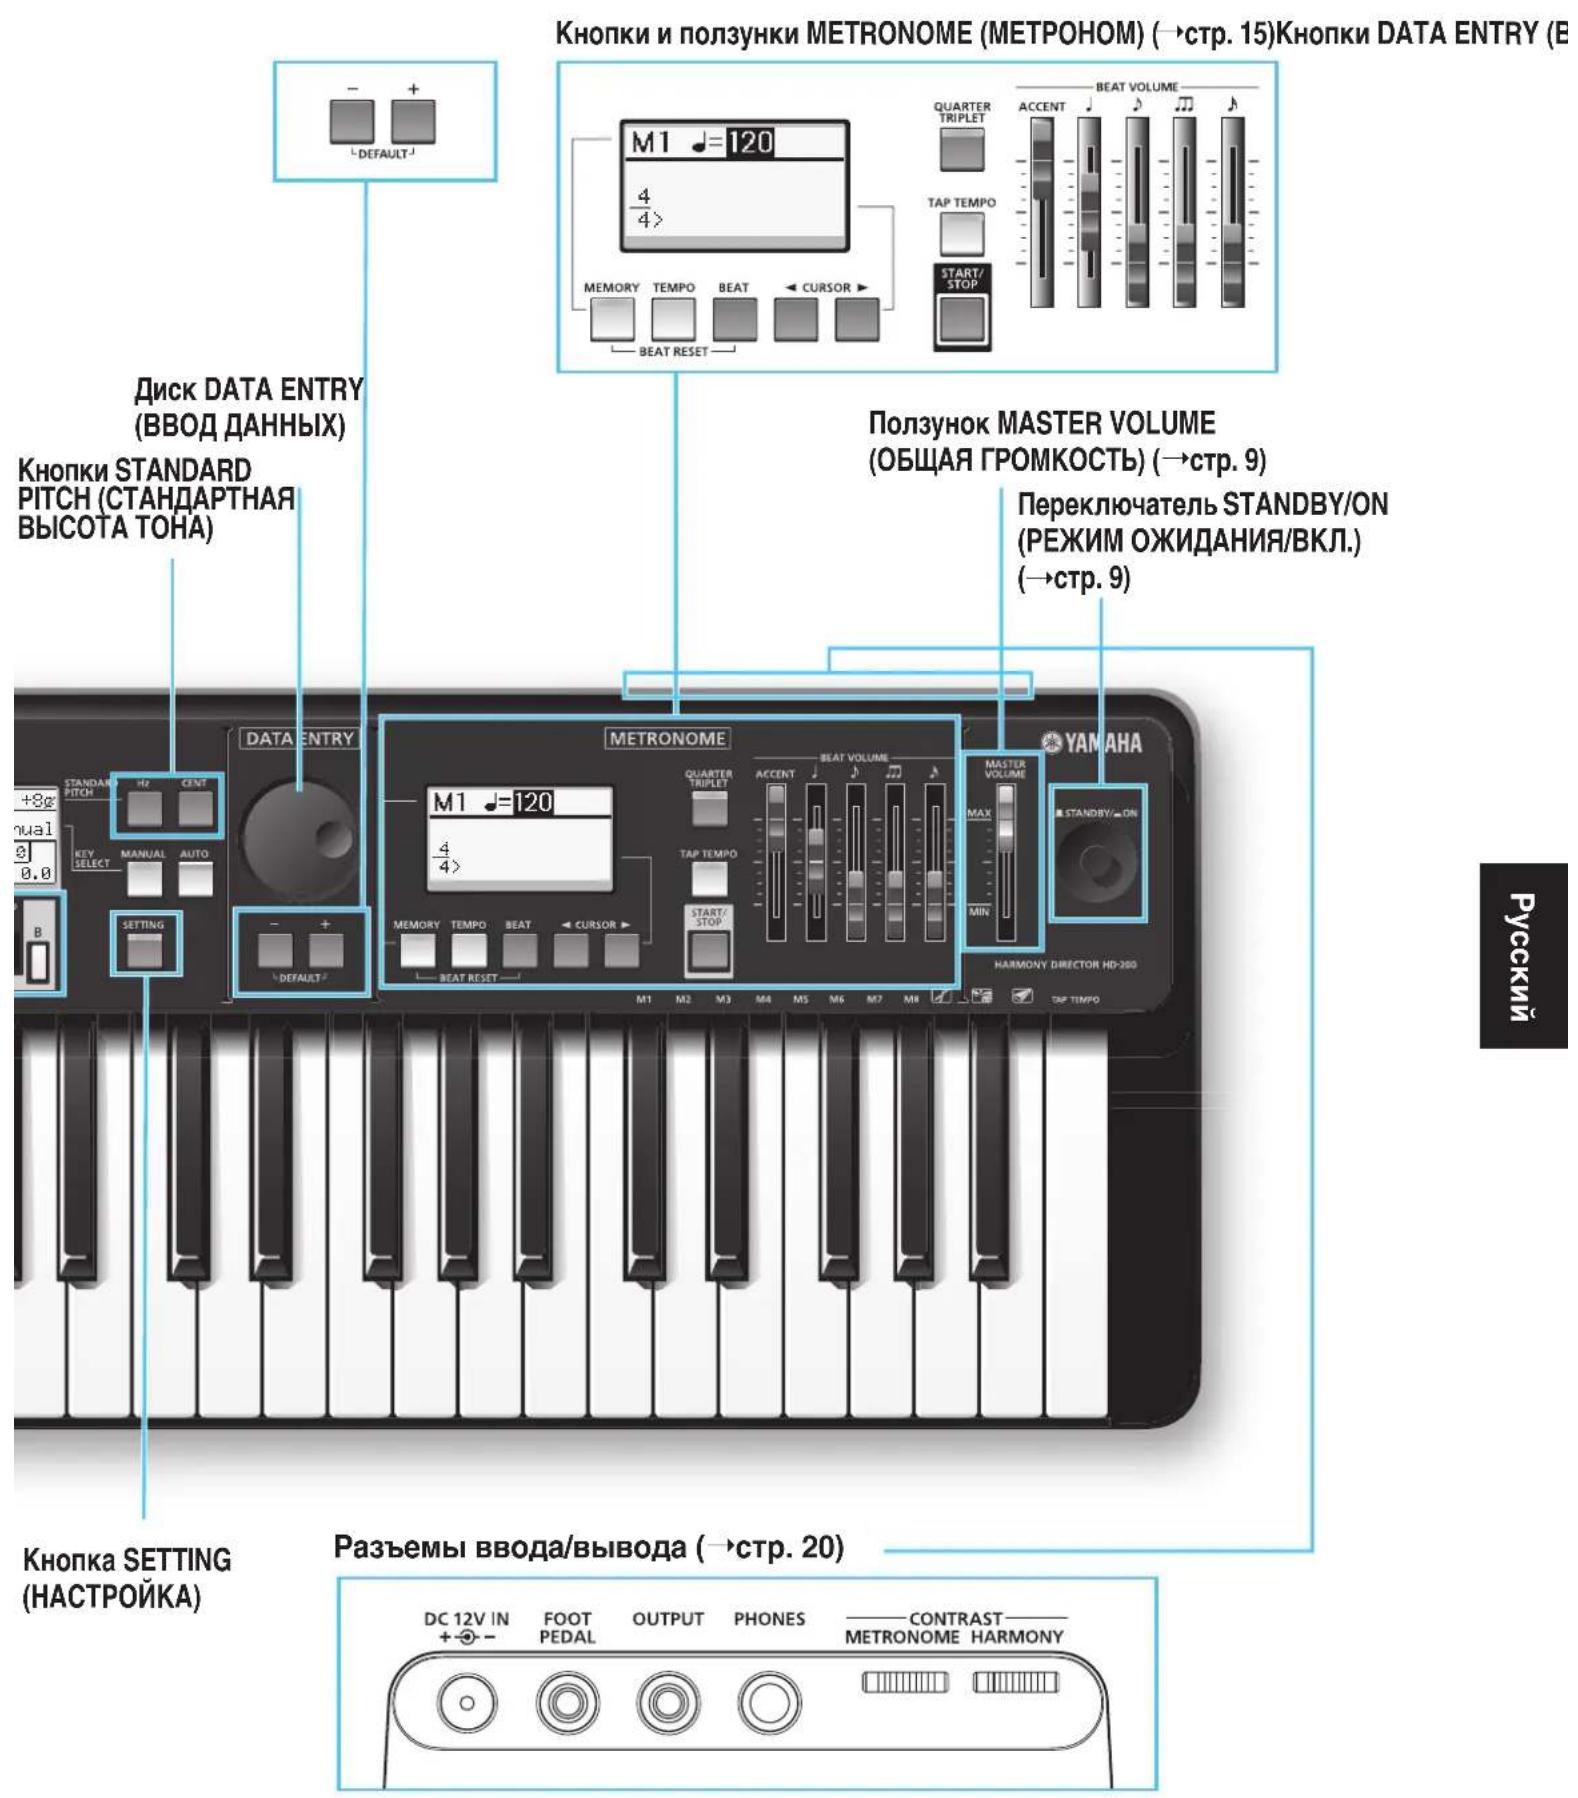
Master Volume Control
Move the [MASTER VOLUME] slider toward MAX to turn up the volume and Move the [MASTER VOLUME] slider toward MIN to turn down the volume.
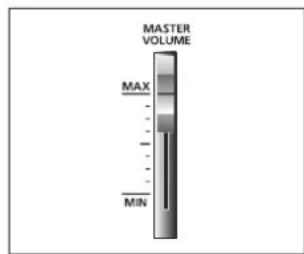
Selecting a Voice for Tuning
This instrument features 10 different voices for tuning. You can select the desired voice by pressing the corresponding button. The lamp of the selected button lights.
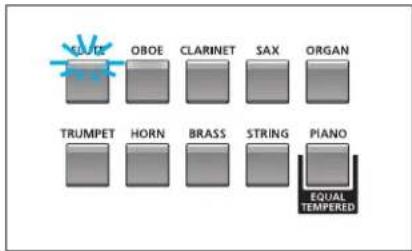

The best voice for tuning
It may be a good idea to select ORGAN or STRING so that both the teacher and student can easily recognize the pitch difference between the instrument's sound (played by the student) and the Harmony Director's sound.
Setting Figure
With this function, you can change the tonal characteristics.
By pressing the [FIGURE] button so that its lamp lights, the three sliders become available and the settings made via these sliders are applied to the keyboard sound.
Move the [ATTACK] slider to adjust how long it takes for the sound to reach full volume when a note is pressed.
Move the [RELEASE] slider to adjust how long it takes for the sound to decay to silence after a note is released.
Move the [BRILLIANCE] slider to adjust the brilliance of the selected voice.
By pressing the [FIGURE] button so that its lamp goes out, the three
sliders become unavailable and the settings made via these sliders are not applied to the keyboard sound.
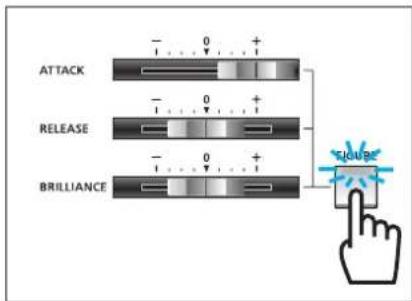
* This function is not available when PIANO is selected.
Turning Hold On/Off
With this function, notes can be maintained even if your fingers are released from the keyboard.
Press the [HOLD] button so that its lamp lights. In this state, notes will be maintained even if your fingers are released from the keyboard. When one or more notes are being maintained, you can change the maintained notes by pressing other keys.
Press the [HOLD] button again to exit this state. Turning off this button will stop the maintained sound.

Selecting Octave
With this function, you can change the keyboard's octave.
Move the [OCTAVE] switch to select the octave.
Switch position and octave
| Switch Position | LOW1 | LOW2 | MID | HIGH | ||
| Octave C0-C4 | C1-C5 | C2-C6 | C3-C7 |
Temperaments
Selecting a Temperament
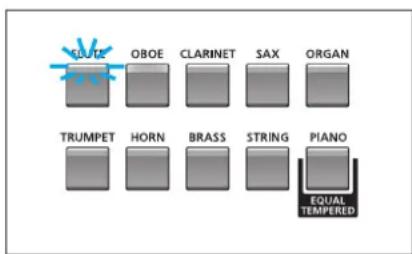
Press the [EQUAL TEMPERED] button so that its lamp lights. "Equal" appears on the HARMONY display.
Press the [PURE TEMPERED MAJOR] button so that its lamp lights. "Pure (key name) Major" appears on the HARMONY display.
Press the [PURE TEMPERED MINOR] button so that its lamp lights. "pure (key name) minor" appears on the HARMONY display.
Press the [MEMORY] button so that its lamp lights. "User1" "User5" appears on the HARMONY display. You can select "User1" "User5" by using the DATA ENTRY dial or [+]/[-] buttons.

You can save your own original temperament settings to the Memory as User Temperaments. For details, see the next page.
Note Select Buttons
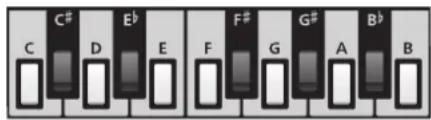
When either the INDIVIDUAL [VOLUME] or [PITCH] button is turned on, these buttons are used to select the note for which the volume or pitch is to be adjusted.
When both the INDIVIDUAL [VOLUME] and [PITCH] buttons are turned off, these buttons are used to select the root key of the selected temperament.
Adjusting the Pitch for Each Note
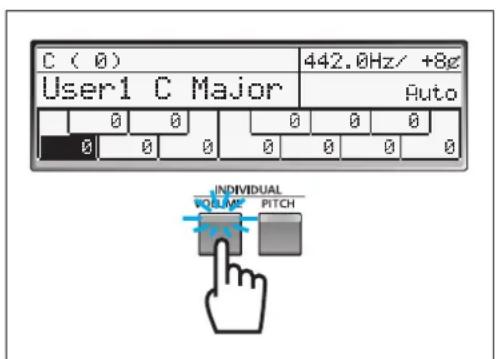
The pitch for each note (C-B) can be set in 0.1 cent increments.
Press the INDIVIDUAL [PITCH] button so that its lamp lights, press the desired Note Select button, and then adjust the pitch by using the DATA ENTRY dial or [+] /[-] buttons. The setting range is -55 cent - +55 cent. Press the DATA ENTRY [+] and [-] buttons simultaneously to return the cent value to "0."
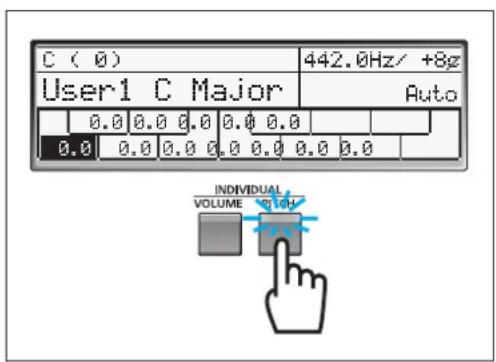
Adjusting the Volume for Each Note
The volume for each note (C-B) can be set.
Press the INDIVIDUAL [VOLUME] button so that its lamp lights, press the desired Note Select button, and then adjust the volume by using the DATA ENTRY dial or [+] /[-] buttons. The setting range is -15 - +5. Press the DATA ENTRY [+] and [-] buttons simultaneously to return the value to "0."
Creating a User Temperament
With this function, you can save your own original temperament settings (pitch and volume settings for each note) to "User1"-"User5" as User Temperaments.
Press the [MEMORY] button so that its lamp lights. Select "User1"-"User5" by using the DATA ENTRY dial or [+]/[-] buttons, then set the volume and pitch for each note by using the INDIVIDUAL [VOLUME] and [PITCH] buttons. After making the settings, select another Memory number and make different temperament settings if necessary.
Copying a Temperament
You can copy temperament settings to any of "User1"-"User5."
After selecting one of "User1"-"User5," hold the [EQUAL TEMPERED] button and press the [MEMORY] button to copy the Equal Temperament settings to the currently selected Memory number. This operation also applies to the PURE TEMPERED [MAJOR] and [MINOR] buttons.
Setting the Root Key
With this function, the root key can be set for each temperament.
When the [MANUAL] button is pressed so that its lamp lights, the root key can be specified by pressing one of the Note Select buttons manually.
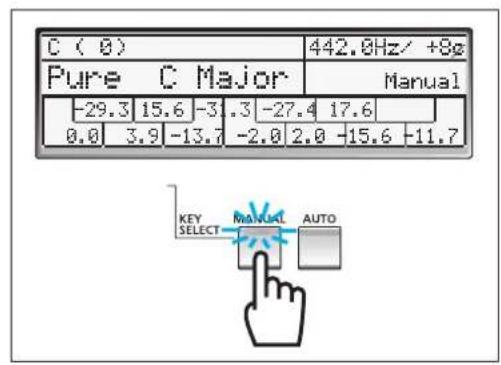
When the [AUTO] button is pressed so that its lamp lights, the root key and chord type (major or minor) will be determined by playing several notes on the keyboard.
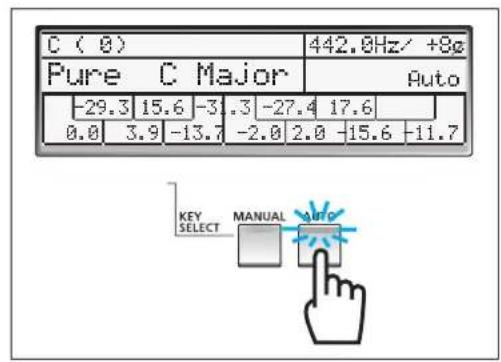

If the notes played cannot be recognized as a chord, the current root key and current chord type will be maintained.
Chord types recognized when [AUTO] is turned on
The following chart shows examples for the root key "C." The inversion of each fingering is also recognized.
![YAMAHA Harmony Director HD200A - Chord types recognized when [AUTO] is turned on - 1](/content/2026/03/479334/images/09d948a33a38060d4ad3a28986503dcdda02cea1bef3fa40d910c5b18a488e22.jpg)
![YAMAHA Harmony Director HD200A - Chord types recognized when [AUTO] is turned on - 2](/content/2026/03/479334/images/5619ec8e181844e2dadd92142759d2ef72f39f1dfff4521365265ba9794dc09b.jpg)
![YAMAHA Harmony Director HD200A - Chord types recognized when [AUTO] is turned on - 3](/content/2026/03/479334/images/dad2b9e7e285728758c39a8a8dd18978c7a9ebb147e25569a6ad30e12dbb76f5.jpg)
![YAMAHA Harmony Director HD200A - Chord types recognized when [AUTO] is turned on - 4](/content/2026/03/479334/images/e109a0c2e62e33da997df8b80955d03e655ca814bca3db736833e00b27e70c9b.jpg)
![YAMAHA Harmony Director HD200A - Chord types recognized when [AUTO] is turned on - 5](/content/2026/03/479334/images/73c6caf275e2530a0872a749f95c0e9f1487e4931c9d245f43d6f0e608cdcaf8.jpg)
![YAMAHA Harmony Director HD200A - Chord types recognized when [AUTO] is turned on - 6](/content/2026/03/479334/images/b6cf8fc39eba2398fc4ad2375c58694b25bd82ddc5b353fe9ccf192324360890.jpg)
![YAMAHA Harmony Director HD200A - Chord types recognized when [AUTO] is turned on - 7](/content/2026/03/479334/images/04c6a1c77cd0f385f68792396e436d1e95e7edea61ed627d0ff69e4d506f4073.jpg)
![YAMAHA Harmony Director HD200A - Chord types recognized when [AUTO] is turned on - 8](/content/2026/03/479334/images/e6f47a4f7a4893ae254f7ea52f25171d1193e9c4917b9f91114fc4fd818923c5.jpg)
![YAMAHA Harmony Director HD200A - Chord types recognized when [AUTO] is turned on - 9](/content/2026/03/479334/images/9e8ae54938d68770551bfb9962c0711ce238d0b2983f3d2cc02e0a7a1bf3bfe4.jpg)
![YAMAHA Harmony Director HD200A - Chord types recognized when [AUTO] is turned on - 10](/content/2026/03/479334/images/e6146b7ea5b59e25614e242979ff10ef622b7d0dccb8126a06d3021fb56b5bd8.jpg)
![YAMAHA Harmony Director HD200A - Chord types recognized when [AUTO] is turned on - 11](/content/2026/03/479334/images/44369f1242fe7f5d3ac762da90b02e4adcfe46c958a779d02aa54f0f276a8190.jpg)
The recognized root key and chord type will be shown on the HARMONY display.
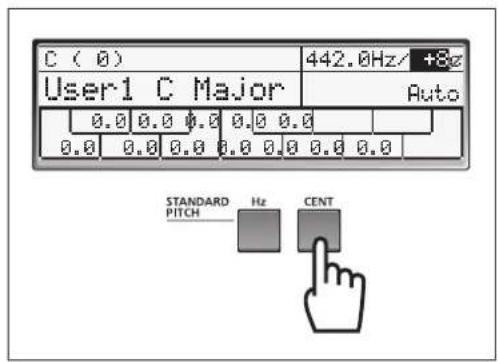
Standard Pitch Setting
With this function, you can change the overall pitch setting which is to be used as the standard pitch of an ensemble such as an orchestra or choir.
Press the [Hz] button to move the cursor to the Hz column, then set the pitch in Hz by using the DATA ENTRY dial or [+] /[-] buttons. The setting range is 430.0~n~Hz - 450.3~Hz . Press the DATA ENTRY [+] and [-] buttons simultaneously to reset the value to "442.0Hz."
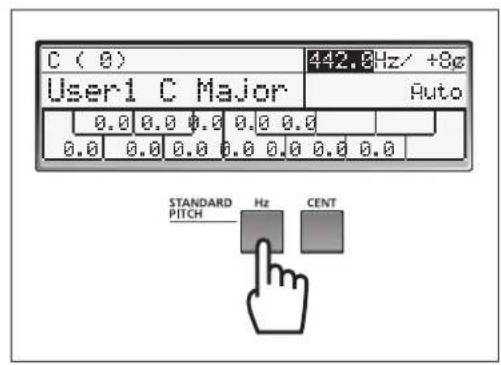
Press the [CENT] button to move the cursor to the Cent column, then set the pitch in cents by using the DATA ENTRY dial or [+]/[-] buttons. The setting range is -40 cent - +40 cent. Press the DATA ENTRY [+] and [-] buttons simultaneously to reset the value to "0."
Transpose Settings
With this function, you can shift the keyboard pitch up or down in semitones.
Press the [TRANSPOSE] button to move the cursor to the Transpose column, then set the transpose value by using the DATA ENTRY dial or [+] /[-] buttons. The setting range is -7 - +7. Press the DATA ENTRY [+] and [-] buttons simultaneously to reset the Transpose value to "0."
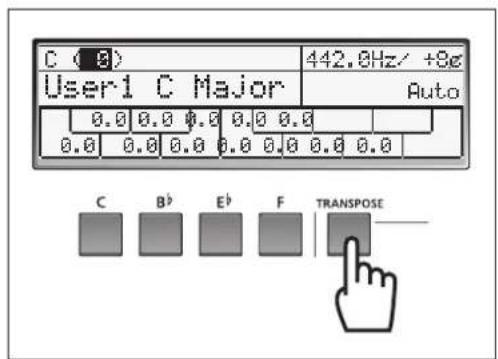
You can transpose the key directly to C, B, E and F by pressing the corresponding button.
| Button Transpose Value |
| [C] button 0 |
| [B] button -2 semitones |
| [E] button +3 semitones |
| [F] button +5 semitones |

[About the pitch]
The pitch value (described in Hz) is used for tuning the sounds of various instruments. In many cases, a value between 440-442Hz is set for A.
Metronome Settings
START/STOP
Press the [START/STOP] button to start the metronome.
Press the [START/STOP] button again to stop the metronome.

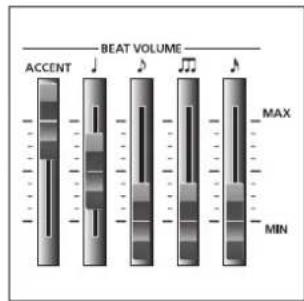
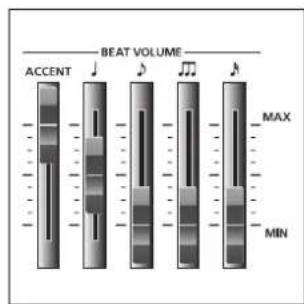
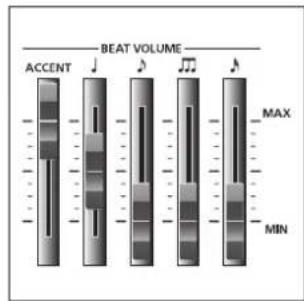
BEAT VOLUME
These five sliders let you adjust the volume for each beat timing.
The ACCENT slider lets you adjust the volume for the accent sound (played on the first beat of the meter set on the METRONOME display).
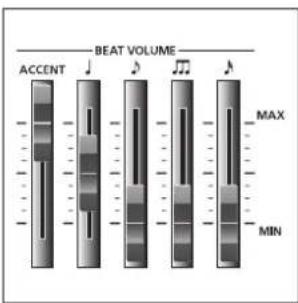
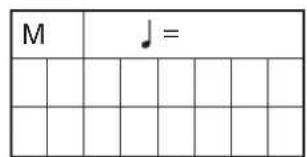
Sounding Timing Chart (4/4)
| J | J | J | J | |||||||||||||
| D | D | D | D | D | D | D | D | |||||||||
| ACCENT | ● | |||||||||||||||
| J | ● | ● | ● | ● | ||||||||||||
| D | ● | ● | ● | ● | ● | ● | ● | ● | ||||||||
| D | ● | ● | ● | ● | ● | ● | ● | ● | ● | ● | ● | ● | ● | ● | ● | ● |
| D | ● | ● | ● | ● | ● | ● | ● | ● | ● | ● | ● | ● | ● | ● | ● | ● |
Sounding Timing Chart (6/8)
| J | D | D | D | D | D | |||||||
| ACCENT | ● | |||||||||||
| J | ||||||||||||
| D | ● | ● | ● | ● | ● | ● | ||||||
| D | ● | ● | ● | ● | ● | ● | ● | ● | ● | ● | ● | ● |
| D | ● | ● | ● | ● | ● | ● | ● | ● | ● | ● | ● | ● |
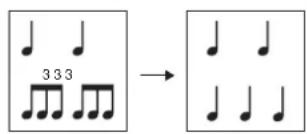
The quarter notes do not sound and the triplets sound at a double tempo of the triplet.
When the metronome pattern is set to "Alternate", the notes marked do not sound.
(Refer to "Other Settings" on page 16)
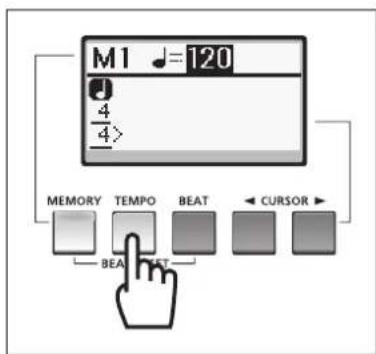
Tempo Setting
On the METRONOME display, you can set the metronome tempo. Press the [TEMPO] button to move the cursor to the tempo value column, then set the quarter note tempo by using the DATA ENTRY dial or [+]/[-] buttons.
The tempo range is 32-280. Press the [+] and [-] buttons simultaneously to reset the tempo value to 120.
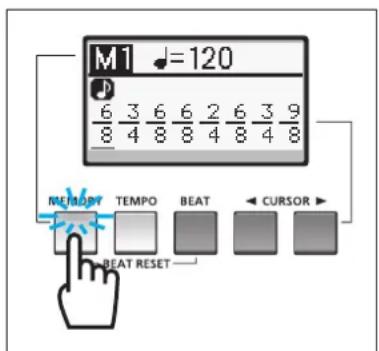
Beat Setting
On the METRONOME display, you can set the meter as well as the metronome tempo. You can also set an irregular meter or multi-metered beats (e.g., 2/8 + 2/8 + 3/8 ) as well as a normal meter (e.g., only 4/4 ). You can create multi-metered beats of up to 8 measures.
To set a normal meter, press the [BEAT] button to move the cursor to the meter section, then set the numerator and denominator values of the meter respectively by using the DATA ENTRY dial or [+]/[-] buttons. Use the CURSOR buttons to move the cursor between the numerator and denominator.
To set an irregular meter, press the CURSOR [>] button several times to indicate the meter for the next measure. Set the numerator and denominator values of the meter respectively by using the DATA ENTRY dial or [+]/[-] buttons. Perform the same operation for additional measures.
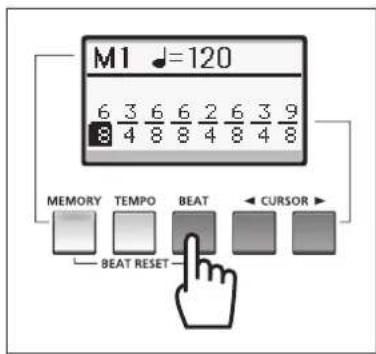

Press the [MEMORY] and [BEAT] buttons simultaneously to reset the beat to 4/4 (1 measure).
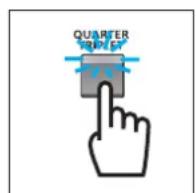
Quarter Triplet
The metronome can be played back as quarter triplet by turning on the [QUARTER TRIPLET] lamp.
When the [QUARTER TRIPLET] button is turned on, you can hear the correct quarter triplet by setting the meter to 4/4, setting the BEAT VOLUME quarter note slider to a low level, setting the BEAT VOLUME triple note slider to a higher level, and setting the other BEAT VOLUME sliders to 0.

Tap
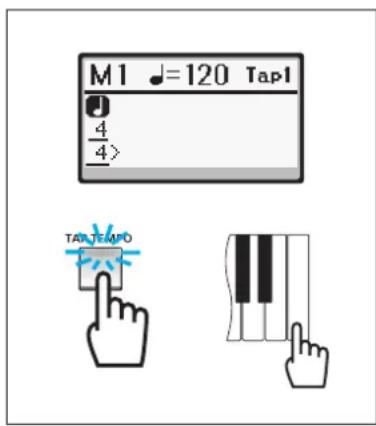
With this function, you can set the metronome tempo by tapping a key.
Press the [TAP TEMPO] button so that its lamp lights, then tap the rightmost white key three times ("Tap2," "Tap1," and "Tap0" are shown in order) to start the metronome in the tempo calculated by averaging the intervals between the three taps.
When the metronome is stopped, the above operation will start the metronome. When the metronome is running, the above operation will change the playback tempo.
Press the [TAP TEMPO] button again to return the keyboard to its normal state.
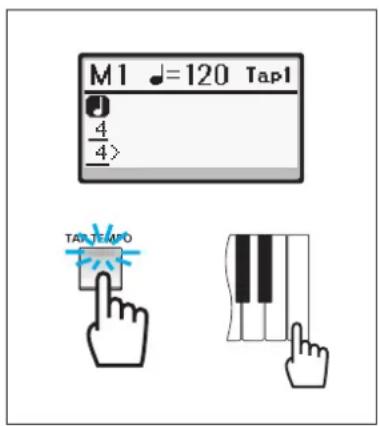

When the TAP indicator is turned on, press the [A], [B] and [B] key on the far right side of the keyboard to trigger the sound of claves, side stick, and cowbell, respectively.
Memory
With this function, you can save up to eight metronome settings ("M1"–“M8”). Each of them can be called up via a single touch.
Press the [MEMORY] button so that its lamp lights, then select the Memory number ("M1"-"M8") by using the DATA ENTRY dial or [+] /[-] buttons. After settings for the current Memory number are completed, select another number to make settings for if necessary.
When the [MEMORY] lamp is turned on, you can select the Memory number ("M1"-"M8") by pressing the key corresponding to "M1"- "M8" printed on the top panel above the keyboard.
Other Settings
From the display called up via the [SETTING] button, you can change settings such as foot pedal volume and metronome sound.
Press the [SETTING] button so that its lamp lights to call up the Setting display, then follow the instructions below.
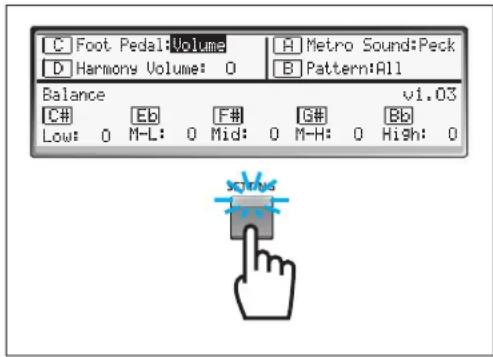
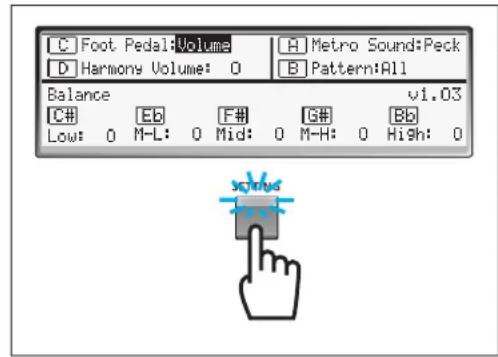
Foot Pedal Function
You can set the function of the foot pedal connected to the FOOT PEDAL jack.
Press the Note Select [C] button to move the cursor to the "Foot Pedal" column, then select the desired function from the following by using the DATA ENTRY dial or [+]/[-] buttons.
| Function Display | Description | |
| Volume Volume Master | volume | |
| Hold Hold [HOLD] button | ||
| Start/Stop Start/Stop Start and stop the metronome | ||
Harmony Volume
You can adjust the volume for the entire keyboard.
Press the Note Select [D] button to move the cursor to the "Harmony Volume" column, then adjust the volume between -10 and +5 by using the DATA ENTRY dial or [+] /[-] buttons.
Metronome Sound
You can change the beat sound of the metronome.
Press the Note Select [A] button to move the cursor to the "Metro Sound" column, then select the desired voice from the following by using the DATA ENTRY dial or [+] /[-] buttons.
| Voice Display | Description | |
| Peck | Peck | Same voice as the HD-81 and HD-100 |
| Click | Click | Sounds like a mechanical metronome |
| Beep Beep Sounds like an electronic metronome | ||
Metronome Pattern
You can select how the metronome plays back.
Press the Note Select [B] button to move the cursor to the "Pattern" column, then select the desired setting from the following by using the DATA ENTRY dial or [+]/[-] buttons.
| Setting Display | play Movement | |
| All All The metronome | plays back all the beats for all resolution types (ACCENT, quarter note, 8th note, triplet and 16th note) completely. | |
| Alternate Alternate | The metronome | plays back all the beats for all resolution types so that multiple click sounds are not doubled at the same timing. At the first beat, for example, only the ACCENT sound will be played back. At the 2nd - 4th beats with the meter 4/4, for example, only the quarter note will be played back. |
Volume Balance
You can adjust the volume balance between five keyboard areas as shown below.
Press either the C, E, F, G or B button to specify the keyboard area, then set the volume by using the DATA ENTRY dial or [+] /[-] buttons. Set the volume for other keyboard areas as necessary.
| Select Button C | # | Eb | F# | G# | Bb |
| Area | Low (around A-1) | Mid-Low (around G1) | Mid (around F3) | Mid-High (around D5) | High (around C7) |
| Display Low M-L | Mid M-H High | ||||
| Range | -10 – +5 | -10 – +5 | -10 – +5 | -10 – +5 | -10 – +5 |
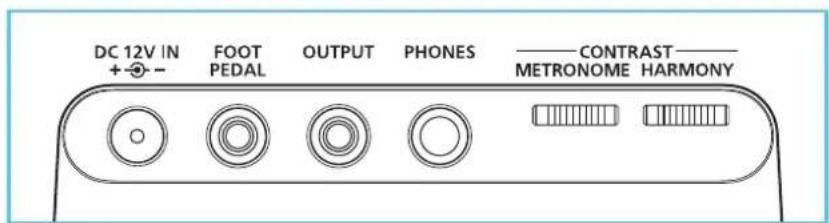
Jacks and Dials
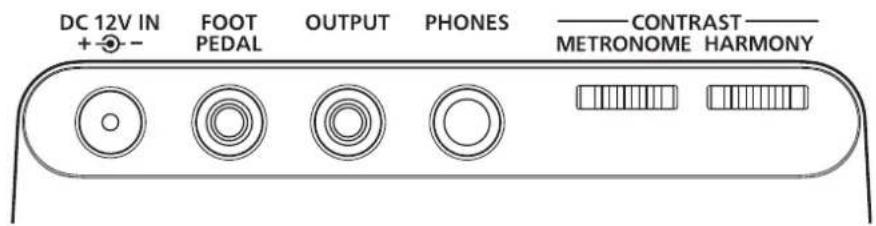
DC 12V IN Jack
This jack is for the AC power adaptor.
Use the specified adaptor (page 3) only.
FOOT PEDAL Jack
This jack is for the foot pedal. (Standard Stereo Phone Jack)
Use the volume type foot pedal (YAMAHA FC7).
A switch type foot pedal can not be used.
OUTPUT Jack
This jack is for the electrical instrument amplifier. Before connecting, turn off the power to the instrument and other equipment connected to the instrument. (Standard Monaural Phone Jack)
PHONES Jack
This jack is for headphones. When using headphones, the speaker of HD-200 does not produce sound. (Standard Stereo Phone Jack)
CONTRAST Dials
These knobs are for adjusting the contrast of the HARMONY display and METRONOME display.
Initializing
Hold down both the DATA ENTRY [+] and [-] buttons, and press the [STANDBY/ON] switch to turn on the power. "Memory is Initialized!" appears on the HARMONY display and all the settings are reset to the factory default values. Because initialization will erase all User Temperament and Metronome settings, it is recommended that you note down any settings on the Blank Chart on page 21.
Error Messages
If an error occurs, a message will appear on the display. Use the following chart to confirm the problem and find an appropriate solution.
| Message Cause | Solution | |
| Low Battery! Battery power is low. Replace all batteries. | ||
| Low Backup Battery! The lithium backup battery power is low. Contact the dealer from whom you purchased the instrument and have the battery replaced. | ||
| Memory is Initialized! There is an irregularity in the memory backup data. The instrument's data is reset to factory defaults. | Contact the dealer from whom you purchased the instrument. | |
| Keyboard Error! The keyboard may be malfunctioning. Contact the dealer from whom you purchased the instrument. | ||
About the Preset Temperaments
Calculating Pitch
What is a Cent?
A cent is a unit used to measure pitch that equals 1/100th of a semitone. Using cents to measure pitch, we can calculate the pitch using simple addition/subtraction rather than multiplication/division. For this reason, the cent is commonly used in music and acoustics as a standard for measuring pitch.
$$ (\text {C e n t V a l u e}) = \frac {1 2 0 0}{\log 2} \times \log (\text {P i t c h R a t i o}) $$
$$ (\text {P i t c h R a t i o}) = 1 0 ^ {\frac {\log 2}{1 2 0 0} \times (\text {C e n t V a l u e})} $$
Temperaments Included in the HD-200
Equal Temperament
In an equal temperament, the octave is divided into 12 equal steps (equal frequency ratios). The frequency ratio between neighboring notes is [13]2 (1.0594631). This temperament is usually tuned relative to a standard pitch of 440Hz .
Pure Major
This tuning preserves the pure mathematical intervals of the major scale, especially for the triad chords. This tuning includes pure fifths and thirds, both large and small interval whole tones, and chromatic scale semi-tones, so changing keys requires changing the pitch ratio of every note in the scale, making it impractical for keyboard or fretted instruments.
Pure Minor
Like the pure major, this tuning preserves the pure mathematical intervals of the minor scale. Changing keys also requires changing the pitch of every note in the scale, making it impractical for keyboard or fretted instruments.
Pitch ratio and cent values for the main pitches
| Pitch | Pitch ratio | Cent value | Comments |
| Octave 2 1200.00 | |||
| Pure 5th | 3/2 701.955 | ||
| 4th | 4/3 498.045 | ||
| Major 3rd | 5/4 386.314 | ||
| Minor 3rd | 6/5 315.641 | ||
| Large Interval Whole Tone 9/8 203.910 | |||
| Small Interval Whole Tone 10/9 182.404 | |||
| Diatonic Scale Semi-tone 16/15 111.731 | Difference between the 4thand major 3rd | ||
| Chromatic Scale Semi-tone | 25/24 70.672 | Difference between the major 3rdand minor 3rd | |
| Meantone | √5/2 | 193.157 | Average between large and small interval whole tones |
| Syntonic-Comma (S.C.) | 81/80 | 21.506 | Difference between large and small interval whole tones |
| Pythagorean Comma (P.C.) | 23.460 | Difference between the pure 5thx12 and 7 octaves | |
| Schisma | 1.954 | Difference between P.C. and S.C. | |
| Equal Semi-tone | 12√2 | 100.0 | |
Preset temperament cent list (for C Major/a minor)
| Display | Temperament type | Individual cent value (cent) | ||||||||||
| C | Db | D | Ec | E | F | Fd | G | Ae | A | Bf | ||
| Equal | Equal | 0.0 | 0.0 | 0.0 | 0.0 | 0.0 | 0.0 | 0.0 | 0.0 | 0.0 | 0.0 | 0.0 |
| Pure (Major) | Pure Major | 0.0 | -29.3 | 3.9 | 15.6 | -13.7 | -2.0 | -31.3 | 2.0 | -27.4 | -15.6 | 17.6 |
| pure (minor) | Pure Minor | 15.6 | -13.7 | -2.0 | 31.3 | 2.0 | 13.7 | -15.6 | 17.6 | -11.7 | 0.0 | 33.2 |
Reference
The following temperaments are occasionally used.
| Temperament type | Individual cent value (cent) | |||||||||||
| C | Db | D | Eb | E | F | F# | G | Ab | A | B# | B | |
| Meatone Temperament | 0.0 | -24.0 | -6.8 | 10.3 | -13.7 | 3.4 | -20.5 | -3.4 | -27.4 | -10.3 | 6.8 | -17.1 |
| Pythagoras Temperament | 0.0 | 13.7 | 3.9 | -5.9 | 7.8 | -2.0 | 11.7 | 2.0 | 15.6 | 5.9 | -3.9 | 9.8 |
| Werkmeister I 3rd Variant | 0.0 | -9.8 | -7.8 | -5.9 | -9.8 | -2.0 | -11.7 | -3.9 | -7.8 | -11.7 | -3.9 | -7.8 |
| Kirnberger III | 0.0 | -9.8 | -6.8 | -5.9 | -13.7 | -2.0 | -9.8 | -3.4 | -7.8 | -10.3 | -3.9 | -11.7 |
| Vallotti & Young | 0.0 | -9.8 | -3.9 | -5.9 | -7.8 | -2.0 | -11.7 | -2.0 | -7.8 | -5.9 | -3.9 | -9.8 |
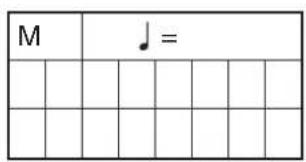
Blank Chart
| Temperament No. Use | Temperament Name | |||||||||||
| Note Name C C | \( ^1/D^b \) | D | \( ^1/D^c/E^b \) | E F F | \( ^1/G^b \) | G | \( ^1/A^b \) | A | \( ^1/A^c/B^c \) | B | ||
| Individual Pitches | ||||||||||||
| Individual Volumes | ||||||||||||
| Temperament No. | Temperament Name | |||||||||||
| Note Name C C | \( ^‡/D^b \) | D | \( D^‡/E^b \) | E F F | \( ^‡/G^b \) | G | \( G^‡/A^b \) | A | \( A^‡/B^b \) | B | ||
| Individual Pitches | ||||||||||||
| Individual Volumes | ||||||||||||
| Temperament No. Use | Temperament Name | |||||||||||
| Note Name C C | 1/D | D | D1/E1 | EFF | 1/G1 | G | G/A1 | A | A1/B1 | B | ||
| Individual Pitches | ||||||||||||
| Individual Volumes | ||||||||||||
| Temperament No. User | Temperament Name | |||||||||||
| Note Name C C | \( ^\dagger/D^{\flat} \) | D | \( D^{\ddagger}/E^{\ddagger} \) | EFF | \( ^\ddagger/G^{\ddagger} \) | G | \( G^{\ddagger}/A^{\ddagger} \) | A | \( A^{\ddagger}/B^{\ddagger} \) | B | ||
| Individual Pitches | ||||||||||||
| Individual Volumes | ||||||||||||
| Temperament No. Use | Temperament Name | Name | |||||||||
| Note Name C C | #/Db | D | D#/Eb | EFF | #/Gb | G | G/Ab | A | A#/Bb | ||
| Individual Pitches | |||||||||||
| Individual Volumes | |||||||||||


Troubleshooting
If you encounter any problems, first check the items listed below. If the solution provided below does not solve the problem, or you are experiencing a problem other than those mentioned in the list, turn the power OFF, disconnect the AC power adaptor and contact the dealer from whom you purchased the instrument to have the instrument repaired.
| Problem Cause Solution | ||
| A "pop" like noise occurs when the power is turned ON. | Electrical current is flowing through the main amplifier. | This indicates that the device is operating and is nothing to worry about. If you are using external speakers, please turn down the volume on the amplifier before switching the power ON. |
| A scratching noise or "pop" occasionally occurs. | Such a noise may occur when turning on/off the power of a household appliance such as a refrigerator or washing machine, or when using an electric drill. | Use an AC outlet that is as far away as possible from the device or machine that may be causing the noise. |
| If you cannot find the source of the noise, please contact the dealer from whom you purchased the instrument. | ||
| Noise occurs from the radio or TV, etc. | The radio or TV is positioned too close to the instrument. | Position the radio or TV as far away as possible from the instrument. |
| The lamps for the panel buttons are flashing. | Battery power is low. Use the AC power adaptor or replace all six batteries with a new set. | |
| The speaker produces no sound even though the keyboard is being played. | The volume settings for all notes are set to the minimum level. | Set the volume to any level other than the minimum level. |
| Headphones are connected to the instrument. | Disconnect the headphones from the instrument. | |
| The volume of lower notes is too low. | This is due to the limitations of the speaker. | Connect the instrument to a keyboard amplifier, etc. |
| The sound is distorted. Low frequency sounds are produced using an external speaker at a high volume. | Reduce the volume. | |
| Remove the objects that are resonating. | ||
| Connect a high-power rated speaker. A speaker rated 100 W or more is recommended when using this instrument for a concert band. | ||
| Data in the memory has been lost. | The backup lithium battery's power is low. | Contact the dealer from whom you purchased the instrument and have the battery replaced. |
| The LCD display is hard to read. | The display may be hard to read depending on the angle. | Adjust the CONTRAST dials on the rear panel. |
| The sound is distorted when playing chords. | Battery power is low. Use the AC power adaptor or replace all six batteries with a new set. | |
VORSICHTSMASSNAHMEN
| J | J | J | J | |||||||||||||
| D | D | D | D | D | D | D | D | |||||||||
| ACCENT | ● | |||||||||||||||
| J | ● | ● | ● | ● | ||||||||||||
| D | ● | ● | ● | ● | ● | ● | ● | ● | ||||||||
| M | ● | ● | ● | ● | ● | ● | ● | ● | ● | ● | ● | ● | ● | ● | ● | ● |
| N | ● | ● | ● | ● | ● | ● | ● | ● | ● | ● | ● | ● | ● | ● | ● | ● |
| J | D | D | D | D | D | |||||||
| ACCENT | ● | |||||||||||
| J | ||||||||||||
| D | ● | ● | ● | ● | ● | ● | ||||||
| D | ● | ● | ● | ● | ● | ● | ● | ● | ● | ● | ● | ● |
| D | ● | ● | ● | ● | ● | ● | ● | ● | ● | ● | ● | ● |
| Boutons C | # | Eb | F‡ | G# | Bb |
| Zone | Grave (A-1) | Médium grave (G1) | Médium (F3) | Médium aigu (D5) | Aigu (C7) |
| Écran Low M-L | Mid M-H High | ||||
| Plage | -10 – +5 | -10 – +5 | -10 – +5 | -10 – +5 | -10 – +5 |
Prises et molettes

Prise DC 12V IN
Pure Major (pura mayor)
| J | J | J | J | |||||||||||||
| D | D | D | D | D | D | D | D | |||||||||
| ACCENT | ● | |||||||||||||||
| J | ● | ● | ● | ● | ||||||||||||
| D | ● | ● | ● | ● | ● | ● | ● | |||||||||
| M | ● | ● | ● | ● | ● | ● | ● | ● | ● | ● | ● | ● | ● | ● | ● | ● |
| N | ● | ● | ● | ● | ● | ● | ● | ● | ● | ● | ● | ● | ● | ● | ● | ● |
发音时序表 (6/8)
| J | J | J | J | J | J | |||||||
| ACCENT | ● | |||||||||||
| J | ||||||||||||
| J | ● | ● | ● | ● | ● | ● | ||||||
| ● | ● | ● | ● | ● | ● | ● | ● | ● | ● | ● | ● | ● |
| ● | ● | ● | ● | ● | ● | ● | ● | ● | ● | ● | ● | ● |
(4 OKTabbC OTKNIKOM Ha
PnPKOCHOBHeHne
OCHOHbIe NepeKJIouaTeJIb STANDBY/ON
(PEKIM OXKIDAHI/ BKI.)
ynpabBHeHHI IOn3yHOK MASTER VOLUME
(OBLLA TPGMOKOCTb)
ToJocA 10 roJocB
ΦηηTa,roβo,KnapHc,TcakcoΦoH,
opraH, Tpy6a, rOpH, MeHbI
DyXOBO INCTpyMeHT,CTpyHHbI
INCTpyMeHT,opTeBHaHO
KhoNka HOLD (YDEPXXATb)
IpeeknoateNB OCTAVE (OKTABA)
(LOW1 (HN3KN1), LOW2
(HN3KN2), MID (CPEHNI), HIGH
(BbICOKM)
Tempeau Khonka EQUAL TEMPERED
(PABHOMEPHAI TEMNEPALI)
Khonka PURE TEMPERED MAJOR
(NUCTbIM MAXKOP)
Khonka PURE TEMPERED MINOR
(NUCTbIMMHHOP)
KhoNka MEMORY (NAMATb)
Khoonku STANDARD PITCH
(CTAHДAPTHAR BbICOTA TOHA)
Khonka Hz (Γι)
Khoonka CENT (LIEHT)
KhONkKey SELECT
(BbIBOP KJIABUNJU)
KhoNka MANUAL (BPyHyIO)
Khonka AUTO (ABTO)
KhONKn BbIbopa HO
C (До), C (До диe3), D (Pe), E (Mn
6eMoJIb), E (Mn), F (Φa), F (Φa
dne3), G (COnb), G' (COnb dne3),
A (_) B(Cn6emOJIb),B (Cn)
Khonka INDIVIDUAL PITCH
(HACTPANBAEMAR BbICOTA TOHA)
Khonka INDIVIDUAL VOLUME
(HACTPANBAEMAR TPOMKOCTb)
Hactpoika KhoNka SETTING (HACTPOIKA)
MetpoHom KhoNka MEMORY (NAMRTb)
Khoŋka TEMPO (TEMPI)
Khonka BEAT (METPUNUÇECKA YOJIA)
KhoNk CURSOR (KYPCOP)
Khonka QUARTER TRIPLE
(YETBEPTHARTPNOJIb)
Khoika TAP TEMPO (TEM)
KACAHVEM)
KhoNka START/STOP (NYCK/CTON)
Pon3yHKn BEAT VOLUME
(ΓPOMKOCTb METPNUECKOДОЛN)
Плэунов ACCENT (AKLIEHT)
Non3yHOK
Pon3yHOK
TOn3yHOK
Pon3yHOK
BbOДaHHbIXДИСК DATAENTRY(BBOДДAHHbIX)
KhoNkDATAENTRY(BBO
DAHHbIX)[+]/[·]
Диспел JKK-нспел
Дистпей HARMONY (ГАРMOHИЙ)
Диспел METRONOME
(METPOHOM)
ДиСК CONTRAST (KOHTPACT)
ДиСH HARMONY CONTRAST
(TAPMOHINCHECKNI KOHTPACT)
Dnck METRONOME CONTRAST
(METPOHOMUHECKM
KOHTPACT)
BheuHne
Pa3beM DC 12V IN (BXOД 12 B
NIOCTOHHHOTOKA)
OT 6aTape:2,5BT (npn paOte c
MAKC. rPOMK.)
Pa3Mepbl
山nha:855 MM(3311/16 mHa)
Iy6Ha:262MM(105/16IOuMa)
BbICota:93,9 MM (3 11/16 ΦHm)
Bec: 4,35 Kr (9 ΦyHTOB 9 yHüni)
(6e3 6aTapei)
MEPbI INPEDOCTOPOXHOCTN1
TexHHueckne xapaKtepncn3
NaHnbl ynpablenu npa3bembl7
YCTAHOBKa HAcTPOKn roIoca 9
BkJIIOueHHe H BbIKJIIOueHHe IITaHH. 9
3JIeMeHTyIpaBJIeHnO6IIeI rPOMKocTbIO 9
Bb6op roioca IIA HacrpoiKn 9
HactpoKa qnrgypb1 10
BkIOHHe H BbIKIOHHe H cyHKnH yIepKHBaHH 10
BbI6op OKTaBl. 10
Tempeaun 11
BbI6op TeMIIepaunn 11
KhoIIKn BbIbopa HOt 12
PeryIINPOBaHHe BbICOTbI ToHa KaKIOH HOTbI 12
PeryJInpoBaHHe rpoMkoCTn KaJIOH HOtbl 12
Co3aHHe IIOJIb3OBATeIbckOHTeMIIpeaHH 12
KoIINPOBaHHe TeMIIePaIHH 12
HacTpoKa 6a3OBoKJIaBnIII.13
CtanhapTHaHacTPOKa BbICOTbI ToHa 14
HactpoKn TpaHcno3nnn 14
HactpoKMeTpoHoma 15
START/STOP (IYCK/CTOII). 15
BEAT VOLUME (TPOMKOCTb
METPNUECKOJIOJI) 15
HacrpoKa TeMa. 16
HaetpoKa MeTpueckoIIOJIH. 16
YetBepTHaTPhoJIb 16
Kacahne. 17
Iamr. 17
DpyrHe HacTpoKn 18
18
TpOMKoCTb yCTPOHcTBA. 18
3ByaHHe MeTpohoma 18
Cxema pa60tb1 MetpoHOMa 19
BaJHaHc rPOMKocTH 19
Pa3beMbI nDnCKn
Pa3bEm DC 12V IN (BXOJ 12 B
IIOCTOHHHO TOKA) 20
Pa3bem FOOT PEDAL (IIEJAJIB KOHTPOJI) 20
Pa3bem OUTPUT(BbIXOII) 20
Pa3bEM PHONES (HAVIIHINKU). 20
JINCKN CONTRAST (KOHTPACT) 20
Hnma3a
06eHn8o6OwN6kax
OTempeauax no ymoJuaHnIO 21
CTaT Ta6nua
YcTpaHHe HEnoJaOk
Panaelb ynpaBlenn npa3beMbI
KhoNKn VOICE (ROJOC) ( cTp.9) KhoNKn TRANSPOSE (TPAHCIOHMPOBATb) ( cTp.14)
YctaHOBKa n HacTpoiKn roJocA
BkJIOUeHne N BbIKJIOUeHne nHTaHnA
3TOT HNCTpymEnT pa6oTaET N OT IIOJINHITeJIbHO rAaIITepa IITAHnIEpeMeHHORTOK, nOT 6aTapei.
O63aTeJIbHO yCTaHOBHTe IpeKJIIOuTaTe Jb HnCTpyMeHTa [STANDBY/ON] (PEXHM OXHDAHNA/BKJI.) B IOJOKeHHE STANDBY (PEXHM OXHDAHNA) (BbIKJ).
a 3aTeM BbIIOJIHNTe CJIeJyIOUHnE IHaRn.
Ipn pa6ote ot aanntepa HnTaHnIepeMeHHoro TOKa IIOKJIOOHnTe Bnky IIocToHHoro TOka aadTepa Ka3bemy DC 12V IN (BXOJ 12B IOCTOHHOROTOKA)Ha 3aJIHeII NaHeJIN HnCTpyMeHTa,a 3aTeM npncoeHHnTe npyroKoHei (cTaHapTHyIO BnKy IepeMeHHoro TOka) K6JnxKaHnE OJIeKTPnuecko p03eTke.
Pp npapote or 6aTapee OTKpoTRe KpbHkY OTeJIeHnJn 6aTapee Ha HxHHe nHeJN, BCTaBbTe IIeCTb HObIX IIOuHbIX 6aTapee, 3aTeM 3aKpoTRe KpbHkY OTJeHnHaedXHO 3aΦHKnPoBaBee.
IocJe yctaHOBN HaXMMte HepeKJIIOuAteJB[STANDBY/ON] (PEXHM OXIIAHNBAKJI).TObBkJIOHTb HNTaHHe.

HaIINIIeHARMONY (FAPMOHn) n METRONOME (METPOHOM) oTo6paXaetcTa JKe HOpMaun, TTO OTo6paKaJacb Ipej BbIKIOueHHem IIHTAHn.
Tak KaK 3OT INHCTpyMeHT O6OpYIOBaH pe3epBHOI 6aTaapeeH, HAcTpoN KIN HnCTpyMeHTa COxpaHIOrTa Jaxe IIpH BbIKJIOUcHH INITaHH.
3JIeMeHT ynpaBJIeHnI O6Ie IrpomKoCTbIO
IpeBnHbTe IOJ3yHOKMASTERVOLUMEK MeTKe MAX (MAKC) IJIYIOBbIeHHr pOMKOCTH, IIpeBnHbTe IOJ3yHOKMASTER VOLUMEK MeTKe MIN (MHH) IJIYIOHOHeHHr pOMKOCTH.
BbI6op roIoca IJIy hAcTpoiKU
Ha 3TOM HhCTpyMeHTe MOKHO HAcTpOHTb 10 pa3HBIX rOIOCOB. MoKHO BbIpaTb HyKbHn rOIOc, HxKaB COOTBeTcTBYIOIyIO KHOIIKy. 3aRopHTcN HHINKaTOP BbIpaHHo KHOIIKN.

Hannywn rooc nna hactpoKn Bo3moXHO,nyue Bb6paTb peXIM ORGAN (OPA H) nn STRING (CTPYHHbI INHCTPMEHT),YTO6bI yUHTeB u YyeHKn IerKO mOrJI pa3NIuHTb BbcOTy ToHa INHCTpymEHTa (BOcPon3BeDeHHoro yyeHKOM) m MHorOfoynKunohalhoro ycToPocTba Harmony Director.
Hacrpoika qnrgpbI
HaKMHTe KHOIIky[PURE TEMPERED MINOR] (HCTbIM MHOP)TO6bI 3aRopeJIc8 ee HINIKaTOp. Ha INCJIeE HARMONY (TAPMOHn) IIOBHTc8 HINIKaIIHn «pure (Ha3BaHHe KJIaBHIIn) minor>.

HaKMHTe KHOIky[MEMORY] (IAMrB), YTO6b3aTOpEJIce ee HIIHKaTOp. Ha IINcIIeH HARMONY (TAPMOHnI) IIo8BHTc HIIHKaIIH «User1» - «User5», MoKHO BbI6paTb «User1» - «User5» c IIOMOUbO JInCKa DATA ENTRY (BBOJ DAHHbIX) HIN KHOIIOK [+] /[-].
Moxho coxpaHnTB co6CTBeHHbIe opHnHaJIbHbIe HAcTpOKn TEmepaunB namTn KaK IOJIb3OBaTeJIbckHe TeMIIepaunn. IOnpO6Hc cM. Ha cJeDyIOUe cTpaHnIe.

O6paTte BHHMaHHe, YTo HAcTpOuKn Tempeaun, Kpome Equal Temperament (paBHomepeHae TEmpeauHa), HeBO3MOxHO npMeHtB K pexmmy PIANO. EcIn BbIbpaH peKIM PIANO, Ha ducnnee HARMONY (rAPMOHn) oTo6paXaetcN INdkaun «Piano», dJa KJIaBnaAtypbI npMeHReTcHacTpOka Equal Temperament, n 3meHenne BBICOTb ToHa n rPoMKoCTn dJa KaKDoJ KJIaBnUn He DocTytnHo.
KhONKn BbI6opa HOT
EcHn BkIIOueHa KHOIIKa INDIVIDUAL (HACTPANBAEMARVOLUME) (TPOMKOCTb) HIN [PITCH] (BbICOTA TOHA) C HX IIOMOIIbBO BbIbIpaTcra HOta, JIJI KOTOpO HyxHo HAcTpOHTb TpOMKOCTb HIN BBICOTy ToHa.
EcnH KHOHN INDIVIDUAL (HACTPANBAEMARVOLUME] (TPOMKOCTb)n [PITCH] (BBICOTA TOHA) BbIKIOCHBI, OHN HcNOJIb3yIOTc IIN BBb6opa 6a3OBOK JIABaHHB bIBpaHHo TEmIIepaHH.
PerylnpobAHne BbICOTbI TOHa KaXdoHOTbl
BbICota ToHa KaJIOH HOTbI ( O - C N) HAcTpaNBAcTc c IHaROM 0,1 eHTa.
HaKMnTe KhoIky INDIVIDUAL (HACTPANBAEMAR) [PITCH] (BbICOTA TOHA) TTObI 3aIopeJIcE ee HINIKaTOp, HaKMnTe HxKHyIO KhoIky BbIbopa HOtbi, 3aTeM OTpeRyJInpye Te BbICOTy ToHa C HOMOIIbIO INcKa DATA ENTRY (BBOI DAHHbIX) INI KNHOIOK [+]/[-] . IIHaIIa3OH HAcTpoeK: O'T-55 I0 +55 IIeHTOB. OINHOBpeMeHHo HaKMnTe KhoIKN DATA ENTRY (BBOI DAHHbIX) [+] I N[-] JIA BO3BpTa K 3HaueHHIO IIeHTA «0».
PergunpoBaHne rpoMKocTn KaXdoi HOtbi
IIIAKKaJIOHOTb1(IO-<CN)MOKHOHaCTPOHTbIPOMKOCTb.
HaKMHTe KHOIIky INDIVIDUAL (HACTPANBAEMAR) [VOLUME] (FPMKOCtB) TTObI 3aOpeJIcE ee HUNKaTOp, HaKMHTe HxKHyIO KHOIIky BbIbopa HObI, 3aTeM OTpeRyINpyIte FpOMKocTb c IOMOIIbIO INCKa DATA ENTRY (BBOJ IAHHBIX) HIN KHOIIOK [+] /[-].ДиЯпа3OH HAcTpOeK:OT-15no +5. OHHOBpeMeHHo HaKMHTe KHOIIKN DATA ENTRY (BBOJ IAHHBIX) [+] ][-]ДЯ BO3BpaTa K 3HaueHIO «0».
C03dahne noIb3OBeTaTeJIbckoTempeaun
Ta yHKnIIO3BOJIEc COxpaHbTco6CTBcHbIeOpHNHaJIbHbIe HAcTPOKN TeMIIepaHIN (HAcTPOKN BbICOTbI TOHa I rPOMKoCTN IIa KaKdoHOTbI) BnapaMeTpax «User1» - «User5» KaK IOJIb3ObaTeJIbckHe TEmIIepaHIN.
HaKMTe KHOKNy [MEMORY] (IAMTb), TTo6b3aTopeJcRce eHINHKaTOp. C IIOOMIIbIO INCKa DATA ENTRY (BBOJI DAHHbIX) HIN KHOIOK[+]/[-] Bb6epHTe PAmr8b «User1» - «User5», 3aTeM KHOIIKaHN INDIVIDUAL (HACTPANBAEMARVOLUME) (TPOMKOCTb) [PITCH] (BBICOTA TOHA) yCTaHOBHTe rpoMKoCTb H bICOTy ToHa KaXIOH HObI. YKa3aB NaCTpOKn, Bb6epHTe DpyroH OHomep IIaMArTH H yKaXHTe dpyrHe NaCTPOKn TeMIIepaUHN, ecJH HeO6xOIMHO.
KoIPOBaHne Tempeaun
| J | J | J | J | |||||||||||||
| D | D | D | D | D | D | D | D | |||||||||
| ACCENT | ● | |||||||||||||||
| J | ● | ● | ● | ● | ||||||||||||
| D | ● | ● | ● | ● | ● | ● | ● | |||||||||
| D | ● | ● | ● | ● | ● | ● | ● | ● | ● | ● | ● | ● | ● | |||
| D | ● | ● | ● | ● | ● | ● | ● | ● | ● | ● | ● | ● | ● | ● | ● | ● |
Cxema nHTepBaNoB mKdy 3ByKaMn (6/8)
| # | # | # | # | # | # | |||||||
| ACCENT | # | |||||||||||
| J | ||||||||||||
| # | # | # | # | # | # | |||||||
| # | # | # | # | # | # | # | # | # | # | # | # | # |
| # | # | # | # | # | # | # | # | # | # | # | # | # |
YetBepThbHe HOTbI He 3ByaT, a TPhOJIH 3ByaT npH yCKopeHHOM TeMIIe TPhOJIH.
EcJIN JII MeTPOHOMA BbI6paHO 3HaueHHe «Alternate», HOtBI CO 3HaKoX. He 3ByaT. (Cm. pa3JIeI «IpyrHc HAcTPOHKn» Ha cTp.18)
Hactpoika Temna
HaIINCIIIE METRONOME (METPOHOM) MOXHO HaCTPOHTb TeMIMETPOHOMa. HaxMMte KHOIIKy [TEMPO] (TEMII) IJIy IepMeIeHHKycPCopa B cToJI6eII 3NaueHHaTeMIIa, 3aTeM yCTaHOBHTe 3NaueHHeTMeIIaYeTEBPTHbIX HO T C IIOMOIIbIO IIHcKa DATA ENTRY (BBOJ IAHHHbIX) HIN KHOIIOK [+] /[-].
IIHaa3OH TEMIIa:OT 32IO 280. OIOHOpeMeHHo HaxMMte KHOIIKN[+] N[-] IINc6pOca 3HaueHnIe TEMIIa K «120»

Hactpoynka metpnucecko doJn
HaHcJIeE METRONOME (METPOHOM) MoXHO HAcTpoNTb MeTp HTeMI MetPOHOMa. MoXHO TaKHe BbIpaTaB CIOXHbIM MeTp, HIN MeTpueckne IOJH CIOXHORo MeTp a (HaIIp., 2/8+2/8+3/8), a TaKHe IIPOCTOm MeTp (HaIIp., TOJIbKO 4/4). MoXHO CO3JaTb MeTpueckne IOJH CIOXHORo MeTp a MaKCHMaJIbHO B 8 TaKTax.
IIIBb6opa IIPOCTORO MeTpHaXKMITE KHOIIKY [BEAT] (METPHUeCKAIOJI),IIO6bi IIEpeMeCtHTB KypCop B pa3JeI MeTpA,3aTeM BbI6epHTE3NaueHHN HcINTeJI IN 3HaMeHaTeJI MeTpac IIOMOIIbIO INcKa DATAENTRY (BBOJ DAHHbIX) INI KNHOOK[+]/[-.KHOIIKaMI CURSOR (KYPCop) IIEpeMeaIte KypCop OT UHCInTeJI K 3HaMeHaTeJIIO.
Iy Bb6opa cIOxHoro MeTp HeckoJIbKO pa3 HaxMHTe KHOINky CURSOR (KYPcOP) [>], yTo6bl yKa3aTb MeTp dIyJeUioTe RaKaTa. Bb6epHTe
3NaueHnIHCJHTeJIH 3HaMeHaTeJI MeTpac NOMOIIbIO INcKa DATA ENTRY (BBOJ DAHHbIX) HIN KHOIOK [+]/-]. BblIOJIHNTE 3TH DeHCTBnI JIA NaCTPOKNIOJIHNHTeJIbHBIX TAKTOB.


OДнOBpeMeHNo HaxMnte KhoNKn [MEMORY] (IAMrTb) n [BEAT] (METPNUECKA JIOJI) ДЯссбраза MeTpnueckoДоЛК pa3mepy «4/4» (1 TaKt).
YetBepTHaTpnoJIb
MeTPOHOM MOKHO BOCINpOHN3BecTH KAK YeTBepTHIyIO TPhoJIb, BKJIOUHNB HIIHKaTOp [QUARTERTRIPLET] (YETBEPTHA TPHOJIb)
EcINBKKIOUeHaKHOIIKa QUARTERTRIPLET.
MOJHO IIOOCJIyIaTb pHTMNHyIoo YeTBepTHyO TPhOJIb, yCTAHOBHB IIIMeTp aHaeHHe 4 / 4 ,BbI6paB IJI IOJI3yHKa BEAT VOLUME (TPOMKOCTb METPNUECKOJ IOJIIN) YcTeBepTHoH HOtBi Hn3Kn yPOBeHb,IIIA IOJI3yHKa BEAT VOLUME (TPOMKOCTb METPNUECKOJ IOJIIN) TpHOJN-BBICOKH yPOBeHb,a IJIpyrHX IOJI3yHKOB BEAT VOLUME (TPOMKOCTb METPNUECKOJ IOJIIN) BB6paB 3HaueHne 0
Kacahne
3a yHKnI IIO3BOJIeT HAcTpAHaBbTeMII MePoHOMa KacaHHeM KJIaBHINH.
HaKMMTe KHOIIkyTAP TEMPOIOcIe Yero BKIOUHTcH INHINKAToP,3aTeM TpIXkbI KOCHTEcB KpaHHe IIpaBOI 6eIOI KJIaBNII (OTo6pa3HTcH IO NOp8IKy INHINKaIIHg «Tap2», «Tap1» I «Tap0»), YTO6bI 3aIyCTHT BOCIIPOH3BeHHe MeTPOHOMA B TEMHe, paBHOMy cpeHemy 3HaueHIO INHTepBaIOB MEJy TpeM KacaHnMI.
EcHpa6Ota MeTPOHOM oCTaHOBJIcHa, yKa3aHHa BbIIIE OIIepaIIH 3aIyCTHT MeTPOHOM. EcH MeTPOHOM pa6OTaeT, yKa3aHHa BbIIe OIIepaIIH 3MeHIT TEMI BOCIPoH3BeJdeHN.
Eipe pa3 haxmnte KhoIky [TAP TEMPO] (TEMII KACAHEM)JIa BO3BpaueHHKJIaHbNAtpybI K HopMaJIbHOMy COCTOHHIO.

Ecnn BKNIOHEn HNDNKaTOp TAP (KACAHNE), HAXMITE cnpaba Ha KNaBnAType KNaBnUy [A] (JIa), [B²] (Cn 6emOJb) nn [B] (Cn), yTo6bl BOCpOn3BecTn 3Byk KnaBeca, 6apa6aHHbIX naNoeK nn Kay6eIJa, COOTBeTCTBeHHO.
NamrTb
3TaФyHKIIINIO3BOJIHReT COXpAHrTB JIO BOCbMH HAcTpOeK MeTpOHOma (M1> -M8>).KaXdIyIO HAcTpOHy MoXHO BB13BaTb OJHHM KacaHHeM.
HaKMHTe KHOIIky [MEMORY] (IAMrTB), TTO6b1 3aROpeJIcE ee HHINKaTOp, 3aTeM BbI6epHrte HOMep IaMrtN («M1» - «M8») c IIOMOIIbIO IIscKa DATA ENTRY (BBOI DAHHbIX) INJ KHOIOK|+|[-]. YKa3aB HAcTPOKn TEkyIeTo HOMep IaMrtN, BbI6epHrte JpyrO HiOMep, TTO6bl YKa3aTb IIJa HeRo HAcTPOKn, ecIn 3TO Heo6XoIHMo.
EcJIH BKJIIOueH HIIINKATOp [MEMORY] (IIAMATb), MOXHO BIL6paTb HOMep IaMHTN («M1» - «M8»), HaKaB KJIaBHNIIy, COOTBeCTCTBYIOIyIO HAINCH «M1» - «M8» Na BepxHne IaHeJN HAI KJIaBHaTpyoH.

Дугne Habстpoикn
HaIINIIe, Bb3BaHHOM KHOIIKOH [SETTING] (HACTPOIKKA), MOXHO H3MeHHTb HaCTPOIKK, HApHMeP, FyHKUHO IeJaJI KOHToJN II 3BYK MeTPOHOMa.
HaXMnTe KhoNkY [SETTING] (HACTPONKA). BKnIOuHTcE ee HnIHKaTOP IIIOBHTcR IINCHIIe HAcTpoE; 3aTeM BbIIOJIHHTe yKa3aHHbIe HIXe HnCTpyKUnn.
Функция петали Контюл.
MoKHO BbIbpaTb yHKIIHIO IeJaJIH KOHTPOJIa, IIOKJIIOueHHoN K pa3bemy FOOT PEDAL (IIEJAAJIb KOHTPOJIa).
KHOIOKO BbI6Opa HOt[C] (JIo) IepeMeCTHe KypCop B cToJI6eII «Foot Pedal》,3aTeM BbI6epHTe HxKyHIO ΦyHKIIIO H3 yKa3aHHbIX HIXe ΦyHKIIIN C IOMONIIbIO JnCKa DATA ENTRY (BBOJ DAHHbIX) INJ KHOIOI[+]/[-].
MOxH0 OTepyIyIHpOBaTb rPOMKoCTb BCeI KJIaBHaTypbl.
Khoikoi Bb6opa HOT[D] (Pe) npemecHTe KypcOp b cToJI6eII «Harmony Volume》,3aTeM bIb6epHte 3HaueHne rpomokctn OT-10IO +5 c IIMOUbIO IIcKa DATA ENTRY (BBOJ DAHHbIX) INI KHOIOI+I[-].
3ByuHne MeTPOHOMa
MOxHO H3MeHHTb 3BYk yIapOB MetPOHOMa.
KhoIkoB bI6opa HOTA IepemecHTe KypcOp B cToJI6eI «MetroSound》,3aTeM bIb6epHTe HxKIIH 3ByK H3 yKa3aHHbIX HnKe 3ByKOB C IIOMOIIbIO JnCKa DATA ENTRY (BBOJ DAHHbIX) HIN KHOIIIO[+]/[-].
MOxHO BbI6paTb CIOOCOBcHPOH3BcJeHmMCTPOHOMA.
KHOIOKO Bb6opa HO[B] (Cn) IepemecHTe KypcOp B cToJI6eI «Pattern», 3aTeM Bb6epHte HxKyHAcTpOIKy H3 yKa3aHHbIX IIHXe IacTpoek C IOMOIIbIO IIncKa DATA ENTRY (BBOJ DAHHbIX) ININ KHOIOK[+]/[-.
| Настори КИДRIAЗАЙ ПОПЕДОК ВOCIPОНЗВЕДЕНИЗ |
| All All MeТронOM ПОЛноctью BOCРОЗБОДТВЕ MEТRIЧЕСКЕ ДOLи BCEX TINOB pa3peшени (ACCENT,ЧETBERТнад HOТа, BOCьМЯ HOТа, Трпльniшеснадцатая HOТа). |
| Alternate Alternate MeТронOM BOCРОЗБОДТВЕ MEТRICHЕСКЕ ДOLи BCEX TINOB pa3peшени ТAK, YTO 3BYКИ HeCKОЛКИX SheL'YKOB He NOВТOPЯOTС OДНОВРЕмEHNO. HanprIMeR, Ддя первой MeTPICHESKO ДOLи BOCPON3BOДNTСТ TOLTКO 3BYK ACCENT. Ддя 2-и - 4-и MEТRICHESKO ДOLи C MeTpOM 4/4, HanprIMeR, BOCPON3BOДNTСТ TOLTКO ChETBERTнад HOТa. |
Баланс ромков�н
MoXHO OTpeRyIHHoBaTb 6aJIaHc rPOMKocTH MeJxNy IITbIO oBlaCTMn KJIaBHaTypbI, KaK IOKa3aHO HIXe.
HaXMHe KhoNkY C (Ito Ine3), E (Mn 6eMOJIb), F (Fa Ine3), G (CoJIb Ine3) IIIN B (Cn 6eMOJIb) IJIa BbOpa
oblaactn KJIaBHaTypbI, 3aTeM hAcTpoHTe rPOMKocTB c IOMOuB IO nUcKa DATA ENTRY (BBOII DAHHbIX) IIIN
KHOIOK [+]/[-.] IIpn Heo6xoIIMoCTH hAcTpoHTe rPOMKocTB IIIN pyrHx OblaCTeN KJIaBHaTypbI.
ACaHdTeKoDnIeLrGgAssucsdEtnaJcTmVgUOgUeSfRgA
JiJiJiJiJiJiJiJiJiJiJiJiJiJiJiJiJiJiJiJiJiJiJiJiJiJiJiJiJiJiJiJiJiJiJiJiJiJiJiJiJiJiJiJiJiJiJiJiJiJiJ1

#
- 01.02.03.04.05.06.07.08.09.010.011.012.013.014.015.016.017.018.019.020.021.022.023.024.025.026.027.028.029.030.031.032.033.034.035.036.037.038.039.040.041.042.043.044.045.046.047.048.049.050.051.052.053.054.055.056.057.058.059.060.061.
| 登录前端首页 同時発言音 | FM방식울원 8개录音 AWM방식울원 32개录音(PIPアモ, 에트로相关内容) |
| 기본 키어 | STANDBY/ON(선원)스워지 MASTER VOLUME(마斯터的具体) 용품 10개 썼품 |
| 几乎所有, 오부에, 키라리 nfl, 썼소본, 오류 갑, 키러flation, 키러, 썼가운 기, 허어목, 키어목 | |
| HOLD(지수)버닝 | |
| 登录FIGURE(登录)버닝 FIGURE(登录)버닝 ATTACK(어목), RELEASE(일리스), BRILLIANCE(敲击) | |
| 조 bs공 transPOSE(조 bs공)버닝 C bs 元 Bbs 元 Ebs 元 F bs 元 OCTAVE(목타드)스워지(LOW1[상품1], LOW2[상품2], MID[종류], HIGH[非常高]) | |
| 조울 | EQUAL TEMPERED(평고울)버닝 PURE TEMPERED MAJOR(수정울 장조)버닝 PURE TEMPERED MINOR(수정울 단조)버닝 MEMORY(모모리)버닝 STANDARD PITCH(가조 썼조)버닝 Hz bs CENT(선트)버antee KEY SELECT(조선목)버antee MANUAL(수동) bs AUTO(자동) bs Note Select(울선목) bs C, C#, D, E, E, F, F, G, G#, A, B#, B INDIVIDUAL PITCH(개물 썼조) bs INDIVIDUAL VOLUME(개물具体) berthing |
| 设置SETTING(设置)버닝 | |
| 那麼로相关内容 | MEMORY(那么相关内容 TEMP(溫度) bs BEAT(비트) bs CURSOR(衢서) bs < >< QUARTER TRIPLET(2명3이) bs TAP TEMPO(명 triplet) bs START/STOP(사��作/중지) bs BEAT VOLUME(무지的具体) ACCENT(강릉) bs SLUGAI (SLUGAI SLUGAI ) bs SLUGAI (SLUGAI SLUGAI ) bs SLUGAI (SLUGAI ) bs |
| 多媒体일iker | DATA ENTRY(多媒体일iker)다이일 DATA ENTRY(多媒体일iker)[+]/[+] bs |
INDIVIDUAL()[VOLUME()]PITCH()]
音韵的音韵
音 ~ 念 ( C - B ) 的 音 ~ 念 = 0 . 1 基本的能
INDIVIDUAL(개athe) [PITCH(목종)] 썼류를 히리 렍트를 편고, 원해Note Select(울선목) 썼류를 히은후 DATA ENTRY(테 이터일요)다이일만 [+]/[-] 썼류를 사용 하이 썼류를 썼cheng nh. 성绝绝워는-55만-+55만에라에라에라 � 썼류)[+]와[-] 썼류을동사에 히어만만만만만만만만만만만만만만만만만만만만만만만만만만만만만만만만만만만만만만만만만만만만만만만만만만만만만만만만만만만만만만만만만만만만만만만만만만만만만만만만만만만만만만만만만만만만만만만만만만만만. [+]와[-] 썼류를동사에 히어만만만만만만만만. [+]와[-] 썼류를동사에 히어만. [+]와[-] 썼류를동사에 히어不再. [+]와[-] 썼류를동사에 히어不再. [+]와[-] 썼류를동사에 히어不再. [+]와[-] 썼류를동사에 히어不再. [+]와[-] 썲류를동사에 히어不再. [+]와[-] 썲류를동사에 히어不再. [+]와[-] 썲류를동사에 히어不再. [+]와[-] 썲류를동사에 히어不再. [+]와[-] 썲류를동사에 히어不再. [+]와[-] 썲류를동사に 히어不再. [+]와[-] 썲류를동사에 히어不再. [+]와[-] 썲류를동사에 히어不再. [+]와[-] 썲류를동사에 히어不再. [+]와[-] 썲류를동사에 히어不再. [+]와[-] 썲류를동사에 히어不再是 [+]와[-] 썲류를동사에 히어不再. [+]와[-] 썲류를동사에 히어不再是 [+]와[-] 썲류를동사에 히어不再是 [+]와[-] 썲류를동사에 히어不再是 [+]와[-] 썲류를동사에 히어不再是 [+]와[-] 썲류를동사에 히어不再是 [+]와[-] 썲류를동사에 히어不再是 [+]와[- ] 썲류를동사에 히어不再是 [+]와[-] 썲류를동사에 히어不再是 [+]와[-] 썲류를동사에 히어不再是 [+]와[-] 썲류를동사에 히어不再是 [+]와[-] 썲류를동사에 히어不再是 [+]와[-] 썲류於的자에 히어不再是 [+]와[-] 썲류於的자에 히어不再是 [+]와[-] 썲류於的자에 히어不再是 [+]와[-] 썲류於的자에 히어不再是 [+]와[-] 썲류於的자에 히어不再是 [+]와[-] 썲류於的자에 히一字于 [+]와[-] 썲류於的자에 히一字于 [+]와[-] 썲류於的자에 히一字于 [+]와[-] 썲류於的자에 히一字于 [+]와[-] 썲류於的자에 히一字于 [+]와[-] 썲류於的자에 히一字于 [+]和[-] 썲류於的자에 히一字于 [+]和[-] 썲류於的자에 히一字于 [+]和[-] 썲류於的자에 히一字于 [+]和[-] 썲류於的자에 히一字于 [+]和[-] 썲류於的자에 히一字于 [+]和[-] 썵류於的자에 히一字于 [+]和[-] 썵류於的자에 히一字于 [+]和[-] 썵류於的자에 히一字于 [+]和[-] 썵류於的자에 히一字于 [+]和[-] 썵류於的자에 히一字于 [+]和[-] 썵류於的자 on the #tiof 0"。 [+] and [-] [+] and [-] [+] and [-] [+] and [-] [+] and [-] [+] and [-] [+] and [-] [+] and [-] [+] and [-] [+] and [-] [+] and [-] [+] and [-] [+] and [-] [+] and [-] [+] and [-] [+] and [-] [+] and [-] [+] and [-] [+] and [-] [+] and [-] [+] and [-] [+] and [-] [+] and [-] [+] and [-] [+] and [-] [+] and [-] [+] and [-] [+] and [-] [+] and [-] [+] and [-] [+] and [-] [+] and [-] [+] and [-] [+] and [-] [+] and [-] [+] and [-] [+] and [-] [+] and [-] [+] and [-] [+] and [-] [+] and [- -] [+ -] [+ -] [+ -] [+ -] [+ -] [+ -] [+ -] [+ -] [+ -] [+ -] [+ -] [+ -] [+ -] [+ -] [+ -] [+ -] [+ -] [+ -] [+ -] [+ -] [ + -] [+ -] [+ -] [+ -] [+ -] [+ -] [+ -] [+ -] [+ -] [+ -] [+ -] [+ -] [+ -] [+ -] [+ -] [+ -] [+ -] [+ -] [+ -] [+ -] [- -] [- -] [- -] [- -] [- -] [- -] [- -] [- -] [- -] [- -] [- -] [- -] [- -] [- -] [- -] [- -] [- -] [- -] [- -] [- -] [[ - - - - - - - - - - - - - - - - - - - - - - - - - - - - - - - - - - - - - - - - - - - - . . . . . . . . . . . . . . . . . . . . . . . . . . . . . . . . . . . . . . . . . . . . . . . . . . . . . . . . . . . . . . . . . . . . . . . . . . . . ; . . . . . . . . . . ? . ; . ; ; ; ; ; ; ; ; ; ; ; ; ; ; ; ; ; ; ; ; ; ; ; ; ; ; ; ; ; ; ; ; ; ; ; ; ; ; ; ; ; ; ; ; ; ; ; ; ; ; ; ; ; ; ; ; ; ; ; ; ; ; ; ; ; ; ; ; ; ; ; ; ; ; ; ;
| J | J | J | J | |||||||||||||
| D | D | D | D | |||||||||||||
| ACCENT | ● | |||||||||||||||
| J | ● | ● | ● | ● | ||||||||||||
| D | ● | ● | ● | ● | ||||||||||||
| M | ● | ● | ● | ● | ||||||||||||
| N | ● | ● | ● | ● | ||||||||||||
音 ~ 云 ~ ~ 云 ~
| # | # | # | # | # | # | |||||||
| ACCENT | # | |||||||||||
| J | ||||||||||||
| # | # | # | # | # | # | # | ||||||
| # | # | # | # | # | # | # | # | # | # | # | # | # |
| # | # | # | # | # | # | # | # | # | # | # | # | # |
4.2018年全国春季学业水平考试题库