
BS 1306 N - Vacuum Cleaner CLATRONIC - Free user manual and instructions
Find the device manual for free BS 1306 N CLATRONIC in PDF.
| Device type | Canister vacuum cleaner |
| Brand | Clatronic |
| Model | BS 1306 N |
| Power supply | 220-240 V~, 50/60 Hz |
| Rated power | 600 W |
| Protection class | II |
| Net weight | approx. 2.30 kg |
| Energy class | A+ |
| Annual energy consumption | 19.9 kWh/year |
| Sound power level | 80 dB(A) |
| Carpet cleaning performance class | E |
| Hard floor cleaning performance class | A |
| Dust re-emission class | E |
| Dust container capacity | 3 liters |
| Bagless system | Yes, transparent container |
| HEPA filter | Yes, washable |
| Coarse filter | Yes, washable |
| Exhaust filter | Washable non-woven filter |
| Suction tube | In two parts |
| Included accessories | Floor nozzle, crevice tool, dusting brush, wall mount |
| Features | On/off switch, floor nozzle brush adjustment, wall mount for storage |
| Maintenance | Empty container, clean filters with water, air dry |
Frequently Asked Questions - BS 1306 N CLATRONIC
User questions about BS 1306 N CLATRONIC
0 question about this device. Answer the ones you know or ask your own.
Ask a new question about this device
Download the instructions for your Vacuum Cleaner in PDF format for free! Find your manual BS 1306 N - CLATRONIC and take your electronic device back in hand. On this page are published all the documents necessary for the use of your device. BS 1306 N by CLATRONIC.
USER MANUAL BS 1306 N CLATRONIC
HEPA filter
Grof filter
m = 311 ;
Thank you for selecting our product. We hope that you will enjoy use of the appliance.
Symbols in these Instructions for Use
Important information for your safety is specially marked. It is essential to comply with these instructions in order to avoid accidents and prevent damage to the machine:

WARNING:
This warns you of dangers to your health and indicates possible injury risks.

CAUTION:
This refers to possible hazards to the machine or other objects.

NOTE: This highlights tips and information.
Contents
Overview of the Components. 3
General Notes. 30
Special Safety Instructions for this Appliance. 30
Overview of the Components / Delivery Scope 31
Unpacking the Device 31
Start-up. 31
Two-part Suction Tube 31
Nozzle Attachments 31
Assembly the Wall Holder. 32
Using the Appliance 32
End of Operation 32
Maintenance 32
Emptying the Dust Collector 32
The Filter System 32
Cleaning 33
Troubleshooting 33
Technical Data 34
Technical Data for Vacuum Cleaners 34
Disposal 34
Meaning of the "Dustbin" Symbol 34
General Notes
Read the operating instructions carefully before putting the appliance into operation and keep the instructions including the warranty, the receipt and, if possible, the box with the internal packing. If you give this device to other people, please also pass on the operating instructions.
- The appliance is designed exclusively for private use and for the envisaged purpose. This appliance is not fit for commercial use.
- Do not use the appliance outdoors. Keep it away from sources of heat, direct sunlight, humidity (never dip it into any liquid) and sharp edges. Do not use the appliance with wet hands. If the appliance is humid or wet, unplug it immediately.
- When cleaning or putting it away, switch off the appliance and always pull out the plug from the socket (pull the plug itself, not the lead) if the appliance is not being used and remove the attached accessories.
- Do not operate the machine without supervision. If you leave the room you should always turn the device off. Remove the plug from the socket.
- The device and the mains lead have to be checked regularly for signs of damage. If damage is found the device must not be used.
- Use only original spare parts.
- In order to ensure your children's safety, please keep all packaging (plastic bags, boxes, polystyrene etc.) out of their reach.

WARNING:
Do not allow small children to play with the foil. There is a danger of suffocation!
Special Safety Instructions for this Appliance
- Do not try to repair the appliance on your own. Always contact an authorized technician. If the supply cord is damaged, it must be replaced by the manufacturer, its service agent or similarly qualified persons in order to avoid a hazard.
- This appliance can be used by children aged from 8 years and above and persons with reduced physical, sensory or mental capabilities or lack of experience and knowledge if they have been given
supervision or instruction concerning use of the appliance in a safe way and understand the hazards involved.
Children shall not play with the appliance.
- Cleaning and user maintenance shall not be made by children without supervision.
- Do not suck up liquids!
- Do not suck up hot ashes or pointed or sharp objects!
- Do not use the device in damp rooms!
- Never use without the filter. Check that the filter is inserted correctly!
- Hair, clothing and body parts away from the vacuum nozzle during use!
- Keep the vacuum cleaner away from sources of heat like radiators, ovens, etc.!
Overview of the Components / Delivery Scope
1 On / off switch
2 Cover for exhaust filter
3 Carrying handle
4 Power cord
5 Hook for wall holder
6 Dust collector base plate
7 Dust collector with HEPA filter
8 Lock of the dust collector
9 Opener of the dust collector
10 Lever for extending and retracting the brushes
11 Floor nozzle
12 Suction tube (two-part)
13 Connector for suction tube or nozzle attachments
Accessories not shown:
1x Crevice nozzle
1x Brush nozzle
1x Wall holder
3x Dowel
3x Screw
Unpacking the Device
- Remove the device from its packaging.
- Check the delivery scope for completeness.
- Check the device for any transport damage, in order to prevent hazards.

NOTE:
In case of any transport damage, contact your dealer immediately. Do not use a damaged device!
Start-up
Two-part Suction Tube
- Insert a suction tube with the thicker end into the connector of the appliance.
- If necessary, insert the second suction tube with the thicker end into the other suction tube.
- To detach the suction tubes, pull them off while turning them slightly.
Nozzle Attachments
- You can attach the nozzle attachments both directly to the connector on the appliance as well as to the already mounted suction tube.
- To detach the nozzle attachments, pull them off while turning them slightly.
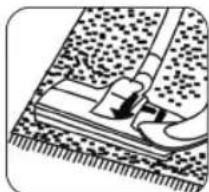
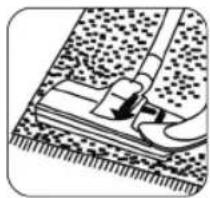
Floor Nozzle (11)
The floor nozzle is fitted with rollers for easier guiding. You can clean smooth surfaces and carpets with the floor nozzle.
- Adjust the brushes outwards or inwards using the lever (10).
Best use of the appliance depends on the texture of the floor covering. We recommend the following use:

Use without brushes: For vacuuming floor coverings with a deep pile

Use with brushes: For vacuuming smooth floors and carpets with a shallow pile
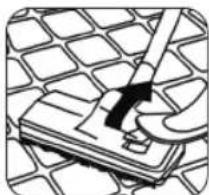
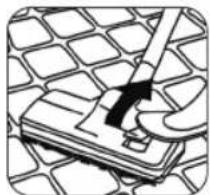
Crevice nozzle
With the crevice nozzle you can selectively vacuum corners and slots.
Brush nozzle
The brush nozzle is especially suitable for vacuuming upholstery, curtains, or books.
Assembly the Wall Holder

WARNING:
Make sure beforehand whether there are cables in the wall which could be damaged!
- Measure the height for the wall holder. Hold the vacuum cleaner against the wall when it is fully assembled with two suction tubes and the floor nozzle.
- Hold the wall holder against the wall in a way that the two drill holes are at the top. Mark 3 drill holes.
- Drill the holes and insert the dowels into the wall.
- Insert the screws through the holes of the wall holder. Turn the screws with the wall holder into the dowels.
- Tighten the screws by hand.
Using the Appliance
- Unwind the power cord completely.
- Insert the mains plug into a correctly installed power socket.
- Switch on the appliance with the on / off switch. Switch position: "I"
- Adjust the floor nozzle with the lever depending on the floor covering.
- Vacuum at a steady speed. There is no need to exert pressure.

NOTE:
Pay attention to the range that can be covered with the cable length!
End of Operation
- Turn the vacuum cleaner off by the on / off switch and remove the plug from the socket.
- Let the device cool down completely.
- If you have already installed the wall holder, hang up the vacuum cleaner. You can attach the crevice nozzle and the brush nozzle on the left and the right of the vacuum cleaner.
- You can wind the power cord loosely around the handle and the dust collector.
Maintenance
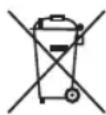
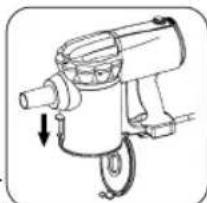
Emptying the Dust Collector
- Disconnect the mains plug from the wall socket.
- If necessary, remove the suction tube or the nozzle attachment from the appliance.
- Hold the appliance with the bottom plate of the dust collector over a dustbin.
- Empty the contents of the dust collector. Slide the opener of the dust collector downwards to open the bottom plate.
- Then close the base plate again. The lock on the dust collector must engage.
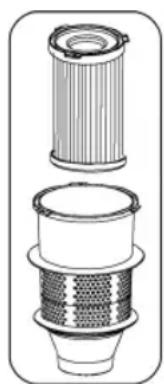
The Filter System
Your appliance features 3 filters. The common dust bag system has been replaced by a transparent dust collector. The higher flow speed of the collector allows for heavy dirt and smallest floating particles to be separated from the "sucked-in air".
It is thus not necessary to buy dust bags.
The filters must be cleaned periodically.

CAUTION:
- Never wash the filter in the washing machine.
- Do not use a hairdryer for drying.
- Put the appliance back into operation when all filters are completely dry and correctly assembled.
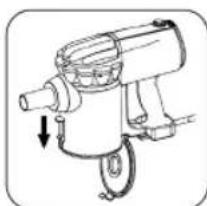
The Filter Unit
The filter unit is composed of:
HEPA filter
- Coarse filter
Proceed as follows to clean the filter unit:
- Empty the dust container as described above. (Steps 1-4)
- Disassembly of the filter unit
2.1 Turn the coarse filter counter-clockwise from the guide rails. Pull the coarse filter from the dust collector.
2.2 Turn the HEPA filter counter-clockwise from the guide rails. Pull the HEPA filter from the dust collector.
- You can brush out the HEPA filter. In case of heavy staining, clean the filters under running water.
- Let the filters air-dry completely before refitting them!
-
Wipe the dust collector with a damp cloth and then wipe it dry.
-
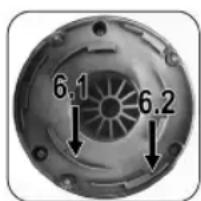
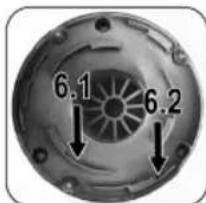
Assembly of the filter unit
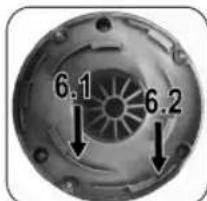
Refer to the adjacent figure.
6.1 Set the HEPA filter with its 3 guides to the inner circle. Tighten the filter clockwise.
6.2 Set the coarse filter over the HEPA filter with its 3 guides in the outer circle. Tighten the coarse filter clockwise.
CAUTION:
If the filters are not tightened, dirt will enter the engine. This can damage the motor.
- Close the bottom plate.
Outlet Filter
The appliance is also equipped with an outlet filter.
The cover of the filter is located on the back of the appliance.
- Turn the cover counter-clockwise.
- Remove the non-woven filter and wash it.
- Let the non-woven filter dry completely in the air, before reinserting it into the appliance.
- Close the exhaust filter with the cover. Turn it clockwise until it is attached to the appliance.
Cleaning

WARNING:
- Before cleaning remove the mains lead from the socket.
- Under no circumstances should you immerse the device in water for cleaning purposes. Otherwise this might result in an electric shock or fire.

CAUTION:
- Do not use a wire brush or any abrasive items.
-
Do not use any acidic or abrasive detergents.
-
Clean the housing with a soft, dry cloth without additives.
- For cleaning of the filters, read the chapter "Maintenance".
Troubleshooting
| Problem Possible cause Remedy | ||
| The device does not work. | The appliance is not connected to mains power. | Check the connection to the mains. |
| Check the position of the switch. | ||
| Problem Possible cause Remedy | ||
| Weak suction power. | The dust collector is full. | Empty the dust collector. |
| The filters are dirty. | Clean the filters as described under "Maintenance". | |
| CAUTION: Restart operation only with dry filters. | ||
| There is a foreign body in the suction tube or the nozzle. | Check the accessories for foreign bodies. | |
Technical Data
Model: BS 1306 N
Power supply: 220-240 V~, 50/60 Hz
Protection class: II
Net weight: approx. 2.30 kg
The right to make technical and design modifications in the course of continuous product development remains reserved.
Technical Data for Vacuum Cleaners COMMISSION DELEGATED REGULATION (EU) Nr.665/2013
| Trade mark Clatronic | ||
| Model BS 1306 N | ||
| Energy efficiency class1) | A+ | |
| Energy consumption | ||
| Annual energy consumption2) | kWh / year | 19.9 |
| Cleaning performance class | ||
| Carpet cleaning performance class | E | |
| Hard floor cleaning performance class | A | |
| Dust re-emission class E | ||
| Sound power level | dB(A) re1pW | 80 |
| Rated input power W 600 |
1) A (highest efficiency) to G (lowest efficiency).
2) Indicative annual energy consumption (kWh per year), based on 50 cleaning tasks.
Actual annual energy consumption will depend on how the appliance is used.
The device meets the European standards and directives in the current version at delivery:
Low Voltage Directive (LVD) 2014 / 35 / EU
- Electromagnetic Compatibility (EMC) Legislation Directive 2014 / 30 / EU
RoHS-directive 2011/65/EU
- Ecodesign-directive (ErP) 2009 / 125 / EC
- Ecodesign requirements for vacuum cleaners COMMISSION REGULATION (EU) No 666 / 2013
Disposal
Meaning of the "Dustbin" Symbol
Protect our environment: do not dispose of electrical equipment in the domestic waste.
Please return any electrical equipment that you will no longer use to the collection points provided for their disposal.
This helps avoid the potential effects of incorrect disposal on the environment and human health.
This will contribute to the recycling and other forms of reutilisation of electrical and electronic equipment.
Information concerning where the equipment can be disposed of can be obtained from your local authority.
Instrukcje obslugi
CTC Clatronic Sp. z 0.0
Ul. Brzeska 1
45-960 Opole
Usuwanie
He noka3aHHbIe npHaNdxKHOCTn.:
1x ⅢeBaaHacaKa
1x HacaKa co ueTko
1x HacteHHb IepKateIb
3xIIO6eBb
3x BnHT
Pacnakobka yctpoicTba
- BbIbTe yCTpoCTBO n3 erO ynaKOBKn.
- Поверьтей Налочи BCex KOMnoHErTOB KOMnIeKTa IOCTaBkN.
- Поберьт eустор CTBO Ha HanuHne KaKx-нб6 NOBpeK-DeHn npn TpAHCNoptIpOBKe DnToro, YTObI N36eKaTaB ONaCHbIX CNTyaCn.
IINPIMEUYAHNA:
B cnyae kakx-ln6o nobpejdeHn npi TpaHcnpTn- pOBke o6paNTecb K BaUeMy npOaBcy HEmdNeHNo. He nol3yntecb nobpejdeHHbIM yCTpOCTBOM!
HauaJopabotbI
Bcabsbaoaa Tpy6a n3 DByx qacte
BCTaBbTE BCacbIbAIOUyTOpy6y 60Jee TOIcTbIM KOHcOM B COeINHTenb npn6opa.
- Pπn Heo6xOaMOCtN BCTaBbTe BTopyIO BCaCbIaIOuIyTOpy6y 60Jee TOIcTbIM KOHcOM B dpyryIO BCaCbIaHO ty6y.
-ДяOTCOEINHEHNA BCAcBIBAOUx Tpy6 BbITHnTe Nx, CnerKa NOBOPaYBaJ.
HacaKn
HacaKMOxHO NOcOeINrTb KaH HeOpceDCTBeHHO K COeHNHTeHn Ha yCTpoICTBE, TaK N KyKe yCTaHOBNeHHo BCacblBaIOuEi Tpy6e.
-ДяOTCOeMHHeHnHaCaoK BbITaHHTe Nx, CJIerKa NOBOPaYHBa.
Hacada kədny nona (11)
HacaKa dna nona cna6keHa pOnkamn dna oIeHnckOJIbKeHn.
C NOMOuH HacaKIN DnIa NOA MOXHO YNCTNTb IpaKne NOBepxHOCTN KOBpbl.
PbuaKOM (10)MOxHO NOBopaNBaTB 电TKN HApxy NIN BHYTpB.
MaKcImaHbHa 3ΦΦeKTHBHOCTb annapata 3aBNCHT OT TEKCTypbl NOIOBOrO NOKpblITn. HauN peKOMeHdaun 3akJIO- yAOTCB CNeDyUoE M.
IcnoJb3ObaHne 6e3 uetok: INrYnCTKNPiIEcOCOM NIOBbIX NOKpbITN C BbICOKM BOPCOM.
IcnoJIb3OBAHHe CO UeTKAMn: IINYUcTKn PbJIeCOCOM TnaKnx IIOOB N KOBPOB C KOPOTKIM BOPCOM.
Ueneea hacaoka
C nomouho ueleboH hacaikn moxho bibopouho nbinecoCnTB B yIax u IeJax.
Hacaoka co ueMKoU
HacaKa co 8eKoOc06eHHO xopoOIOxOoNT dIpy ONUIECOCOM OOBKN,3aHaBECOK KNIG.
MOHTAX HACTeHHoro DepeKaTeJIa
PENEYIPEXJEHNE:
PepBapnteBHO yBeNTecB OTCyTCTBnB CtHe Ka6eIe (npoBOK), KOTOpbIe MOrY T 6bITb NOBpeKJHbI!
- N3mepbTe BbICOTy DnA MOHTaKa HAcTeHHORO DePkaTeJI. PpINOxKITe NbIEcOC K CTEHe B NOnHocTbIO Co6paHHOM BInde C DByMa BCacBbIAuUIMN Tpy6aMn HacaKnDnI nOJa.
2.ПиЖМЛТЕ HabTeHHbI DepeKATEJIb K CTHe TaKIM O6pa3OM, YTO6bl DA BbICBepINBaEMbIX OTBepCTNIA 5bln CBepxY.OTMeTbTe 3 MeCTa IIN BbICBepINBaHINr OTBepCTNI. - PocBepnIte OTBepCTnI N BCTaBBe TB CTeHy IIO6eII.
4.BCTaBtBe BHTbI Yepe3 OTBepCTnB HAcTeHHOM DepeKataTe. BBeHnte BHTbIC HaCTeHHbIM DepeKaTeJIem BIO6eJN. - 3aTnHtse wypynbI bpyHyIO.
IcnoJIb3OBAHne np6opa
1.ПОЛНOCtIbO pa3MOTaIte cTeBoiU SHyp.
2.BCTaBtBe BnIky 3neKtpoNTaHnB nPpabInbHo yCTaHOBJIeHHyIO 3neKtpuYeCKyIO po3eTKy.
3.BKIOHTeYCTPOIcTBOC NOMOJIbIO NEPEKIOHATeTBAK.I BbIKI. IIOJKeHHe NEPEKIOHATeTIA
4.C NOMOJIbOp bIyara OTpeRpyNpIyTe HacaKy dJa nOna B 3aBnCmOCTn OT HAnONbHOro NOKpbITn.
5.ПювODиTe YIcTky C NOCTOЯнHо CKopoCtBJ. He Tpe6y-etc npnaraTb 3HaHTeNbHorO yCINIA.
I PIMMEUAHNIA:
O6paTne BHHMaHHe Ha pacCToHHe, KOtOpoe oBeCneuBaETc DaHHOH Hypa!
3aKOHHTb NOJIb3OBAHne np6opom
- BbIKIOHHTe NbIeOC nepeKIOHaTeIeM BKN./BbIKN.I 3BbIeKHTe BUNKY I3 3NEKTPnueCKo pO3ETKn.
2.06ecnehe Te noJIHOe oCTbIaHHe ycTpoIcTBA. - Nocle MoTaxa HacteHHoro DePkaTeN NOBcTe Ha Hero nbIecoc.CneBa n cnpaba OT nbIecoca MOKHO 3akpenTb UeneByu HacaKy H hacaKy co tkoi.
- MoJHo CBO6OAnHO O6MOTaTb CeTeBOI UHyp BOKpyr pyKn I PbIInec6OpHnKa.
06cnykmbaHne
OnyctoWeHne nbIeScbOpnka
- BbIKIIOHTe BUNKy n3 CEteBOI po3ETK.
2.Пи Heo6xOIMOCn ydaJIInTe C yctpoiCTBa BCacbIbaIO- 5yU Tpy6y nIN HacaNk.
3.Деркinte yctpoCTBO TAK,HTO6bI HxHnra NaHeIb nbIeC5OpHnka paCnolaraIacb HaMycOPHbIM BeDpOM. - OnopoxHnTe nbIe6OpHNK. CdbHbTe OTkpblateNb nbIe6OpHNka Bn3, yTO6bl OTkpblb HxHHO naHenb.
- 3aTeM 3aKoIe OCHOBaHne. 3aUeNka IbIeNc6OpHnKa DOJIkHa 3aФuKcnpObaTbCra.
CnCTemaΦnIbTpOB
B yctpoCTbe npedyCMOTpeho 3 fnhbtpa.Obhna CnCTema C MeUKOM dny c6opa nbInn 6blna 3amHeHa ha np03paHbI nbINec6OpHnik.Boone BbcOKaK CKOPoCTb c6opa nbInn PO3BOJNAET pa3dJIeTb TjKeJyIO nbInN MaNeUWe qACTNUBI B 3acCaIBaEMOM BO3dyxa.
TakIM o6pa3OM, OTCyTCTByeT Heo6xOJIMOCtB NOKyIaTb MeUKN.
ΦnIbTpblTre6yHOT nepnoDmueckoOuCTKl.

BHIMAHHE:
- 3aippeuaetcmaBtbpCTpBCTpaHbHOMaHHe.
-3anpeuataeTcHnOJIb3OBaTbΦeHДЯ cyuKm. - Bo3BpaaTa b yctpoiCTBO B pa60Ty moXHO B TOM cnUyae, ecnB BCE φnJIbTpbl abcoJIIOTHO cyxne n npabInbHo co6paHbl.
EloK qunbmpoe
BIOKΦnIbTPOB BKNIOUaET Bce68 cnEduouee:
ΦnIbTp HEPA
ΦnIbTp rpyboi OuNCTK
Iy ouhctkn 6noka fnilbtpoB BblnoHHTe cneDyUoee:
- Onopoxhnte emkoctbIaIbIINcorglaCHO npBedeHHbIM BbIe INHCTpyKUmaI. (War 1-4)
- Pa36epnte 6JIOK qnIbItpoB.
2.1 NobepHnTe pInbTp rpy6o OunCTKn IpOtnB Yacob Boi CtrpeIkn BdoNb HaprabnaIOxN. BbiTaUnte pInbTp rpy6o OUnCTKn n3 nbinec6opHnka.
2.2 NObepHnTe BbICOKo3ΦΦeKTHBbI CyXo BO3- DyuHbI ΦnIbTp npOTNB YacOB O CTpeKN BDOJIb HApRaBnIOxN. BbITaUHTe BbICOKo3ΦΦeKTHBbI CyXo BO3DyuHbI ΦnIbTp n3 nbJNEc6OpHnKa.
- BbICOKOaΦeKTHBHy cyXoB 03dyuHbI ΦnIbTp MOxHO npoucntTb 1eTKoB. B cnYae CnIbHoro 3arpa3HeHn npOMoTe cNlkbTpbl NO, pnoTOOH BOdoi.
4.ДаTeФиТьрБI NOJIHOCThBIO BbICOXHyTb NepeД yCTaHOB-KoI Ha MecTo! - IpoTpIte nbJInc6OpHnK BJIaXHoN TkaHbIO, 3aTeM BblPTne HAcYxo.
6.C60ka 6noka qnbTPOB
Cm.coceHn pncyHok.
6.1 YcTaHOBnTe BbICOKO3ΦpeK-TNBHbI cyXoB03dyuHbI ΦnIbTp c 3 HapPabJIyIOUMN BO BHyTpEHHeOkpyKHOCTN. 3aTnHTe FnIbTp nO yacOBoB CTpeKe.
6.2 YcTaHOBInTe fNtBtp rpy6oOn OHCTKN NOBepx BbICOKO3ΦfKeTINBHOrO cyXOrO BO3DyUHOrO fNtBtpa C 3 HappaJIIOUIMM BO BHeuHnE OKpyKHOCTn. 3aTaNHTe fNtBtp rpy6oON OHCTKN No YacOBOn CTpeJIke.

BHIMAHNE:
EcH He 3aTMyb PnNtBpbl B DnRatEnb nonaTe Tpy3b.3TO MoKET npNBecTN K NOBpeKeHIO MOTopa.
- 3akpoTe HnKHHIOI naHEnb.
Bbinyckhofpnbmp
Pp60rKaKe IMeeT BInyckHoi qnlbTp.
Kpbuika qunbtpa pacnonaraetcB 3aHne uactn yctpoCTBa.
1.ПовернITE КрblИКу пOTив YacOBОВ CTpeIKN.
2. YdaJIInTe ФиЛьТР ИЗ HeTkaHOrO MaTePnIaN I npOMoiTe erO.
3.ПОЛНOCТБЮ ПОСУЛNTE ФИNBТР ИЗ HETКАНО MaTePиANA Ha BO3Дуxe,а 3aTeM CHOBA BCTaBbTe erO BycTpoICTBO.
4. 3akpoTe KpbIuKoB BbInyckHoi fNbTp. NOBopaunBaTne no YacBOI CTpeJIke, noka OH He 6yJeT 3aФNKcnpOBaH Ha yCTpoiCTBE.
UncTka
I P E D U N P E X K D E H N E:
- ПерацяковиЗБКИТЕВИКУи3po3eTKN.
- Hn npi kaix o6ctoTeIbCTBax He donyckaIte norgyKeHny yCTpoIcTBA B BODy C cIbIO OChtKn. INaYe BO3MoJxH yIap 3JIeKTPnueCKIM TOKOM IJIH BO3RopAHne.

BHIMAHHE:
He npimehaTe npoBonoHyu 1eTky nn a6pa3nBhble MaTePnaJIbI.
He nCnoNb3yIe KNCIObTI Nn a6pa3INBbIe YnCTaIIne cpeIcTBA.
OuHCTHTe KOpNc MRAKoC cyXoT KtAHbIO 6e3 UcCTraIcx CpeIcTB.
ДяоиctknФньtpOB npoHTaIe rnaBy ,06cnyKnBaHne".
Ponck u yctpaHenne HencnpaBHOte
YcTpoIcTB COOTBETCTBye EBPOEncknM CTaHdApTaM INIpeKTHBAM BpeJaKuIN, DeIcTBNTeNbHO HA MOMENT DOCTABKN YcTpoIcTBa:
Hn3koJIbTHoe 6OpyObaHne 2014 / 35 / EC
Директура NOЗнКТРOMaRHTHOn COBMeCTMocTn (3MC)
2014/30/EC
Дуpeктува RoHS 2011/65/EU
Директва по Кождзайу 2009 / 125 / EC
Tpe6obanno nO ekOn3aHny dna nbinecoocOBIOCTA
HOBJEHNE COBETA (EC) No 666 / 2013
a
#
.
.
aayss
665/2013 4 (y)
Jnlll n a cll l b jck sck HePA 2.2
HEPA
jldlll 3
111111111111111111111111111
aaii i aiiia aiae aie aiie jaiil gao 5
j 6
J 1
HEPA 6.1
a 1
aeww
jia jia jiu jiu jiu 6.2
HEPA
al jlljll
aell wlae alal jilall b
4
A
1
Aaall aagai
2^1 · 2^2 · 2^3 · 2^4
j j j j j j j
jie jie jie jie jie jie jie jie
AeWuJie SuSe 1
4k = 3
-
-
-
-
-
-
-
-
-
-
-
-
-
-
-
-
-
-
-
- 1.
-
-
-
-
-
-
-
-
-
-
-
-
-
-
-
-
-
-
aaiy
- jiaiill lai/
all j 2 .1
Jl all Jai 3 .Sai all
y
4.
aill
J
1.
Jg j 2
jlll p
a 3 a a a a a
a
a a a a a a a a a a a a a a a a a
"olgill aiaaall jaijll" jao
a
a 1
a + b = 5
y
jglll jg jglll g
Laijia jaoa jaoi k jiall jiall jiey jiey Jua
1
iiaaill gddalgall jnllldoljlaaiy
·
·
L
1
aaiSally bai 1
10
a gali lal
1
eai gai gei aai gai jai
(11) 23 + 23 - 1 + 0 = 2
y
a
.(10)
y j 11
1
a 1
a.
y
#
g j j j j j j j j j j j j j j j j j j j j j j j j j j j j j j j j j j j j j j j j j j j
bilaal Jalaal
y = - ( x - 2) ^2 + 9 = - x^2 + 4x + 5
Jrnnn nn nnnn nn nnnn nn nnnn nn nnnn nn nnnn nn nnnn nn nnnn nn nnnn nn nnnn nn nnnn nn nnnn nn nnnn nn nnnn nn nnnn nn nnnn nn nnnn nn nnnn nn nnnn nn nnnn nn nnnn nn nnnn nn nnnn nn nnnn nn nnnn nn nnnn nn
aill aikai kai. 1
a 120
2
aill 1
aallll lalld 3
puii jbi/ ciigai iie aale sji
Jia jiu / Jia jiu 1
2
Joull 3
4
alalalalal 5
joll 6
HEPA 7
8
Jieell 9
10
11
()12
a gill cia, 1 baiill 13
:
x^2 + y^2 = 1 + 1^2
x1
Jolol x1
x_1 = 2( 0 < x < 3)
x3
jiee 1
i j 1
Lay Laiyilil bial, jzll Jia Jia Jia Jia Jia Jia Jia
y j 1111111111111111111111111111111111
1
i (a) 2) a b g s yall waiy i jall
jL i. aiio y jaoi y .sall g (aiu o
. jall y jll
131 (Jus gill dll jg, aaij wall lail 5y jy Sll jy
jill uao jao wali g jil .a jall s jlae sic lai jle
jie 1
- solilo 2. Solilo (la) y, y siunall y.
jz 1
jz aiz
jzai all jz jz jzai all jzly e y
!jz
L
jolil plisidu piinui jolisi liqii uljialge all
pki 1
Ic bll Laiai aolll clogall oic lc laoe gao
C 20g 2001 1000000000000000000000000000000000000000000000000000
y j 1 y j 1 1 1 1 1 1 1 1 1 1 1 1 1 1 1 1 1 1 1
hao 2010
1
Cilagall gailaill c gail jai lla y
- 1
54
54
53 53
53
53 1
29 = 3 : 主要影響 ( 0 : 0 : 0 变化] [
53
52
52
52
52
52
jgljll jg: aalil aylll laij
aJai. slai jai jai Jgai 2 gao
1 1
j
J 8 n nn Jn
a a a a a a a a a a a a a a a a a a a a a a a a a a a a a a a a
aiiaial 155
j
Jil gll 1
1
1
一
一
1
1
一
一
1
1
一
一
GARANTIEKARTE
warranty card · garantiekaart · carte de garantie · scheda di garanzia · tarjeta de garantia · cartao de garantia · garantiokt · karta gwarancyjna · zaručni list · karta jamstva · carte de garantie · fapaunnoHa Kapta · zaručnlyist · garancijski list · garanciajegy · rapaHTHmOpMynp · fapaHTnHbI TaON ·
BS 1306 N
24 Monate Garantie gemäß Garantieerklarung - 24 months warranty according to warranty declaration - 24 maanden garantie volgens garantieverklarung - 24 mois de garantie selon la déclaration de garantie - 24 messi de garanzia seconde la dichiarazione di garanzia - 24 meses de garantia de acordo con la déclaration de garantia - 24 manedors garanti i henhold til garantibeteingelsene - 24 misesque gwarancjna podstawtie owiadcnziona gwarancjnyego - zaruka 24 mescic podle prohlaseni o zaruca - 24 mesecno jamstvo u skladu s jamstvenom declaracionj - 24 luni garantie conform declarejie de garantie - 24 mecua rapaHINB C bOHTCTBME c rapaHIOHNHATA deknapauN - 24-mesacna zaruka podla vhylasiena o zaruke - 24-mesecna garancija, skladn2 garancjsko Izavo - 24 honap garancia a garanciafeleteteleken be leirtak szerint - rapaTNI HA 24 micui BIDNOIOI ZAII npo raptaiio - rapaTHNI 24 mecua corncho 3aRbENHHMA raptAHINHMnpabnAm -
Kaufdatum, Handlertempel, Unterschied - date of purchase, dealer stamg, signature - aankoopdatum, dealerstempel, handeltensing - date d'achat, tampon du concessionaire, signature - data de acquisto, timbo del rivendatore, firma - fecha de compra, sello del distribuidor, firma - data de compra, carinbo do distribuidor, assinatura - kapsdipal, forhandlertempel, signatur - data zakuip, piezecr spredawcy, podipsi - datum zakuapnl, razitko prodejce, podipsi - datum kupovine, big trovica, potips - data de schizje, tamplia fumzeridurul, semnata - da na ekymara, Tievat na Ipojaasaia, Iogmic - datum nukipu, pehchatka obchodnirka/ prenejcu, podipsi - datum nukapu, big trovica, potips - vassaris datuma, kereskebd behegyolze, alalas - data npdoanmi, nevatka npodauja, ngmic - Data npoeperteniu, ilraan npodaasaia, Iogmnc -

CATRONIC INTERNATIONAL GMBH
www.clatronic-germany.de

- Symbols in these Instructions for Use
- WARNING:
- CAUTION:
- Contents
- General Notes
- Special Safety Instructions for this Appliance
- Overview of the Components / Delivery Scope
- Accessories not shown:
- Unpacking the Device
- NOTE:
- Start-up
- Two-part Suction Tube
- Nozzle Attachments
- Floor Nozzle (11)
- Crevice nozzle
- Brush nozzle
- Assembly the Wall Holder
- Using the Appliance
- End of Operation
- Maintenance
- Emptying the Dust Collector
- The Filter System
- The Filter Unit
- Outlet Filter
- Cleaning
- Technical Data
- The device meets the European standards and directives in the current version at delivery:
- Disposal
- Meaning of the "Dustbin" Symbol
- Instrukcje obslugi
- Usuwanie
- He noka3aHHbIe npHaNdxKHOCTn.:
- Pacnakobka yctpoicTba
- IINPIMEUYAHNA:
- HauaJopabotbI
- Bcabsbaoaa Tpy6a n3 DByx qacte
- HacaKn
- Hacada kədny nona (11)
- Ueneea hacaoka
- Hacaoka co ueMKoU
- MOHTAX HACTeHHoro DepeKaTeJIa
- PENEYIPEXJEHNE:
- IcnoJIb3OBAHne np6opa
- I PIMMEUAHNIA:
- 3aKOHHTb NOJIb3OBAHne np6opom
- 06cnykmbaHne
- OnyctoWeHne nbIeScbOpnka
- CnCTemaΦnIbTpOB
- BHIMAHHE:
- EloK qunbmpoe
- BHIMAHNE:
- Bbinyckhofpnbmp
- UncTka
- I P E D U N P E X K D E H N E:
- YcTpoIcTB COOTBETCTBye EBPOEncknM CTaHdApTaM INIpeKTHBAM BpeJaKuIN, DeIcTBNTeNbHO HA MOMENT DOCTABKN YcTpoIcTBa:
- a
- #
- aaiy
- aill
- jlll p
- a gali lal
- 23 + 23 - 1 + 0 = 2
- a.
- bilaal Jalaal
- y = - ( x - 2) 2 + 9 = - x2 + 4x + 5
- puii jbi/ ciigai iie aale sji
- jiee 1
- L
- jgljll jg: aalil aylll laij
- GARANTIEKARTE
- BS 1306 N
Brand : CLATRONIC
Model : BS 1306 N
Category : Vacuum Cleaner