GSR 12LI Professional - Screwdriver BOSCH - Free user manual and instructions
Find the device manual for free GSR 12LI Professional BOSCH in PDF.
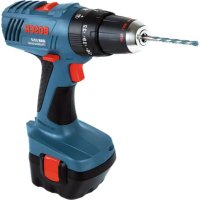
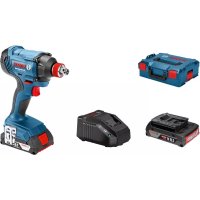
| Technical Specifications | Bosch GSR 12LI Professional cordless screwdriver, brushless motor, maximum torque of 30 Nm, no-load speed of 0-400/0-1300 rpm, 10 mm keyless chuck. |
|---|---|
| Usage | Ideal for screwing and drilling in wood, metal, and plastic, suitable for indoor and outdoor work. |
| Maintenance and Repair | Regularly check the battery condition, clean the chuck, and lubricate moving parts if necessary. |
| Safety | Wear safety glasses during use, do not exceed torque capacity, keep the tool out of reach of children. |
| General Information | Lightweight at 1.3 kg, 12 V lithium-ion battery, fast charging time, 2-year warranty. |
Frequently Asked Questions - GSR 12LI Professional BOSCH
Download the instructions for your Screwdriver in PDF format for free! Find your manual GSR 12LI Professional - BOSCH and take your electronic device back in hand. On this page are published all the documents necessary for the use of your device. GSR 12LI Professional by BOSCH.
USER MANUAL GSR 12LI Professional BOSCH
OBJ_BUCH-1010-005.book Page 2 Thursday, January 15, 2015 11:27 AM3 | 1 609 92A 0WN | (15.1.15) Bosch Power Tools AL 1115 CV (3,6 – 10,8 V) GBA 10,8V .. OBJ_BUCH-1010-005.book Page 3 Thursday, January 15, 2015 11:27 AM4 | 1 609 92A 0WN | (15.1.15) Bosch Power Tools
GSR 10,8-LI OBJ_BUCH-1010-005.book Page 4 Thursday, January 15, 2015 11:27 AM5 | 1 609 92A 0WN | (15.1.15) Bosch Power Tools
(triax vector sum) and uncertainty K determined according to EN 60745: Drilling into metal: a
The vibration level given in this information sheet has been measured in accordance with a standardised test given in EN 60745 and may be used to compare one tool with anoth- er. It may be used for a preliminary assessment of exposure. The declared vibration emission level represents the main ap- plications of the tool. However if the tool is used for different applications, with different accessories or insertion tools or is poorly maintained, the vibration emission may differ. This may significantly increase the exposure level over the total working period. An estimation of the level of exposure to vibration should also take into account the times when the tool is switched off or when it is running but not actually doing the job. This may sig- nificantly reduce the exposure level over the total working period. Identify additional safety measures to protect the operator from the effects of vibration such as: maintain the tool and the accessories, keep the hands warm, organisation of work pat- terns. Technical Data Declaration of Conformity We declare under our sole responsibility that the product de- scribed under “Technical Data” is in conformity with all rele- vant provisions of the directives 2009/125/EC (Regulation 1194/2012), 2011/65/EU, 2004/108/EC, 2006/42/EC including their amendments and complies with the following standards: EN 60745-1, EN 60745-2-2. Cordless Screwdriver GSR 10,8-LI Article number 3 601 J92 9.. Rated voltage V= 10,8 No-load speed – 1st gear – 2nd gear min
0–400 0–1300 Max. torque for hard/soft screw- driving application according to ISO 5393 Nm 30/15* Max. drilling dia. – Steel – Wood
Max. screw dia. mm 7 Weight according to EPTA-Procedure 01/2003 kg 0,8 Permitted ambient temperature – during charging – during operation
- depending on the battery pack being used** Limited performance at temperatures <0
Assembly Battery Charging (see figure A) Note: The battery supplied is partially charged. To ensure full capacity of the battery, completely charge the battery in the battery charger before using your power tool for the first time. The lithium-ion battery can be charged at any time without re- ducing its service life. Interrupting the charging procedure does not damage the battery. The lithium-ion battery is protected against deep discharging by the “Electronic Cell Protection (ECP)”. When the battery is empty, the machine is switched off by means of a protective circuit: The inserted tool no longer rotates. Do not continue to press the On/Off switch after the machine has been automatically switched off. The bat- tery can be damaged. To remove the battery 7 press the unlocking buttons 6 and pull out the battery downwards. Do not exert any force. Observe the notes for disposal. Changing the Tool (see figure B) Before any work on the machine itself (e. g. mainte- nance, tool change, etc.) as well as during transport and storage, remove the battery from the power tool. There is danger of injury when unintentionally actuating the On/Off switch. Inserting Pull the locking sleeve 3 toward the front and then push the in- sert tool to the stop into the tool holder 2. The insert tool is au- tomatically locked. Removing Pull the locking sleeve 3 forward and remove the insert tool. Dust/Chip Extraction Dusts from materials such as lead-containing coatings, some wood types, minerals and metal can be harmful to one’s health. Touching or breathing-in the dusts can cause allergic reactions and/or lead to respiratory infections of the user or bystanders. Certain dusts, such as oak or beech dust, are considered as carcinogenic, especially in connection with wood-treat- ment additives (chromate, wood preservative). Materials containing asbestos may only be worked by specialists. – Provide for good ventilation of the working place. – It is recommended to wear a P2 filter-class respirator. Observe the relevant regulations in your country for the materials to be worked. Prevent dust accumulation at the workplace. Dusts can easily ignite. Operation Starting Operation Inserting the battery Use only original Bosch lithium-ion batteries with the voltage listed on the nameplate of your power tool. Using other batteries can lead to injuries and pose a fire hazard. Note: Use of batteries not suitable for the machine can lead to malfunctions of or cause damage to the power tool. Set the rotational direction switch 8 to the centre position in order to avoid unintentional starting. Insert the charged bat- tery 7 into the handle so that it can be felt to engage and faces flush against the handle. Reversing the rotational direction (see figure C) The rotational direction switch 8 is used to reverse the rota- tional direction of the machine. However, this is not possible with the On/Off switch 9 actuated. Right Rotation: For drilling and driving in screws, push the rotational direction switch 8 left to the stop. Left Rotation: For loosening and unscrewing screws and nuts, press the rotational direction switch 8 through to the right stop. Setting the torque With the torque presetting ring 4 the required torque setting can be preselected in 20 steps. With the correct setting, the insert tool is stopped as soon as the screw is screwed flush in- to the material or when the adjusted torque is reached. The safety clutch is deactivated in the “ ” position, e. g. for drilling. Select a higher setting or switch to the “ ” symbol when un- screwing screws. Gear selection, mechanical Actuate the gear selector 5 only when the machine is at a standstill. Two speed ranges can be preselected with the gear selector
Gear I: Low speed range; for screwdriving or working with large drill- ing diameter. Gear II: High speed range; for working with small drilling diameter. If the gear selector 5 cannot be pushed through to the stop, lightly turn the tool holder 2 with the insert tool. Switching On and Off To start the machine, press the On/Off switch 9 and keep it pressed. Henk Becker Executive Vice President Engineering Helmut Heinzelmann Head of Product Certification PT/ETM9 OBJ_BUCH-1010-005.book Page 14 Thursday, January 15, 2015 11:27 AMEnglish | 15 Bosch Power Tools 1 609 92A 0WN | (15.1.15) The power light 10 lights up when the On/Off switch 9 is slightly or completely pressed, and allows the work area to be illuminated when lighting conditions are insufficient. To switch off the machine, release the On/Off switch 9. To save energy, only switch the power tool on when using it. Adjusting the Speed The speed of the switched-on power tool can be variably ad- justed, depending on how far the On/Off switch 9 is pressed. Light pressure on the On/Off switch 9 results in a low rotation- al speed. Further pressure on the switch results in an increase in speed. Fully automatic spindle locking (Auto-lock) When the On/Off switch 9 is not pressed, the drill spindle and thus the tool holder are locked. This enables screws to be screwed in, even when the battery is empty and allows for the machine to be used as a screwdriv- er. Run-on Brake When the On/Off switch 9 is released, the chuck brakes to a stop, thus preventing the run-on of the tool. When driving in screws, wait until the screw is screwed in flush with the material and then release the On/Off switch 9. By doing so, the head of the screw does not penetrate into the material. Temperature Dependent Overload Protection When using as intended for, the power tool cannot be subject to overload. When the load is too high or the allowable battery temperature range is exceeded, the speed is reduced. The power tool will not run at full speed until reaching the allow- able battery temperature. Working Advice Apply the power tool to the screw only when it is switched off. Rotating tool inserts can slip off. After longer periods of working at low speed, allow the ma- chine to cool down by running it for approx. 3 minutes at max- imum speed with no load. For drilling in metal, use only perfectly sharpened HSS drill bits (HSS=high-speed steel). The appropriate quality is guar- anteed by the Bosch accessories program. Before screwing larger, longer screws into hard materials, it is advisable to predrill a pilot hole with the core diameter of the thread to approx.
2006/42/EC2004/108/EC