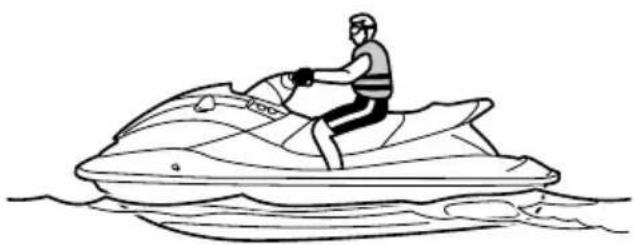
 — Jet ski — Mode d'emploi PDF")
WaveRunner GP1800R HO (2020) - Jet ski YAMAHA - Free user manual and instructions
Find the device manual for free WaveRunner GP1800R HO (2020) YAMAHA in PDF.
| Product type | Jet ski / Personal watercraft |
| Brand | YAMAHA |
| Model | WaveRunner GP1800R HO |
| Year | 2020 |
| Category | High performance jet ski |
| Engine type | 4-stroke, 3-cylinder, DOHC |
| Displacement | 1 812 cm³ |
| Maximum power | 180 hp (approx.) |
| Fuel tank capacity | 70 L (approx.) |
| Propulsion system | Jet pump |
| Steering system | Handlebar with steerable nozzle |
| Reverse and deceleration system | RiDE (electronic reverse/neutral) |
| Maximum load capacity | 240 kg (530 lb) |
| Number of seats | 3 (rider + 2 passengers) |
| Dry weight (approx.) | 320 kg (705 lb) |
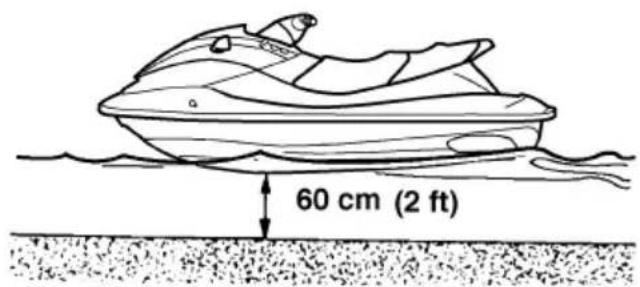
| Minimum water depth required | 60 cm (2 ft) |
| Fuel type | Unleaded gasoline |
| Safety cut-off | Lanyard cut-off switch (stops if rider falls) |
| Starting | Electric (push-button) |
| Riding exercise functions | Built-in riding guide (9 exercises) |
| Fairing and hull | Reinforced polymer hull |
| Maintenance and cleaning | Rinse the engine and hull with fresh water after saltwater use |
Frequently Asked Questions - WaveRunner GP1800R HO (2020) YAMAHA
User questions about WaveRunner GP1800R HO (2020) YAMAHA
0 question about this device. Answer the ones you know or ask your own.
Ask a new question about this device
Download the instructions for your Jet ski in PDF format for free! Find your manual WaveRunner GP1800R HO (2020) - YAMAHA and take your electronic device back in hand. On this page are published all the documents necessary for the use of your device. WaveRunner GP1800R HO (2020) by YAMAHA.
USER MANUAL WaveRunner GP1800R HO (2020) YAMAHA
Introduction 1
Important information 2
How to use this guide to practice 4
Exercise 1: Controls. 6
Exercise 2: Starting and stopping engine. 7
Exercise 3: Boarding and balancing. 10
Exercise 4: Trolling speed maneuvering. 13
Exercise 5: Sub-planing speed maneuvering. 14
Exercise 6: Full acceleration and stopping 17
Exercise 7: Planing speed operation. 18
Exercise 8: Crossing wakes and swells. 20
Exercise 9: Operating with passengers 21
Postscript 23
WaveRunner
GP1800R HO
RIDING PRACTICE GUIDE
©2020 by Yamaha Motor Co., Ltd.
1st Edition, May 2019
All rights reserved.
Any reprinting or unauthorized use
without the written permission of
Yamaha Motor Co., Ltd.
is expressly prohibited.
Printed in U.S.A.
Introduction
Yamaha watercraft are exciting ways to enjoy water recreation.
A watercraft can offer hours of fun, and it is tempting just to put yours in the water and go.
But it is important to remember that, as with any new sport or any unfamiliar vehicle, there are techniques that must be learned and skills that must be developed, both for maximum enjoyment and for safety.
This Riding Practice Guide booklet has been developed to help the new watercraft operator learn techniques and develop skills.
Everyone who intends to operate or ride as a passenger on a watercraft could benefit from reading and using this handbook.
Keep in mind, though, that this practice guide is just that: a guide.
It does not take the place of common sense or good judgment.
Safe and responsible watercraft operation requires skills and knowledge that are learned as riders become familiar with the craft.
Yamaha recommends that you practice each exercise in order according to the directions. Do not push yourself. Take a break when you get tired.
Be sure you fully understand how to perform each of the exercises well before you go on to learn the next one, because skills learned in one lesson may be required in the next.
Remember, you must be the final judge of when you feel comfortable and competent with the particular skills learned.
Important information
This practice guide does not replace the Owner's/Operator's Manual or the labels on the watercraft.
Be sure to study these instructional materials thoroughly before you begin to operate this watercraft.
AW ARNIN
Collisions result in more injuries and deaths than any other type of accident for personal watercraft (PwC).
To avoid collisions:
Scan constantly for people, objects, and other watercraft. Be alert for conditions that limit your visibility or block your vision of others.
Operate defensively at safe speeds and keep a safe distance away from people, objects, and other watercraft.
- Do not follow directly behind PWCs or other boats.
- Do not go near others to spray or splash them with water, go too close to other boats, or go too fast for the traffic conditions.
- Avoid sharp turns, slowing down rapidly by squeezing the Reverse with Intuitive Deceleration Electronics (RiDE) lever forcefully, and other maneuvers that make it hard for others to avoid you or understand where you are going.
The RiDE system is an electronic system for controlling the engine speed and reverse gate, which is located near the jet thrust nozzle. The RiDE lever located at the left handlebar grip can be used to change the direction of the jet thrust so that the watercraft moves in reverse or is in neutral. The RiDE system assists the operator when slowing down and during slow-speed maneuvering, such as launching, beaching, and docking.
- Avoid areas with submerged objects or shallow water.
Take early action to avoid collisions. Remember, PwCs and other boats do not have brakes. In addition, the RiDE system is not a braking device for avoiding dangerous situations.
Important information
Do not release the throttle lever when trying to steer away from objects—as with other powerboats, you need throttle to steer. Always check throttle and steering controls for proper operation before starting PwC.
Follow navigation rules and local laws that apply to PwCs. See Owner's Manual for more information.
How to use this guide to practice
The Yamaha watercraft you are going to learn to operate may have different specifications and different performance characteristics from other personal watercraft or boats you may have operated.
The riding practice steps in this booklet will help you to become familiar with the basic techniques you will need to learn to master operating your watercraft.
Remember, you will be learning the skills and developing the good judgment that safe operation of your watercraft requires.
The purpose of this guide is to help you get started by practicing certain important skills. You should practice each exercise until you can do it well—until it feels comfortable to you. Only then should you go on to the next exercise.
Each exercise builds on the skills you have already learned; so do not try to jump ahead.
In these exercises, we want you to get the feel of the watercraft, and to learn how it operates in its many modes of use. Always keep in mind that these exercises are only a beginning and a guide. You must use your common sense and good judgment, along with the skill and knowledge you gain as you continue to operate your watercraft.
This practice guide is divided into 9 exercises. Practice operating the watercraft in steps, starting with Exercise 1. Exercises 1 through 7 cover the basic riding techniques you need to master.
Exercise 9 will help you learn the skills you need for operating with passengers. Again, do not attempt this exercise until you have developed your skills in the earlier exercises.
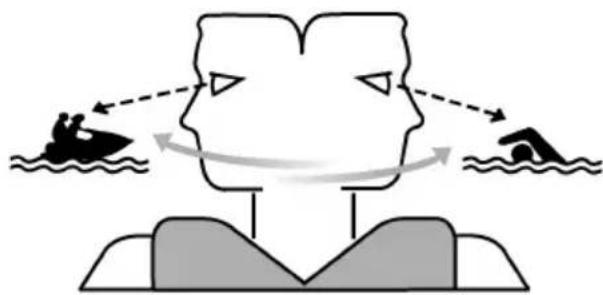
Before starting the exercises read this guide completely. Then read the exercise again before you start to practice it. In this guide we refer to different speeds.
How to use this guide to practice
Here is an explanation of what we mean by each:
"Trolling" is the lowest maneuvering speed. You are applying little or no throttle. The watercraft is down in the water, and there is no wake.

Trolling speed
"Sub-planing" is a medium speed. The bow of the watercraft is slightly up from the water surface, but you are still traveling through the water. There is a wake.
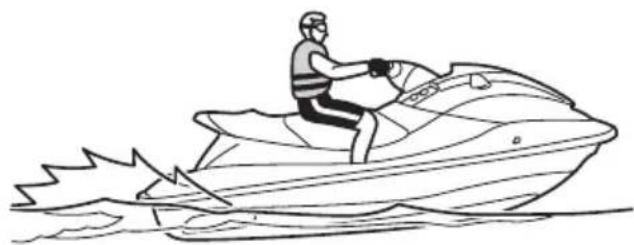
Sub-planing speed
"Planing" is a faster speed. The watercraft is more level and is skimming on top of water. There is a wake.
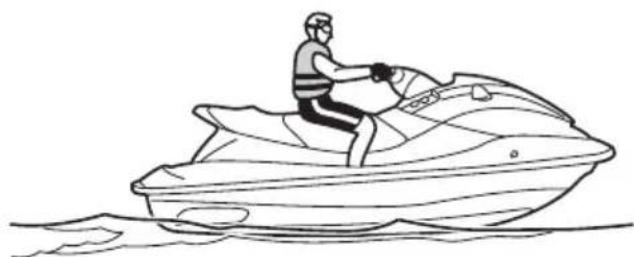
Planing speed
Exercise 1: Controls
Objective:
This exercise trains you to locate and operate the watercraft's controls without looking or hesitating. You must master this skill so you can scan constantly for people, objects, and other watercraft as you maneuver, rather than taking away concentration to find a control.
Skills:
Knowing where every control is and how to use it without having to stop and think about it.
Directions:
Drill 1: Identifying the components and controls
Read your Owner's/Operator's Manual to identify the watercraft's main components and controls.
Do not just assume you know how a control works, read the instructions to be sure!
Drill 2: Pre-operation checks
Practice performing the pre-operation checks listed in your Owner's/Operator's Manual. You learned where everything is in Drill 1.
Now make sure everything is working properly. Pay particular attention to the steering controls and the throttle lever.
Drill 3: Operating positions
With the watercraft on land and the engine off, board and become familiar with the correct operating positions described in your Owner's/Operator's Manual. Then, with your eyes facing straight ahead, locate each control and verify that you know how to use it. Continue this drill until you feel comfortable with the controls.
Exercise 2: Starting and stopping engine
Objective:
This exercise teaches you about how the engine starts and stops and how the watercraft behaves after starting and while idling.
Skills:
Identifying and performing engine starting and stopping controls and procedures.
Directions:
Launch the watercraft and practice this exercise while standing next to it in water free from weeds or debris and at least 60~cm (2 ft) deep from the bottom of the watercraft.
Never operate in water that is less than 60~cm (2 ft) deep, otherwise pebbles or sand could be sucked into the jet intake, causing impeller damage or engine overheating.
Exercise 2: Starting and stopping engine
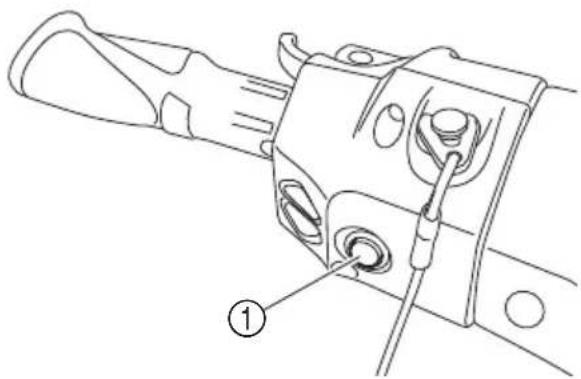
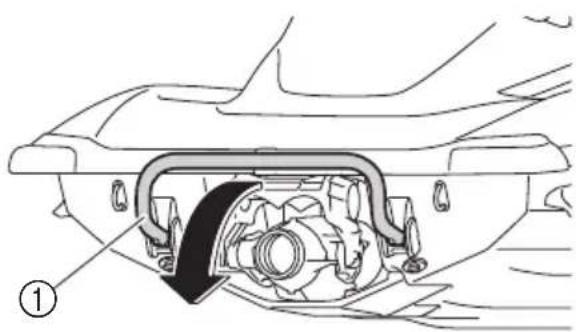
Drill 1: Starting the engine
-
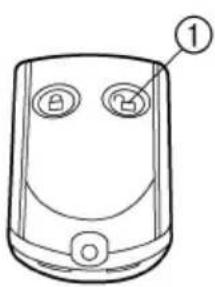
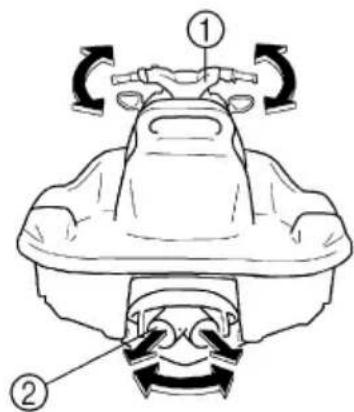
Press the unlock button ① on the remote control transmitter to deactivate the security system. (See the "Yamaha Security System" section in the owner's/operator's manual for more information.)
-
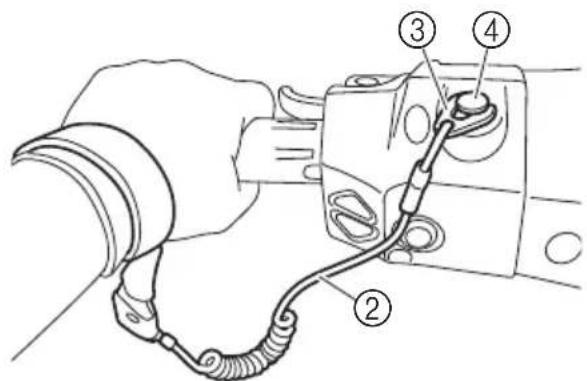
Attach the engine shut-off cord ② to your wrist. Insert the clip ③ , under the engine shut-off switch ④ . Make sure to keep the engine shut-off cord free from the handlebars so the engine stops if the operator falls off. The clip may not pull free if the cord is wrapped around the handlebars.
- Push the start switch ⑤ (green button).
(Do not squeeze either the throttle lever or RiDE lever. Otherwise, the engine will not start.)
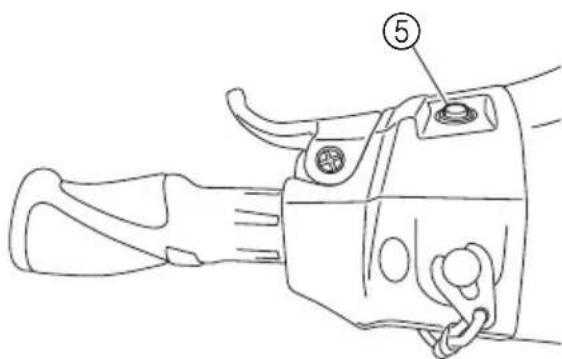
- Release the start switch as soon as the engine starts to run.
Exercise 2: Starting and stopping engine
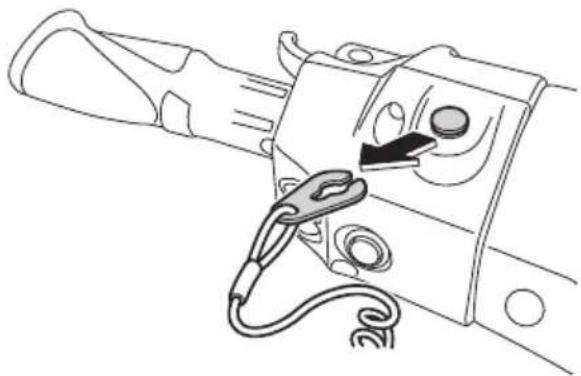
Drill 2: Stopping the engine
-
Release the throttle lever and let the engine slow to idle.
-
Push the engine stop switch ① (red button). The ignition circuit opens and stops the engine immediately.
- Practice pulling the engine shut-off cord to remove the clip from the engine shut-off switch.
Tips:
-
Attach the engine shut-off cord to your left wrist before starting the engine. To prevent accidental starting, always remove the clip from the engine shut-off switch when the engine is not running.
-
Do not operate the start switch for more than 5 seconds at a time. Never push the start switch while the engine is running.
-
If the engine does not start in 5 seconds, release the start switch and try again after 15 seconds. Continuous cranking for more than 5 seconds will discharge the battery and the engine will not start.
-
When the engine starts, thrust from the jet unit will move the watercraft. Squeezing the throttle lever produces more thrust. Apply only enough throttle to keep the engine running.
Exercise 3: Boarding and balancing
Objective:
This exercise trains you to board the watercraft in deep water after falling off, and to upright a capsized watercraft. Repeat these exercises until you can perform them without difficulty.
Skills:
Boarding in deep water and balancing at a standstill.
Directions:
Practice this exercise near shore before going out into open water.
The heavier the weight of an operator, the more difficult it will be to balance the watercraft.
These exercises should be done without starting the engine.
Attach the engine shut-off cord to your wrist and keep the watercraft afloat in water that is at least chest deep.
Drill 1: Boarding the watercraft
- Swim to the rear of the watercraft and place both hands on the boarding platform, and then grasp the handgrip with one hand.
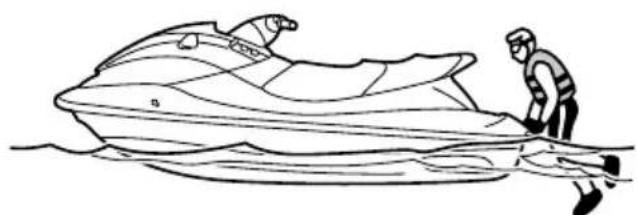
- Pull yourself up to a kneeling position on the platform, and then move to the seat and sit astride.
Exercise 3: Boarding and balancing
- With the engine shut-off cord attached to your wrist, install the clip to the engine shut-off switch.
- Grip the handlebars firmly with both hands and place both feet in the footwell.
- Practice boarding and balancing several times until you can maintain good balance of the watercraft during the entire process.
Tips:
This watercraft is equipped with a reboarding step ①, which can be lowered and used to assist in reboarding. The step returns automatically to the up position after you have boarded.
Exercise 3: Boarding and balancing
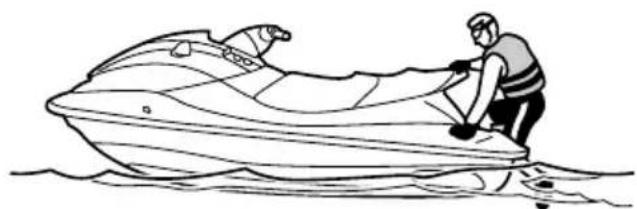
Drill 2: Uprighting a capsized watercraft
Do not leave the watercraft capsized longer than necessary to upright it again. More water may enter the engine compartment the longer the watercraft is capsized.
- To practice uprighting, first purposely capsize the watercraft.
- Remove the clip from the engine shut-off switch.
- Swim to the rear of the watercraft. Turn the watercraft over by pulling on the ride plate with one hand while pushing down on the gunwale with your other hand or your foot.
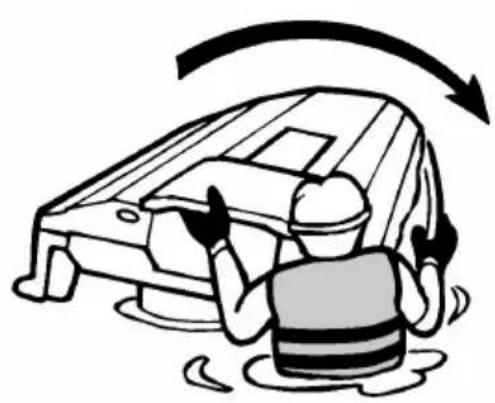
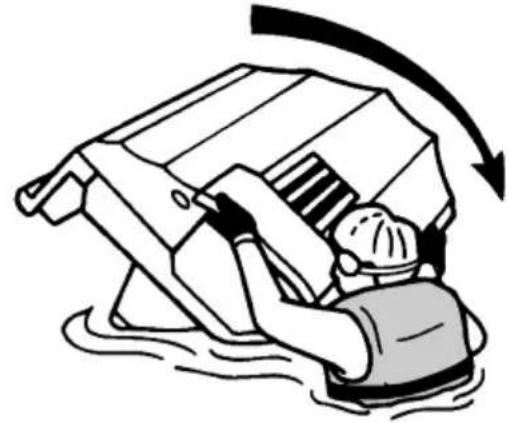
- Start the engine and operate the watercraft above planing speed as straight as possible for at least 2 minutes to discharge any water remaining in the engine compartment. (See the "Capsized watercraft" section in the owner's/operator's manual for more information.)
Exercise 4: Trolling speed maneuvering
Objective:
This exercise familiarizes you with the watercraft's handling characteristics at trolling speed. It teaches techniques you will use when beaching, docking, or approaching objects.
Skills:
Starting and turning at trolling speed.
Directions:
Drill 1: Moving straight and turning at trolling speed
- Board the watercraft, and check for people, objects and other watercraft.
- Start the engine and go straight ahead.
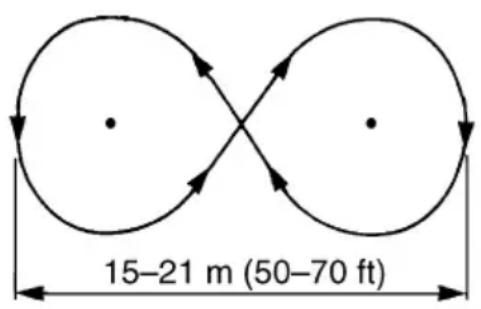
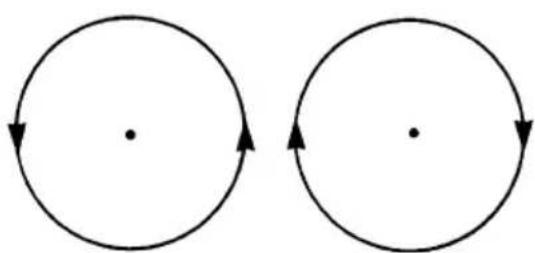
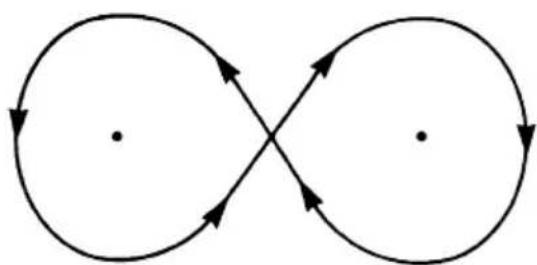
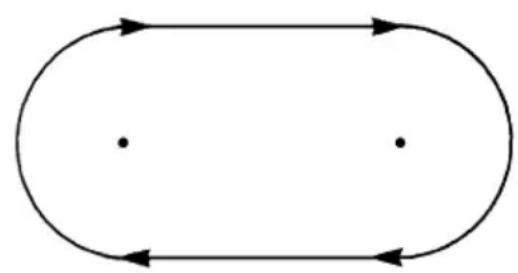
- Begin to turn, making a large figure eight about 15-21 m (50-70 ft) long. Do not apply throttle.
Drill 2: Making full-lock turns at trolling speed
- Turn the handlebars as far as possible in either direction. Allow the watercraft to turn 360^ .
- Practice turning both clockwise and counterclockwise to get a feel for how the water-craft responds to handlebar movement.
Exercise 5: Sub-planing speed maneuvering
Objective:
This exercise shows you how to move ahead, turn in small circles, and combine the two maneuvers to make a figure eight.
Skills:
Throttle control and slow to medium speed turning.
Directions:
Steering
Your watercraft is steered by a combination of applying throttle and turning the handlebars ①. When the handlebars are turned, the angle of the jet thrust nozzle ② at the stern is changed, which changes the direction of the watercraft.
Since the strength of the jet thrust determines the speed and direction of a turn, the throttle must always be open when attempting a turn, except at trolling speed.
Exercise 5: Sub-planing speed maneuvering
Stopping
The watercraft is not equipped with a separate braking system. The watercraft slows down by water resistance or, when operating in reverse, by the water jet. The watercraft slows down as soon as the throttle lever is released, but will coast for a distance before fully stopping. If you are not sure you can stop in time before hitting an obstacle, apply throttle and turn in another direction.
From full speed, the watercraft comes to a complete stop due to water resistance in approximately 110m (360 ft) after the throttle lever is released or the engine is stopped, although this distance will vary depending on many factors, including gross weight, water surface conditions, and wind direction.
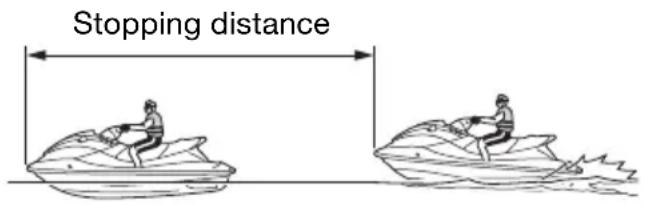
If the RiDE lever is squeezed to slow down, the stopping distance is approximately 30% shorter than when the RiDE lever is not used. However, this distance will vary depending on many factors, including gross weight, water surface conditions, and wind direction.
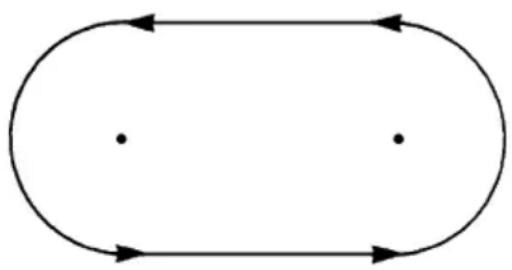
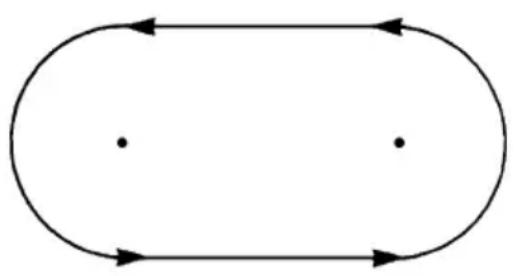
Drill 1: Moving forward and turning in large ovals
- Gradually accelerate forward to sub-planing speed, and then make a gradual right turn while maintaining your speed.
- Repeat the drill, making a gradual left turn.
- Repeat the drill, traveling forward and turning to make a complete oval.
Exercise 5: Sub-planing speed maneuvering
Drill 2:Turning in circles
-
Make large circles, turning to the right. Gradually decrease the size of the circles while keeping your speed constant.
-
Repeat the drill, turning to the left.
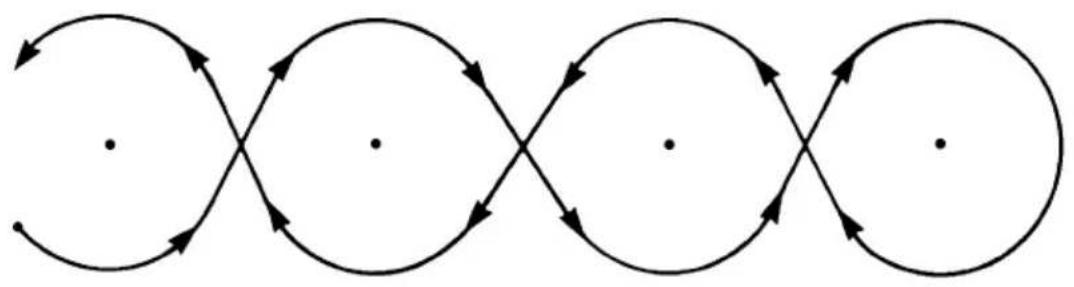
Drill 3: Making a figure eight
-
Combine the above drills to make a large figure eight.
-
Repeat the drill, making the figure eight smaller each time.
Drill 4: Understanding how throttle affects turns
- Gradually accelerate to sub-planing speed while traveling in a straight line. Release the throttle lever and then turn the handlebars as far as possible to the right or left.
- Notice that you have rapidly decreasing ability to turn the watercraft and that the watercraft does not respond to handlebar input once the engine slows down after the throttle lever is released.
- Gradually re-apply throttle to see how the watercraft responds with throttle again.
Tips:
To make tight turns at these speeds you must apply more throttle while you are turning the handlebars.
Exercise 6: Full acceleration and stopping
Objective:
This exercise teaches you how the watercraft stops.
Skills:
Stopping, operating at planing speed, and stopping from planing speed.
Directions:
Releasing the throttle completely produces only minimum thrust. Once the engine slows down, the watercraft will no longer respond to handlebar input until you apply throttle again or you reach a trolling speed - you need throttle to steer.
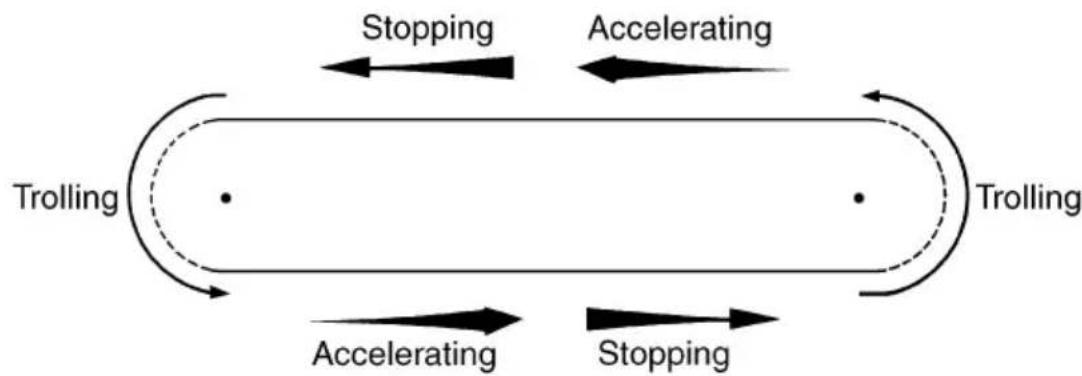
Drill 1: Stopping
- Accelerate to planing speed, and then release the throttle lever until you come to a stop.
- Make a turn at trolling speed as shown in the illustration.
- Repeat the drill, increasing your maximum speed as you progress.
Drill 2: Approaching objects
- Pick a spot in the water at a certain distance away and visualize an imaginary object there.
- Accelerate toward the chosen spot, then release the throttle lever and slow to see if you can stop before you reach the imaginary object.
- If the watercraft will not stop before it reaches the imaginary object, look in all directions, then apply throttle and turn away from the spot, as if you were avoiding the object.
Repeat the drill at different distances from your chosen spot and at different speeds so you become familiar with both stopping and turning as ways to avoid objects in your path.
Tips:
- If a smaller practice area is used, reduce the maximum speed you reach.
- The faster you go, the farther it will take you to stop.
Exercise 7: Planing speed operation
Objective:
This exercise teaches you how the watercraft feels and operates at higher speeds. It also illustrates what happens when the watercraft slides or partially spins due to abrupt high speed turning.
Skills:
Throttle control, turning, shifting weight, and sliding.
Directions:
Because of the high speeds involved, do this exercise in a very large area, in open, calm water free of traffic or other obstacles.
Remember, you need throttle to steer.
Drill 1: Turning at planing speed
- Accelerate to planing speed, and then make a turn.
- Practice making ovals using right and left turns.
- Repeat the drill, starting with gradual turns and slower speeds, and then working up as your skill and confidence build.
You will notice how the watercraft no longer "carves" its turns as it did at sub-planing speed.
The watercraft can only make so sharp a turn at any given planing speed.
When the handlebars are turned more than is necessary, the watercraft may start sliding and may not turn any more sharply. This is because when the watercraft is sliding there is less water going into the jet intake, and steering thrust is reduced because less water is discharged from the jet thrust nozzle.
As a result, the watercraft starts to slow down and turns more gradually. Returning the handlebars to a less extreme position allows the watercraft to resume normal turning.
Exercise 7: Planing speed operation
Drill 2: Planing speed operation while turning
- Accelerate to planing speed.
- Combine right and left turns to make a series of circles and figure eights.
- Repeat the drill, gradually increasing your speed and making tighter turns. Do not try to do too much too soon.
Tips:
- Get to know how the watercraft responds at lower speeds before trying to go faster.
- You can make sharper turns at planing speeds.
- Remember, as with any motor vehicle, the faster you go, the farther it takes to stop.
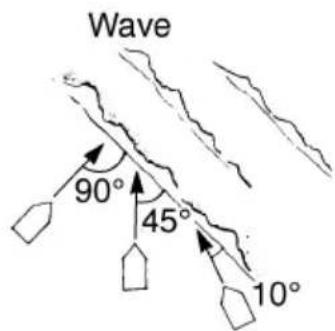
Exercise 8: Crossing wakes and swells
You will not always have flat, smooth water to ride on. There will be swells, wakes from other boats, etc. We cannot give you a drill to practice as in the earlier lessons, but we can give you some information to help you when you encounter swells and wakes.
The best way to cross wakes and swells is with the least jolt to you and the watercraft. Small swells are not as difficult to cross as larger swells or wakes.
Crossing a sharp wake gives more of a jolt than a broad swell.
To cross a wake or swell, change your speed and choose the angle at which you cross the wake or swell. Usually, a slower speed and "quartering" the wake (crossing at an angle) will reduce the jolt.
Two other things you may notice as you ride.
The first is that crossing a group of wakes or swells is not as easy or smooth as crossing just one wake.
The second is that when you quarter the wake or swell the watercraft will try to steer away from the wake or swell.
When crossing at a 45^ angle, you may not notice this, but at a smaller angle, say 10^ , it can be very strong. Be prepared to steer and balance as necessary.


Tips:
- Grip the handlebars firmly and keep both feet on the floor of the footwell at all times.
- Reduce speed before crossing the wake or swell.
- "Quarter" the wake or swell.
- When going over wakes, raise your body off the seat slightly and absorb the shock with your knees.
- Do not operate the watercraft with your chin or chest right above the handlebars. It is possible for the operator to hit his or her chest or jaw on the watercraft body or handlebars and be injured.
- Do not operate in rough water.
- Do not operate in bad weather.
Exercise 9: Operating with passengers
Objective:
This exercise lets you practice operating the watercraft with passengers on board.
Skills:
Boarding with passengers, and maneuvering the watercraft with passengers on board.
Directions:
The heavier the total weight of the operator and passengers, the more difficult it will be to balance the watercraft.
Maximum load
Do not operate the watercraft when the total weight exceeds 240kg (530 lb) including any cargo.
Drill 1: Boarding, accelerating and maneuvering with passengers on board
- Board the watercraft as noted in Exercise 3, and sit astride the seat.
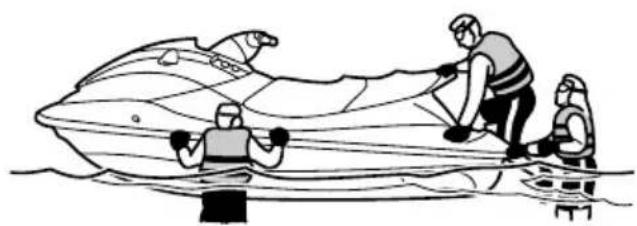
- Grip the handlebars with both hands and place both feet on the floor of the footwell.
Exercise 9: Operating with passengers
- Have the passenger get on board and sit astride the seat. If additional passengers are getting on, have them follow the same procedure.

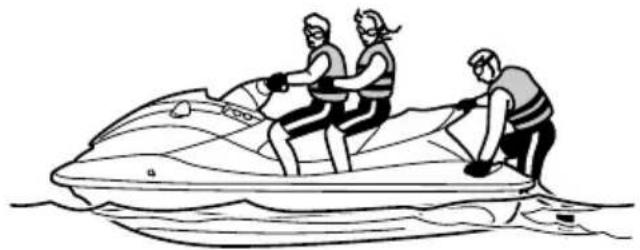
- Make sure all passengers are properly seated with their feet in the footwell and that they are securely holding on to the person in front of them or to the handgrip provided.
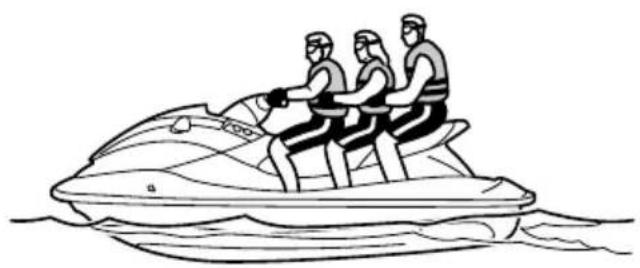
-
Attach the engine shut-off cord to your left wrist, and then install the clip to the engine shut-off switch.
-
Look in all directions, start the engine, and then start off slowly.
-
Practice accelerating, turning, and stopping to get accustomed to how the watercraft handles with passengers on board.
Postscript
Watercraft operation requires common sense and good judgment, as well as skills and knowledge that are learned as riders become familiar with the craft. Although practicing the exercises contained in this book helps you learn needed skills, you should be aware of your limits and stay within them as you continue to develop your abilities.
Sommaire
©2020 Yamaha Motor Co., Ltd.
1ère Edition, mai 2019
Exercice 1: Commandes
Objectif:
©2020 Yamaha Motor Co., Ltd.
- Ausgabe, Mai 2019
©2020, Yamaha Motor Co., Ltd.
1a edition, Mayo 2019
Controlo directional
OAHTOIPIAKTIKHESEAKEHSE
©2020 aπό την Yamaha Motor Co., Ltd.
1η'Ekδoση, Mauoc 2019
Me eipo6laogov tov dkaowotov ma.
Anayopoeetai npnta ka0e aovaoipertn
avapaywnxopi tsnv ypantn adia tnC
Yamaha Motor Co., Ltd.
Hektoonooeyivoeotny HIIA
Eioaayn
©2020 Yamaha Motor Co., Ltd.
July 2019-0.3 × 1 CR
F2W-F819T-73
(E,F,G,S,P,R,H,M)