IAN 107555 - Metal detector POWERFIX - Free user manual and instructions
Find the device manual for free IAN 107555 POWERFIX in PDF.



| Product type | Multifunction detector (metal, wood, live cables, laser rangefinder) |
| Brand | Powerfix |
| Model | IAN 107555 |
| Power supply | 9V battery |
| Laser | Class 2, power < 1 mW, wavelength 650 nm |
| Distance measurement range | 0.6 m to 16 m (2 to 53 ft) |
| Detection functions | Metals, wood, live AC cables |
| Measurement functions | Distance, area, volume, totalization |
| Laser marking | Horizontal and vertical line |
| Bubble level | Integrated |
| Scope of delivery | Detector, 9V battery, instruction manual |
| Maintenance | Clean with a dry, soft cloth. Do not use chemical products. |
| Safety | Class 2 laser: do not look into the beam. Do not drill on a detected cable. Do not use in explosive atmospheres. |
| Warranty | 3 years |
| Customer service France | 0800 919270 (toll-free) |
| Customer service Switzerland | 0842 665566 (0.08 CHF/min) |
Frequently Asked Questions - IAN 107555 POWERFIX
User questions about IAN 107555 POWERFIX
0 question about this device. Answer the ones you know or ask your own.
Ask a new question about this device
Download the instructions for your Metal detector in PDF format for free! Find your manual IAN 107555 - POWERFIX and take your electronic device back in hand. On this page are published all the documents necessary for the use of your device. IAN 107555 by POWERFIX.
USER MANUAL IAN 107555 POWERFIX
MULTIFUNKTIONSDETEKTOR PMDL 5 A1
DE AT CH
MULTIFUNKTIONSDETEKTOR
Bedienungsanleitung
FR CH
DÉTECTEUR
MULTIFONCTION
Mode d'emploi
IT CH
Operating instructions
IAN 107555


DE AT CH
Before reading, unfold the page containing the illustrations and familiarise yourself with all functions of the device.
⑫ Taste RM (Read Memory)
13 Taste Haltenadel
14 Taste +/=
15 Batteriefach
16 Taste PUSH
Lieferumfang
Abb. 1 Abb. 2
Abb. 3
KOMPERNASS HANDELS GMBH
BURGSTRASSE 21
44867 BOCHUM, GERMANY
www.kompernass.com
SOMMAIRE
PAGE
Usage conforme 14
Fig. 3
KOMPERNASS HANDELS GMBH
BURGSTRASSE 21
44867 BOCHUM, GERMANY
www.kompernass.com
INDICE PAGINA
Uso conforme 26
III. 1 III. 2
III. 3
KOMPERNASS HANDELS GMBH
BURGSTRASSE 21
44867 BOCHUM, GERMANY
www.kompernass.com
CONTENT PAGE
Intended use 38
Safety instructions 38
Technical data 40
Description of the appliance 40
Items supplied 40
Unpacking 40
Inserting the battery 41
Measuring distances 41
Measuring areas 43
Measuring volumes 44
Locating concealed objects 44
Laser marking 46
Battery display 47
Cleaning and storage 47
Disposal 47
Warranty & Service 48
Importer 48
Read the operating instructions carefully before using the device for the first time and preserve this booklet for later reference. Pass this manual on to whoever might acquire the device at a future date.
MULTI-FUNCTION DETECTOR
PMDL 5 A1
Intended use
The Multi-Measurement Detector is designed for the locating of electrical cables, of wood and metal objects, for the projecting of laser lines, for the measuring of areas and volumes as well as for the measuring of distances. The appliance is intended for domestic use only. Do not use it for commercial purposes. A different or any other usage is regarded as unintended use and can lead to damages and injuries. No liability will be accepted for damage caused by manipulation of the laser equipment, as well as of the ultrasound transmitter/receiver, or through disregard of these safety instructions.
Safety instructions
Optimal and safe working with the multi-detector is only possible if you read these operating and safety instructions completely and strictly follow their instructions.
Risk of injury!
- Do not use the appliance at locations where there is a risk of fire or explosion, e.g. close to inflammable liquids or gases.
- This appliance may be used by children aged 8 over and by persons with reduced physical, sensory or mental capabilities or lack of experience and knowledge, provided that they are under supervision or have been told how to use of the appliance safely and are aware of the potential risks. Children must not play with the appliance. Cleaning and user maintenance tasks must not be carried out by children unless they are supervised.
• Exercise caution with the holding pins. They are sharp and can cause injuries.
⚠ Caution regarding damage to the appliance!
- Do not expose the appliance to rainfall. Do not use the appliance in moist or wet environments.
- Do not place objects containing liquids, e. g. flower vases, on the appliance.
- Do not place any open sources of fire, like candles, on the device.
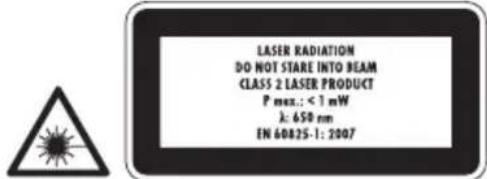
This appliance contains a Class 2 laser. NEVER direct the laser beam at people or animals. NEVER look directly into the laser. The laser can cause serious eye damage.
- Do NOT direct the laser beam at strongly reflective material.
Reflected laser beams are also dangerous.
- Do NOT use the appliance to determine the alternating voltage level in exposed or non-insulated power cables.
- Do NOT use the appliance as a substitute for a voltmeter.
⚠️ Notes regarding inaccurate measurement results
The appliance does not always recognise all pipes and power cables.
The following conditions can contribute to inaccurate results:
- very thick walls
- weak battery
- deeply laid power cables or pipework
- shielded cables
- thick walls with thin pipes or power cables
- walls panelled with metal sheets
- very moist conditions
• This appliance is not suitable for detecting power cables in circuits,
- which are isolated from the mains power supply.
- through which direct current flows.
- which are used for computer or telecommunications systems.
- With this appliance pipework made of plastic or similar materials cannot be detected, only pipework made of metal.
△ Interaction with batteries:
- Leaking batteries can cause damage to the appliance. If you do not intend to use the appliance for an extended period, remove the batteries.
- Should the batteries leak, wear protective gloves and clean the battery compartment with a dry cloth.
- Keep batteries away from children. Children can put batteries into their mouths and swallow them. Should a battery ever be swallowed, seek medical attention IMMEDIATELY.
Distance measurement by means of Ultrasound
Locating of: power cables, metal, wood
Laser class: 2
Max. output power (P.max): < 1 mW
Wave length ( ): 650 nm
according EN60825-1:2007
Power supply: 9 V block battery
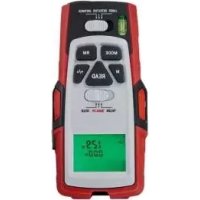
Description of the appliance
① Measurement point
② Display
③ Material switch (STUD/AC WIRE/METAL)
4 Button - MODE
⑤ Button - Holding pin
6 Button - READ
⑦ Button M (Memory)
8 Spirit level
9 Laser beam exit opening
⑩ Ultrasound sender/receiver
11 Function switch (LASER/DETECTOR/DISTANCE)
12 Button - RM (Read Memory)
13 Button - Holding pin
14 Button +/=
15 Battery compartment
16 Button - PUSH
Items supplied
- Multi-Function Detector
- 9 V block battery
- Operating instructions
Unpacking
Take the Manifold Measurer from its packaging. Remove all transport restraints and packaging materials. Remove the protective foil from the display ②.
- Open the battery compartment Detector.
15 on the rear side of the Multi-Measurement - Place the 9 V block battery onto the contacts. Pay heed to the correct polarity.
- Lay the tape for removal of the battery underneath the 9 V block battery and press it into the battery compartment 15.
⚠️ Important!
Ensure that the wires are not trapped in any way.
This would lead to irreparable damage to the appliance.
-
Close the battery compartment with an audible click.
-
The battery compartment lid must close
Measuring distances
- Slide the function switch ⑪ to „DISTANCE“. The display ② switches itself on.
To switch between the metric and the Anglo-American units of measurement, press and hold the button MODE ④. Then press the button READ ⑥ and release both buttons simultaneously. When you release the buttons, the measurement units change.
(i) Note:
Measurements start at the measurement point ①!
Should the measurement lie outside the measurement range, „Err“ or an illogical number appear in the display. The measurement range lies between 0,6 m (2') and 16 m (53').
-
Hold the appliance upright towards the wall to which you wish to measure the distance. The ultrasound sender/receiver 10 must be at a right-angle to the wall. For this, use the spirit level: The bubble in the glass 8 must stand between the marking lines (see Fig. 1).
-
Press the button READ ⑥. The distance measured appears in the display ②. When you hold the button READ ⑥ pressed down and slowly move the appliance over the surface to be measured, the appliance continually measures the distances. These are shown on the display ②.
Take note of the following illustrations:
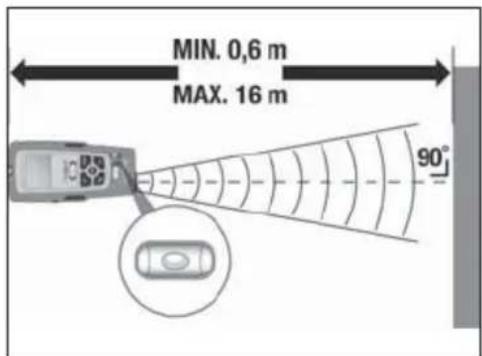
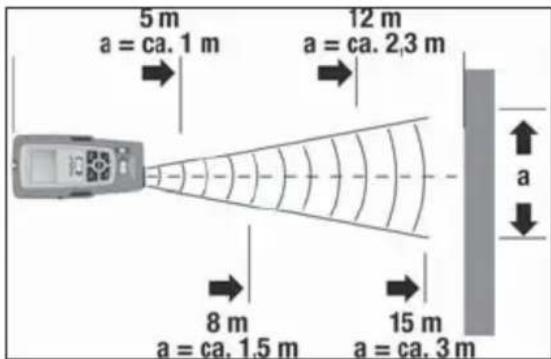
Fig. 1 Fig. 2
The further you are from the wall, the wider is the area (a) that the Multi-Measurement Detector must measure by ultrasound (Fig. 2). Therefore take care that the Manifold Measurer is always directed at a right angle towards a level surface (Fig. 1 and 3). Ensure that there are no objects positioned within the measurement area.
False!
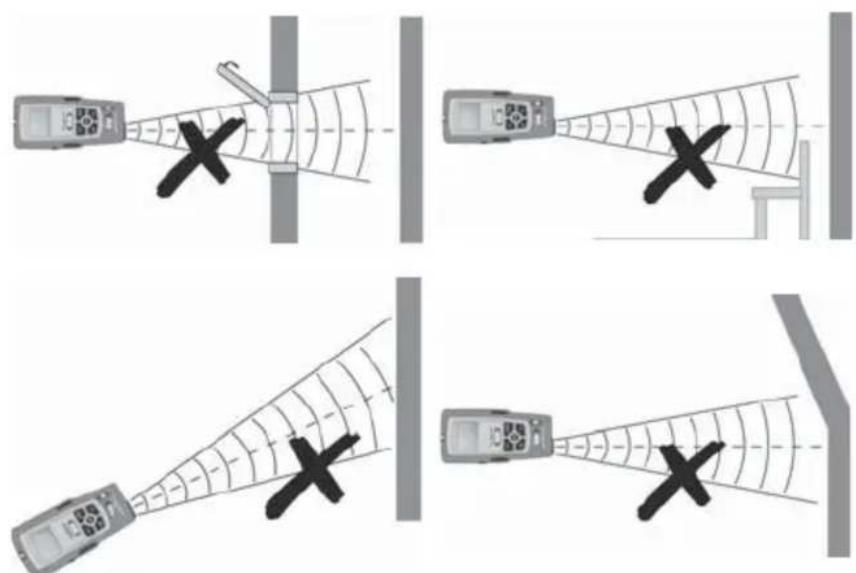
(Fig. 3)
The display illumination glows during the measurement. If a button is not pressed within ca.15 seconds, the illumination extinguishes. After a further ca. 15 seconds the display itself switches off. Press the button READ ⑥, to reactivate the display and the illumination.
(i) Note:
Inaccurate measurements can also occur through a weak battery. If the battery is too weak, the battery symbol appears in the display.
Adding distances together
You can add the measured distances together:
- Measure the first distance as described.
- Press the button +/= 14. In the display ②, „+” appears and the distance measured carries itself over to the lower line.
- Measure the next distance. The newly measured distance is shown in the upper line.
- Once again, press the button +/= 14. The new measurement is added to the old measurement in the lower line.
- Repeat steps 2 to 4 to add further measurements.
- When you wish to leave the addition mode, press the button MODE All values are erased.
Measuring areas
- Slide the function switch ⑪ to „DISTANCE“.
The display ② switches itself on. - Press the button MODE ④ once. In the display ② flashes „L“ (Length).
- Press the button READ 6, to measure the length. In the upper line the measured length appears and „W“ (Width) starts to flash.
- Press the button READ ⑥ to measure the width. The measured width appears on the upper line and the result of the area calculation in the lower line.
Adding areas together
- Measure an area as described in the section „Measuring areas“.
- Press the button M ⑦. „M+“ appears in the display ②. The area measured is now saved.
- Press the button MODE measurement.
- The appliance is now ready for the second
- Measure the next area.
- Press the button +/= ⑭. A „+“ appears in the display ②.
- Press the button RM 12. The result of the first measurement is shown in the lower line.
- Press the button +/= 14. Both measurements are added together and the result is shown in the lower line.
- Repeat the steps 2 to 7 to add in further measurement values.
-
When you wish to leave the addition mode, press the button MODE All values are erased.
-
Slide the function switch ⑪ to „DISTANCE“.
The display ② switches itself on. - Press the button MODE ④ twice. In the display ② flashes „L“ (Length).
- Press the button READ ⑥, to measure the length. In the upper line the measured length appears and „W“ (Width) starts to flash.
- Press the button READ ⑥ to measure the width. In the upper line the measured width appears and „H“ (Height) starts to flash.
- Press the button READ ⑥ to measure the height. The measured height appears in the upper line. In the lower line appears the result of the volume calculation.
Adding volumes together
- Measure a volume as described in the section „Measuring volumes“.
- Press the button M ⑦. „M+“ appears in the display ②.
The volume measured is now saved.
- Press the button MODE measurement.
- The appliance is now ready for the second
- Measure the next volume.
- Press the button +/= 14. A „+“ appears in the display 2.
- Press the button RM 12. The result of the first measurement is shown in the lower line.
- Press the button +/= 14. Both measurements are added together and the result is shown in the lower line.
- Repeat the steps 2 to 7 to add in further measurement values.
- When you wish to leave the addition mode, press the button MODE All values are erased.
Locating concealed objects
Notice:
- Before using the appliance for this task, first test it by locating a pipeline or electrical power cable at a known position.
- In cases of doubt, always ask a qualified building contractor.
Attention!
Should the appliance find a live wire carrying alternating current,
⚠️ appears in the display. Under no circumstances should you drill at this location! Danger of electric shock!
The locating of concealed objects is the same in all three modes (STUD = wood, AC WIRE = live electric power cables, METAL = metal).
- Slide the function switch ⑪ to „DETECTOR“.
- Slide the material switch ③ to STUD, AC WIRE or METAL.
-
First of all, the appliance must be calibrated. Place it flat against the wall where you wish to search for concealed objects.
-
Press and hold the button PUSH 16 until the signal tone hums. The appliance has now adjusted itself to the wall thickness. Continue to keep the button PUSH 16 pressed down.
-
Move slowly along the wall with the appliance. As the arrows in the display move closer to the centre of the display, you are getting closer to the concealed object. When the arrows touch and a constant signal tone is heard, mark this position (see Fig. 4).
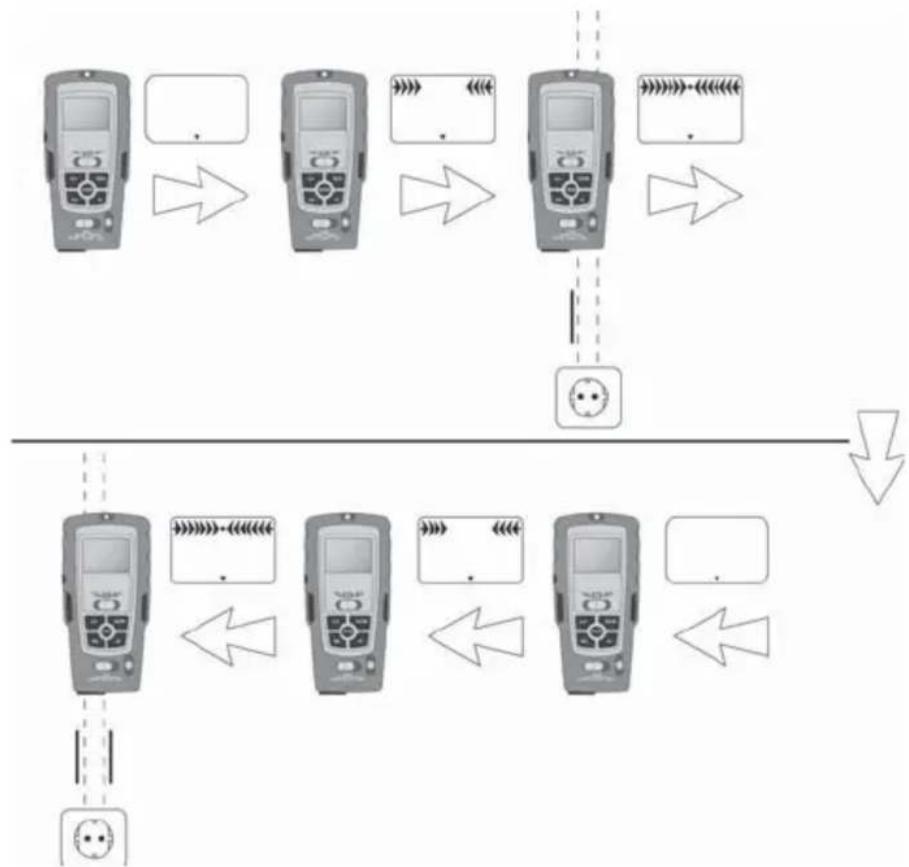
flowchart
graph TD
    A["Device 1"] -->|Signal| B["Device 2"]
    B -->|Data Signal| C["Device 3"]
    C -->|Data Signal| D["Device 4"]
    D -->|Data Signal| E["Device 5"]
    E -->|Data Signal| F["Device 6"]
    F -->|Data Signal| G["Device 7"]
    G -->|Data Signal| H["Device 8"]
    H -->|Data Signal| I["Device 9"]
    I -->|Data Signal| J["Device 10"]
    J -->|Data Signal| K["Device 11"]
    K -->|Data Signal| L["Device 12"]
    L -->|Data Signal| M["Device 13"]
    M -->|Data Signal| N["Device 14"]
    N -->|Data Signal| O["Device 15"]
    O -->|Data Signal| P["Device 16"]
    P -->|Data Signal| Q["Device 17"]
    Q -->|Data Signal| R["Device 18"]
    R -->|Data Signal| S["Device 19"]
    S -->|Data Signal| T["Device 20"]
Fig. 4
- Now repeat the procedure, but this time approach the object from the other side. As soon as the signal tone sounds, mark this position (see Fig. 4).
The concealed object runs between these two positions.
Locating wood objects
- Proceed with the search for wood objects as described in the section „Locating concealed objects“.
- When the Multi-Measurement Detector has found an object, mark it. To be sure that the object is wood, slide the material switch ③ to METAL.
- Now search in the same position for metal. Should the Multi-Measurement Detector not find anything, then the object is wood. Should it find something, then the object is metal.
In this case, search again at a different position in the mode „STUD“ and repeat steps 1 to 3.
Laser marking

The appliance contains a Class 2 laser. NEVER direct the laser beam at people or animals. NEVER look directly into the laser. The laser can cause serious eye damage.
You can use laser marking for the exactly horizontal positioning of pictures, shelves etc.
- Place the function switch ⑪ to „LASER“. A laser line is projected.
Horizontal laser line
Attention!
Exercise caution with the holding pins. They are sharp and can cause injuries.
- Hold the Manifold Measurer horizontally against the wall and align it with the assistance of the spirit level ⑧. The air bubble must stand between the two marking lines.
- Push both of the holding pins (5 + 13) buttons firmly downwards. The pins lightly bore themselves into the wall so that the appliance does not fall to the floor. The laser throws a horizontal line onto the wall.
(i) Note:
The holding pins do not function on stone or metal walls. The walls must have a soft upper surface.
Vertical laser line
- Secure a strong thread in the eyelet above the measurement point ①.
- Hang the Multi-Measurement Detector on the wall at the position where you want to project the vertical line. The Manifold Measurer hangs like a plumbline, perpendicularly downwards. The laser throws a vertical line onto the wall.
Battery display
A battery symbol appears in the display ② when the battery is weak resp. almost discharged. Replace the battery as soon as possible (see section „Inserting the battery“). If you do not, the measurements will be false.
Cleaning and storage
- Store the appliance at a dry and frost-free location.
- If you do not intend to use the appliance for an extended period, remove the battery from the battery compartment.
- Clean the appliance with a soft, dry cloth.
- Do not use chemical or abrasive cleaning agents.
These could damage the housing.
Disposal

Do not dispose of the appliance in your normal domestic waste. This product is subject to the European guideline 2012/19/EU.
Dispose of the appliance through an approved disposal centre or at your community waste facility. Observe the currently applicable regulations. In case of doubt, please contact your waste disposal centre.
Battery disposal!
Batteries may not be disposed of with normal domestic waste.
All consumers are statutorily obliged to dispose of batteries at the collection point in their community/district or with the original supplier. The purpose of this obligation is to ensure that batteries can be disposed of in an environmentally friendly manner. Only dispose of batteries when they are fully discharged.

Dispose of all packaging materials in an environmentally friendly manner.
The warranty for this appliance is for 3 years from the date of purchase. The appliance has been manufactured with care and meticulously examined before delivery. Please retain your receipt as proof of purchase. In the event of a warranty claim, please make contact by telephone with our Service Department. Only in this way can a post-free despatch for your goods be assured.
The warranty covers only claims for material and manufacturing defects, but not for transport damage, for wearing parts or for damage to fragile components, e.g. buttons or batteries. This product is for private use only and is not intended for commercial use. The warranty is void in the case of abusive and improper handling, use of force and internal tampering not carried out by our authorized service branch. Your statutory rights are not restricted in any way by this warranty. The warranty period will not be extended by repairs made under warranty. This applies also to replaced and repaired parts. Any damage and defects extant on purchase must be reported immediately after unpacking the appliance, at the latest, two days after the purchase date. Repairs made after the expiration of the warranty period are subject to payment.
GB Service Great Britain
Tel.: 0871 5000 720 (£ 0.10/Min.)
E-Mail: kompernass@lidl.co.uk
IAN 107555
Hotline availability:
Monday to Friday 08:00 - 20:00 (CET)
Importer
KOMPERNASS HANDELS GMBH
BURGSTRASSE 21
44867 BOCHUM, GERMANY
www.kompernass.com
KOMPERNASS HANDELS GMBH
BURGSTRASSE 21
44867 BOCHUM
DEUTSCHLAND / GERMANY
www.kompernass.com
- MULTIFUNKTIONSDETEKTOR PMDL 5 A1
- MULTIFUNKTIONSDETEKTOR
- DÉTECTEUR
- MULTIFONCTION
- DE AT CH
- Lieferumfang
- SOMMAIRE
- PAGE
- INDICE PAGINA
- CONTENT PAGE
- MULTI-FUNCTION DETECTOR
- PMDL 5 A1
- Intended use
- Safety instructions
- Risk of injury!
- ⚠ Caution regarding damage to the appliance!
- ⚠️ Notes regarding inaccurate measurement results
- △ Interaction with batteries:
- Description of the appliance
- Items supplied
- Unpacking
- ⚠️ Important!
- Measuring distances
- Note:
- Adding distances together
- Measuring areas
- Adding areas together
- Adding volumes together
- Locating concealed objects
- Notice:
- Attention!
- Locating wood objects
- Laser marking
- Horizontal laser line
- Vertical laser line
- Battery display
- Cleaning and storage
- Disposal
- Battery disposal!
- GB Service Great Britain
- Importer
Brand : POWERFIX
Model : IAN 107555
Category : Metal detector