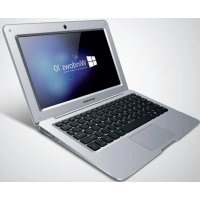
SCL101BTP - Laptop SCHNEIDER - Free user manual and instructions
Find the device manual for free SCL101BTP SCHNEIDER in PDF.



| Product Type | Laptop |
| Brand | Schneider |
| Model | SCL101BTP |
| Screen | 10.1 inches TN |
| Resolution | 1024 x 600 pixels |
| Processor | Intel Bay Trail 3735F Quad Core |
| RAM | 1 GB DDR3 |
| Internal Storage | 32 GB eMMC |
| Expandable Storage | microSD card up to 128 GB |
| Operating System | Windows 10 |
| Battery | Lithium-polymer, 10,000 mAh, 3.7 V |
| Power Supply | 5 V / 3 A AC adapter (input 100-240 V) |
| Front Camera | 0.3 megapixels |
| Wireless Connectivity | Wi-Fi, Bluetooth 4.0 |
| Ports | 1 USB, 1 HDMI, 1 headphone jack 3.5 mm, 1 microSD slot |
| Maintenance | Clean with a soft, dry cloth |
| Safety | Do not disassemble, do not expose to water or humidity |
Frequently Asked Questions - SCL101BTP SCHNEIDER
User questions about SCL101BTP SCHNEIDER
0 question about this device. Answer the ones you know or ask your own.
Ask a new question about this device
Download the instructions for your Laptop in PDF format for free! Find your manual SCL101BTP - SCHNEIDER and take your electronic device back in hand. On this page are published all the documents necessary for the use of your device. SCL101BTP by SCHNEIDER.
USER MANUAL SCL101BTP SCHNEIDER
Thisusermanualwillhelpyouunderstandthefeaturesandfunctionsof your newlaptop.Pleasereadthisusermanual carefullybeforeusingthisdevice.Itis recommendedtofullychargethedevicebeforethefirstuse.
Contents
- SafetyPrecautions2
II. ButtonsandPorts3
III.Desktop4
iv. SettingupaMicrosoftAccount5-6
v. StartMenuandtheWindowsStore7
vi. ActionCenterandOneDrive8
vii. TaskView,StartScreenandRestoringWindows9
viii. Tips&Tricks
IX. Specifications
10-14
15
Safety Precautions
- This device is suitable for use in tropical areas below 2,000 meters.
- Do not drop the device or apply strong force.
- Avoid extended use in extreme cold, hot, humid or dusty environments. Avoid exposing the device to direct sunlight for extended periods of time.
- Avoid using the device near strong magnetic fields and in static environments.
- Keep the device away from water and other liquids. In the event that water or other liquids get on or into the device, power off the device immediately and ensure the device remains off and unplugged until fully dry.
- Do not clean the device with any chemical or other liquid to avoid causing damage due to corrosion and moisture. Clean with a dry soft cloth only.
- We are not responsible for loss of data due to malfunction, misuse, modification, or accident.
- Please back up your important data regularly to avoid loss.
- Please do not attempt to disassemble or repair the product on your own, as it will warranty.
- Do not attempt to change the battery on your own. Using an incompatible battery may cause explosion.
- To reduce the risk of fire or electric shock, do not expose this device to rain or m The device should not be exposed to dripping or splashing. Never place objects filled with liquids, such as vases, on the device.
- Windows Software receives updates directly from Microsoft. The device will update automatically, or you may manually check to see if there are updates available from Microsoft.
- Remember your passwords - Manufactures and resell outlets cannot assist in unlocking your device due to forgotten passwords. Setting up a Microsoft account vs. local account is best if requesting any assistance from Microsoft for any issue.
- Handle your device with care - any misuse or abuse which causes malfunction of the unit, voids all warranty. This includes cracked display screens.
- We reserve the right to change the contents of this manual.
Appearance and buttons:
1.Power Button
2.Fron Camera
3.+5VDC
4. Headphone Connection
5.USB Port
6.HDMI Port
7.TF Card
8.Track pad
9.Display Screen
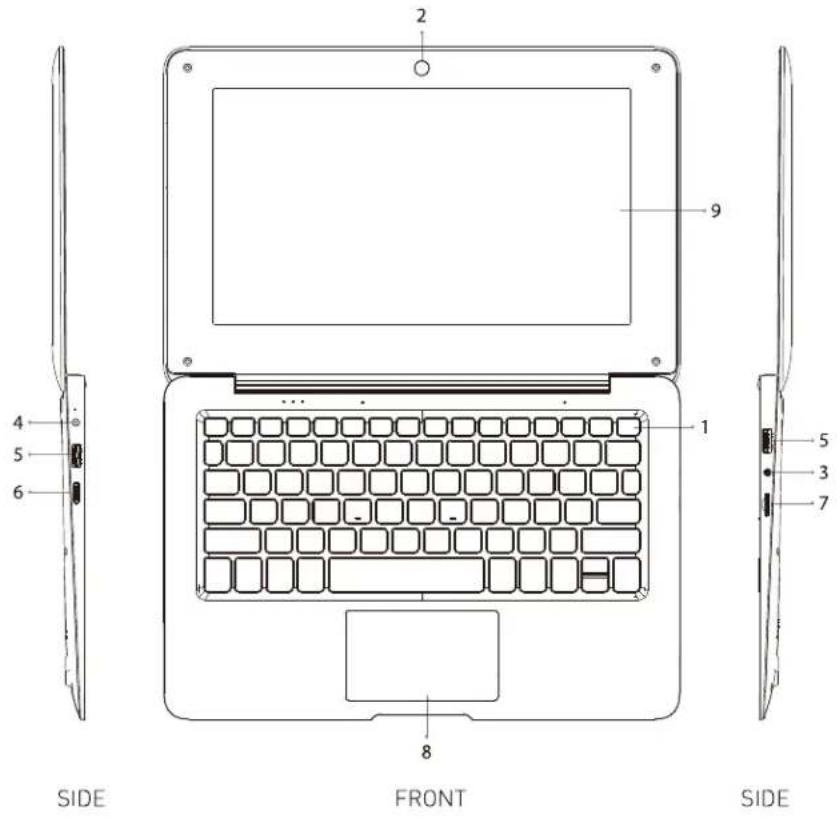
ButtonsandPorts
- PowerButton : To poweron/offthedevicel,lon g pressthe powerbuttonfor about 2-3 seconds.
- Camera:Fortakingphotosorvideos.
- Dcport :Usedtoconnectthepowersupplyandrechargethe device.
- Headphone port: Audio-out used toconnec t headphonesor portable speakerus ing a 3.5mmconnec tion.
- USBport :UsedtoconnectUSBaccessories suchasakekeyboard, mouse, USBdriveorotherportablestorage.
- HDMIport :HDMIoutusedtoconnectthedevicetoaTVorotherHDMI input.
- TFcardslot :UsedtoinsertaMicroSD(TF)cardtoexpandthememory. SupportsMicroSDcardsupto128GB.
- TrackPad: Translateshemotion and positionofauser'sfin gerstonavi gate and request functionson the device.
- DisplayScreen
Desktop
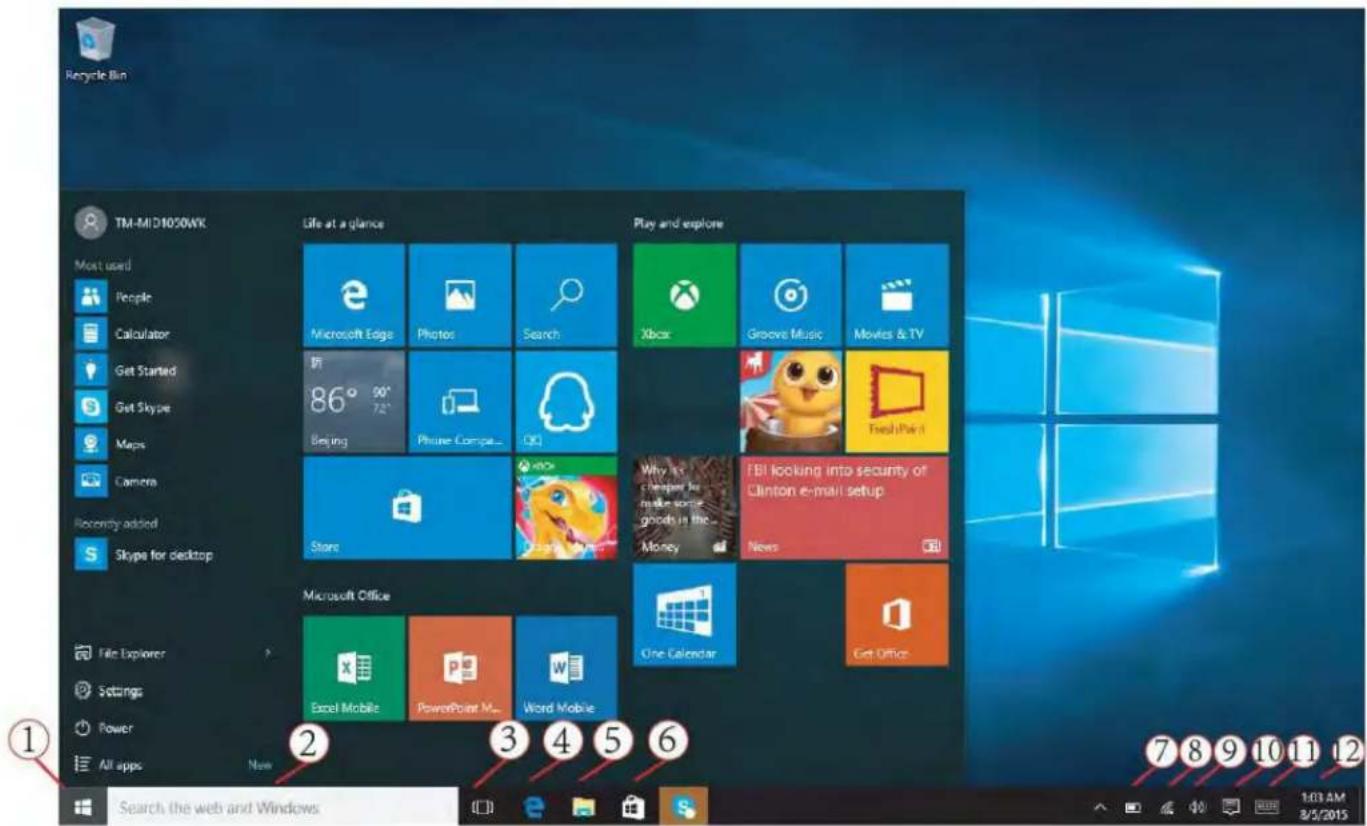
- Windows (Start) Icon 7. Battery
- Search Bar 8. Wi
- View all open windows 9. Volume
- Browser 10. Action Center
- File Explorer 11. Keyboard Settings 6. Windows Store 12. Date and Time Setting
Setting up a Microsoft Account
NOTE: We highly recommend using a Microsoft Account instead of a local account. If you use a local account and forget your password you will be locked out of the device.
Setting up Microsoft account allows you to sign in and use the various features provided on your tablet, includOneDrive, Outlook.com, Xbox Live, Office 365, Skype and more. Setting up Microsoft account makes using your device easier. If you do not already Microsoft account, you can create one for free.
Some of the benefits include:
- You only have to sign in once. If ydMicrosoft Account to sign into Windows, you do not need to sign in again to use Microsoft related apps and services suchSkype, Outlook.com, OneDrive and more.
You are connected and synchronized across all your Windows devices you have sign in under.
You will be prompted to sign into your existing Microsoft Account when accessing Windows. You can click up to create one if needed.
To create Microsoft Account, select Sign Upon the log in page.
- You can also goMicrosoft.com/account
NOTE: You can use your existing email address to sign up, even if it is Microsoft provided address. If you do not have an existing email address, you can click "get a new email address" to sign up for one.
If you just choose a Local Account, you will not get the benefits of on having to sign in once and having your settings synchronized across devices. Create a Microsoft Account to use these features.
Switching from a Local Account to a Microsoft Account
If you do sign in with a local account, you can choose to switch to a account at any time.
. Click on thWindows (Start) Icon
- Click onSettings
- Click on Accounts
. Click Sign in with a Microsoft Accountstead
Start Menu
The Start Menu is accessed by clicking Windows icon in the lower left corner of the screen.
The Start Menu provides access to tApps you have installed, system Settings, and othimportant features.
You can usAll Appsto view all installed apps in a list. You can pin frequently used apps to Start menu by holding your finger on the app icon for a few seconds and then choobingto" Start orPin to Task ba!.
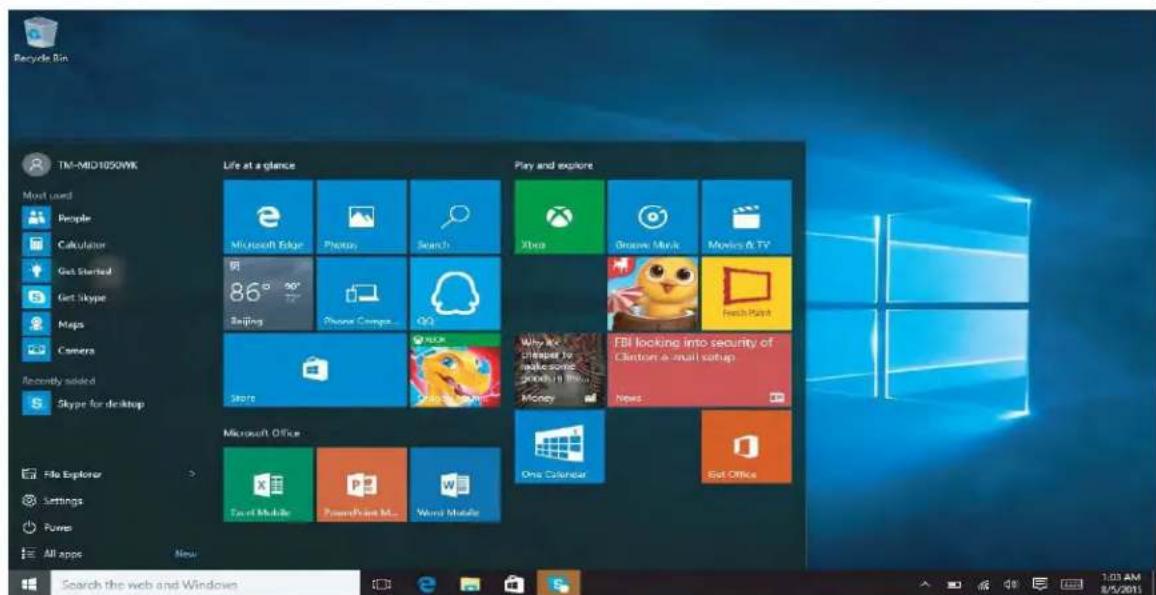
The Windows Store
The Windows Store is where you can install new apps for your device. I access theWindows Store, chooseStore from theStart Menu or click the shopping bag icon in the toolbar at the bottom.
- Search for the app you wish to download
. Click the app to view more information - Click Install if it is a free apBuyoto purchase the app and install it. NOTE: You need to be signed in to your Microsoft Account to inst from the Windows Store.
Action Center
The Action Center is accessed by tapping notification icon on the lower right.
The Action Center provides quick access to important notifications, and allows you to change some common settings.
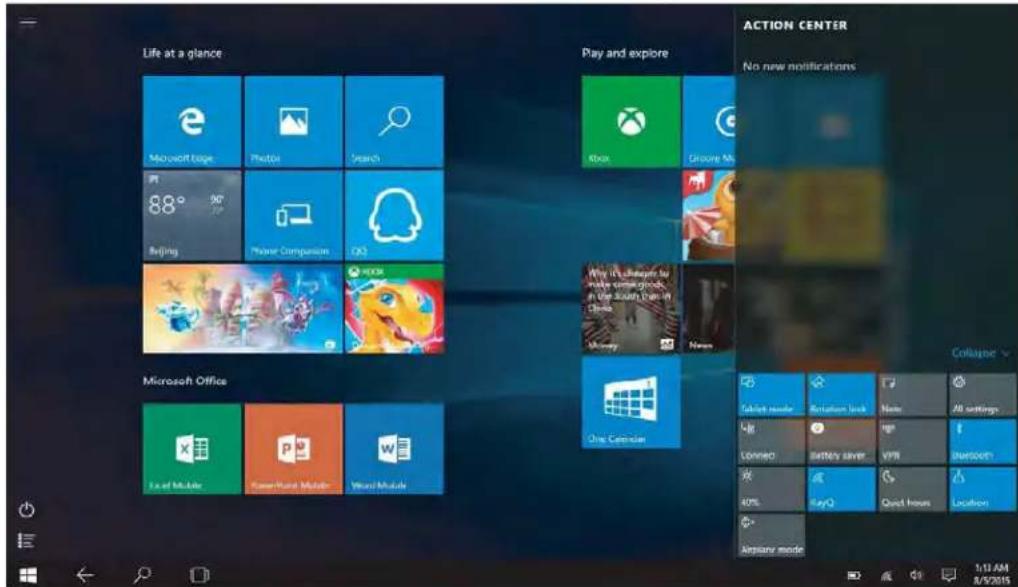
From the Action Center, you can turn Airplane Mode on or off. When Airplane Mode is on, all-FWiand otherconnections are disabled.
One Drive
OneDrive is an online cloud storage provide Microsoft. When you create a Microsoft Account, you get some online storage free through OneDrive.
You can accessOneDrive through theMicrosoft Edgebrowser by going to https://onedrive.com
Sign in with your Microsoft Account if prompted.
By default, a local folder is also createDrive.
You can find tDrive folder under
C:\Users[ACCOUNT_NAME]\OneDrive (where [ACCOUNT_NAME] is your username.
Task View
Task Viewallows you to quickly switch between and close open apps. To launch Task View, click the icon shown below on the bottom toolbar.

Start Screen
If you prefer using theWindows Start Screeninstead of thDesktop View, you can switch by using the steps below:
- Click on thWindows (Start) Icon
- Click Settings
- Click Personalization
- Choose Start on the left
To the right, turn the setting that UsesStart full screeh to on.
You can also switch back the Windows Start Screento Desktop
View by turning the option off. NOTE: You may need to sign out and back in for these changes to take effect.
Restoring Windows
If your device is encountering errors which you have been unable to reset, you can restore Windows to the original state.
- Click on thWindows (Start) Icon
- Click Settings
- Click Update and Security
- Click Recovery
. Under Reset this PClick Get Started
NOTE: If you want to keep any files, Keep my files. If you do not wish to keep your files, or you have backed them using an external method, click Remove Everything.
Tips and Tricks
1. Creating a Recovery Drive
It is recommended you create a recovery drive when you first get your tablet. A recovery drive can help you troubleshoot and fix problems with your PC, even if it won't start. To create one, all you need is a US
- From the task bar, search for Create a recovery drive and then select it.
You might be asked to enter an admin password or confirm your c - When the tool opens, make sure Back up system files to the recov drive is selected and then select Next.
- Connect a USB drive to your PC, select it, and then select Next > A lot of files need to be copied to the recovery drive, so this migl while.
- When it's done, you might see a Delete the recovery partition from your PC link on the final screen. If you want to free up drive space your PC, select the link and then select Delete. If not, select Finish.
2. Using Bluetooth to Send and Receive files:
- Click on the Windows (Start) Icon
- Click on Settings
- Click on Devices
- Click on Bluetooth and turnBluetooth ON
After Bluetooth is turnedON, your tablet will begin to search for nearby Bluetooth devices
NOTE: You will need to ensure that the device you wish to pair a Bluetooth enabled and is visible to nearby devices.
Once the search is complete, it will display available nearby devices. You can pair your tablet with another device by selecting it from the list.
NOTE: You may need to confirm a pass key on both devices to find pairing.
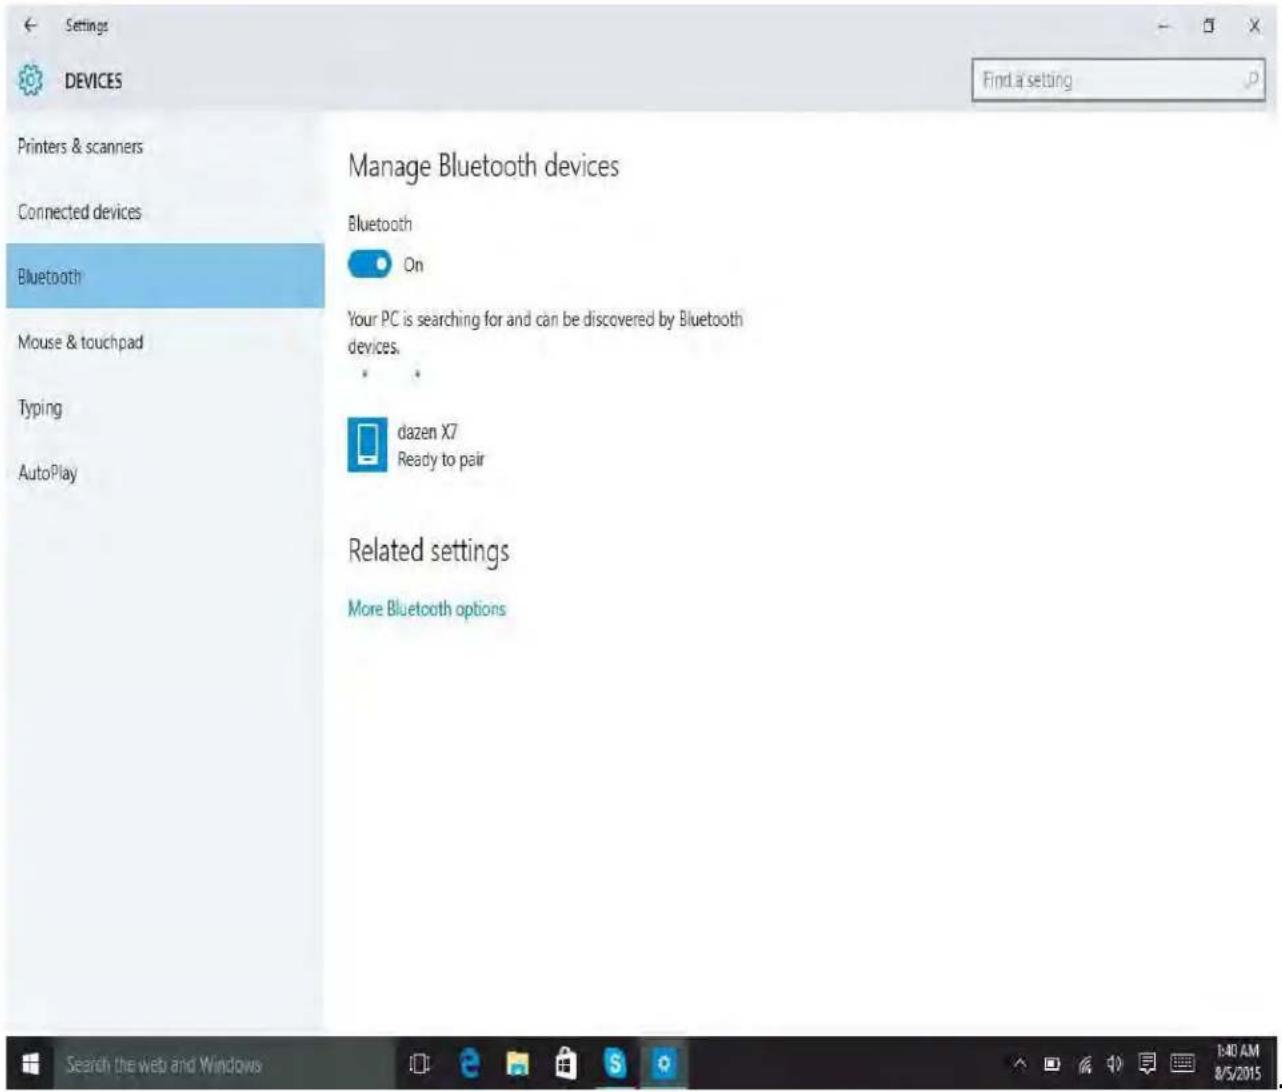
After pairing the devices click on the Bluetooth icon on the task the bottomright.
To transfer a file to your tablet, click receive" a file! You will see a "waiting for connection" window.
- Go to your other device, select the file you wish to send and use option to share or send via Bluetooth.
- Select the tablet from the list of paired devices to send.
- The tablet will begin downloading the file and will provide an opt save.
NOTE: The same process can be used to send files from tablet to device.
3. Resizing Icons and Fonts in Desktop View:
- Click on the Windows (Start) Icon
- Click on Settings
- Click on System
- Choose Display
Here you can choose from 100% , 125% , 150% or click "custom options".
NOTE: If you go over 150% , some menu options may no longer accessible. It is recommended you use the magnifier tool instead of you need the font to be larger.
4. Shutting Down and Powering On:
When you shut down the PC, allow the PC to shut down completely. recommended to wait five minutes before turning it back on to ensure internal hardware has completed the shutdown cycle.
5. Power Saver:
This device has a built rechargeable battery. We recommend you keep the screen brightness on medium and tanhy it up when needed to conserve battery power.
To access the Power Saving options:
- Click the battery icon in the task bar on the lower right
-
Select "Additional Power Settings"
. Here you can Choose or Customize a Power Plan -
Changing the Language and Keyboard Input Method:
-
Click on the Windows (Start) Icon
- Click on Settings
- Click on Time & Language
- Choose Region & Language
- Choose Add a language and select the language you want to use.
After this, you will see the selected language in the list. Choose optic download the language pack if needed and to assign it as an input for the keyboard.
7. Date and Time:
The correct date and time is required for many applications to function properly. Generally the date and time is set automatically when connected to the Internet. However, if this is not working properly or you are of you can set the time and date manually.
- Click on theWindows (Start) Icon
- Click on Settings
- Choose Time and Language
Here you can choose your time zone and, if needed, turn off automatic time and manually set it by clicking "change."
| Specifications | |
| Product | 10.1" Intel Quad Core CPU Clamshell Laptop with Windows 10 OS |
| Processor | Intel Baytrial 3735F Quad Core Processor (, up to 1.8GHz) |
| Operating System | Windows 10 OS |
| Memory | 32 GB Builtin Memory (eMMC Fast Memory) |
| Expansion | micro SD card slot (supports up to 128GB max) |
| Resolution / Screen | 1024*600TN |
| RAM Memory | 1 GB DDR3 Builtin |
| Bluetooth | Built-in Bluetooth V4.0 EDR |
| Camera | Front: 0.3 MP |
| Power Adapter | Input AC100 - 240V 50-60Hz, Output DC 5V/3A |
| Battery | Rechargeable Li-ion Polymer battery 4000 mAh 3.7V |
- Contents
- Safety Precautions
- Appearance and buttons:
- ButtonsandPorts
- Desktop
- Setting up a Microsoft Account
- Some of the benefits include:
- Switching from a Local Account to a Microsoft Account
- Start Menu
- The Windows Store
- Action Center
- One Drive
- Task View
- Start Screen
- Restoring Windows
- Tips and Tricks
- Creating a Recovery Drive
- Using Bluetooth to Send and Receive files:
- Resizing Icons and Fonts in Desktop View:
- Shutting Down and Powering On:
- Power Saver:
- To access the Power Saving options:
- Date and Time:
Brand : SCHNEIDER
Model : SCL101BTP
Category : Laptop