
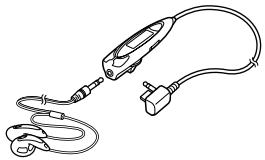
WM-FX888 - Portable cassette player SONY - Free user manual and instructions
Find the device manual for free WM-FX888 SONY in PDF.

User questions about WM-FX888 SONY
0 question about this device. Answer the ones you know or ask your own.
Ask a new question about this device
Download the instructions for your Portable cassette player in PDF format for free! Find your manual WM-FX888 - SONY and take your electronic device back in hand. On this page are published all the documents necessary for the use of your device. WM-FX888 by SONY.
USER MANUAL WM-FX888 SONY
Operating Instructions (page 42)
SAHINGSELMGE (503)


WALKMAN
WM-FX888
危险
•
•
•
4
6
8
10
13
AMS 14
MODE 15
16
*BNR 18
19
20
23
24
SOUND 25
AVLS- 26
27
28
30
31
34
36
37
38
| GROOVE | 25 | 3 | REVIVE | MEGA | BASS | ||
| 16 | 9 | AMS | 14 | ||||
| 29 | 58 | ||||||
| 1 | 1 | 13 |

AC
(
NH-14WM (A)

AC
1
2
AC

CHARGE
6

3
TYPEI
TYPE II
TYPE IV
1
① OPEN
(2)
FWD
REV
2
1
2
AM
FM
3
4
RADIO OFF
RADIO ON/BAND·OFF
AM
FM
19
20

| ▲●REPEAT | FWD | |
| REV | ||
| ▲●REPEAT | FWD | |
| REV | ||
| ■ | ||
| / | FF | REW |
| * | 1 | |
| ▲●REPEAT | ||
| 2 | ||
| FF | AMS | |
| 2 | ||
| REW | AMS | |
| 2 | ||
AMS
9
AMS 1
AMS 1
4
4
AMS 1
34
MODE
| MODE | ||
| ← | ← | |
| → | → | 1 * |
| * REV | REV | |
MODE
MENU MODE
SET
| BL SKIP | ||
| BL SKIP | ON | BL SKIP |
| BL SKIP | ||
MODE
MENU
SET

BLSKIP
12
10
34
*B NR
*
Dolby
D
| ONR | |
| ON | BNR |
| BNR | |
| B NR | |
| SOUND | |
| MENU | |
| SET | ON |
1 BAND·RADIO ON
RADIO ON/
BAND·OFF 1
2 BAND·RADIO ON FM
AM
RADIO ON/BAND-OFF
1
3 MENU TUNE MODE
4 SET MANUAL
5 TUNE/PRESET
- TUNE/PRESET
TUNE/PRESET
AM FM 8
1 BAND·RADIO ON
RADIO ON/
BAND·OFF 1
2 BAND·RADIO ON FM
AM
RADIO ON/BAND·OFF 1
3 A
ENTER
22
20

1 BAND·RADIO ON
BAND·OFF 1
2 BAND·RADIO ON FM
RADIO ON/
RADIO ON/BAND·OFF 1
3 ENTER
4 TUNE/PRESET
ENTER
5 TUNE/PRESET
6 ENTER
*
3
22
1 21
1 3
2
TUNE/PRESENT
3 ENTER
4
TUNE/PRESET
5 ENTER
1 BAND·RADIO ON
RADIO ON/
BAND·OFF 1
2 BAND·RADIO ON FM
RADIO ON/BAND·OFF 1
3 MENU TUNE MODE
4 SET PRESET
5 TUNE/PRESET
- -
1
2REW
3FF
4 VOL
5
6 HOLD
7
AMS
5

: RADI O N/
BAND·OFF
1AVLS
BLSKIP
3 一 / 一
6
7
8
9
RV/MB/GRV
B NR ON
4 FM/AM
[5]
Preparations
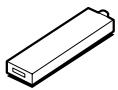
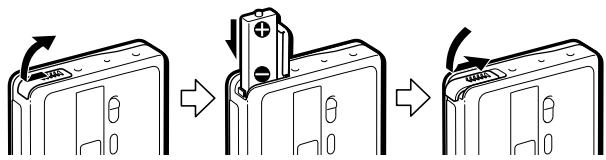
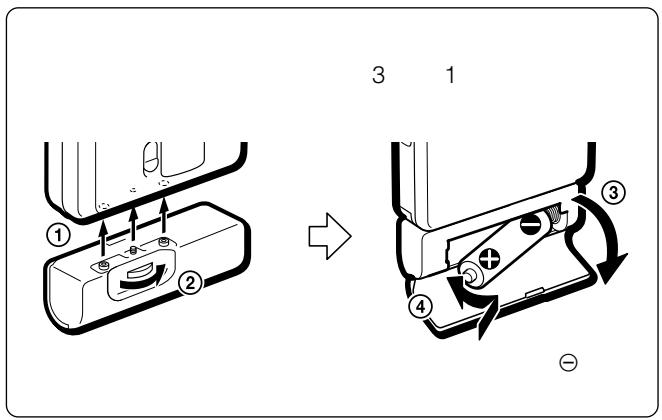
Prepare a dry battery (not supplied) or the rechargeable battery (supplied).
Dry Battery
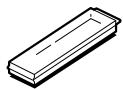
Attach the supplied battery case, and then insert one R6 (size AA) battery with correct polarity.
Note
- For maximum performance we recommend that you use a Sony alkaline battery.
Rechargeable Battery
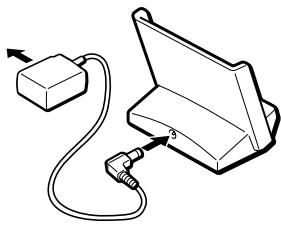
1 Insert the supplied rechargeable battery (NH-14WM (A)) into the rechargeable battery compartment with correct polarity.
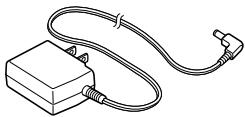
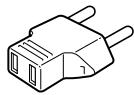
2 Connect the supplied AC power adaptor to the charging stand, plug in the AC power adaptor to the house current (mains). If the plug does not fit to your mains, attach the supplied AC plug adaptor.
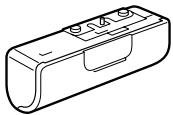
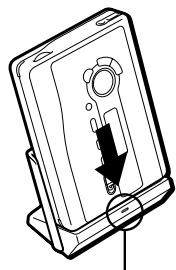
3 Place the main unit on the charging stand. The CHARGE lamp will light up.
Full charging takes about 6 hours.
The CHARGE lamp will go off when charging is complete.
You can charge the battery about 300 times.
Notes
- Do not use the unit while charging. Remove the unit from the charging stand when using it.
- If you operate the unit while charging, the battery will not be charged.
- If you operate the unit while charging, it may cause malfunction.
- Do not place the unit on the charging stand without the rechargeable battery. Otherwise, it may cause malfunction.
- Certain countries may regulate disposal of the battery used to power this product. Please consult your local authority.
Note on the AC power adaptor
Use only the supplied AC power adaptor. Do not use any other AC power adaptor.

Polarity of the plug
When to replace/charge the battery
Replace or charge the battery when "□" flashes in the display.
Battery life
| (Approx. hours) | (JEITA*) |
| Sony alkaline LR6 (SG)** | |
| Tape playback | 36 |
| Radio reception | 32 |
Rechargeable battery (NH-14WM (A))
| Tape playback | 22 |
| Radio reception | 22 |
Sony alkaline LR6 (SG)** and Rechargeable NH-14WM (A)
| Tape playback | 58 |
| Radio reception | 54 |
- Measured value by the standard of JEITA (Japan Electronics and Information Technology Industries Association). (Using a Sony HF series cassette tape)
**When using a Sony LR6 (SG) "STAMINA" alkaline dry battery (produced in Japan).
Note
- The battery life may be shorter depending on the operating condition, the surrounding temperature and battery type.
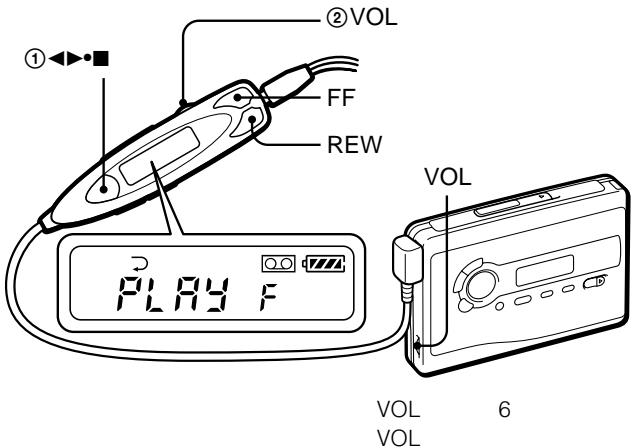
Playing a Tape
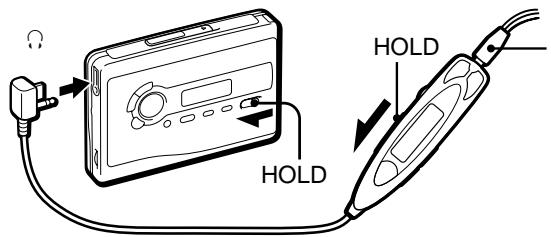
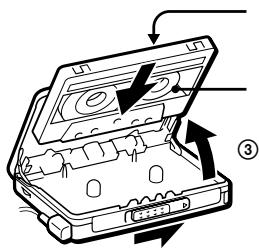
1 Insert a cassette and if the HOLD function is on, slide the HOLD switch in the opposite direction of the arrow to unlock the controls.
2 Press (play) (stop) on the remote control and adjust the volume with VOL. (On the main unit, press REPEAT.)
When adjusting the volume on the remote control
Set the VOL control on the main unit to around 6.
When adjusting the volume on the main unit
Set the VOL control on the remote control at maximum.
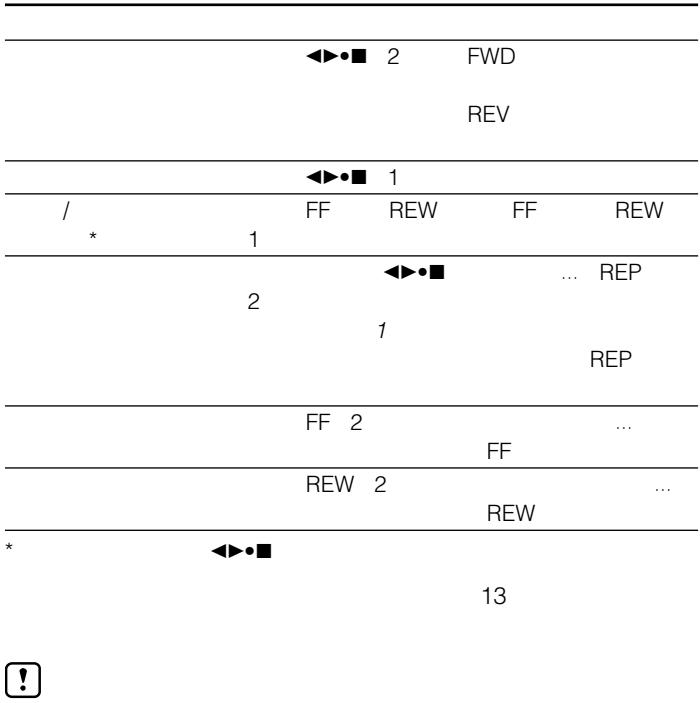
Operation on the remote control
| To | Press |
| Switch playback to the other side | ▲▶●■ for 2 seconds or more during playback |
| Stop playback | ▲▶●■ once during playback |
| Repeat the current track (Repeat Single Track function) | ▲▶●■ twice during playback To stop a single repeat, press ▲▶●■ once. |
Operation on the main unit
| To | Press |
| Switch playback to the other side | ↔●REPEAT during playback |
| Stop playback | ■ (stop) |
| Repeat the current track (Repeat Single Track function) | ↔●REPEAT for 2 seconds or more during playback To stop a single repeat, press it again. |
Other tape operations
| To | Press |
| Fast forward* | FF |
| Rewind* | REW |
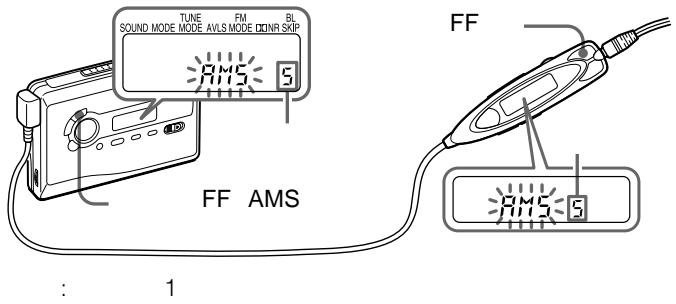
| Play the next track/succeeding 9 tracks from the beginning (AMS**) | FF once/repeatedly during playback |
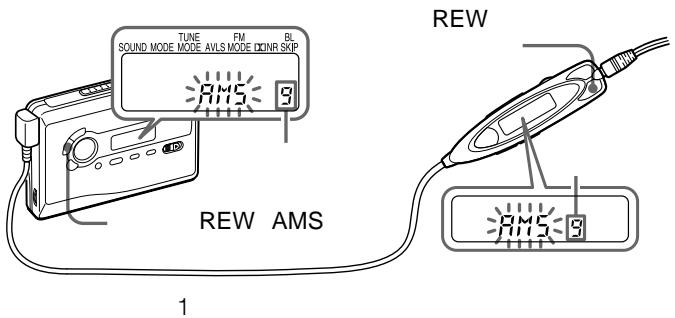
| Play the current track/previous 8 tracks from the beginning (AMS**) | REW once/repeatedly during playback |
| Play the other side from the beginning (Skip Reverse function) | FF for 2 seconds or more during stop |
| Play the same side from the beginning (Rewind Auto Play function) | REW for 2 seconds or more during stop |
| *If <>■ on the remote control is pressed during fast forward or rewind, the Walkman switches to playback.**Automatic Music Sensor | |
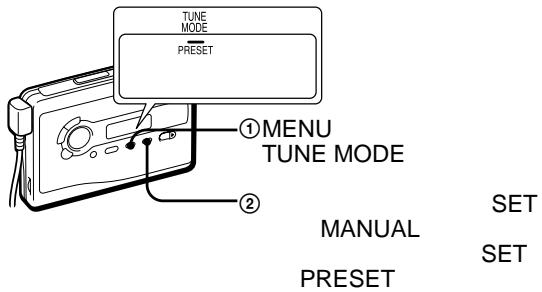
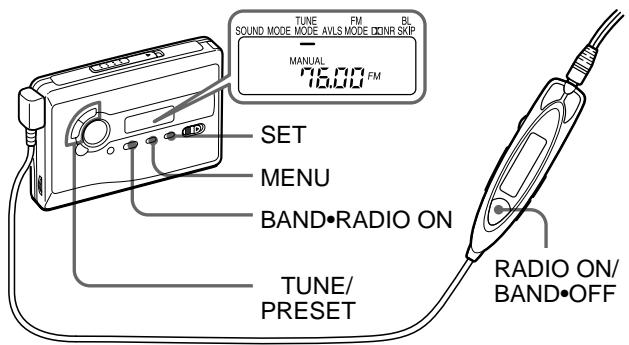
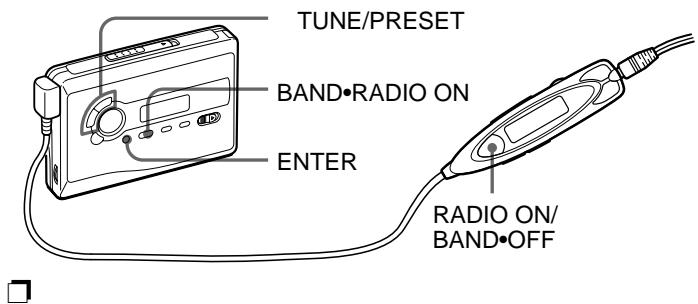
Listening to the Radio
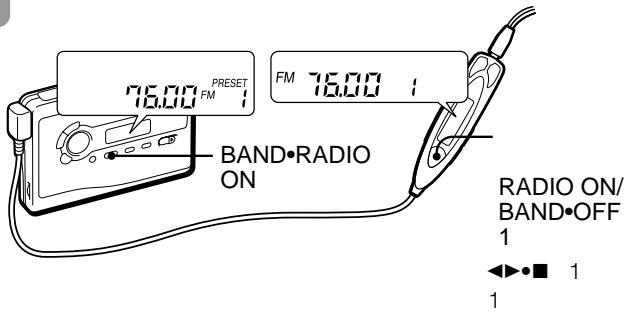
1 Press BAND·RADIO ON to turn on the radio.
2 Press BAND·RADIO ON repeatedly to select the band: AM, FM1 or FM2.
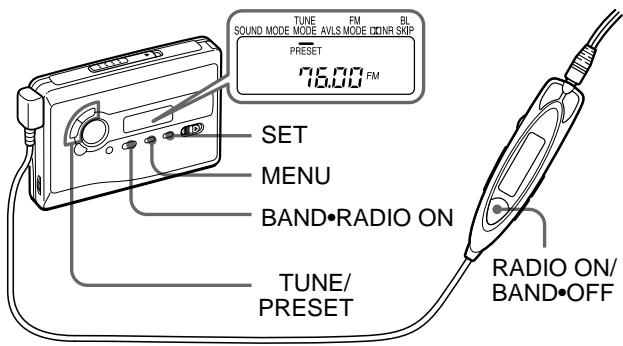
3 Press MENU on the main unit repeatedly and set " _ " (the cursor) in the display of the main unit to TUNE MODE.
4 For manual tuning
① Press SET to choose MANUAL.
② Press TUNE/PRESET ^+ or - repeatedly to tune in to the desired station.
Hold down TUNE/ PRESET + or - for a few seconds to scan for stations.
For preset tuning
① Press SET to choose PRESET.
② Press TUNE/PRESET ^+ or - repeatedly to recall the desired preset station.
To use preset tuning, preset stations first (see "Presetting Radio Stations").
To turn off the radio
Press RADIO OFF.
To improve the broadcast reception
- For AM: The Walkman has a built-in antenna. Reorient the Walkman horizontally to obtain optimum AM reception.
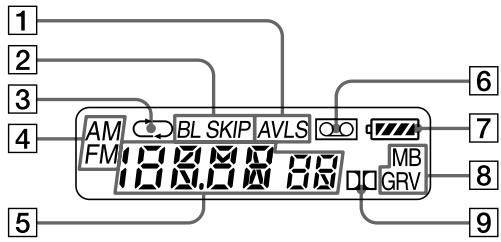
- For FM: Extend the remote control cord (antenna). If the reception is still not good, press MENU repeatedly to set the cursor in the display to FM MODE. Then press SET to choose from "MONO" (monaural), "LOCAL" or none (stereo) for best reception.
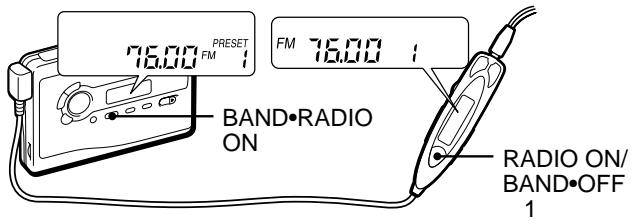
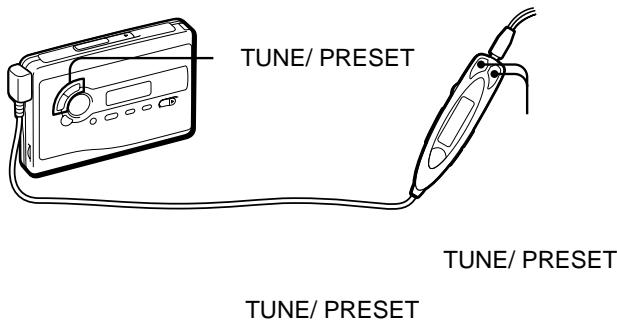
To operate from the remote control
To turn on the radio, press RADIO ON/BAND · OFF for more than one second (while the tape is in stop mode only). To select the band, press RADIO ON/BAND · OFF for more than one second while the radio is on. To tune in or recall a preset station, press + or -. To turn off the radio, press RADIO ON/BAND · OFF.
Presetting Radio Stations
Once you store your favorite stations in memory, you can play them easily. You can preset up to 32 stations - 8 for AM and 12 each for FM1 and FM2.
Tuning in to and Storing Radio Stations Automatically (Auto-Memory Scanning function)
1 Press BAND·RADIO ON to turn on the radio.
2 Press BAND*RADIO ON repeatedly to select AM, FM1 or FM2.
3 Press ENTER until "A" appears in the display. The Walkman starts searching and storing stations. Then the preset number appears.
Note
- Do not remove the power sources until all the stations are stored.
Storing Radio Stations Manually (Manual-Memory function)
You can preset the stations in any order.
1 Press BAND·RADIO ON to turn on the radio.
2 Press BAND · RADIO ON repeatedly to select AM, FM1 or FM2.
3 Press ENTER. The frequency digits will flash in the display.
4 Press TUNE/PRESET + or - repeatedly to tune in to the desired station and press ENTER. The preset number will flash in the display.
5 Press TUNE/PRESET + or - repeatedly to select the desired preset number and press ENTER. The station is preset to the number of your choice.
Notes
- If you cannot complete step 4 or 5 while the indications are flashing, repeat from step 3.
- If you preset a new station to the same preset number, the previously stored station will be erased.
To cancel the stored station
Follow the procedure above and in step 4, instead of tuning in to a station, press and hold TUNE/ PRESET + or - until "---" is displayed. Press ENTER while "---" is flashing. The preset number will flash in the display. Press TUNE/PRESET + or - repeatedly to select the preset number you want to cancel and press ENTER.
Using in Foreign Countries
1 Press BAND·RADIO ON to turn on the radio.
2 Press ENTER. The frequency digits will flash in the display.
3 Press and hold BAND · RADIO ON until "JPn", "USA" or "Eur" flashes.
4 Press BAND·RADIO ON repeatedly to select "JPn", "USA" or "Eur" and press ENTER.
5 Tune in to the stations following the procedure of "Listening to the Radio" and "Presetting Radio Stations".
Area indication and frequency range
| Area* | Frequency range | |
| FM (MHz) | AM (kHz) | |
| JPn | 76-90 | 531-1 710 |
| USA | 87.5-108 | 530-1 710 |
| Eur | 87.5-108 | 531-1 602 |
- JPn: Japan
USA: USA, Canada, and Central and South America
Eur: European and other countries
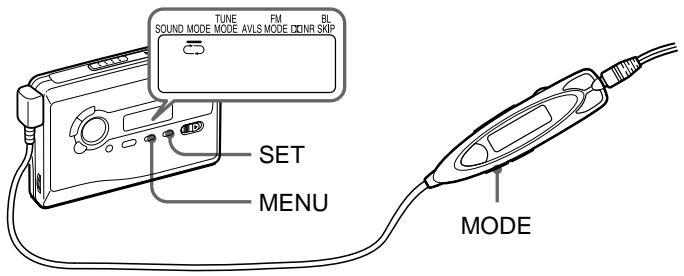
Using the Menu
Adjusting playback modes
To select playback direction mode
Press MENU repeatedly to set the cursor in the display to MODE. Then press SET to select the desired mode.
| To play | Select |
| both sides repeatedly | ←→ |
| both sides once from the FWD side | → |
To skip a long blank space - the BL SKIP mode
When the BL SKIP mode is on, the tape is fast-forwarded to the next track if there is a blank space of longer than 12 seconds. You will hear repeated sets of three short beeps when skipping a blank.
On the main unit:
1 Press MENU repeatedly to set the cursor in the display to BL SKIP.
2 Press SET to show "ON".
On the remote control:
1 Press MODE repeatedly to show "BL SKIP".
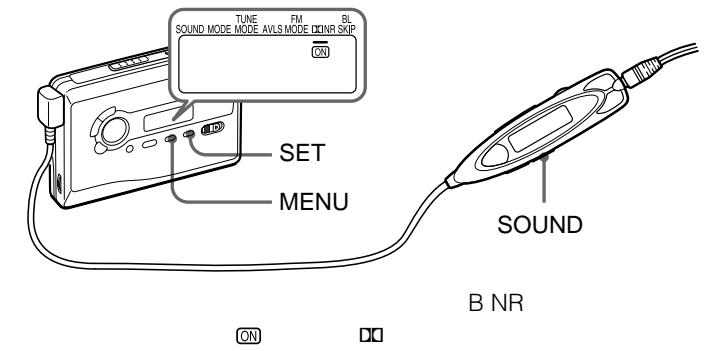
To play a tape recorded with Dolby* B NR system
Press MENU repeatedly to set the cursor in the display to NR (Dolby noise reduction). Then press SET to show "ON".
- Manufactured under license from Dolby Laboratories.
"Dolby" and the double-D symbol are trademarks of Dolby Laboratories.
Emphasizing Sound
On the main unit:
1 Press MENU repeatedly to set the cursor in the display to SOUND.
2 Press SET repeatedly to select the sound emphasis of your choice.
On the remote control:
1 Press SOUND repeatedly. With each press, the indications change.
The indications change as follows:
RV:Sound Revitalizer. Emphasizes treble sound.
MB: Mega Bass. Emphasizes bass sound (moderate effect).
GRV: Groove. Emphasizes bass sound (strong effect).
no message: normal (no effect).
Note
- If the sound is distorted with the mode "GRV", turn down the volume of the main unit or select other modes.
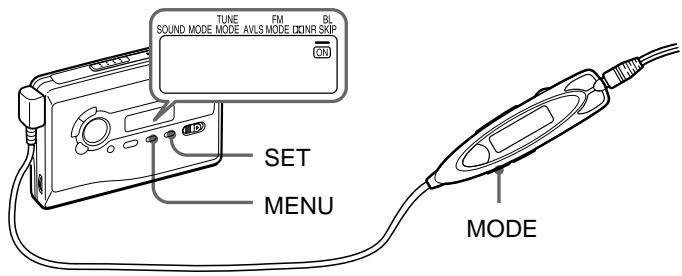
Protecting Your Hearing — AVLS (Automatic Volume Limiter System)
On the main unit: Press MENU repeatedly in the playback, stop or radio mode to set the cursor to AVLS in the display. Then press SET to show
On the remote control: Hold down MODE until "AVLS" appears in the display.
To cancel the AVLS function
Press SET so that " ⑦ " disappears from the display on the main unit. On the remote control, hold down MODE again until "AVLS" disappears.
Note
- The AVLS setting will be canceled when you replace the battery.
Locking the Controls — HOLD Function
Slide the HOLD switch in the direction of the arrow to lock the controls of the Walkman or the remote control.
“
(JEITA*)
| Sony | LR6(SG)** |
| 36 | |
| 32 |
| (NH-14WM(A)) |
| 22 |
| 22 |
| Sony | LR6(SG)** |
| NH-14WM(A) | |
| 58 | |
| 54 |
| * JEITA (Japan Electronics and Information Technology Industries Association: ) .(Sony HF) |
| **LR6(SG) Sony "STAMINA" ( ) |
1 HOLD HOLD