
WM-GX822 - Portable cassette player SONY - Free user manual and instructions
Find the device manual for free WM-GX822 SONY in PDF.

| Product Type | Portable cassette player with AM/FM/TV radio |
| Brand | Sony |
| Model | WM-GX822 |
| Dimensions | 108.9 × 78.6 × 26.5 mm |
| Weight | 170 g (without batteries), 265 g (with rechargeable battery and cassette) |
| Power Supply | Rechargeable Ni-Cd battery NC-6WM (1.2 V, 600 mAh) or alkaline battery LR6(WM) or R6P(SR) battery or AC adapter AC-E15L (Japan) / AC-E15HG (international) |
| Battery Life (cassette playback) | Approximately 16 h with alkaline battery LR6(WM), 6 h with rechargeable battery NC-6WM |
| Battery Life (radio/TV) | Approximately 25 h with alkaline battery LR6(WM), 8 h with rechargeable battery NC-6WM |
| Radio Bands | FM 76 – 90 MHz, AM 531 – 1710 kHz, TV 1 – 12 channels |
| Playback Functions | Normal playback, repeat (single track, IC 4 s, A-B), fast forward/rewind, AMS (track skip), Skip Reverse, Auto Rewind Play, BL SKIP, speed control (3 fast speeds, 2 slow, normal) |
| Recording | Built-in microphone (MIC jack), radio recording, programmed recording (timer), ISS noise reduction for AM |
| Noise Reduction | Dolby B NR (on/off) |
| Bass Enhancement | MEGA BASS (two levels) |
| Volume Limiter | AVLS (Automatic Volume Limiter System) |
| Compatible Cassette Types | Type I (normal) – do not use CrO2 (Type II) nor metal (Type IV) |
| Supplied Accessories | Battery charger, rechargeable battery NC-6WM, battery case, battery R6P(SR), lithium battery CR2016, stereo earphones with remote control, carrying pouch, rechargeable battery case, AC adapter (depending on model), stereo microphone, microphone stand, ear adapters |
| Power Consumption | 4 mW + 4 mW (DC, according to EIAJ standard) |
Frequently Asked Questions - WM-GX822 SONY
User questions about WM-GX822 SONY
0 question about this device. Answer the ones you know or ask your own.
Ask a new question about this device
Download the instructions for your Portable cassette player in PDF format for free! Find your manual WM-GX822 - SONY and take your electronic device back in hand. On this page are published all the documents necessary for the use of your device. WM-GX822 by SONY.
USER MANUAL WM-GX822 SONY
Operating Instructions
XXXXXXX
WALKMAN
WALKMAN
WALKMAN is a registered trademark of Sony Corporation.
XXXXXXXXXXXXXXXXXXXXXXXXXXXXXX
WM-GX822


4
5
6
8
10
12
14
29
16 31
19
32
22 33
23 34
36 37
36
38 39
40 44
41 45
43 46
English 48
XXXX 58
IC A-B 30 20 6
14 3 AMS FM/AM TV
ASP)
LCD
21
MEGA BASS
EL
LIVE
REC/PAUSE

R6P (SR)
NC-6WM

CR2016

2
(
AC
39
1 CR2016
2
300
50 (30)
3
4
QREMOTE
1
1
CLOCK
2 SPEED CONTROL·TIME/TUNE
3
CLOCK
12 AM12 00 PM12 00
1
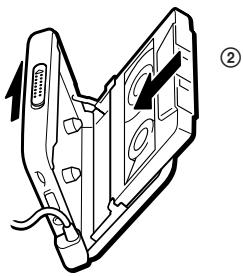
① OPEN
43

2
| ←● REPEAT FWD | ||
| REV | ||
| ■ | ||
| FF • AMS | ||
| REW • AMS | ||
| 1 | 2 | ←● REPEAT |
| REP | ||
| FF • AMS | …… | |
| 2 | ||
| REW • AMS | …… | |
| 2 | ||
1
2
"AREA"
ASP
PRESET 1
FM
FM
1
3
AM FM TV
4
RADIO OFF
2 14
AM
FM TV
23
22
TYPE I
1
FWD
REV
FWD
FWD REV
2

①
FM TV

②
12
BAND·RADIO ON ASP
3
REC/PAUSE
REC
REC
FM 76.0 90.0MHz
AM 531 1,710kHz
TV 1 12ch
AC AC-E15L( ) AC AC-E15HG NC-6WM CHK-1 ( ) MDR-E747V MDR-E868MP DCC-E215
\*EIAJ(
ISS AM
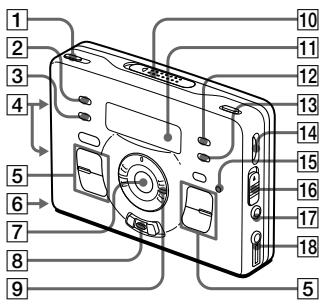
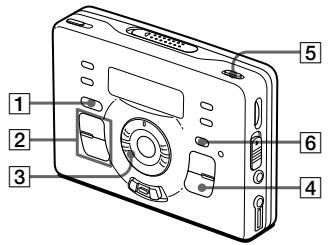
CLOCK
3 TIMER
4
5
6
7 REPEAT IC/A-B
REC/PAUSE
9 SPEED CONTROL TIME SLOW,FAST/
10 OPEN(
11
12 MENU
13 SET
14 : VOLUME
: VOL
15 BATT
16 HOLD
MIC
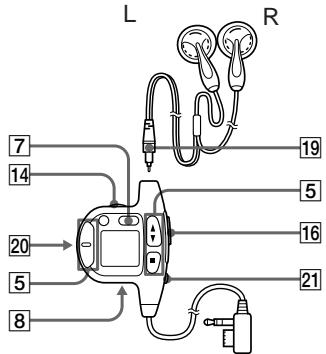
18 REMOTE
19
20 LIGHT
21 MEGA BASS /AVLS
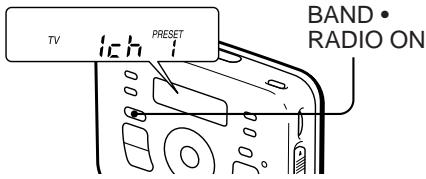
1 : BAND FM AM TV RADIO ON
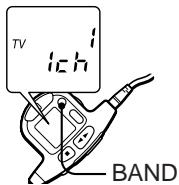
:BAND FM AM TV
Before operating the unit, please read this manual thoroughly and retain it for future reference.
Getting Started
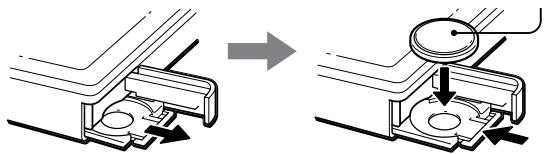
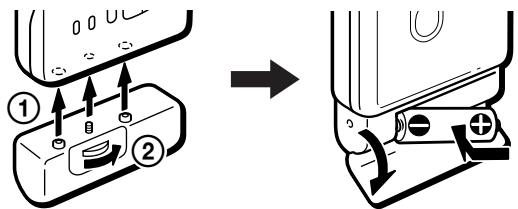
Installing the Lithium Battery
Before using to the unit for the first time, open the battery compartment lid at the left side of the Walkman and insert one CR2016 lithium battery (supplied) with the correct polarity. The battery keeps the memory of the clock.
When to replace the lithium battery
The lithium battery will last for about a year. To replace it, remove all the batteries from the unit and wait for 15 seconds before inserting a new one. The clock display will return to "AM 12:00", re-enter the clock again.
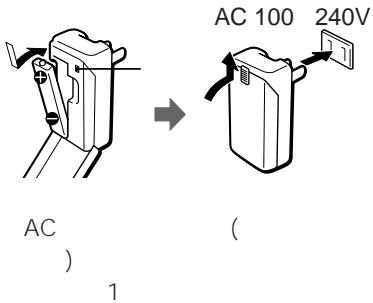
Preparing Power Sources
Rechargeable Battery
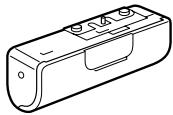
1 Before using the rechargeable battery, you must charge it with the supplied battery charger.
Japanese model: Full charging takes about 2 hours. World model: 50% -charging takes about 30 minutes. Fullcharging takes about 60 minutes (then the charge lamp goes off).
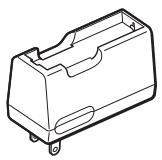
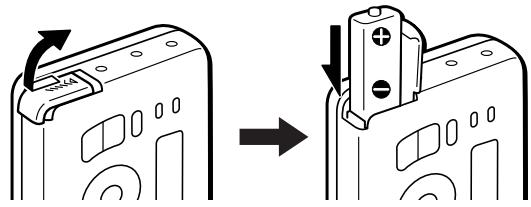
2 Open the rechargeable battery compartment lid at the left side of the Walkman and insert the charged battery.
Dry Battery
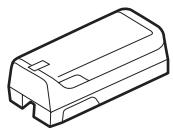
Attach the battery case to the unit, and then insert one R6P(SR) battery (supplied) with the correct polarity.
Battery life (Approx. hours)
| Sony alkaline LR6(WM) | |
| Playback | 16.0 |
| Radio/TV reception | 25.0 |
| MIC recording | 8.5 |
| Radio recording | 7.0 |
| Rechargeable NC-6WM | |
| Playback | 6.0 |
| Radio/TV reception | 8.0 |
| MIC recording | 3.5 |
| Radio recording | 3.0 |
| Sony alkaline LR6(WM) and Rechargeable NC-6WM | |
| Playback | 21.0 |
| Radio/TV reception | 32.0 |
| MIC recording | 12.0 |
| Radio recording | 9.5 |
(continued)
| Sony R6P(SR) | |
| Playback | 4.5 |
| Radio/TV reception | 8.0 |
| MIC recording | 2.0 |
| Radio recording | 1.5 |
Notes
- Remove the charger unit from the wall outlet as soon as possible after the rechargeable batteries has been charged. Overcharging may damage the rechargeable battery.
- Use the Sony NC-6WM rechargeable battery only with the supplied battery charger or with the separately sold battery charger for Sony NC-6WM.
- Be sure not to short-circuit the battery. When you carry it with you, use the supplied carrying case. If you do not use the carrying case, do not carry with other metallic objects such as keys in your pocket.
- The battery charger and the rechargeable battery may become warm during charging, but it is not a problem.
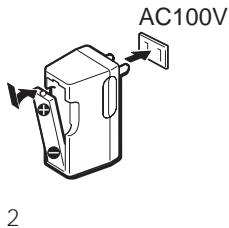
House Current
Before using the Walkman, remove the rechargeable battery if it is installed. Attach the supplied battery case and connect the AC power adaptor AC-E15L for Japan (not supplied) or AC-E15HG for overseas (not supplied) to the DC IN 1.5V jack of the battery case. Do not use any other AC power adaptor.
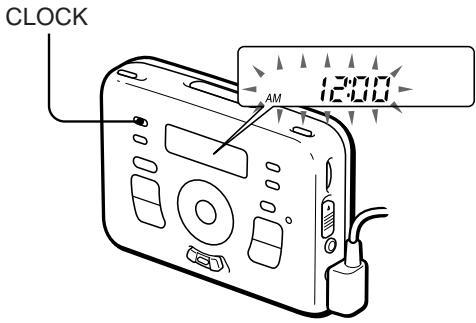
Setting the CLOCK
1 Press CLOCK until the display flashes "AM 12:00".
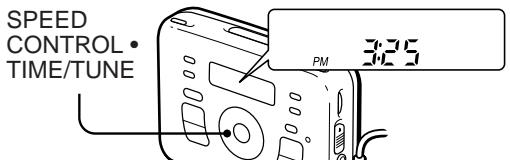
2 Turn the SPEED CONTROL·TIME/TUNE to adjust the clock.
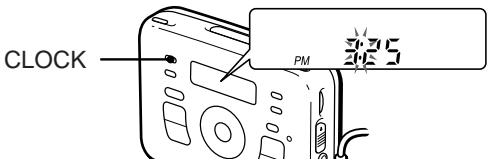
3 Release CLOCK at the time signal.
"..." will start to flash and the clock will start to operate.
12-hour system:
"AM 12:00" = midnight
"PM 12:00" = noon
Operating the Walkman
Playing a Tape
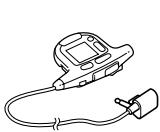
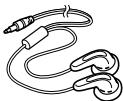
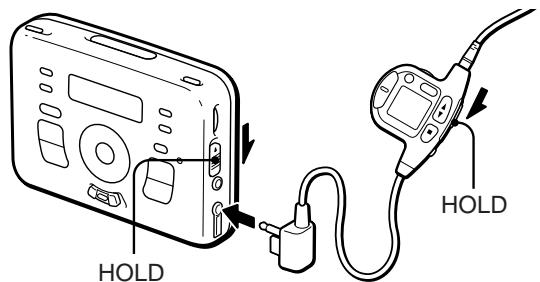
1 Connect the supplied headphones with the remote control firmly to the REMOTE jack and switch the Hold function off.
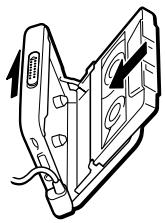
2 Open the cassette holder and insert a cassette.
3 Press REPEAT (play) and adjust the volume with the volume dial.
| To | Press |
| Play the other side | (REPEAT (during playback) |
| Stop playback | ■ (stop) |
| Fast forward | FF·AMS (in the stop mode) |
| Rewind | REW·AMS (in the stop mode) |
| Repeat the current track (Repeat Single Track function) | (REPEAT (2 seconds or more during playback) to stop a single repeat, press it again. |
| Find the beginning of the next track/succeeding 3 tracks (AMS*function) | FF·AMS (shortly/repeatedly during playback) |
| Find the beginning or the current track/previous 2 tracks (AMS function) | REW·AMS (shortly/repeatedly during playback) |
| Play the other side from the beginning (Skip Reverse function) | FF·AMS (2 seconds or more during stop) |
| Play the same side from the beginning (Auto Rewind Play function) | REW·AMS (2 seconds or more during stop) |
*Automatic Music Sensor
To skip a long blank space between tracks (BL SKIP* function)
Press MENU repeatedly to set the cursor to BL SKIP in the display. Press SET to show "ON".
- The Walkman fast forwards the tape to the next track if there is a blank space longer than 12 seconds.
Note
To detect a blank space easier when the AMS or BL SKIP does not operate, press MENU repeatedly to set the cursor to AMS in the display and then press SET to show "LOW". The AMS and BL SKIP will change sensitivity to detect the blank space easier. To return to the normal settings, press SET to clear "LOW".
To select playback mode
Press MENU repeatedly to set the cursor to DIR in the display. Press SET to select the desired function.
| To play | Set the selector to |
| Both sides repeatedly | ←→ |
| Both sides once from the side facing the tape holder | → |
To play a tape recorded with the Dolby* B NR system
Press MENU repeatedly to set the cursor to NR (Dolby noise reduction) in the display. Press SET to show "ON".
- Dolby noise reduction manufactured under license from Dolby Laboratories Licensing Corporation. "DOLBY" and the double-D symbol are trademarks of Dolby Laboratories Licensing Corporation.
Adjusting the Playback speed
You can choose from 6 playback speed steps, three in fast speed, two in slow speed and one in normal speed. Approximately from +30% to -20% .
Turn SPEED CONTROL·TIME/TUNE to FAST/+.
(When turning the control all the way, the steps changes rapidly.) (Approx. speed)
| Playback Speed | Display |
| +10% | FAST 1 |
| +20% | FAST 2 |
| +30% | FAST 3 |
(When turning the control all the way, the steps changes rapidly.) (Approx. speed)
| Playback Speed | Display |
| -10% | SLOW 1 |
| -20% | SLOW 2 |
To put back the normal speed
Turn SPEED CONTROL·TIME TUNE repeatedly until "PLAY" will appear in the display.
Notes
- If you open the cassette holder or start the recording operation, the playback speed will automatically change back to the normal speed.
- The setted playback speed will be memorized until changed back to the normal speed.
- You can not change the recording speed by the playback speed.
IC Repeat Playback
Playback repeats 4 seconds from the point you press REPEAT IC/A-B.
When the tape operation is stopped, press REPEAT IC/A-B, "4" appears in the display. On the remote control "IC. REP" will appear.
During playback press MENU repeatedly, to set the cursor to IC. REP in the display. Press SET to show "4".
To slow down the playback on IC Repeat
When you press REW·AMS during the IC repeat playback, "SLOW" will appear and the playback will speed down to 10% . To put back the normal speed press FF·AMS.
To cancel the IC REPEAT playback
Press REPEAT IC/A-B or
REPEAT during playback.
Notes
- When the IC REPEAT is set, the battery consumption will quicken. If you are not using the IC REPEAT playback, change the display to "A-B".
- The IC REPEAT will automatically cancel and start playback in 5 minutes.
- When using IC REPEAT function, the sound turns to monaural.
- The IC REPEAT will not operate during 1 track repeat playback.
- The IC REPEAT cannot be used on the radio.
A-B RepeatPlayback
Choosing a section you want to repeat playback by pressing REPEAT IC/A-B.
When the tape operation is stopped, press REPEAT IC/A-B, "A-B" appears in the display. During playback press MENU repeatedly to set the cursor to "IC. REP" in the display. Press SET to show "A-B".
Repeat playback by pressing REPEAT IC/A-B once at the beginning (A point) and once at the end of the chosen section (B point).
To cancel the A-B REPEAT playback
Press REPEAT IC/A-B or
REPEAT during playback.
Notes
- The A-B REPEAT function will not operate at where the tape turns over to the other side.
- The A-B REPEAT will not operate during 1 track repeat playback.
- The A-B REPEAT cannot be used on the radio.
Listening to the Radio
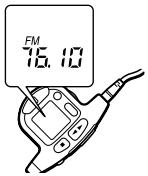
1 Connect the supplied remote control firmly to the REMOTE jack and switch the Hold function off.
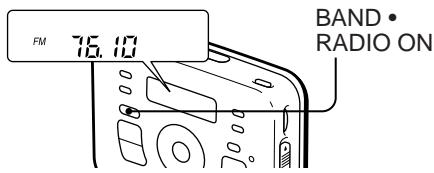
2 Press BAND·RADIO ON to turn on the radio.
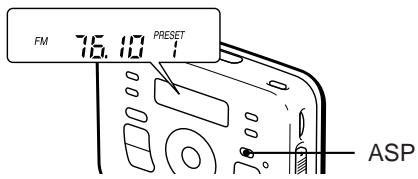
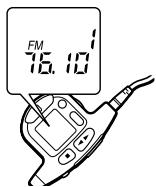
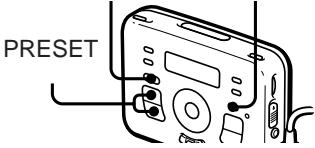
3 Press and hold ASP until "AREA" flashes in the display. Then the FM frequency and "PRESET 1" will light up in the display of the unit and "1" will light up on the remote display.
4 Press BAND·RADIO ON to select AM, FM or TV.
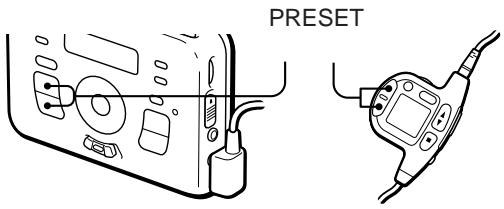
5 Press PRESET+/- to select the preset number you wish to listen to and adjust the volume using the volume dial.
To turn off the radio, press
■RADIO OFF.
Next time you listen to the radio in the same frequency area, you can skip step 3.
To improve radio reception
When you are listening to FM or TV, extend the ear receiver cord for better reception. When you are listening to AM, rotate the unit horizontally for optimum reception.
When you are listening to stereo broadcast
Press MENU repeatedly to set the cursor to FM/AM. Press SET so that "MONO" disappears. If the reception is poor, show "MONO".
What the ASP button does ASP (Auto Station Preset function)
This Walkman stores the main stations of eight areas of Japan (Sapporo, Sendai, North Kanto, South Kanto, Nagoya, Osaka, Hiroshima, and Fukuoka) and Shinkansen. You can tune in the originally stored stations by simply pressing ASP. Keep pressing the ASP button until the Walkman starts to search.
If the ASP function does not store the desired station, or you want to customize the preset number of the stations, see "Tuning in the Radio Manually" or "Storing Radio Stations Manually" as following.
Tuning in the Radio Manually (Manual tuning)
Turn on the radio and select the desired band. Then tune SPEED CONTROL · TIME/TUNE-/SLOW or + / FAST . If you tune and hold SPEED CONTROL · TIME/TUNE-/SLOW or + / FAST for more than a few seconds, the Walkman will start tuning the stations automatically.
Storing Radio Stations Manually (Manual-Memory function)
1 Turn on the radio and select the desired band.
2 Press ENTER. The frequency digits, "PRESET" and a preset number flash in the display.
3 While the frequency digits, "PRESET" and the preset number are flashing, tune in to a station you wish to store using SPEED CONTROL. TIME/TUNE, and select a preset number on which you wish to store a station using PRESET+/-.
4 While the frequency digits, "PRESET" and the preset number are flashing, press ENTER.
Notes
- If you cannot complete step 3 or 4 while the indications are flashing, repeat from step 2.
- If you preset automatically using ASP, the stations stored will be erased.
To cancel the stored station
Operate the unit according to the steps in Storing Radio Stations Manually and Receiving the Stations from step 1 to step 3. Instead of tuning in to a station, turn and hold SPEED CONTROL·TIME/TUNE-/SLOW or + /FAST until " - - - is displayed. Then press ENTER while " - - - is flashing. The maximum frequency or the minimum frequency will be displayed as " - - -
Receiving Stations Outside Japan
1 Press BAND·RADIO ON to turn on the radio.
2 Press ENTER. The frequency digits, "PRESET" and a preset number flash in the display.
3 Press and hold BAND · RADIO ON until "AREA 1" flashes in the display.
4 While "AREA 1" is flashing, press PRESET + / - repeatedly to select either area "USA" (USA, Canada, Central and South America) or "Eur" (Europe and other countries) and then press ENTER.
5 Press and hold ASP until "1" changes to "A" in the display.
The Walkman starts searching and storing stations.
6 Press BAND · RADIO ON to select the desired band and press PRESET+/- to select a station.
Recording
1 Insert a normal (TYPE I) tape with the side facing forward you want to record on.
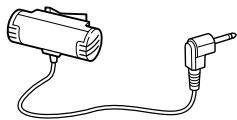
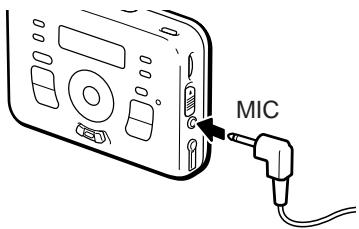
2 Select a recording source: To record with the microphone
Connect the supplied microphone to the MIC jack.
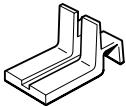
You can use the supplied microphone stand.
To record from the radio
Tune in a station you want to record (see "Listening to the Radio" on page 52). When recording FM or TV programs, make sure the headphones are plugged in as they serve as an antenna.
3 Slide REC/PAUSE.
"REC" appears in the display and recording starts after about two seconds.
To record on both sides, insert a cassette with the side to be recorded on facing the cassette holder.
To record on one side only, insert the cassette with the side to be recorded not facing the cassette holder.
When the cassette holder is opened, the direction of the tape will automatically set to FWD. When recording one side, press and hold (stop) until FWD changes REV in the display.
Note
If the record-protect tab is broken, you cannot record on that side.
To pause a recording
Press and slide REC/PAUSE during recording, the recording will pause.
A pause during recording : "REC" will flash in the display.
To record, press and slide REC/ PAUSE again.
To stop recording
Press (stop).
To reduce noise while recording AM programs
Set the ISS (Interference Suppress Switch) to the position that reduces noise the most.
Timer Recording
You can record the radio or TV by the timer recording.
Make sure the clock time is correct when using the timer recording.
1 Tune in a station you want to record.
2 Insert a blank tape with the side you want to record.
3 Press and hold TIMER until "START" will appear.
4 Turn SPEED CONTROL·TIME/TUNE to set the time you want to start recording.
5 Press TIMER, "STOP" will appear.
6 Turn SPEED CONTROL·TIME/TUNE to set the time you want to stop recording.
7 Press TIMER. The setting has been completed, the radio will turn off and the timer recording is in the standby mode.
The setting for the timer-recording time is erased when the power source is removed. In this case, set it again.
To cancel the standby mode Press.
To stop recording
Press ■.
Notes
- If the power source is removed during timer recording standby, the setting is erased and timer recording will not operate. In this case, set the settings for timer recording again.
- You can not listen to a tape during the timer recording standby mode.
- Set the timer recording before one minute of the recording time. If the setting is completed less than one minute before the recording time, the timer recording function will not operate.
Choosing a mode on recording
At a private stage or recording loud music, press MENU repeatedly to set the cursor to REC and then press SET, "LIVE" will appear in the display. When recording a business meeting or a low level sound, press SET and "LIVE" will disappear from the display.
To prevent a tape from being accidentally recorded over
Break off the tabs from side A and/or B. To reuse the tape for recording, cover the tab hole with adhesive tape.
Notes
-
Do nopt use a CrO_2 (TYPE II) or metal (TYPE IV) tape, otherwise the sound may be distorted when you play back the tape, or the previous recording may not be erased completely.
-
Do not connect or disconnect the headphones to ☑REMOTE while recording from the radio. The recording condition may change abruptly, or noise may be recorded.
- When recording with the microphone, do not place it near a lamp cord or a fluorescent lamp to avoid interference noise.
- If a howling effect occurs, turn down the volume.
- While recording, the operation only functions.
Using Other Functions
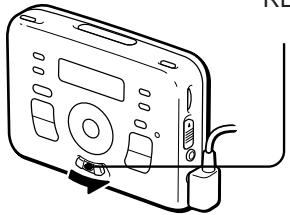
To lock the controls -Hold function
Slide HOLD in the direction of the arrow to lock the controls of the Walkman or the remote control.
To see the remote display in the dark
Press LIGHT on the remote control.
You can see the remote display in the dark which provides illumination by electroluminescence(EL). The EL display will glow for about 5 seconds for each press. The LIGHT button on the remote will operate even if the HOLD function is on.
To emphasize bass sound -MEGA BASS function
To listen to the emphasized deep bass sound, press MEGA BASS / AVLS on the remote control repeatedly to select the mode you want.
Each time you press the button, the mode changes. The selected mode is displayed in the window of the remote control.
:emphasizes bass sound
:emphasizes deeper bass sound
No message: off (normal)
To adjust the sound to an appropriate level —AVLS (Automatic Volume Limiter System) function
To limit the maximum volume, press and hold MEGA BASS / AVLS on the remote control for more than 2 seconds until appears in the display.
To cancel the AVLS function, press and hold MEGA BASS /AVLS for more than 2 seconds until disappears in the display.
Supplied Accessories
- Battery charger (1)
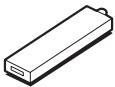
- Rechargeable battery (NC-6WM, 1.2 V, 600 mAh, Ni-Cd) (1)
Battery case (1) - Battery R6P (SR) (1)
Lithium battery CR2016 (1) - Stereo headphones with remote control (1)
- Carrying pouch (1)
- Battery carrying case (1)
- AC plug adaptor (1) (excluding Japanese model)
- Stereo microphone (1)
- Microphone stand (1)
- Ear adaptors (2)