
WM-GX655 - Portable cassette player SONY - Free user manual and instructions
Find the device manual for free WM-GX655 SONY in PDF.

User questions about WM-GX655 SONY
0 question about this device. Answer the ones you know or ask your own.
Ask a new question about this device
Download the instructions for your Portable cassette player in PDF format for free! Find your manual WM-GX655 - SONY and take your electronic device back in hand. On this page are published all the documents necessary for the use of your device. WM-GX655 by SONY.
USER MANUAL WM-GX655 SONY
Operating Instructions
WALKMAN
WALKMAN
WALKMAN is a registered trademark of Sony Corporation.
WM-GX655
©1997 by Sony Corporation

4
5
6
8
10
14
20
24
16 22
18
19 25
27 28
29 29
30 33
30 34
32 35
English 37
| 36 | ||||||
| 1 | ||||||
| 8 | JR | () | ||||
| AM8 | FM8 | |||||
| 16 | 9 | AMS | ||||
| LCD | ||||||
| AVLS |
NC-6WM

R6P (SR)
(

29
1
2
300
2


3
1
① OPEN
2

VOL VOLUME


FFAMS
REWAMS
FFAMS
2
REWAMS
2
16
1
2
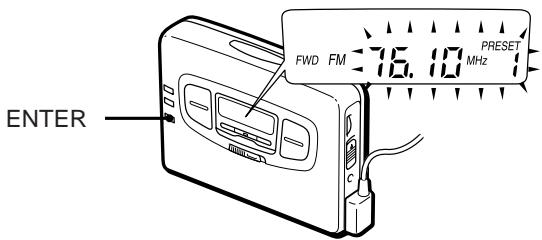
①ENTER
② AREA 1
RADIO ON·BAND
(3) PRESET
1 8 JR ENTER PRESET 1 2 3 4
5 6 7 8 JR USA* Eur* 1 2 3...
1: 2: 3: 4: 5:
6: 7: 8: JR:
PRESET
ENTER
USA Eur
24
2-①
23
22
(
3 AM FM

4

RADIO OFF (■)
2
14
AM :
FM :
19
20
TYPE I
1
REV
FWD
2
①
FM
②
10
3
■ AM
ISS
12
3
FF-AMS

FFAMS
REWAMS
9
| FF AMS | 1 |
| AMS FF | |
| REW AMS | 1 |
| AMS REW |
AMS
AMS
4

MENU
MODE(PB)
SET
| MODE | |
| ←→ | |
| 1 | * |
| → | |

MENU
B NR
SET
ON
| FM | 1 | 80.4MHz | FM |
| 2 | 82.5MHz | FM | |
| 3 | 85.2MHz | NHK FM | |
| 4 | 88.2MHz | NHK FM |
| 2 | |||
| AM | 1 | 891kHz | NHK 1 |
| 2 | 1089kHz | NHK 2 | |
| 3 | 1260kHz | ||
| FM | 1 | 77.1MHz | FM |
| 2 | 82.5MHz | NHK FM | |
| 3 | ||
| AM | 1 | 594kHz NHK 1 |
| 2 | 693kHz NHK 2 | |
| 3 | 810kHz FEN | |
| 4 | 954kHz TBS | |
| 5 | 1134kHz | |
| 6 | 1197kHz | |
| 7 | 1242kHz | |
| 8 | 1530kHz | |
| FM | 1 | 76.4MHz FM |
| 2 | 78.8MHz | |
| 3 | 80.0MHz TOKYO FM | |
| 4 | 80.3MHz NHK FM | |
| 5 | 81.6MHz NHK FM | |
| 6 | 83.2MHz NHK FM | |
| 7 | 86.3MHz FM | |
4
| AM | 1 | 594kHz | NHK | 1 |
| 2 | 693kHz | NHK | 2 | |
| 3 | 810kHz | FEN | ||
| 4 | 954kHz | TBS | ||
| 5 | 1134kHz | |||
| 6 | 1242kHz | |||
| 7 | 1422kHz | |||
| FM | 1 | 76.1MHz | FM | |
| 2 | 78.0MHz | FM | ||
| 3 | 78.6MHz | FM | ||
| 4 | 79.5MHz | FM | ||
| 5 | 80.0MHz | TOKYO FM | ||
| 6 | 81.3MHz | FM | ||
| 7 | 82.5MHz | NHK FM | ||
| 8 | 84.7MHz | FM |
| 5 | |||
| AM | 1 | 729kHz | NHK 1 |
| 2 | 909kHz | NHK 2 | |
| 3 | 1053kHz | CBC | |
| 4 | 1332kHz | ||
| 5 | 1431kHz | ||
| FM | 1 | 77.8MHz | FM |
| 2 | 78.9MHz | FM | |
| 3 | 80.7MHz | FM | |
| 4 | 81.8MHz | NHK FM | |
| 5 | 82.5MHz | NHK FM | |
| 6 | 83.6MHz | NHK FM | |
6
| AM | 1 | 558kHz | |
| 2 | 666kHz | NHK 1 | |
| 3 | 828kHz | NHK 2 | |
| 4 | 1008kHz | ABC | |
| 5 | 1143kHz | KBS | |
| 6 | 1179kHz | ||
| 7 | 1314kHz | ||
| 8 | 1431kHz | ||
| FM | 1 | 76.5MHz | |
| 2 | 80.2MHz | FM802 | |
| 3 | 82.8MHz | NHK FM | |
| 4 | 85.1MHz | FM | |
| 5 | 86.5MHz | NHK FM | |
| 6 | 88.1MHz | NHK FM | |
| 7 | 89.4MHz | FM | |
| 8 | 89.9MHz | FM |
JR JR
| FM | 1 | 76.0MHz |
| 2 | 76.6MHz | |
| 3 | 77.5MHz | |
| 4 | 78.8MHz | |
| 5 | 79.6MHz |
2
| 7 | |||
| AM | 1 | 702kHz | NHK 2 |
| 2 | 918kHz | ||
| 3 | 1071kHz | NHK 1 | |
| 4 | 1116kHz | ||
| 5 | 1350kHz | ||
| 6 | 1575kHz | FEN | |
| FM | 1 | 78.2MHz | FM |
| 2 | 88.3MHz | NHK FM | |
| 8 | |||
| AM | 1 | 612kHz | NHK 1 |
| 2 | 1017kHz | NHK 2 | |
| 3 | 1278kHz | RKB | |
| 4 | 1413kHz | ||
| FM | 1 | 77.9MHz | FM |
| 2 | 78.7MHz | FM | |
| 3 | 80.7MHz | FM | |
| 4 | 81.6MHz | NHK FM | |
| 5 | 84.8MHz | NHK FM | |
PRESET
| OPEN | OPEN | ||
| REC | 26 | ||
| REV | FWD | ||
| AVLS | AVLS | ||
| (27 28) | |||
| SOUND | SOUND | ||
| (27 28) | |||
| CHK-1 | |||
| HOLD | HOLD | ||
| 6 | |||
| ---- | 15 | ||
| ---- | |||
1
)
6
1
90
DOLBY NR (PB) OFF
(EIAJ) 20 18,000 Hz
100 8,000 Hz
1
0.4 mV
( ) 1
8 300
(DC) 4 mW + 4 mW (EIAJ 16)
DC 1.5 V
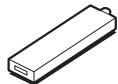
NC-6WM 1.2 V 600 mAh
Ni-Cd 3 1
(EIAJ) 29
109× 78.6× 26.4mm( / / ) 150g 215 g( NC-6WM C-60HF
FM 76.0 90.0MHz
AM 531 1,710kHz
Thank you for purchasing the Sony WM-GX655 Radio Cassette-Corder.
Some features are:
- You can enjoy low bass sounds by the powerful earphone.
- You can choose from 2 different emphasizing tones: MB (MEGA BASS) and GRV (GROOVE) to adjust to your favorite sound.
- LCD menu function that lets you select and switch functions in the display window of the main unit.
- Auto Memory Scanning function that lets you store and recall up to 8 stations for FM and 8 stations for AM automatically.
- AMS (Automatic Music Sensor) function that searches the beginning of the current and 8 previous tracks, and succeeding 9 tracks at high speed.
- Useful remote control.
Getting Started
Preparing a Power Source
Choose one of the three power sources below; dry battery, rechargeable battery, and house current.
Dry Battery
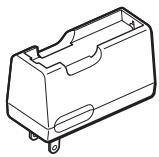
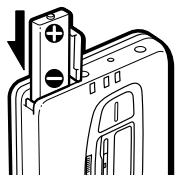
1 Attach the supplied battery case.
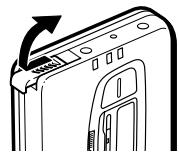
2 Open the battery compartment lid, and insert an R6 (size AA) dry battery like the illustration in this manual.
When to replace the battery Replace the battery with a new one when the BATT lamp dims.
| Battery life | (Approx. hours) | |
| Sony alkaline LR6 (WM) | Sony R6P (SR) | |
| Tape playback | 29 | 8 |
| Radio reception | 30 | 8 |
| MIC recording | 10 | 3.5 |
| Radio recording | 6.5 | 2 |
Note
- The battery life may shorten depending on the operation of the unit.
For maximum performance we recommend that you use an alkaline battery.
Notes
- Do not charge a dry battery.
- When you do not use the Walkman for a long time, remove the battery to avoid any damage caused by battery leakage and subsequent corrosion.
- When the battery becomes weak, the Walkman may not operate normally. Replace the battery with a new one.
Rechargeable Battery
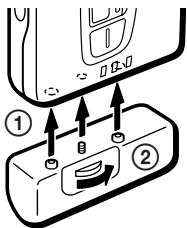
1 Insert the rechargeable battery (NC-6WM) into the charger with correct polarity.
2 Plug in the charger to the wall outlet. Full charging takes about 2 hours.
3 Insert the fully charged battery into the rechargeable battery compartment.
When to charge the battery Charge the battery when the BATT lamp dims. You can charge the battery about 300 times.
Battery life (Approx. hours)
| Rechargeable battery (NC-6WM) | |
| Tape playback | 836 (with Sony alkaline LR6 (WM)) |
| Radio reception | 937 (with Sony alkaline LR6 (WM)) |
| MIC recording | 413 (with Sony alkaline LR6 (WM)) |
| Radio recording | 39 (with Sony alkaline LR6 (WM)) |
Notes
- Do not tear off the film on the rechargeable battery.
- Use the Sony NC-6WM rechargeable battery only with the supplied battery charger or with the separately sold battery charger for Sony NC-6WM.
- Remove the charger unit from the wall outlet as soon as possible after the rechargeable battery has been charged. Overcharging may damage the rechargeable battery.
- The battery charger and the rechargeable battery may become warm during charging, but it is not a problem.
- Be sure not to short-circuit the battery. When you carry it with you, use the supplied carrying case. If you do not use the carrying case, do not carry with other metallic objects such as keys in your pocket.
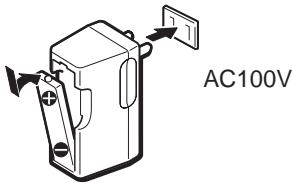
House Current
Remove the rechargeable battery if inserted and attach the battery case. Connect the AC power adaptor AC-E15L for Japan (not supplied) or AC-E15HG for overseas (not supplied) to the DC IN 1.5V of the battery case and to the wall outlet. Do not use any other AC power adaptor.
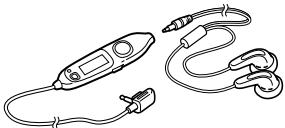
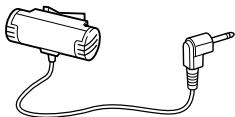
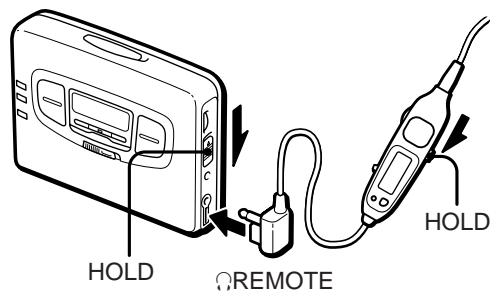
Connecting the Earphones
1 Connect the micro plug firmly to the remote control.
2 Connect the remote control to REMOTE.
You can put the longer earphone cord behind your neck.
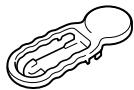
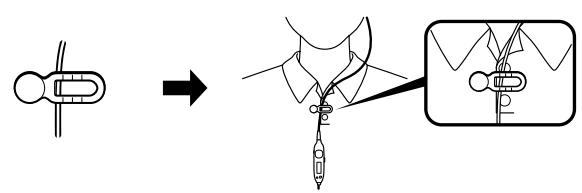
To use the supplied clip
Position the earphones cord through the guides on the supplied clip as shown. Fasten the clip to your clothes.
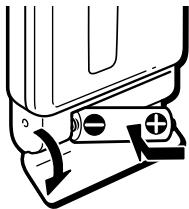
Releasing HOLD
The HOLD function locks the Walkman to prevent from operating when you accidentally press a button. If the Walkman is locked, unlock it before operating.
1 Slide HOLD to the opposite direction of the arrow.
To lock the Walkman
Slide HOLD to the direction of the arrow.
To lock and unlock the remote control
See "Using the remote control".
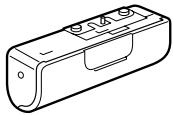
Operating the Walkman
Playing a Tape
The Auto Tape Selector automatically selects the tape (normal (TYPE I), CrO_2 (TYPE II), or metal (TYPE IV)) for playback.
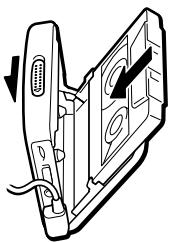
1 Insert a cassette.
2 Press to start playing then adjust the volume.
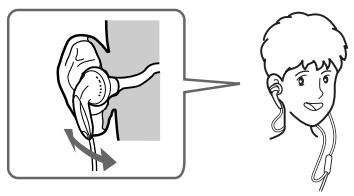
If the earphones do not fit to your ears or the sound is unbalanced, turn round the earphones a little to fit to your ears firmly.
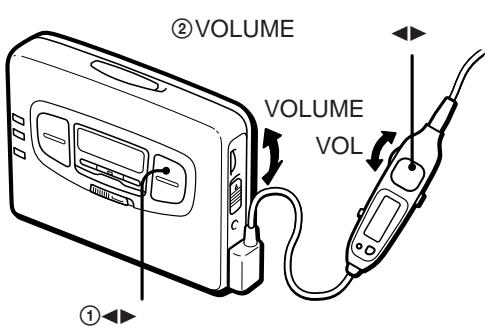
When adjusting the volume on the Walkman
Set the VOL control on the remote control at maximum.
When adjusting the volume on the remote control
Set the VOLUME control on the Walkman to around 6.
| To | Press |
| play the other side | ▷ during playback |
| stop playback | ■ (stop) |
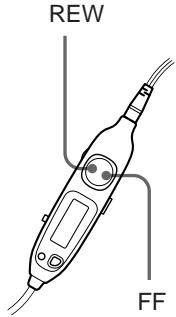
| fast forward | FF•AMS during stop |
| rewind | REW•AMS during stop |
(continued)
| find the beginning of the next track/succeeding 9 tracks (AMS*) | FF•AMS once/repeatedly during playback |
| find the beginning of the current track/previous 8 tracks (AMS) | REW•AMS once/repeatedly during playback |
| play the same side from the beginning (Rewind Auto Play function) | REW•AMS for two seconds or more during stop |
| play the other side from the beginning (Skip Reverse function) | FF•AMS for two seconds or more during stop |
- Automatic Music Sensor
Note on AMS
- To operate the AMS, you need a blank of 4 seconds or longer between the tracks. Therefore, if there is noise between the tracks, this function will not detect the blank and will not operate. Likewise, if the recording level is moderately low within a track, this function may inaccurately operate.
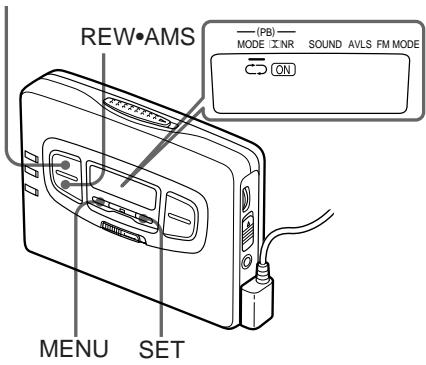
To select playback mode (PB)
Press MENU repeatedly in the playback and stop mode to set the cursor to MODE (PB) in the display. Then press SET to select the desired mode.
| To play | Select |
| both sides repeatedly | → |
| both sides once from the side facing the cassette holder | → |
To play a tape recorded with Dolby* NR (PB) system
Press MENU repeatedly in the playback or stop mode to set the cursor to NR (PB) (Dolby noise reduction) in the display. Then press SET to show "ON".
- Dolby noise reduction manufactured under license from Dolby Laboratories Licensing Corporation. "DOLBY" and the double-D symbol are trademarks of Dolby Laboratories Licensing Corporation.
Recording
You can record radio programmes from the built-in radio, or record with the supplied microphone. In either case, use a new or fully charged battery.
1 Insert a normal (TYPE I) tape with the side you want to record facing the tape holder. When you open the cassette holder, "FWD" will appear in the display window. If "REV" is displayed, open and close the cassette holder so that "FWD" appears.
2 Select a recording source:
To record from the radio
Tune in to a station you want to record (see "Listening to the Radio"). When recording FM programmes, make sure the earphones are plugged in as they serve as an aerial.
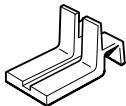
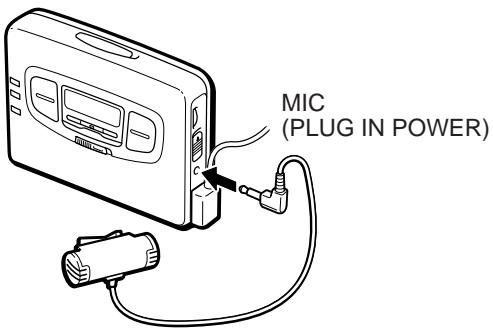
To record with the microphone
Connect the supplied microphone to the MIC (PLUG IN POWER) jack. You can use the supplied microphone stand as illustrated.
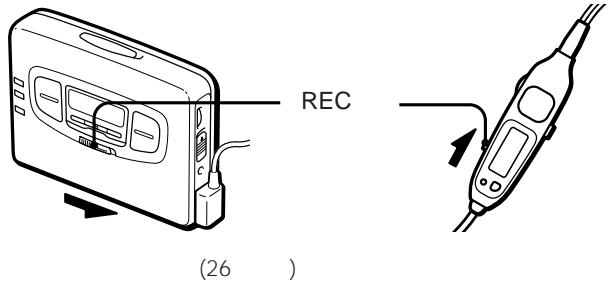
3 Slide REC.
"REC" appears in the display and recording starts after about two seconds. Recording stops at the end of the side.
To stop recording
Press ■.
To reduce noise while recording AM programmes
Set the ISS (Interference Suppress Switch) to the position that reduces noise the most.
To prevent a tape from being accidentally recorded over
Break off the tabs from side A and/or B. To reuse the tape for recording, cover the tab hole with adhesive tape.
Notes
- Do not use a CrO_2 (TYPE II) or metal (TYPE IV) tape, otherwise the sound may be distorted when you play back the tape, or the previous recording may not be erased completely.
- Do not connect or disconnect the headphones to ☐REMOTE while recording from the radio. The recording condition may change abruptly, or noise may be recorded.
- When recording with the microphone, do not place it near a lamp cord or a fluorescent lamp to avoid noise interference.
- If a howling effect occurs, turn down the volume.
- While recording, only the (stop) operation functions.
- MB/GRV mode does not affect recording.
- During recording, the LCD menu function is inoperable.
Listening to the Radio
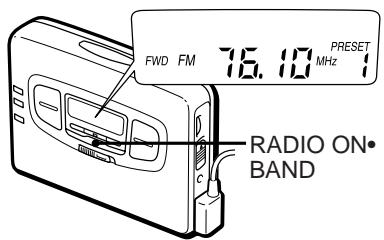
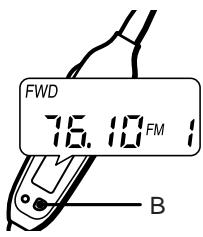
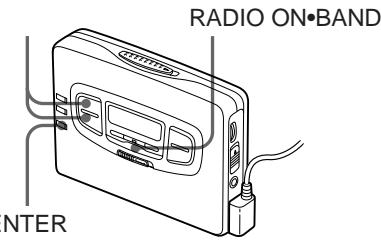
1 Press RADIO ON·BAND to turn on the radio.
2 Press RADIO ON·BAND repeatedly to select AM or FM.
3 Press TUNING + / - to tune in to the desired station. If you keep pressing TUNING + / - for a few seconds, the Walkman will start tuning to the stations automatically.
To turn off the radio
Press RADIO OFF.
To improve the broadcast reception
- For AM: The Walkman has a built-in antenna. Reorient the Walkman horizontally to obtain optimum AM reception.
- For FM: Extend the cord of the remote control, the aerial. If the reception is still not good, press MENU repeatedly to set the cursor to FM MODE in the display. Then press SET to show "MONO" (monaural).
Note
- Do not remove the power sources while listening to the radio, or the received stations may not be stored.
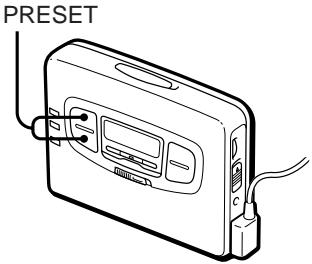
Presetting Radio Stations
Once you store your favorite stations in memory, you can play them easily. You can preset up to 8 stations for FM and 8 stations for AM of each mode (Eur, Jpn, USA).
Tuning the Area Manually (Manual Area Call)
When you choose 1 to 8 or the JR area number, the table of Area number (factory preset) will automatically store.
1 Press RADIO ON·BAND to turn on the radio.
2 Press ENTER to flash the frequency, PRESET and the preset number in the display.
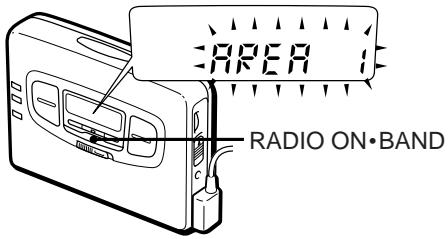
3 Hold down RADIO ON· BAND until "AREA 1" will flash in the display.
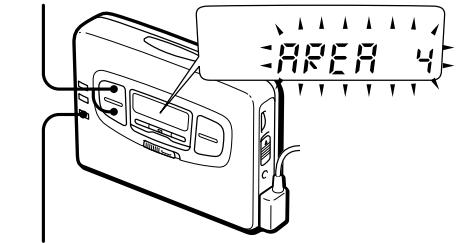
4 While "AREA 1" is flashing, press PRESET + / - repeatedly to select and area number from 1 to 8 or JR area number and then press ENTER.
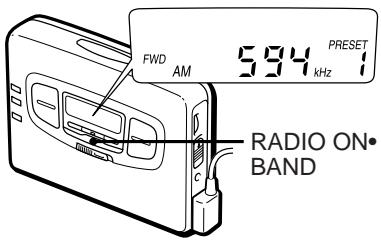
5 Press RADIO ON·BAND repeatedly to select AM or FM and then press PRESET+/− to select a preset number you wish to listen to.
Tuning in to and Storing Radio Stations Automatically (AutoMemory Scanning function)
1 Press RADIO ON·BAND to turn on the radio.
2 Press RADIO ON·BAND repeatedly to select AM or FM.
3 Press ENTER until "A" appears in the display. The Walkman starts searching and storing stations.
4 After the preset number appears, tune in to a station using PRESET + / -
Storing Radio Stations Manually (Manual-Memory function)
You can preset the stations in any order.
1 Turn on the radio and select the desired band.
2 Press ENTER. The frequency digits and a preset number flash in the display.
3 While the frequency digits and the preset number are flashing, tune in to a station you wish to store using TUNING + / - ,and select a preset number using PRESET + / -
4 While the frequency digits and the preset number are flashing, press ENTER.
5 Tune in to a station using PRESET+/-.
Notes
- If you cannot complete step 3 or 4 while the indications are flashing, repeat from step 2.
- If you preset a new station to the same preset number, the previously stored station will be erased.
To cancel the stored station
Follow the procedure above and in step 3, instead of tuning in to a station, press and hold TUNING +/- until "----" is displayed. Press ENTER while "----" is flashing.
Receiving Stations Outside Japan
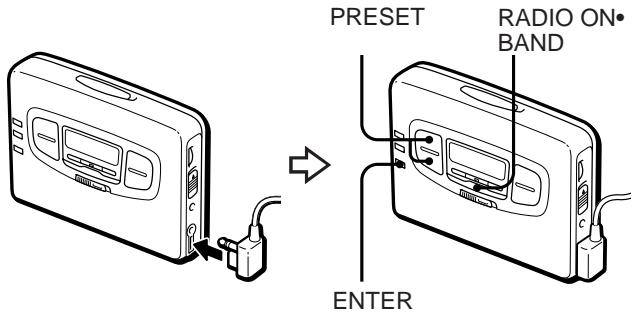
1 Press RADIO ON·BAND to turn on the radio.
2 Press ENTER. The frequency digits, "PRESET" and a preset number flash in the display.
3 Press and hold RADIO ON· BAND for more than 2 seconds. "AREA 1" flashes in the display.
4 While "AREA 1" is flashing, press PRESET + / - repeatedly to select "USA" or "Eur" and press ENTER.
5 Press RADIO ON·BAND repeatedly to select AM or FM and press TUNING+/- to select a station.
Area indication and frequency range
| Area* | Frequency range | |
| FM (MHz) | AM(kHz) | |
| USA | 87.5–108.0 | 530–1,710 |
| Eur | 87.5–108.0 | 531–1,602 |
- USA : USA, Canada and Central and South America
Eur : European and other countries
Using Other Functions
Emphasizing Bass
1 Press MENU repeatedly in the playback or stop mode to set the cursor to SOUND in the display. Then, press SET to select the desired mode. With each press, the indications change as follows.
MB (MEGA BASS):
emphasizes bass sound
GRV (GROOVE): emphasizes deeper bass sound
No message: off (normal)
When using the remote control, see "Using the remote control".
Note
- If the sound is distorted with the mode "GRV", select the mode "MB" or no message.
Protecting Your Hearing (AVLS)
When you set the AVLS (Automatic Volume Limiter System) function to active, the maximum volume is kept down to protect your ears.
1 Press MENU repeatedly in the playback, stop or radio mode to set the cursor to AVLS in the display. Then press SET to show “ ”.
To cancel the AVLS function Press SET so that disappears.
When using the remote control, see "Using the remote control".
Notes
- If the sound is distorted when you listen to the bass-boosted sound with the AVLS function, turn down the volume.
- The setting is stored as long as the battery is not replaced.
Using the Remote Control
All buttons on the remote control unless otherwise noted below function identically to those corresponding on the main unit. Read the direction for your model.
To lock the buttons
1 Slide HOLD to the direction of the arrow.
When you press any button "Hold" appears in the display.
To unlock, slide HOLD to the opposite direction of the arrow.
Using SOUND
Press SOUND/AVLS to select the desired mode. With each press, the indications in the display changes as follows:
MB: emphasizes bass sound
GRV: emphasizes deeper bass sound
No message: off (normal)
Using AVLS
Press and hold SOUND/AVLS for two seconds or more. " " appears in the display.
To cancel, press and hold SOUND/AVLS for two seconds or more again.
Additional Information
Precautions
On rechargeable battery and charger
-
If the rechargeable battery is new or has not been used for a long time, it may not be charged completely until you use it several times.
-
The nameplate indicating the operating voltage, power consumption, etc. is located on the bottom exterior of the battery charger.
On dry batteries
Do not carry the dry or rechargeable batteries with coins or other metallic objects. It can generate heat if the positive and negative terminals of the batteries are accidentally contacted by a metallic object.
On the unit
- Do not drop the unit or give a shock to the unit, or it may cause a malfunction.
- Do not leave the unit in a location near heat sources, or in a place subject to direct sunlight, excessive dust or sand, moisture, rain, mechanical shock, or in a car with its windows closed.
- The LCD display may become hard to see or slow down when using the unit at high temperatures (above 40^ / 104^ ) or at low temperatures (below 0^ / 32^ ). At room temperature, the display will return to its normal operating condition.
- If the unit has not been used for long, set it in the playback mode and warm it up for a few minutes before inserting a tape.
On tapes longer than 90 minutes
We do not recommend the use of tapes longer than 90 minutes except for a long continuous recording or playback. They are very thin and tend to be stretched easily.
On the remote control
Use the supplied remote control only for each unit.
On headphones/earphones Road safety
Do not use headphones/earphones while driving, cycling, or operating any motorized vehicle. It may create a traffic hazard and is illegal in some areas. It can also be potentially dangerous to play your headphones/earphones at high volume while walking, especially at pedestrian crossings. You should exercise extreme caution or discontinue use in potentially hazardous situations.
Preventing hearing damage Do not use headphones/earphones at high volume. Hearing experts advise against continuous, loud and extended play. If you experience a ringing in your ears, reduce volume or discontinue use.
Caring for others
Keep the volume at a moderate level. This will allow you to hear outside sounds and to be considerate to the people around you.
Maintenance
To clean the tape head and path
Use the cleaning cassette CHK-1 (not supplied) every 10 hours of use.
Note
- Use only the recommended cleaning cassette.
To clean the exterior
Use a soft cloth slightly moistened in water. Do not use alcohol, benzine or thinner.
Note
- Clean the headphones/earphones plug and microphone plug periodically.
Troubleshooting
The cassette holder does not open.
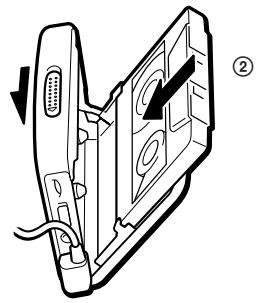
- If the tape is playing, stop and then slide OPEN.
- This condition may occur when you remove the power sources during playback or recording, or when you use exhausted dry or rechargeable battery. Set the power sources again or replace the exhausted battery with a new one.
The volume is not turned up.
If appears for AVLS display, press SET so that disappears.
A beep sounds and recording is not possible when REC is slid.
- If the tab of the tape is broken off, cover the tab hole with adhesive tape.
- If "REV" appears, open the cassette holder then close it so that "FWD" appears.
The display on the remote control is not normal
Disconnect the remote control from the Walkman, then connect it again.
The radio and playback operates but recording is not possible.
This condition may occur when the batteries become weak. Replace the batteries with new ones.
Specifications
Radio section
Frequency range
FM: 76.0-90.0 MHz
AM: 531-1,710 kHz
Tape section
Frequency response
(Dolby NR off)
Playback: 20-18,000 Hz
Recording/playback: 100 - 8,000Hz
Output
Headphones (Q)REMOTE jack
Load impedance 8-300 ohms
Power output
4mW + 4mW (16 ohms)
General
Power requirements
1.5 V
Rechargeable battery
One R6 (size AA) battery
Dimensions (w/h/d)
Approx. 109 × 78.6 × 26.4 ~mm
(4^3 / 8× 3^1 / 8× 1^1 / _16 inches) incl.
projecting parts and controls
Mass
Approx. 150g
Approx. 240g (8.5 oz) incl.
rechargeable battery, earphones with remote control and cassette
Supplied accessories
Battery case (1)
Stereo earphones with remote control (1)
Clip (1)
Battery charger (1)
Rechargeable battery (NC-6WM,
1.2 V, 600 mAh, Ni-Cd) (1)
Battery R6P (SR)
Rechargeable battery carrying case (1)
Carrying pouch (1)
Stereo microphone (1)
Microphone stand (1)
Design and specifications are subject to change without notice.
141
6-7-35
(03)5448-3311
(052)232-2611
(06)539-5111