
WM-FX877 - Portable cassette player SONY - Free user manual and instructions
Find the device manual for free WM-FX877 SONY in PDF.

| Product Type | Portable cassette player with radio |
| Brand | SONY |
| Model | WM-FX877 |
| Dimensions (approx.) | 109 x 79 x 30 mm |
| Weight (with batteries) | Approx. 220 g |
| Power Supply | 2 AA batteries (LR6) or AC adapter |
| Battery Life (approx.) | Cassette playback: 15 h / Radio: 25 h |
| Main Functions | Cassette playback, AM/FM radio, auto stop, REPEAT |
| Radio | FM stereo and AM, manual tuning |
| Equalizer | No (standard playback) |
| Audio Output | 3.5 mm stereo headphone jack |
| Cassette Playback | Auto Reverse, REPEAT (continuous playback) |
| Maintenance and Cleaning | Clean the playback heads with a cotton swab dipped in isopropyl alcohol |
| Safety | Do not expose to moisture, turn off when cleaning |
| Spare Parts | Batteries, AC adapter, headphones, drive belt (repairable) |
| Repairability | Open with a Phillips screwdriver, parts available online |
| Included Accessories | Stereo headphones, wrist strap, AC adapter (depending on market) |
| General Information | Portable device with belt clip, robust design |
Frequently Asked Questions - WM-FX877 SONY
User questions about WM-FX877 SONY
0 question about this device. Answer the ones you know or ask your own.
Ask a new question about this device
Download the instructions for your Portable cassette player in PDF format for free! Find your manual WM-FX877 - SONY and take your electronic device back in hand. On this page are published all the documents necessary for the use of your device. WM-FX877 by SONY.
USER MANUAL WM-FX877 SONY
Operating Instructions (page 48)
XXXXXXXXXX
XXXXXXXXXX

WALKMAN
WALKMAN
WALKMAN is a registered trademark of Sony Corporation.
XXXX
XXXX
WM-FX877

•
•
4
5
6
8
10
14
(AMS) 15
(MODE) 16
( )....18
B NR 20
22
23
24
28
30
(SOUND) 32
(AVLS) 34
36
37
38
39
40
42
44
45
46
| (ASP) ( ) | )(10) | |||
| GROOVE (32 ) | 3 | REVIVE MEGA BASS | ||
| 16 | 9 | 45 | AMS (15 ) | |
| (37 ) | ||||
| 1 | 1 | (14 ) | ||
natural_image
Line drawing of a mechanical housing or enclosure with mounting feet (no text or symbols)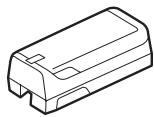
natural_image
Line drawing of a rectangular electronic component with internal slots and mounting brackets (no text or symbols)NC-6WM

natural_image
Line drawing of a rectangular electronic component with two ports and a handle (no text or symbols)(3)
R6P(SR)
(*)

( )

natural_image
Line drawing of a medical or diagnostic device with tubing and connector (no text or symbols)AC
natural_image
Line drawing of a bag with a coiled handle and attached string (no text or symbols)
natural_image
Line drawing of a two-pin electrical connector (no text or symbols)1
300
2
natural_image
Technical line drawing of a mechanical device with no visible text or symbolsAC )

AC 100 240V
natural_image
Simple line drawing of a device with arrows indicating direction (no text or symbols)(
1
2
natural_image
Line drawing of a washing machine with a door and buttons, showing a scroll with an arrow (no text or symbols)
natural_image
Technical line drawing of a mechanical bracket with mounting holes and a downward arrow indicating motion (no text or symbols)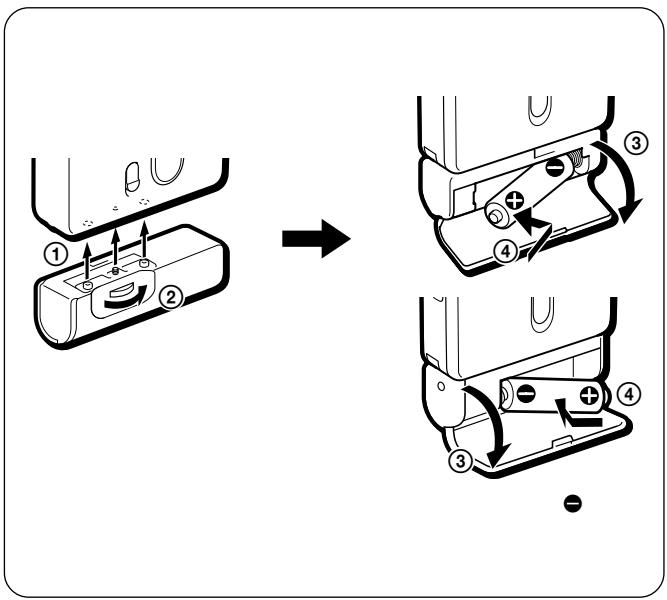
3
OREMOTE
TYPE I ( ) TYPE II ( ) TYPE IV ( )
1
①OPEN
②
(FWD)
(REV)
2

| ( ) | ||
| 1 | FWD ( ) ( FWD ● )REV ( ) ( REV ● ) | |
| 1 | ( FF ) | |
| ( REW ) | ||
| 1 | 2 1 | REP |
| REP | ||
| 2 | ( FF ) | |
| 2 | ( REW ) | |
| (14 ) | ||

1
BAND•RADIO ON
1 1
1
2
(
)
(ASP )
AREA RADIO ON
BAND/ASP•
AM FM TV
FM
PRESET 1
( )
1 JR
28 29
①ENTER

② AREA 1
BAND•RADIO ON
③ TUNE/PRESET
1 8 JR TUNE/PRESET 1 2
3 4 5 6 7 8 JR USA* Eur* 1 2 3...
1:2:
3:4:
5:
6:7:
8: JR:

* USA Eur 30
( )
④ENTER
2-①
28
29
3
:AM FM
:AM
TV
FM
BAND•RADIO ON
1
4
PRESET
5
■•RADIO OFF
natural_image
Simple line drawing of a mechanical device with no text or symbols2
1 5
AM
FM TV ( )
23
24
REPEAT
FWD( )
REV( )
◀▶•REPEAT
FWD( )
REV( )
■•RADIO OFF
FF•AMS
REW•AMS
◀▶•REPEAT
2
1
FF•AMS
2
REW•AMS
2
(AMS
)
1
FF•AMS
natural_image
Technical line drawing of a mechanical component with no visible text or symbols1
REW•AMS
9
AMS 1
• AMS 1
4
4
• AMS 1
(42
(MODE)

flowchart
graph TD
    A["(MODE)"] --> B["●"]
    B --> C["↔"]
    C --> D["1"]
    D --> E["*"]
    F["* REV"] --> G["REV"]
1 MENU 1


2

3

( )


1
30
MENU
MENU
SET
MODE
•
•
( )
| (BL SKIP) | |||
| BL SKIP | ● | ON | BL SKIP |
| BL SKIP | BL SKIP | ||
1 MENU 1

BL SKIP ●
2 ● BL
SKIP
3
BL SKIP
( )
30
MENU
MENU
SET
ON
BL SKIP
• 12
• 10
•
42
•
•
\*B NR
ON
B NR
DOLBY
D
DO
natural_image
Diagram of a handheld device with cable and scroll, showing motion arrows (no text or symbols)1 BAND•RADIO ON
(
1 )
2 BAND•RADIO ON
TV( )
( 1 )
3 MENU TUNE
MODE
4 SET MANUAL
5 TUNE/PRESET
( )
TUNE/PRESET
TUNE/PRESET+ -
:AM FM TV 8
:AM FM 8

1 BAND•RADIO ON
( ) 1
2 BAND•RADIO ON
TV( )
( 1 )
3 A ENTER
8 28 29

1 BAND•RADIO ON
1
2 BAND•RADIO ON TV( )
AM FM
1
3 ENTER
4 * TUNE/PRESET
ENTER
5 * TUNE/PRESET
6 * ENTER
3
( )
1 25
1 3
2 TUNE/PRESET
*
3 ENTER
4 TUNE/PRESET
5 ENTER

natural_image
Diagram of a handheld device with cable and probe, showing motion arrows (no text or symbols)1 BAND•RADIO ON
( )
2 BAND•RADIO ON
TV( )
( 1 )
3 MENU
MODE
4 SET
5 TUNE/PRESET
( )
1
AM FM
TUNE
10 11
| AREA 1 (Sapporo) | |||
| ( ) | |||
| AM 1 | 567kHz | NHK 1 | |
| 2 | 747kHz | NHK 2 | |
| 3 | 1287kHz | ||
| 4 | 1440kHz | ||
| FM 1 | 80.4MHz | FM | |
| 2 | 82.5MHz | FM | |
| 3 | 85.2MHz | NHK FM | |
| 4 | 88.2MHz | NHK FM | |
| TV* 1 | 1 ch | HBC | |
| 2 | 3 ch | NHK | |
| 3 | 5 ch | STV | |
| 4 | 12 ch | NHK | |
| AREA 2 (Sendai) | |||
| AM | 1 | 891kHz | NHK 1 |
| 2 | 1089kHz | NHK 2 | |
| 3 | 1260kHz | ||
| FM | 1 | 77.1MHz | FM |
| 2 | 82.5MHz | NHK FM | |
| TV* | 1 | 1 ch | |
| 2 | 3 ch | NHK | |
| 3 | 5 ch | NHK | |
| 4 | 12 ch | ||
| AREA 3 (Northern Kanto) | ||
| AM 1 | 594kHz | NHK 1 |
| 2 | 693kHz | NHK 2 |
| 3 | 810kHz | AFN ( FEN) |
| 4 | 954kHz | TBS |
| 5 | 1134kHz | |
| 6 | 1197kHz | |
| 7 | 1242kHz | |
| 8 | 1530kHz | |
| ( ) | ||
| FM 1 | 76.4MHz | FM |
| 2 | 78.8MHz | |
| 3 | 80.0MHz | TOKYO FM |
| 4 | 80.3MHz | NHK FM |
| 5 | 81.6MHz | NHK FM |
| 6 | 83.2MHz | NHK FM |
| 7 | 86.3MHz | FM |
| TV* 1 | 1 ch | NHK |
| 2 | 3 ch | NHK |
| 3 | 4 ch | |
| 4 | 6 ch | TBS |
| 5 | 8 ch | |
| 6 | 10 ch | |
| 7 | 12 ch | |
| AREA 4 (Southern Kanto) | ||
| AM 1 | 594kHz | NHK 1 |
| 2 | 693kHz | NHK 2 |
| 3 | 810kHz | AFN ( FEN) |
| 4 | 954kHz | TBS |
| 5 | 1134kHz | |
| 6 | 1242kHz | |
| 7 | 1422kHz | |
| FM 1 | 76.1MHz | FM |
| 2 | 78.0MHz | FM |
| 3 | 78.6MHz | FM |
| 4 | 79.5MHz | FM |
| 5 | 80.0MHz | TOKYO FM |
| 6 | 81.3MHz | FM |
| 7 | 82.5MHz | NHK FM |
| 8 | 84.7MHz | FM |
| TV* 1 | 1 ch | NHK |
| 2 | 3 ch | NHK |
| 3 | 4 ch | |
| 4 | 6 ch | TBS |
| 5 | 8 ch | |
| 6 | 10 ch | |
| 7 | 12 ch | |
| AREA 5 (Nagoya) | |||
| ( ) | |||
| AM 1 | 729kHz | NHK | 1 |
| 2 | 909kHz | NHK | 2 |
| 3 | 1053kHz | CBC | |
| 4 | 1332kHz | ||
| 5 | 1431kHz | ||
| FM 1 | 77.8MHz | FM | |
| 2 | 78.9MHz | FM | |
| 3 | 80.7MHz | FM | |
| 4 | 81.8MHz | NHK FM | |
| 5 | 82.5MHz | NHK FM | |
| 6 | 83.6MHz | NHK FM | |
| TV* 1 | 1 ch | ||
| 2 | 3 ch | NHK | |
| 3 | 5 ch | CBC | |
| 4 | 9 ch | NHK | |
| 5 | 11 ch | ||
| AREA 6 (Osaka) | ||
| AM 1 | 558kHz | |
| 2 | 666kHz | NHK 1 |
| 3 | 828kHz | NHK 2 |
| 4 | 1008kHz | ABC |
| 5 | 1143kHz | KBS |
| 6 | 1179kHz | |
| 7 | 1314kHz | |
| 8 | 1431kHz | |
| FM 1 | 76.5MHz | |
| 2 | 80.2MHz | FM802 |
| 3 | 82.8MHz | NHK FM |
| 4 | 85.1MHz | FM |
| 5 | 86.5MHz | NHK FM |
| 6 | 88.1MHz | NHK FM |
| 7 | 89.4MHz | FM |
| 8 | 89.9MHz | FM |
| TV* 1 | 2 ch | NHK |
| 2 | 4 ch | |
| 3 | 6 ch | ABC |
| 4 | 8 ch | |
| 5 | 10 ch | |
| 6 | 12 ch | NHK |
| AREA 7 (Hiroshima) | ||
| ( ) | ||
| AM 1 | 702kHz | NHK 2 |
| 2 | 918kHz | |
| 3 | 1071kHz | NHK 1 |
| 4 | 1116kHz | |
| 5 | 1350kHz | |
| 6 | 1575kHz | AFN ( FEN) |
| FM 1 | 78.2MHz | FM |
| 2 | 88.3MHz | NHK FM |
| TV* 1 | 3 ch | NHK |
| 2 | 4 ch | |
| 3 | 7 ch | NHK |
| 4 | 12 ch | |
| AREA 8 (Fukuoka) | |||
| AM | 1 | 612kHz | NHK 1 |
| 2 | 1017kHz | NHK 2 | |
| 3 | 1278kHz | RKB | |
| 4 | 1413kHz | ||
| FM | 1 | 77.9MHz | FM |
| 2 | 78.7MHz | FM | |
| 3 | 80.7MHz | FM | |
| 4 | 81.6MHz | NHK FM | |
| 5 | 84.8MHz | NHK FM | |
| TV* | 1 | 1 ch | |
| 2 | 3 ch | NHK | |
| 3 | 4 ch | RKB | |
| 4 | 6 ch | NHK | |
| 5 | 9 ch | ||
| JR | JR | ** (Shinkansen) |
| FM | 1 | 76.0MHz |
| 2 | 76.6MHz | |
| 3 | 77.5MHz | |
| 4 | 78.8MHz | |
| 5 | 79.6MHz |
*TV
**
2
1 BAND•RADIO ON
2 ENTER
3 AREA 1 BAND•RADIO ON
4 * TUNE/PRESET
USA
Eur
2
| USA | FM: 87.5 | 108MHz |
| AM: 530 | 1,710kHz | |
| Eur | FM: 87.5 | 108MHz |
| AM: 531 | 1,602kHz |
5 ENTER
6 :
① 1 A RADIO ON
BAND/ASP•
AM FM
② (27)
) (24)
(23
:
(23)
(24)
1 3 4 AREA1 8 JR
ENTER
(SOUND)
| ( SOUND ) | |
| RV | ( ) |
| MB | |
| GRV | |
| NORM ( ) | |
1 MENU 1
2
(RV MB GRV
NORM)
3
( )
30
MENU
MENU
SOUND
SET
•GRV
MB NORM
(AVLS—
)
| (AVLS) | |||
| AVLS | ● | ◎ | AVLS |
| AVLS | AVLS | ||
1 MENU 1

AVLS ●
AVLS
2
AVLS
3
AVLS
( )

AVLS
AVLS
30
MENU
MENU
SET
AVLS

•
•AVLS
HOLD

• 100
(EIAJ*)
| LR6(WM) | 36 | 32 | |
| (100% ) | NC-6WM | 10 | 10 |
| 45 | 42 |
* EIAJ ( )
HF
AMS
1
2 AC
AC-E15L( )
AC-E15HG( )
DC IN 1.5V
3 AC
•
• AC
AC-E15HG(
AC
AC-E15L
EIAJ )

natural_image
Pure electrical circuit lines without any symbols- AC-E15HG
10
CHK-1W
natural_image
Line drawing of a printer with a paper airplane being inserted (no text or symbols)
natural_image
Pure mechanical assembly diagram without any text, numbers, or symbols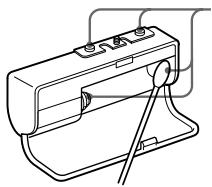
natural_image
Line drawing of a mechanical device with a lever and base (no text or symbols)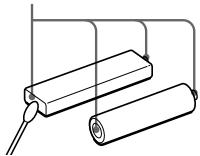
natural_image
Simple line drawing of two cylindrical objects connected by wires, no text or symbols present
Ni-Cd
(60)
( )
(40)
(0)
1
90
AMS 1
(AMS
)
36
18
AVLS
AVLS
34
| MB | GRV | (32) | ||
| ASP | ||||
| ( ) | (23) | |||
| (24) | ||||
| ---- | 15 | |||
1
)
6
(
1
90
(EIAJ*) DOLBY NR OFF 40 15,000 Hz
( )1
8 300
(DC ) 4 mW + 4 mW (EIAJ 16 )
DC 1.5 V
NC-6WM 1.2 V 600 mAh
Ni-Cd 3 1
(EIAJ)
37
108.9 × 77.7 × 23.9 mm ( / / )
145 g
210 g ( NC-6WM C-
60HF )
FM 76.0 90.0MHz
AM 531 1,710kHz
TV 1 12ch( )
NC-6WM CHK-1W
( )**MDR-ED238SP (GROOVE ) MDR-E888SP
AC AC-E15L ( AC AC-E15HG
( DCC-E215
* EIAJ( )
** REMOTE
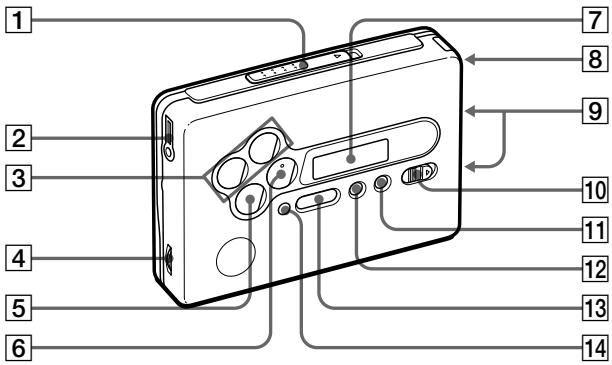
1 OPEN ( )
2 Ⓞ REMOTE
3 : FF ( )•AMS/ REW ( )•AMS : TUNE ( )/ PRESET+ - ( )
4 VOL
13 :BAND/ASP AM FM TV / * •RADIO ON
* BAND
ASP
:BAND AM
FM •RADIO ON
14 ENTER ( )
▶Getting Started
Choosing a Power Source
Dry Battery
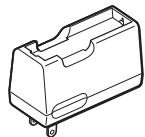
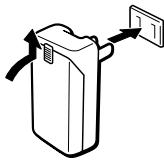
Attach the supplied battery case, and then insert one R6 (size AA) battery with correct polarity. Be sure to insert it from the ⬤ side.
Note
- For maximum performance we recommend that you use a Sony alkaline battery.
Rechargeable Battery
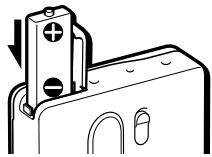
1 Insert the supplied rechargeable battery (NC-6WM) into the charger with correct polarity.
2 Plug in the charger to the house current (mains). Japanese model: Full charging takes about 2 hours. "Sony World Model": Full charging takes about 1 hour. If the plug does not fit to your mains, attach the supplied AC plug adaptor.
3 Insert the fully charged battery into the rechargeable battery compartment.
You can charge the battery about 300 times.
Note
- Certain countries may regulate disposal of battery used to power this product. Please consult your local authority.
When to replace/charge the battery
The battery remainder mark has 3 steps to show the remaining battery power.
| Display | Condition | |
| Remote control | Main unit | |
 |  | There is enough battery power. |
| [500] | [500] | The battery power is decreasing. |
| [553] | [557] | |
| [597] | [620] | The battery is exhausted. Replace it with a new battery. |
 |  | |
When the battery is exhausted, tape playback will become unstable and noisy, and then the tape will stop. Replace or charge the battery when “☐” flashes in the display.
Notes
- When you insert a charged battery, the battery remainder mark may show “☐” (“☐” on the main unit) even if it is not fully charged.
- The battery remainder mark may temporarily show a lower level during fast forwarding or rewinding or use in extremely low temperatures.
Battery life
| (Approx. hours) | (EIAJ*) |
Sony alkaline LR6 (SG)
| Tape playback | 36 |
| Radio reception | 32 |
Rechargeable battery (NC-6WM)
| Tape playback | 10 |
| Radio reception | 10 |
Sony alkaline LR6 (SG) and Rechargeable NC-6WM
| Tape playback | 45 |
| Radio reception | 42 |
* Measured value by the standard of EIAJ (Electronic Industries Association of Japan). (Using a Sony HF series cassette tape)
Note
- The battery life may shorten depending on the operation of the unit.
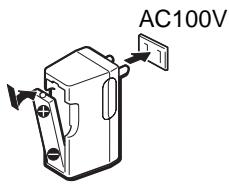
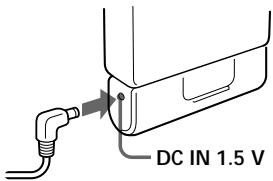
House Current ("Sony World Model" only)
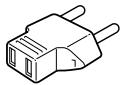
Remove the rechargeable battery if inserted. Attach the battery case and connect the AC power adaptor AC-E15L for Japan (not supplied) or AC-E15HG (not supplied) to the DC IN 1.5 V jack of the battery case and to the wall outlet.
Do not use any other AC power adaptor.
Specifications for AC-E15HG vary for each area. Check your local voltage and the polarity of the plug before purchasing.
natural_image
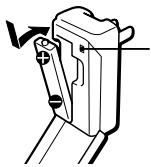
Pure electrical circuit lines without any symbolsPolarity of the plug
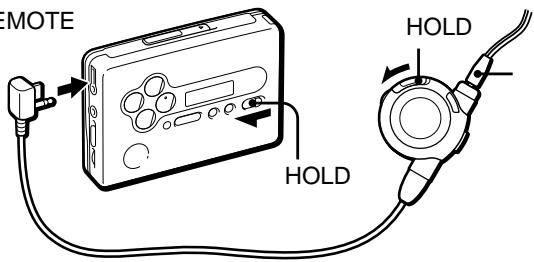
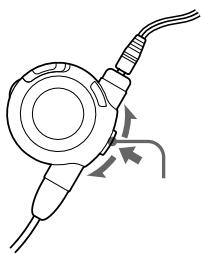
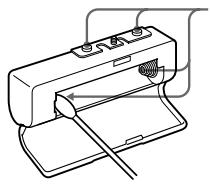
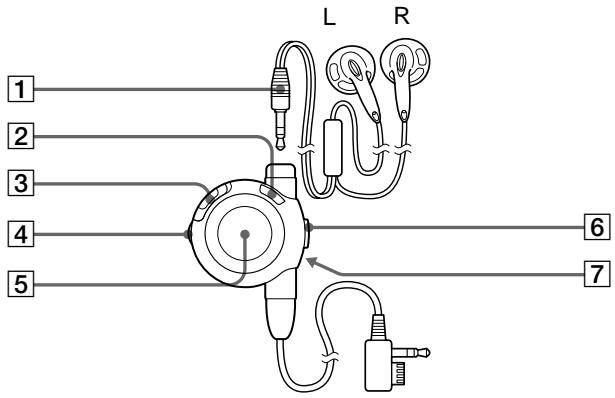
Connecting the earphones
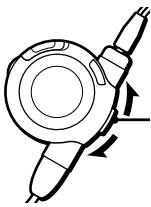
1 Connect the stereo miniplug firmly to the remote control.
2 Connect the remote control to ⓃREMOTE.
3 Wear the "L" marked side to the left ear and the "R" marked side to the right ear. If the earphones do not fit to your ears or the sound is unbalanced, adjust the earphones to fit to your ears firmly.
▶ Operating the Walkman
Playing a Tape
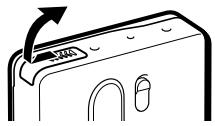
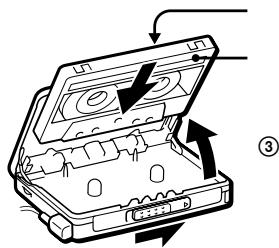
1 Open the cassette holder and insert a cassette.
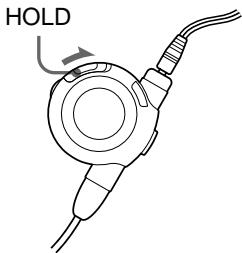
2 Make sure the HOLD function is turned off. If it is on, slide the HOLD switch to turn it off.
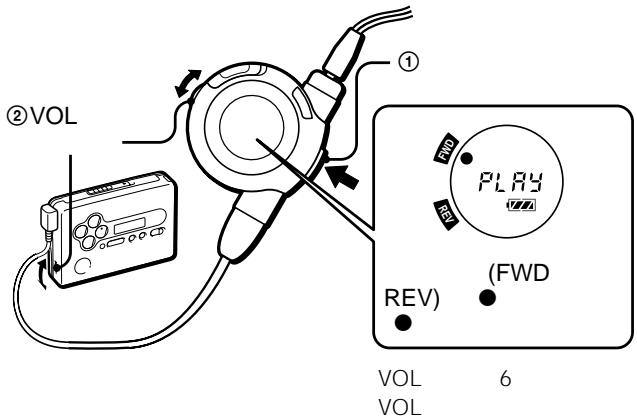
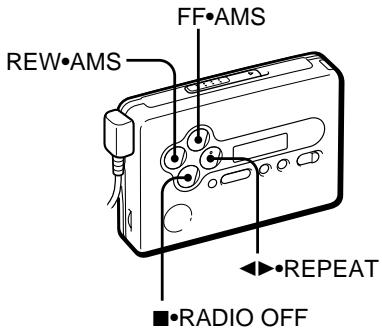
3 Press the jog lever on the remote control, or press ◀▶•REPEAT on the main unit.
Adjust the volume with VOL.
When adjusting the volume on the main unit
Set the VOL control on the remote control at maximum.
When adjusting the volume on the remote control
Set the VOL control on the main unit to around 6.
Note on the cassette holder
When opening the cassette holder on the main unit, make sure the tape is stopped, then slide the OPEN switch. If the cassette holder is opened when the tape is running, the tape may loosen and be damaged.
Operation on the remote control
| To | Operation on the jog lever and display |
| Play the other side | Press for more than a second during playback(Playing side FWD: “●” on “FWD”. Playing side REV: “●” on “REV”) |
| Stop playback | Press once during playback |
| Fast forward | Jog upward for less than a second during stop (“FF” appears) |
| Rewind | Jog downward for less than a second during stop (“REW” appears) |
| Repeat the current track (Repeat Single Track Function) | Press twice during playbackTo stop a single repeat, press once. |
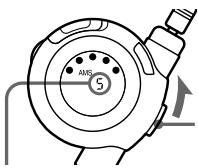
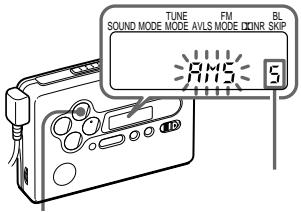
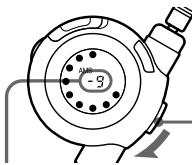
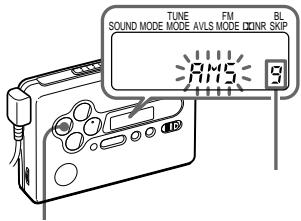
| Play the next track/ succeeding 9 tracks from the beginning (AMS*) | Jog upward once/for the number of tracks to be skipped during playback(“AMS” and the number of tracks to be skipped appear) |
| Play the current track/previous 8 tracks from the beginning (AMS*) | Jog downward once/for the number of tracks to be skipped during playback(“AMS” and the number of tracks to be skipped appear) |
(continued)
| Play the other side from the beginning(Skip Reverse function) | Jog upward for 2 seconds or more during stop(“FF” flashes) |
| Play the same side from the beginning(Rewind Auto Play function) | Jog downward for 2 seconds or more during stop(“REW” flashes) |
* Automatic Music Sensor
Operation on the main unit
| To | Press |
| Play the other side | ◀▶•REPEAT during playback |
| Stop playback | ■ (stop)•RADIO OFF |
| Fast forward | FF•AMS during stop |
| Rewind | REW•AMS during stop |
| Repeat the current track (Repeat Single Track function) | ◀▶•REPEAT for 2 seconds or more during playback To stop a single repeat, press it again. |
| Play the next track/ succeeding 9 tracks from the beginning (AMS*) | FF•AMS once/repeatedly during playback |
(continued)
| Play the current track/previous 8 tracks from the beginning (AMS*) | REW•AMS once/repeatedly during playback |
| Play the other side from the beginning (Skip Reverse function) | FF•AMS for 2 seconds or more during stop |
| Play the same side from the beginning (Rewind Auto Play function) | REW•AMS for 2 seconds or more during stop |
* Automatic Music Sensor
Note on AMS, Repeat Single Track and BL SKIP
- The AMS and the Repeat Single Track functions detect a blank of 4 seconds or longer between the tracks. The BL SKIP function detects a blank of 12 seconds or longer. If there is noise between the tracks, these functions may not recognize the blank and may not operate. Likewise, if there is a quiet segment within a track, these functions may recognize it as a blankspace.
- You need a blank of 10 seconds or longer at the beginning of each side of the cassette. Otherwise, the first track may not be played back from the beginning.
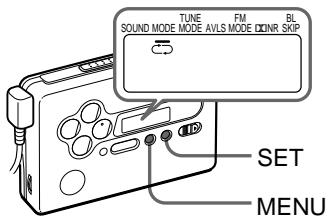
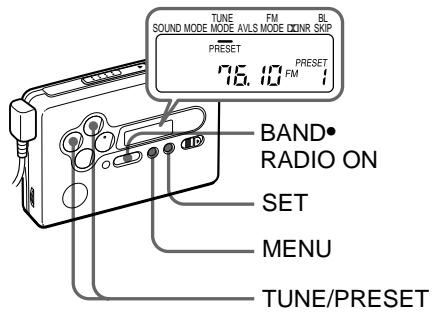
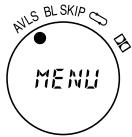
Using the Menu
Adjusting playback modes
You can adjust the following playback modes using the Menu function on the remote control or on the main unit.
AVLS: Turn on to limit the maximum volume to protect your hearing (Automatic Volume Limiter System) (on the main unit, “😊” indicates “on”).
BL SKIP: Fast-forwards the tape to the next track if there is a blank space of longer than 12 seconds (Repeats a set of three short beeps when skipping a blank) (on the main unit, “ON” indicates “on”).
(MODE): plays both sides repeatedly when turned on (on the main unit, “→” is displayed). Plays both sides once from the FWD side when turned off (on the main unit, “→” is displayed).
☐☐ (☐☐NR): Turn on when you play back a tape recorded with the Dolby* B NR system (on the main unit, “ON” indicates “on”).
* Dolby noise reduction manufactured under license from Dolby Laboratories Licensing Corporation. “DOLBY” and the double-D symbol □□ are trademarks of Dolby Laboratories Licensing Corporation.
Note
- The playback modes can be set or canceled separately.
On the remote control
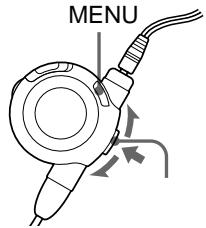
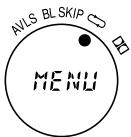
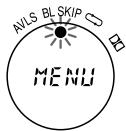
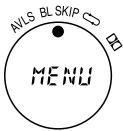
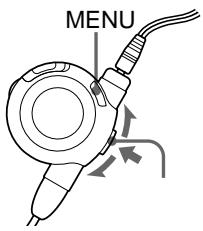
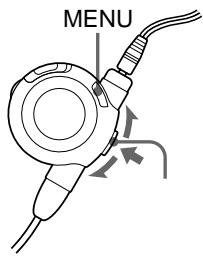
1 Press MENU to enter the menu mode. “●” (the cursor) will flash in the display of the remote control.
2 Jog the jog lever upward/ downward repeatedly until “●” flashes on the playback mode to be adjusted.
3 Press the jog lever to enter. You will hear a short beep and “●” will appear for a few seconds. Then, the display will exit the menu mode.
To cancel a playback mode On the remote control, repeat the above so that “●” disappears on the playback mode to be adjusted.
To display the playback mode status on the remote control Press MENU to enter the menu mode. The active playback mode(s) will be marked by the “●”.
On the main unit
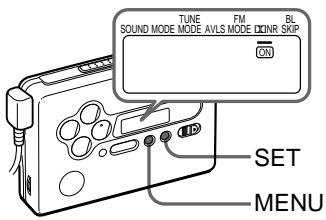
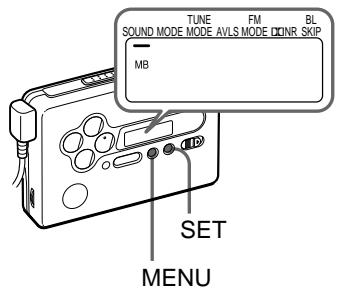
1 Press MENU repeatedly to move “__” (the cursor) in the display of the main unit to the playback mode to be adjusted.
2 Press SET repeatedly to select the playback mode to your choice.
Note
- If the sound is distorted when you listen to the bass-boosted sound with AVLS function, turn down the volume.
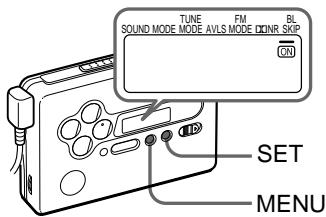
Emphasizing Sound
You can choose one of the following sound emphases using the Menu function on the remote control or on the main unit.
RV : Sound Revitalizer. Emphasizes treble sound.
MB : Mega Bass. Emphasizes bass sound (moderate effect).
GRV : Groove. Emphasizes bass sound (strong effect).
NORM (no message on the main unit) : normal (no effect).
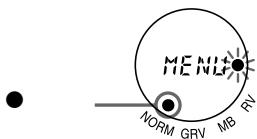
On the remote control
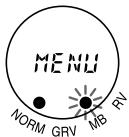
1 Press MENU to enter the menu mode. “●” will flash in the display.
2 Jog the jog lever upward/ downward repeatedly until “●” flashes on the sound emphasis of your choice.
3 Press the jog lever to enter. You will hear a short beep and “●” will appear for a few seconds. Then, the display will exit the menu mode.
To display the sound emphasis status on the remote control Press MENU to enter the menu mode. The active sound emphasis will be marked by the “●”.
On the main unit
1 Press MENU repeatedly to move “_” in the display to SOUND.
2 Press SET repeatedly to select the sound emphasis of your choice.
Note
- If the sound becomes distorted with the GRV effect, select MB or NORM (no message).
Notes on the menu mode
- You cannot operate the tape from the remote control while you are in the menu mode.
- When you press the jog lever to enter, or if you leave the remote control unoperated for more than 30 seconds, the display will exit the menu mode automatically. To exit the menu mode manually, press MENU again.
- The menu setting (except for AVLS) is stored even after the battery is replaced.
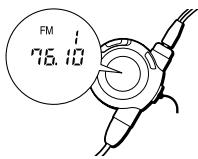
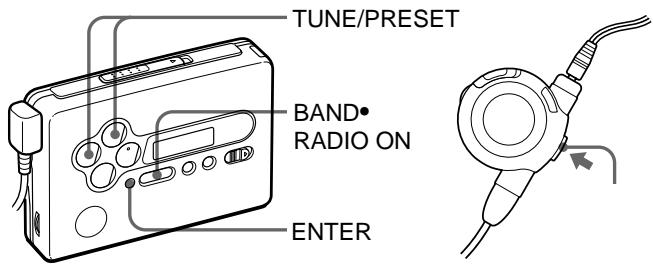
Listening to the Radio
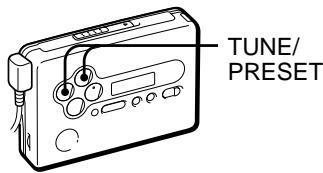
1 Press BAND • RADIO ON to turn on the radio.
2 Press BAND • RADIO ON repeatedly to select the band. (Japanese model: AM, FM, or TV.
"Sony World Model": AM or FM.)
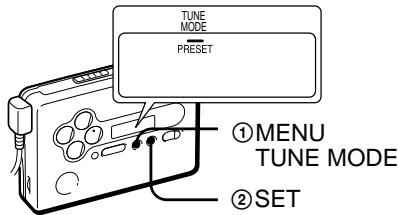
3 Press MENU on the main unit repeatedly and set “_” (the cursor) in the display of the main unit to TUNE MODE.
4 For manual tuning
① Press SET to choose MANUAL.
② Press TUNE/PRESET + or – repeatedly to tune in to the desired station. Hold down TUNE/PRESET + or – for a few seconds to scan for stations.
For preset tuning
① Press SET to choose PRESET.
② Press TUNE/PRESET + or – repeatedly to recall the desired preset station. To use preset tuning, preset stations first. For details see “Tuning in to the Ready-preset Stations for Each Area” or “Presetting Radio Stations”.
To turn off the radio
Press ■•RADIO OFF.
To improve the broadcast reception
- For AM: The Walkman has a built-in antenna. Reorient the Walkman horizontally to obtain optimum AM reception.
- For FM or TV (Japanese model only) : Extend the cord of the remote control, which serves as the FM antenna. If the reception is still not good, press MENU repeatedly to set the cursor in the display of the main unit to FM MODE. Then press SET to choose from “MONO” (monaural), “LOCAL” (stereo) or none (stereo) for best reception.
To operate from the remote control
To turn on the radio, press the jog lever for more than one second (while the tape is in stop mode only).
To tune in or recall a preset station, jog the jog lever upward/ downward.
To turn off the radio, press the jog lever.
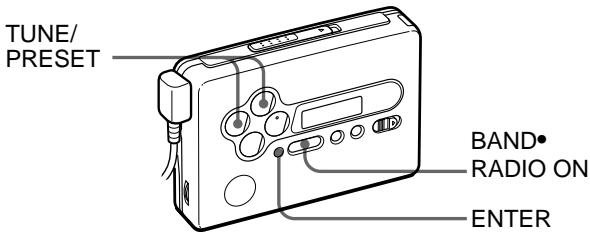
Tuning in to the Ready-preset Stations for Each Area
For each of the nine areas in Japan (Sapporo, Sendai, Northern Kanto, Southern Kanto, Nagoya, Osaka, Hiroshima, Fukuoka and the Shinkansen), this Walkman is factory preset with frequency data for major stations receivable in the area. Once your present area is selected, you can tune in to the stations on the area by preset tuning. For the factory preset stations for each area, see pages 28 to 29 of the Japanese text.
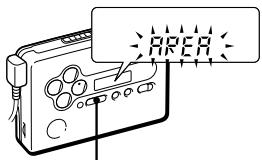
Searching the Area Automatically — Auto Station Preset function (Japanese model only)
The Walkman automatically selects your present area.
1 Press BAND/ASP • RADIO ON to turn on the radio.
2 Hold down BAND/ASP • RADIO ON until “AREA” is displayed.
The unit automatically selects the area number for your present area and the factory preset FM, AM, and TV stations for that area are stored on the preset numbers. Then, the FM frequency and “PRESET 1” will appear.
If area number was not found, the unit automatically scans for FM, AM, and TV stations and stores the ones that were received.
3 Tune in to the desired station by “preset tuning” (see “Listening to the Radio”).
If the ASP function does not store your desired station, or if you want to customize the preset number for the stations, preset the stations manually (see “Storing Radio Stations Manually”).
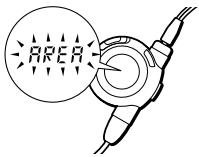
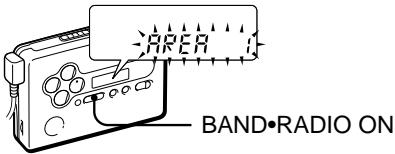
Selecting the Area Manually (Manual Area Call)
You can choose the area number manually.
1 Press BAND • RADIO ON to turn on the radio.
2 Press ENTER. The frequency digits will flash in the display.
3 Hold down BAND • RADIO ON until “AREA 1” flashes.
4 While “AREA 1” is flashing, press TUNE/PRESET+ or - repeatedly to select and area number from 1 to 8 or “JR” and then press ENTER.
5 Tune in to the desired preset station by “preset tuning” (see “Listening to the Radio”).
Presetting Radio Stations
Once you store your favorite stations in memory, you can play them easily.
Japanese model: You can preset up to 24 stations — 8 each for FM, AM and TV.
"Sony World Model": You can preset up to 16 stations — 8 each for FM and AM.
Tuning in to and Storing Radio Stations Automatically (Auto-Memory Scanning function)
1 Press BAND • RADIO ON to turn on the radio.
2 Press BAND • RADIO ON repeatedly to select the band.
3 Press ENTER until “A” appears in the display. The Walkman starts searching and storing stations. Then the preset number appears.
Note
- Do not remove the power sources until all the stations are stored.
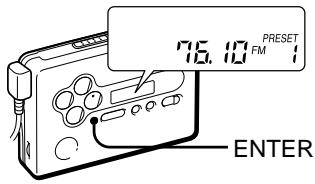
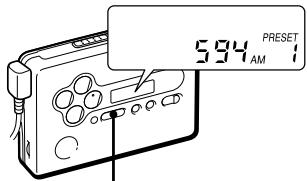
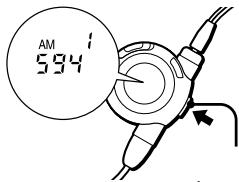
Storing Radio Stations Manually (Manual- Memory function)
You can preset the stations in any order.
1 Press BAND • RADIO ON to turn on the radio.
2 Press BAND • RADIO ON repeatedly to select the band.
3 Press ENTER.
The frequency digits will flash in the display.
4 Press TUNE/PRESET + or - repeatedly to tune in to the desired station and press ENTER.
The preset number will flash in the display.
5 Press TUNE/PRESET + or - repeatedly to select the desired preset number and press ENTER.
The station is stored to the number of your choice.
Notes
- If you cannot complete step 4 or 5 while the indications are flashing, repeat from step 3.
- If you preset a new station to the same preset number, the previously stored station will be erased.
To cancel the stored station
Follow the procedure above and in step 4, instead of tuning in to a station, press and hold TUNE/PRESET + or - until “- - - -” is displayed. Press ENTER while “- - - -” is displayed. The preset number will flash in the display. Press TUNE/PRESET + or - repeatedly to select the preset number you want to cancel and press ENTER.
Receiving Stations Outside Japan
1 Press BAND • RADIO ON to turn on the radio.
2 Press ENTER.
The frequency digits will flash in the display.
3 Press and hold BAND •
RADIO ON until “AREA 1” flashes.
4 While “AREA 1” is flashing, press TUNE/PRESET + or - to select “USA” or “Eur”.
5 Press ENTER.
6 Japanese model only:
①Press and hold BAND/ASP•RADIO ON until the preset number display changes to “A”, to store the radio stations (both AM and FM) automatically. The Walkman starts searching and storing stations. If you cannot store the desired stations, store them manually.
②Tune in to the stations following the procedure of "Listening to the Radio".
"Sony World Model": Tune in to and store stations as necessary following the procedure of "Listening to the Radio" and "Presetting Radio Stations".
Area indication and frequency range
| Area* | Frequency range | |
| FM (MHz) | AM(kHz) | |
| USA | 87.5–108 | 530–1,710 |
| Eur | 87.5–108 | 531–1,602 |
| Japan(AREA 1-8, JR) | 76–90 | 531–1,710 |
*USA : USA, Canada, and Central and South America
Eur : European and other countries
To receive stations in Japan
Select “AREA 1 to 8” or “JR” in step 4 above.
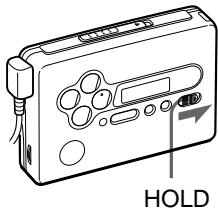
Locking the controls — Hold function
Slide HOLD switch in the direction of the arrow to lock the controls.
Sony online
http://www.world.sony.com/
Sony online