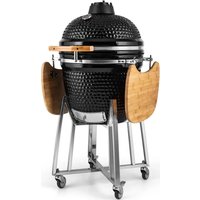
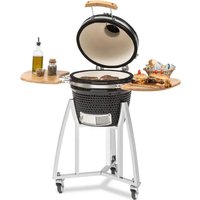
Kingsize Kamado - Barbecue Klarstein - Free user manual and instructions
Find the device manual for free Kingsize Kamado Klarstein in PDF.
| Product type | Ceramic kamado barbecue |
| Brand | Klarstein |
| Model | Kingsize Kamado |
| Article number | 10028282 |
| Total dimensions (W x D x H) | 132 x 125 x 75 cm |
| Ceramic dome dimensions | 54 x 68 cm |
| Weight | 87 kg |
| Material | Thick ceramic |
| Fuel type | Charcoal (not coal) |
| Cooking surface | Stainless steel grill (chrome plated, not dishwasher safe) |
| Included accessories | Handle, thermometer, side shelves, locking casters |
| Optional accessories | Second cooking level, pizza stone, protective cover |
| Cooking temperatures | Low/smoking 110-135 °C, normal 135-260 °C, searing 260-370 °C |
| Usage | Outdoor only, on stable and heat-resistant surface |
| Safety | Do not use indoors, keep 2 m away from flammable objects, do not use alcohol or gasoline for lighting |
| Maintenance | Self-cleaning: heat 30 min at 260 °C; exterior: damp cloth and mild detergent; interior: wire brush |
| Storage | Store under cover after cooling, use cover; in winter, store under roof |
| Assembly | Requires 2 persons, follow manual steps |
| Warranty | Consult manufacturer's terms |
Frequently Asked Questions - Kingsize Kamado Klarstein
User questions about Kingsize Kamado Klarstein
0 question about this device. Answer the ones you know or ask your own.
Ask a new question about this device
Download the instructions for your Barbecue in PDF format for free! Find your manual Kingsize Kamado - Klarstein and take your electronic device back in hand. On this page are published all the documents necessary for the use of your device. Kingsize Kamado by Klarstein.
USER MANUAL Kingsize Kamado Klarstein
Kamado Ceramic Grill
Barbecue céramique kamado
Barbecue in ceramica Kamado
text_image
QR code image containing encoded data, no visible human-readable textINHALT
Technische Daten 4
text_image
Exploded view diagram of a kitchen appliance with numbered parts for identificationtext_image
9 10 E 0 Cnatural_image
Simple line drawing of a curved table with two legs and vertical bars on top (no text or symbols)Zweite Grillebene
natural_image
Simple line drawing of a circular table with two legs and a flat top (no text or symbols)natural_image
Simple line drawing of a pair of scissors (no text or symbols)Clip
natural_image
Simple line drawing of a hat with a bow detail (no text or symbols)Regenplane
natural_image
Simple line drawing of a tool or measuring tool with a handle and base (no text or symbols)Schürhaken
Congratulations on purchasing this equipment. Please read this manual carefully and take care of the following hints to avoid damages. Any failure caused by ignoring the items and cautions mentioned in the instruction manual are not covered by our warranty and any liability. Scan the QR code to get access to the latest user manual and other information about the product.

text_image
QR code image containing encoded data, no visible human-readable textCONTENTS
Technical Data 19
Safety Instructions 20
Parts List 21
Assembly 22
Accessories (Available for Purchase) 27
Operation Instructions 28
Cooking Temperature Guide 32
TECHNICAL DATA
| Item number 10028282 | |
| Dimensions entire grill 132 x 125 x 75 cm | |
| Dimensions ceramic dome 54 x 68 cm | |
| Weight 87 kg |
SAFETY INSTRUCTIONS
- This product is intended FOR OUTDOOR USE ONLY. DO NOT use indoors.
• ALWAYS keep children and pets at a safe distance from the oven when in use.
• NEVER leave a burning fire unattended.
- DANGER of carbon monoxide poisoning – NEVER light this product or let it smoulder or cool down in confined spaces.
- DO NOT use this product in a tent, caravan, car, cellar, loft or boat.
• DO NOT use under any awnings, parasols or gazebos.
- FIRE HAZARD – Hot embers may emit while in use.
- CAUTION - DO NOT use petrol, white spirit, lighter fluid, alcohol or other similar chemicals for lighting or relighting. Use only firelighters complying to EN1860-3.
- It is highly recommended that you use lump charcoal in your Kamado. It burns for longer and produces less ash which can restrict the airflow.
• DO NOT use coal in this product.
- IMPORTANT: When opening the lid at high temperatures it is essential to lift the lid only slightly, allowing air to enter slowly and safely, preventing any backdraft or flare-ups that may cause injury.
- ALWAYS follow the FOOD COOKING INFORMATION stated on page 4 of this instruction manual.
- DO NOT use the Kamado on decking or any other flammable surfaces such as dry grass, wood chips, leaves or decorative bark.
- Ensure that the Kamado is positioned at least 2 metres away from flammable items.
• DO NOT use this Kamado as a furnace.
- ATTENTION: This product will become very hot, DO NOT move it during operation.
- ALWAYS USE heat resistant gloves when handling hot ceramics or cooking surfaces.
- Allow the unit to cool down completely before moving or storing.
- Always inspect the unit prior to use for fatigue and damage and replace as and when necessary.
PARTS LIST
Parts
Mounting parts

C (2x)

D(2x)


Prior to assembly, read the instructions carefully. Check all parts against the parts list. Carry out assembly on a soft surface to avoid scratching the paint. Please retain this information for future reference.
For ease of assembly on ly loosely tighten bolts and then tighten fully when assembly is complete.
DO NOT over tighten bolts; only tighten with moderate pressure to avoid damaging the bolts or components of the Kamado grill.
ASSEMBLY
IMPORTANT - Remove any packaging before use, but retain the safety instructions and store them with this product.
Ensure that the lid is closed prior to assembly.
text_image
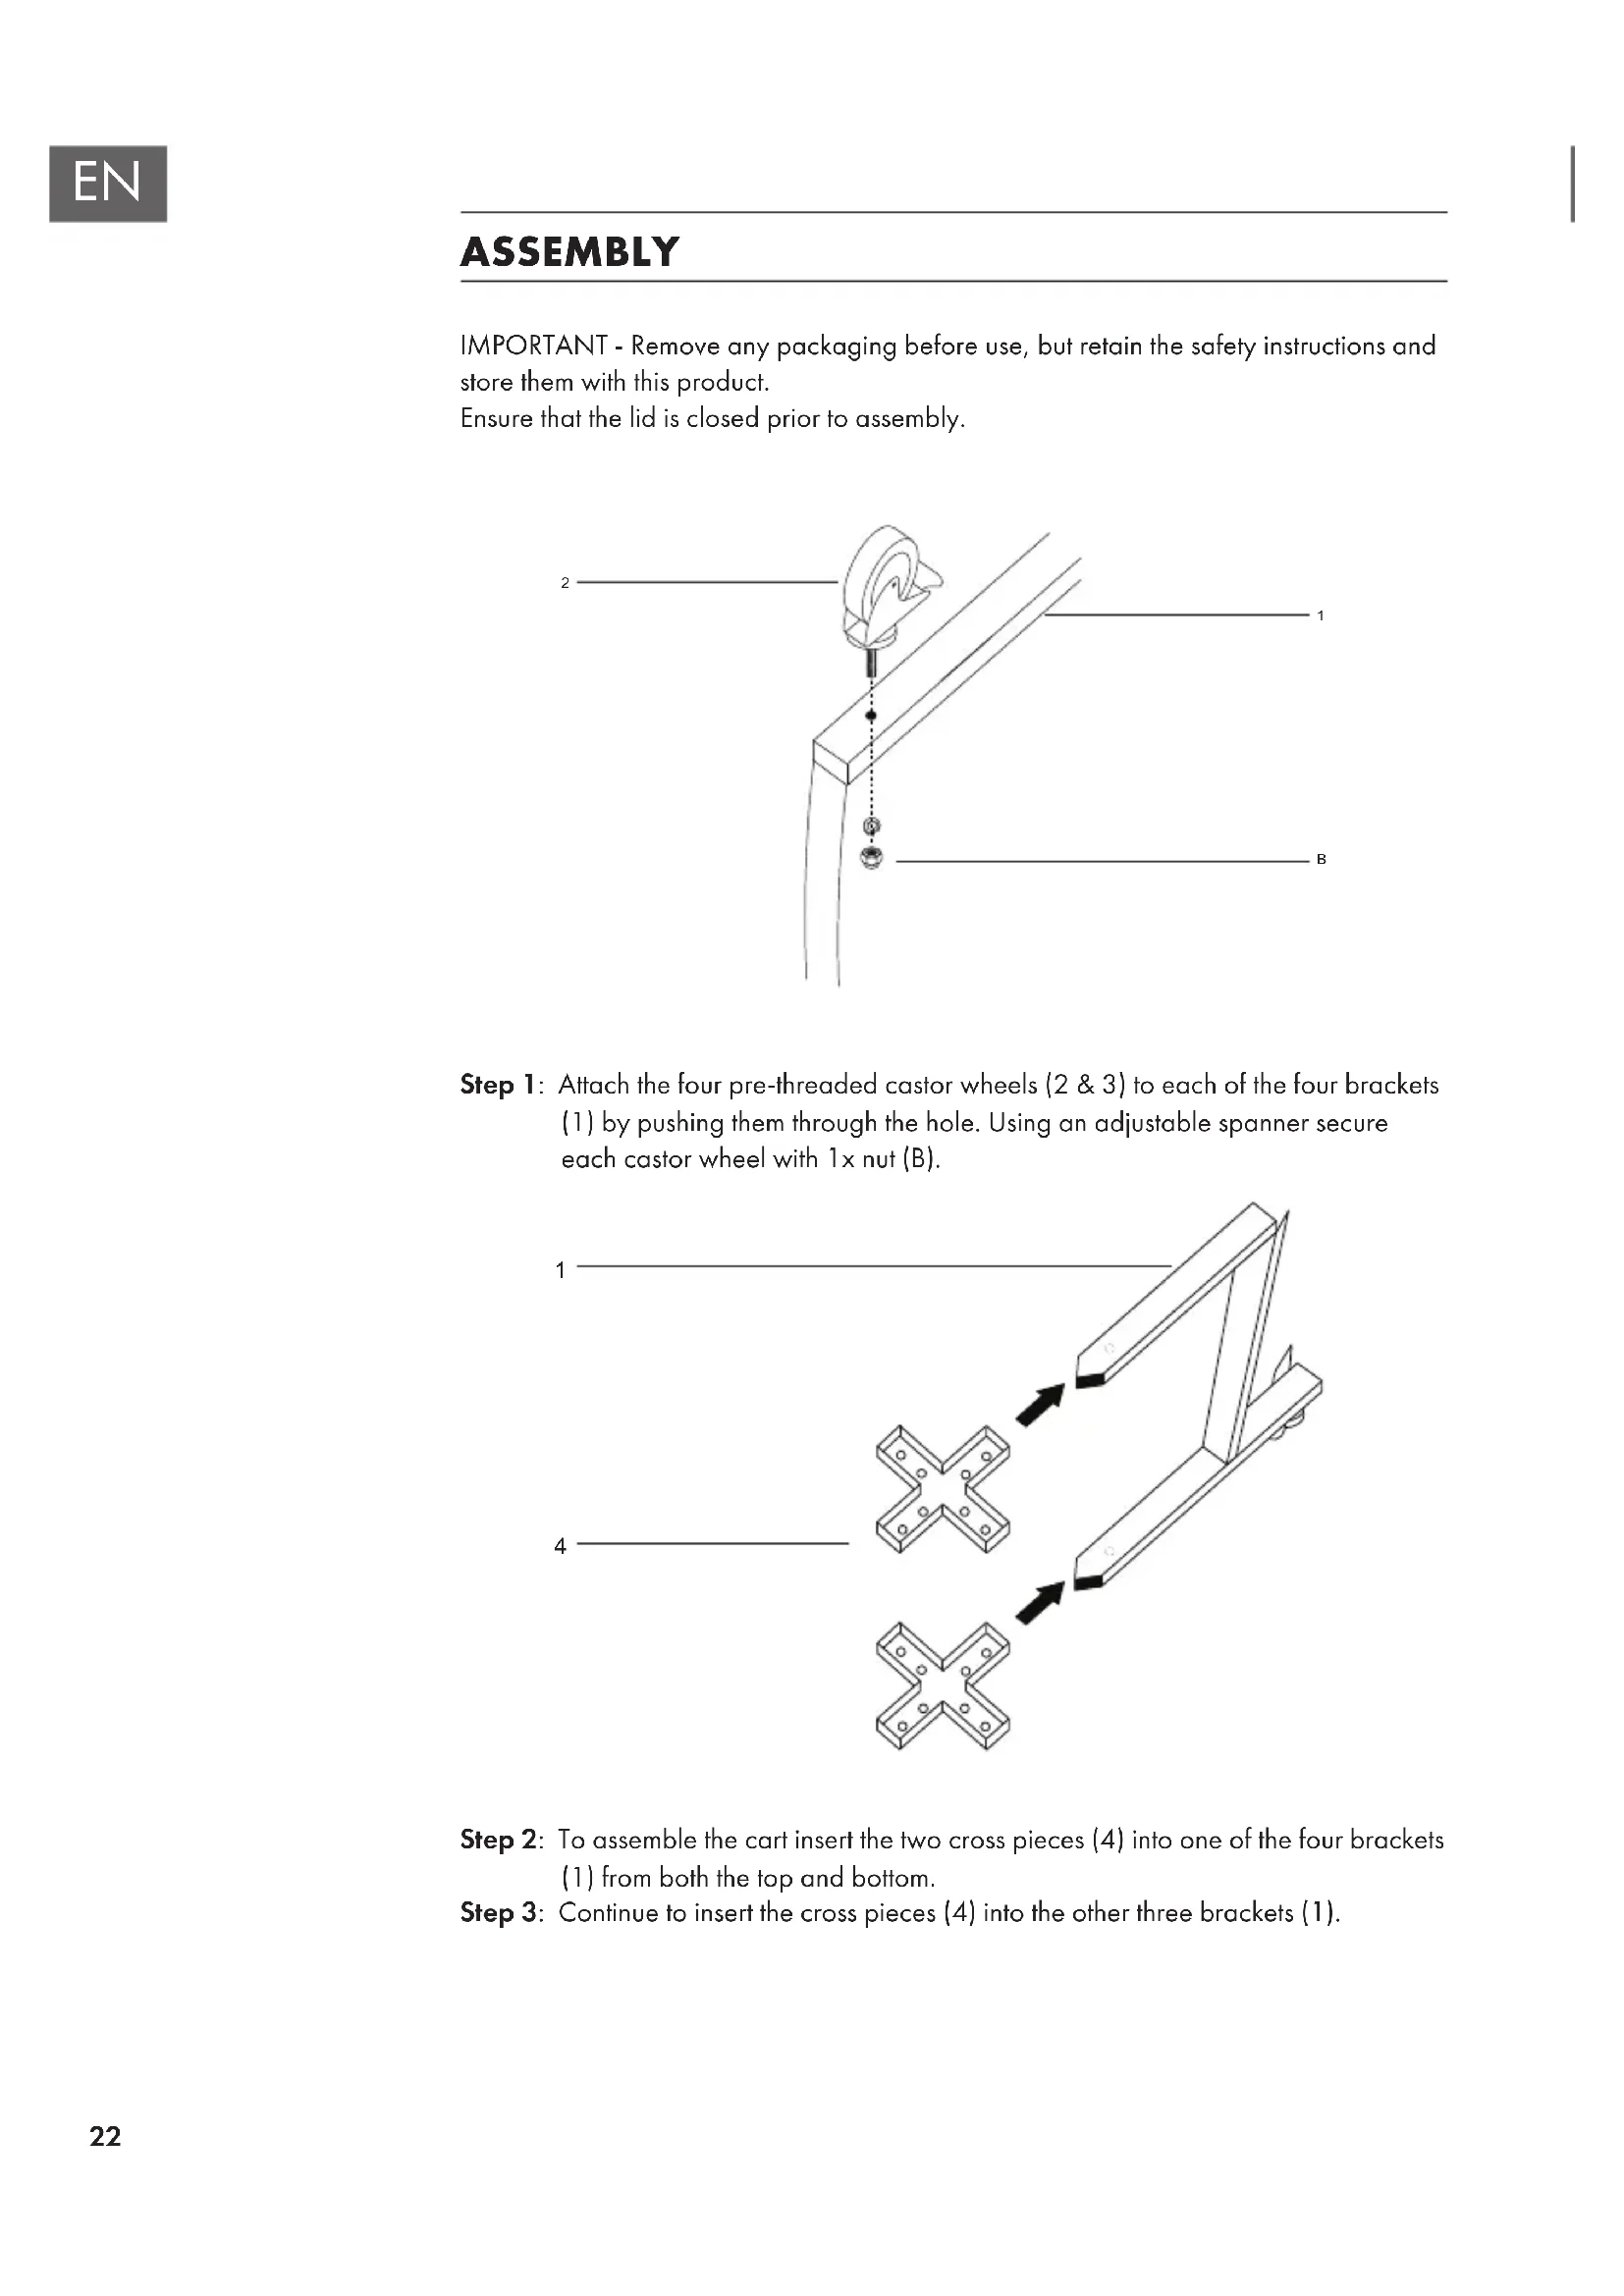
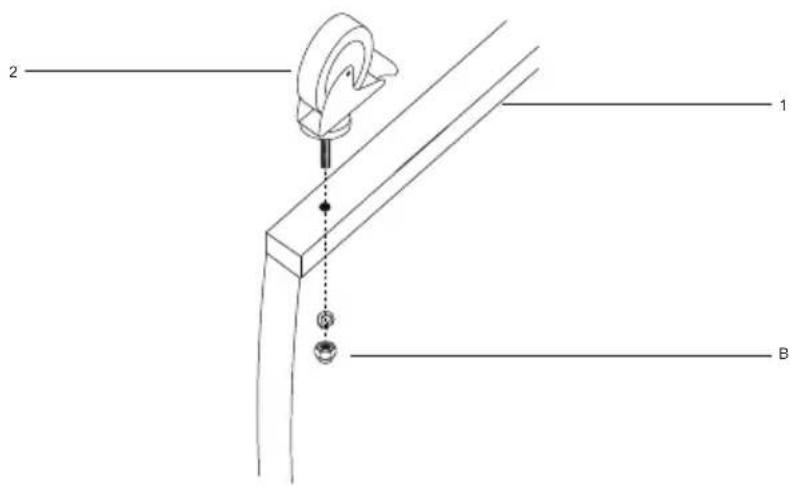
2 1 BStep 1: Attach the four pre-threaded castor wheels (2 & 3) to each of the four brackets (1) by pushing them through the hole. Using an adjustable spanner secure each castor wheel with 1x nut (B).
text_image
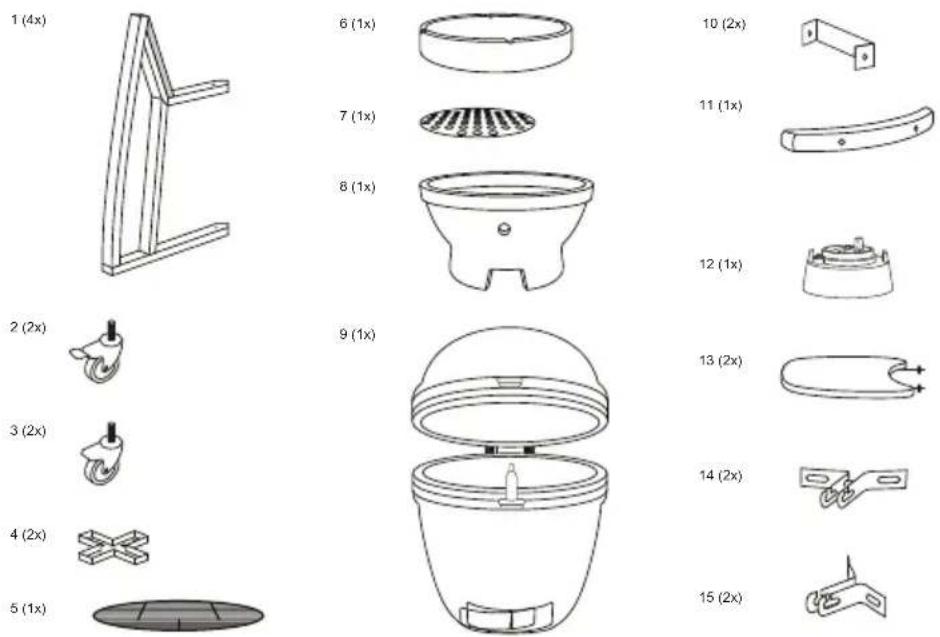
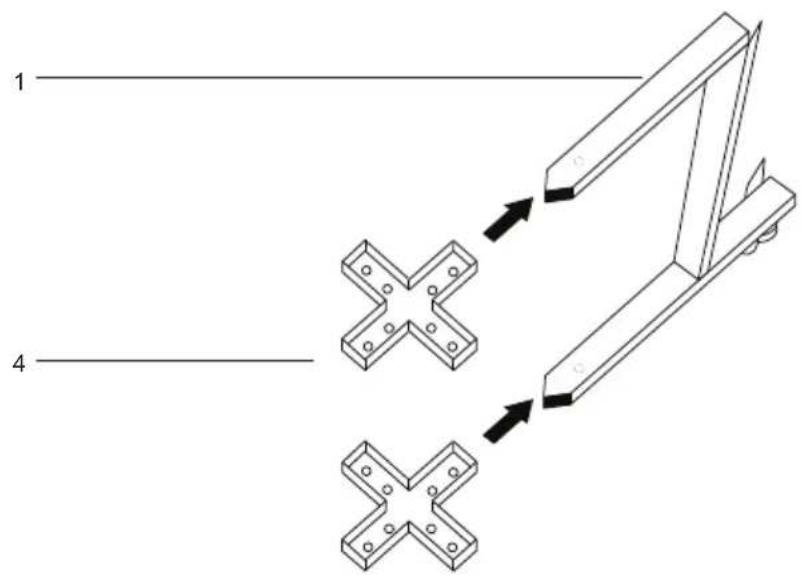
1 4Step 2: To assemble the cart insert the two cross pieces (4) into one of the four brackets (1) from both the top and bottom.
Step 3: Continue to insert the cross pieces (4) into the other three brackets (1).
text_image
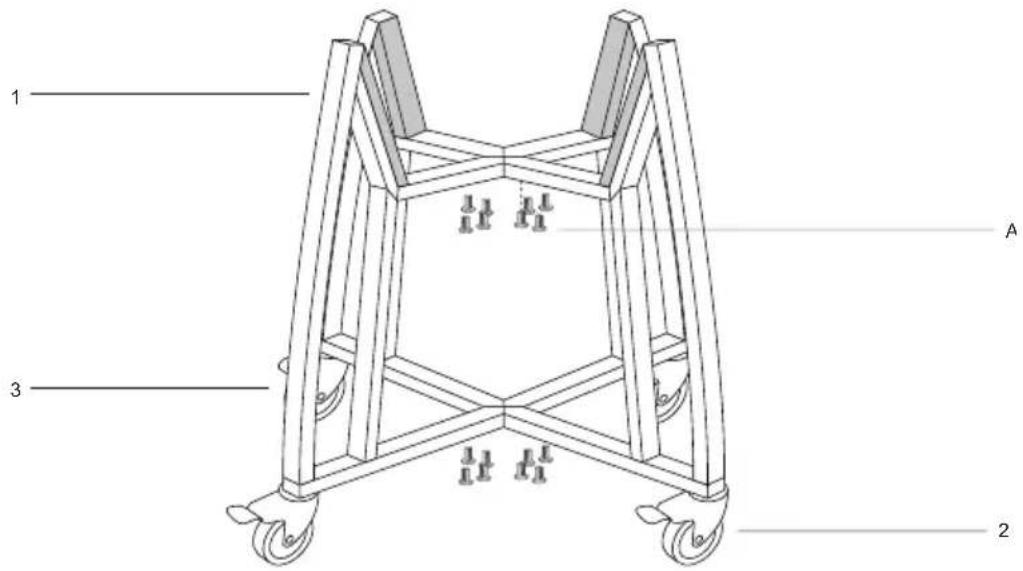
1 3 A 2Step 4: Secure the brackets (1) to the cross pieces (4) by using the 16x screws (A). Make sure the cart is secure and all of the screws are tight before placing the Kamado Grill (9) into it.
Step 5: To place the Kamado Grill (9) on the cart first remove all of the items that are inside of the grill to make lifting easier.
Step 6: Use a minimum of two people when lifting the Kamado Grill onto the cart. Place one of your hands in the bottom vent of the Kamado and the other under the grill. Lifting by the hinge or the side tables could result in injury and damage to the product.
Step 7: Place the Kamado Grill on the cart with the bottom vent facing to the front of the cart allowing the vent to open and close without any interruption.
text_image
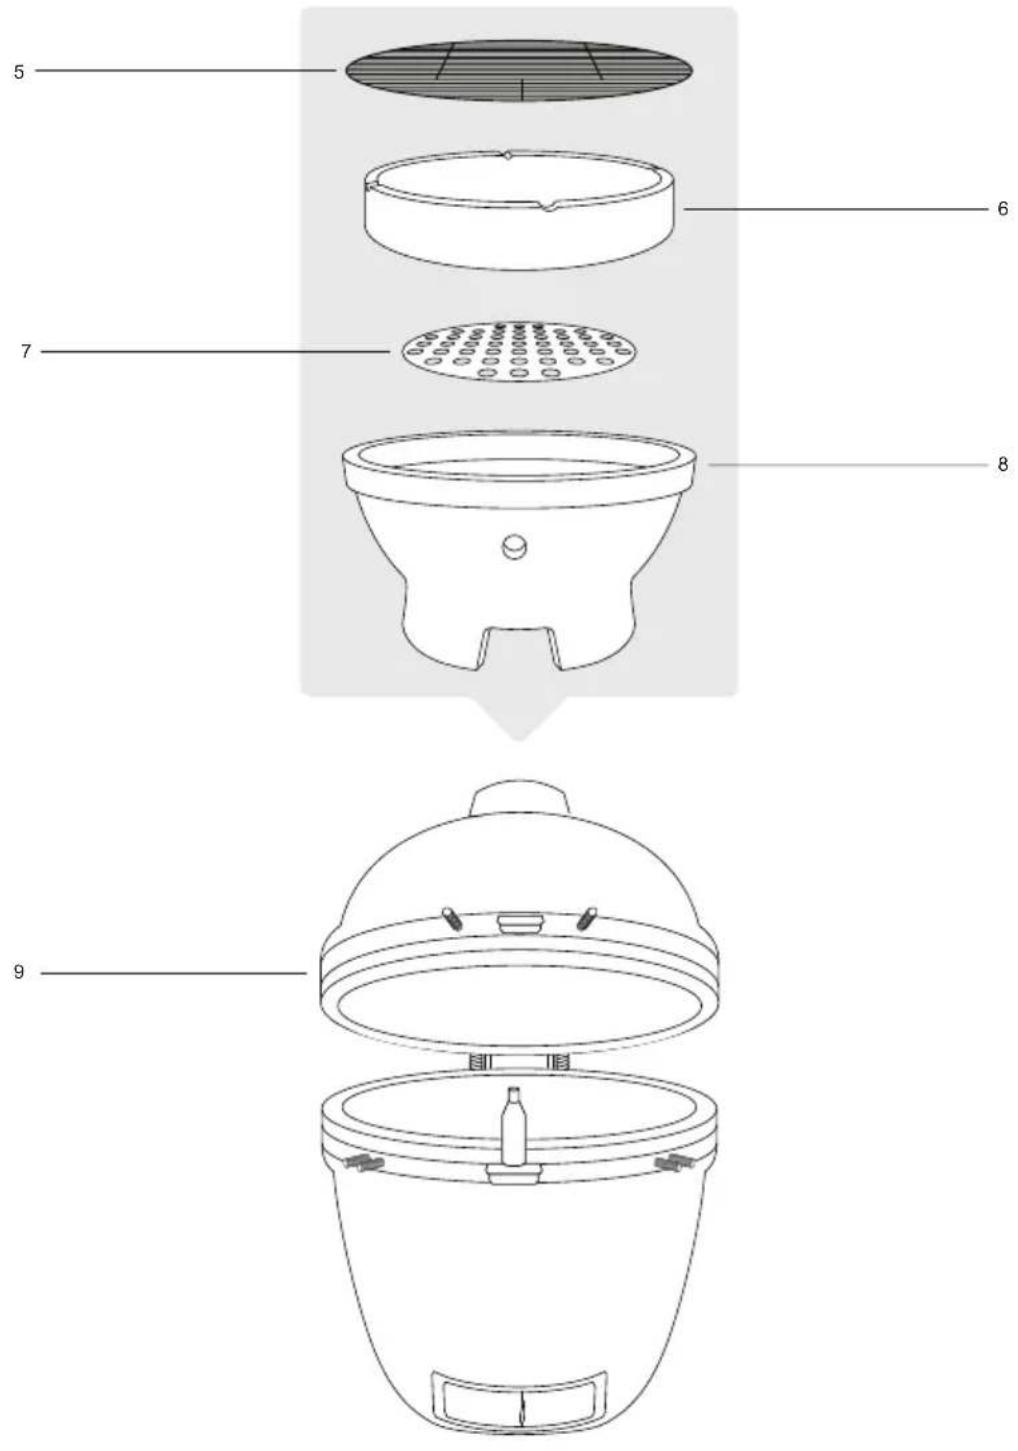
Exploded view diagram of a kitchen appliance with numbered parts for identificationStep 8: When the grill is securely placed on the cart add the firebox (8), charcoal plate (7), upper ring (6) and cooking grill (5) inside of the Kamado Grill as displayed in the assembly diagram.
Step 9: Press down on the castor levers (2) to lock the castor wheels to ensure the Kamado can not move when in use.
9
10
E
C
Step 10: To attach the handle (10) to the lid of the Kamado Grill (9) start by attaching 2x handle brackets (11) using the 2x pre-attached bolts and dome headed nuts. Attach the handle (11) to the brackets (10) using 2x bolts (C) and nuts (E).
12
D
E
9
Step 11: To attach the top vent (12) to the Kamado Grill (9) place it on top and align both the bolt holes. Secure using 2x bolts (D) and nuts (E). Ensure that the top vent bolt is on the left hand side when assembling it.
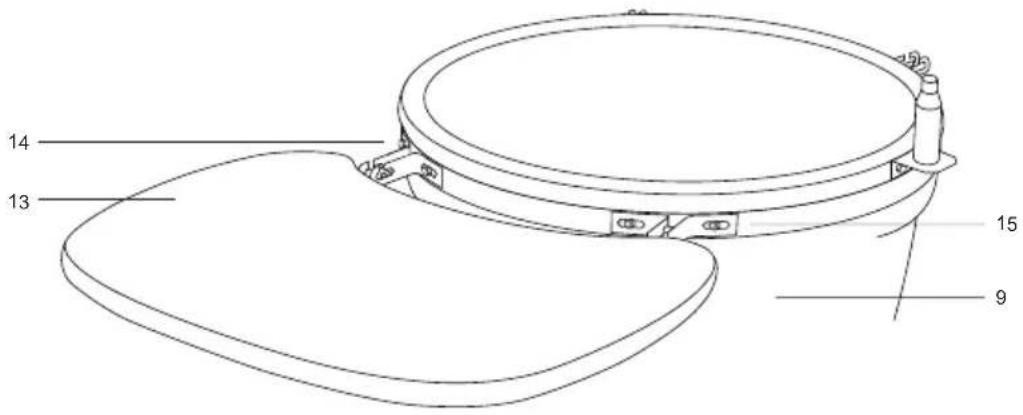
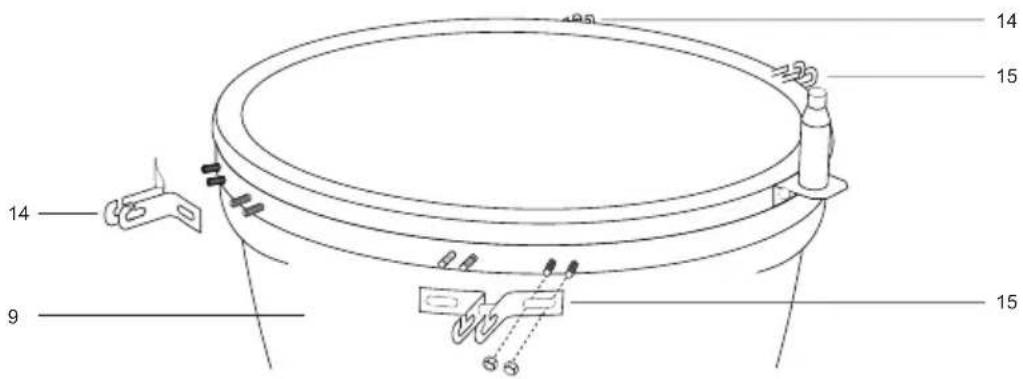
Step 12: Attach the 2x table brackets (14) to the Kamado Grill (9) using the 4x pre-attached bolts and dome headed nuts per bracket. Please note the position shown in the above diagram.
Step 13: Attach the 2x table brackets (15) to the Kamado Grill (9) using the 4x pre-attached bolts and dome headed nuts per bracket. Please note the position shown in the above diagram.
text_image
14 13 15 9Step 14: The Kamado Grill is now ready to use but please ensure that you have read the curing instructions thoroughly prior to use.
text_image
14 15 185 14 15 9 15ACCESSORIES (AVAILABLE FOR PURCHASE)
natural_image
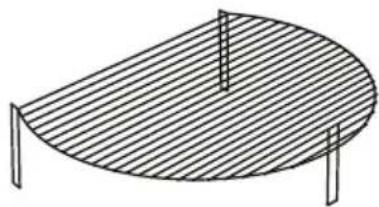
Simple line drawing of a curved table with two legs and a vertical railing (no text or symbols)Raised cooking grid
Stainless steel extra grill for additional cooking space
natural_image
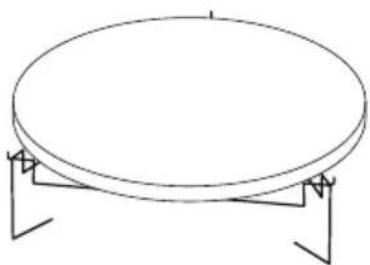
Simple line drawing of a circular object mounted on two supports (no text or symbols)Pizza stone with support frame
Essential accessory for evenly cooking chrispy pizzas, flat breads and other delights.
natural_image
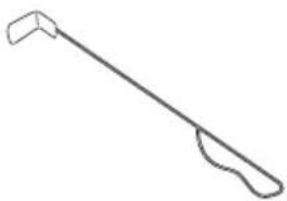
Simple line drawing of a pair of scissors or clips (no text or symbols)Clip tool
Allows you to lift the pizza stone or cooking grills whenthey are too hot to handle.
natural_image
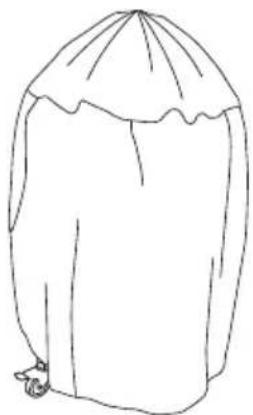
Simple line drawing of a garment sleeve with pleated fabric (no text or symbols)Rain cover
When the Kamado has cooled and is not in use, cover it with the Kamado raincover for extra protection.
natural_image
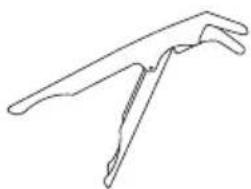
Simple line drawing of a long-handled tool or tool with a handle and handlehead (no text or symbols)Ash tool
Once your Kamado has burnt all its fuel and cooled down use this tool for removing the ash from the bottom.
OPERATION INSTRUCTIONS
Curing the Kamado
- To start a fire place rolled up newspaper with some lighter cubes or solid firelighters on the charcoal plate (7) in the base of the Kamado. Then place 2 or 3 handfuls of lump charcoal over the top of the newspaper.
- Do not use petrol, white spirit, lighter fluid, alcohol or other similar chemicals for lighting or relighting.
- Open the bottom vent and light the newspaper using a long nosed lighter or safety matches.
- Do not overload the unit with fuel – if the fire is too intense this could damage the Kamado.
- Leave until all the fuel is used and extinguished.
- If the first burns are too high it could damage the felt gasket seal before it has had the chance to mature properly.
- After first use inspect all fasteners for tightness. The metal band connecting your lid to the base will expand from the heat and this could become loose. It is recommended you check and if necessary tighten the band with a spanner.
• You can now use your Kamado as normal.
Extinguishing
- To extinguish unit – stop adding fuel and close all the vents and the lid to allow the fire to die naturally.
- DO NOT use water to extinguish the charcoals as this could damage the ceramic Kamado.
Storage
- When not in use, and if stored outside, cover the Kamado once completely cooled with a suitable rain cover.
- The chrome plated cooking grill is NOT dishwasher safe; use a mild detergent with warm water.
- When using the Kamado push down on both of the locking wheels to stop the unit moving about during use.
- It is recommended the Kamado be stored under cover in a garage or shed over winter for complete protection.
Cleaning
- The Kamado is self cleaning. Heat it up to 260°C for 30 minutes and it will scorch off all of the food and debris.
- DO NOT use water or any other types of cleaning product to clean the inside of your Kamado. The walls are porous and will absorb any fluids used, this could cause the Kamado to crack. If the soot becomes excessive then use a wire brush or the ash tool (not supplied) to scrape off the carbon remnants before the next use.
- To clean the grills and grates use a non-abrasive cleaner once the unit has fully cooled.
- To clean the outer surface wait until the Kamado is cool and use a damp cloth with a mild detergent.
Maintenance
- Tighten the bands and oil the hinge 2 times a year or more if needed.
Lighting, Usage and Care Information
- Ensure the Kamado is positioned on a permanent, flat, level, heat resistant non-flammable surface away from flammable items.
- Ensure the Kamado has a minimum of 2m overhead clearance and has a minimum 2m clearance from other surrounding items.
- To start a fire place rolled up newspaper with some lighter cubes or solid firelighters on the charcoal plate (7) in the base of the Kamado. Then place 2 or 3 handfuls of lump charcoal over the top of the newspaper.
- Do not use petrol, white spirit, lighter fluid, alcohol or other similar chemicals for lighting or relighting.
- Open the bottom vent and light the newspaper using a long nosed lighter or safety matches. Once it has caught, leave the bottom vent and lid open for about 10 minutes to build a small bed of hot embers.
- Allow the charcoal to heat up and be kept red hot for at least 30 minutes prior to the first cooking on the kamado. Do not cook before the fuel has a coating of ash.
- It is recommended you don't stoke or turn the coals once they are alight. This allows the charcoals to burn more uniformly and efficiently.
- Once alight only use heat resistant gloves when handling hot ceramics or cooking surfaces.
• See below for cooking instructions depending on temperature and duration.
Low temperture cooking guide
- Light the lump charcoal according to the instructions above. Do not move or stoke the coals once lit.
- Open the bottom vent fully and leave the lid open for about 10 minutes to build a small bed of hot embers.
- Monitor the Kamado until it has risen to the desired temperature. See page 4 for a temperature cooking guide.
• Fully close the bottom vent to maintain the temperature. - You are now ready to use the Kamado for cooking on.
- IMPORTANT: When opening the lid at high temperatures it is essential to lift the lid only slightly, allowing air to enter slowly and safely, preventing any backdraft or flare-ups that may cause injury.
• ALWAYS follow the FOOD COOKING INFORMATION in this instruction manual. - ALWAYS use heat resistant gloves when handling hot ceramics or cooking surfaces.
Smoking guide
- Leave the bottom vent slightly open.
- Close the top vent and continue to check the temperature for a few more minutes.
• Using heat resistant gloves sprinkle the wood chips in a circle over the hot charcoal.
• You are now ready to use the Kamado to smoke on. - TIP: Soak your wood chips or cooking planks in water for 15 minutes to prolong the smoking process.
- IMPORTANT: When opening the lid at high temperatures it is essential to lift the lid only slightly, allowing air to enter slowly and safely, preventing any backdraft or flare-ups that may cause injury.
- ALWAYS follow the FOOD COOKING INFORMATION stated on page 4 of this instruction manual.
- ALWAYS use heat resistant gloves when handling hot ceramics or cooking surfaces.
High temperature cooking guide
Food cooking information
• DO NOT cook until the fuel has a coating of ash.
- Please read and follow this advice when cooking on your Kamado.
- Always wash your hands before and after handling uncooked meat and before eating.
• Always keep raw meat away from cooked meat and other foods.
- Before cooking ensure grill surfaces and tools are clean and free of old food residues.
- Do not use the same utensils to handle cooked and uncooked foods.
- Ensure all meat is cooked thoroughly before eating.
- CAUTION – eating raw or under cooked meat can cause food poisoning (e.g. bacteria strains such as E.coli).
- To reduce the risk of under cooked meat cut open to ensure it is cooked all the way through.
- CAUTION – if the meat has been cooked sufficiently the meat juices should be clear and there should be no traces of pink/red juice or meat colouring.
- Pre-cooking larger pieces of meat and joints is recommended before finally cooking on your grill.
• After cooking on your Kamado always clean the grill cooking surfaces and utensils.
Refuelling
With the vents closed, the Kamado stays at a high temperature for several hours. If you require a longer cooking time (e.g when roasting a whole joint or slow smoking), it may be necessary to add more charcoal. Just add some additional charcoal and continue as above.
COOKING TEMPERATURE GUIDE
| Meat type Cooking time | Top vent Bottom vent | ||
| Slow cook / Smoke (110 °C-135 °C) | |||
| Beef Brisket 2 hrs. per lb. |  |  | |
| Pulled Pork 2 hrs. per lb. | |||
| Whole Chicken 3-4 hrs. | |||
| Ribs 3-5 hrs. | |||
| Roasts 9 hrs. | |||
| Grill / Roast (160 °C - 180 °C) | |||
| Fish 15-20 min. |  |  | |
| Pork Tenderloin 15-30 min. | |||
| Chicken Pieces 30-45 min. | |||
| Whole Chicken 30-45 min. | |||
| Leg of lamb 1-1.5 hrs. | |||
| Turkey 2-4 hrs. | |||
| Ham 2-5 hrs. | |||
| Sear (260 °C - 370 °C) | |||
| Steak 5-8 Min. |  |  | |
| Pork Chops 6-10 Min. | |||
| Burgers | 6-10 Min. | ||
| Sausages | 6-10 Min. | ||
Chère cliente, cher client,
text_image
QR code image containing encoded data, no visible human-readable textSOMMAIRE
Fiche technique 34
text_image
Exploded view diagram of a kitchen appliance with numbered parts for identificationtext_image
9 10 E 0 Cnatural_image
Simple line drawing of a curved table with two legs and vertical bars on top (no text or symbols)natural_image
Simple line drawing of a circular table with two legs and a flat top (no text or symbols)natural_image
Simple line drawing of a pair of scissors (no text or symbols)Clip
natural_image
Simple line drawing of a hat with a pointed brim and a small flower on the side (no text or symbols)Bâche anti pluie
natural_image
Simple line drawing of a long-handled tool or tool with a curved handle and handlehead (no text or symbols)Tisonnier
text_image
QR code image containing encoded data, no visible human-readable textINDICE
Dati Tecnici 49
text_image
Exploded view diagram of a kitchen appliance with numbered parts for identificationnatural_image
Simple line drawing of a curved table with two legs and a vertical bar on top (no text or symbols)Griglia aggiuntiva
natural_image
Simple line drawing of a circular table with two legs and a central top (no text or symbols)natural_image
Simple line drawing of a pair of scissors or pliers (no text or symbols)Clip
natural_image
Simple line drawing of a hat with a pointed lid and a small flower on the side (no text or symbols)natural_image
Simple line drawing of a long-handled tool or tool with a handle and handlehead (no text or symbols)Attizzatoio
Kamado Ceramic Grill

bar
| Category | Value | |---|---| | Category 1 | 100 | | Category 2 | 100 | | Category 3 | 100 | | Category 4 | 100 | | Category 5 | 100 | | Category 6 | 100 | | Category 7 | 100 | | Category 8 | 100 | | Category 9 | 100 | | Category 10 | 100 | | Category 11 | 100 | | Category 12 | 100 | | Category 13 | 100 | | Category 14 | 100 | | Category 15 | 100 | | Category 16 | 100 | | Category 17 | 100 | | Category 18 | 100 | | Category 19 | 100 | | Category 20 | 100 | | Category 21 | 100 | | Category 22 | 100 | | Category 23 | 100 | | Category 24 | 100 | | Category 25 | 100 | | Category 26 | 100 | | Category 27 | 100 | | Category 28 | 100 | | Category 29 | 100 | | Category 30 | 100 | | Category 31 | 100 | | Category 32 | 100 | | Category 33 | 100 | | Category 34 | 100 | | Category 35 | 100 | | Category 36 | 100 | | Category 37 | 100 | | Category 38 | 100 | | Category 39 | 100 | | Category 40 | 100 | | Category 41 | 100 | | Category 42 | 100 | | Category 43 | 100 | | Category 44 | 100 | | Category 45 | 100 | | Category 46 | 100 | | Category 47 | 100 | | Category 48 | 100 | | Category 49 | 100 | | Category 50 | 100 | | Category 51 | 100 | | Category 52 | 100 | | Category 53 | 100 | | Category 54 | 100 | | Category 55 | 100 | | Category 56 | 100 | | Category 57 | 100 | | Category 58 | 100 | | Category 59 | 100 | | Category 60 | 100 | | Category 61 | 100 | | Category 62 | 100 | | Category 63 | 100 | | Category 64 | 100 | | Category 65 | 100 | | Category 66 | 100 | | Category 67 | 100 | | Category 68 | 100 | | Category 69 | 100 | | Category 70 | 100 | | Category 71 | 100 | | Category 72 | 100 | | Category 73 | 100 | | Category 74 | 100 | | Category 75 | 100 | | Category 76 | 100 | | Category 77 | 100 | | Category 78 | 100 | | Category 79 | 100 | | Category 80 | 100 | | Category 81 | 100 | | Category 82 | 100 | | Category 83 | 100 | | Category 84 | 100 | | Category 85 | 100 | | Category 86 | 100 | | Category 87 | 100 | | Category 88 | 100 | | Category 89 | 100 | | Category 90 | 100 | | Category 91 | 100 | | Category 92 | 100 | | Category 93 | 100 | | Category 94 | 100 | | Category 95 | 100 | | Category 96 | 100 | | Category 97 | 100 | | Category 98 | 100 | | Category 99 | 100 | | Total (Total) = [sum of bars] / [values] * (sum of bars + bars) * (sum of bars + bars) * (sum of bars + bars). The values in the table represent the sum of the bars and the corresponding sum of the bars. There is no additional data series or categories specified in the code.text_image
QR code image containing encoded data, no visible human-readable textINHALT
Technische Daten 4