
XDP20 - Mp3 player PIONEER - Free user manual and instructions
Find the device manual for free XDP20 PIONEER in PDF.
| Product type | Audiophile MP3 player |
| Brand | Pioneer |
| Model | XDP20 |
| Dimensions (L x H x D) | 63.2 x 97.7 x 16.0 mm |
| Weight | 125 g |
| Display | 2.4-inch capacitive touch, 240x320 pixels |
| Internal memory | 16 GB (including system) |
| External storage | 2 microSD slots, up to 256 GB each |
| Supported audio formats | DSD (native 2.8/5.6 MHz), FLAC, ALAC, AIFF, WAV, MP3, AAC, WMA, etc. |
| Wireless connectivity | Wi-Fi 802.11 a/b/g/n, Bluetooth with aptX HD |
| Headphone outputs | Balanced 2.5 mm (4-pole) and unbalanced 3.5 mm (3-pole) |
| Maximum output power | 75 mW + 75 mW (unbalanced), 150 mW + 150 mW (balanced) at 32 Ω |
| Signal-to-noise ratio | ≥ 115 dB |
| Battery life | Approx. 15 hours (FLAC 24-bit/96 kHz, screen/WiFi/Bluetooth off) |
| Power supply | Built-in rechargeable battery, charging via micro USB |
| Main features | Balanced mode and A.C.G., equalizer, upsampling, ReplayGain, network services (TuneIn, Deezer, TIDAL), USB line output |
| Care and cleaning | Use a soft, dry cloth; avoid dust in card slots |
| Security | 4-digit access code, password lock |
| Included accessories | Micro USB cable, screen protector, quick start guide |
| Repairability | Firmware update via network or SD card; factory reset possible |
| General information | Manufactured by Pioneer; imported into the EU by Hanns-Martin-Schleyer-Str. 35, 47877 Willich, Germany |
Frequently Asked Questions - XDP20 PIONEER
User questions about XDP20 PIONEER
0 question about this device. Answer the ones you know or ask your own.
Ask a new question about this device
Download the instructions for your Mp3 player in PDF format for free! Find your manual XDP20 - PIONEER and take your electronic device back in hand. On this page are published all the documents necessary for the use of your device. XDP20 by PIONEER.
USER MANUAL XDP20 PIONEER
natural_image
Line drawing of a rectangular electronic device with a screen and base (no text or symbols)2

3

text_image
Diagram illustrating a battery charging operation with labeled components and directional arrows indicating charging direction.
text_image
2 Pioneer
text_image
语言 (Language) ✓ 日本語 English Deutsch Français Español初期設定が自動で開始
text_image
文件(F) 编辑(E) 视图(V) 窗口(W) 帮助(H) 新建(N) 打开(O) 保存(S) 重命名(M) 粘贴(P) 撤销(U) 重命名(R) 关闭(C) Ctrl+V Ctrl+X Ctrl+Y Ctrl+Z Ctrl+D Ctrl+E Ctrl+F Ctrl+G Ctrl+H Ctrl+I Ctrl+J Ctrl+K Ctrl+L Ctrl+M Ctrl+N Ctrl+O Ctrl+P Ctrl+Q Ctrl+R Ctrl+S Ctrl+T Ctrl+U Ctrl+V Ctrl+W Ctrl+X Ctrl+Y Ctrl+Z Ctrl+A Ctrl+A Ctrl+A Ctrl+A Ctrl+A Ctrl+A Ctrl+A Ctrl+A Ctrl+A Ctrl+A Ctrl+A Ctrl+A Ctrl+A Ctrl+A Ctrl+A Ctrl+A Ctrl+A Ctrl+A Ctrl+A Ctrl+A Ctrl+A Ctrl+A Ctrl+A Ctrl+A Ctrl+A Ctrl+A Ctrl+A Ctrl+A Ctrl+A Ctrl+A Ctrl+A Ctrl+A Ctrl+A Ctrl+A Ctrl+APC から音楽をコピーする
text_image
OK Cancel OK/Cancel

text_image
Diagram showing two-step installation of a device with a lock and cable, followed by a laptop screen setup.
natural_image
Illustration of a person using a laptop with a cursor icon on the screen (no text or symbols)text_image
Diagram showing installation steps of a wall-mounted electrical outlet with tool and switch components
natural_image
Two-step diagram showing hands using a tool to adjust or install a device, with no visible text or symbols.
natural_image
Diagram of an open CD or DVD drive with a disc and an open case, showing rotation arrows (no text or symbols)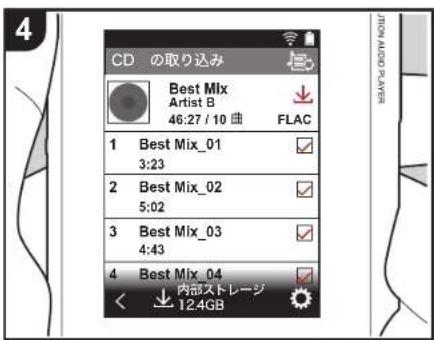
text_image
Music Streamingtext_image
Best Mix_01 Artist2B Best Mix Volumes 35text_image
Music Streaming Balanced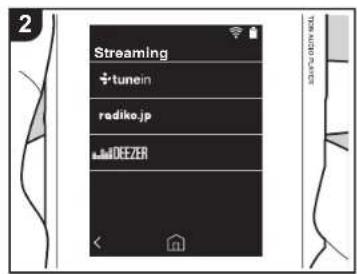
text_image
2 Streaming +tunein radiko.jp #DEEZERnatural_image
Illustration showing two-step tool manipulation: one on a device with screwdriver, the other on a device with tool (no text or symbols)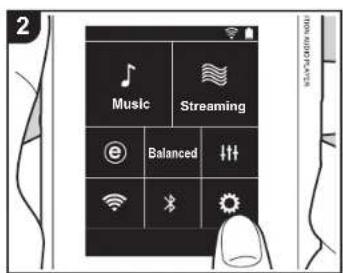
text_image
Music Streaming Balanced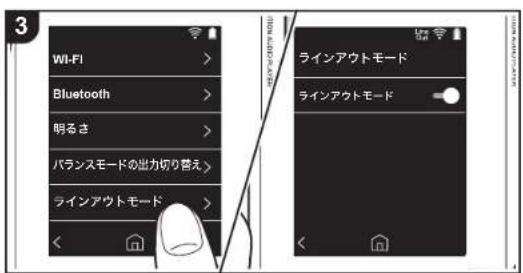
text_image
Music Streaming Balanced Wi-Fi RSS TOM ADMI 2FLAC/ALAC/WAV/AIFF/MP3/AAC/MQA (44.1 kHz/48 kHz/88.2 kHz/96 kHz/176.4 kHz/192 kHz (16 bit/24 bit/32 bit)) DSD/DSF/DSDIFF *DSD ネイティブ (2.8 MHz/5.6 MHz (1 bit))
実用最大出力 (JEITA)
The Wi-Fi CERTIFIED Logo is a certification mark of Wi-Fi Alliance ^® .
e-onkyo music
© 2018 Onkyo & Pioneer Corporation. All rights reserved.
Onkyo group has established its Privacy Policy, available at [http://pioneer-audiovisual.com/privacy/].
text_image
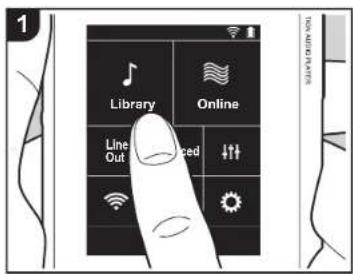
High-resolution audio player Library Online Line Out Balanced Wi-Fi X SunJa En Fr Es It De Sv Ru Ct Cs
XDP-02U
HIGH RESOLUTION AUDIO PLAYER
取扱説明書
▶ Instruction Manual
Mode d'emploi
Advanced Setup | Supplementary Information | Others

Table of Contents
Before Start 2
What's in the box 3
Part Names ....4
Part Names .... 4
Initial Setup 6
Turning the power on and initial settings ....6
Playback 8
Copying music with "X-DAP Link" 8
Dragging and dropping to copy music ....13
Listening to music from the "Library" 14
Creating a play list 16
Using network services 17
Connecting BLUETOOTH ^® .....18
Line Out 19
USB Output 20
Advanced Setup 21
- Various settings ......21
Audio Adjust 24
Customizing the Home screen 26
Software Update 27
Supplementary Information ....29
Supplementary Information 29
Others 30
Entering text 30
General Specifications ....31
Cautions for use 32
> Before Start > Part Names > Initial Setup > Playback
Advanced Setup | Supplementary Information | Others
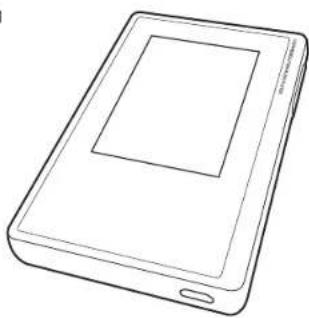
What's in the box
1
natural_image
Line drawing of a rectangular electronic device with a screen and base (no text or symbols)- Main unit (1)
- micro USB cable (1)
- Protective film (1)
This protects the main unit. Peel off the temporary film on the display first, then attach this film.
• Quick Start Guide (1)
* This document is an online instruction manual. It is not included as an accessory.
2

3

Part Names
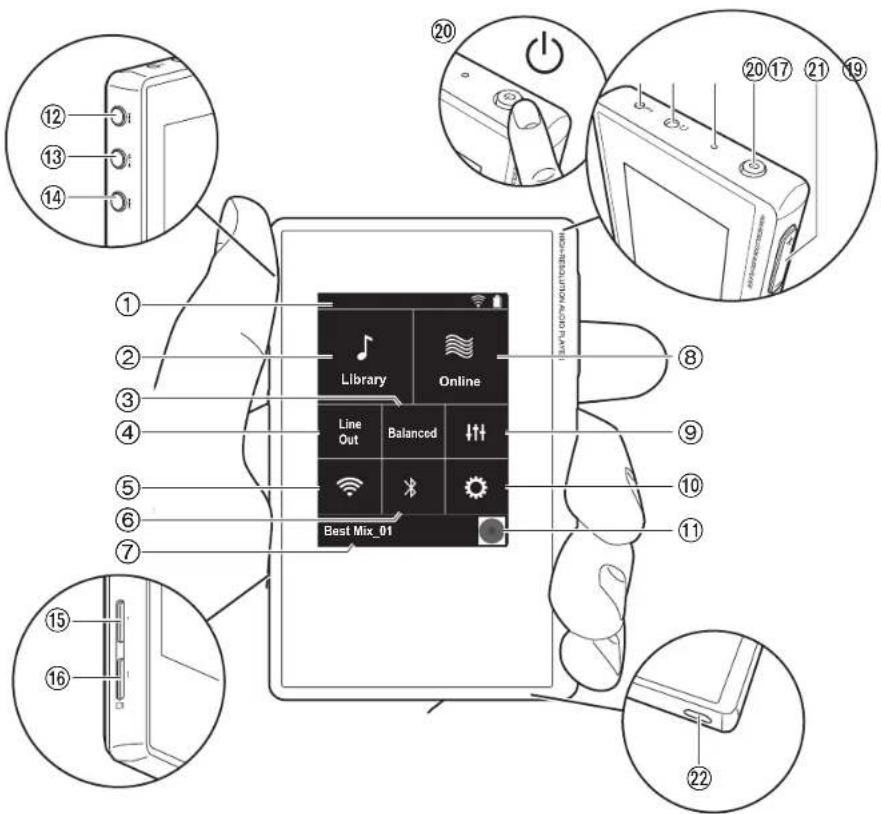
text_image
12 13 14 Library Online Line Out Balanced Best Mix_01 20 21 20 17 21 19 8 9 10 11 15 16 22- Status bar
- Library: Tap to display the tracks copied from your computer (P14).
- Tap when using balanced headphones and switch between the "Balanced" and "ACG" modes. Balanced: Compared to the normal single-ended operation, this mode enables you to get a larger output and as the high voltage is not grounded together with the small signal, you can anticipate superior music quality. Because you get a larger output, you can drive headphones with a higher impedance. ACG: The basic operating method is the same as Balanced (mode), but uses technology to even more forcefully fix grounding standards, so you can enjoy a sound quality with improved clarity and stability than Balanced (mode). Output volume is the same as the regular single-ended operation, however.
- Line Out: You can switch the headphone output to the line output mode to connect external equipment. "Line Out" is displayed on the status bar when this is on.
- Turn on or off the Wi-Fi feature. "Is displayed on the status bar when this is on. Connection settings are necessary to use Wi-Fi features. Refer to "2. Wi-Fi" (P7) for connection settings.
- Turn on or off the BLUETOOTH feature." is displayed on the status bar when this is on. Pairing is necessary to connect BLUETOOTH wireless technology enabled devices. Refer to "Connecting BLUETOOTH" (P18) for connection settings.
- Shows the name of the track being played. Tap to display the play screen.
- Online: Tap to switch to a screen showing a list of network services, such as TuneIn Radio, etc. (P17).
- You can set to your preferred sound quality (P24).
- You can make various settings for the unit, such as Wi-Fi and BLUETOOTH settings (P21).
- Artwork: Displays the album art of the track being played. Tap to display the play screen.
- Skip (▶) -lon: Skip to the next track. Press and hold to fast-forward through the track.
Before Start
Part Names
Initial Setup
Playback
Advanced Setup | Supplementary Information | Others

- Play/pause (▶ button: Play or pause tracks. Press and hold to lock operations on this unit. To unlock, press and hold again.
- Skip (I) Letton: Skip to the beginning of the track or to the previous track. Press and hold to rewind the track quickly.
15.micro SD card slot 1
16.micro SD card slot 2
- When inserting the micro SD card into the card slot, insert with the contacts facing up and push in completely so the card clicks into place.
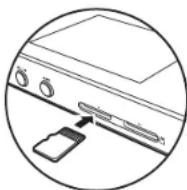
- To remove the micro SD card, first unmount it (P32). After unmounting, push the micro SD card in until you hear a click and then pull straight out. The micro SD card may spring out so take care not to lose it.
- Headphone jack ( ) Connect headphones compatible with balanced output. (2.5 mm/4-conductor)
-
Headphone jack (Ω: Connect regular headphones. (3.5 mm/3-conductor)
-
This unit is compatible with headphone sets with control buttons, but not all headphones are guaranteed to work.
- This unit does not support simultaneous use of the balanced headphone jack and the headphone jack. Using both jacks at the same time may result in damage.
- Charging lamp: This lights white when charging starts. It turns off when recharging finishes. If the unit is in a state that prevents charging, it flashes white. Try charging
again after waiting a while.
- Power button (☐): Press and hold the power button to turn the power on. To turn the power off, press and hold the power button so the "Power Off?" screen is displayed. You can turn the power off by tapping "Yes".
To turn the display on or off, just press the button.
- If operation becomes unstable, you can shutdown the unit by pressing and holding the power button for 10 or more seconds. Refer to "If operation becomes unstable" (P32) for details.
- Volume (+/-) keys: Press the keys up or down to adjust the volume.
- micro USB port: To charge the unit (P6) or transfer music files (P8, P13), connect the supplied micro USB cable.
Before Start
Part Names
Initial Setup
Playback
Advanced Setup | Supplementary Information | Others
Turning the power on and initial settings
text_image
Diagram illustrating a battery charging operation with labeled components and directional arrows indicating charging direction.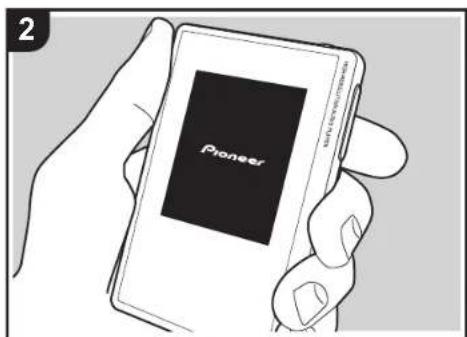
text_image
2 Pioneer
text_image
Language English Deutsch Français Españel ItalianoInitial Setup starts automatically
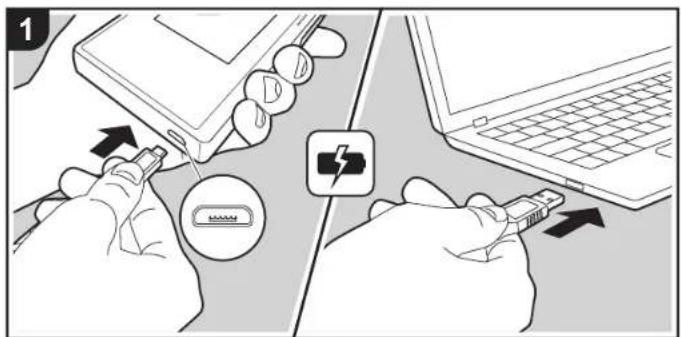
- The battery is not charged at the time of purchase. Charge the unit with the supplied micro USB cable before use. Connect so the wider side of the plug is down when inserting into this unit's micro USB port. The recharging mark is displayed at the top right of the screen when recharging.
- As malfunction may result, do not use the accessories with devices other than this unit and do not use a USB cable other than the supplied one with this unit.
- You can also recharge while the unit is on. The time for recharging may increase in this case.
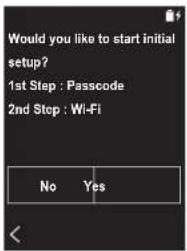
- The power comes on automatically when recharging starts, and the initial settings start.
- Select the language you want to use first. Flick the list of languages up or down, then tap the language you want to use. When you select the language, a confirmation for the initial settings is displayed. Tap "Yes". If you tap "No", you will ext the initial settings and the home screen is displayed.
text_image
Would you like to start initial setup? 1st Step : Passcode 2nd Step : Wi-Fi No Yes- "Passcode (P23)" and "Wi-Fi (P21)" settings can be completed later.
Before Start
Part Names
Initial Setup
Playback
Advanced Setup | Supplementary Information | Others

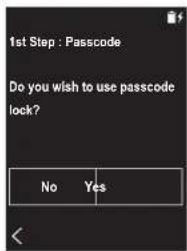
■ 1. Passcode
Set the pass code used to protect this unit. When you set a pass code, the pass code screen is displayed when the power is turned on or when restoring from display off. You should create a pass code to protect your account if you are going to use a network service.
text_image
1st Step : Passcode Do you wish to use passcode lock? No Yes- Enter any four digit number. If you made a mistake with an entry, tap "☒"
- Enter the pass code again to confirm.
- If you enter the wrong pass code three times, a message appears asking if you want to initialize the unit's settings. Note that even if the settings are initialized, the copied music files are not deleted.
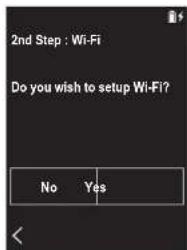
2. Wi-Fi
Set to use network services such as TuneIn Radio on this unit.
text_image
2nd Step : Wi-Fi Do you wish to setup Wi-Fi? No Yes
text_image
Wi-Fi Choose a network... SSID 1 SSID 2 Other... Push ButtonWi-Fi can be connected in the following two ways.
Selecting SSID:
- Tap the SSID of the access point you want to connect from the SSID displayed.
- If the SSID of the access point is not displayed, tap "Other..." in the SSID list and follow the on screen instructions to configure.
- After tapping the field for entering the password, enter the password of the access point, then tap "Connect". For details on how to enter text, refer to "Entering text" (P30).
- "s displayed on the status bar on the screen when
the connections are complete.
Using the push button:
- The access point needs to have an automatic setting button.
- Tap "Push Button" on the screen and press the automatic setting button on the access point.
- The operation of the automatic setting button depends on your device. Refer to the instruction manual of your device for instructions.
- "s displayed on the status bar on the screen when the connections are complete.

> Before Start > Part Names > Initial Setup > Play back
Advanced Setup | Supplementary Information | Others
Copying music with "X-DAP Link"
text_image
1 X-DAP Link DOWNLOAD
text_image
2
text_image
3 DAP DAPYou can copy music files stored on your computer to the built-in storage on this unit or to a micro SD card in this unit, then listen to the music through the "Library" (P14). You can copy either using the data copying software "X-DAP Link" or by dragging and dropping (P13).
- X-DAP Link is compatible with Windows® 10 (32bit/64
bit), Windows ^® 8/8.1 (32 bit/64 bit), and Windows ^® 7 (32 bit/64 bit). - To copy to a micro SD card, insert a micro SD card into the card slot (P5).
- When removing the micro SD card, unmount the micro SD card before removing it (P32).
- NTFS format micro SD cards are not supported on this unit.
Install [X-DAP Link] on your computer
This unit supports X-DAP Link versions 1.2.0 and later. When using version 1.2.0 or earlier, install the latest version before continuing.
Perform the following procedure when the unit is on.
-
Start your computer and download the installer for X-DAP Link from the following site. http://jp.pioneer-audiovisual.com/support/av_pc/compo/dap/x-daplink/download/Double-click "setup.exe" to install. Follow the on-screen instructions to install. A shortcut is created on the desktop after installation.
-
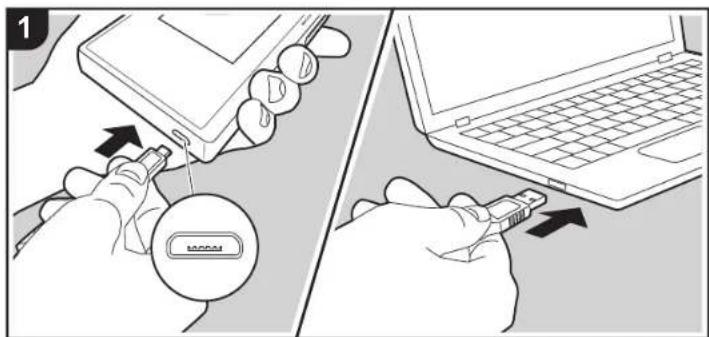
Connect this unit to a computer with the supplied micro USB cable. Connect so the wider side of the plug is down when inserting into this unit's micro USB port. You may damage the plug or jack if you try to insert it the wrong way. Screen "Change to USB Mass Storage Mode?" is displayed, so tap "Yes". Do not tap "Unmount", displayed when you tap this, until the transfer of the playlist is complete. If you do tap it, unplug the micro USB cable, then connect it again.
Before Start
Part Names
Initial Setup
Playback
Advanced Setup | Supplementary Information | Others
- Start X-DAP Link. The following types of screens are displayed when you start it.
![PIONEER XDP20 - Install [X-DAP Link] on your computer - 1](/content/2026/03/473281/images/3a86c84359db15e9dceacd100c3fb28795b46ed1c2e64df65cbe5809ffe3020d.jpg)
text_image
Form1 Model 1 Project Project1 Project2 Project3 Project4 Project5 Project6 Project7 Project8 Project9 Project10 Project11 Project12 Project13 Project14 Project15 Project16 Project17 Project18 Project19 Project20 Project21 Project22 Project23 Project24 Project25 Project26 Project27 Project28 Project29 Project30 Project31 Project32 Project33 Project34 Project35 Project36 Project37 Project38 Project39 Project40 Project41 Project42 Project43 Project44 Project45 Project46 Project47 Project48 Project49 Project50 Project51 Project52 Project53 Project54 Project55 Project56 Project57 Project58 Project59 Project60 Project61 Project62 Project63 Project64 Project65 Project66 Project67 Project68 Project69 Project70 Project71 Project72 Project73 Project74 Project75 Project76 Project77 Project78 Project79 Project80 Project81 Project82 Project83 Project84 Project85 Project86 Project87 Project88 Project89 Project90 Project91 Project92 Project93 Project94 Project95 Project96 Project97 Project98 Project99 Project100Copying music from a computer
- Click ① and select the folder that contains the music files you want to copy. If the folder you want to copy is already displayed, start selecting from ②.
text_image
Folder onkyo music iTunes Media Best Mixonkyo music
If there are music files you have downloaded from onkyo music (a site that distributes music files), select this folder.
iTunes Media
If you are using iTunes ^® , a play list and content are displayed. If iTunes cannot be selected, open "Preferences" - "Advanced" in iTunes, then put a check mark next to "Share iTunes Library XML with other applications".
• There may be some differences in the operations screens and how operations are performed depending
on the iTunes version. For details, see the operating instructions for iTunes.
- A list of music files is displayed in the center of the screen when you select it.
text_image
Preview C:\Users\music\* Layered: 100% Layered: 100% Layered: 100% Layered: 100% Layered: 100% Layered: 100% Layered: 100% Layered: 100% Layered: 100% Layered: 100% Layered: 100% Layered: 100% Layered: 100% Layered: Layered: Layered: Layered: Layered: Layered: Layered: Layered: Layered: Layered: Layered: Layered: Layered: Layered: Layered: Layered: Layered: Layered: Layered: Layered: Layered: Layered: Layered: Layered: Layered: Layered:- Click ③ in the bottom left of the screen and select the copy destination. When copying to the Internal Storage of this unit, select "Internal", when copying to a micro SD card, select the "Removable disk" for the card to be copied to, then click "OK". You can also click ④ ⑤ to specify different copy destinations to ③.
text_image
Select Free
- Select the music files you want to copy according to the copy destination specified in step 3. If the copy destination was selected by clicking ③, put check marks in the column ⑥ to the left of the music files to be added. By clicking the check button ⑦ at the very top of the list, you can either select or deselect all tracks. • If there are already copied music files in the copy destination, the check button is automatically selected. If there are music files that you want to delete from this unit, deselect them.
text_image
6 7 Title A Title Best Mi Best Mi Best Mi Best MiBefore Start
Part Names
Initial Setup
Playback
Advanced Setup | Supplementary Information | Others

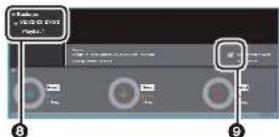
If the copy destination was selected by clicking ④, click ⑧ in the central column, and if ⑤ was clicked to select the copy destination, click the check button ⑨ in the column on the right.
text_image
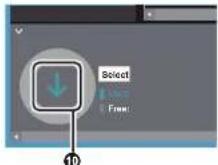
8 9 Title A Title Best Mix Best Mix Best Mix Best Mix- If the copy destination was selected by clicking ③ in step 3, click ⑩.
text_image
Select Free 10If the copy destination was selected by clicking ④, click ⑪, and if ⑤ was selected click ⑫.
- When "OK" is selected in the confirmation screen, the selected music files are copied to this unit.
- When copying a music file and an error message is displayed, restart this unit and perform the operation again. If the error message is displayed again, use your computer to delete the "xdaplink" folder from the built-in storage of this unit.
- Tap "Unmount" on this unit's screen and unplug the micro USB cable. Refer to "Listening to music from the "Library" (P14) for play operations.
Creating a play list with "X-DAP Link"
You can create a playlist with "X-DAP Link", then transfer it together with the music files to this unit. Creating playlists with X-DAP Link is supported with X-DAP Link versions 1.3.0 or later. When using version 1.3.0 or earlier, install the latest version before continuing.
Perform the following procedure when the unit is on.
- Connect this unit to a computer with the supplied micro USB cable. Connect so the wider side of the plug is down when inserting into this unit's micro USB port. You may damage the plug or jack if you try to insert it the wrong way.
Screen "Change to USB Mass Storage Mode?" is displayed, so tap "Yes". Do not tap "Unmount", displayed when you tap this, until the transfer of the playlist is complete. If you do tap it, unplug the micro USB cable, then connect it again.
- Start X-DAP Link
- Click the ① on the left of the screen and enter the
Playlist name. The playlist you created is added to the left of the screen when you click "OK".

text_image
Folder onkyo music iTunes Media Best Mix Playlists X-DAP Link iTunes Media- Click ② and select the folder that contains the music files you want to add to the playlist. If the folder you want to add to the playlist is already displayed, start selecting from ③.
text_image
Folder onkyo music iTunes Media Best Mix> Before Start > Part Names > Initial Setup > Playback
Advanced Setup | Supplementary Information | Others
- Drag and drop the music files you want to add to the playlist to the playlist you have created.
-
Repeat steps 4 and 5 to keep adding tracks to the play list.
-
Click 4 in the bottom left of the screen and select the transfer destination.
4
- When transferring to the built-in storage of this unit, select "Internal", when transferring to a micro SD card, select the "Removable disk" for the card to be copied to, then click "OK" at 6.
- Irrespective of the destination you transferred the playlist to, it is displayed in the same place in a list on this unit.
text_image
Storage Device Select storage devices All fixed devices are closed, go to double 500 options and select the backbone/MTV and ref. OP11 / OP29 - 200 OP12 / OP39 - 200 OP13 / OP49 - 200 Retranscale data (1, 2) Retranscale data (2, 3) Retranscale data (3, 4) OK Cancel- When the playlist to be transferred to this unit is selected, a screen similar to the one shown below is displayed in the middle of the screen. After putting a check mark in ⑥ on the left hand edge, click ⑦.
- When "OK" is selected in the confirmation screen, the selected playlist is copied to this unit.
- When transferring a playlist and an error message is displayed, restart this unit and perform the operation again. If the error message is displayed again, use your computer to delete the "xdaplink" folder from the built-in storage of this unit.
- Tap "Unmount" on this unit's screen and unplug the micro USB cable. Refer to "Loading playlists" (P16) for how to load playlists.
Backing up playlists on your computer
You can back up playlists you have created on this unit to your computer using X-DAP Link. The playlists you have backed up can be restored by transferring them from X-DAP Link.
To back up:
-
Connect this unit to a computer with the supplied micro USB cable. Screen "Change to USB Mass Storage Mode?" is displayed, so tap "Yes".
-
Start X-DAP Link.
-
When you press ① at the bottom left of the screen, the "Storage select" screen is displayed.
- Select the storage in ②, put a check mark next to "Backup Playlists created on device" in ③, then click "OK" at ④ to start the backup.
- Irrespective of the storage selected, the playlist files created on this unit are backed up to the PC all at once.
• Playlists created on other devices are not backed up.
text_image
Select storage device "To external devices (not to install, go to devices to file options and select the installed IPTC and mini. DO DO DO DO DO DO DO DO DO DO DO DO DO DO DO DO DO DO DO DO DO DO DO DO DO DO DO DO DO DO DO DO DO DO DO DO DO DO DO DO DO DO DO DO DO DO DO DO DO DO DO DO DO DO DO DO DO DO DO DO DO DO DO DO DO DO DO DO DO DO DO DO DO DO DO DO DO DO DO DO DO DO DO DO DO DO DO DO DO DO DO DO DO DO DO DO DO DO DO DO DO D * To create from an existing device (PC) * Do Initialize created on device * Do Find Springs, Display from PC to Next PC OK CancelBefore Start
Part Names
Initial Setup
Playback
Advanced Setup | Supplementary Information | Others
- When backing up is complete, the date and time of the backup and the playlist file are added to the left of the screen.
text_image
Folder onkyo music iTunes Media Best Mix Playlists X-DAP Link iTunes Media Media Go Backups XX/XX/XX XX:XX Playlist 1- The playlist files you have backed up cannot be edited on your computer.
To restore:
- Connect this unit to a computer with the supplied micro USB cable. Screen "Change to USB Mass Storage Mode?" is displayed, so tap "Yes".
- Start X-DAP Link.
- When you press 5 at the bottom left of the screen, the "Storage select" screen is displayed.
- Select the storage destination to restore the playlist file at ⑥, then click "OK" at ⑦.
- Irrespective of the storage selected as the restore destination, the playlist is restored automatically as a playlist for this unit.
text_image
Select storage device If any device is installed, go to Windows 5.08 interface and set the 'transfer/MTM' and 'any' USB / USB-2001 USB / USB-2002 USB / USB-2003 USB / USB-2004 USB / USB-2005 USB / USB-2006 USB / USB-2007 USB / USB-2008 USB / USB-2009 USB / USB-2010 USB / USB-2011 USB / USB-2012 USB / USB-2013 USB / USB-2014 USB / USB-2015 USB / USB-2016 USB / USB-2017 USB / USB-2018 USB / USB-2019 USB / USB-2020 USB / USB-2021 USB / USB-2022 USB / USB-2023 USB / USB-2024 USB / USB-2025 USB / USB-2026 USB / USB-2027 USB / USB-2028 USB / USB-2029 USB / USB-2030 USB / USB-2031 USB / USB-2032 USB / USB-2033 USB / USB-2034 USB / USB-2035 USB / USB-2036 USB / USB-2037 USB / USB-2038 USB / USB-2039 USB / USB-2040 USB / USB-2041 USB / USB-2042 USB / USB-2043 USB / USB-2044 USB / USB-2045 USB / USB-2046 USB / USB-2047 USB / USB-2048 USB / USB-2049 USB / USB-2050 USB / USB-2051 USB / USB-2052 USB / USB-2053 USB / USB-2054 USB / USB-2055 USB / USB-2056 USB / USB-2057 USB / USB-2058 USB / USB-2059 USB / USB-2060 USB / USB-2061 USB / USB-2062 USB / USB-2063 USB / USB-2064 USB / USB-2065 USB / USB-2066 USB / USB-2067 USB / USB-2068 USB / USB-2069 USB / USB-2070 USB / USB-2071 USB / USB-2072 USB / USB-2073 USB / USB-2074 USB / USB-2075 USB / USB-2076 USB / USB-2077 USB / USB-2078 USB / USB-2079 USB / USB-2080 USB / USB-2081 USB / USB-2082 USB / USB-2083 USB / USB-2084 USB / USB-2085 USB / USB-2086 USB / USB-2087 USB / USB-2088 USB / USB-2089 USB / USB-2090 USB / USB-2091 USB / USB-2092 USB / USB-2093 USB / USB-2094 USB / USB-2095 USB / USB-2096 USB / USB-2097 USB / USB-2098 USB / USB-2099 USB / USB-2100- Select the playlist file you want to restore at ⑨, then put a check mark next to "Send backup Playlist to the device" at ⑩ at the right of the screen. Note that if there is a playlist with the same name on this unit when you restore a playlist, the playlist is overwritten.
- Click 10 at the bottom left of the screen then click "OK" to start restoring the file.
> Before Start > Part Names > Initial Setup > Play back
Advanced Setup | Supplementary Information | Others
Dragging and dropping to copy music
text_image
Diagram showing two-step battery installation process: one with hand holding device, another with laptop screen open
natural_image
Illustration of a person using a laptop with a cursor hovering nearby (no text or symbols visible)You can copy music files stored on your computer to the built-in storage on this unit or dragging and dropping to a micro SD card in this unit, then listen to the music through the "Library" (P14).
- To copy to a micro SD card, insert a micro SD card into the card slot (P5).
- When removing the micro SD card, unmount the micro SD card before removing it (P32).
- NTFS format micro SD cards are not supported on this unit.
Copying music from a computer
- Connect this unit to a computer with the supplied micro USB cable. Connect so the wider side of the plug is down when inserting into this unit's micro USB port. You may damage the plug or jack if you try to insert it the wrong way. Screen "Change to USB Mass Storage Mode?" is displayed, so tap "Yes". Do not tap "Unmount", displayed when you tap this, until the transfer of the playlist is complete. If you do tap it, unplug the micro USB cable, then connect it again.
- If "AutoPlay" or similar is displayed on your computer, select "Open folder to view files" and then proceed to step 3.
-
Open "PC", "My Computer", etc., on your computer.
-
Select the save destination from the list. To copy to the built-in storage in this unit, open "Internal". To copy to a micro SD card, open the "Removable disk" card you want to copy to.
- The screen displayed depends on the OS and language of your computer.
-
Drag and drop the folder on your computer that contains the music files that you want to copy to the copy destination.
-
Tap "Unmount" on this unit's screen and unplug the micro USB cable. Refer to "Listening to music from the "Library""(P14) for play operations.
> Before Start > Part Names > Initial Setup > Play back
Advanced Setup | Supplementary Information | Others

Listening to music from the "Library"
text_image
Library Online Line Out CodedYou can listen to music files copied from your computer or to music on an inserted micro SD card. Note that the operations to play are the same for both.
- Refer to (P5) for how to insert the micro SD card.
- When removing the micro SD card, unmount the micro SD card before removing it (P32).
- NTFS format micro SD cards are not supported on this unit.
■ Playing Music with the "Library"
- A categorized list of tracks you copied from your computer is displayed when you tap "Library" in the home screen.
- It may take some time for synchronized tracks to be displayed.
- Flick the list screen up and down then tap on the display category you want.
Folders
All tracks saved in the same folder level are displayed.
Playlists
text_image
Library Folders Playlists Artists Album Artists AlbumsDisplays a list of play lists you have created (P16).
Artists
Displays by artists as recorded in the music files as participating artists.
Album Artists
Displays by artists as recorded in the music files as artists participating in the album.
Albums
Displays by album.
Songs
Displays all tracks.
Genres
Displays by genre.
- When you tap the track you want to play in the list of tracks, the screen changes to the play screen and play starts. To return to the list of tracks, tap "at the bottom left of the screen.
- Do not connect headphones that have

text_image
Best Mix Artist B 10Songs / 46:27 1 Best Mix_01 3:23 MP3 + 2 Best MI 5:02 MP3 + 3 Best MI 4:43 MP3 + 4 Best Mix 5:13 +an impedance outside the rated range as this may result in damage. Refer to "General Specifications"(P31) for the headphone specifications.
- At the time of purchase, the Auto sync feature is on, so when music files are copied to this unit or a micro SD card with music files on it is inserted (P5), the data is automatically synchronized. When "Auto sync" (P22) has not been set, tracks may not be displayed.
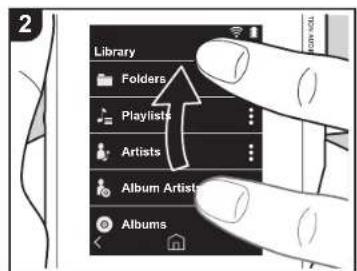
■ Change the order of categories in "Library"
Tap " : at the right of the screen for the category you want to reorder in the "Library" categorized list, then tap either "↑ or " "↓Tap " x " to confirm the change in order.

text_image
Best Mix_01 Artist B Best Mix MP3 44.1 kHz/PCM 44.1 kHz 16bit 0:03 3:23Adjusting the volume
Press the volume keys to adjust the volume.
- The volume bar is displayed on the screen when you press the volume keys.
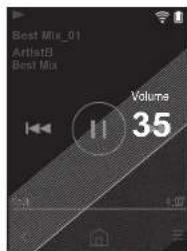
text_image
Best Mix_01 Artist2 Best Mix Volume 35> Before Start > Part Names > Initial Setup > Playback
Advanced Setup | Supplementary Information | Others
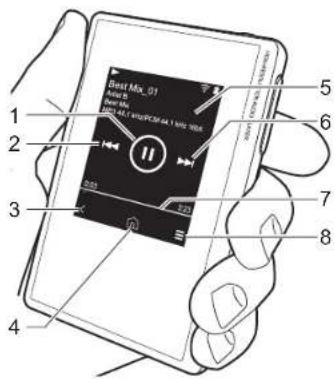
■ The play screen
Screen A
text_image
CD4 Mix_01 I/O port I/O port Control buttons Control buttons Control buttons Control buttons Control buttons Control buttons Control buttons Control buttons Control buttons Control buttons Control buttons Control buttons Control buttons Control buttons Control buttons Control buttons Control buttons Control buttons Control buttons Control buttons Control buttons Control buttons Control buttons Control buttons Control buttons Control buttons Control buttons Control buttons Control buttons Control buttons Control buttons Control buttons Control buttons Control buttons1. Play/pause (▶/■)
- Skipping (|)
Skip to the beginning of the track or to the previous track.
-
Return to the list of tracks.
-
Switches to the home screen.
-
Tap to display the album art.
-
Skipping (▶▶)
Skip to the next track.
- Seek bar
Progresses along with the track's progress. By swiping left or right from the current play position, you can move the play position to the position where you lift your finger.
- Switches to screen B
Screen B
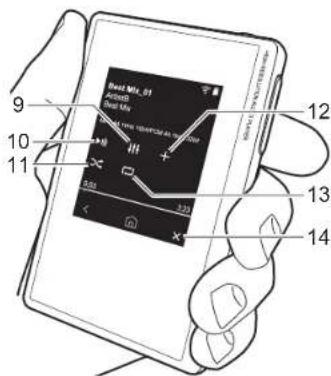
text_image
Best Mio_03 Aircraft Best Mio 12 10 11 13 149. Audio Adjust
You can set to your preferred sound quality (P24).
10.Switch output between "Headphone",
"Line Out", or "Bluetooth"
- When "Line Out" is selected, output through the headphone jack is at maximum volume, so do not use headphones. Adjust the volume on the connected device.
- "Bluetooth" is displayed when BLUETOOTH is on and a BLUETOOTH wireless technology enabled device is connected.
- Shuffle mode
You can switch shuffle play on or off by tapping this. "Is displayed on the
status bar on the screen when this is on.
-
The track being played is added to the play list (P16).
-
Repeat mode
Tap to change the mode: 1 track repeat,
→ all track repeat, → no repeat. "1
is displayed on the status bar on the
screen when 1-track repeat is set, and
"□s displayed for all-track repeat.
- 1-track repeat cannot be set when the shuffle mode is on.
14.Switches to screen A.
> Before Start > Part Names > Initial Setup > P I a y b a c k
Advanced Setup | Supplementary Information | Others

Creating a play list

You can select the tracks you like to create your own play list.
- Tap "Playlists" in the categorized list in the "Library".
- Tap "New Playlist" and enter the title. For details on how to enter text, refer to "Entering text" (P30). Tap "at the bottom left of the screen to switch to the track list when you have finished entering text.
- In the list, tap the "+" to the right of the track you want to add to the play list.
- Tap a play list you have created to register the track in the play list.
- Repeat steps 3 and 4 to keep adding tracks to the play list.
- Play lists created outside the "Library", such as in iTunes, are not displayed in the list of play lists on this unit.
■ Editing a play list
Tap "Playlists" in the list of categories in the "Library" to display the list of play lists.
To delete a play list:
Tap "at the top right of the play list you want to delete, then tap"
To change the name of a play list:
Tap " : at the top right of the play list whose name you want to change, then tap "/".
■ Editing tracks in a play list
Tap "Playlists" in the list of categories in the "Library" to display the list of play lists. Tap the play list you want to edit next.
To delete a track from a play list:
Tap " : at the top right of the track you want to delete, then tap "
- Tracks are not deleted from the unit even if you delete them from a play list.
To change the order of tracks in a play list:
Tap " : at the top right of the track you want to reorder, then tap "↑↓
- Loading playlists
Load the playlist files transferred to the built-in storage of this unit or to a micro SD card to use as the playlist for this unit.
- This unit can load m3u, m3u8, pls, and wpl format playlist files.
- Tap "Playlists" in the categorized list in the "Library".
- Tap "Import Playlist File" to display a list of playlist files you have stored.
"Import Playlist File" displays a list of all of the playlist files that have been transferred to the built-in storage, to micro SD card 1, or to micro SD card 2.
- After tapping the file in the list that you want to load as the playlist, tap "Yes".
- The playlist file is not deleted from the list even if you load it.
> Before Start > Part Names > Initial Setup > Play back
Advanced Setup | Supplementary Information | Others

Using network services
text_image
Library Online Line Out Balanced
text_image
2 Online + tunein + MODEEER + TIDALYou can use network services such as Tuneln Radio, DEEZER and TIDAL by connecting this unit to a network that has an internet connection.
0 There needs to be a Wi-Fi connection in order to play network services.
0) Depending on the network service, the user may need to register from their computer first. Refer to the websites for each of the services for details about them.
0 Functionality may be introduced by software updates and service providers may cease services, meaning that some network services and content may become unavailable in the future.
Playing Back
Perform the following procedure when the unit is on.
- Tap "Online" in the home screen of this unit.
- Tap the network service you want to use.
- Follow the on screen instructions and tap the radio station or program to start
play.
0 To return to the preceding screen, tap "at the bottom left of the screen.
Network service menus
You can register certain stations as your favorites or delete stations you have registered from your favorites. The menu displayed depends on the service currently selected.
A menu is displayed by tapping "at the bottom right of the screen while playing a station and then tapping "in the middle of the screen.
Regarding the TuneIn Radio Account
Creating an account on the TuneIn Radio website (tunein.com) and logging in from the unit allows you to automatically add your favorite radio stations and programs to your "My Presets" on the unit as you follow them on the website. "My Presets" are displayed in the level under TuneIn
Radio.
To display a radio station registered in "My Presets", you must log into TuneIn Radio from the unit. To log in, select "Login" - "I have a TuneIn account" in the "tunein" top list on the unit, and then enter your user name and password.
0 If you associate the device on My Page within the Tuneln Radio website using the registration code obtained by selecting "Login" on the unit, you can log in from "Login" - "Login with a registration code" without entering the user name and password.
> Before Start > Part Names > Initial Setup > Play back
Advanced Setup | Supplementary Information | Others

Connecting BLUETOOTH®
You can listen to music wirelessly by using BLUETOOTH wireless technology enabled devices such as headphones or speakers. Reception is possible over a distance of 10 m with a clear line of sight. The communication distance will be reduced in some conditions. This unit supports Qualcomm® aptX™ HD. You can enjoy higher quality wireless sound by connecting headphones and wireless speakers that support aptX HD.
- Playback will be aptX when connected with a Bluetooth enabled device that supports aptX, and aptX HD when connected with a Bluetooth enabled device that supports aptX HD.
Pairing for play
Pairing is necessary when connecting the BLUETOOTH wireless technology enabled devices for the first time. Make sure the BLUETOOTH wireless technology enabled device you want to connect is ready to be detected.
-
Tap "in the home screen."
-
Tap "Bluetooth".
-
Turn on the BLUETOOTH feature and select the device to connect from the "Available Devices" list.
-
Pairing will end after a short time.
-
Tap "Library" or "Online" in the home screen.
- This unit can store the data of up to eight paired devices.
When connecting after the first time
- Tap "in the home screen."
- Tap "Bluetooth" and tap the device you want to connect in "Paired Devices".
Canceling a connection
- Tap "○ in the home screen."
- Tap "Bluetooth".
- Tap "at the top right of the device you want to disconnect, then tap "Disconnect".
- Pairing information is not deleted even if you cancel the connection. Tap "Forget this device" to delete the pairing
information.
> Before Start > Part Names > Initial Setup > Play back
Advanced Setup | Supplementary Information | Others

Line Out
natural_image
Illustration showing two-step hand tool application on a device, with arrows indicating tool movement (no text or symbols present)
text_image
2 Library Online Line Out Balanced SecurityYou can connect a headphone amplifier or D/A converter, for example, that has line input. You will need a headphone plug (commercially available) to connect to this unit. Make sure you have the correct type of headphone plug for the jack of the device you are connecting.
Connecting a device
- Connect the device to this unit through the headphone jack.
- Turn on the power of this unit, and select "Line Out" in the home screen to turn Line Out on. "Line Out" is displayed on the status bar on the screen when this is on.
- When "Line Out" is on, output through the headphone jack is at maximum volume, so do not use headphones. Adjust the volume on the connected device.
> Before Start > Part Names > Initial Setup > Play back
Advanced Setup | Supplementary Information | Others

USB Output
text_image
1 OTG CableYou can connect a headphone amplifier or D/A converter, for example, that has a USB connector. You will need a USB OTG (On-The-Go) cable (commercially available) to connect to this unit. Make sure you have the correct type of USB cable for the USB port of the device you are connecting to the OTG cable. If it is a micro USB port, you can use the USB cable included with this unit.
This unit is compatible with the following devices. (As of December 2017) Headphone amplifier : XPA-700, DAC-HA300
- If the attached USB-DAC does not support DoP stream, playback and attached devices may be adversely affected.
Connecting a device
- Connect this unit to the device you are connecting using an OTG cable, etc. Make sure you plug the cable in the right way up when connecting. You may

text_image
2 Library Online Line Out Balanced Wi-Fi Sun Sensorydamage the plug or jack if you try to insert it the wrong way.
- Turn on the power of this unit and the connected device. "Is displayed on the status bar on the screen when this unit recognizes the connected device.
- When playing DSD format music files, DoP format can be output via USB (P22).
> Before Start > Part Names > Initial Setup > Playback
Advanced Setup | Supplementary Information | Others

Various settings
text_image
1 Library Online Line Out Balanced 2 Settings Wi-Fi > Bluetooth > Brightness > Balanced Output Select > Line Out Mode > ASSOCIATION AND POWERTap☐to make settings for Wi-Fi and BLUETOOTH, settings for audio output, pass code settings, software updates, and a variety of other settings.
- Tap 📋 in the home screen.
- Tap the item you want to set.
■ Wi-Fi
"On": Connection to a network via Wi-Fi is enabled. This also enables you to make various settings related to Wi-Fi, such as selecting the SSID of the access point to be connected. "Off (default value)": Connection by Wi-Fi is not enabled
Bluetooth
Bluetooth
"On": Enables connection with a BLUETOOTH wireless technology enabled device. This also enables you to make various settings related to BLUETOOTH, such as pairing. "Off (default value)": When BLUETOOTH is not to be used
Enable aptX™ HD: When this is On, you can get even better wireless sound from your Bluetooth wireless technology enabled headphones or speakers that support aptX HD. If sound interruptions occur while playing with aptX HD enabled, the problem may be improved by disabling this feature.
"On (default value)": Enable aptX HD
"Off": Disable aptX HD. When disabled, play is with aptX or SBC, according to the codec supported by the connected Bluetooth wireless technology enabled device.
Brightness
You can adjust the brightness of the screen. The brightness can be set with the slide bar in 10 steps between " (1) " and " (10) ". The screen becomes brighter when you slide it to the right (default value is "9").
■ Balanced Output Select
Use when balanced headphones are to be connected.
"Balanced (default value)": Compared to the normal single-ended operation, you can get a larger output and the high voltage is not grounded together with the small signal, so you can anticipate a superior effect in the quality of the music. Because you get a larger output, you can drive headphones with a higher impedance.
"ACG": The basic operating method is the same as Balanced (mode), but uses technology to even more forcefully fix grounding standards, so you can enjoy a sound quality with improved clarity and stability than Balanced (mode). Output volume is the same as the
> Before Start > Part Names > Initial Setup > Playback
Advanced Setup | Supplementary Information | Others

regular single-ended operation, however.
- This unit does not support simultaneous use of the balanced headphone jack and the headphone jack. Using both jacks at the same time may result in damage.
■ Line Out Mode
"On": Switch the headphone output to the line output mode to connect external equipment. When "Line Out Mode" is on, output through the headphone jack is at maximum volume, so do not use headphones. Adjust the volume on the connected device.
- When turned on for European models, you can then select either "Fixed (default value)" or "Variable". When "Variable" is selected, volume can be adjusted on this unit. If you select "Fixed", adjust the volume on the connected external device. "Off (default value)": Line output is not enabled
Audio
Gain: You can select the headphone output level to suit your headphones. Select "High (default value)", "Normal", or "Low".
- Lower the volume first if you intend to select "High".
- When connecting a pair of headphones for the first time, set to "Low" and change the volume level gradually.
Volume Limiter: You can set an upper limit for the maximum volume so that the volume does not increase too much. Select between "0" and "60 (default value)".
USB Audio: DSD format music files can be output in DoP format via USB. Note that DSD is not output if "Output DSD" is set to off.
- If the attached USB-DAC does not support DoP stream, playback and attached devices may be adversely affected.
Output DSD: "On" / "Off (default value)"
ReplayGain
When this is on, the variation in volume between each music file is corrected and played according to a standard value. To use ReplayGain, you first need to use software, etc., on a computer to embed the volume information in the music file. Enable ReplayGain: "On" / "Off (default value)"
Normalize setting: Select either "Track Gain" or "Album Gain" to use to make the volume uniform.
"Track Gain (default value)" / "Album Gain"
Preamp with RG info: When the music file has ReplayGain information, the volume level is
either increased or decreased according to the standard value. The volume level can be set in 25 steps between "-12 dB" and "12 dB". ("6 dB" is the default value)
Preamp without RG info: When the music file does not have ReplayGain information, the volume level is either increased or decreased according to the standard value. The volume level can be set in 13 steps between "-12 dB" and "0 dB". ("0 dB" is the default value)
■ Music Library Sync
Auto sync: When this is on, music files you have copied to this unit from a computer or music files on a micro SD card are automatically synchronized with the library. "On (default value)": When this function is to be used "Off": When this function is not to be used
Sync Now
If "Auto sync" is off, tap this to manually synchronize the music files with the library. You can select "Sync All" or "Sync Added Songs" after tapping this. Sync All: Select to synchronize all transferred tracks. Sync Added Songs: Select to synchronize only tracks that have been added.
■ SD Card
Unmount SD Card: You can unmount a micro SD card. The card can be damaged or may stop working properly if you fail to unmount the card first.
Format SD Card: You can initialize a micro SD card. All the data on the card will be deleted when you initialize it, so make sure you save data you want to keep to a computer, etc. To initialize, after tapping the micro SD card to be initialized, tap "Format" - "Confirm".
■ Physical Buttons
Operations while Holding
When set to "Enable", even when you press and hold the play/pause button (P5) to lock operations on this unit, the Volume keys and side buttons for play (P5), etc., can still be used. Tap this to change the settings for "Volume" and "Side Buttons". Volume: "Disable (default value)" / "Enable" Side Buttons: "Disable (default value)" / "Enable"
Operations while Screen Off
When set to "Disable", the side keys, such as the Volume keys and the play button (P5), will not work while the LCD of the unit is off. Tap this to change the settings for "Volume" and "Side Buttons".
> Before Start > Part Names > Initial Setup > Playback
Advanced Setup | Supplementary Information | Others

- When you press and hold the play/pause button (P5) to lock operations on this unit, operations are according to the settings in "Operations while Holding". Volume: "Disable" / "Enable (default value)" Side Buttons: "Disable" / "Enable (default value)"
Home
- You can change the buttons displayed in the home screen to buttons for features you prefer. - Change the buttons displayed in the home screen from the home screen. Refer to "Customizing the Home screen" (P26) for how to change.
■ Power Management
Auto Display Off: The unit's LCD automatically switches off when the specified time elapses with no operations. Select "Off", "15 seconds", "30 seconds (default value)", "1 minute", "2 minutes", or "5 minutes".
Auto Power Off: The unit's power automatically switches to "Off" when the specified time elapses with no operations. Select "Off (default value)", "10 minutes", "30 minutes", or "60 minutes".
Pioneer DuoRemote App: This restricts connections between the "Pioneer DuoRemote App" smartphone app and this unit. By setting to "Disable", the amount of battery consumed can be reduced even when BLUETOOTH is on. "Enable (default value)": To enable connection with "Pioneer DuoRemote App". "Disable": To disable connection with "Pioneer DuoRemote App".
Passcode
Passcode Lock: Set a four-digit pass code to protect this unit. (This is not set by default)
Change Passcode: Change the number for the set pass code. This can not be selected if a pass code has not been set.
- If you enter the wrong pass code three times, a message appears asking if you want to initialize the unit's settings. Even if the settings are initialized copied music files are not deleted.
- You should create a pass code to protect your account if you are going to use a network service.
Language
Select the language you want to use. Flick the list of languages up or down, then tap the language you want to use. English, German, French, Spanish, Italian, Swedish, Russian, Traditional Chinese, Simplified Chinese, Japanese
■ Software Update
Update Notice: Availability of a software update will be notified via network when "Enable" is set. "Disable": Do not notify "Enable (default value)": Notify
Update Now: Software can be updated via a network or via a micro SD card. Select "via Network" or "via SD Card". You can not select if there is no software update.
■ Device Information
Software Version: The current software version is displayed.
MAC Address: The MAC address of this unit. This value is specific to the component and cannot be changed.
Serial Number: The unique identifier for this unit.
License: Displays a guide to our privacy policy and the licenses for open source software.
Certification (North American models only): The certificates for acquired safety standards are displayed.
Reset
Reset All Settings: The settings of the unit are initialized. Note that music files copied to the internal storage are not deleted. Also, after resetting, the initial settings screen is automatically displayed.
Factory Reset: Reset the unit to the condition it was in when you purchased it. Note that music files copied to the internal storage and settings data are all deleted.
> Before Start > Part Names > Initial Setup > Playback
Advanced Setup | Supplementary Information | Others

Audio Adjust
text_image
1 Library Online Line Out Balanced ↓↑↑ Audio Adjust Custom Sound Equalizer Flat Bass Enhancer Off Upsampling Mode Off Hi-bit 32Tap!!to set to your preferred sound quality.
- Tap 7 in the home screen.
- Tap the item you want to set.
■ Custom Sound
"On": Select to use "Equalizer" and "Bass Enhancer"
"Off (default value)": When this function is not to be used
Equalizer: You can select the sound quality you like from "Flat (default value)", "Pop",
"Rock", "Jazz", "Dance", "Vocal", "Custom 1", "Custom 2", or "Custom 3".
Note that you can register your own original equalizers in Custom 1 to 3 using the following operations.
- To edit an equalizer, first tap the equalizer you want to edit, then tap it again.
- Tap "< >" to modify the frequency and tap "∨ ∧" to adjust the volume of the selected
frequency. - Tap "Save" when editing is finished and select the location to save to from Custom 1 to 3.
Bass Enhancer: Select a bass sound effect from one of five levels.
Select "Off (default value)", "1", "2", "3", "4", or "5".
■ Upsampling Mode
The sampling frequencies of the tracks played are upsampled for output.
Select "Off (default value)", "96k/88.2k", or "192k/176.4k".
Hi-bit 32
"On": 16bit or 24bit audio is re-quantized to 32 bit so that a smoother, more refined sound is realized.
"Off (default value)": When this function is not to be used
Digital Filter
By modifying the filter characteristics of the built-in digital converter you can enjoy three different types of modified sound quality.
Select "SHARP (default value)", "SLOW", or "SHORT".
■ Lock Range Adjust
You can improve sound quality by adjusting the lock range of the audio input signal's jitter (modulation). The lock range can be adjusted from the more precise "Narrow" up to "Wide" in seven steps. (Default Value is "Normal")
> Before Start > Part Names > Initial Setup > Playback

Advanced Setup | Supplementary Information | Others
- If you change the lock range and the sound is interrupted, adjust to the Normal or Wide ends.
> Before Start > Part Names > Initial Setup > Playback

Advanced Setup | Supplementary Information | Others
Customizing the Home screen
text_image
1 Library Online Line Out Balanced 2 Select a Short cut button Repeat × Shuffle Settings Wi-Fi BluetoothBy pressing and holding the buttons in the home screen of this unit, you can change the buttons displayed to ones for features you prefer.
- "Library" and "Online" cannot be changed.
Changing shortcut buttons
- In the home screen, press and hold the button you want to change.
- In the "Select a Short cut button" screen, tap the feature you want to display in the home screen. Features that are already displayed in the home screen will be displayed in gray and you will be unable to select them. Select "None" if you do not want to place a button.
> Before Start > Part Names > Initial Setup > Playback

Advanced Setup | Supplementary Information | Others
Software Update
The updating function on this unit
This unit has functionality to update the software over a network or a micro SD card. This enables us to make improvements to a variety of operations and to add features.
How to update
There are two methods for updating the firmware: via network and via micro SD card. Use the one that best suits your environment. The update may take about 3 minutes to complete for either method: via network or micro SD card. Furthermore, existing settings are guaranteed regardless of the method used for update.
- For the latest information on updates, visit our website. There is no need to update the software on this unit if there is no update available.
- During an update, do not
- Disconnect and reconnect any cable or micro SD card, headphones, or perform any operation on the component such as turn off its power
- Accessing this unit from your computer
Disclaimers: The program and accompanying online documentation are furnished to you for use at your own risk.
We will not be liable and you will have no remedy for damages for any claim of any kind whatsoever concerning your use of the program or the accompanying online documentation, regardless of legal theory, and whether arising in tort or contract.
In no event will we be liable to you or any third party for any special, indirect, incidental, or consequential damages of any kind, including, but not limited to, compensation, reimbursement or damages on account of the loss of present or prospective profits, loss of data, or for any other reason whatsoever.
Updating the Firmware via Network
First make sure the unit is connected by Wi-Fi.
- Make sure the unit is charged sufficiently before updating.
- Tap "in the home screen."
- Tap "Software Update".
- After tapping "Update Now", the software update starts when you tap "via Network".
- You will not be able to select "via Network" if there is no software update.
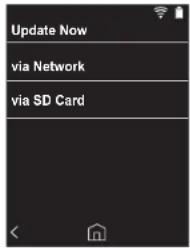
text_image
Update Now via Network via SD Card- "Completed!" is displayed when the update is complete.
- If "Failed to Update" screen is displayed, the update has failed. Redo from the beginning.
Updating via micro SD card
• Refer to (P5) for how to insert the micro SD card.
- When removing the micro SD card, unmount the micro
SD card before removing it (P32).
- NTFS format micro SD cards are not supported on this unit.
- Make sure the unit is charged sufficiently before updating.
1. Insert a micro SD card into your computer.
2. Download the software file from the our website to your
> Before Start > Part Names > Initial Setup > Playback

Advanced Setup | Supplementary Information | Others
PC and unzip.
- Copy all unzipped files and folders to the root folder of a micro SD card.
• Make sure to copy the unzipped files.
-
Insert the micro SD card into a card slot (either 1 or 2) on this unit.
-
Tap "in the home screen."
-
Tap "Software Update".
-
After tapping "Update Now", the software update starts when you tap "via SD Card".
- You will not be able to select "via SD Card" if there is no software update.
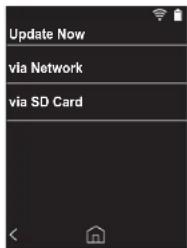
text_image
Update Now via Network via SD Card- "Completed!" is displayed when the update is complete.
- If "Failed to Update" screen is displayed, the update has failed. Redo from the beginning.
- You may need to update a number of times to update to the latest version of the firmware.
> Before Start > Part Names > Initial Setup > Playback
Advanced Setup | Supplementary Information | Other

Supplementary Information
Due to software updates after you make your purchase or software changes during production of the product, there may be additions or changes to the settings and operation available compared to what is in the instruction manual. For information about the settings and operations that have been added or changed, see the following references.
Supplementary Information
Click here <<<

En29
> Before Start > Part Names > Initial Setup > Playback
Advanced Setup | Supplementary Information | Others

Entering text
text_image
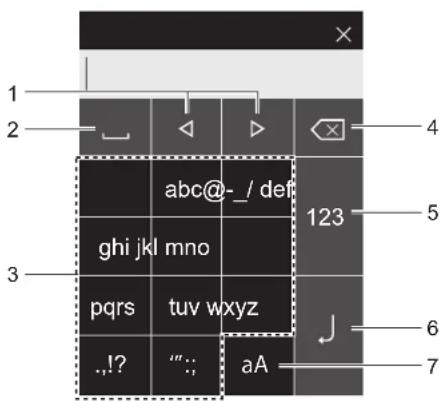
1 2 abc@-_ / def ghi jkl mno pqrs tuv wxyz .,!? "": aA 123 4 5 6 7- Moves the cursor.
- Enters a space.
- Tap to enter text.
- Removes a character on the left of the cursor.
- Change the type of text.
- Confirm the text you entered.
- Switches between upper and lower cases.
- This unit enables input of the alphabet, symbols, and numbers only.
> Before Start > Part Names > Initial Setup > Playback
Advanced Setup | Supplementary Information | Others

General Specifications
Display
2.4-inch, 240 × 320 dot resolution, capacitive touch screen
Internal memory
16 GB (including system area)
External memory
2 micro SD card slot (maximum 256 GB × 2)
Network Section
Wireless LAN: IEEE802.11 a/b/g/n compliant BLUETOOTH: A2DP, AVRCP, SBC codec
Supported playback formats
FLAC/ALAC/WAV/AIFF/MP3/AAC/MQA (44.1 kHz/48 kHz /88.2 kHz /96 kHz/176.4 kHz/192 kHz (16 bit/24 bit/32 bit)) DSD/DSF/DSDIFF *DSD Native (2.8 MHz/5.6 MHz (1 bit))
Maximum Effective Output Power (JEITA)
75 mW + 75 mW (Unbalanced, 32 Ω, 1 kHz, 10 % THD) 150 mW + 150 mW (Balanced, 32 Ω, 1 kHz, 10 % THD)
THD+N (Total Harmonic Distortion+Noise) 0.006% or less
Signal to Noise Ratio
115 dB or more
Frequency band
20 Hz - 80,000 Hz
Interfaces and input/output jacks
Headphone jack: 3-conductor, 3.5 mm (compatible with 4-conductor remote control), impedance: 16 to 300^ Headphone jack (balanced output): 4-conductor, 2.5 mm, impedance: 32 to 600^
* Do not connect headphones that have an impedance outside the rated range as this may result in damage.
1 micro USB port (B type, combined charging and data transfer)
Gain switch
Low/Normal/High
Continuous play time
Times shown are a guide. Playback times depend on settings. FLAC 24 bit 96 kHz: 15 hours *
* With the screen off, Wireless LAN and BLUETOOTH off, playing with Music, and using a 3-conductor 3.5 mm headphone connection
Mass of main unit
125 g (4.41 oz)
External dimensions (excluding protrusions)
63.2 mm × 97.7 mm × 16.0 mm 2-1/2" × 3-7/8" × 5/8" (width/height/depth)
Specifications and appearance are subject to change without prior notice.
We will not accept responsibility for damage arising from the connection of equipment manufactured by other companies.
> Before Start > Part Names > Initial Setup > Playback
Advanced Setup | Supplementary Information | Others

Cautions for use
■ If operation becomes unstable
- The issue may be fixed by restarting this unit. Press and hold the power button on this unit for 10 or more seconds to force the unit to shutdown, then press and hold the power button again to restart the unit. (The settings in the unit are maintained.)
■ Removing the micro SD card
- When removing the micro SD card, in the home screen tap "O-"SD Card" - "Unmount SD Card" - "SD Card 1" - or "SD Card 2" to unmount the micro SD card, then remove it. The card can be damaged or may stop working properly if you fail to unmount the card first. Refer to (P5) for how to remove.
This unit
- Use a 4-conductor plug for the ∅2.5 mm diameter headphone jack of this unit, and use a 3-conductor plug for the ∅3.5mm diameter headphone jack. It is not compatible with microphone input.
- This unit does not support simultaneous use of the balanced headphone jack and the headphone jack. Using both jacks at the same time may result in damage.
- Take care that dust and foreign objects do not get into the entrance of the micro SD card slot, as this can cause a malfunction.
- Do not press down with force on the unit when the unit is placed with the screen facing down. This can damage the LCD.
- The antenna is built into the bottom of the back of the main unit. The transmission speed of the unit may be adversely affected if you block the antenna area with your hand.
■ Album artwork
If album artwork is not registered as metadata for the music file, you can use an image as the play screen for a music file by putting an image file in the same folder as the music file. Note that for music files that have already been synchronized in the library, when you add artwork, the album artwork is not shown in the list screen of the categorized display. Synchronize by tapping "O- "Music Library Sync" - "Sync Now" - "Sync All" in the home screen.
- If album artwork is registered in the metadata, the metadata is prioritized. Supported image formats: PNG (.png), JPEG (.jpg,.jpeg) File size: 3MB or less
■ Folder and file names
If artist names, album names, and track names are not registered in the metadata of music files, folder names and file names are embedded in the metadata.
- If artist names, album names, and track names are registered in the metadata, the metadata is prioritized.
Example folder structure
☐ Parent folder - ☐ Child folder - Music file Artist name: The name of the parent folder is registered Album name: The name of the child folder is registered Track name: The name of the music file is registered
■ Electronic authorization labeling (North American models only)
You can confirm information related to authorizations using the following procedure:
- Tap "in the home screen."
- Tap "Device Information".
- Tap "Certification".
> Before Start > Part Names > Initial Setup > Playback
Advanced Setup | Supplementary Information | Others

License and Trademark
Bluetooth
The Bluetooth® word mark and logos are registered trademarks owned by Bluetooth SIG, Inc.

Qualcomm ^® aptX ^™ HD
Qualcomm aptX is a product of Qualcomm Technologies, Inc. and/or its subsidiaries.
Qualcomm is a trademark of Qualcomm Incorporated, registered in the United States and other countries. aptX is a trademark of Qualcomm Technologies International, Ltd., registered in the United States and other countries.
Windows ^® 7, Windows ^® Media, and the Windows ^® logo are trademarks or registered trademarks of Microsoft Corporation in the United States and/or other countries.

CERTIFIED
The Wi-Fi CERTIFIED Logo is a certification mark of Wi-Fi Alliance®.
iTunes is a trademark of Apple Inc., registered in the U.S. and other countries.
DSD and the Direct Stream Digital logo are trademarks of Sony Corporation.
"All other trademarks are the property of their respective owners."
Music and image content, etc., whose rights are owned by a third party are protected as works by copyright laws. Such content that you load into this unit may not be copied, modified, distributed or transmitted in public without the permission of the copyright holder, except where permitted under copyright law, such as copying and quoting for the purposes of personal use. Note that there may be other restrictions on loading material such as performances, shows, and exhibitions, even if only for personal use.
Important Notice Regarding Software
The software package installed in this product includes software licensed to Onkyo & Pioneer Corporation (hereinafter, called "O&P Corporation") directly or indirectly by third party developers. Please be sure to read this notice regarding such software.
Notice Regarding GNU GPL/LGPL-applicable Software
This product includes the software that is covered by GNU General Public License (hereinafter, called "GPL") or by GNU Lesser General Public License (hereinafter, called "LGPL"). O&P Corporation notifies you that, according to the attached GPL/LGPL, you have right to obtain, modify, and redistribute software source code for the listed software.
Notice Regarding MPL-applicable Software
This product includes the software that is covered by Mozilla Public License (hereinafter, called "MPL"). O&P Corporation notifies you that, according to the attached MPL, you have right to obtain, modify, and redistribute software source code for the listed software.
Perform the following procedure to see which of GPL, LGPL, and MPL apply to which pieces of software.
-
Tap in the home screen.
-
Tap "Device Information".
-
Tap "License" and tap the software item you want to check.
You may obtain a complete machine-readable copy of the corresponding source code on a physical medium by contacting Customer Service. This offer is valid to any third party within three years after last shipment of the product. Costs of physical distribution will be charged.
Pioneer
1-10-5 Yokoami, Sumida-ku, Tokyo 130-0015 Japan
18 PARK WAY, UPPER SADDLE RIVER, NEW JERSEY 07458, U.S.A. Tel: 1-201-785-2600
Hanns-Martin-Schleyer-Straße 35, 47877 Willich, Germany Tel: +49(0)8142 4208 188 (Product Support)
Anteros Building, Odyssey Business Park, West End Road, South Ruislip, Middlesex, HA4 6QQ United Kingdom
Tel: +44(0)208 836 3612
6, Avenue de Marais F - 95816 Argenteuil Cedex FRANCE Tel: +33(0)969 368 050
Register your product on
http://www.pioneerelectronics.com (us)
http://www.pioneerelectronics.ca (Canada)
http://www.pioneer.eu (Europe)
© 2018 Onkyo & Pioneer Corporation. All rights reserved.
Onkyo group has established its Privacy Policy, available at [http://pioneer-audiovisual.com/privacy/] "Pioneer" is a trademark of Pioneer Corporation, and is used under license.
SN 29403320B
Pioneer

text_image
High-resolution audio player Library Online Line Out Balanced Wi-Fi X Sun/Resolution Audio PlayerJa EnFr Es It De Sv Ru Ct Cs
XDP-02U
LECTEUR AUDIO HAUTE RÉSOLUTION
取扱説明書
Instruction Manual
▶ Mode d'emploi
natural_image
Line drawing of a rectangular electronic device with a screen and base (no text or symbols)2

3

text_image
Diagram illustrating battery charging process with hands inserting a plug into a device and using a battery icon to test battery charging.
text_image
2 Pioneer Digital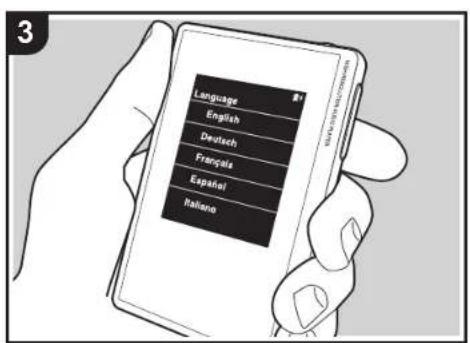
text_image
Language English Deutsch Français Español Italianotext_image
Would you like to start initial setup? 1st Step : Passcode 2nd Step : Wi-Fi No Yestext_image
1st Step : Passcode Do you wish to use passcode lock? No Yestext_image
2nd Step : Wi-Fi Do you wish to setup Wi-Fi? No Yes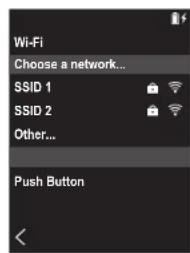
text_image
Wi-Fi Choose a network... SSID 1 SSID 2 Other... Push Buttontext_image
Screenshot of a software interface with labeled controls and a display panel showing three circular buttons.text_image
Folder onkyo music iTunes Media Best Mixonkyo music
text_image
Timer Action Timer Artist Bast Vb_01 Bast Vb_02 Bast Vb_03 Bast Vb_04 Bast Vb_05 Bast Vb_06 Bast Vb_07 Bast Vb_08 Bast Vb_09 Bast Vb_10 Bast Vb_11 Bast Vb_12 Bast Vb_13 Bast Vb_14 Bast Vb_15 Bast Vb_16 Bast Vb_17 Bast Vb_18 Bast Vb_19 Bast Vb_20 Bast Vb_21 Bast Vb_22 Bast Vb_23 Bast Vb_24 Bast Vb_25 Bast Vb_26 Bast Vb_27 Bast Vb_28 Bast Vb_29 Bast Vb_30 Bast Vb_31 Bast Vb_32 Bast Vb_33 Bast Vb_34 Bast Vb_35 Bast Vb_36 Bast Vb_37 Bast Vb_38 Bast Vb_39 Bast Vb_40 Bast Vb_41 Bast Vb_42 Bast Vb_43 Bast Vb_44 Bast Vb_45 Bast Vb_46 Bast Vb_47 Bast Vb_48 Bast Vb_49 Bast Vb_50 Bast Vb_51 Bast Vb_52 Bast Vb_53 Bast Vb_54 Bast Vb_55 Bast Vb_56 Bast Vb_57 Bast Vb_58 Bast Vb_59 Bast Vb_60 Bast Vb_61 Bast Vb_62 Bast Vb_63 Bast Vb_64 Bast Vb_65 Bast Vb_66 Bast Vb_67 Bast Vb_68 Bast Vb_69 Bast Vb_70 Bast Vb_71 Bast Vb_72 Bast Vb_73 Bast Vb_74 Bast Vb_75 Bast Vb_76 Bast Vb_77 Bast Vb_78 Bast Vb_79 Bast Vb_80text_image
Select Free
text_image
8 9 Title A Title Best Mix Best Mix Best Mix Best Mixtext_image
Select Free: 10text_image
Folder onkyo music iTunes Media Best Mix Playlists X-DAP Link iTunes Mediatext_image
Folder onkyo music iTunes Media Best Mixtext_image
Select change devices *Android device does not agree to device still options and select: The transfers/OSY and other. CPU (1): 200-30K Internet (A) 1.5 GB 11.4 GB CPU (2): 200-30K Remote data (B) 7.18 GB 7.29 GB CPU (3): 200-30K Remote data (C) 7.18 GB 7.39 GB □ Copy contents from any other means to PC □ Default (Random) started on device □ Default (Random, Default) from device not to OK Cancel6
text_image
Select storage devices If not available devices are selected, go to ensure USB options and select. The transfers/USB and other. GP (1): USB-300 Internal (C): 12.4 GB 2.5 GB 3.0 GB GP (1): USB-300 Removable data (A): 7.6 GB 7.8 GB GP (1): USB-300 Removable data (B): 7.8 GB 7.9 GB □ Copy templates from a software mask □ Backup Myosets created or device □ Delete Files (Windows, macOS) from OK Canceltext_image
Playbox 15.12.23.24.25.26.27.28.29.30.31.32.33.34.35.36.37.38.39.40.41.42.43.44.45.46.47.48.49.50.51.52.53.54.55.56.57.58.59.60.61.62.63.64.65.66.67.68.69.70.71.72.73.74.75.76.77.78.79.80.81.82.83.84.85.86.87.88.89.90.text_image
Diagram showing two-step battery application process: one with hand holding device, another with laptop screen and plug inserted.
natural_image
Illustration of a person using a laptop with a cursor hovering nearby (no text or symbols visible)text_image
Library Online Line Out Speed Security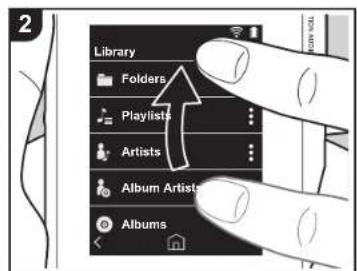
text_image
Library Folders Playlists Artists Album Artists Albums
text_image
Best Mix Artist B 10Songs / 46:27 1 Best Mix_01 3:23 MP3 + 2 Best MI 5:02 MP3 + 3 Best MI 4:43 MP3 + 4 Best Mix 5:13 +
text_image
Best Mix_01 Artist B Best Mix MP3 44.1 kHz/PCM 44.1 kHz 16bit 0:03 3:23text_image
Best Mix_01 ArtistB Best Mix Volume 35text_image
Library Online Line Out Balanced
text_image
2 Online +tunein +MODEEZEER +TIDALnatural_image
Illustration showing two-step hand tool application on a device, with arrows indicating tool direction (no text or symbols present)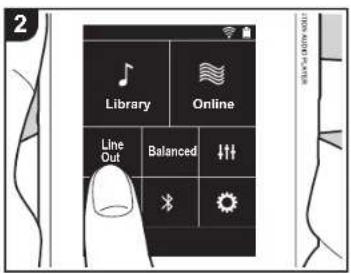
text_image
2 Library Online Line Out Balanced SELF-OPEN YOURtext_image
1 OTG Cable
text_image
2 Library Online Line Out Balanced Wi-Fi Sunsettext_image
1 Library Online Line Out Balanced 2 Settings Wi-Fi > Bluetooth > Brightness > Balanced Output Select > Line Out Mode >text_image
1 Library Online Line Out Balanced Audio Adjust Custom Sound Equalizer Flat Bass Enhancer Off Upsampling Mode Off Hi-bit 32text_image
1 Library Online Line Out Balanced 2 Select a Short cut button Repeat × Shuffle Settings Wi-Fi Bluetoothtext_image
Update Now via Network via SD Cardtext_image
Update Now via Network via SD CardFLAC/ALAC/WAV/AIFF/MP3/AAC/MQA (44,1 kHz/48 kHz /88,2 kHz /96 kHz/176,4 kHz/192 kHz (16 bits/24 bits/32 bits))
The Bluetooth® word mark and logos are registered trademarks owned by Bluetooth SIG, Inc.

Qualcomm ^ aptX ^ HD
Windows ^16 7, Windows ^20 Media, and the Windows ^16 logo are trademarks or registered trademarks of Microsoft Corporation in the United States and/or other countries.

CERTIFIED
The Wi-Fi CERTIFIED Logo is a certification mark of Wi-Fi Alliance ^15 .
iTunes is a trademark of Apple Inc., registered in the U.S. and other countries.
DSD and the Direct Stream Digital logo are trademarks of Sony Corporation.
"All other trademarks are the property of their respective owners."
Anteros Building, Odyssey Business Park, West End Road, South Ruislip, Middlesex, HA4 6QQ United Kingdom
Tel: +44(0)208 836 3612
6, Avenue de Marais F - 95816 Argenteuil Cedex FRANCE Tel: +33(0)969 368 050
http://www.pioneerelectronics.ca (Canada)
http://www.pioneer.eu (Europe)
© 2018 Onkyo & Pioneer Corporation. All rights reserved.
Onkyo group has established its Privacy Policy, available at [http://pioneer-audiovisual.com/privacy/]. "Pioneer" is a trademark of Pioneer Corporation, and is used under license.
SN 29403320B
Pioneer
text_image
High-resolution audio player Library Online Line Out Balanced Wi-Fi X Sun/Resolution Audio PlayerJa EnEsr □ It De Sv Ru Ct Cs
XDP-02U
HIGH RESOLUTION AUDIO PLAYER
取扱説明書
Instruction Manual
Mode d'emploi
▶ Manual de instrucciones
natural_image
Line drawing of a rectangular electronic device with a screen and base (no text or symbols)text_image
Diagram illustrating a battery charging operation with labeled components and directional arrows indicating charging direction.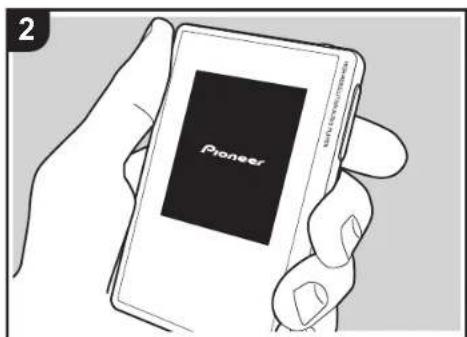
text_image
2 Pioneer
text_image
Language English Deutsch Français Español Italianotext_image
Would you like to start initial setup? 1st Step : Passcode 2nd Step : Wi-Fi No Yes> Antes de empezar
text_image
1st Step : Passcode Do you wish to use passcode lock? No Yestext_image
2nd Step : Wi-Fi Do you wish to setup Wi-Fi? No Yes
text_image
Wi-Fi Choose a network... SSID 1 SSID 2 Other... Push Buttontext_image
Screenshot of a software interface with labeled controls and a display panel showing text, icons, and numeric values.text_image
Folder onkyo music iTunes Media Best MixMúsica Onkyo
text_image
Scene Mix Scene Mix Title Action Action Event Vb_01 Action D Event Vb_02 Action B Event Vb_03 Action E Event Vb_04 Action D Event Vb_05 Action A Event Vb_06 Action D Event Vb_07 Action Btext_image
Select Free
text_image
8 9 Title A Title Best Mix Best Mix Best Mix Best Mixtext_image
Select Free: 10text_image
Folder onkyo music iTunes Media Best Mix Playlists X-DAP Link iTunes Mediatext_image
Folder onkyo music iTunes Media Best Mixtext_image
Select change devices Standard device design options go to be selected. All options and select. The transfer/MTV, or apply. OP10 / X2P-304 Internal (x1) 12.4 GB 12.4 GB OP10 / X2P-305 External (x2) 7.18 GB 7.26 GB OP10 / X2P-306 External (x3) 7.18 GB 7.26 GB Copy contents from software into NC • Copy Products installed on device • Delete File(Scope, Realtek) from device not in OK Canceltext_image
Manage select Select storage device If not available, it does not access, go to default USB options and select "the transfer/HTTP" and help. CPU 1.1 / CPU 2.0 CPU 1.1 / CPU 2.0 CPU 1.1 / CPU 3.0 CPU 1.1 / CPU 4.0 Internet port (I:\ TCP 1.0 / TCP 2.0) Internet port (I:\ TCP 1.0 / TCP 2.0) Internet port (I:\ TCP 1.0 / TCP 2.0) Windows from a network host C:\Program Files\ installed at the device C:\Program Files\ installed at the device C:\Program Files\ installed at the device OK Canceltext_image
Diagram showing two-step battery application process: one with hand holding device, another with laptop screen and plug inserted.
natural_image
Illustration of a person using a laptop with a cursor hovering nearby (no text or symbols visible)text_image
Library Folders Playlists Artists Album Artists Albums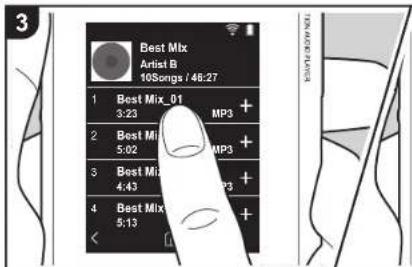
text_image
Best Mix Artist B 10Songs / 48:27 1 Best Mix_01 3:23 MP3 + 2 Best Mix 5:02 MP3 + 3 Best Mix 4:43 MP3 + 4 Best Mix 5:13 + +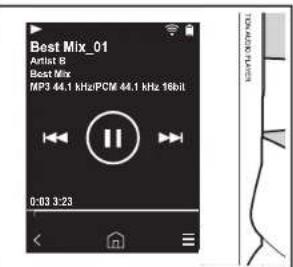
text_image
Best Mix_01 Artist 8 Best Mix MP3 44.1 kHz/PCM 44.1 kHz 16bit 0:03 3:23text_image
Best Mix_01 ArtistB Best Mix Volume 35text_image
Library Online Line Out Balanced
text_image
2 Online +tunein +MODEEZEER +TIDALnatural_image
Illustration showing two-step hand tool application on a device, with arrows indicating tool direction (no text or symbols present)
text_image
2 Library Online Line Out Balanced SELF-OPEN YOURtext_image
1 OTG Cable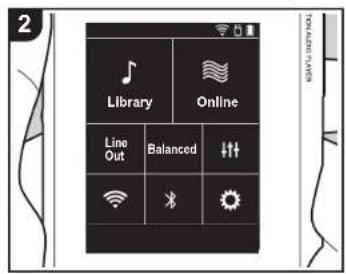
text_image
2 Library Online Line Out Balanced Wi-Fi *_ SOSItext_image
1 Library Online Line Out Balanced 2 Settings Wi-Fi > Bluetooth > Brightness > Balanced Output Select > Line Out Mode >text_image
1 Library Online Line Out Balanced 2 Audio Adjust Custom Sound Equalizer Flat Bass Enhancer Off Upsampling Mode Off Hi-bit 32text_image
1 Library Online Line Out Balanced 2 Select a Short cut button Repeat × Shuffle Settings Wi-Fi Bluetoothtext_image
Update Now via Network via SD Cardtext_image
Update Now via Network via SD CardThe Bluetooth® word mark and logos are registered trademarks owned by Bluetooth SIG, Inc.

Qualcomm ^® aptX ^™ HD
Windows® 7, Windows® Media, and the Windows® logo are trademarks or registered trademarks of Microsoft Corporation in the United States and/or other countries.

CERTIFIED
The Wi-Fi CERTIFIED Logo is a certification mark of Wi-Fi Alliance®.
iTunes is a trademark of Apple Inc., registered in the U.S. and other countries.
DSD and the Direct Stream Digital logo are trademarks of Sony Corporation.
"All other trademarks are the property of their respective owners."
'Toutes les autres marques commerciales sont la propriété de leurs propriétaires respectifs.'
"El resto de marcas comerciales son propiedad de sus respectivos propietarios."
“ Tutti gli altri marchi di fabbrica sono di proprietà dei rispettivi proprietari.”
“ Alle anderen Warenzeichen sind Eigentum ihrer jeweiligen Eigentümer. ”
“ Alla andra varumärken tillhör deras respektive ägare. ”
"Все товарные знаки являются собственностью соответствующих владельцев."
Anteros Building, Odyssey Business Park, West End Road, South Ruislip, Middlesex, HA4 6QQ United Kingdom
Tel: +44(0)208 836 3612
6, Avenue de Marais F - 95816 Argenteuil Cedex FRANCE Tel: +33(0)969 368 050
© 2018 Onkyo & Pioneer Corporation. All rights reserved.
Onkyo group has established its Privacy Policy, available at [http://pioneer-audiovisual.com/privacy/]. "Pioneer" is a trademark of Pioneer Corporation, and is used under license.
SN 29403320B
Pioneer

text_image
High-resolution audio player Library Online Line Out Balanced Wi-Fi X Sun/Resolution Audio PlayerJa En Fr Es De Sv Ru Ct Cs
XDP-02U
HIGH RESOLUTION AUDIO PLAYER
取扱説明書
Instruction Manual
Mode d'emploi
natural_image
Line drawing of a rectangular electronic device with a screen and base (no text or symbols)text_image
Diagram illustrating battery charging process with hands using a switch and battery, showing battery symbol and charging icon
text_image
2 Pioneer Digital
text_image
Language English Deutsch Français Español Italianotext_image
Would you like to start initial setup? 1st Step : Passcode 2nd Step : Wi-Fi No Yestext_image
1st Step : Passcode Do you wish to use passcode lock? No Yestext_image
2nd Step : Wi-Fi Do you wish to setup Wi-Fi? No Yes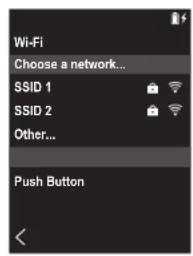
text_image
Wi-Fi Choose a network... SSID 1 SSID 2 Other... Push Buttontext_image
Screenshot of a software interface with labeled controls and a digital display paneltext_image
Folder onkyo music iTunes Media Best Mixonkyo music
text_image
Select Free
text_image
8 9 Title A Title Best Mix Best Mix Best Mix Best Mixtext_image
Select Free 10text_image
Folder onkyo music iTunes Media Best Mix Playlists X-DAP Link iTunes Mediatext_image
Folder onkyo music iTunes Media Best Mixtext_image
Select storage device *Android devices cannot agree to deliver still options and select the transfers/MTV and remote. CPU (1) / 80K-30K Internal (1) 2.6 GB 31.4 GB CPU (2) / 80K-30K Remote disk (1, 3, 5) 7.28 GB 7.28 GB CPU (3) / 80K-30K Remote disk (1, 5, 7) 7.28 GB 7.28 GB □ Copy contents from a single source to PC □ Copy (Hi/My) started as close □ Copy (file groups, files) from device not to OK Cancel6
text_image
Diagram showing two-step installation of a device with a lock and cable, followed by a laptop screen setup.
natural_image
Illustration of a person using a laptop with a cursor hovering nearby (no text or symbols visible)text_image
Library Online Line Out Speed Wi-Fi Sensory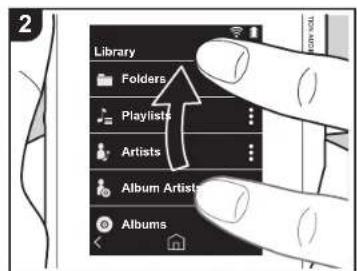
text_image
Library Folders Playlists Artists Album Artists Albums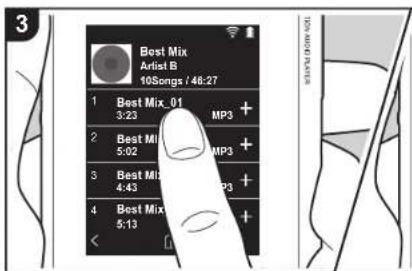
text_image
Best Mix Artist B 10Songs / 46:27 1 Best Mix_01 3:23 MP3 + 2 Best MI 5:02 MP3 + 3 Best MI 4:43 MP3 + 4 Best Mix 5:13 + + < | |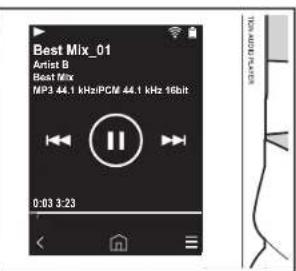
text_image
Best Mix_01 Artist B Best Mix MP3 44.1 kHz/PCM 44.1 kHz 16bit 0:03 3:23text_image
Best Mix_01 ArtistB Best Mix Volume 35text_image
Library Online Line Out Balanced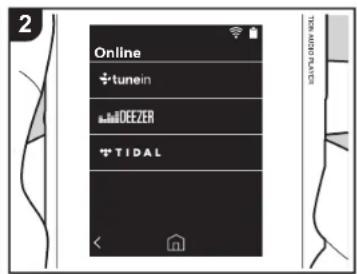
text_image
2 Online +tunein +MDEEZER +TIDAL TOMOLED PLATESnatural_image
Illustration showing two-step hand tool application on a device, with arrows indicating tool movement (no text or symbols present)
text_image
2 Library Online Line Out Balanced SELF-OPEN YOURtext_image
1 OTG Cable
text_image
2 Library Online Line Out Balanced Wi-Fi Sun Sensorytext_image
1 Library Online Line Out Balanced 2 Settings Wi-Fi > Bluetooth > Brightness > Balanced Output Select > Line Out Mode > ASSISTENT POWERtext_image
1 Library Online Line Out Balanced ↓↑↑ 2 Audio Adjust Custom Sound Equalizer Flat Bass Enhancer Off Upsampling Mode Off Hi-bit 32text_image
1 Library Online Line Out Balanced 2 Select a Short cut button Repeat Shuffle Settings Wi-Fi Bluetoothtext_image
Update Now via Network via SD Cardtext_image
Update Now via Network via SD CardThe Bluetooth® word mark and logos are registered trademarks owned by Bluetooth SIG, Inc.

Qualcomm ^® aptX ^™ HD
Windows ^® 7, Windows ^® Media, and the Windows ^® logo are trademarks or registered trademarks of Microsoft Corporation in the United States and/or other countries.

CERTIFIED
The Wi-Fi CERTIFIED Logo is a certification mark of Wi-Fi Alliance®.
iTunes is a trademark of Apple Inc., registered in the U.S. and other countries.
DSD and the Direct Stream Digital logo are trademarks of Sony Corporation.
"All other trademarks are the property of their respective owners."
Anteros Building, Odyssey Business Park, West End Road, South Ruislip, Middlesex, HA4 6QQ United Kingdom
Tel: +44(0)208 836 3612
6, Avenue de Marais F - 95816 Argenteuil Cedex FRANCE Tel: +33(0)969 368 050
© 2018 Onkyo & Pioneer Corporation. All rights reserved.
Onkyo group has established its Privacy Policy, available at [http://pioneer-audiovisual.com/privacy/]. "Pioneer" is a trademark of Pioneer Corporation, and is used under license.
SN 29403320B
Pioneer

text_image
High-resolution audio player Library Online Line Out Balanced Wi-Fi X Sun/Resolution Audio PlayerJa En DeEs It □ Sv Ru Ct Cs
XDP-02U
HIGH RESOLUTION AUDIO PLAYER
取扱説明書
Instruction Manual
Mode d'emploi
natural_image
Line drawing of a rectangular electronic device with a screen and base (no text or symbols)2

3

text_image
Diagram illustrating battery charging process with hands using a switch and battery, showing battery symbol and charging icon
text_image
2 Pioneer Digital
text_image
Language English Deutsch Français Español Italianotext_image
Would you like to start initial setup? 1st Step : Passcode 2nd Step : Wi-Fi No Yestext_image
1st Step : Passcode Do you wish to use passcode lock? No Yestext_image
2nd Step : Wi-Fi Do you wish to setup Wi-Fi? No Yes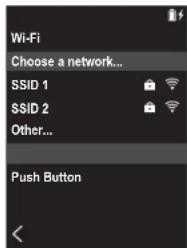
text_image
Wi-Fi Choose a network... SSID 1 SSID 2 Other... Push Buttontext_image
Screenshot of a software interface with labeled buttons and a central display screentext_image
Folder onkyo music iTunes Media Best MixOnkyo Music
text_image
Select Free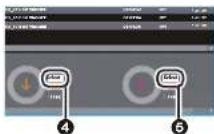
text_image
8 9 Title A Title Best Mix Best Mix Best Mix Best Mixtext_image
Select Free: 10text_image
Folder onkyo music iTunes Media Best Mix Playlists X-DAP Link iTunes Mediatext_image
Folder onkyo music iTunes Media Best Mixtext_image
Storage Window Select storage device Standard device designed to open to be selected. To install MSIPs and select. The transfer/MSIP, or apply. OP 101 / MSIP-004 Microsoft (6) 12.5 GB 72.5 GB OP 101 / MSIP-004 Microsoft (6) 7.5 GB 7.5 GB OP 101 / MSIP-004 Microsoft (6) 7.5 GB 7.5 GB □ Copy contents from software installed on NC □ Copy Products installed on device □ Delete Files (Windows, macOS) from device not used OK Canceltext_image
Diagram showing two-step installation of a device with a lock and cable, followed by a laptop screen setup.
natural_image
Illustration of a person using a laptop with a cursor hovering nearby (no text or symbols visible)text_image
Best Mix_01 ArtistB Best Mix Volume 35text_image
Library Online Line Out Balanced
text_image
2 Online + tunein + MODEEER + TIDALnatural_image
Illustration showing two-step hand tool application on a device, with arrows indicating tool direction (no text or symbols present)
text_image
2 Library Online Line Out Balanced SUNTER SELF-DRIVE DO NOTtext_image
1 OTG Cable
text_image
2 Library Online Line Out Balanced Wi-Fi Sun Sensorytext_image
1 Library Online Line Out Balanced 2 Settings Wi-Fi > Bluetooth > Brightness > Balanced Output Select > Line Out Mode > ASSOCIATION MODE LAVERtext_image
1 Library Online Line Out Balanced ↓↑↑ 2 Audio Adjust Custom Sound Equalizer Flat Bass Enhancer Off Upsampling Mode Off Hi-bit 32text_image
1 Library Online Line Out Balanced 2 Select a Short cut button Repeat Shuffle Settings Wi-Fi Bluetooth 3text_image
Update Now via Network via SD Cardtext_image
Update Now via Network via SD CardFLAC/ALAC/WAV/AIFF/MP3/AAC/MQA (44,1 kHz/48
kHz /88,2 kHz /96 kHz/176,4 kHz/192 kHz (16 Bit/24 Bit/32 Bit))
DSD/DSF/DSDIFF *DSD Native (2,8 MHz/5,6 MHz (1 Bit))
2-1/2" × 3-7/8" × 5/8" (Breite/Höhe/Tiefe)
The Bluetooth® word mark and logos are registered trademarks owned by Bluetooth SIG, Inc.

Qualcomm ^® aptX ^™ HD
Windows® 7, Windows® Media, and the Windows® logo are trademarks or registered trademarks of Microsoft Corporation in the United States and/or other countries.

CERTIFIED
The Wi-Fi CERTIFIED Logo is a certification mark of Wi-Fi Alliance®.
iTunes is a trademark of Apple Inc., registered in the U.S. and other countries.
DSD and the Direct Stream Digital logo are trademarks of Sony Corporation.
"All other trademarks are the property of their respective owners."
Anteros Building, Odyssey Business Park, West End Road, South Ruislip, Middlesex, HA4 6QQ United Kingdom
Tel: +44(0)208 836 3612
6, Avenue de Marais F - 95816 Argenteuil Cedex FRANCE Tel: +33(0)969 368 050
© 2018 Onkyo & Pioneer Corporation. All rights reserved.
Onkyo group has established its Privacy Policy, available at [http://pioneer-audiovisual.com/privacy/] "Pioneer" is a trademark of Pioneer Corporation, and is used under license.
SN 29403320B
Pioneer

text_image
High-resolution audio player Library Online Line Out Balanced Wi-Fi X Sun/Resolution Audio PlayerJa En Fr Es It De Sv Ru Ct Cs
XDP-02U
HIGH RESOLUTION AUDIO PLAYER
取扱説明書
Instruction Manual
Mode d'emploi
natural_image
Line drawing of a rectangular electronic device with a blank screen (no text or symbols)text_image
Diagram illustrating battery charging process with hands inserting a plug into a device and using a battery icon, next to a laptop screen.
text_image
2 Pioneer Digital Platform
text_image
Language English Deutsch Français Españel Italianotext_image
Would you like to start initial setup? 1st Step : Passcode 2nd Step : Wi-Fi No Yestext_image
1st Step : Passcode Do you wish to use passcode lock? No Yestext_image
2nd Step : Wi-Fi Do you wish to setup Wi-Fi? No Yes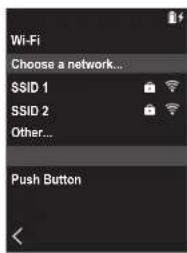
text_image
Wi-Fi Choose a network... SSID 1 SSID 2 Other... Push Buttontext_image
Screenshot of a software interface with labeled controls and a central display area showing audio or audio data.text_image
Folder onkyo music iTunes Media Best Mixonkyo music
text_image
Select Free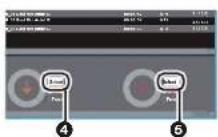
text_image
8 9 Title A Title Best Mix Best Mix Best Mix Best Mixtext_image
Select Free 10text_image
Folder onkyo music iTunes Media Best Mix Playlists X-DAP Link iTunes Mediatext_image
Folder onkyo music iTunes Media Best Mixtext_image
Select storage device *Standard device does not agree to deliver SIM options and select the transfers/MPV and retry CPU (1): 200-300 Internet (U): 1.6 GB USB (1): 2.4 GB USB (1): 5.0 GB USB (1): 7.0 GB USB (1): 9.0 GB USB (1): 12.0 GB USB (1): 15.0 GB USB (1): 18.0 GB USB (1): 22.0 GB USB (1): 25.0 GB □ Stay contacts from start point to PC □ Setup (Hybrid) started on device □ Setup (File/Groups, Files) from device not to OK Cancel6
text_image
Diagram showing two-step installation of a device with a lock and cable, followed by a laptop screen setup.
natural_image
Illustration of a person using a laptop with a small icon on the screen (no text or symbols)text_image
Library Online Line Out Speed Security
text_image
Library Folders Playlists Artists Album Artists Albums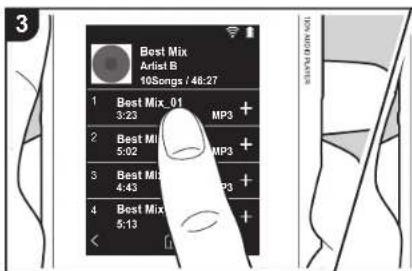
text_image
Best Mix Artist B 10Songs / 46:27 1 Best Mix_01 3:23 MP3 + 2 Best MI 5:02 MP3 + 3 Best MI 4:43 MP3 + 4 Best Mix 5:13 + + < | |
text_image
Best Mix_01 Artist B Best Mix MP3 44.1 kHz/PCM 44.1 kHz 16bit 0:03 3:23text_image
Best Mix_01 ArtistB Best Mix Volume 35text_image
Library Online Line Out Balanced
text_image
2 Online +tunein +MODEEZEER +TIDALnatural_image
Illustration showing two-step hand tool application on a device, with arrows indicating tool direction (no text or symbols present)
text_image
2 Library Online Line Out Balanced SELF-OPEN YOURtext_image
1 OTG Cable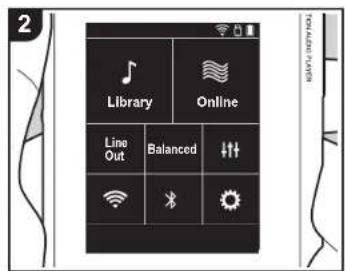
text_image
2 Library Online Line Out Balanced Wi-Fi Sun Sensorytext_image
1 Library Online Line Out Balanced 2 Settings Wi-Fi > Bluetooth > Brightness > Balanced Output Select > Line Out Mode >text_image
1 Library Online Line Out Balanced ↓↑↑ 2 Audio Adjust Custom Sound Equalizer Flat Bass Enhancer Off Upsampling Mode Off Hi-bit 32text_image
1 Library Online Line Out Balanced 2 Select a Short cut button Repeat Shuffle Settings Wi-Fi Bluetooth 3text_image
Update Now via Network via SD Cardtext_image
Update Now via Network via SD CardTHD+N (total harmonisk distorsion+brus)
2-1/2" × 3-7/8" × 5/8" (bredd/höjd/djup)
The Bluetooth® word mark and logos are registered trademarks owned by Bluetooth SIG, Inc.

Qualcomm aptX HD
Windows ^® 7. Windows ^® Media, and the Windows ^® logo are trademarks or registered trademarks of Microsoft Corporation in the United States and/or other countries.

The Wi-Fi CERTIFIED Logo is a certification mark of Wi-Fi Alliance®.
iTunes is a trademark of Apple Inc., registered in the U.S. and other countries.
DSD and the Direct Stream Digital logo are trademarks of Sony Corporation.
"All other trademarks are the property of their respective owners."
Anteros Building, Odyssey Business Park, West End Road, South Ruislip, Middlesex, HA4 6QQ United Kingdom
Tel: +44(0)208 836 3612
6, Avenue de Marais F - 95816 Argenteuil Cedex FRANCE Tel: +33(0)969 368 050
© 2018 Onkyo & Pioneer Corporation. All rights reserved.
Onkyo group has established its Privacy Policy, available at [http://pioneer-audiovisual.com/privacy/] "Pioneer" is a trademark of Pioneer Corporation, and is used under license.
SN 29403320B
Pioneer

text_image
High-resolution audio player Library Online Line Out Balanced Wi-Fi X Sun/ Solomon Audio PlayerJa En Fr Es It De Sv Ru Ct Cs
XDP-02U
natural_image
Line drawing of a rectangular electronic device with a blank screen (no text or symbols)text_image
Diagram illustrating a battery charging operation with labeled components and directional arrows indicating charging direction.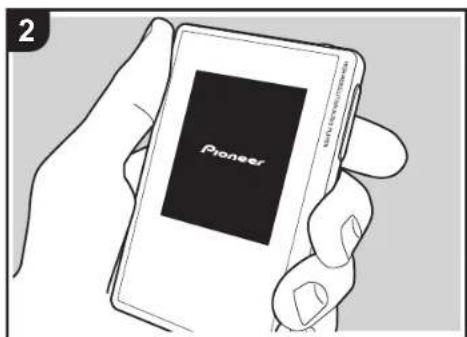
text_image
2 Pioneer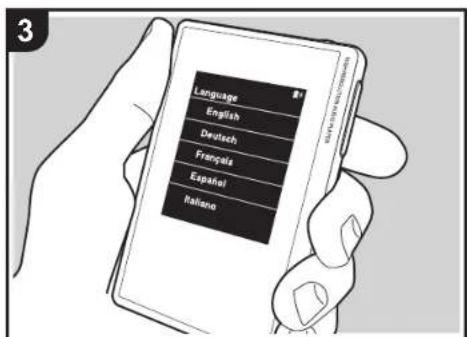
text_image
Language English Deutsch Français Español Italianotext_image
Would you like to start initial setup? 1st Step : Passcode 2nd Step : Wi-Fi No Yestext_image
1st Step : Passcode Do you wish to use passcode lock? No Yestext_image
2nd Step : Wi-Fi Do you wish to setup Wi-Fi? No Yes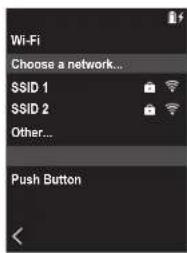
text_image
Wi-Fi Choose a network... SSID 1 SSID 2 Other... Push Buttontext_image
Diagram showing a hand using a tool to adjust a device with an arrow indicating the process, alongside a laptop screen.
text_image
3 DAP DAPtext_image
Screenshot of a software interface with labeled panels and circular indicators, likely from an older software application.text_image
Folder onkyo music iTunes Media Best Mixonkyo music
text_image
Select Free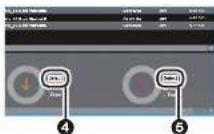
text_image
8 9 Title A Title Best Mu Best Mu Best Mu Best Mutext_image
Select End Free: 10text_image
Folder onkyo music iTunes Media Best Mix Playlists X-DAP Link iTunes Mediatext_image
Folder onkyo music iTunes Media Best Mixtext_image
Select storage devices * And stored device does not appear, go to drivers SSD options and select. File transfer(RP) and copy. Network (S1) Internal (S2) 10.4 GB 62.5 GB USB (S3) External (S4) 1.2 GB 7.28 GB USB (S5) External (S6) 1.18 GB 7.99 GB □ Copy directories from a single mode to PC □ Backup Files created on device □ Delete Web Storage, WebHost from device not to OK Cancel5
text_image
Select storage device * All network devices are designed to approve, go to Android USB options and select "the transferred Internet" and other OK Canceltext_image
Diagram showing two-step battery application process: one with hand holding device, another with laptop screen and plug inserted.
natural_image
Illustration of a person using a laptop with a cursor hovering nearby (no text or symbols visible)text_image
Best Mix_01 Artist1B Best Mix Volume 35text_image
Best Mix_01 I I I I I I I I I I I I I I I I I I I I I I I I I I I I I I I I I I I I I I I I I I I I I I I I I I 1 2 3 4 5 6 7 8text_image
Library Online Line Out Balanced
text_image
2 Online +tunein MDEEZER +TIDALnatural_image
Illustration showing two-step hand tool application on a device, with arrows indicating tool direction (no text or symbols present)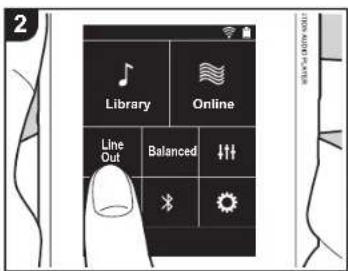
text_image
2 Library Online Line Out Balanced Securitytext_image
1 OTG Cable
text_image
2 Library Online Line Out Balanced Wi-Fi Sunsettext_image
1 Library Online Line Out Balanced 2 Settings Wi-Fi > Bluetooth > Brightness > Balanced Output Select > Line Out Modetext_image
1 Library Online Line Out Balanced ↓↑↑ Audio Adjust Custom Sound Equalizer Flat Bass Enhancer Off Upsampling Mode Off Hi-bit 32text_image
1 Library Online Line Out Balanced 2 Select a Short cut button Repeat Shuffle Settings Wi-Fi Bluetoothtext_image
Update Now via Network via SD Cardtext_image
Update Now via Network via SD CardThe Bluetooth® word mark and logos are registered trademarks owned by Bluetooth SIG, Inc.

Qualcomm aptX HD
Windows® 7. Windows® Media, and the Windows® logo are trademarks or registered trademarks of Microsoft Corporation in the United States and/or other countries.

CERTIFIED
The Wi-Fi CERTIFIED Logo is a certification mark of Wi-Fi Alliance®.
iTunes is a trademark of Apple Inc., registered in the U.S. and other countries.
DSD and the Direct Stream Digital logo are trademarks of Sony Corporation.
"All other trademarks are the property of their respective owners."
Anteros Building, Odyssey Business Park, West End Road, South Ruislip, Middlesex, HA4 6QQ United Kingdom
Tel: +44(0)208 836 3612
6, Avenue de Marais F - 95816 Argenteuil Cedex FRANCE Tel: +33(0)969 368 050
© 2018 Onkyo & Pioneer Corporation. All rights reserved.
Onkyo group has established its Privacy Policy, available at [http://pioneer-audiovisual.com/privacy/] "Pioneer" is a trademark of Pioneer Corporation, and is used under license.
SN 29403320B
Pioneer
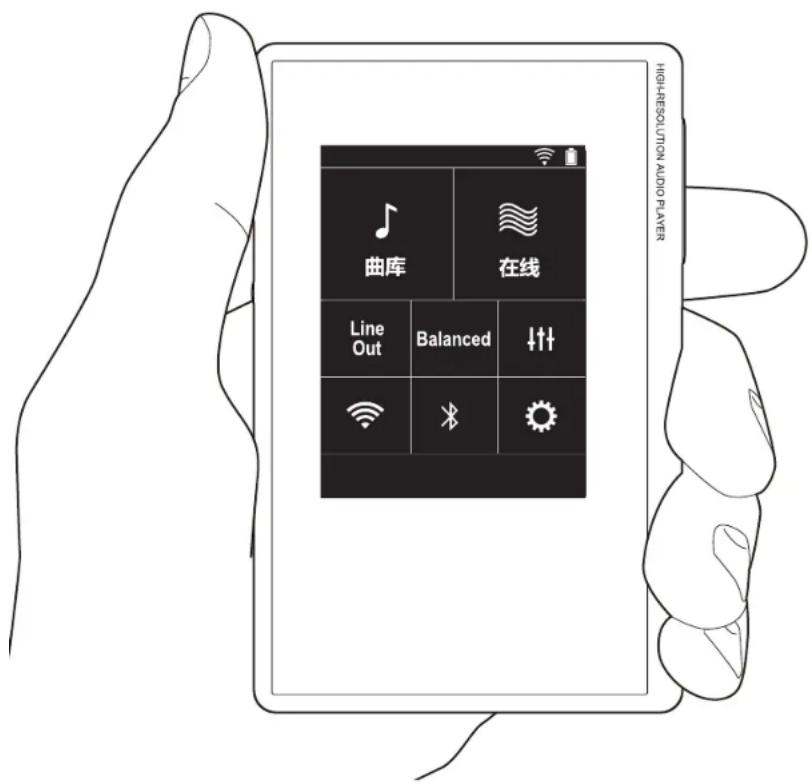
natural_image
Line drawing of a rectangular electronic device with a screen and base (no text or symbols)2

3

text_image
Diagram illustrating a battery charging operation with labeled components and directional arrows indicating charging direction.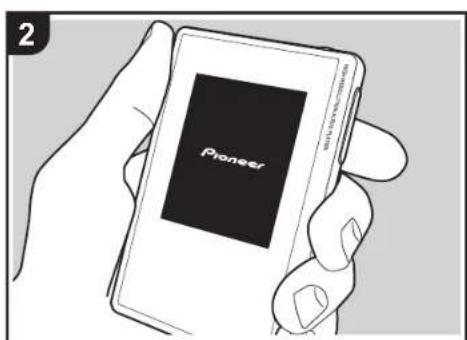
text_image
2 Pioneer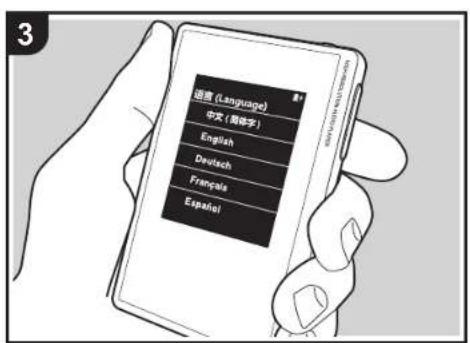
text_image
语言 (Language) 中文 (简体字) English Deutsch Français Español初始設定將自動開始
text_image
Screenshot of a software interface with labeled controls and a central display area從電腦複製音樂
text_image
Folder onkyo music iTunes Media Best Mixonkyo 音樂
text_image
Select Free
text_image
Select Free: 10text_image
Folder onkyo music iTunes Media Best Mix Playlists X-DAP Link iTunes Mediatext_image
Folder onkyo music iTunes Media Best Mix啟動之前
零件名稱
初始設置
播放

進階設定 | 補充資訊 | 其他
text_image
Storage Select Select Storage Device For existing device, this version gets contents: 100% options and select. The transfer(RTR) and reply. Date: 1/27/2008 Time: 12:43:00 Date: 1/27/2008 Removable file (1): 2.36 GB Removable file (2): 2.36 GB Date: 1/27/2008 OK Canceltext_image
Select storage device Device lists device specified as: go to Devices SIM options and set As: The transferred/INTC and RFs OP51 / VSP-001 Internal (A): 12.4 GB Internal (B): 12.4 GB OP51 / VSP-001 Remote drive (S, L) 7.36 GB Remote drive (D, P) 7.36 GB OP51 / VSP-001 Remote drive (P, S) 7.36 GB OK Canceltext_image
Diagram showing two-step installation of a device with a USB tag and a laptop on the right, indicating process steps.
natural_image
Illustration of a person using a laptop with a mouse cursor icon (no text or symbols)text_image
Best Mix_01 Artist9 Best Mix Volume 35啟動之前
零件名稱
初始設置
播放

進階設定 | 補充資訊 | 其他
■ 播放畫面
畫面 A
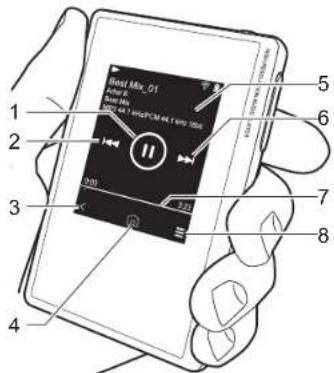
text_image
Best Mix_01 1 2 3 4 5 6 7 8"Login" - "I have a TuneIn account"
然後輸入您的使用者名稱和密碼。
natural_image
Illustration showing two-step hand tool application on a device, with arrows indicating tool movement (no text or symbols present)
text_image
2 曲库 在线 Line Out Balanced + ★ ★ 2014-03-26 0:57:38FLAC/ALAC/WAV/AIFF/MP3/AAC/MQA (44.1 kHz/48
DSD/DSF/DSDIFF *DSD Native (2.8 MHz/5.6 MHz (1 位元))
最大有效输出功率 (JEITA)
Windows ^® 7, Windows ^® Media, and the Windows ^® logo are trademarks or registered trademarks of Microsoft Corporation in the United States and/or other countries.

CERTIFIED
The Wi-Fi CERTIFIED Logo is a certification mark of Wi-Fi Alliance ^® .
iTunes is a trademark of Apple Inc., registered in the U.S. and other countries.
DSD and the Direct Stream Digital logo are trademarks of Sony Corporation.
"All other trademarks are the property of their respective owners."
Anteros Building, Odyssey Business Park, West End Road, South Ruislip, Middlesex, HA4 6QQ United Kingdom
Tel: +44(0)208 836 3612
6, Avenue de Marais F - 95816 Argenteuil Cedex FRANCE Tel: +33(0)969 368 050
© 2018 Onkyo & Pioneer Corporation. All rights reserved.
Onkyo group has established its Privacy Policy, available at [http://pioneer-audiovisual.com/privacy/]. "Pioneer" is a trademark of Pioneer Corporation, and is used under license.
SN 29403320B
Pioneer

natural_image
Line drawing of a tablet device with a blank screen (no text or symbols)2
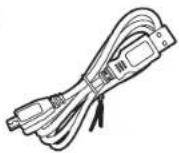
3

text_image
Diagram illustrating battery charging process with labeled components and directional arrows
text_image
2 Pioneer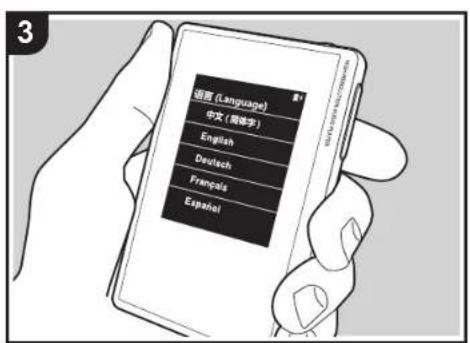
text_image
语言 (Language) 中文 (简体字) English Deutsch Français Español初始设置自动启动
text_image
Screenshot of a software interface with labeled controls and a central display area showing three circular buttons.从计算机复制音乐
text_image
Folder onkyo music iTunes Media Best Mixonkyo 音乐
text_image
Select Free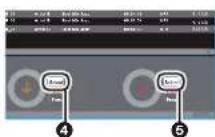
text_image
8 9 Title A Title Best Mix Best Mix Best Mix Best Mixtext_image
Select Free 10text_image
Folder onkyo music iTunes Media Best Mix Playlists X-DAP Link iTunes Mediatext_image
Folder onkyo music iTunes Media Best Mixtext_image
Select Storage Device If not selected devices,请勿使用 Windows NTFS or any other OSOS. Select: The transferred NTFS and other OSOS. Internal (3.1) External (2.4) Internal (3.1) External (2.4) Internal (3.1) External (2.4) Internal (3.1) External (2.4) Internal (3.1) External (2.4) Internal (3.1) External (2.4) Internal (3.1) External (2.4) Internal (3.1) External (2.4) Internal (3.1) External (2.4) Internal (3, 1) External (2, 1) Internal (3, 1) External (2, 1) Internal (3, 1) External (2, 1) Internal (3, 1) External (2, 1) Internal (3, 1) External (2, 1) Internal (3, 1) External (2, 1) Internal (3, 1) External (2, 1) Internal (3, 1) External (2, 1) External (3, 1) Internal (3, 1) External (2, 1) Internal (3, 1) External (2, 1) Internal (3, 1) External (2, 1) Internal (3, 1) External (2, 1) Internal (3, 1) External (2, 1) Internal (3, 1) External (2, 1) Internal (3, 1) External (2,1) Internal (3, 1) External (2, 1) Internal (3, 1) External (2, 1) Internal (3, 1) External (2, 1) Internal (3, 1) External (2, 1) Internal (3, 1) External (2, 1) Internal (3, 1) External (2, 1) Internal (3, 1) External (2, 1)text_image
Select storage device * All created devices not approved, go to devices without options and listed: The transfers/HPD and Help. 10.1.1 / 500 KB 20.1.1 / 500 KB 30.1.1 / 500 KB 40.1.1 / 500 KB Reversible data (L): 2.26 KB Reversible data (M): 7.29 KB By complete from existing device: - Top Portfolio created on device - FreeChange, Portfolio Data OK Canceltext_image
Select storage device To provide a device or app, go to Windows 3.08 options and select: Title transfer/NTC and https OP-12 / OP-200 Internal (L): 12.4 GB Internal (R): 12.4 GB OP-12 / OP-200 Remote (R) - 1.25 GB Remote (R) - 1.25 GB OP-12 / OP-200 Remote (R) - 1.25 GB OK Canceltext_image
Diagram illustrating a device being inserted into a laptop, showing the process from pinning to readout.
natural_image
Illustration of a person using a laptop with a cursor icon on the screen (no text or symbols)text_image
Best Mix_01 Artist9 Best Mix Volume 35natural_image
Illustration showing two-step hand tool application on a device, with arrows indicating tool direction (no text or symbols present)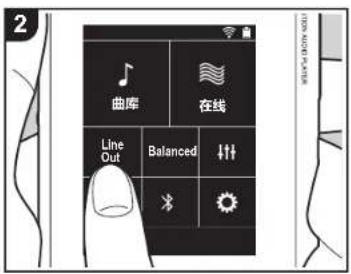
FLAC/ALAC/WAV/AIFF/MP3/AAC/MQA (44.1 kHz/48 kHz/88.2 kHz/96 kHz/176.4 kHz/192 kHz (16 位/24 位/32 位)) DSD/DSF/DSDIFF *DSD Native (2.8 MHz/5.6 MHz (1 位))
最大有效输出功率 (JEITA)
75 mW + 75 mW (不平衡, 32 Ω, 1 kHz, 10% THD) 150 mW + 150 mW (平衡, 32 Ω, 1 kHz, 10% THD)
THD+N(总谐波失真率+噪声)
0.006%或更低
信噪比
115 dB 或更高
频段
20 Hz - 80,000 Hz
接口和输入 / 输出插孔
Windows® 7, Windows® Media, and the Windows® logo are trademarks or registered trademarks of Microsoft Corporation in the United States and/or other countries.
WiFi
CERTIFIED
The Wi-Fi CERTIFIED Logo is a certification mark of Wi-Fi Alliance ^® .
iTunes is a trademark of Apple Inc., registered in the U.S. and other countries.
DSD and the Direct Stream Digital logo are trademarks of Sony Corporation.
"All other trademarks are the property of their respective owners."
Anteros Building, Odyssey Business Park, West End Road, South Ruislip, Middlesex, HA4 6QQ United Kingdom
Tel: +44(0)208 836 3612
6, Avenue de Marais F - 95816 Argenteuil Cedex FRANCE Tel: +33(0)969 368 050
Onkyo group has established its Privacy Policy, available at [http://pioneer-audiovisual.com/privacy/] "Pioneer" is a trademark of Pioneer Corporation, and is used under license.
SN 29403320B