
10032436 - Fan Klarstein - Free user manual and instructions
Find the device manual for free 10032436 Klarstein in PDF.

| Product type | Tower fan |
| Brand | Klarstein |
| Model | 10032436 |
| Power supply | 220-240 V ~ 50-60 Hz |
| Power | 40 W |
| Noise level | ≤ 50 dB(A) |
| Ventilation modes | Normal, Natural, Sleep |
| Number of speeds | 3 (low, medium, high) |
| Timer | 1 to 12 hours (auto shut-off) |
| Oscillation function | Yes (on/off) |
| Remote control | Yes (lithium battery included, range 5 m) |
| Protection | Thermal fuse (auto shut-off in case of overheating) |
| Safety | Front safety grille, do not insert objects |
| Assembly | Requires base assembly (two pieces) and cable fixing |
| Cleaning | Dry cloth, do not use water on electrical parts |
| Maintenance | Annual inspection recommended by a professional |
| Repairability | Call an approved service for any replacement (cable, etc.) |
| Recycling | Do not dispose of with household waste (WEEE compliant) |
| Batteries | Must be recycled separately (Directive 2006/66/EC) |
| Compliance | CE, RoHS, ErP |
Frequently Asked Questions - 10032436 Klarstein
User questions about 10032436 Klarstein
0 question about this device. Answer the ones you know or ask your own.
Ask a new question about this device
Download the instructions for your Fan in PDF format for free! Find your manual 10032436 - Klarstein and take your electronic device back in hand. On this page are published all the documents necessary for the use of your device. 10032436 by Klarstein.
USER MANUAL 10032436 Klarstein
Congratulations on purchasing this equipment. Please read this manual carefully and take care of the following hints to avoid damages. Any failure caused by ignoring the mentioned items and cautions mentioned in the instruction manual are not covered by our warranty and any liability.
CONTENT
Technical Data 11
Declaration of Conformity 11
Safety Instructions 12
Product Description 13
Assembly 14
Use and Operation 15
Usage of the Remote Control 17
Care and Cleaning 18
Hints on Disposal 18
TECHNICAL DATA
DECLARATION OF CONFORMITY

Producer:
Chal-Tec GmbH, Wallstraße 16, 10179 Berlin, Germany.
This product is conform to the following European Directives:
2014/30/EU (EMC)
2014/35/EU (LVD)
2011/65/EU (RoHS)
206/2012/EU (ErP)
SAFETY INSTRUCTIONS
- This appliance can be used by children aged from 8 years and above and persons with reduced physical, sensory or mental capabilities or lack of experience and knowledge if they have been given supervision or instruction concerning use of the appliance in a safe way and understand the hazards involved. Children shall not play with the appliance. Cleaning and user maintenance shall not be made by children without supervision.
- If the supply cord is damaged, it must be replaced by the manufacturer, its service agent or similarly qualified persons in order to avoid a hazard.
- Before use, check that the voltage used is the same as the one identified on the unit.
- When the fan is not assembled, do not turn on the power, and turn off the power when moving the fan.
- Do not use wet hands to remove the power plug, to avoid the risk of electrification or electric shock.
- Do not insert your fingers or sharp objects into the guard when the fan is running.
- Use the fan away from high temperature, high humidity, acid and alkali oil, insecticide, curtains and other articles that are easy to be sucked in.
- Babies and the elderly should not be directly under high wind for a long time.
- Do not place the fan on uneven floor to prevent the fan from overturning.
- Before use, it is necessary to first check any damage with the power cord and the plug. If the power cord is damaged, in order to avoid danger, it must be replaced by professional workers from the manufacturer's maintenance department or similar department.
- When leaving the machine or when the machine is not used for a long time, turn off the power and remove the power plug, so as to avoid the circuit failure.
- Do not place it in a place where curtains, etc. may be sucked in or covered.
- Do not cover any items when used.
- The fan is not intended for extended use by persons (including children) with reduced physical capabilities.
- During the transport, assembly and storage, observe not to collide and squeeze the fan, especially the blade must be properly kept, resulting in no deformation, so as not to affect the performance of the fan.
- In case of any abnormal noise, smell, smoke and other phenomena during the use, lose no time to shut off the power and send to our after-sales service department for maintenance.
- Do not blow against the stove or gas.
- Before removing the protective housing, make sure that the fan is disconnected from the power supply.
Fan overheating protection
There is a thermal fuse installed in the fan motor, when the motor is overheated due to a variety of accidents, and the motor temperature reaches the level to activate the thermal fuse, the fuse will be blown out to cut off the power.
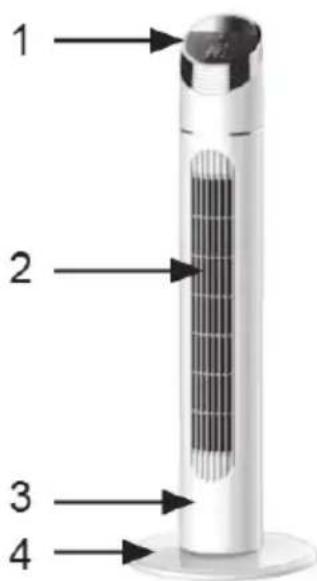
PRODUCT DESCRIPTION
1 Control Panel
2 Air outlet
3 Fan body
4 Base
ASSEMBLY
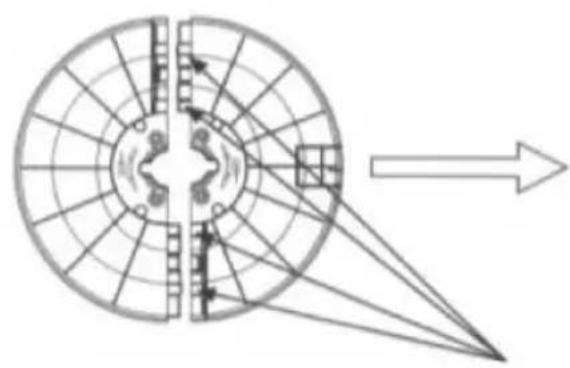
- Remove the two parts of the base from the box, so that the holes of the two-part base are aligned and the two parts are formed into a complete base. (As shown in Fig. 1)
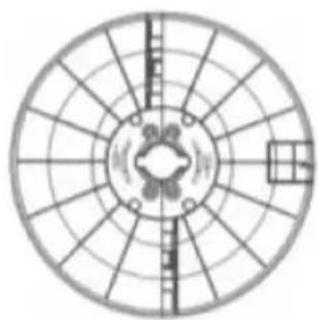
- Run the power cord through the base, align the base with the holes on the fan body, then secure the power cord under the base clip to tighten the base with the fan body. (As shown in Fig. 2)
- When the base is disassembled, screw out the screws first, then take the base out. (The method to disassemble the base is as shown in Fig. 3)
1
After the four posts are aligned and wrapped, firmly snap the base front inward (a sound can be heard), then use the same method to snap the base back.
| 2 | 3 |
| Fan body Basie Power cord Fixing screw | |
| After the base is put on the fan body, follow the schematic to secure the power cord under the base clip, then tighten the screws. | Hold the clip and forcibly pull the base out, after the clip comes out, use the same method to remove another clip. |
USE AND OPERATION
Operate using a remote control (each button on the remote control is the same as that of an actual fan):
On/Off
- When this button is pushed, the fan will start at a low speed.
- By pressing this button again, the fan will stop working.
Timing Selection
When the fan is under working, if this button is pushed, it will enter timing status and the setting at this time is 1 hour. The timing can be selected from 1h to 12h.
When the timer is set to 12h, if this button is pushed, the timing selection will be canceled. The timing hours change as per the way shown below:
1 hour >2 hour >3 hour >4 hour >5 hour >6 hour >... > 12 hour > Timer canceled.
Selection of Wind
This button is to select the wind mode. When this button is repeatedly pushed, the wind mode will change from normal wind, natural wind, sleep wind and normal wind in turns; the three different wind modes have following features:
1 Normal wind: the normal wind mode is simply the Low, Medium & High fan speed speeds.
2 Natural wind: the natural wind mode automatically selects wind speed randomly as you would find outdoors. The natural wind also has low, medium and high speeds.
3 Sleeping wind: the sleeping wind allows you to set a speed at low, medium and high. The wind speed of these three sleeping wind modes changes as below:
- High sleeping wind: the air flows with high speed for half an hour, then drops to medium speed for half an hour, and finally drops to low speed.
- Medium sleeping wind: the air flow begins with medium speed for half an hour and finally drops to low speed.
- Low sleeping wind: the air flows at a low natural wind speed, till the preset time is reached or the fan is turned off.
Wind speed
When this button is pushed, three different wind speeds of low, medium and high can be set.
Oscillation
When this button is pushed, the fan starts to oscillate the wind, by pressing this button again, the fan stops oscillate the wind.
Notes on Use
- The above operation can also be carried out on the control panel of the fan body, with the method same as the one described above.
- Only when "ON/OFF" is pushed, the fan can send wind.
USAGE OF THE REMOTE CONTROL
- When the remote control is used, make sure that the head of the front of the remote control is aligned with the receiving window on the fan body.
- The remote control can be about 5m from the front of the fan body; it can be normally operated if the deviation is within 30 degrees.
- Avoid direct sunlight on the receiving window, so as not to affect the effect of the receiver.
- If the remote control is not used for a long time, remove the battery and handle it properly.
When using the remote control, install the battery. The remote control operates on one lithium battery, with the insertion method as shown below:
- Open the battery cover.
- Insert a new battery, pay attention to the polarity of the battery (+ and -).
- Close the battery cover.
CARE AND CLEANING
- Before cleaning this product, make sure that the power is turned off first.
- Do not use water or other liquid to clean the electrical components (such as switching power supply, motor, etc.) and the electrical components can be wiped clean with a clean cloth.
- Do not use any grinding tools and solvents that can damage the surface to clean the product. You can wash the product with detergent and wipe dry with a clean cloth.
- Do not take the product apart for modification. It is recommended to inspect and clean the product annually as to extend its service life.
HINTS ON DISPOSAL
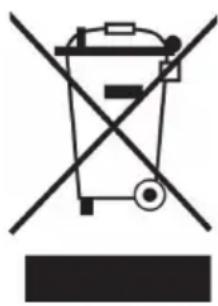
According to the European waste regulation 2012/19/EU this symbol on the product or on its packaging indicates that this product may not be treated as household waste. Instead it should be taken to the appropriate collection point for the recycling of electrical and electronic equipment. By ensuring this product is disposed of correctly, you will help prevent potential negative consequences for the environment and human health, which could otherwise be caused by inappropriate waste handling of this product. For more detailed information about recycling of this product, please contact your local council or your household waste disposal service.
Your product contains batteries covered by the European Directive. 2006/66/EC, which cannot be disposed of with normal household waste. Please check local rules on separate collection of batteries. The correct disposal of batteries helps prevent potentially negative consequences on the environment and human health.
Estimado cliente:


- CONTENT
- TECHNICAL DATA
- DECLARATION OF CONFORMITY
- SAFETY INSTRUCTIONS
- Fan overheating protection
- PRODUCT DESCRIPTION
- ASSEMBLY
- USE AND OPERATION
- On/Off
- Timing Selection
- Selection of Wind
- Wind speed
- Oscillation
- Notes on Use
- USAGE OF THE REMOTE CONTROL
- CARE AND CLEANING
- HINTS ON DISPOSAL
- Estimado cliente:
Brand : Klarstein
Model : 10032436
Category : Fan