USER MANUAL 10030512 Klarstein
Congratulations on purchasing this equipment. Please read this manual carefully and take care of the following hints to avoid damages. Any failure caused by ignoring the mentioned items and cautions mentioned in the instruction manual are not covered by our warranty and any liability.
Contents
Technical Data 8
Safety Instructions 8
Product Description 9
Control Panel and Operation 9
Cleaning and Care 11
Troubleshooting 13
Hints on Disposal 13
Declaration of Conformity 13
Technical Data
| Item number 10030512, 10030513 | |
| Power supply 220-240 V ~ 50-60 Hz | |
| Power consumption 40 W | |
Safety Instructions
- Pull out the plug when not using the machine for a long time.
- Please take off the packing polybag of filter before using the machine.
- Do not use the air purifier in kitchen.
- Do not put sundries in airflow inlet and airflow outlet.
- Do not look directly to the UV light.
- Place the machine in above 1.5 meters distance from electrical appliance, such as television and computer.
- Do not place the machine beside curtain.
- Do not place the machine to where the children can touch.
- The machine can be only used in the indoor dry place, do not use it under the moist environment, like the bathroom or outdoors.
- Unplug the plug when clean or change the filter.
- Do not pour water on the machine, nor soak the machine in water.
- When using the machine with gas appliance, please allow the indoor air to circulate. Because this machine have no function of eliminating the carbon monoxide.
- Do not place the machine in a heating objects, such as stoves, heaters etc.
If the machine is broken, it must be repaired by the manufacturer or its service provider or similarly qualified persons.
- The machine must be regularly checked, regularly clear the grime and replace the filter elements, so that the purifying effect won't be affected.
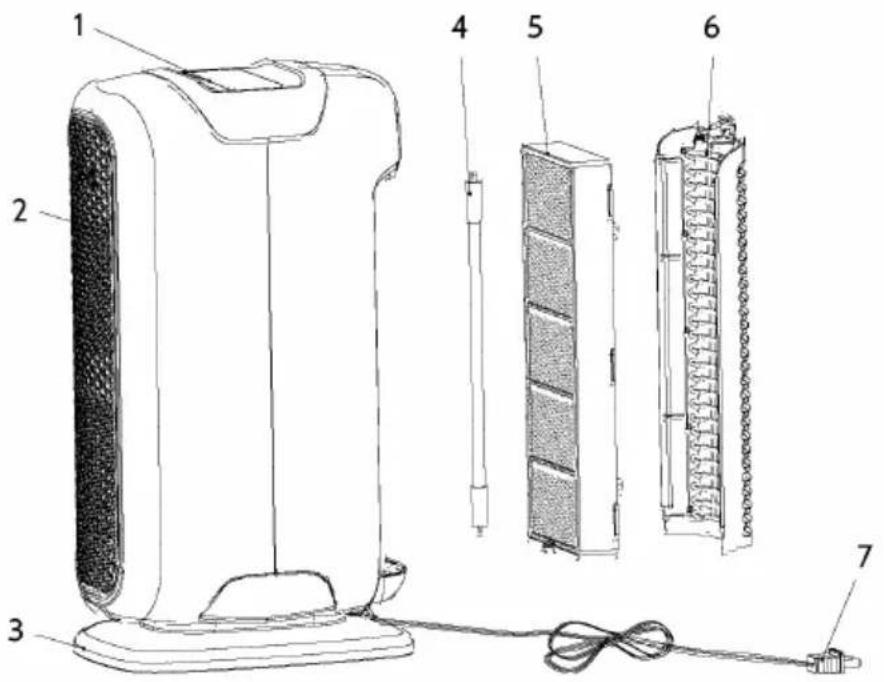
Product Description
1 Control panel
2 Air outlet grid
3 Base
4 UVlight
5 HEPA filter
Active carbon filter Photocatalyst
6 Air inlet grid
7 Plug
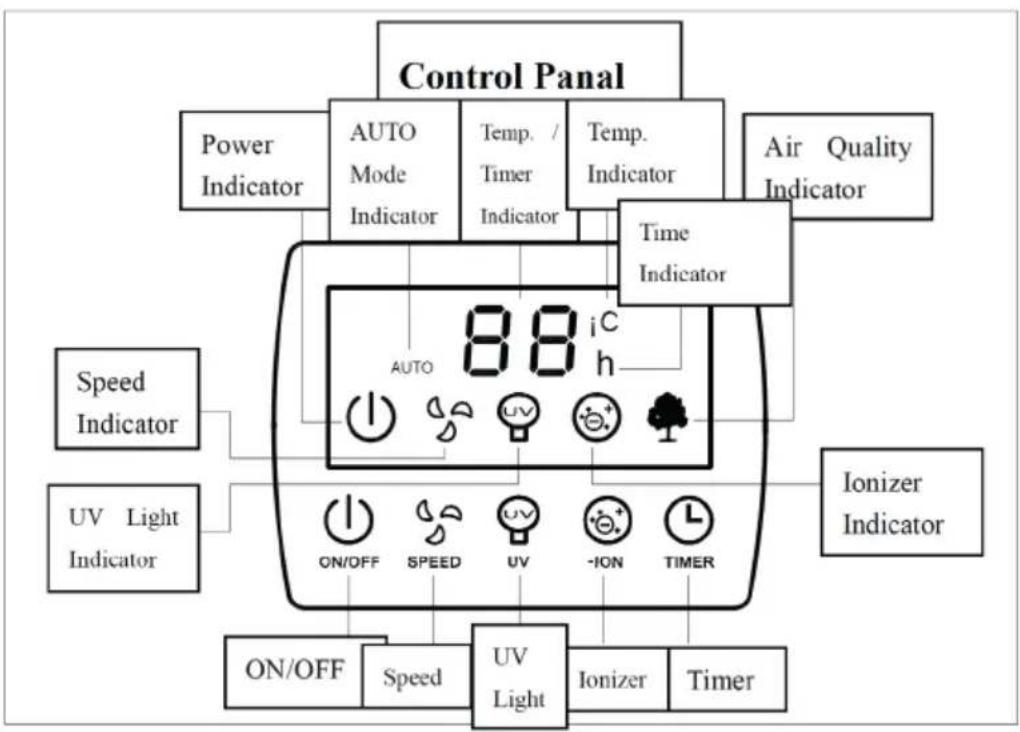
Control Panel and Operation
Use and Operation
- Get the air purifier out of the giftbox, and take away the polybag wrapped on the machine.
- Get down the air inlet grid, and fetch the filters. If there is a polybag on the filter, you should take it off.
- When the filters are assembled well in the machine, and the machine is put on a flat place, then plug into the indoor electricity supply.
- Connected with the power supply, the machine will make a buzz noise.
- Power on, the machine will make a buzz noise, at the same time, the Power Indicator flash 3 times (after 3 times flash, the light off).
- On/off button: After pressing this button, the power indication light will be on, and the machine will be turned on. While the machine is on, press the on/off button again, the machine will stop working, all the indication light will be off.
NOTE:
The machine has memory function, every time the machine is turned on, it will work according to the last state before turned off. To delete the memory working function: to press "timer" & "ionizer" at the same time for 3 seconds. After 3 seconds, all lights turned off except the power indicator, and the power indicator will flashing which means the memory working function is delete. Then the machine turn to be the default mode.
Default Mode
The power indicator on and the MED speed indicator on. At the same time, the fan working under med-range, and other functions such as the timer, the UV light, the lonizer and the AUTO mode stop working.
Fan Speed Choice
- When the machine is on, press the button on the panel "SPEED", the machine will change the fan speed from "MED"-“HIGH"-“AUTO"-“LOW"-“MED" circulated, the indication light will be on correspondently.
- If one speed indicator is lighting, it means LOW range; if two speed indicators are lighting, it means MED range; if all the speed indicators are lighting, it means HIGH range.
UV Light Sterilization Function Choice
When the machine is on, press the UV button, the UV button can be chose alternatively, and the indication light will be on and off accordingly.
The Ionizer Refreshing Air Choice
When the machine is on, press the lonizer button, the lonizer button can be chose alternatively, and the indication light will be on and off accordingly.
Timer Function
- When the machine is on, press the Timer button, the machine will be accumulated in units of 1 hour, and the indication light will show the status accordingly.
- The timer can be set from 1-24 hours, O means without setting timer.
- If the Temperature indicator on, the Temp./Timer indicator will show the temperature currently, press the Timer button, the temperature indicator off, at the same time, the Timer indicator on, and the Temp./Timer indicator will show the remaining time of the timer. Press the timer button one more time, then can enter the Timer setting mode.
- After setting the timer mode, the Temp./Timer indicator will show the setting time about 10 seconds. Then the Temp./Timer indicator and the Timer indicator will flash 5 times, and back to the temperature display, at the same time, the Timer indicator off, and the Temperature indicator on.
AUTO Mode Function
- Press the SPEED button choosing circularly, the machine can enter AUTO mode, and the AUTO indicator on.
- The AUTO mode is working automatically according to the air quality.
- When the AUTO mode is on, the Air Quality indicator is on, and shows the air quality good or bad; if the light is green, it means the air quality is good; if the light is yellow, it means the air quality is not so good; if the light is red, it means the air quality is bad.
- When the AUTO mode is on, it needs about 1 minute to detect the air quality. After 1 minute, the Air Quality indicator can show the correct current air quality.
- When the air quality is good, the fan works under LOW-range; when the air quality is medium, the fan works under MED-range; when the air quality is bad, the fan works under HIGH-range.
Display Light
When the machine is on, after 10 seconds without pressing any buttons, the display turns dark.
Cleaning and Care
- Cut off the power source before the following operation.
- Multi-layer filters must be replaced regularly. And it's better to replace it 3-6 months.
- If the filter is cleanable, you can use a vacuum cleaner to clean the inlet surface to make it clean. But after 2 and 3 times cleaning, the filter should change a new one in case of affecting the effect.
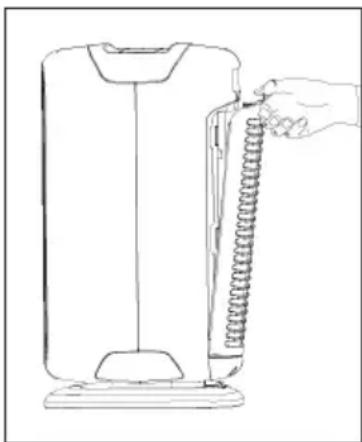
Get Down the Air Inlet Grid
Put the machine flat, use the thumb to press the air inlet grid buckle gently, and wave out gently. Then the air inlet grid will come out as picture shows.
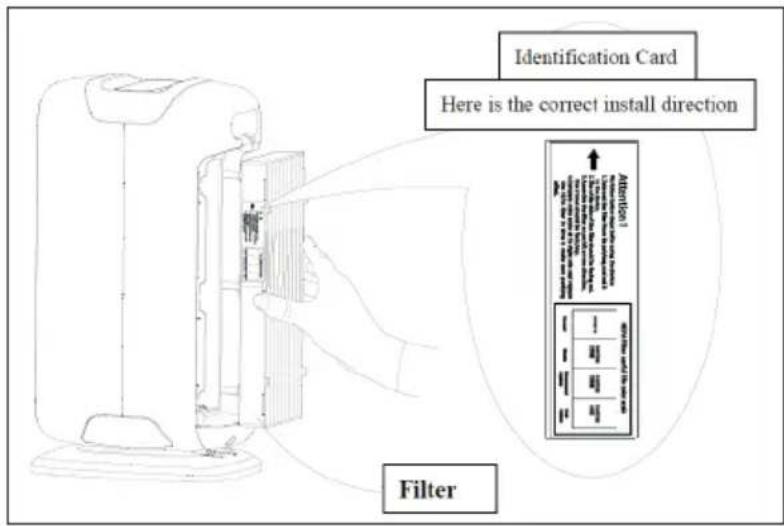
Change Filters
The new filter must remove the polybag first.
Get the filter out of the machine
- Remove the polybag, write down the first date on the blank place in the label which can indicate when the filter was started to use on the machine.
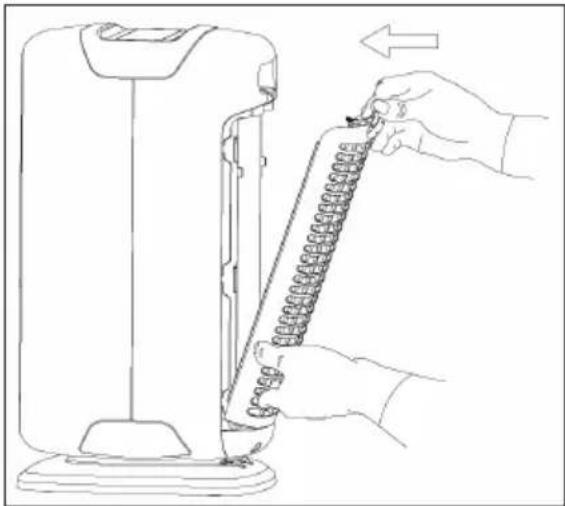
Assemble the Air Inlet Grid
- With the left hand holding the bottom of the air inlet grid, and use the thumb of right hand holding the noose of the air inlet grid.
- Push the bottom buckle of the air inlet into the oblique groove. With left hand pressing the buckle and pushing the grid into the machine, until the grid is well settled.
- The used filter should be abandoned with polybag wrapped, in case of polluting the environment.
Cleaning Method
- Ensure pulling out the plug before cleaning.
- Do not clean the appliance body by corrosive chemical reagent, such as petrol, thinner and alcohol. Wring up wet cloth and then to clean the appliance body.
- The front panel can be removed and cleaned by water.
HEPA filter CAN NOT be washed by water. It can be cleaned by vacuum cleaner or replace a new filter.
Troubleshooting
| Problem Possible Cause Solution | | |
| Can't operate. Whether the plug is | ready. Insert the plug again. | |
| Inefficiency of absorb smoke and smell. | Filters. Clean or replace the filter. | |
Except professional technical maintenance people, do not attempt to open or repair this machine. Please contact retail shop or after service center when maintaining the machine.
Hints on Disposal
m = 311 ;
According to the European waste regulation 2002/96/EG this symbol on the product or on its packaging indicates that this product may not be treated as household waste. Instead it should be taken to the appropriate collection point for the recycling of electrical and electronic equipment. By ensuring this product is disposed of correctly, you will help prevent potential negative consequences for the environment and human health, which could otherwise be caused by inappropriate waste handling of this product. For more detailed information about recycling of this product, please contact your local council or your household waste disposal service.
Producer: Chal-Tec GmbH, Wallstraße 16, 10179 Berlin, Germany.

This product is conform to the following European Directives:
2014/30/EU (EMC)
2014/35/EU (LVD)
2011/65/EU (RoHS)
Estimado cliente,
Chere cliente, cher client,