
El Paso - Fan Klarstein - Free user manual and instructions
Find the device manual for free El Paso Klarstein in PDF.

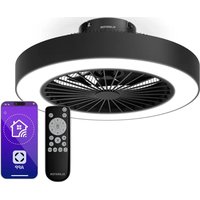
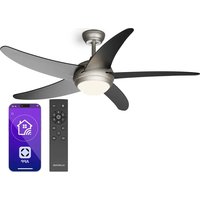
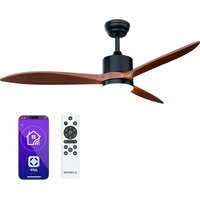
| Product type | Ceiling fan with light |
| Brand | Klarstein |
| Model | El Paso |
| Item numbers | 10033493, 10033494, 10033495 |
| Power supply | 220-240 V ~ 50/60 Hz |
| Blades | 3 blades (supplied) |
| Approximate diameter | 132 cm (52 inches) |
| Estimated weight | Approximately 7 kg |
| Minimum height from floor | 2.3 m |
| Hook load capacity | At least 100 kg |
| Speeds | 3 speeds (high, medium, low) |
| Rotation direction switch | Yes (switch on motor) |
| Remote control | Yes, with AAA batteries not supplied |
| Integrated lighting | Bulbs (not supplied) |
| Bulb type | E27 (estimation) |
| Grounding | Required |
| Circuit breaker required | All-pole, contact gap ≥ 3 mm |
| Installation | On ceiling joist, by a qualified electrician |
| Cleaning | Soft dry cloth, do not immerse |
| Recycling | Do not dispose of with household waste |
Frequently Asked Questions - El Paso Klarstein
User questions about El Paso Klarstein
0 question about this device. Answer the ones you know or ask your own.
Ask a new question about this device
Download the instructions for your Fan in PDF format for free! Find your manual El Paso - Klarstein and take your electronic device back in hand. On this page are published all the documents necessary for the use of your device. El Paso by Klarstein.
USER MANUAL El Paso Klarstein
INHALTSVERZEICHNIS
Berlin Brands Group UK Ltd
PO Box 1145
Oxford, OX1 9UW
United Kingdom
SICHERHEITSHINWEISE
Member of Berlin Brands Group
Handwerkerstr. 11
15366 Dahlwitz-Hoppegarten
Deutschland
natural_image
Symbol of a trash bin crossed with a diagonal line, no text or numbers presentCongratulations on purchasing this equipment. Please read this manual carefully and take care of the following hints to avoid damages. Any failure caused by ignoring the items and cautions mentioned in the instruction manual is not covered by our warranty and any liability. Scan the QR code to get access to the latest user manual and other information about the product.

CONTENT
Safety Instructions 10
Installation 10
Operation 12
Hints on Disposal 13
TECHNICAL DATA
| Item number 10033493, 10033494, 10033495 | |
| Power supply 220-240 V ~ 50/60 Hz | |
MANUFACTURER & IMPORTER (UK)
Manufacturer:
Chal-Tec GmbH, Wallstrasse 16, 10179 Berlin, Germany.
Importer for Great Britain:
Berlin Brands Group UK Ltd
PO Box 1145
Oxford, OX1 9UW
United Kingdom
SAFETY INSTRUCTIONS
- Never attach the fan to a power point, but to the ceiling itself.
- The minimum distance between the blades of the fan and the floor must be more than 2.3 m. The minimum carrying capacity of the hook from which the fan is hung must be 100 kg.
- Make sure to install all poles disconnection switch having a contact separation of at least 3 mm between poles in the supply wiring to the ceiling fan.
- The model or type reference of luminaries which may be installed in fans which are constructed for his purpose.
- Switch off the power before connecting.
- The electrical wiring must be in accordance with the local regulation.
- The fan must be properly earthed to avoid the risk of electric shocks.
• Never mount the fan in a moist or wet room. - Be careful when working near the rotating blades.
Note: Always have your fan installed by someone who is knowledgeable about electrical wiring.
INSTALLATION
| 123 | ||
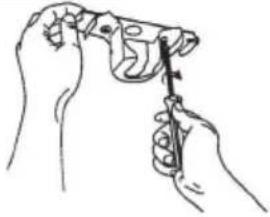 | 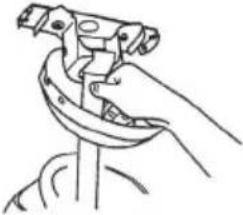 | 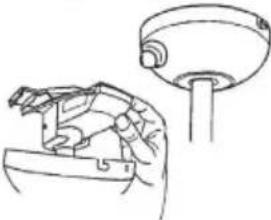 |
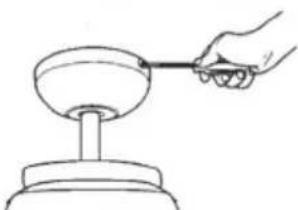
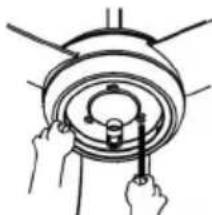
| Secure the mounting plate to a ceiling joist with two screws, spring washers and flat washers provided. Ensure the support for the mounting plate must be capable of safely and securely holding the moving weight of the fan.456 | Hang the fan assembly onto the mounting plate. The mounting plate has a lug on it; this should be lined up with the corresponding groove on the fan assembly ball joint. | Insert the remote control receiver between the bra-cket and the ball joint, and the sensor as shown. |
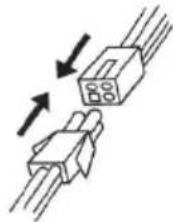 | 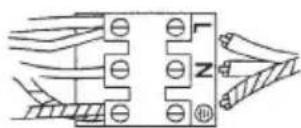 |  |
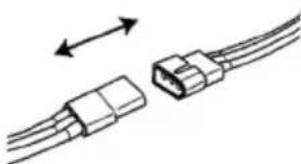
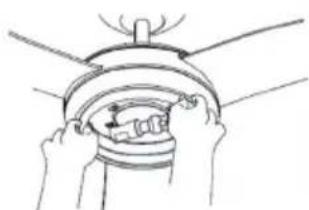
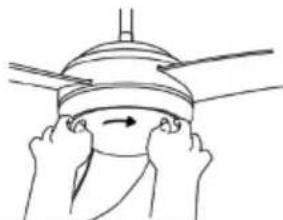
| Insert the male connector into the female connector (from the remote control receiver to the fan, and from the remote control to the terminal block. | Connect the wires from the earthed mains supply to the terminal block. | Lift up the canopy into place over the mounting plate. Ensure that you do not trap any wires. |
| 789 | ||
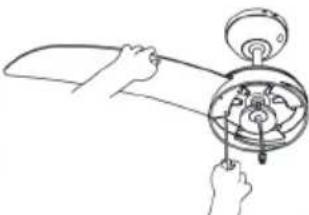 |  |  |
| Fasten the blade assembly to the motor with the screws and spring washers already attached to the motor. | Connect the light kit by clipping together the two plastic male/female connectors. | Fit the light kit to the switch housing by using the three light kit-fixing screws and star washers. Ensure that you do not trap any wires. |
| 1011 | ||
 |  | |
| Install the light bulb. Install the lampshade onto the lamp gallery by rotating the lampshade clockwise. | ||
OPERATION
Manual
- Select the fan speed by pressing the speed control button on the remote control transmitter:
HI: High Speed
MED: Medium Speed
LOW: Low Speed
OFF: Off
- The switch on motor housing for controlling the fan blades rotating direction controls the direction of air movement. Before using this rotating direction switch, turn OFF the fan and ensure the fan stops rotating to prevent injury to yourself and damage to the motor.
- Cold weather: Push the switch "UP" so that the blades will bring the warm air trapped near the ceiling fan to move downwards throughout the room.
- Hot weather: Push switch "DOWN" so that the blades will create a breeze and circulate the air to the room.
Remote Control
- Pressing the "ON/OFF" light button on the remote control transmitter can control the turning on or off of the light.
- Pressing and holding the "DIMMER" button on the remote controller transmitter can adjust the level of light brightness.
- Use the remote control transmitter to change the speed of the fan and to switch the light and fan on or off.
- Replace the batteries by sliding the battery compartment cover on the remote control transmitter in the direction of the arrow, fit 2 x "AAA" batteries, ensure the polarity of the batteries match with the figures shown in the battery compartment
Note: The batteries for the remote control are NOT included.
• Always ensure the battery compartment cover is closed properly.
- Do not expose the remote control to direct sunlight.
- Do not attempt to recharge expired batteries. There are special rechargeable batteries, which are clearly marked with.
- Do not dispose of batteries in fire to avoid explosion.
DISPOSAL CONSIDERATIONS
natural_image
Symbol of a trash bin crossed with a diagonal line, no text or numbers presentIf there is a legal regulation for the disposal of electrical and electronic devices in your country, this symbol on the product or on the packaging indicates that this product must not be disposed of with household waste. Instead, it must be taken to a collection point for the recycling of electrical and electronic equipment. By disposing of it in accordance with the rules, you are protecting the environment and the health of your fellow human beings from negative consequences. For information about the recycling and disposal of this product, please contact your local authority or your household waste disposal service.
This product contains batteries. If there is a legal regulation for the disposal of batteries in your country, the batteries must not be disposed of with household waste. Find out about local regulations for disposing of batteries. By disposing of them in accordance with the rules, you are protecting the environment and the health of your fellow human beings from negative consequences.
Chère cliente, cher client,
SOMMAIRE
Berlin Brands Group UK Ltd
PO Box 1145
Oxford, OX1 9UW
United Kingdom
CONSIGNES DE SÉCURITÉ
natural_image
Symbol of a trash bin crossed with a diagonal line, no text or numbers presentÍNDICE
Berlin Brands Group UK Ltd
PO Box 1145
Oxford, OX1 9UW
United Kingdom
natural_image
Symbol of a trash bin crossed with a diagonal line, no text or numbers presentINDICE
PRODUTTORE E IMPORTATORE (UK)
Produttore:
Chal-Tec GmbH, Wallstraße 16, 10179 Berlino, Germania.
Berlin Brands Group UK Ltd
PO Box 1145
Oxford, OX1 9UW
United Kingdom
AVVERTENZE DI SICUREZZA
natural_image
Symbol of a trash bin crossed with a diagonal line, no text or numbers present

- INHALTSVERZEICHNIS
- SICHERHEITSHINWEISE
- Member of Berlin Brands Group
- Handwerkerstr. 11
- Dahlwitz-Hoppegarten
- Deutschland
- CONTENT
- TECHNICAL DATA
- MANUFACTURER & IMPORTER (UK)
- Manufacturer:
- Importer for Great Britain:
- SAFETY INSTRUCTIONS
- INSTALLATION
- OPERATION
- Manual
- Remote Control
- DISPOSAL CONSIDERATIONS
- SOMMAIRE
- CONSIGNES DE SÉCURITÉ
- ÍNDICE
- INDICE
- PRODUTTORE E IMPORTATORE (UK)
- Produttore:
- AVVERTENZE DI SICUREZZA
Brand : Klarstein
Model : El Paso
Category : Fan