
BL6000 - Blender BLACK & DECKER - Free user manual and instructions
Find the device manual for free BL6000 BLACK & DECKER in PDF.
| Product Type | Blender |
| Brand | Black & Decker |
| Model | BL6000 |
| Main Container Capacity | 64 oz (1.89 L) |
| Individual Container Capacity | Approximately 20 oz (0.6 L) |
| Container Material | Tritan (BPA-free plastic) |
| Number of Speeds | Variable (rotary dial) |
| Pulse Function | Yes (dedicated switch) |
| Power | Approximately 600 W |
| Power Supply | 120 V, 60 Hz (United States and Canada) |
| Plug Polarization | Yes, polarized plug |
| Motor Protection | Thermal protection device with automatic reset |
| Cleaning of Removable Parts | Dishwasher safe (lower basket for container, upper basket for other parts) |
| Base Cleaning | Wipe with a damp cloth, do not immerse |
| Available Replacement Parts | Lid (BL6010-02), Cap (BL6010-01), Container (BL6010-03), Individual container (BL1130-08), Individual blade assembly (BL1130-09), Drink lid (BL1130-07) |
| Warranty | 3-year limited (United States and Canada) |
| Usage | Household use only |
Frequently Asked Questions - BL6000 BLACK & DECKER
User questions about BL6000 BLACK & DECKER
0 question about this device. Answer the ones you know or ask your own.
Ask a new question about this device
Download the instructions for your Blender in PDF format for free! Find your manual BL6000 - BLACK & DECKER and take your electronic device back in hand. On this page are published all the documents necessary for the use of your device. BL6000 by BLACK & DECKER.
USER MANUAL BL6000 BLACK & DECKER
Thank you for your purchase!
Rate and review your products at
Should you have any questions or concerns with your new product, please call our Customer Service Line at 1-800-231-9786 (US and Canada). Please do not return to the store.
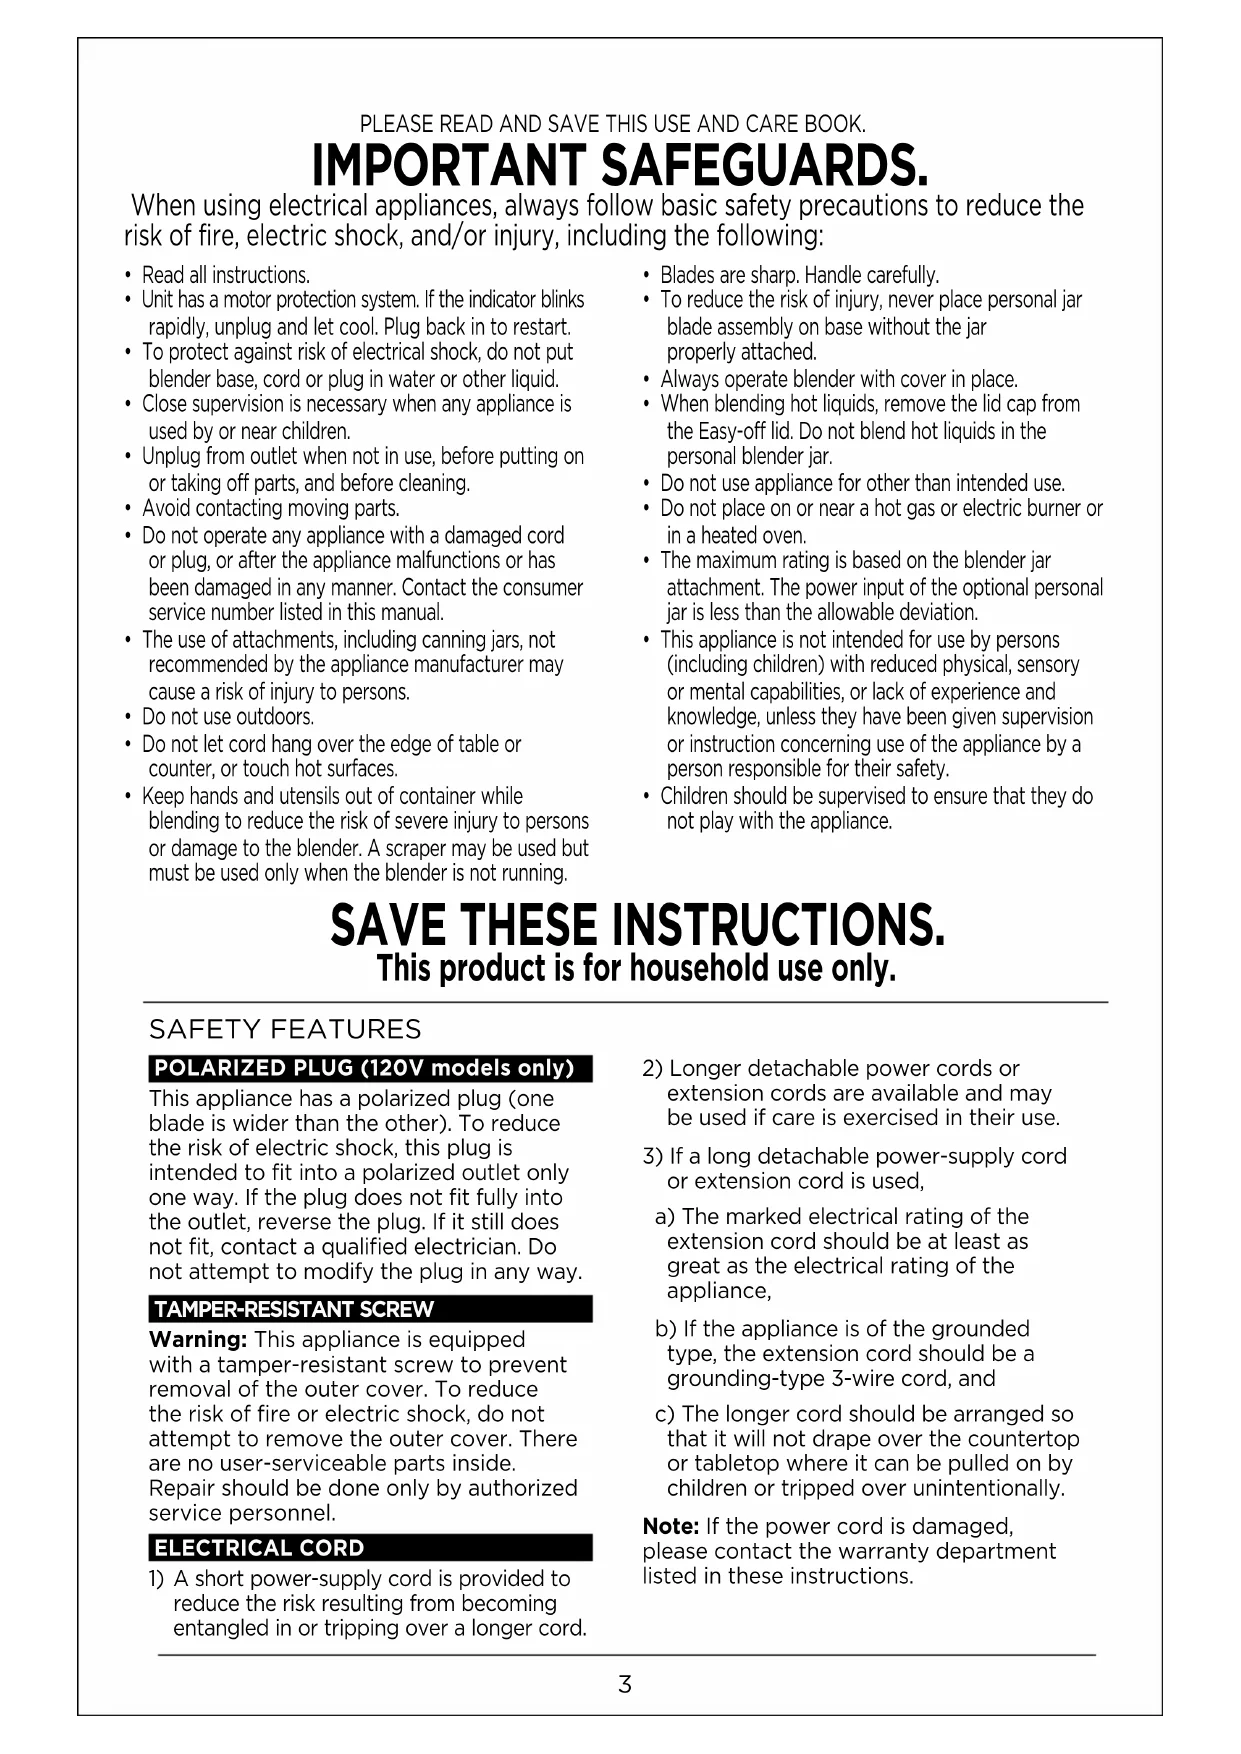
PLEASE READ AND SAVE THIS USE AND CARE BOOK.
IMPORTANT SAFEGUARDS.
When using electrical appliances, always follow basic safety precautions to reduce the risk of fire, electric shock, and/or injury, including the following:
- Read all instructions.
- Unit has a motor protection system. If the indicator blinks rapidly, unplug and let cool. Plug back in to restart.
- To protect against risk of electrical shock, do not put blender base, cord or plug in water or other liquid.
- Close supervision is necessary when any appliance is used by or near children.
- Unplug from outlet when not in use, before putting on or taking off parts, and before cleaning.
- Avoid contacting moving parts.
- Do not operate any appliance with a damaged cord or plug, or after the appliance malfunctions or has been damaged in any manner. Contact the consumer service number listed in this manual.
- The use of attachments, including canning jars, not recommended by the appliance manufacturer may cause a risk of injury to persons.
- Do not use outdoors.
- Do not let cord hang over the edge of table or counter, or touch hot surfaces.
-
Keep hands and utensils out of container while blending to reduce the risk of severe injury to persons or damage to the blender. A scraper may be used but must be used only when the blender is not running.
-
Blades are sharp. Handle carefully.
- To reduce the risk of injury, never place personal jar blade assembly on base without the jar properly attached.
Always operate blender with cover in place. - When blending hot liquids, remove the lid cap from the Easy-off lid. Do not blend hot liquids in the personal blender jar.
- Do not use appliance for other than intended use.
- Do not place on or near a hot gas or electric burner or in a heated oven.
- The maximum rating is based on the blender jar attachment. The power input of the optional personal jar is less than the allowable deviation.
- This appliance is not intended for use by persons (including children) with reduced physical, sensory or mental capabilities, or lack of experience and knowledge, unless they have been given supervision or instruction concerning use of the appliance by a person responsible for their safety.
Children should be supervised to ensure that they do not play with the appliance.
SAVE THESE INSTRUCTIONS.
This product is for household use only.
SAFETY FEATURES
POLARIZED PLUG (120V models only)
This appliance has a polarized plug (one blade is wider than the other). To reduce the risk of electric shock, this plug is intended to fit into a polarized outlet only one way. If the plug does not fit fully into the outlet, reverse the plug. If it still does not fit, contact a qualified electrician. Do not attempt to modify the plug in any way.
TAMPER-RESISTANT SCREW
Warning: This appliance is equipped with a tamper-resistant screw to prevent removal of the outer cover. To reduce the risk of fire or electric shock, do not attempt to remove the outer cover. There are no user-serviceable parts inside. Repair should be done only by authorized service personnel.
ELECTRICAL CORD
1) A short power-supply cord is provided to reduce the risk resulting from becoming entangled in or tripping over a longer cord.
2) Longer detachable power cords or extension cords are available and may be used if care is exercised in their use.
3) If a long detachable power-supply cord or extension cord is used,
a) The marked electrical rating of the extension cord should be at least as great as the electrical rating of the appliance,
b) If the appliance is of the grounded type, the extension cord should be a grounding-type 3-wire cord, and
c) The longer cord should be arranged so that it will not drape over the countertop or tabletop where it can be pulled on by children or tripped over unintentionally.
Note: If the power cord is damaged, please contact the warranty department listed in these instructions.
Congratulations on your new Performance FusionBlade ™ Blending System! Designed for premium food prep and culinary excellence, your new performance blender will help you crush, create, blend, chop, mix and prep. Enjoy!
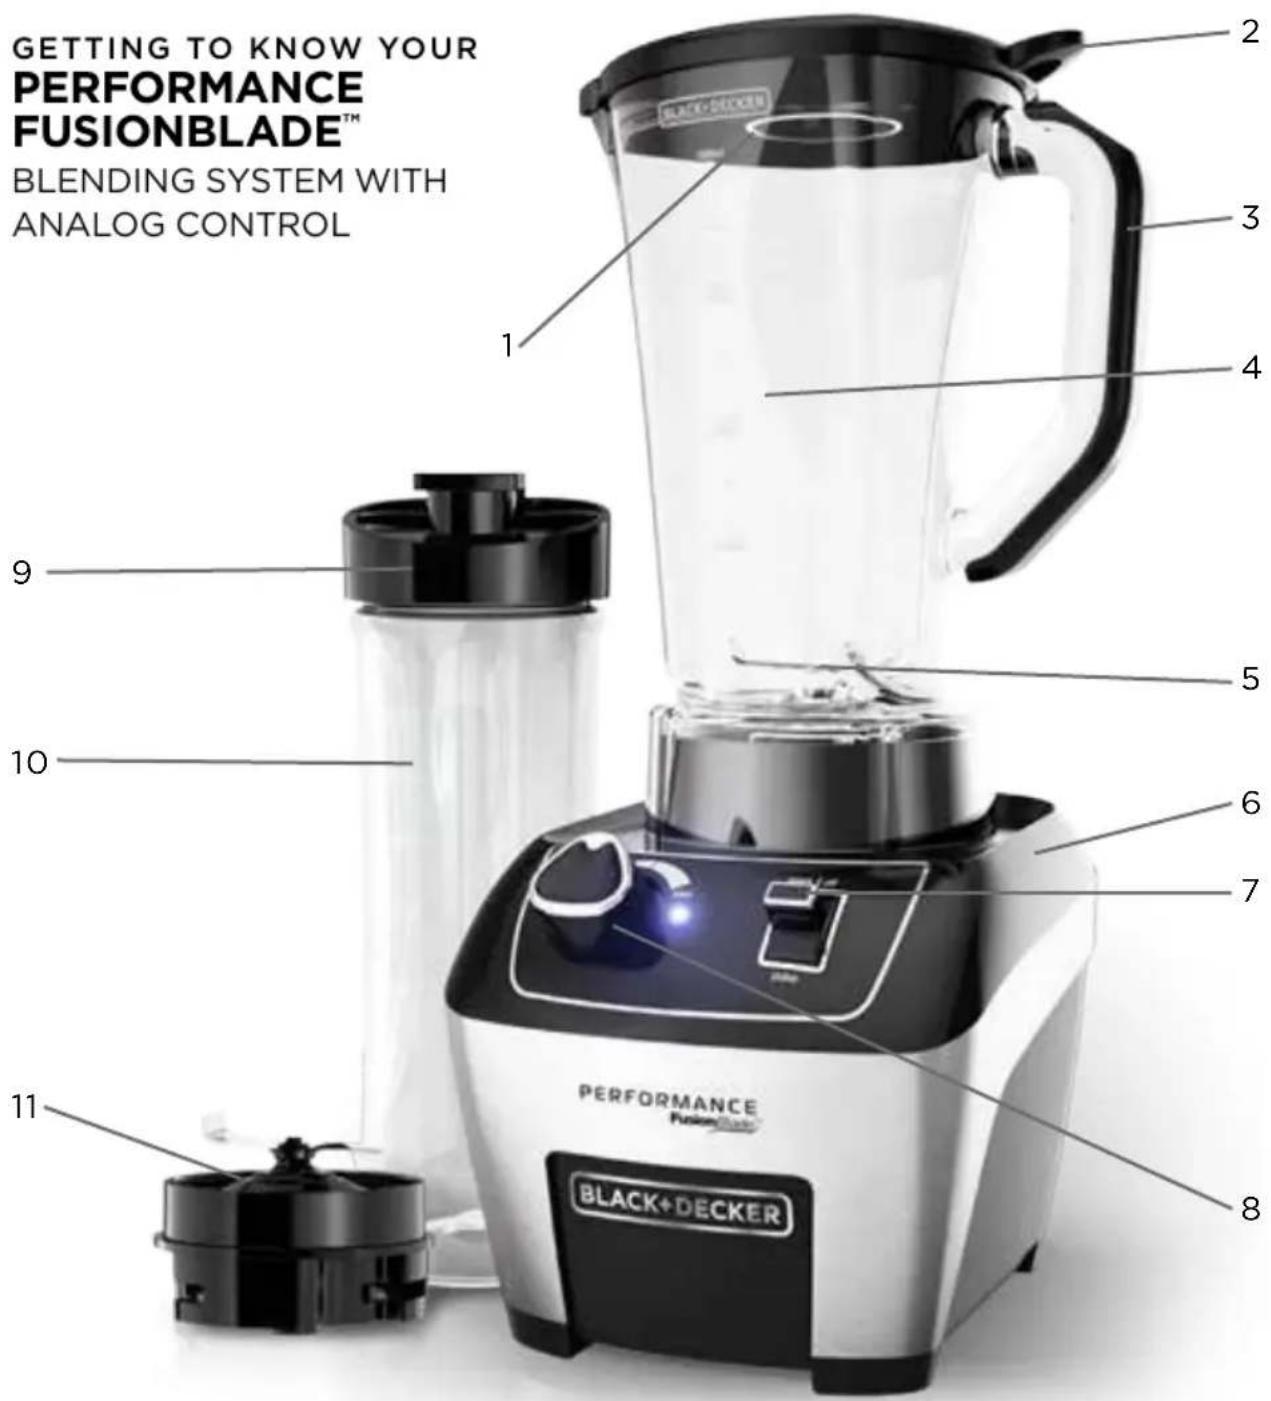
- Lid cap (Part # BL6010-01)
- Easy-off lid (Part # BL6010-02)
- Handle
- One-piece Tritan™ blender jar (Part # BL6010-03)
- Integrated blade (non-removable)
- Base
- STARTOFF and PULSE toggle switch
-
Variable speed dial
-
Drinking lid attachment (Part # BL1130-07)
- Personal blender jar (Part # BL1130-08)
- Personal jar blade assembly (Part # BL1130-09)
Note: additional personal jars can be purchased separately at BlackAndDeckerAppliances.com
HOW TO USE
This product is for household use only.
GETTING STARTED
- Remove all packing material, any stickers, and the plastic band around the power plug.
- Remove and save literature.
- Please visit www.prodprotect.com/applica to register your warranty.
- Wash all removable parts as instructed in CARE AND CLEANING section of this manual.
USING YOUR BLENDER
- Make sure appliance is off and the jar is securely situated on the base.
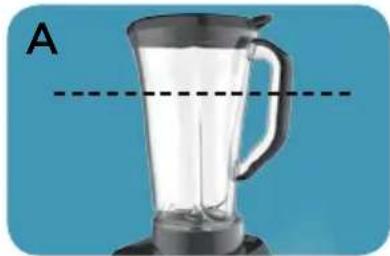
- Place foods to be blended into jar. Do not fill past the 64 oz. marking.
NOTE: When blending hot ingredients, only fill blender jar 2/3 full. (A)
NOTE: For best results, add ingredients in the following order:
a. Liquids
b. Powders
c. Soft foods
d. Hard foods
e. Ice
- Place lid securely on jar. Make sure lid cap is in place.
NOTE: Before blending hot liquids, remove lid cap and cover with a towel to prevent hot liquids from spattering.
- Plug power cord into outlet.
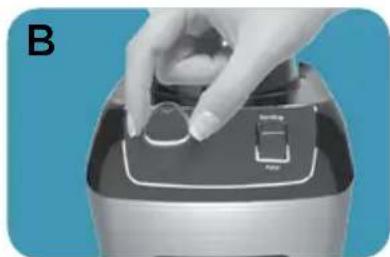
- Use the dial to select a speed. (B) Turn the dial clockwise for faster speeds and counterclockwise for slower speeds (See SPEED CHART).
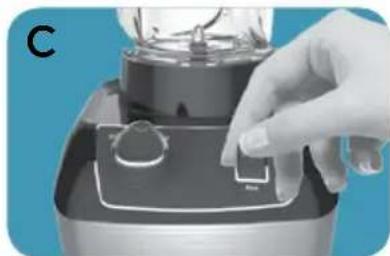
- Press the toggle upwards to START|OFF to turn on the motor. (C) LED will illuminate.
- When food reaches desired consistency, press toggle upwards to START|OFF to stop the motor. (C) LED will go out.
IMPORTANT: Do not leave the blender unattended while it is in use.
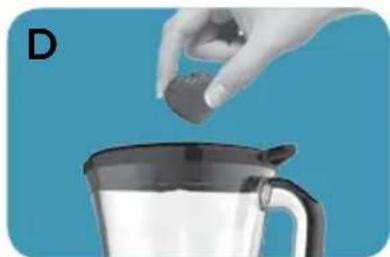
- You may remove the lid cap and drop ingredients through the lid cap opening while the blender is running. (D)
- When using the PULSE function, press and hold the toggle downward towards PULSE for a few seconds, then release. (E) Repeat until food reaches desired consistency. Releasing pulse stops the blending. LED will illuminate when motor is operating.
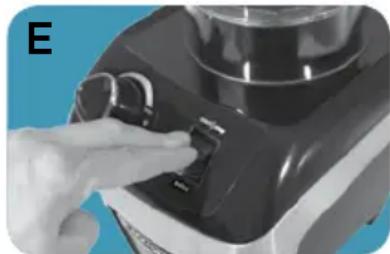
IMPORTANT: Do not hold toggle down for more than a few seconds at a time when pulsing.
IMPORTANT: Do not remove the lid while the blender is running.
- Make sure blades have completely stopped before attempting to remove the blending jar from the base. (Refer to troubleshooting for any issues)
- To remove the jar, grasp the handle and lift up.
- Remove lid to pour.
- Always unplug the appliance when not in use.
USING THE PERSONAL BLENDER JAR (NOT INCLUDED WITH ALL MODELS)
Personal blender jars may be purchased separately.
NOTE: Do not blend hot liquids in the personal jar.
- Place the personal blender jar on a flat surface with the open end facing up. Fill the jar with ingredients, keeping the amount below the top marking.
NOTE: For best results, add ingredients in the following order:
a. Liquids
b. Ice
c. Hard Foods
d. Soft Foods
e. Powders
- Tighten the personal jar blade assembly on the open end of the personal jar with the blade facing down towards the ingredients. It is important to tighten to prevent leaking during blending.
- Turn personal jar upside down and place on the blender base, turning clockwise to lock into place.
- Select Low speed.
IMPORTANT: It is recommended to only use Low speed when using the personal jar. Do NOT use PULSE when using the personal jar.
- Press the toggle upwards towards START|OFF to turn on the motor. The LED will illuminate. Blend to desired consistency.
- Press the toggle upwards towards START|OFF to stop the motor. The LED light will turn off.
- Once blending has finished, remove the personal jar by turning counterclockwise and lifting off the base. Turn the jar over and place it on a flat surface.
IMPORTANT: If the jar gets stuck on the blending base or begins to loosen from the blade assembly, follow these steps:
a. Unplug the unit
b. Turn the jar clockwise to tighten jar onto the blade assembly
c. Turn jar and blade assembly counterclockwise to unlock from blending base and lift up.
- Remove the blade assembly from the personal jar by turning counterclockwise. Place the personal jar drinking lid on the personal jar and enjoy your delicious drinks on the go.
SPEED CHART
This blender uses a variable speed dial to control the speed of use. The lowest speed is when the dial is turned all the way to the left. The highest speed is when the dial is turned all the way to the right. The variable speed dial allows you full control of your blend. The following speed chart contains recommendations for speeds and functions.
| FUNCTION FOOD TYPE SPEED SETTING | ||
| Puree Fruits and Vegetables | Soups | Start on Low and increase as needed to desired consistency |
| Baby food | ||
| Milkshakes | ||
| Crumb Bread crumbs | Cereals | Pulse to desired consistency |
| Cookies | ||
| Mix Dressings | Batters | Low or Medium |
| Dips | ||
| Chop Salsa | Nuts | Pulse to desired consistency |
| Vegetables | ||
| Ice Crush/Frozen Blend | Ice (max 2 cups) | High or Pulse |
| Frozen fruits | ||
| Blend/Smoothies Smoothies | Fruits | High or Pulse |
| Vegetables | ||
| Flours Rice | Corn | Medium or High |
| Oats | ||
| Grains | ||
| Nut butters Peanuts | Almonds | High |
| Walnuts | ||
| Cashews | ||
| Personal jar recipes | Half recipe/Use with Personal jar (not included with all models) | Low |
HELPFUL HINTS AND TIPS
- When using hard foods, such as ice or cheese, keep one hand on the lid to keep blender jar and base in place.
- Cut food into pieces no larger than 3/4 before blending.
- When ingredients splatter onto the sides of the jar or the mixture is very thick, turn the appliance off. Remove the lid and use a rubber spatula to scrape down the sides of the jar and to redistribute the food, pushing food toward the blades. Replace the lid and continue blending.
- The lid cap holds up to 2 oz. of liquid and can be used as a measure when adding ingredients such as oil, milk, cream or liquor.
- When making bread, cookie, cereal, or cracker crumbs, make sure blending jar is completely dry.
- When using the PULSE function, use short bursts. Allow the blades to stop rotating between pulses. Do not use PULSE for more than 30 seconds continuously.
- It is helpful to begin the blending process on the lowest speed and then increase to a higher speed, if necessary.
- Never operate the blender without the lid.
- To stop blending at any time, press the toggle upwards towards START|OFF.
- When blending hot ingredients, always let them cool at least 5 minutes before blending. Begin blending on the lowest speed with the lid cap off to allow steam to escape. Cover lid cap hole with towel or hot pad.
- When crushing ice with no other ingredients, use 2 cups ice max (about 15 cubes). Make sure blender jar is completely dry before ice crushing.
CARE AND CLEANING
This product contains no user serviceable parts. Refer service to qualified service personnel.
- Unplug the blender base before cleaning. Wipe the blender base using a damp cloth. Do not immerse the blender base in water.
- Lift the blending jar, by the handle, off the base.
- Remove lid and lid cap.
- Wash removable parts by hand or in the dishwasher. Place the jar on the bottom rack and the rest of the parts on the top rack only.
CAUTION: Blades are sharp. Handle with care when hand washing.
CLEANING TIPS
- For quick cleanup, combine 1 cup hot water and a drop of liquid dish soap in the blending jar.
- Cover and blend on medium for about 30 seconds.
- Discard liquid and rinse thoroughly.
IMPORTANT:
- Do not place the jar parts in boiling liquids.
-
Do not immerse the base in liquid. Wipe the base with a damp cloth and dry thoroughly.
-
Remove stubborn spots by rubbing with a damp cloth and nonabrasive cleaner.
Note: If liquids spill onto the base, wipe with a damp cloth and dry thoroughly. Do not use rough scouring pads or cleansers on parts or finish.
TROUBLESHOOTING
| Problem Possible Cause Solution | ||
| Blender is having difficulty blending | Mixture is too thick or air bubble has formed between mixture and blade. | Turn blender off. Use rubber spatula to scrape down sides of jar and redistribute, pushing food towards blades. Add more liquid if needed. |
| LED is blinking rapidly | Blender overheated. Motor protection caused blender to stop working. | Unit must be reset. Unplug unit and let cool for at least 20 minutes. |
RECIPES
PEANUT BUTTER
3 cups peanuts
1/3 cup peanut oil
Place all ingredients into the blender. Press toggle upwards to START|OFF and use the dial to adjust your speed and blend. Press the toggle upwards to START|OFF when peanut butter has reached your desired consistency.
RICE FLOUR
12 cup white rice
Freeze rice for 15 minutes prior to blending. Place in the blender and use the dial to adjust your speed.
PINEAPPLE STRAWBERRY SMOOTHIE
1 cup pineapple juice
2 cups vanilla flavored yogurt
1 cup fresh strawberries
8-10 ice cubes
Place all ingredients, in the order listed, into your blender and blend on High.
PERSONAL JAR ORANGE MANGO SMOOTHHIE
12 cup orange juice
4-5 ice cubes
12 cup fresh mango
1 cup plain or vanilla flavored yogurt
Place all ingredients in your personal jar in the order listed. Place blade base on top of jar and screw tightly in place. Flip the jar onto the blender base and blend, on lowest speed.
CREAMY BUTTERNUT SQUASH SOUP
2 Tbsp. butter
1 small onion, chopped
2 lbs. butternut squash, peeled, seeded and cut into 1-inch cubes
2 cups chicken or vegetable broth
1/8 tsp. salt
1/8 tsp. black pepper
12 cup heavy cream
Melt butter in large sauce pan on medium heat. Add onion; cook and stir 3 minutes or until tender crisp.
Add squash, chicken broth, salt and pepper. Bring to boil. Reduce heat to medium low, cover and simmer 20 minutes or until squash is tender.
Puree squash mixture in blender in two batches on low speed, 15 seconds or until smooth.
Return pureed soup to sauce pan. Stir in cream and heat through. Do not boil.
WARRANTY AND CUSTOMER SERVICE INFORMATION
For support or any questions regarding your appliance, call the appropriate 800 number listed within this section. Please DO NOT return the product to the place of purchase. Also, please DO NOT mail product back to manufacturer, nor bring it to a service center. You may also want to consult our Product Protection Center at www.prodprotect.com/applica .
Three-Year Limited Warranty (Applies only in the United States and Canada)
What does my warranty cover?
- Your warranty covers any defect in material or workmanship provided; however, the liability of Spectrum Brands Inc. will not exceed the purchase price of product.
How long is the warranty period?
- Your warranty extends three years from the date of original purchase with proof of purchase.
What support does my warranty provide?
- Your warranty provides you with a reasonably similar replacement product that is either new or factory refurbished.
How do you get support?
- Save your receipt as proof of date of sale.
- Visit the online service website at www.prodprotect.com/applica, or call toll-free 1-800-231-9786, for general warranty service.
- If you need parts or accessories, please call 1-800-738-0245.
What does my warranty not cover?
- Damage from commercial use
- Damage from misuse, abuse or neglect
- Products that have been modified in any way
- Products used or serviced outside the country of purchase
- Glass parts and other accessory items that are packed with the unit
- Shipping and handling costs associated with the replacement of the unit
- Consequential or incidental damages (Please note, however, that some states do not allow the exclusion or limitation of consequential or incidental damages, so this limitation may not apply to you.)
How does state law affect my warranty?
- This warranty gives you specific legal rights. You may also have other rights that vary from state to state or province to province.
PROBLEMA CAUSA POSIBLE SOLUCION
Col. Centro, Cuauhtemoc,
México, D.F.
Tel. 018007142503
Nicaragua
LRM ELECTRONICA
Managua - Sinsa Altamira 1.5
kilómetros al norte
Nicaragua
Tel. (505) 2270-2684
Panamá
Supermarcas
Centro commercial El dorado, Plaza
Dorado, Local 2.
Panama
Tel. (507) 392-6231
Perú
Servizio Central Fast Service
City Market Nivel Plaza Local 153
Diagonal Hotel Melia,
Caracas
Tel. (582) 324-0969
www.applicaservice.com
servicio@applicamail.com
IMPORTANTES CONSIGNES DE SECURITÉ
Made in People's Republic of China
BLACK+DECKER and the BLACK+DECKER logo are trademarks of The Black & Decker Corporation and are used under license. All rights reserved.
BLACK+DECKER y el logo tipo BLACK+DECKER son MARCAS registradas de The
© 2015 The Black & Decker Corporation
and Spectrum Brands, Inc.
Middleton, WI 53562
T22-5001073
11971-00 E/S/F