
Charleston 10028294 - Fan Klarstein - Free user manual and instructions
Find the device manual for free Charleston 10028294 Klarstein in PDF.

| Brand | Klarstein |
| Model | Charleston 10028294 |
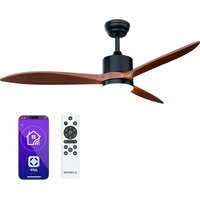
| Product type | Ceiling fan with light |
| Power supply | 220-240 V ~ 50-60 Hz |
| Maximum power | 60 W |
| Number of speeds | 3 |
| Number of blades | 4 (estimated) |
| Blade diameter | 132 cm (estimated) |
| Weight | 7 kg (estimated) |
| Material | Metal and plastic |
| Lighting | E27 bulb, max. 60 W (not included) |
| Control | Pull cord for speeds and light |
| Rotation reversal | Yes, via switch on motor |
| Minimum installation height | 2.3 m between blades and floor |
| Hook load capacity | 100 kg |
| Grounding | Required |
| Protection | All-pole circuit breaker with 3 mm contact opening |
| European standards | 2014/30/EU, 2014/35/EU, 2011/65/EU, 206/2012/EU |
| Recycling | Complies with Directive 2012/19/EU (WEEE) |
| Warranty | 2 years (standard) |
Frequently Asked Questions - Charleston 10028294 Klarstein
User questions about Charleston 10028294 Klarstein
0 question about this device. Answer the ones you know or ask your own.
Ask a new question about this device
Download the instructions for your Fan in PDF format for free! Find your manual Charleston 10028294 - Klarstein and take your electronic device back in hand. On this page are published all the documents necessary for the use of your device. Charleston 10028294 by Klarstein.
USER MANUAL Charleston 10028294 Klarstein
Congratulations on purchasing this equipment. Please read this manual carefully and take care of the following hints to avoid damages. Any failure caused by ignoring the items and cautions mentioned in the instruction manual is not covered by our warranty and any liability. Scan the QR code to get access to the latest user manual and other information about the product.

CONTENT
Safety Instructions 10
Installation 10
Use and Operation 12
Hints on Disposal 13
TECHNICAL DATA
| Item number 10028294 | |
| Power supply 220-240 V ~ 50-60 Hz | |
| Power consumption 60 W |
DECLARATION OF CONFORMITY

Producer:
Chal-Tec GmbH, Wallstraße 16, 10179 Berlin, Germany.
This product is conform to the following European
Directives:
2014/30/EU (EMC)
2014/35/EU (LVD)
2011/65/EU (RoHS)
206/2012/EU (ErP)
SAFETY INSTRUCTIONS
- Never attach the fan to a power point, but to the ceiling itself.
- The minimum distance between the blades of the fan and the floor must be more than 2.3m . The minimum carrying capacity of the hook from which the fan is hung must be 100kg .
- Make sure to install all poles disconnection switch having a contact separation of at least 3mm between poles in the supply wiring to the ceiling fan.
- The model or type reference of luminaries which may be installed in fans which are constructed for his purpose.
- Switch off the power before connecting.
- The electrical wiring must be in accordance with the local regulation.
- The fan must be properly earthed to avoid the risk of electric shocks.
- Never mount the fan in a moist or wet room.
- Be careful when working near the rotating blades.
Note: Always have your fan installed by someone who is knowledgeable about electrical wiring.
INSTALLATION
| 123 | ||
| Secure the mounting plate to a ceiling joist with two screws, spring washers and flat washers provided. Ensure the support for the mounting plate must be capable of safely and securely holding the moving weight of the fan. | Hang the fan assembly onto the mounting plate. The mounting plate has a lug on it; this should be lined up with the corresponding groove on the fan assembly ball joint. | Connect the internal lead to the fan body by clipping together the two plastic male / female connectors are firmly clicked together |
| 456 | ||
| Connect wires from supply and bracket to the wiring terminals as follow: Brown wire: "L" Blue wire: "N" Green/Yellow wire: | Attach canopy to the bracket by aligning canopy side holes with the bracket side holes. Lift fan until the screws reach the bottom of the slots and then rotate the canopy counterclockwise until the screws drop into the slot recesses. | Insert the other two set screws and washers. Tighten all the screws, make sure that the canopy is secure and that you have not trapped any wires. Ensure that the slot of the nylon ball hanger fits into the guide pin of the upper canopy. |
| 789 | ||
| Assemble blade clips onto the blades by tightening the screws, flat washer, spring washers and nuts together. | Install the fan blade sets onto the motor by tightening the screws and spring washers | Insert the male connector into the female connector securely as shown. |
| 10 11 | 12 | |
| Insert light kit cover onto the light kit and secure with three set screws. | Install the shade onto the switch housing. | Install a light blulb (E27 MAX.60W, not supplied) to the lampholder.Switch the power on to check the operation of the light kit and fan. |
USE AND OPERATION
- Turn electricity on before the fan starts to work.
- The fan starts to operate when pulling the Three-speed Switch connected by an extension chain on the motor housing.
Pulling the "ON/OFF" Light Switch connected by an extension chain on the motor housing can control the turning on or off of the light.
The fan can be in different speeds as pulling the Three-speed Switch:
The first pulling = HIGH SPEED
The second pulling = MEDIUM SPEED
The third pulling = LOW SPEED
The fourth pulling = OFF
The switch on motor housing for controlling the fan blades rotating direction controls the direction of air movement.
- Cold weather: Push the switch "UP" so that the blades will bring the warm air trapped near the ceiling fan to move downwards throughout the room.
- Hot weather: Push switch "DOWN" so that the blades will create a breeze and circulate the air to the room.
Note: Do make sure that the fan stops operating before using the Direction Switch. In order to prevent any damage to the motor or injury to you, the switch should stay at the UP or DOWN position when the fan is working.
HINTS ON DISPOSAL
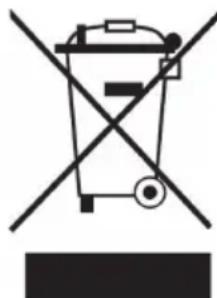
According to the European waste regulation 2012/19/EU this symbol on the product or on its packaging indicates that this product may not be treated as household waste. Instead it should be taken to the appropriate collection point for the recycling of electrical and electronic equipment. By ensuring this product is disposed of correctly, you will help prevent potential negative consequences for the environment and human health, which could otherwise be caused by inappropriate waste handling of this product. For more detailed information about recycling of this product, please contact your local council or your household waste disposal service.
Your product contains batteries covered by the European Directive. 2006/66/EC, which cannot be disposed of with normal household waste. Please check local rules on separate collection of batteries. The correct disposal of batteries helps prevent potentially negative consequences on the environment and human health.
Estimado cliente,
Chere cliente, cher client,
m = 311 ;


Brand : Klarstein
Model : Charleston 10028294
Category : Fan