
10029713 - Juicer Klarstein - Free user manual and instructions
Find the device manual for free 10029713 Klarstein in PDF.

| Product type | Slow juicer |
| Brand | Klarstein |
| Model | 10029713 |
| Dimensions (W x D x H) | 20 x 20 x 41 cm |
| Net weight | 3.5 kg |
| Power supply | 220-240 V ~ 50-60 Hz |
| Power | 150 W |
| Rotation speed | 32 rpm |
| Max. operation time | 20 minutes |
| Capacity | Juicing of fruits and vegetables (except very hard) |
| Extraction mechanism | Slow screw pressing, preserves vitamins and taste |
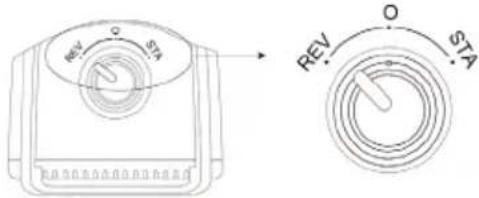
| Functions | Forward (STA), reverse (REV), stop (O) |
| Included accessories | Carafe with spouts, pusher, cleaning brush, sealing rings, strainer |
| Cleaning | Base wiped with damp cloth, accessories washable with water |
| Safety | Automatic shut-off after 20 min, overheating protection, do not open while operating |
| Repairability | Seals and screw press detachable, after-sales service available |
| Intended use | Household use only, indoors |
| Regulatory information | CE certified, compliant with RoHS, EMC and LVD directives |
Frequently Asked Questions - 10029713 Klarstein
User questions about 10029713 Klarstein
0 question about this device. Answer the ones you know or ask your own.
Ask a new question about this device
Download the instructions for your Juicer in PDF format for free! Find your manual 10029713 - Klarstein and take your electronic device back in hand. On this page are published all the documents necessary for the use of your device. 10029713 by Klarstein.
USER MANUAL 10029713 Klarstein
natural_image
Row of white kitchen and appliance icons including blender, kettle, refrigerator, TV, and microwave (no text or symbols)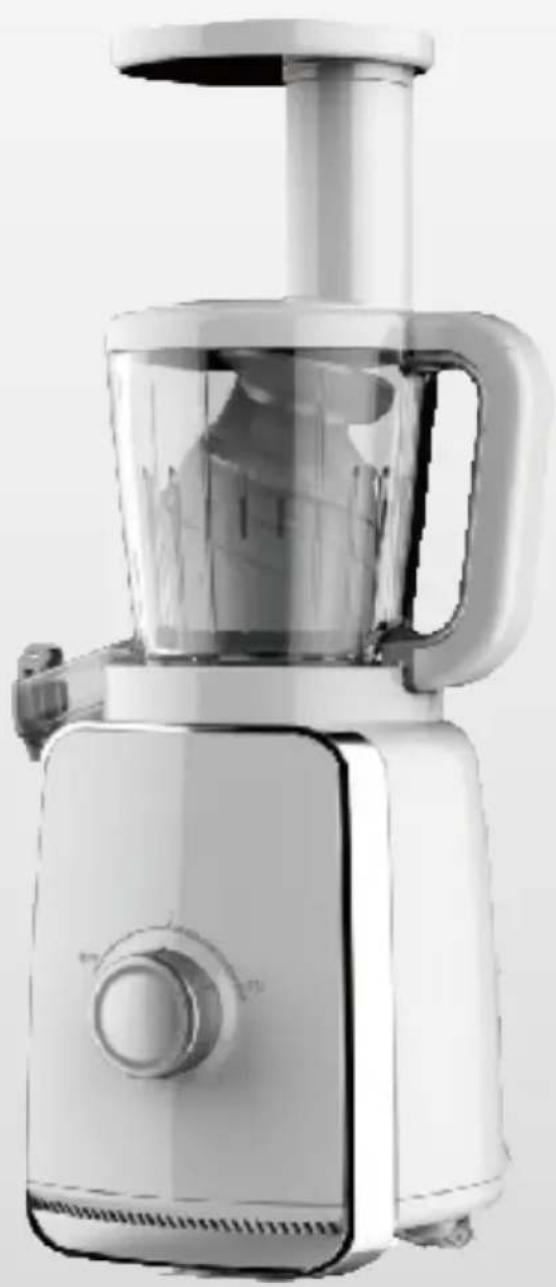
natural_image
Exterior view of a modern kitchen blender with clear glass and handle (no text or symbols visible)natural_image
Line drawing of two hands holding a cylindrical device with a circular button and indicator lights (no text or symbols)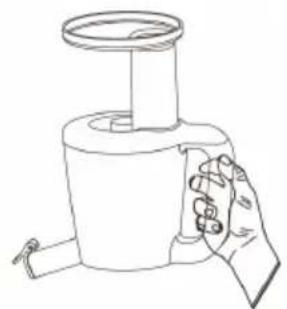
natural_image
Line drawing of a hand holding a cylindrical device with a lid, no text or symbols presentGeräteübersicht
natural_image
Line drawing of a blender with a lid and handle, showing internal structure (no text or symbols)
natural_image
Line drawing of a mechanical component with no visible text or symbolsnatural_image
Line drawing of a hand holding a mug with a lid, containing a bowl of food (no text or symbols)Bedienung
Vorbereitung
natural_image
Line drawings of a two-tiered blender with a power outlet and a side-view view showing its internal structure (no text or symbols)natural_image
Line drawing of a hand holding a battery with a rotary knob (no text or symbols)natural_image
Line drawing of a hand washing a coiled spring with a faucet in the background (no text or symbols)
Fehlerbehebung
Congratulations on purchasing this equipment. Please read this manual carefully and take care of the following hints on installation and use to avoid technical damages. Any failure caused by ignoring the items and cautions mentioned in the operation and installation instructions are not covered by our warranty and any liability.
Contents
Technical Data 12
Safety Instructions....13
Product Description 14
Assembly. 16
Operation 18
Cleaning 19
Troubleshooting 19
Disposal Considerations 21
Declaration of Conformity 21
Technical Data
| Item number 10029713 10029714 | 10030790 |
| Power supply 220-240 V~50-60 Hz | |
| Power consumption 150 W | |
| Dimensions (W x D x H) 20 x 20 x 41 cm | |
| Weight Net.: 3.5 kg Gross: 4.5 kg | |
| RPM 32 | |
| Max. usage time 20 minutes |
Safety Instructions
- Please read carefully before using. Please follow instructions to avoid injuries.
- This appliance is not intended for use by persons (including children) with reduced physical, sensory or mental capabilities, or in struction concerning use of the appliance by a person responsible for their safety.
- Do not put where the children can catch, it may cause electric shock or suffocation caused by swallowing small parts mistakenly.
- Do not submerge or hold the main body under running water when cleaning. It will cause electric shock or short circuit.
-
Please stop using and unplug when some abnormal problem occur:
-
The power cord, plug or main body become over heat.
The power cord has a bad burning smell with abnormal vibration. - Breakage and any sign of damage for the drum or other parts.
- Some other abnormal problem.
- Do not put your finger, spoon, chopsticks or cleaning brush into the hopper.
Power cable and electrical plug
- Do not pull the cord to remove plug (will cause breakage or sparks of fire).
- Pull the electrical plug from the socket when power off (people get injured because of violating this).
- Any components installation, removal or maintenance should be done when state is "OFF". Then pull the plug from the socket.
- When not using, please also remember to turn the machine off and pull the plug from the socket (to avoid electric shock, leakage and fire caused by insulation aging).
Positioning
- Place and use the appliance on a firm (noise, vibration, loose), stable, and horizontal surface.
- Do not operate on unstable place (it will cause injury when falling down or product damage).
- Do not operate near water or fire(it will cause discoloration, deformation, electrocution, fire).
- Do not operate near wall and furniture (it will make them dirty).
Special safety instructions
- Do not use to crush things.
- Do not operate the unit without fruit or vegetables (it will get broken).
- Remove any hard seeds like peach (the reason to cause damage).
- Please do not open the juice cover when operation (will get injured).
- Do not use where expose to direct sunlight (will get discoloured).
-
Unplug the power cord and separate the drum from the main body when moving.
-
This appliance is intended for household use, do not put anything other than foods recommended in this book into the appliance.
- Only use the attachments provided with the product.
- Do not use outdoors, the unit is designed for indoor use only.
- Do not use the product next to a heather or heating device.
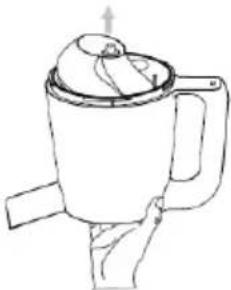
Right way to hold.
natural_image
Line drawing of two hands holding a device with a circular button and mechanical components (no text or symbols)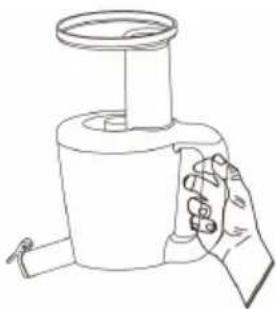
natural_image
Line drawing of a hand holding a small mechanical component (no text or symbols)Product Description
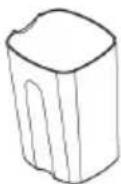
The slow juicer contains a revolutionary mechanism where the fresh juice comes from squeezing, rather than grinding. Compared with the traditional juicer, the low speed technology system squeezes instead of speedy grinding, allowing the juice to maintain its pure colour, natural taste, nutrients and vitamins.
This juicer separates the juice and pulp with two different outlets, keep juice with high purity. This machine is capable of producing juice of celery, spinach, carrots, apples, bananas, tomatoes, cucumbers, balsam pear, oranges, but not for the fruits and vegetables which contain starch, and please do not us this juicer to squeeze sugarcane.
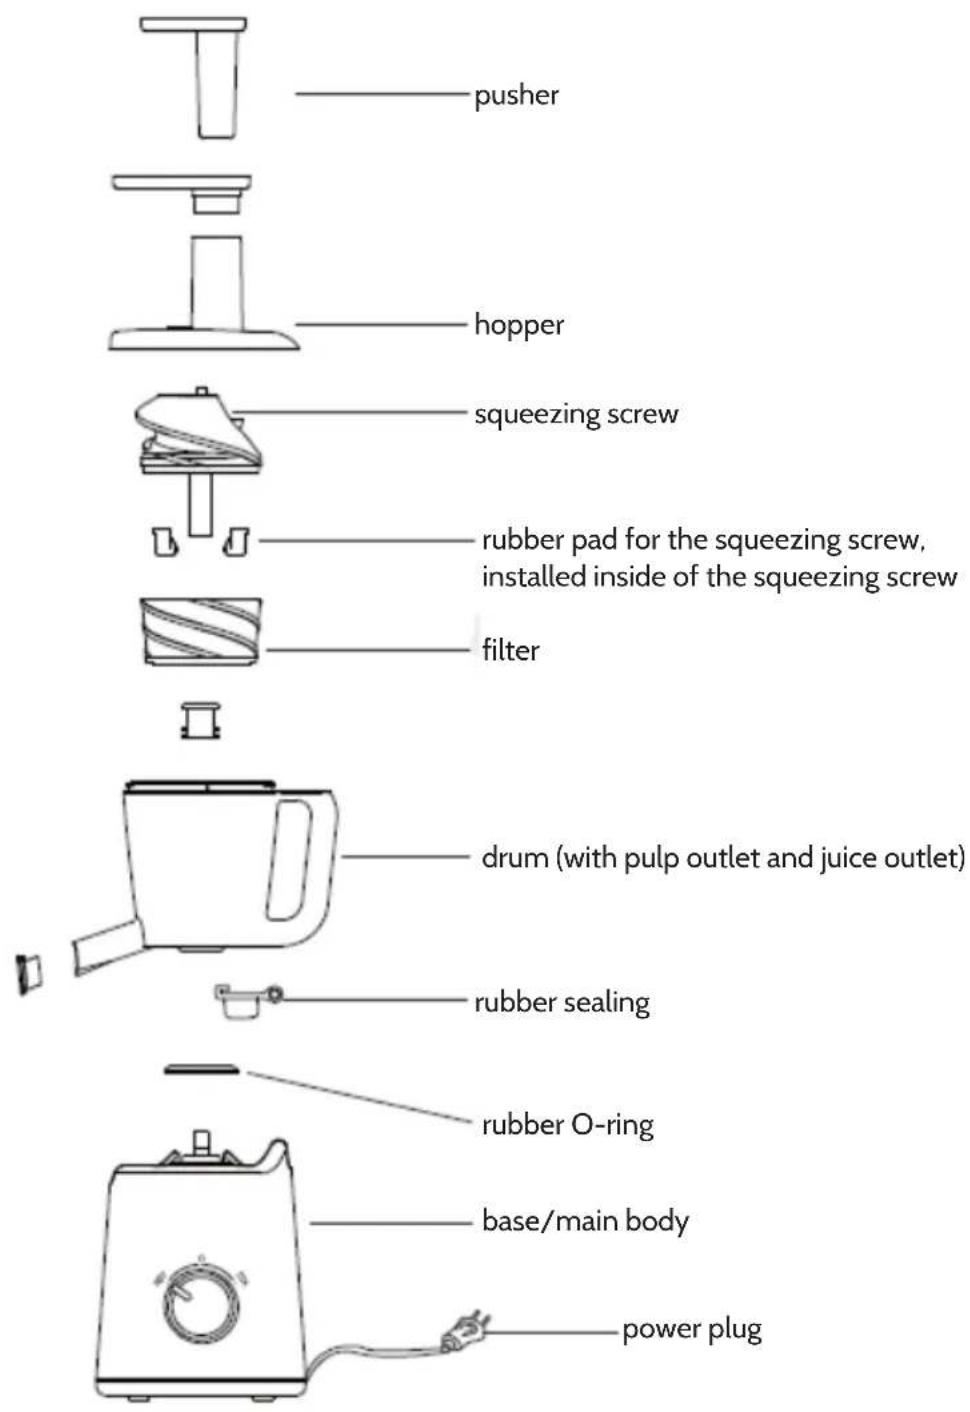
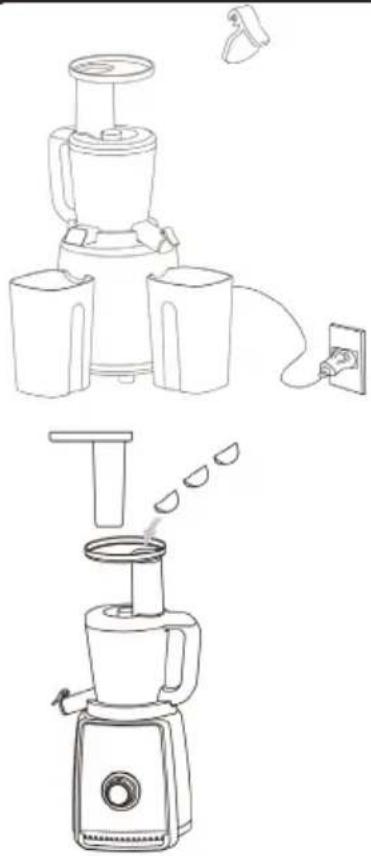
Attachments
Container/Pitcher • (Not microwavable)
Juice cap
Cleaning brush User manual

Appliance
Assembly
- Please assemble on a flat surface after unplugging the power cord.
-
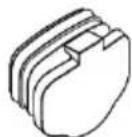
Make sure it is assembled properly, drum gasket and screw filler (two) are installed with the rubber pad. Please refer to below steps.
-
Place the rubber pad until it reaches the line inside. It will be easy to insert rubber pad into juice outlet with a little of water.

- Assemble the protuberant part together with the recess part at the bottom of the drum. Make sure the drum all the way into the shaft of the main body.
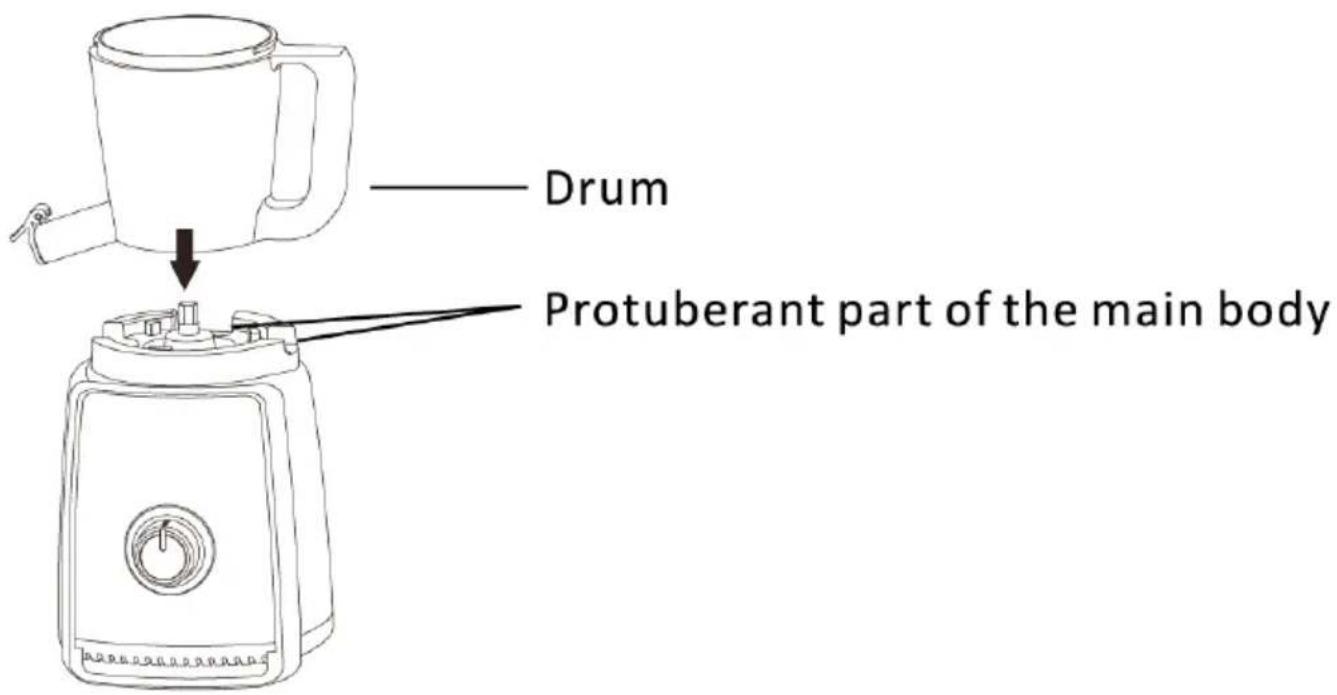
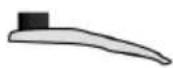
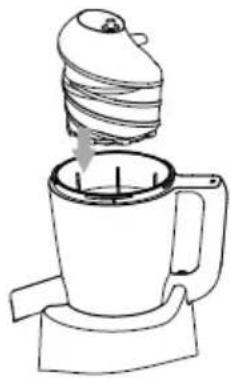
- Insert the squeezing screw into the centre of the drum (on the spinning brush of the main body).
If installed improperly, the hopper cannot be closed.
natural_image
Line drawing of a blender with a lid and handle, showing internal structure (no text or symbols)
Warning: Hazard of pinching
Never put your finger at the small gap between drum and squeezing screw.
- Assemble the hopper onto the drum.
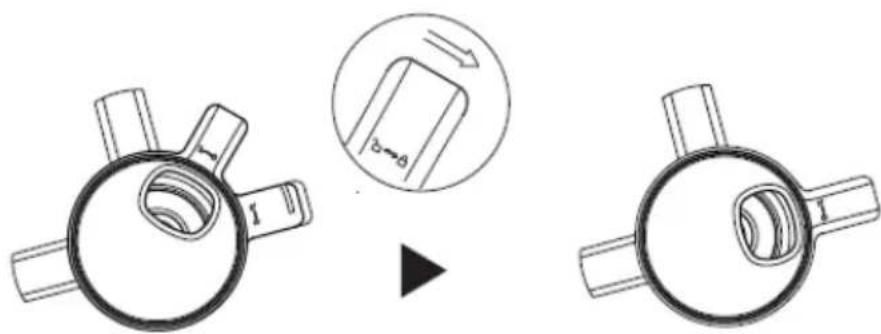
Hopper drum (open) Finished installation (closed)
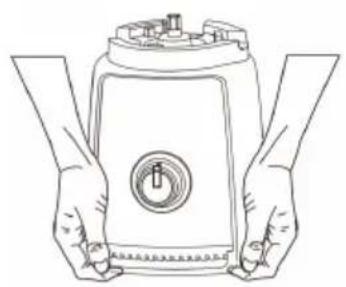
Disassembling instruction
When disassembling for cleaning, start with the reverse step when assembling.
If the squeezing screw is difficult to take out, please:
- Take out the drum from the main body.
- Press upward from the bottom of the drum.
natural_image
Line drawing of a mechanical component with no visible text or symbolsBottom of drum
natural_image
Line drawing of a hand holding a cup with a lid and a handle, no text or symbols presentOperation
Before use
- Check all the parts (including the rubber pad/sealing/O-ring) are assembled properly.
- Place pitchers under both outlets (pulp/juice outlet).
- Take off the "juice cap" on the juice outlet when juicing.
- Insert the power plug.
Making juice
- Put the ingredients slowly into the machine.
- Use the pusher if necessary. The pusher is used to push some leafy ingredients (which are difficult to put in) into the squeezing screw.
-
Do not the pusher to press all the ingredients into the hopper at a time.
-
Turn the switch to "STA" to start juicing.
-
If ingredients got stuck, turn switch to "REV" for a few seconds and then turn to "STA" again.
natural_image
Line drawings of a two-tiered blender with a power outlet and a side-view view showing its internal structure (no text or symbols)

Under the work of squeezing screw, it will squeeze out juice and pulp at the same time. If the pulp has a hard time coming out from the pulp outlet, please stop the machine and use the brush to clean it out.
- Turn switch to "O" to stop operation after you have finished juicing.

Cleaning
Notes
- Do not use detergents that contain organic solvents (solvent, thinner,etc), bleach, chlorine, benzene or abrasives.
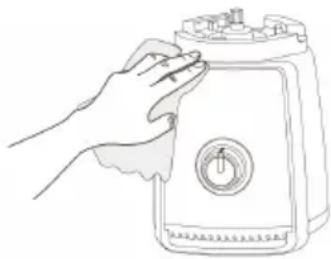
Clean the main body
- Use a smooth and wet towel for cleaning the main body.
- Do not rinse it under sunning water directly.
- Use a dry towel for cleaning the plug and cable.
natural_image
Line drawing of a hand holding a battery with a rotary knob (no text or symbols)Clean other components
- Do not use dishwasher or high-temperature cleaner for cleaning.
- Do not dry the product parts with any heating appliance.
- Do not keep the product without cleaning after use.
- Please remove pulp immediately or within 5 minutes after juicing.
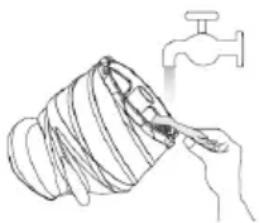
Clean the squeezing screw
- Clean the inside and outside of the squeezing screw with the brush under running water.
- Rinse the squeezing screw under running water after cleaning with the brush. The remaining pulp will be washed out.
- You can also clean the inside of the squeezing screw after detaching the rubber pad. Doing so will be more hygienic.
natural_image
Line drawing of a hand washing a coiled pipe with a faucet in the background (no text or symbols)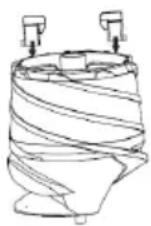
Troubleshooting
Users might improperly operate the product due to their unfamiliarity with how to use the product. Check the following items to resolve such issues. If issues cannot be resolved using these procedures, please contact the service centre.
| Problem Check Solution | ||
| The Product is not working. | Is the power cord connected? | Check weather the power cord is plugged into a 220-240V 50/60Hz wall out let. |
| Is the Juicer assembled correctly? | Assemble the product as described in this user's manual. | |
| Has the power gone off? | Assemble the product as described in this user's manual. | |
| Have you operated the Juicer for over 20 minutes? | Turn off the appliance. Wait for a while and reactivate the product. If you want to use the product continuously, pause the operation for 1 hour. | |
| The Juice does not discharge sufficiently or there is juice discharging from pulp ejector. | Did you assemble the rubber pad correctly? | Assemble the rubber pad correctly as described in this user's manual. |
| Did you use fresh ingredients? | Overripe fruits or vegetable may clog in the motor.If you want to use the overripe ingredients,use them after soaking in mineral water for 10 minutes or more. | |
| Did you put too many ingredients or anything else into the machine? | Turn switch to “REV”for several second,stop,then to “STA”. | |
| The product stops while in operation. | Did you force food into the juicer? | Check if there is many ingredients put into the machine. |
| Did you put the ingredients with hard seeds? | Turn off the machine,and switch to “REV”for several seconds,and then turn to “STA”and try it again. | |
| The pulp is too wet. Is the strainer jammed? | Check if there is too many pulp blocked on the strainer, clean it at once. | |
| The motor is running with loud noise and shaking | Did you check that all parts are assembled properlyand in correct position? | If the product is assembled properly,it is normal to make noise in juicing from overripe fruit and vegetables. Turn the product off and clean the drum. |
| The receptacle is vibrating in use | This is normal to make juice as the drum and main body is separated. | |
Disposal Considerations

natural_image
Symbol of a trash bin crossed out by a diagonal line, with no text or labels present.According to the European waste regulation 2002/96/EC this symbol on the product or on its packaging indicates that this product may not be treated as household waste. Instead it should be taken to the appropriate collection point for the recycling of electrical and electronic equipment. By ensuring this product is disposed of correctly, you will help prevent potential negative consequences for the environment and human health, which could otherwise be caused by inappropriate waste handling of this product. For more detailed information about recycling of this product, please contact your local council or your household waste disposal service.
Declaration of Conformity

Producer: Chal-Tec GmbH, Wallstraße 16, 10179 Berlin. Germany
This product is conform to the following European Directives:
2004/108/EC (EMC)
2006/95/EC (LVD)
2011/65/EU (RoHS)
Gentile cliente,
natural_image
Line drawing of two hands holding a cylindrical device with a circular button and indicator lights (no text or symbols)
natural_image
Line drawing of a hand holding a small mechanical component (no text or symbols)natural_image
Line drawing of a blender with a lid and handle, showing internal structure (no text or symbols)
natural_image
Line drawing of a mechanical component with no visible text or symbolsnatural_image
Line drawing of a hand holding a mug with a lid and handle, no text or symbols presentUtilizzo
Preparazione
natural_image
Line drawings of a two-tiered blender with a power outlet and a side-view view showing its internal structure (no text or symbols)natural_image
Line drawing of a hand holding a battery with a circular button (no text or symbols)natural_image
Line drawing of a hand pouring liquid from a pipe into a coiled pipe, with a faucet in the background (no text or symbols)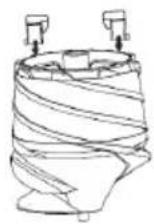
natural_image
Line drawing of two hands holding a cylindrical device with a circular button and indicator lights (no text or symbols)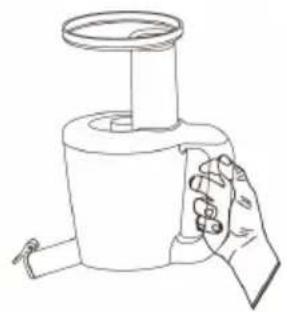
natural_image
Line drawing of a hand holding a small cylindrical device (no text or symbols)natural_image
Line drawing of a blender with a lid and handle, showing internal structure (no text or symbols)
natural_image
Line drawing of a mechanical component with no visible text or symbolsDessous de la carafe

natural_image
Line drawing of a hand holding a mug with a lid and handle, no text or symbols presentUtilisation
Préparation
natural_image
Line drawings of a two-tiered blender with a power outlet and a side-view view showing its internal structure (no text or symbols)natural_image
Line drawing of a hand holding a battery with a circular dial and control knob (no text or symbols)natural_image
Line drawing of a hand washing a coiled spring with a faucet in the background (no text or symbols)
natural_image
Symbol of a trash bin crossed out by a diagonal line, with no text or labels present.natural_image
Line drawing of two hands holding a cylindrical device with a circular button and a handle (no text or symbols)
natural_image
Line drawing of a hand holding a small mechanical component (no text or symbols)natural_image
Line drawing of a blender with a lid and handle, no text or symbols present
natural_image
Line drawing of a mechanical component with no visible text or symbolsnatural_image
Line drawing of a hand holding a mug with a lid and handle, no text or symbols presentFuncionamiento
Preparación
natural_image
Line drawings of a two-tiered blender with a power outlet and a side-view view showing its internal structure (no text or symbols)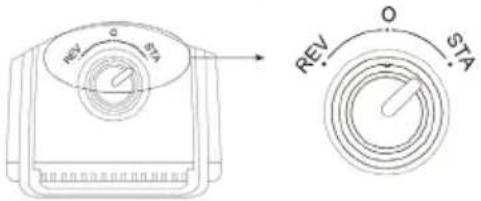
natural_image
Line drawing of a hand holding a battery with a circular button (no text or symbols)natural_image
Line drawing of a hand pouring liquid from a coiled pipe into a bottle, with a faucet nearby (no text or symbols)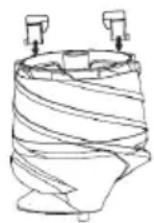


- Geräteübersicht
- Bedienung
- Vorbereitung
- Fehlerbehebung
- Contents
- Technical Data
- Safety Instructions
- Power cable and electrical plug
- Positioning
- Special safety instructions
- Product Description
- Attachments
- Appliance
- Assembly
- Disassembling instruction
- Operation
- Before use
- Making juice
- Cleaning
- Notes
- Clean the main body
- Clean other components
- Clean the squeezing screw
- Troubleshooting
- Disposal Considerations
- Declaration of Conformity
- Utilizzo
- Preparazione
- Utilisation
- Préparation
- Funcionamiento
- Preparación
Brand : Klarstein
Model : 10029713
Category : Juicer