
Steam Buddy - Iron Klarstein - Free user manual and instructions
Find the device manual for free Steam Buddy Klarstein in PDF.

| Product type | \nSteam iron | \n
| Brand | \nKlarstein | \n
| Model | \nSteam Buddy | \n
| Power supply | \n220-240 V ~ 50/60 Hz | \n
| Power | \n3000 W | \n
| Temperature range | \n20-220 °C | \n
| Steam function | \nYes, with intensity regulator | \n
| Spray function | \nYes, spray button | \n
| Self-cleaning | \nYes, dedicated button | \n
| Anti-scale | \nBuilt-in water softener filter | \n
| Anti-drip | \nBimetallic strip blocking steam at low temperature | \n
| Automatic shut-off | \nGrip sensor on the handle | \n
| Water tank | \nWith lid, filling by tilting at 45° | \n
| Power indicator | \nLight indicator | \n
| Temperature adjustment | \nKnob with MIN to MAX positions | \n
| Soleplate | \nSmooth, suitable for all fabrics | \n
| Maintenance | \nClean soleplate with damp cloth, descaling monthly | \n
| Article number | \n10033771 | \n
Frequently Asked Questions - Steam Buddy Klarstein
User questions about Steam Buddy Klarstein
0 question about this device. Answer the ones you know or ask your own.
Ask a new question about this device
Download the instructions for your Iron in PDF format for free! Find your manual Steam Buddy - Klarstein and take your electronic device back in hand. On this page are published all the documents necessary for the use of your device. Steam Buddy by Klarstein.
USER MANUAL Steam Buddy Klarstein
Congratulations on purchasing this equipment. Please read this manual carefully and take care of the following hints to avoid damages. Any failure caused by ignoring the items and cautions mentioned in the instruction manual are not covered by our warranty and any liability. Scan the QR code to get access to the latest user manual and other information about the product.

CONTENTS
Technical Data 11
Safety Instructions 12
Overview 13
Operation 14
Type of Fabric and Thermostat Dial Form 16
Cleaning and Maintenance 16
Troubleshooting 17
Disposal Considerations 18
TECHNICAL DATA
| Item number 10033771 | |
| Power supply 220-240 V~ 50/60 Hz | |
| Power rating 3000 W | |
| Iron temperature 20-220 °C | |
SAFETY INSTRUCTIONS
Before using for the first time, please check if the voltage rating on the type plate corresponds to the mains voltage in your home, if not, please contact with the seller.
- Use an earthed wall socket; the cord and plug must be dry.
- Unfold the AC cord completely before using.
- Make sure to unplug the appliance from the socket when leaving the iron even for a short while, and stand the iron on its end. Please leave the iron away from the touch of children. Take care of the iron when it is on.
- The iron will be of high temperature when used, never touch it with hand or close to the flammable product in order to avoid the accident.
- Caution: Unplug the appliance from the socket before filling the iron with water or pouring out the remaining water.
- Never immerse the iron in water or other liquid.
- Please send the iron to our special repair agent for repair if any damage on cord.
- Deposit or Mineral in the water will lead to generate the scales and block the steam hole, therefore it is advisable to use distilled water.
- In order to prevent overriding the circuit load, please don't use other appliances with high power at the same line.
- If necessary to connect with several appliances with high power at the same line, please use the cord with 10A, otherwise the cord with less than 10A will be too heat. The cord should be placed carefully in order not to be pulled out or stumbled.
- This appliance is not intended for use by persons (including children) with reduced physical, sensory or mental capabilities, or lack of experience and knowledge, unless they have been given supervision or instruction concerning use of the appliance by a person responsible for their safety. Children should be supervised to ensure that they do not play with the appliance.
- The iron must not be left unattended while it is connected to the supply mains.
- The iron must be used and rested on a stable surface.
- When placing the iron on its stand, ensure that the surface on which the stand is placed is stable.
- The iron is not to be used if it has been dropped, if there are visible signs of damage or if it is leaking.
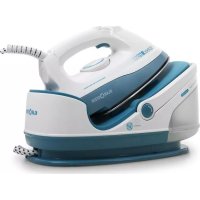
OVERVIEW
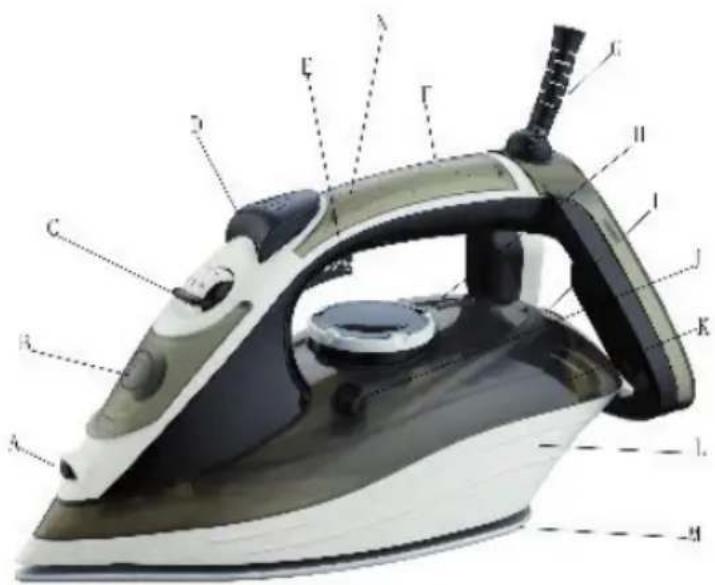
A Spray Nozzle
B Water Tank Cover
C Steam Control Button
D Spray Button
E Burst of Steam Button
F Touch Handle
G Bushing
H Thermostat Button
I Power Indicator Light
J Self Clean Button
K Water Tank
L Skirt body
M Soleplate
N Sensor Indicator Light
OPERATION
Cautions of the first use:
- The iron has been greased, and as a result, the iron may slightly smoke when switched on for the first time. After a short while, this will cease.
- Before using for the first time, remove any sticker or protective foil from the soleplate. Clean the soleplate with a soft cloth.
- Keep the soleplate smooth: avoid hard contact with metal objects (such as clothes rack, button and slide fastener).
- Pure woolen fabrics (100% wool) may be pressed with the iron set to a steam position. Preferably set the steam regulator to strong position, and use a dry pressing cloth.
Filling with Water:
- Set the steam regulator to O (=no steam) (only for steam iron).
- Hold the iron by hand and slant the iron with 45^ down, open Water Filling Cover if any.
- Fill the water in the box through the Water-Filling Hole, if the water is too hard, it is advisable to use distilled water, do not put the chemically decaled water in the water reservoir.
- Wipe off the water over the box; pour out the remaining water after use.
Dry Ironing
- Before running the iron, please classify the clothes as per its washing label, as it will be quicker for the iron to heat up that to cool, the clothes (such as synthetic fabric, silk etc) with lower ironing temperature shall be ironed firstly, and then iron the clothes (such as wool, cotton and linen etc) with higher temperature.
- Stand the iron on its end, and turn the thermostat dial to the MIN position.
- Plug in the iron and select the temperature by turning the thermostat dial. If there is water in the reservoir, turn the steam regulator to OFF position. Wait until the indicator light goes off showing that the required temperature has been reached.
Steam Ironing:
- Fill water in the iron as per the water-filling methods.
- Plug the appliance in the socket.
- If only set thermostat dial to MAX position as per the temperature indicator, steam iron will be available, otherwise water may leak from the soleplate.
- It indicates that the temperature has been ready until the indicator light goes off.
- Set the steam regulator correctly, increase the steam output by rotating the steam regulator anticlockwise, otherwise decrease.
Caution: Synthetic Fabric, Nylon, Synthetic Silk and Silk cannot use the steam iron, otherwise it will damage the finish of surface.
Burst of Steam
This function will be able to provide more steam to remove stubborn creases.
- Set the thermostat dial button to MAX until the indicator light goes off.
- Release the steam by pressing the steam button.
- Wait for several minutes and let the steam penetrate through the fabric, and then release more steam through pressing this buttons again.
Notes
- There should be 3-5 seconds rest between two times of pressing Steam Button in order to obtain the best steaming result.
- Fill the water to the Max position before using this function.
- In order to prevent the water leaking from soleplate, please do not press the steam button continuously with more than 5 seconds.
Spraying Methods:
- Fill the water in the iron as per water-filling methods.
- Press water spray button.
Note: No matter what steam ironing or dry ironing is, Spray will always be available in any case.
Self-cleaning
In order to remove scale and impurities, apply self-clean system once every month at least.
- Fill half of the box with box. Set the steam knob to No Steam position.
- Plug in the iron to the socket. Set the thermostat knob dial to Max.
- When the pilot light goes off, i.e. the steam iron has been in its presetting temperature.
- Unplug the iron, and hold the appliance horizontally over a sink.
- Set the steam knob to position "Self-Clean", boiling water and steam will come out from the soleplate, shake the iron slightly in order to wash out impurities & scale.
- Set the steam knob to position when no water in the box.
- Stand the iron on its end and plug the appliance in the socket, heat up the iron again.
- Move the iron over a piece of clean cotton cloth, and the remaining water in the iron will evaporate from the soleplate.
Anti Calc
With a small filter built-in, which can make hard water soft, thus preventing any calc or flake accumulated on the surface of soleplate, this features can prolong the life of the iron for long use.
Anti Drip
With a bimetal assembled inside the iron, which can close the steam when the iron soleplate becomes very low, so water leakage will never happen with this features.
Auto Shut-Off, Auto Turn-On
Please plug the iron into the electric outlet the light on the handle will blink until the iron will reach the right temperature. Once your hand will touch the iron handle the iron will be on. Once you remove your hand from the handle the iron will automatically turn off. In order to activate please put your hand on the handle than iron will automatically turn on.
TYPE OF FABRIC AND THERMOSTAT DIAL FORM
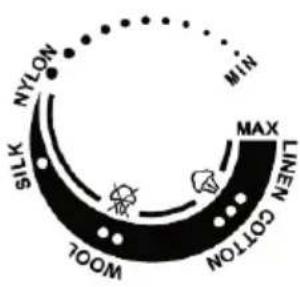
| Instructions on label Type | Type of fabric Thermostat dial |
| Nylon Silk | |
| Wool | |
| Cotton Linen |
Caution: If the fabric consists of various kinds of fibers, always select the lowest ironing temperature of the composition of those fibers
CLEANING AND MAINTENANCE
Before cleaning, remove the plug from the socket and allow the iron to cool down sufficiently.
- Wipe off the soleplate with a damp cloth and a non-abrasive (liquid) cleaner.
- If the fi ber is adhered to the soleplate, use a damp cloth with vinegar to wipe off the soleplate.
- Never use strong acid or alkali in order to avoid damaging the soleplate.
- If the scale blocks the steam hole, please remove the scale with toothpick; do not damage the surface of soleplate.
- Stand the iron on its end and let it cool down suffi ciently, and meantime pour any remaining water out of the box, set the steam regulator to position "O".
TROUBLESHOOTING
| Failure Possible Reasons | Measurement | |
| Not enough heat or Too heat | Rotate thermostat dial button improperly. | Correct Thermostat dial Button in position. |
| No steam produces Ch | Check if the Thermostat dial has been set towards the steam range. | Adjust the thermostat dial as per steam range. |
| Check if the steam regulator has been set towards the steam position. | Set steam regulator towards the steam range. | |
| Fill water into the box | ||
| Leaking water from Soleplate | Set the thermostat dial out of steam range. | Set the thermostat dial as per steam range. |
| The heat is still not enough. Open steam button only after the indicator light goes off. | ||
| The water is over than max position | Pour out the remaining water | |
| Little Steam Check if the | steam regulator is in proper location. | Set the steam regulator to the proper location. |
| Steam hole or box is blocked. | Clean hole with distilled water. | |
| Too little water in the box Fill water into the box | ||
| No Spraying No enough | pressure or air inside | Press the spray nozzle by hand, and push the spray button several times continuously. |
| No or little water in the box Fill water into the box | ||
After the above-mentioned methods to repair iron, if it still cannot come to work normally, please send to our special repair agent for repair.
DISPOSAL CONSIDERATIONS
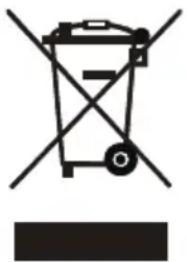
According to the European waste regulation 2012/19/EU this symbol on the product or on its packaging indicates that this product may not be treated as household waste. Instead it should be taken to the appropriate collection point for the recycling of electrical and electronic equipment. By ensuring this product is disposed of correctly, you will help prevent potential negative consequences for the environment and human health, which could otherwise be caused by inappropriate waste handling of this product. For more detailed information about recycling of this product, please contact your local council or your household waste disposal service.

Declaration of Conformity
Producer:Chal-Tec GmbH, Wallstraße 16, 10179 Berlin, Germany
This product is conform to the following European Directives
2011/65/EU (RoHS)
2014/30/EU (EMV)
2014/35/EU (LVD)
Chere cliente, cher client,


- CONTENTS
- TECHNICAL DATA
- SAFETY INSTRUCTIONS
- OVERVIEW
- OPERATION
- Cautions of the first use:
- Filling with Water:
- Dry Ironing
- Steam Ironing:
- Burst of Steam
- Notes
- Spraying Methods:
- Self-cleaning
- Anti Calc
- Anti Drip
- Auto Shut-Off, Auto Turn-On
- TYPE OF FABRIC AND THERMOSTAT DIAL FORM
- CLEANING AND MAINTENANCE
- TROUBLESHOOTING
- DISPOSAL CONSIDERATIONS
- Declaration of Conformity
Brand : Klarstein
Model : Steam Buddy
Category : Iron